Hi there, awesome Friends, and Happy Independence Day to my friends here in the United States!
I appreciate you guys SO much and how supportive y’all have been about me replaying some old favorites around here, to be able to spend more quality time with my boys while they’re out for the Summer.
We have really been enjoying ourselves, but guess what Jack and I did last week? We went thrifting and picked out a couple of new pieces to work on! It’s hard to get completely away from it I guess, but he was looking to make a little money and I have to admit, I missed having a paint brush in my hand. I loved having Jack out there with me again though!

I will share one of those new makeovers on Thursday. 🙂
Today I am bringing another favorite out of the vault. I originally shared it around Halloween time, but it is much better suited for the Summer!
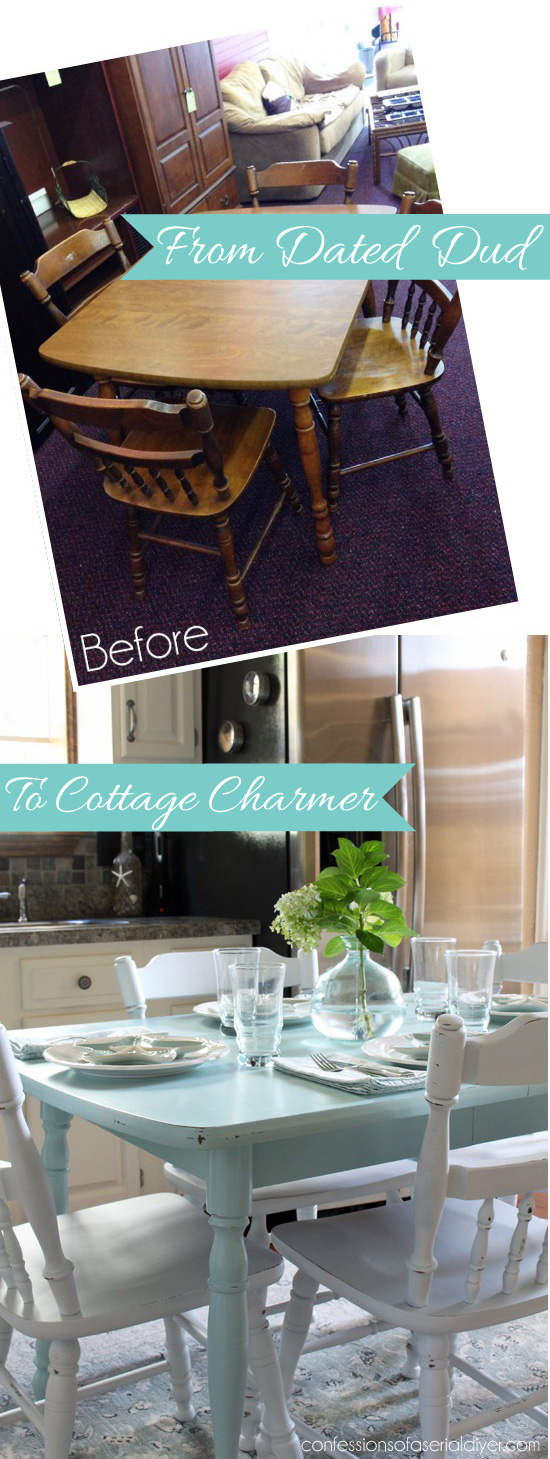
I spied this set at the thrift store a couple of Summers ago:

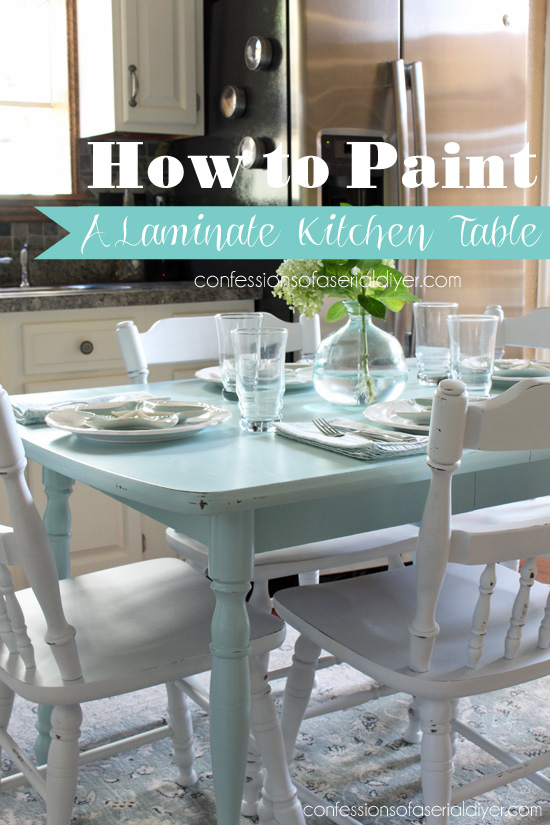
Anyone remember this one? Wasn’t it gorgeous before? No it certainly was not, but I shared it on my Facebook page when I found it and together we decided I should get it anyway. Although the top is laminate, the chairs are solid wood and the whole set was only a mere $45! It was originally $89, but all furniture was half off that day so I just had to bring it home.
I love anything cottage-inspired and I imagined this in a quaint little seaside cottage.
Can you picture it?
It’s not easy, I know.
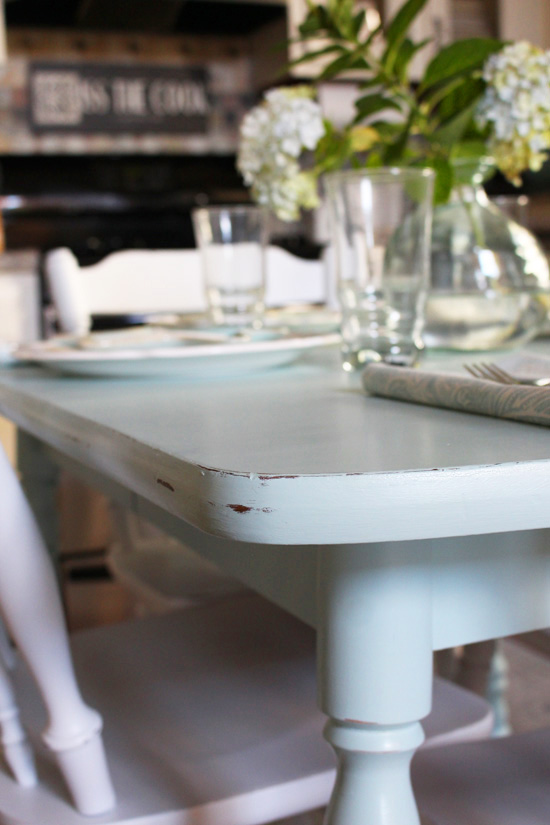
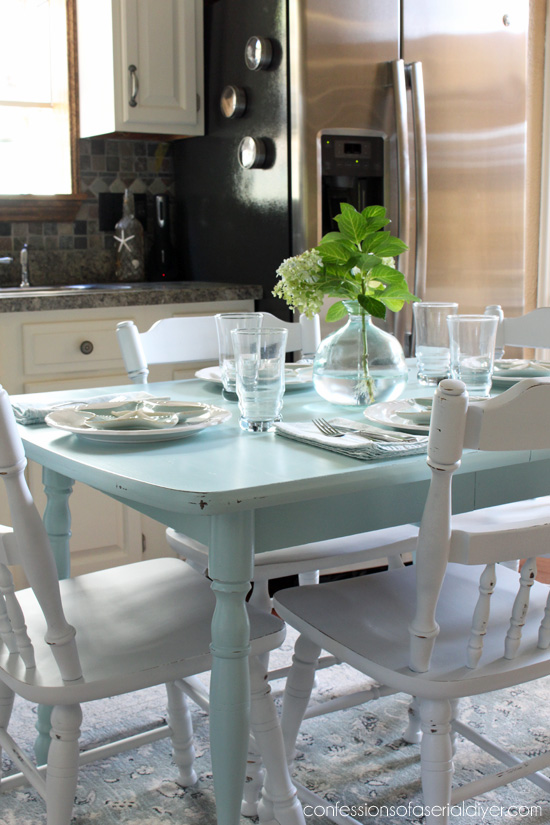
But after letting it sit in my garage for the better part of a year, I finally gave it the cottage-inspired makeover I had imagined it could be:
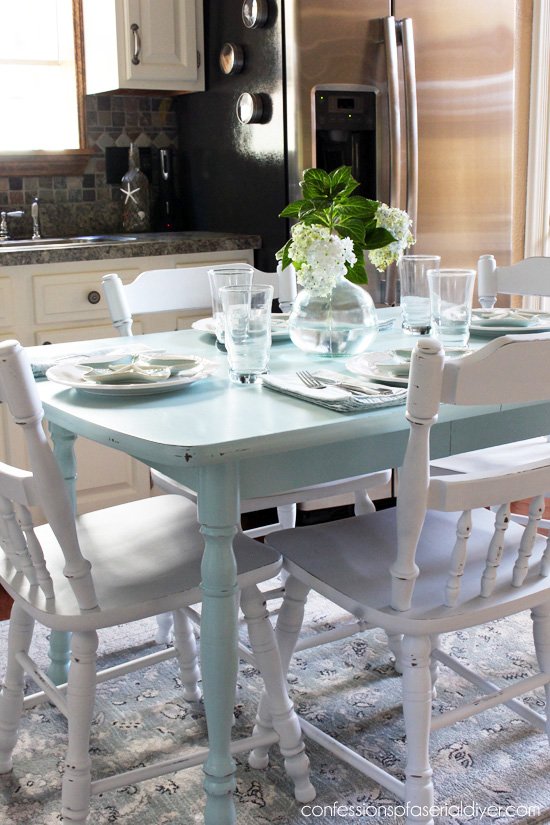
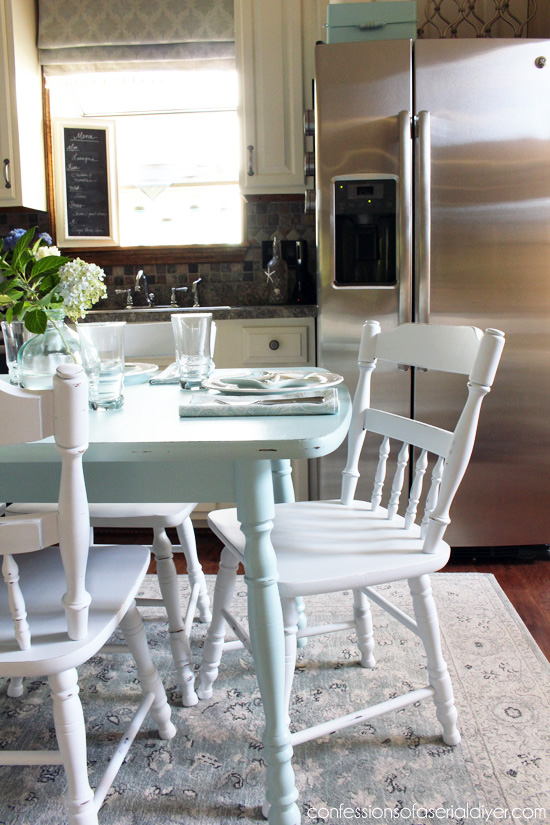
Can you believe this is the same set?? I knew it could be so much more if only given the chance.
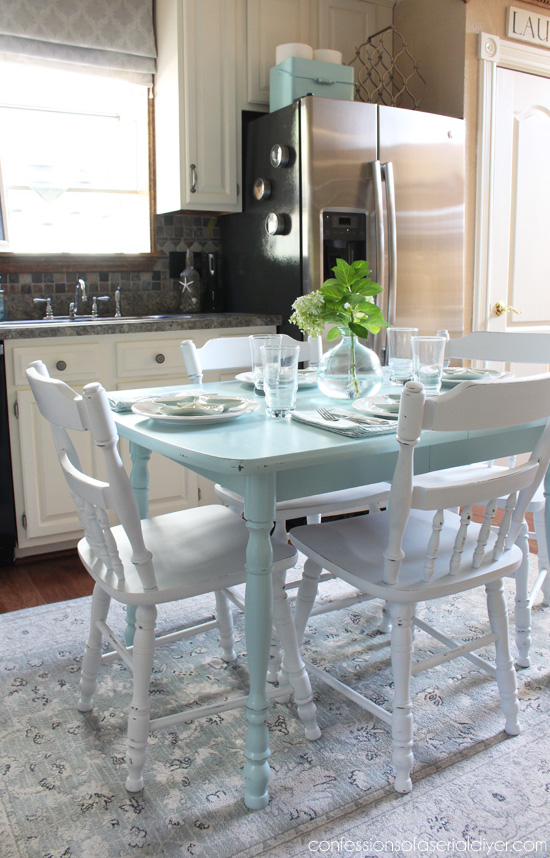
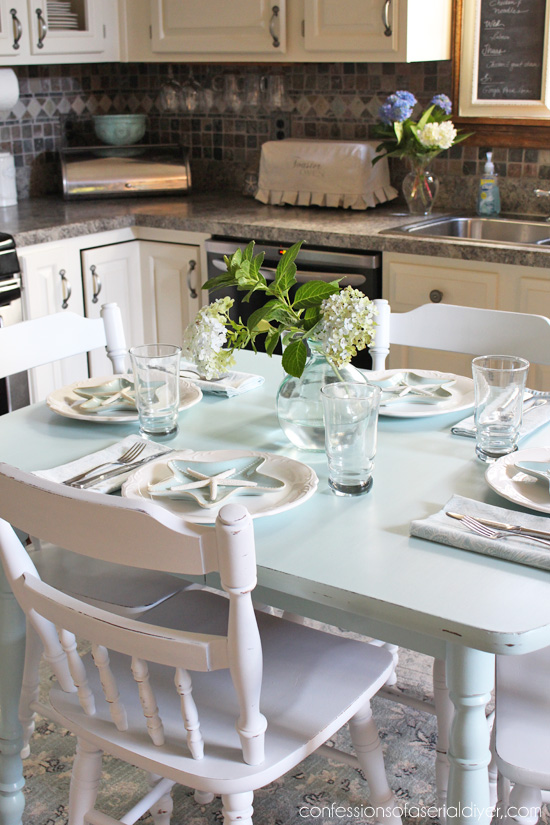
I brought it into my kitchen to take pictures, and I didn’t want to take it out.
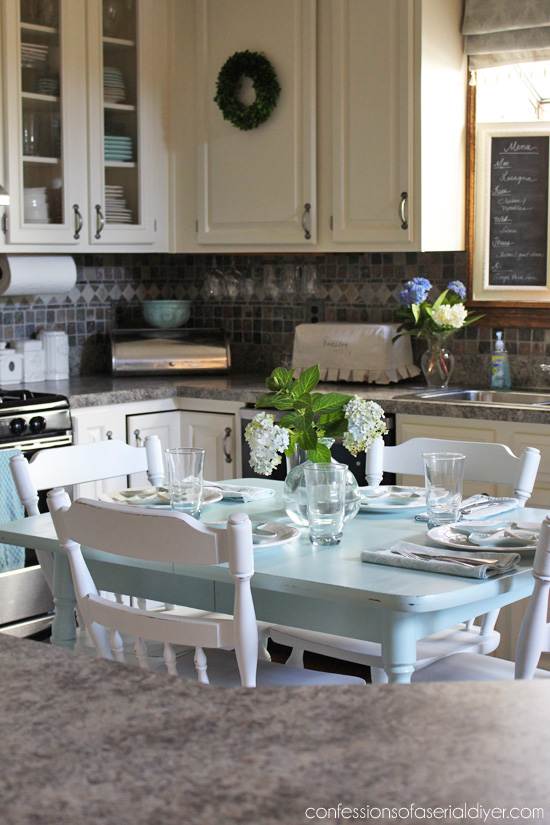
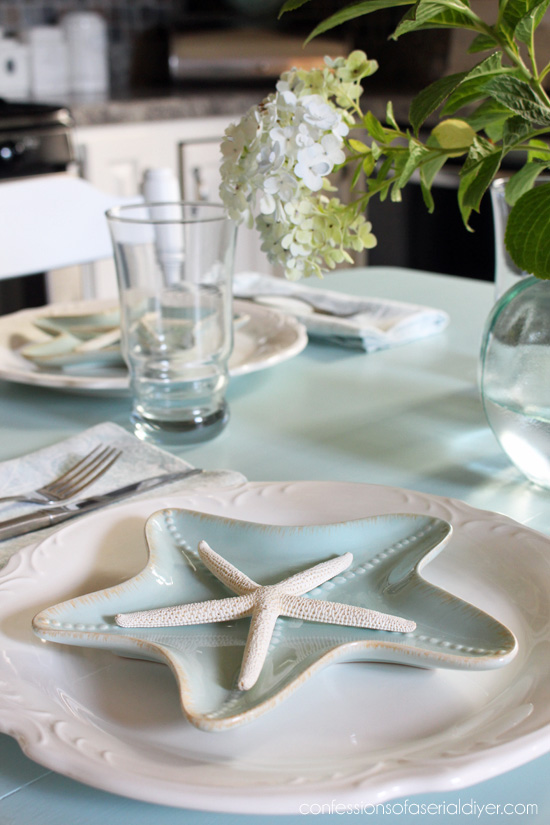
It was just so darned cute! I had fun setting it with some of my favorite dishes.
These ironstone plates are from Pier one and we use these everyday. The little blue starfish plates came from Homegoods years ago…
Got a laminate table you want to paint? I’ll show you how! (This method will also work for a solid wood table.) I’ve included a few affiliate links so you can find the products I used. Read my full disclosure here.
How to Paint a Laminate Kitchen Table
Sand the Surface
To paint a laminate table top, first you need to sand the surface.
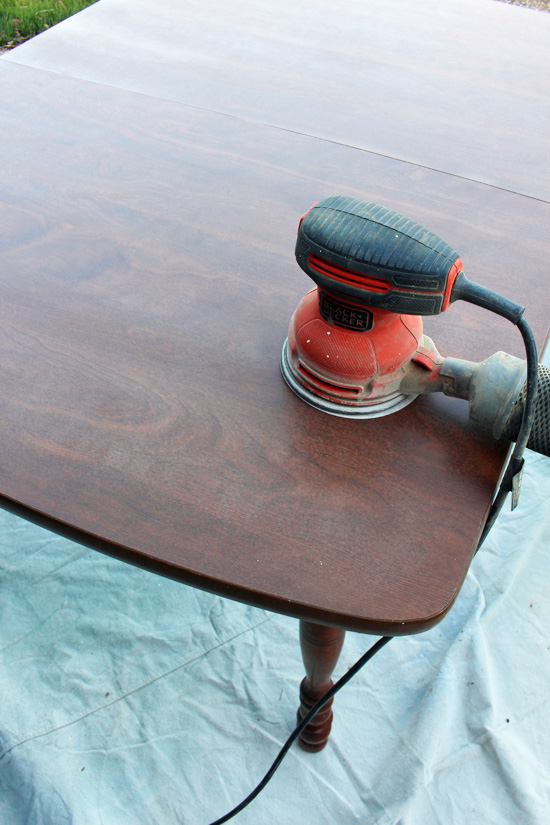
The purpose of sanding is to dull the surface as much as possible to give the primer something to grab onto. I used my rotary sander and 220 grit sandpaper.
After sanding, clean the surface free of debris. I used my shop vac with a brush attachment and followed up with a soft clean cloth.
Prime
The next step is priming.

I chose Rustoleum’s spray primer:
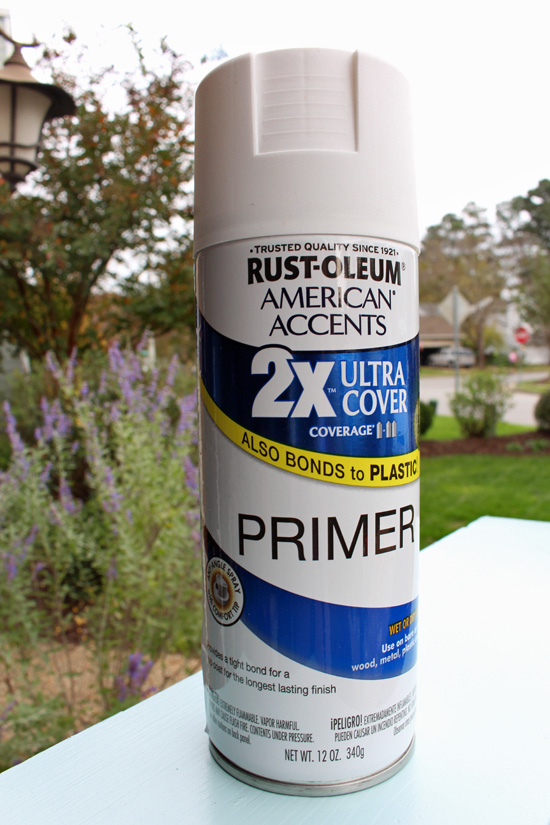
Super easy.
I hit the legs while I was at it. I cleaned them, but didn’t bother to sand first.
Paint
Time for paint. I chose latex paint for this project. I usually love chalk paint, but for something that will need to withstand spills and possible fork stabbings, I wanted something super durable.
I used an HGTV Home by Sherwin Williams paint (no affiliation) that I found at Lowes.
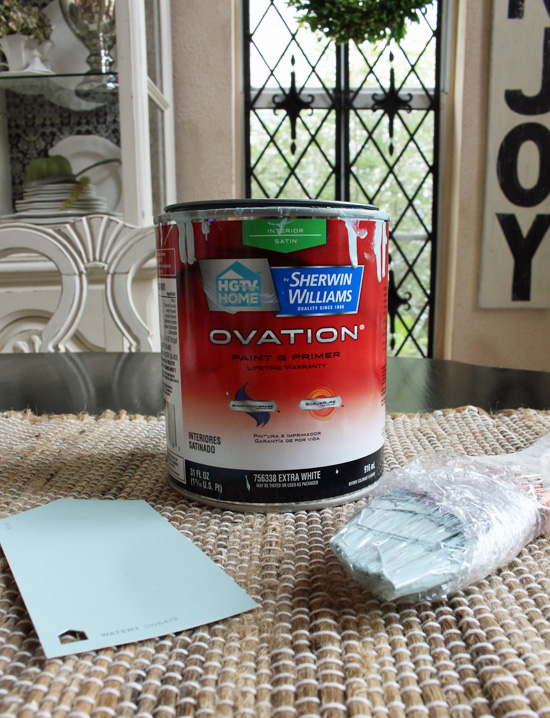
This color is “Watery” in a satin finish and I absolutely love it! I usually use Behr paint from the Home Depot, but we had a Lowe’s coupon to use. I was really pleased with how this paint went on and covered.
I used two coats applied with my good ole purdy brush, but the coverage after just one coat was fantastic. Priming first over the dark probably helped with that. You could also use a roller to apply the paint, I’m just used to grabbing a brush.
Seal
Finally, to keep this table beautiful and make it as durable as possible, I used Minwax Polycrylic to seal the top.
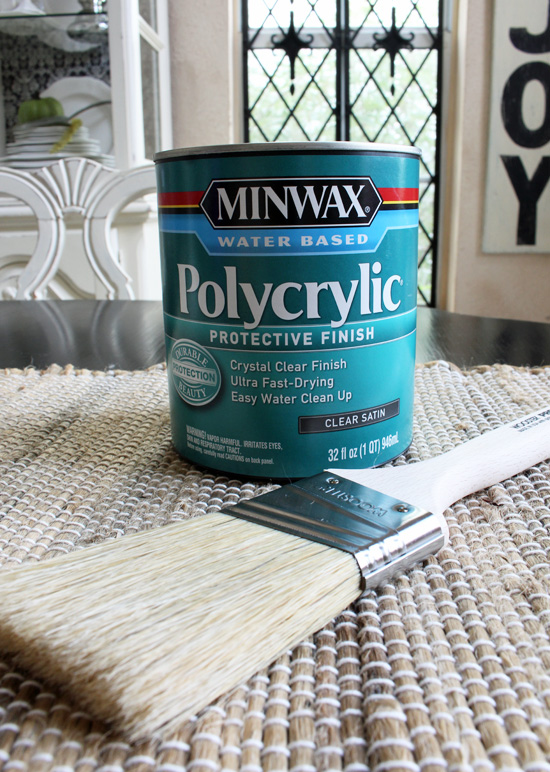
To apply it, I used a brush specially designed for polyurethane by Wooster. The brush makes all the difference. If you use a regular brush like a brush you would paint with, you will get a ton of brush marks in your finish. (Trust me on this one.)
I applied one coat and let it dry over night, then lightly hand-sanded with 320 grit sandpaper in the direction of my brush strokes, cleaned the surface, and added another coat. I repeated that process, sanding even more lightly the second time. Your surface should be ready for light use 24 hours after your 3rd coat. I did three coats because this piece will need to withstand some abuse. If I were painting a bedside table, I might not even seal it at all.
I cheated and spray painted the chairs, giving them a coat of Rustoleum’s spray primer first. I did not sand the chairs, just cleaned them first. (Don’t mind my Halloween display in the background!)
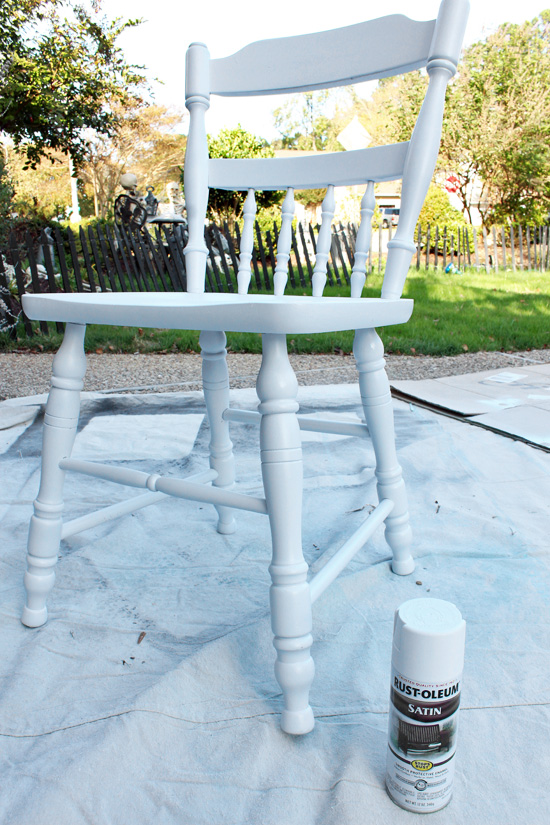
I was not looking forward to hand-painting all those spindles, so spray paint to the rescue! I used three cans of primer and four cans of spray paint for the chairs, which ran about $40, but so worth it, especially since I got such a steal on this set.
I still sanded the raised areas here and there after for a little bit of a worn feel.
What do you think about a two-toned table and chairs? I kind of love it.
I hope you enjoyed this look back at this cute set!
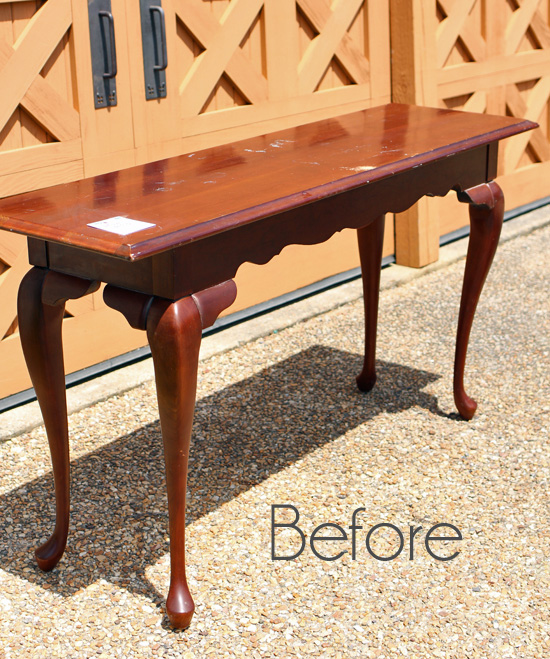
I’ll be back on Thursday with a brand new makeover…this sofa table I picked up for at the thrift store recently:
Till then, I wish everyone a safe and fun Holiday!! 😀
UPDATE: See how this sofa table looks now HERE!
XOXO,
![]()
Don’t Miss a Thing!
If you like what you see, there are several ways to follow along!


Christina in FL says
Christy, I love the table and chairs yet I kind of wish there was some color on the chairs to coordinate. That said, not adding color lets the chairs and table sell separately.
Christy says
Thanks, Christina! I could have painted a couple of the spindled parts in blue…never thought of that! Maybe next time! 🙂 XO
Jody says
After I saw the set I remembered it. I painted the table white and the chairs blue because I loved yours.
Christy says
Oh that’s awesome! I bet yours is gorgeous! XO
Donna says
The table and chairs is perfect in your kitchen! Pinning the tips on painting a Formica surface.
Christy says
Thanks, Donna! I sold this set, but I did not want to take it out of my kitchen! XOXO
Cecilia says
Happy 4th of July! I’m enjoying your archives. Some I haven’t seen before like this set. They turned out just wonderful. I like the two tones. I can just picture this in a lake or beach cottage!
Looking forward to the “new” reveal later this week! Have a great 4th!
Christy says
I’m so glad you are enjoying some of these older projects, Cecilia! It’s fun for me to look back at them as well. Happy 4th to you too! XOXO
Mary Kaiser says
Wow, so cute. Can’t wait to see what you and Jack recreated together. You two make such an awesome team!
Christy says
Thanks, Mary! The project we teamed up on is still a work in progress, but it is cute so far…hoping to share soon! I love having him out there with me. 😀
Mari says
I love the color as well as using two different colors. Have you ever used a foam brush to appply the polyacrylic instead of a brush?
Christy says
Thanks, Mari! I have used a foam brush for adding poly to a stained piece in the past, but prefer a brush made for poly on painted pieces. 🙂
Tania says
I love how that table and chair set turned out, it’s beautiful! I can see why you don’t want to take it out of your kitchen!
Tania
Christy says
Thanks, Tania! I did not want to take it out of my kitchen at all, but it did eventually make its way to my booth, and now has a new home! 🙂
Jina Sheppard says
Ah! The miracle of paint!
Christy says
Yes!!! 😀
Sherry Stuifbergen says
Looking forward to Jack’s accomplishment. I love your past posts..keep relishing your boys’ summer together. How nice that Jack is inspired by you!
Christy says
Thank you, Sherry! I am enjoying every little minute, and I too am thrilled when Jack wants to get in the workshop with me, although I think he is more inspired by the $$ ha ha! XOXO
Joan says
I found 2 dirty, scratched and cracked (not badly) Cane chairs which I would like to repair- the strips used to tie the parts in place- and also want to paint them and buy 2 nice lush garden cushions. How would I start- after pressure washing (carefully) do I just apply an undercoat or do I try to condition the dry cane first before I paint? And then I would like them a charcoal colour, do I use a Silk or eggshell paint? Could you please help me with your wonderfully talented advice? Thanks so much, Joan
Christy says
I have never repaired cane before myself, but I have painted it and I recommend using a spray primer on the cane portion first, then spray paint. Then you can paint the chairs however you like. I like a satin finish, but either will do. 🙂
Joan says
Thanks so very much for your help. I will do as you say and hopefully I can send you a pic when the job is done. Thanks again, I really love the beautiful work that you do! Perfection!!!
-Joan
Christy says
My pleasure, and thank you!! XO
Susan Pearson says
Absolutely love this little dinette set!!!! You are so talented!
Christy says
Thank you so much, Susan! XO
Rose Lefebvre says
What an amazing makeover! I would totally buy this. I am so in awe of your talents. You are a great “recycler.”
Christy says
Thank you, Rose! I so appreciate that!! XOXO
Gloria Sears says
Nice job! It looks right at home in your kitchen.
Christy says
Thank you, Gloria!! XO
Terri Hughes says
Very nice. Have a Happy 4th!
Christy says
Thank you, Terri! Happy 4th to you too! XO
Marti says
OHMYGOSH! — JUST TOO CUTE!! Wish I’d done this to my mom’s old set instead of donating! You did a great job!! Maybe I can find a set to redo for a reasonable price! Your colors are PERFECT for what I want!! Will use same!
Christy says
Thank you, Marti! I too have gotten rid of so many pieces in the past that I wish I had kept! Best of luck finding another set! XOXO
Sheila DelCharco says
I am new to your blog so I’m enjoying even your old posts! I confess that I spent 3 hours on Mother’s Day hopping around on your blog! I love it! It’s so inspiring! I’m ready to paint everything in my house! Haha!! Thank you for showing us exactly how you do it and what products you use!
Christy says
Welcome, Sheila! I am SO thrilled to hear you are enjoying my blog so far! And yes, clearly I love paint ha ha…I hope you’ll come back and visit often! XOXO
Foney says
Love your posts. I am attempting to do an old oak table to sit on our front porch. I want to do a white distressed but know I need to seal it good afterwards to keep out the potential weather it may get. Any info you could give me would be appreciated. Thanks
Christy says
Thank you, Foney! You can use just about any paint, just stay away from wax to seal it since it will melt in the heat. You can use a spray matte sealer instead. Rustoleum makes one and so does Plaid. I have also used the polyacrylic that I used in this post to seal the table, but I have had some complain that it yellowed their white paint. (Hasn’t done that for me.) Or you can use good old spray paint. The one I used on these chairs will work just fine, or my favorite is this one: http://amzn.to/1Uyyp6Z. (Cheaper at the Home Depot) Just be sure to spray prime first, but no topcoat should be needed. 🙂
Foney says
Thank you so much for your reply.
Christy says
You’re welcome!
Leticia says
Love love love it! I wish this set was coming home with me! Thanks for sharing your greatness! Leticia
Christy says
Thank you, Leticia!! I wish you could have had this too! XOXO
Kathleen Rupp says
Oh that makeover is terrific too! I love the colors you used! I am so happy you are bringing all of these projects out of your archives because since I just found your site….they are new thrilling makeovers to me! Lovely!
Christy says
Oh awesome!! Thank you, Kathleen! I love that you are enjoying these oldies! XOXO
Susanne says
Beautiful! Love the colors.
I was wondering about the chairs. I have a set I’m redoing for my daughter. The spindles are a pain! Was told I needed to sand off glossy part on the stained chairs. Did you not sand yours at all before priming them?
Christy says
Thank you, Susanne! I have found that spray paint sticks to wood amazingly well if you use a primer first. If you were going to sand at all just to be extra sure, I would suggest just the seat part and maybe the top of the back where you would handle it often. Just a very light sanding will do the trick. I see no need to sand all those spindles at all. Good luck! XO