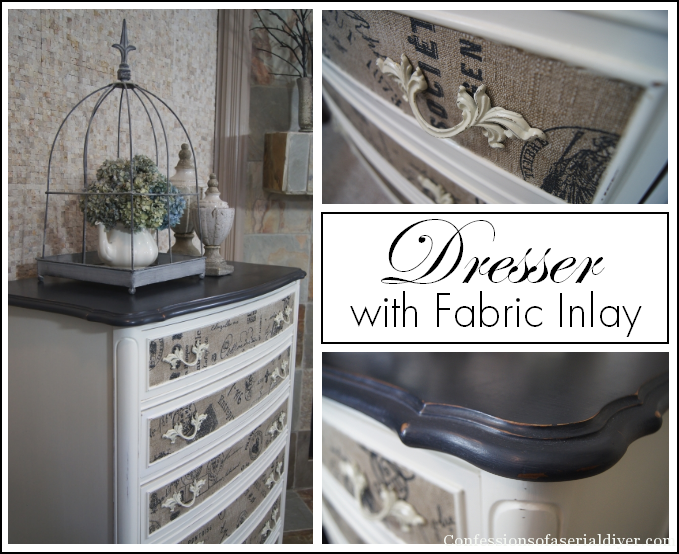
Hello beautiful people! I’m so happy you stopped by because I have a pretty project to share with you. Today I am sharing a yard sale dresser I made over with a fabric inlay treatment.
You are not going to believe what I paid for this. Last month I was just about to call it a day after hitting up several yard sales when I happened upon this particular sale. I spied this dresser from a mile away, but of course I thought for sure it was either sold or ridiculously priced since it was still there.
When I got closer, this is what I found:
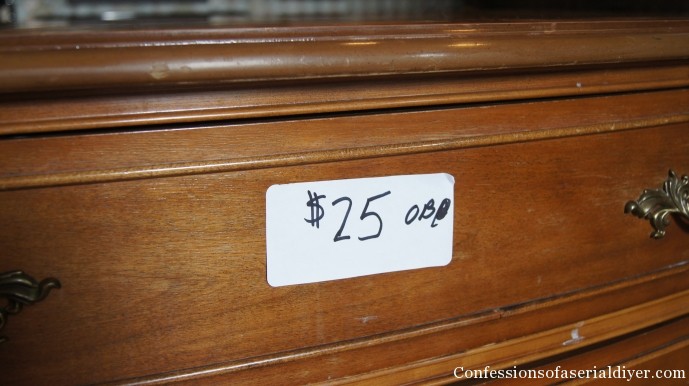
Seriously? Not only was it only $25, but they were willing to negotiate! I can’t believe I actually had the nerve to ask the sweet woman what her best price was… $20. It was all I could do not to squeal with pure delight right then and there! I couldn’t load it up fast enough! Deal of the century woot woot…
Because this sticker was attached to this:

The top was a bit damaged, but the rest of it was in perfect condition and the insides of the drawers looked brand new! Perfect!
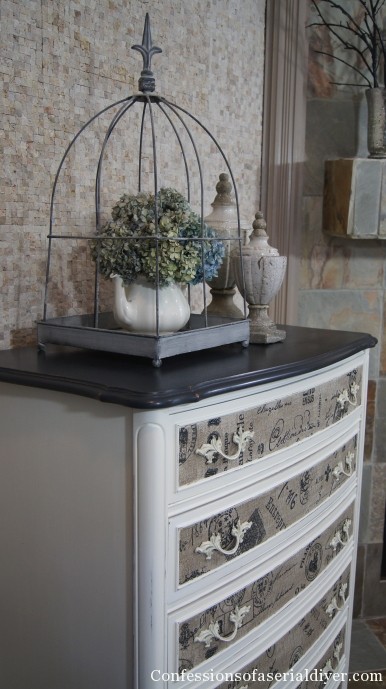
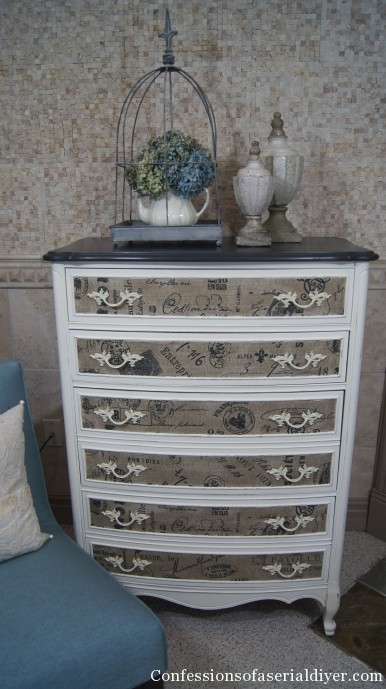
And here she is now:
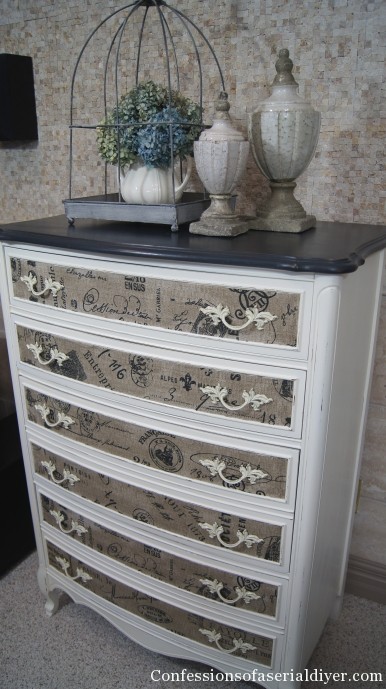
What do you think? Ooh la la, right?
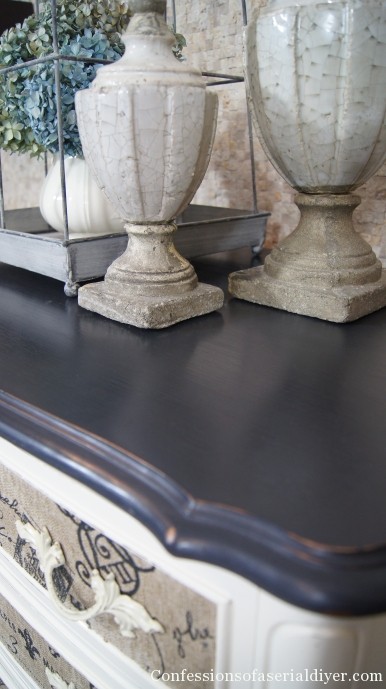
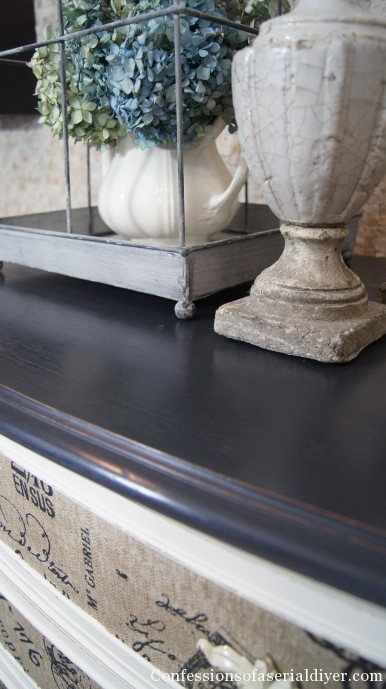
I painted the top in Annie Sloan’s Graphite chalk paint. What damage?
The body was painted in DIY chalk paint.
Everything got a light sanding and a coat of Annie Sloan’s clear wax. I gave the top two coats.
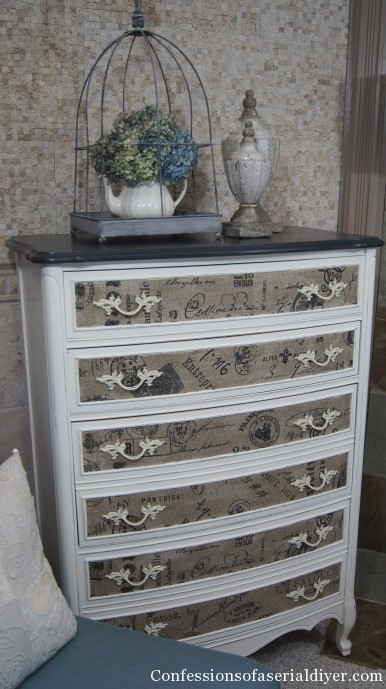
This is the same fabric I used to reupholster my ugly desk chair. When I went to Hancock Fabrics to find fabric for the drawer fronts, I fell in love with it again!
I used Mod Podge to attach it. I think the most difficult part of this makeover was cutting the fabric to fit the drawer panels just right.
To attach the fabric with Mod Podge:
- Apply Mod Podge to the drawer with a paint brush or foam brush
- Lay fabric, already cut to size, across the drawer panel
- Smooth out any bumps
- Apply another coat of Mod Podge over the fabric
- Let it dry ( I left mine over night.)
I only gave mine one coat on top as that seemed to do fine, but because of the heavier texture of my fabric, I gave each drawer panel a pretty generous coat.
I usually give you guys step by step photos, but this part was done in the wee hours of the morning so I didn’t stop to take pics this time. I found that mod podging fabric is much easier than paper since the fabric is woven and doesn’t trap air bubbles. Who knew?
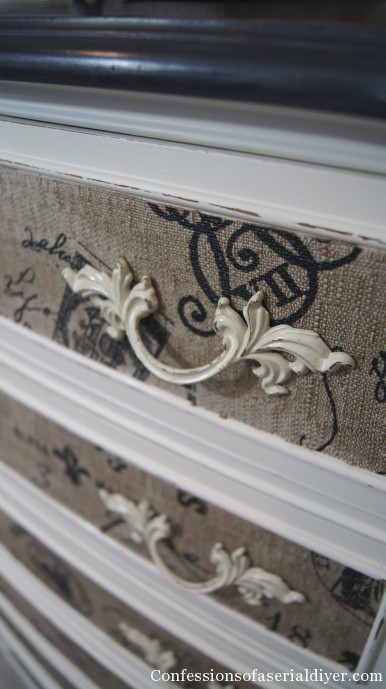
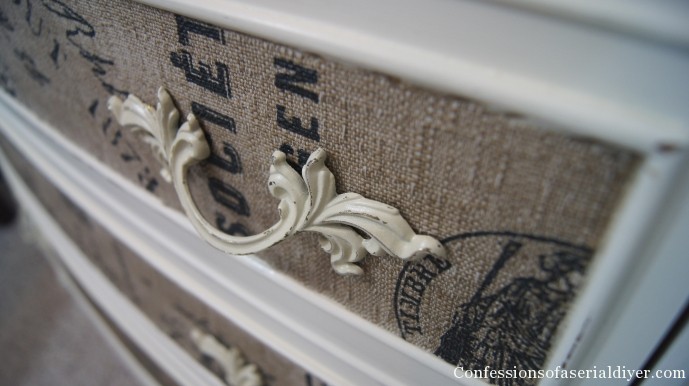
I loved the original hardware, so I spray painted them with Rustoleum in Almond Satin and distressed them a bit with sandpaper.
I did snap a pic of this part lol…just so you can see something in action 🙂
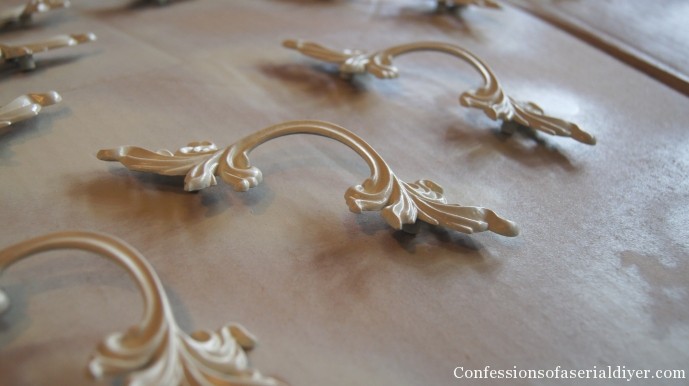
Are you more patient than I am when it comes to waiting for spray paint to dry?!
This was not my original plan for this piece. I spent several hours searching, printing, piecing together, and painstakingly transferring a graphic that I was going to paint on the front. As it turned out, there were just too many bumps and grooves to work with. I almost wanted to cry.
So back to square one. I had remembered seeing a side table with fabric on the drawers while walking through Home Goods a while back and knew that’s what this needed all along. See how things work out?
I’m so pleased with the result.
Here’s a shot before I added the fabric:

Very plain…the fabric adds so much depth and texture.
This has been sitting in my garage taunting me since I brought it home.
I thought it would be the perfect project for Furniture Revival week in our Get Your DIY on Sixteen Week Fall Party Challenge.
My amazing co-hosts have been busy with a few furniture revivals of their own:

Zebra Chair Makeover The Hankful House
Faux Mantel Cabinet with DIY Chalk Paint The Happy Housie
Console Table Facelift House by Hoff
A Fun Kid’s Craft Table Makeover Just a Girl and Her Blog
Our new Get Your DIY on link party theme: Furniture Revivals, starts Sunday at 7:00 EST. Come link up your furniture makeovers or just come by to get inspired! I don’t know of anyone who doesn’t love a good furniture transformation!
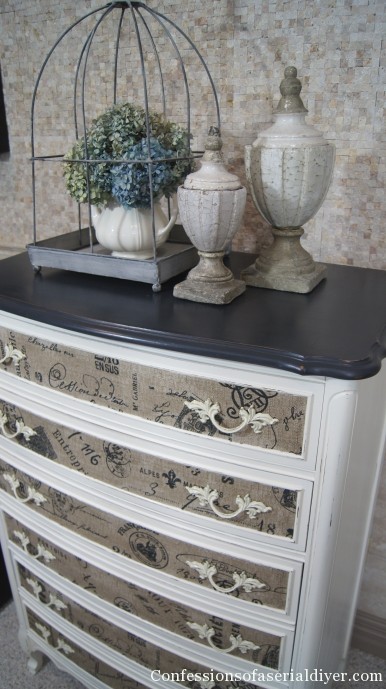
Speaking of furniture transformation, let’s see that dresser one more time…
Love. Isn’t it great when something totally fails and then plan B is far better than what you originally planned?
I used about a half a yard of 54″ wide fabric wich on sale, was around $9. With the cost of the dresser, this was less than $30!! Who says beautiful home decor has to cost a fortune?
I’d love to know what you think!
Hope to see you Sunday!
XO,
![]()
If you like what you see, there are several ways to follow along! ![]()
Email * Facebook * Pinterest * Hometalk * Twitter * Instagram
I love to share at some of these great parties:
Home Stories A to Z Not Just a Housewife Kammy’s Korner The Happy Housie Design Dining and Diapers Liz Marie Blog Funky Junk Interiors Savvy Southern Style Tatertots and Jello DIY Show Off Redoux Interiors Between Naps on the Porch The DIY Dreamer Oh My Creative Little Miss Celebration Just a Girl and Her Blog Sand and Sisal Interior Frugalista House on the Way Addicted 2 DIY I should be Mopping the Floor Miss Mustard Seed


Cheryl @ The Creative Me and My McG says
WOW – that is an amazing transformation! I have some drawers that are in need of some loving…going to the fabric store today to see what I can find – thanks for this inspiration – I will be sure and share my project with you when its finished!
Christy K. James says
Awesome! I’d love to see then when you’re done! 🙂
Mandy Hank says
This is just beautiful Christy!! You did an amazing job. I love that you put a tiny cover under the dresser while working on it. You must be a neat painter, I am one of those that finds it in my hair 🙂
Christy K. James says
Thanks, Mandy! You’re so funny…It is small, right? It worked though 🙂
distresseddonna says
Lovely way to transform this dresser. She looks tres chic.
Christy K. James says
Merci, Donna! Im really pleased with the result after my original plan flopped! 🙂
Nancy @ A Joyful Cottage says
Fabulous makeover. I’m pinning it!
Christy K. James says
Thank you, Nancy!
The Refeathered Roost says
Absolutely Beautiful!! Well done!
Christy K. James says
Thanks so much 🙂
Cathy says
Christy this is so beautiful… I have a dresser I have been stressing over what to do with it but I think you just showed me… I love this and am definitely going to try it… thank you so much… Cathy
Christy K. James says
Thank you and I’m so glad you feel inspired, Cathy! 🙂
Abby @ Just a Girl and Her Blog says
Stunning! It is seriously so gorgeous, Christy! What an amazing transformation. You are so incredibly talented!
~Abby =)
Christy K. James says
Aww thanks, Abby…that’s very sweet to say 🙂
Brittany of Faded Furnishings says
The texture of the fabric is just perfect! Classy and sophisticated – and would look beautiful in any room of any home. Beautiful job!
Christy K. James says
Thanks so much, Brittany! 🙂
Cindy says
Love your makeover! The dresser is so classy now all dressed up. No longer a plain Jane.
Cindy
Christy K. James says
Thanks, Cindy! It was really plain before!
Sally says
Wow! What a transformation!!! Amazing.
Christy K. James says
Thanks so much, Sally!
monica livas says
Awesome!
Christy K. James says
Thanks for coming to check it out, Monica!
JudeB says
WOW! You lucky girl! Amazing price for a fabulous piece of furniture, and then you go and make it even better! LOVE, LOVE, LOVE, the fabric inserts, in fact, love EVERYTHING about it! Well done you.
Judi in the UK
Christy K. James says
Thanks so much, Jude! I was so excited about this deal. It made it easier to have fun with its makeover! Thanks for stopping by! 🙂
Cindy Eikenberg says
Christy, this looks absolutely gorgeous! LOVE the fabric inlay and again, what a great job you did!!! I’m seriously thinking about flying you to my house and having you do some things with me! 🙂 Pinning and sharing! Hope you have a happy Friday and fantastic weekend!
Christy K. James says
Aww thanks, Cindy! You are so good to me 🙂
Trisha says
We must be on the same wave length! I had done this with regular fabric to a dresser I picked up roadside. I was inspired by the framed mirror with burlap done by you so I (who am NOT a fan of burlap!) decided to buy some and thought it would look good on the jelly cabinet I have redone with ASCP – but it needs a little poof so I thought I would put the burlap inside the panels – you beat me to it!!!!!!!! I will still be doing it though -Thanks for always inspiring me!
Christy K. James says
Too funny, Trisha! Great minds think alike, right? I’m so happy you feel inspired, that totally makes my day! XO
Terry says
Oh La La is Right! Such character and beauty!
Christy K. James says
Thanks, Terry! XO
Krista @ the happy housie says
Wow Christy! This is a seriously amazing transformation! I love the rustic texture of the fabric on such a pretty and traditional piece. Gorgeous!
Christy K. James says
Thanks, Krista! I was almost in tears when my transfer idea wasn’t working out, so I’m thrilled that I was able to save this project!
Debbie @Dewdrop Gables says
Oh wow…that is stunning! I love how it turned out! I have a couple I’m working on right now and I will definitely be trying this technique! Thank you, I’m pinning.
Debbie 🙂
Christy K. James says
Awesome, Debbie! I live that you feel inspired 🙂
Luisa says
Christy, this is really gorgeous. I ADORE it! Your talent never ceases to amaze me!
Christy K. James says
Aww…Luisa, you are too good me! 🙂
Jacqui says
Gor-geeeeee-ous. Love it, thanks for sharing
Christy K. James says
I’m so glad you like it, Jacqui! Thanks 🙂
Beth Damon says
Love, love, love it!
Christy K. James says
I’m so glad…thanks, Beth! XO
Shanee says
Stunning piece, stunning makeover. Love the use of the burlap, the texture is perfect. Thanks for sharing, visiting from Miss Mustard Seed.
Christy K. James says
Thanks so much, Shanee!
Denyse @ Glitter, Glue & Paint says
Christy! If that dresser ever disappears I would have no idea where it went. 😉
LOVE IT!!!
xoxo
Denyse
Christy K. James says
You are so funny…maybe I shouldn’t have disclosed where I live lol!
Denyse @ Glitter, Glue & Paint says
You made me laugh!!
Elaine says
Sometimes the best ideas come from mistakes, don’t they? I love this piece! So professional looking…….just gorgeous!
Christy K. James says
Thanks so much, Elaine! I was really happy for this mistake! 🙂
karen@somewhatquirky says
I LOVE fabric decoupage! This looks really great. Nice job!
Christy K. James says
Thanks so much, Karen! XO
Tasha @ Designer Trapped in a Lawyer's Body says
This caught my eye at The Shabby Nest link party. It’s just gorgeous and is an amazing transformation! I look forward to following you on Facebook, Pinterest and Google +!
Christy K. James says
Thanks, Tasha! I love your blog name! XO
Suzan says
How gorgeous !!!
I redid the exact same dresser awhile back – now wish I would have waited until I saw this LOL – it’s really just perfect!
XOX
Christy K. James says
Thanks, Suzan! I just realized that I think I spelled your name with an S instead of a Z when I visited you last! If so, so sorry…I don’t mind if you call me out on it. I’m a “Christy” so I should know better. Thanks for visiting and I’m so glad you like it! XO
Christina in Cleveland says
O.M.S.!!! (Oh My Stars!) This is awesome! So is your blog and I have subscribed for regular drooling. 🙂 Thank you!!
Christy K. James says
Thanks, Christina!! I’m so excited to have a new follower! 🙂
Susan @ SunfowerHugs.blogspot.com says
You did an absolutely amazing job! I love every detail.
Christy K. James says
Thanks so much, Susan! XO
Christine says
I’m not usually a fan of fabric on furniture, although these days I’m enjoying it more and more. THIS piece, though, is so quirky and well done, I love it. I like the fact it’s not garish, if that makes any sense. It’s quiet enough for my eye, yet has style. Like someone casual, but with a great pair of shoes. Job well done!
Christy K. James says
Thanks so much, Christine! It’s bold, yet understated at the same time. I’m so glad you like it! 🙂
Shirley says
Christy, You found the best deal ever! This is an awesome piece of furniture and you turned it into an AMAZING piece! I love it!
Christy K. James says
Thanks, Shirley! Getting a good deal made it easier to have fun with it 🙂
Lusine says
Absolutely love this! I love the printed burlap! I made over a desk a while ago with scrapbook paper on the drawer fronts, and I kind of want to redo it with printed burlap. Beautiful work!! 🙂
Christy K. James says
I’m so glad you like it, Lusine! Thanks for your sweet comment 🙂
Shelly says
Wow Gorgeous!!! That fabric was the perfect detail that made it look amazing!! But then again it was a beautiful dresser before! Great Job! Thanks for sharing on DIY Sunday Showcase!!
I’m gonna pin this one to our Talent Board!
Shelly
Minettesmaze.blogspot.com
Christy K. James says
Thanks so much, Shelly! 🙂
Andi says
I love it! I did something similar with Phil’s nightstand, but with plain burlap. I like the printed fabric much better. 🙂
-andi
Christy K. James says
Thanks, Andi! I bet you’re exhausted from the move!! XO
Melissa @ Two It Yourself says
HI Christy,
This piece is stunning! I love the fabric you went with for the drawers. It’s just a unique piece and you pulled it off perfectly! I would love it you shared this wonderful furniture flip with us at the Link It or Lump It link party. http://www.twoityourself.blogspot.com/2013/11/LinkParty13.html
xo Melissa
Christy K. James says
Thanks for the invite, Melissa! Just linked up 🙂
Carrie This Home says
This is a great idea, Christy! Putting the fabric gives the dresser an extra dose of character! I’ll have to remember this for a future furniture makeover. I’m hopping over from Give Me The Goods Monday.
Christy K. James says
Thanks so much, Carrie! I’ve wanted to try this for a while, but hadn’t found the right piece until I found this! XO
Cheryl P says
Wow, what a transformation. I would never have considered using fabric for a project like this.
Christy K. James says
Thanks, Cheryl! I think the $20 price tag made it easier to have fun with it 🙂
Tammy says
WOW!!! I love this! The fabric is a wonderful addition to a beautiful refinish! Would like to invite you to come share at One More Time Events..
http://www.onemoretimeevents.com/2013/11/dessert-display-with-flour-sack.html
Tammy
Christy K. James says
I’d love to, Tammy! 🙂
Yana says
Hopping over from Kammy´s Korner to tell you I love it! It looks incredibly chic!
Christy K. James says
Thanks, Yana!:)
Amber L. says
It turned out beautiful!!!
Christy K. James says
Thanks so much, Amber! 🙂
Kayla @ Home Coming blog says
This turned out beautifully! I can’t believe you got it for only $20!! I’m hosting a giveaway for an awesome starburst mirror that you should enter! http://homecomingmn.blogspot.com/2013/11/starburst-mirror-giveaway.html
Christy K. James says
Thanks, Kayla! 🙂
Karen says
Christy this turned out so gorgeous!! Thank you so much for sharing at Redoux! I LOVE it and I am sharing tomorrow at my party. -K
Christy K. James says
Yay! I’m so glad you like it, Karen…thank you! 🙂
Jeanne says
I absolutely love this makeover! The fabric inlay on the drawers is awesome. You have inspired me for my next dresser project. Thanks!
Christy K. James says
Awesome! Thanks, Jeanne 🙂
Theresa Higby says
I just love this piece. What a great idea.
Christy K. James says
Thanks so much, Theresa!
Deborah says
I adore everything you do! This dresser is absolutely stunning! Love the fabric inserts. I’m also crazy about the burlap mirror and fence picket signs. Thank you for sharing them at What We Accomplished Wednesdays.
Christy K. James says
Thanks so much, Deborah! XO
Tammy says
Hi just stopping by to let you know you have been featured at One More Time Events and pinned…http://www.onemoretimeevents.com/2013/11/fall-wrap-upwho-i-am-very-thankful-for.html
Hope to see you Sunday for another Share It One More Time Events Party…Hope you have a great weekend….Hugs Tammy
Christy K. James says
Yay! Thanks so much, Tammy 🙂
Nancy @ Artsy Chicks Rule says
Definitely ooh lala!!! Yes and a HUGE yes to Plan B being the winner. It is absolutely stunning Christy! (and a steal too!)
Nancy
Christy K. James says
I spent hours transferring the graphic I enlarged on posters.net, but when I started painting, the words were being cut off and skewed by all the raised areas on the drawers. It was a hot mess! Plan B definitely saved this project! I need to find a piece with flatter drawers next time! Have a great Sunday! 🙂
Dria says
That is stunning! You did an amazing job!
Christy K. James says
Thanks so much, Dria! Glad you came for a visit 🙂
Linda in NH says
Absolutely beautiful transformation!!! I love it!!!
Christy K. James says
Thanks so much, Linda! 🙂
arod says
great job on this dresser i love the way it turned out
Christy K. James says
Thanks, Arod 🙂
Judy says
Extremely impressive. You did an amazing job. I will be featuring this tonight at my Fall into Fall party that opens at 8pm EST. Please stop by and pick up an I’ve Been Featured button. Thanks. http://diybydesign.blogspot.com
Sherry @ No Minimalist Here says
Beautiful, Christy! I’ll be featuring your project at the Open House party starting this evening.
xx,
Sherry
Christy K. James says
Thanks so much, Sherry!! XO
Carolyn Staat says
I just bought the nightstand that matches your dresser at a garage sale for $6.00. It is now ready to be painted, I might take your idea but change it a bit to match my room. I think I might paint the drawer blue and then cover it with lace if I find some I like. Thanks
Christy K. James says
Ooh that sounds pretty! You got a steal for $6. Have fun with it 🙂
Suzanne says
This is the most unique and beautiful piece. Congratulations for a job well done! And thank you so much for sharing.
Liz @ Infuse With Liz says
Super cute! You had a great vision on this! Love the fabric and the colors your chose for the cabinet.
Christy K. James says
Thanks so much, Liz! 🙂
Carole says
I love the way this looks. How do you keep the fabric from raveling? Does the Modge Podge take care of that issue?
Thanks for sharing it is gorgeous!
Christy K. James says
Thanks, Carole! Keeping the fabric from unraveling wasn’t easy, but once I applied the mod podge, it was fine. This fabric had a really loose weave though, so if you used something thinner with a tighter weave, it would go on more smoothly 🙂
Babs2u says
Hello! I’m not sure how I stumbled on this link, but I’m happy I did! Your work is gorgeous and inspiring! Fortunately or unfortunately?, I’m a woman who loves to change her mind and I’m wondering…What would you do if you wanted a new look or different color on the drawers? Would you be able to remove the burlap? (I don’t have much experience with ModPodge.) Would you try to put different fabric on top of it? Any insights and wisdom you can share would be greatly appreciated. Thank you!
Christy K. James says
SO glad you found me! The fabric was applied with Mod Podge which acts much like a glue. I have never tried to remove fabric that I’ve applied with Mod Podge, but I would probably try to remove it and add then add another fabric if I wanted to change it up. The fabric I used was a nice weight decorator fabric, although it does resemble burlap. Burlap frays and sheds like crazy, so you might have a harder time removing it. Hope this answers your question, and I hope you come back and visit again! 🙂
Corky says
Is this fabric from Hancock’s Burlap?
Christy K. James says
It is from Hancock’s, but it’s a heavier weight decorator fabric. I think burlap would unravel a bit too much if you tried to use it for something like this.
Heather@ viralupcycle.com says
I am in love with this Christy. I just saw this in MMS, and am wondering why I haven’t seen this pin yet, with how many that ARE pinned.
Christy K. James says
Thanks, Heather! It’s a project I posted about last fall, so it probably hasn’t been circulating recently. 🙂
Vivien says
Hi Christy, Greetings from N.Ireland, I have just discovered your site and I love it! As I am a total beginner to crafting and up cycling, its So refreshing to have step by step pics you can refer to. You’ve made me feel brave enough to attempt an upholstery project as I have been wanting to do one since pussy was a kitten! (But lacked the nerve to take apart a piece of furniture!) Please keep up the posts as I am now a committed Irish D.I Y,er in need of inspiration! Sounds dangerous LOL!
Christy K. James says
Thanks so much for taking a minute to say hello, and welcome! SO glad you feel inspired to tackle a project! Good luck and come back and visit again soon! 🙂
Roberta says
Could you please tell me if you finished the edges of the burlap in any way after you cut it and before you applied it?
Thank you
Christy K. James says
Hi Roberta,
No I did not, however the fabric I used was not burlap. It was a decorator fabric. I imagine if you used burlap, you might have a tough time with the edges unraveling. I used a rotary cutter and a straight edge to cut the fabric and tried not to handle the fabric too much when applying to the drawer fronts. Hope this helps!
Christy H. says
I’m jealous of people who don’t live in SoCal. Honestly, it’s so hard to find true deals on furniture. No joke – I went to a Goodwill and they had this crummy picture frame (not even any type of wood nor design), one of those plastic frames from the 80s and it was $70! Crazy. Then there was this old, beat up dresser that I thought I could do something with and they wanted $450! I was shocked!
Great job on these chairs! You’re so talented. I bought a wingback chair from someone on Craigslist and I was able to score it for a good price. I wanted to attempt reupholstering it myself, but hubby talked me out of it. l do love the result and I still saved several hundred dollars compared to the original chair I wanted, but I did want the satisfaction of accomplishing such a task.
Christy K. James says
Those prices are outrageous! There are a few thrift stores here to that try to overprice things, but not nearly like yours!
Gretchen says
There are a lot of different kinds of Mod Podge. What kind would you suggest for this type of project?
marilyn says
The fabric makes this so special! It is really beautiful. Years ago I remember seeing people put fabric on walls as wallpaper or perhaps wall fabric. I seem to recall that they used starch to give it body and make it adhere. Is the Mod Podge fairly easy to work with once you have the fabric cut? Does it make the fabric have more body and become more resistant to soil? I really want to try to do this when the weather gets a bit warmer so that I can paint and adhere the fabric outside. You’re an inspiration.
Christy K. James says
Thanks, Marilyn! I paint the Mod Podge (matte) on in thin coats with a paint brush, then adhere the fabric. The Mod Podge acts like a glue. Then I go back over it with another thin coat of Mod Podge. I think because the fabric on the dresser I did was in a recessed panel, there probably isn’t a huge risk of it becoming soiled, but I chose a forgiving fabric just in case. The hardest thing about applying the fabric is the fabric fraying, so I tried not to handle it too much after cutting. 🙂
Dee says
Where did you by the fabric i love it. Very nice job.
Christy K. James says
Thanks, Dee! This came from Hancock Fabrics. 🙂
Amy@Europe's Calling says
So gorgeous and inspiring!