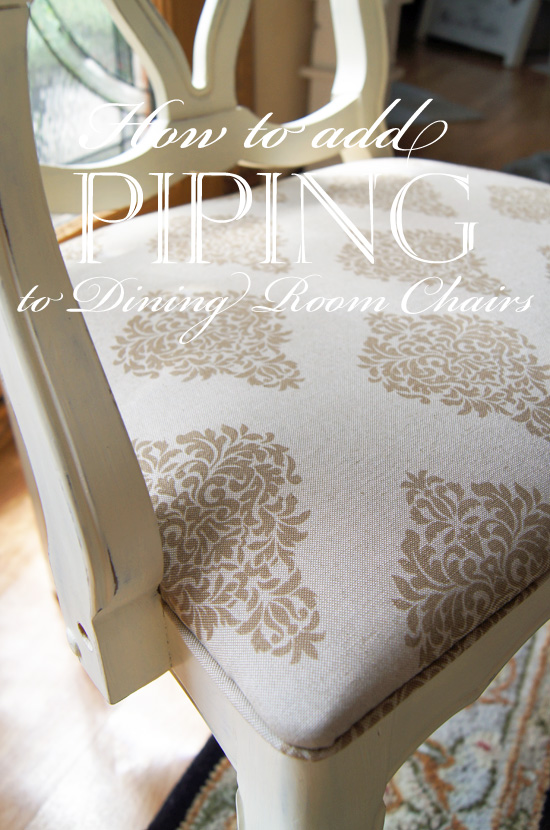
When I revealed my dining room table makeover, I promised I would share how to add piping to dining room chairs, so here it is!
Piping is a small detail that makes a huge impact. I sewed mine but you don’t have to. I am going to show you both ways, both super easy!
Before we can get to the piping, you need to cover your chair pads. There are a billion and one (probably more) tutorials on how to cover your chair pads so here’s just a quickie recap:
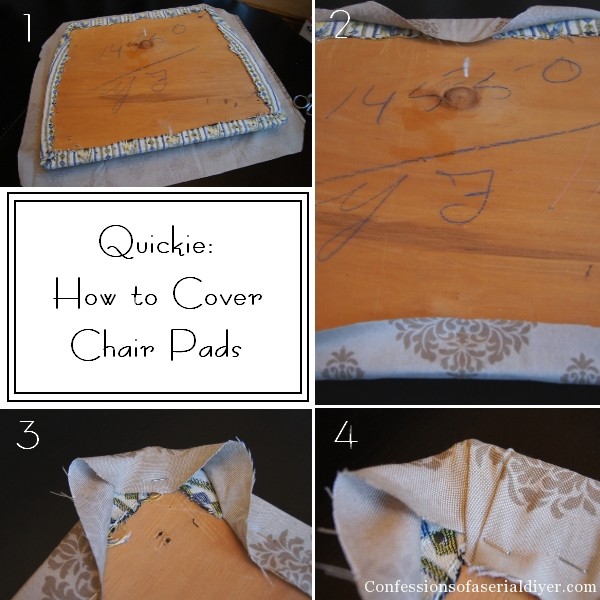
- Cut fabric to size leaving enough to overlap edge buy 1-2 inches. See photo 1.
- Staple gun top and bottom in center, stretching taut to hold fabric in place. See Photo 2. (*If you are using a print, especially something geometric, make sure your pattern is centered.)
- Staple from center to left across the top, stopping 2-3 inches from corner. Then staple from center to right across the top, stopping 2-3 inches from corner. Repeat across the bottom, pulling your fabric taut as you go.
- Repeat these steps on both sides of your chair pad.
- Pull corner down and staple in place. You may choose to trim excess fabric here. See photo 3.
- Pull fabric taut enough to smooth out corner wrinkles and staple in place. See photo 4. There is actually a litttle wrinkle in this photo here I could have smoothed out better had I pulled it a bit tighter oops. Repeat in all four corners.
Okay, enough about covering chair pads which you probably already know how to do! Let’s get to the piping! I’m going to show you both the sew and the no-sew method simultaneously since many of the instuctions are the same. Both are EASY!
How to Make Your Piping:
To make your piping you will need fabric, cotton cording, scissors or other cutting device (see below), and a sewing machine for sew method or hot glue for no-sew method.
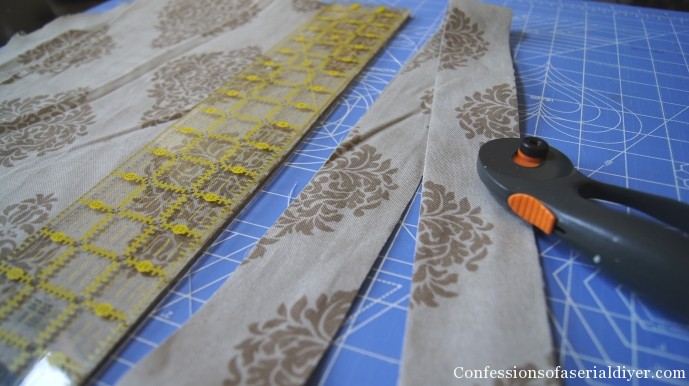
- First you’ll need to cut your fabric into two inch strips, enough to cover the perimeter of each chair. I like to use a rotary cutter, cutting mat, and straight edge, to get nice straight cuts.
- Sew Method: Sew the strips right sides together, end to end, to make one long narrow chain of fabric.
- No-Sew Method: Add a narrow bead of hot glue across the end of one strip. Place another strip on top making sure right sides are together. Continue gluing end to end, until you have one long strip.
- You’ll need cotton cording for your fabric to wrap around. I actually used clothesline that I found in the hardware section at Walmart for less than $3.
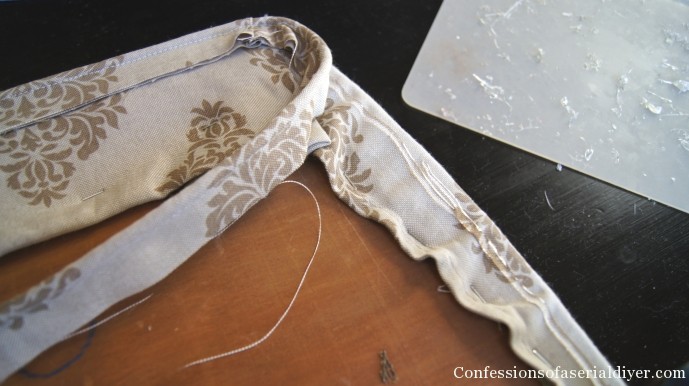
- Fold one end over the top of your cotton cording.
- Fold your fabric widthwise over your cording.
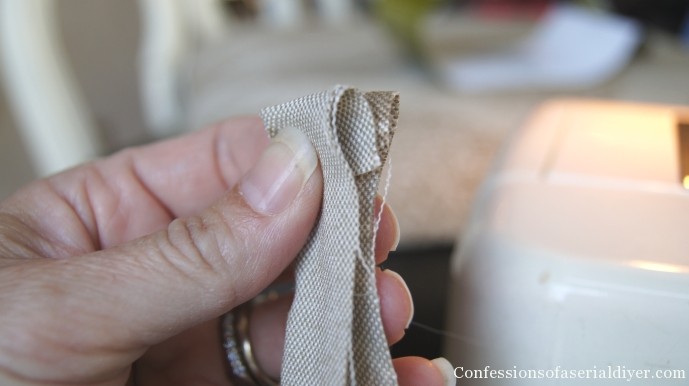
- This is a clean way to start it off, but this won’t be seen as you will see.
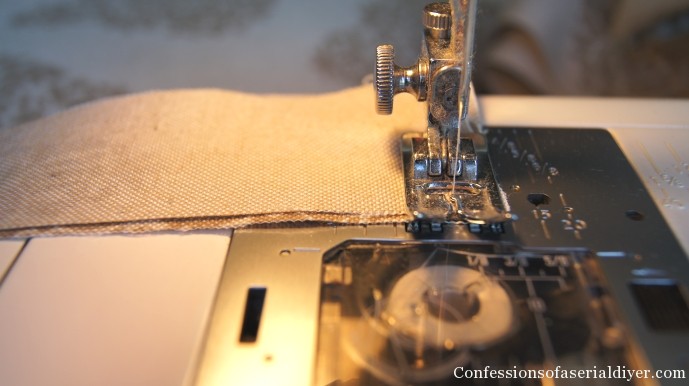
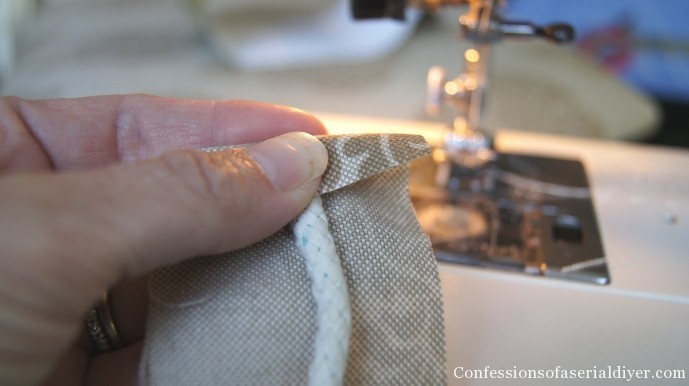
- Sew Method: Start sewing a seam as close to the cotton cording as possible. You may want to switch to your zipper foot for this, however I did not. I know, I’m a rebel and I like to live on the edge.

As you can see, my foot is almost on top of the cording.
- Sew down the entire length of your fabric.
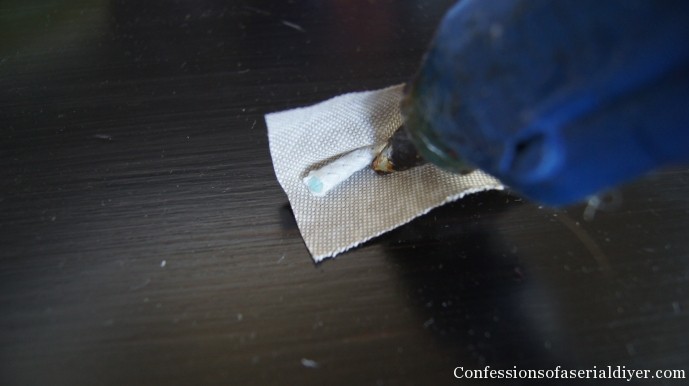
- No Sew Method: Center the cording on your fabric strip and run a bead of glue all along it, folding over as you go. Seal edge as close to the cording as possible.
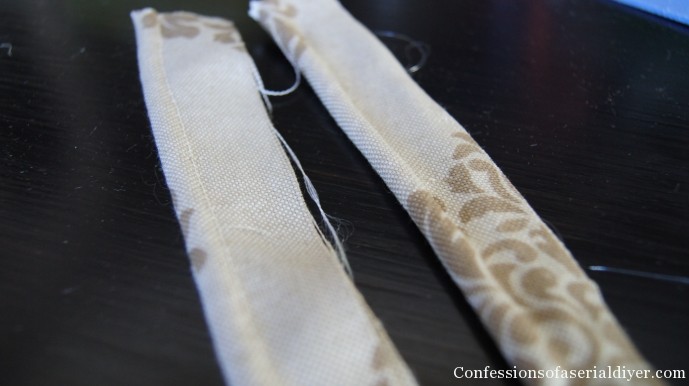
You can see here, the glued piping looks just as good as the sewn piping:
Adding Piping to Chairs:
Now that you’ve got your piping made, it’s time to attach it to your chairs. For this you will need hot glue and scissors. (Hopefully you won’t need the burn spray!)
The back of my chairs hide the piping all together, however that is not always the case. If yours will be seen at the back, you will want to start attaching your piping to the corner where your cushion will be against the back of the chair.
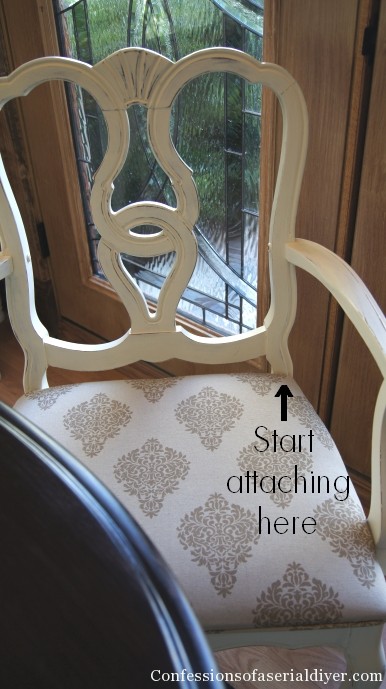
- Using hot glue, run a bead along the edge of the bottom of your chair pad and attach piping. I told you this was easy! Just don’t burn your fingers! Also be sure the glue isn’t super close to the edge, you don’t want it to ooze out between your piping and the chair pad.
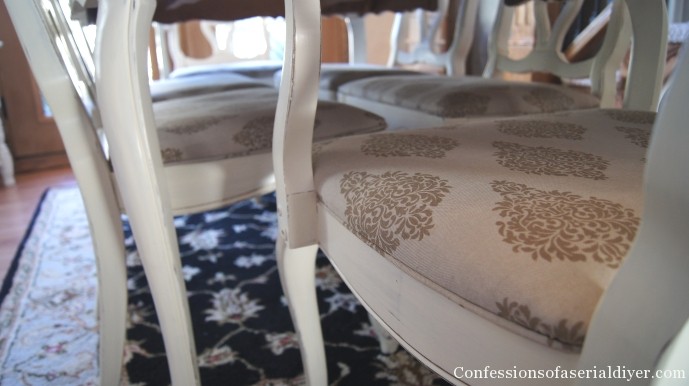
*You will have seams in your piping from where you joined your strips. Try to keep these on one of the sides. The back will be seen when the chairs are pushed in and the front will be seen when you pull your chairs out. Noone really pays attention to the sides.

- Continue all the way around.
- When you get all the way around, cut your piping to fit.
- Screw chair pad back in place.
- Stand back and stare in amazement at how fabulous your chairs look!
What? It’s uneven, doesn’t look straight, not happy with placement? No problem! Rip it right back off and redo! Seriously, I should know. You’ll have to tug a little, but it will come off.
Are you ready to give it a try? I hope so! Please let me know if you find this helpful. 🙂
If you have any questions, don’t hesitate to leave me a message!
XO,
![]()
If you like what you see, there are several ways to follow along! ![]()
Email * Facebook * Pinterest * Hometalk * Twitter * Instagram


sharon says
Thank you Christy! I love how generous you are with your knowledge and skills! Your blog has been a big help to me in reclaiming lost furniture treasures.
Christy K. James says
Thanks so much for your sweet comment, Sharon! Sometimes all it takes is a willingness to try, right? 🙂
Katie says
This piping looks fabulous, Christy! The extra detail makes the chair look great. Your tutorial is easy to follow. Would love for you to share this at the Frugal Crafty Home Blog Hop tonight at 8 pm (Central).
Katie @ http://www.thecasualcraftlete.com/
Christy K. James says
Thanks, Katie! 🙂
dee@ The Old Fat Hen says
you make it look so easy but I will give it a go -love dee x
Christy K. James says
It is easy, Dee! Thanks for stopping by! 🙂
Laurie@Laurie's Little Bits of Creativity, etc. says
Thank you so much for sharing this. Great tutorial! I know I can do this.
Christy K. James says
Your’e welcome, Laurie! You can absolutely do this! 🙂
Andi says
Yay the tute! And yay, you’re back in my Bloglovin feed! 🙂
-andi
Christy K. James says
Woot woot! Thanks for letting me know! I emailed bloglovin and they fixed it fast! 🙂
Pat says
Christy,
Thank you so very much for this tutorial!!!
I already knew how to make the piping,
but was unsure how to attach it to the chair!!!Amazing!!!
Visiting from Susan’s MM!!!
Fondly,
Pat
Christy K. James says
You’re welcome, Pat! It really is easy, right?! Thanks for checking it out! 🙂
phyllis says
I always love the way pieces look with piping, so much more expensive and custom looking and really so easy, loved the tut to help folks out…Phyllis
Christy K. James says
Yes, Phyllis, I agree! I see so many beautiful chair makeovers and I always feel like they are missing that one final detail that would make them perfect when they don’t have any piping. So easy to do, too! Thanks for visiting! XO
sweet violets says
I always wondered how to get the piping on the chair!!! Could I staple it in place also?? In the next couple of weeks I’ll be re-doing my dining room chairs also. The hardest part for me is getting the seats back on !!
Christy K. James says
You absolutely could staple it back. I’ve had to remove and reposition the piping on a couple of the chairs and found it easier to remove with the hot glue. Staples would be less messy though! 🙂
Tammy says
Great tutorial and love the fabric you used would love it if you came by and shared at One More Time Events http://www.onemoretimeevents.com/2013/08/share-it-one-more-time-features-and_10.html
Christy K. James says
Yes indeed, I’m on my way! 🙂
Home Coming says
Great tutorial! I’ve been wondering how you do that!
Christy K. James says
Thanks! It’s pretty easy, huh?! Have a great day! 🙂
Tina says
Of course, why didn’t I think of using a glue gun for piping!? It is a quick and easy idea. Thanks so much for sharing.
Christy K. James says
Yes, Tina! Easy, right?! We love easy! 🙂
Tina says
Oh Yes!! Easy is the best.
Tammy says
Very helpful tutorial. Love all the photos. Looks like piping is a little extra work, but it gives a very professional look.
Christy K. James says
I agree, Tammy! The piping is a nice finishing touch for not too much trouble! 🙂
Cecilia says
Ok, it looks easy enough! Pinning it for future reference! Also, I am a new follower!
Amber says
Wow! Awesome tutorial! I didn’t realize it was so easy!! Must try next time I recover chairs! Love your blog too! Newest follower!
Amber@ Dimples & Pig Tales
Christy K. James says
Thanks, Amber! It really is pretty simple and adds a really finished look! Thanks for following along, I appreciate it so much!! 🙂
LUCY says
Love, love, love this …thank you xo
Christy K. James says
Thanks for coming to check it out, Lucy! 🙂
Shayna @ The Wood Grain Cottage says
Amazing tutorial! Your chairs turned out fabulous… Thanks for the inspiration! 🙂
Christy K. James says
Thanks for the sweet comment, Shayna!
Heather says
I love your tutorial – so detailed! Your chairs are beautiful and the piping is such a lovely touch! Thanks for sharing at Project Inspired!! Pinned to our group pinboard for some extra luv! Heather
Christy K. James says
Awesome, Heather! Thank you…extra luv is always appreciated! 🙂
amy @ commona-my house says
This is such a great tutorial. Thanks for including the no-sew option!!! SO helpful. I loved it so much it was one of my features this week on Give Me the Goods Monday! Thanks for sharing your talents! So glad to have found you through Give Me the Goods!! http://commona-myhouse.blogspot.com/2013/08/give-me-goods-features-no-21.html
Christy K. James says
Thanks again Amy!! 🙂
The French Hens Nest says
Christy, great tutorial! I have been covering chairs for 30 years and never thought to add piping! It really is the finishing touch!
Have a very blessed day,
Linda at The French Hens Nest
Christy K. James says
Thanks! I agree that a lot of people just never think to add piping, but it’s so simple to do and really makes chair look finished. I’m so glad you stopped by today…I just came from checking out your thrift store highlights. They had some gorgeous thing there!! 🙂
Melanie says
Hey, I just came over from Savvy Southern Style. I have been wondering how to do this…can’t wait to give it a try!
Christy K. James says
Great! It really makes a big impact for not too much effort! Good Luck 🙂
Krista @ the happy housie says
You are seriously one talented lady Christy! I am inspired to try out some of the piping that I bought for making pillows… I have been terrified of it so far, but your skill is encouraging me to try!
Christy K. James says
Thanks, Krista! It’s really easy…you should give it a try!
Becca says
I’ve recovered chairs but piping scares me. :/ Not sure if I’m ready for that. Thanks for sharing! Stop by my Friday’s Five Features and link up this post (and others)! http://diy-vintage-chic.blogspot.com/2013/08/fridays-five-features-no-5.html
Christy K. James says
It’s easy…really! Thanks for the invite, Becca!
Becca says
Thanks for stopping by DIY Vintage Chic’s Friday’s Five Features and Fun Festivities. Don’t forget to stop back by this Friday!
Marlin says
Great tutorial !! I think without sewing is best for me 🙂 Great chairs and love the color !!
Have a great weekend !!
Best,
Marlin
Christy K. James says
Thanks, Marlin! It’s pretty easy to do and adds a nice finishing detail! I hope you have a great weekend, too 🙂
Sarah Tremblay says
You have done a good job. The instructions are good. But I am not very good at sewing. So I don’t that I would try any of these
Nancy @ Artsy Chicks Rule says
Oh I am definitely inspired to add some piping to my dining chairs now Christy! I am all about that no sew method. 😉 Great tutorial too.
Nancy
Christy K. James says
You’ll have to come over one day and I’ll teach you to sew 🙂
Kathleen says
Hey! Visiting from Throwback Thursday. I love piping. I’ve reupholstered a couch and had to sew the piping into the cushion covers. That was tricky too, but the impact is fantastic. Your chairs turned out so beautiful. I will definitely do this when I get around to re-covering my boring dining room chair covers! Great tutorial.
Christy K. James says
Hi Kathleen, I have yet to redo my sectional (it’s on my to-do list) and I know it’s going to be tough with all the piping. Maybe that’s why I keep putting off! Kudos to you! Dining room chairs, I can handle. Thanks for visiting and leaving a sweet comment 🙂
keri says
You my dear, Rock! This has ALWAYS been a,’scary’ thing for me! Not anymore! I feel liberated! Now, to actually get er’ done!
Keri
Christy K. James says
Awesome! A mystery no more! It really is so easy 🙂
Graciela @ Dining Room Furniture says
Thanks Christy to share this awesome tips to add piping to dining room chairs…My husband yesterday asked me to search this kind of tutorial through net;. I found your site useful….wow! piping looks cool ….
Marie @The Interior Frugalista says
Awesome tutorial Christy – I pinned it for future reference. Thank you so much!
Christy K. James says
Great, Marie! I hope you find it helpful 🙂
Harumi says
Thanks so much for this tutorial, im getting ready to redo my dining chairs and your blog could not have come at a better time. It was very easy to follow.
Christy K. James says
I’m so glad I could help! 🙂
Vickie Meador says
What a great teacher you are! I love your work <3
Christy K. James says
Thanks so much, Vickie! xoxo
Vickie Meador says
You are welcome!
Kathy Shipley says
Thanks so much for the piping tutoriol. I have two chairs Exactly like yours that I just painted and rcovered. Since I did not know how to do piping I left the original cover on and hand stiched around the original piping. If you ever want two more chairs to march yours let me know lol.
Christy K. James says
Ha ha piping is pretty simple, but it looks like you found a way to make it work. 🙂
Frankie says
YOOO!!!! THIS IS THE BEST FREAKIN TUTORIAL ON ADDING PIPING! I have read countless articles on how to do it but this, honey! Humph……the best hands down. I really appreciate you explaining how to do it using the hot glue gun and sewing machine. Thank you so much. There’s hope for this beginner 🙂
Christy K. James says
Yay!! Awesome! Thanks so much, Frankie! Piping adds such a tailored, finished touch. Glad I could help! 🙂
Tina Matteson says
What, it’s that easy!? I had no idea… Can’t wait to try it.
Christy K. James says
Ha ha yep! 🙂
joy crofoot says
We have a very expensive lazboy couch and the piping came undone everywhere. its a huge huge mess. Can just the piping be redone on a couch- upholstery is fine. Thanks so so much!
Christy K. James says
Sure! You may find this post helpful as I share how I added the piping to my sectional: https://www.confessionsofaserialdiyer.com/how-to-make-a-sectional-slipcover/