Hello, beautiful Friends, and welcome to Themed Furniture Thursday!! If you’re new around here, welcome!! A bunch of us crazy DIY girls get together once a month to share a furniture makeover. The catch is that everyone’s makeovers have to follow a theme! Feel free to check out all my previous themed makeovers HERE.
I gave you a peek at what I would be sharing today on Tuesday.
If you missed it, here it is again:

What you didn’t see is the tag…
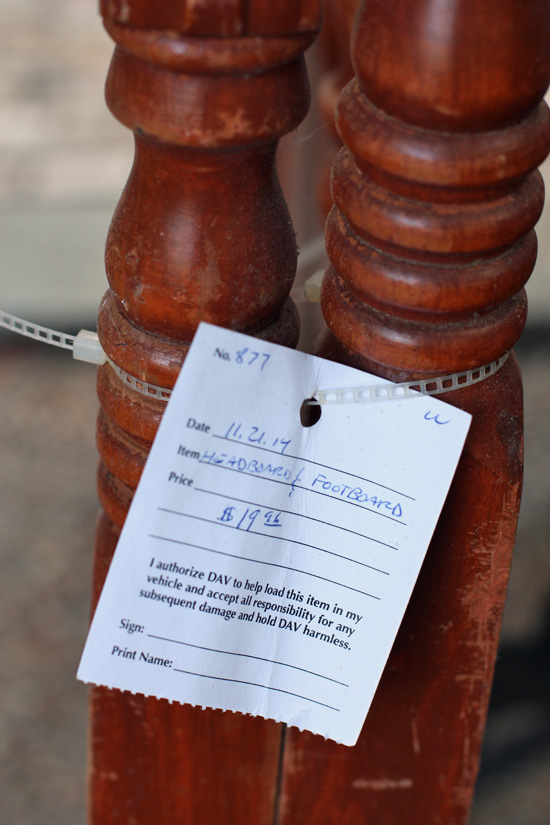
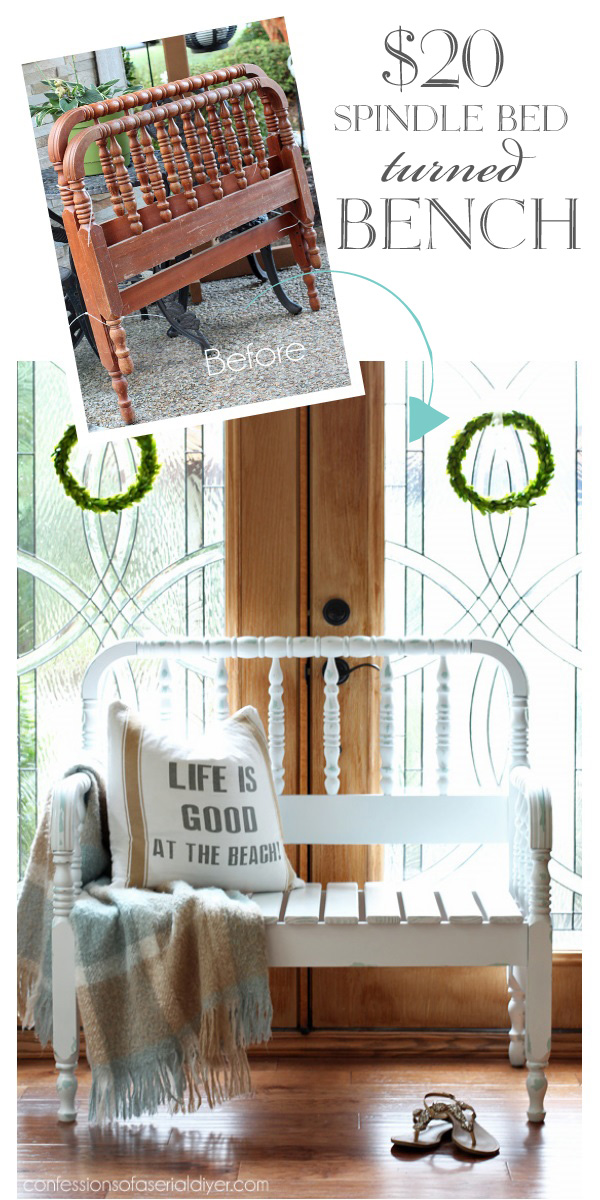
Not that it was only $20, which was awesome, but that it is dated for November of 2014! This one has been hanging around a long time and I have proof! I can’t tell you how good it feels to finally get these older finds done and out of my to-do pile!
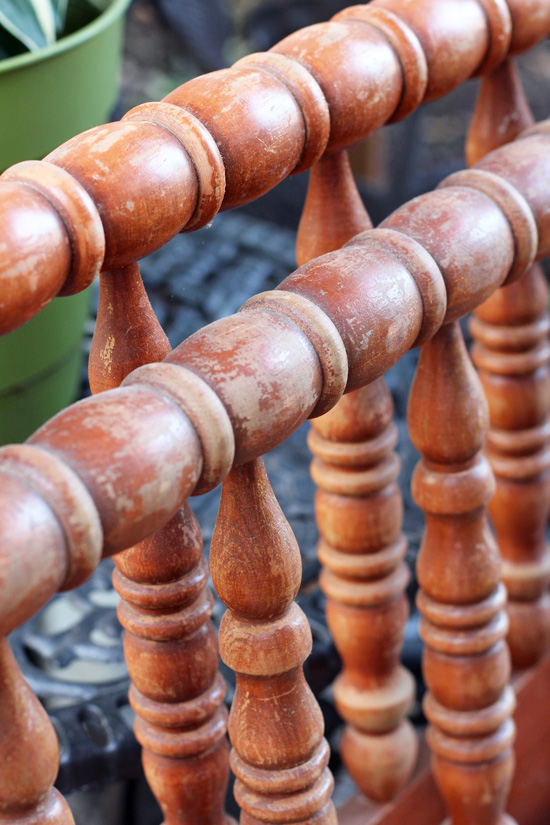
What was holding this one up for so long is the fact that it is nothing but spindles, and I just wasn’t looking forward to tackling this all with a brush. Plus the finish was terrible:
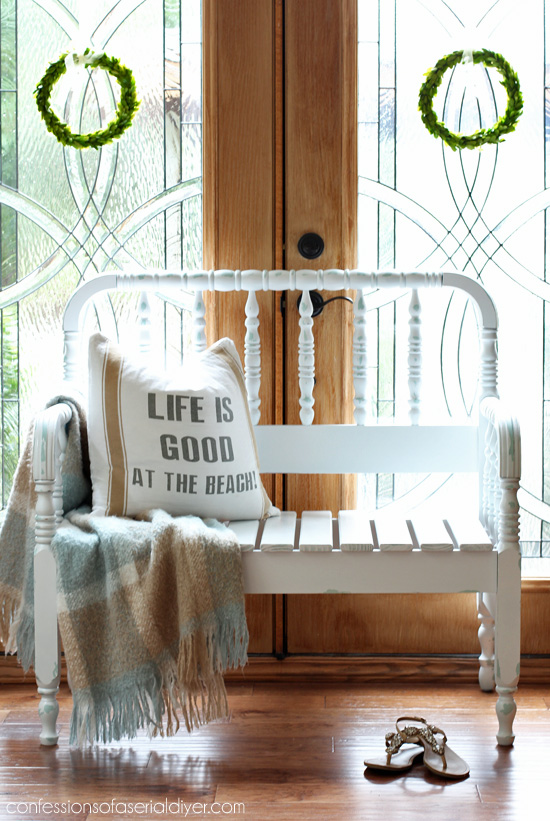
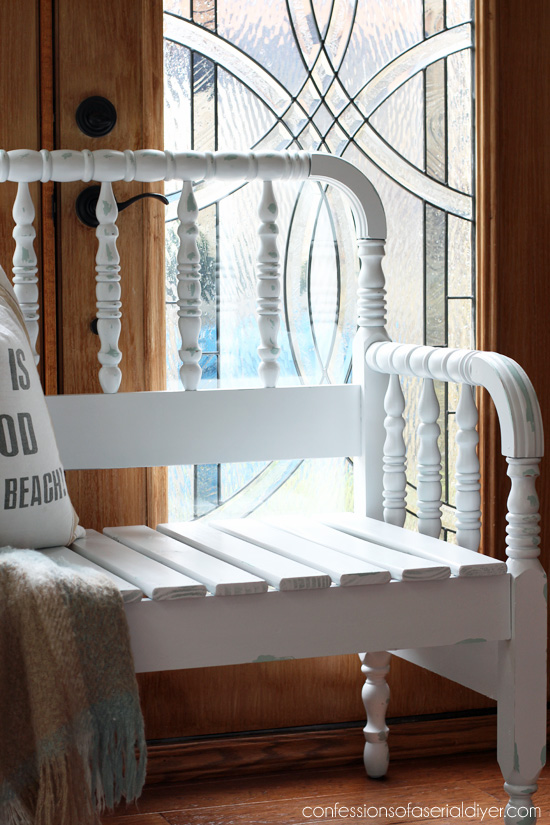
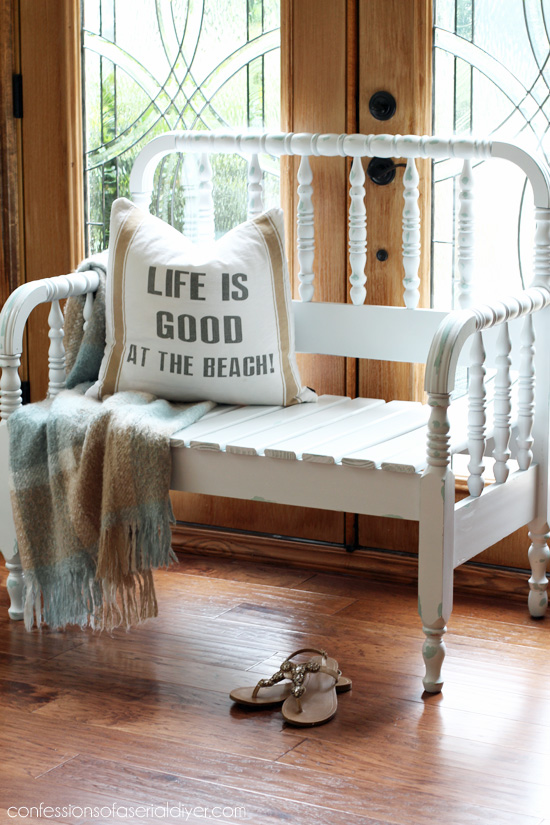
This month’s theme is layers, so of course my first thought was paint layers. And that’s exactly what I went with:
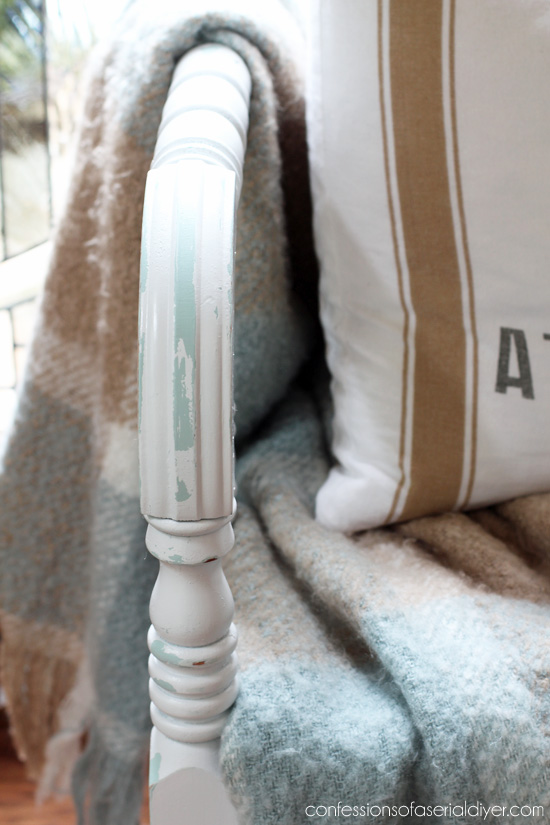
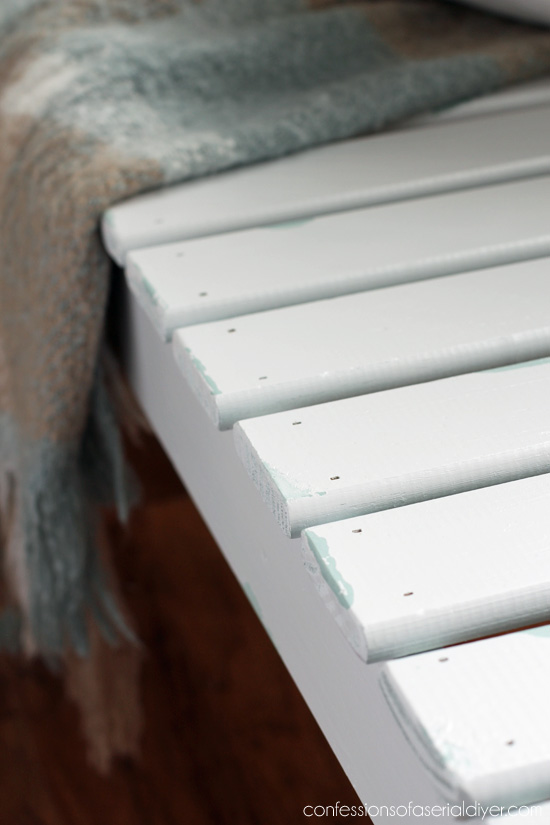
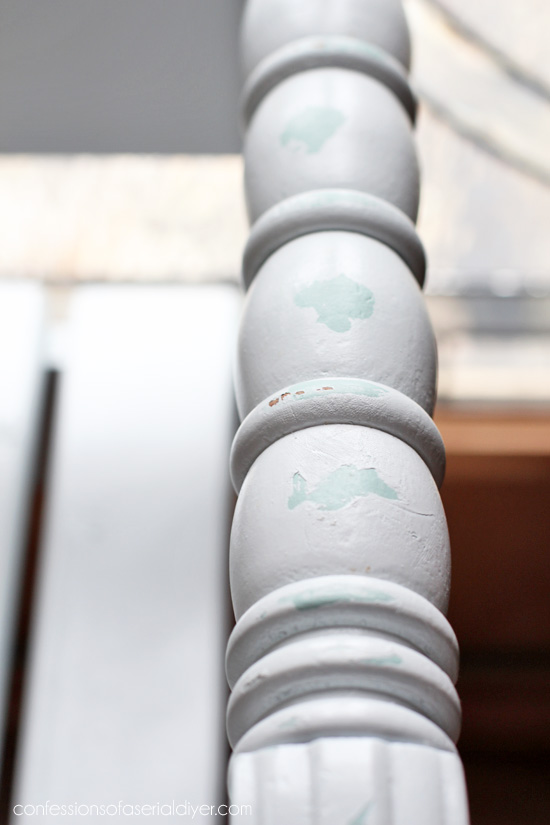
Can you see the layers? NO? Let me take you in for a closer look:
I’ve added a few affiliate links so you can find the products I used.
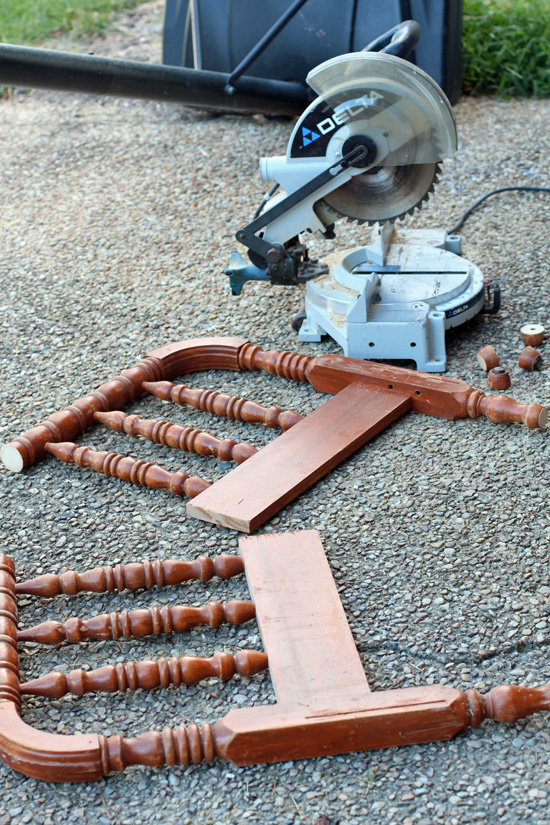
And how did I combat all those spindles??
Meet my arsenal:

Oh yeah…spray paint all the way for the win!
I’ve made a few headboard benches and shared them HERE, HERE, and HERE. This one was made pretty similarly with just a couple adjustments for the spindles.
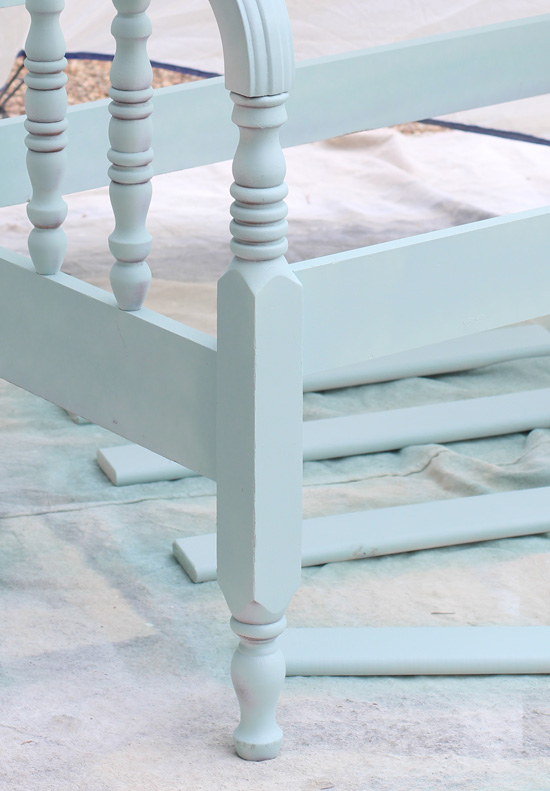
I started by cutting the footboard in half using my miter saw:
Then I had to cut some height off the legs on my new side pieces…
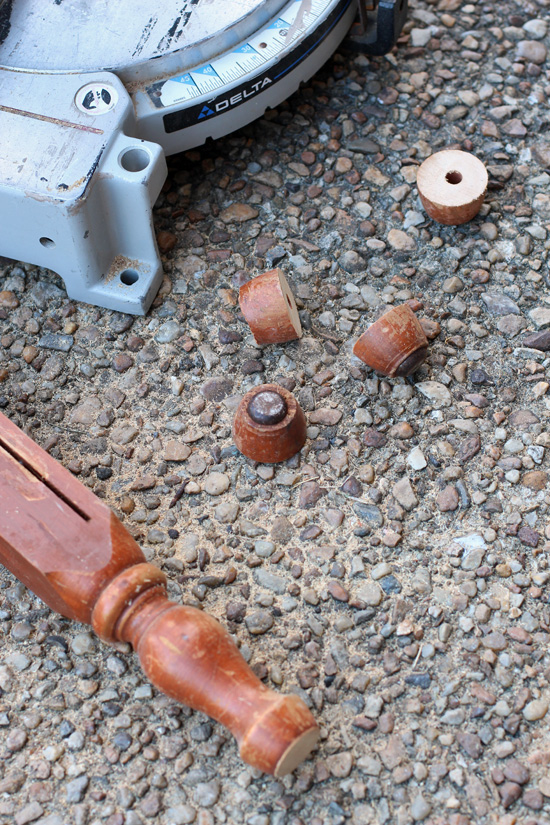
So that the top of the sides would meet the back at just the right place…
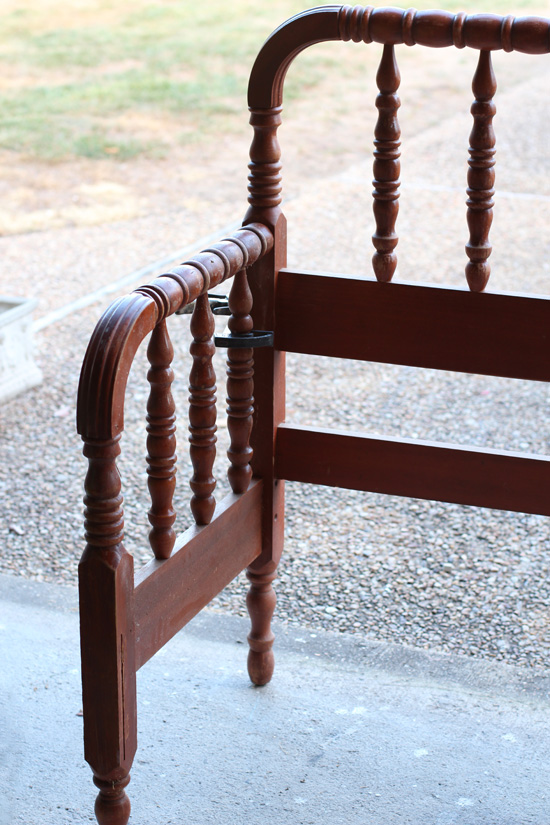
I clamped the sides to the back as pictured above, making sure everything was level as I went. (You’ll want to be sure you create your bench on a level surface as well.)
I usually connect the sides to the back using my Kreg Jig Jr, but I wasn’t able to use that here since the side pieces were spindles and not flat. So from the back, I pre-drilled a hole through the back and into the spindle at the top of the side where it meets the back, using a 1/8″ drill bit:
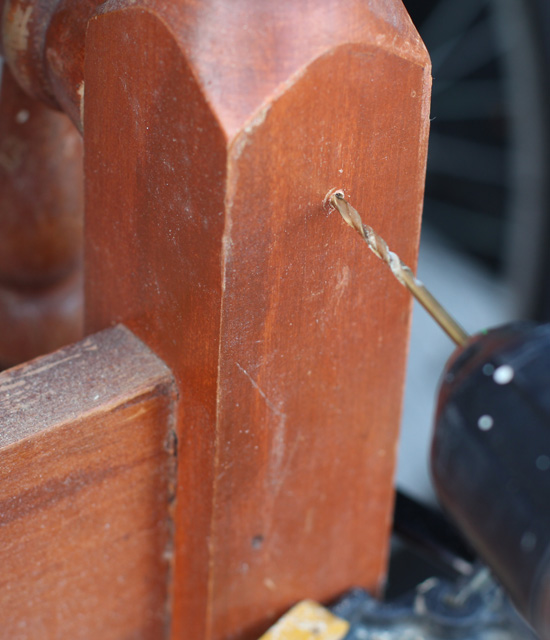
I followed with a 3/8″ drill bit just barely into the surface there, to allow me to countersink the screw a bit. (I never thought to countersink them until I read this post from my friend Nancy at Artsy Chicks Rule not too long ago.)
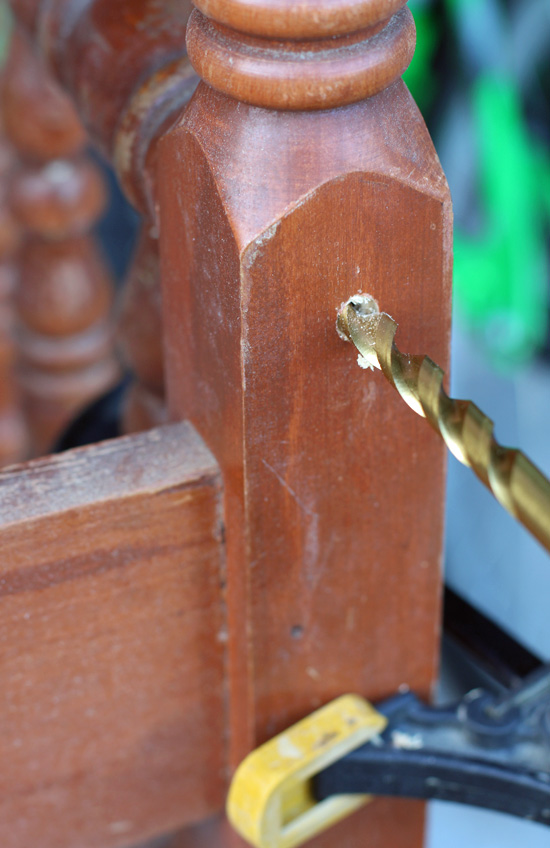
Then I screwed the back to the sides using a 3″ wood screw.
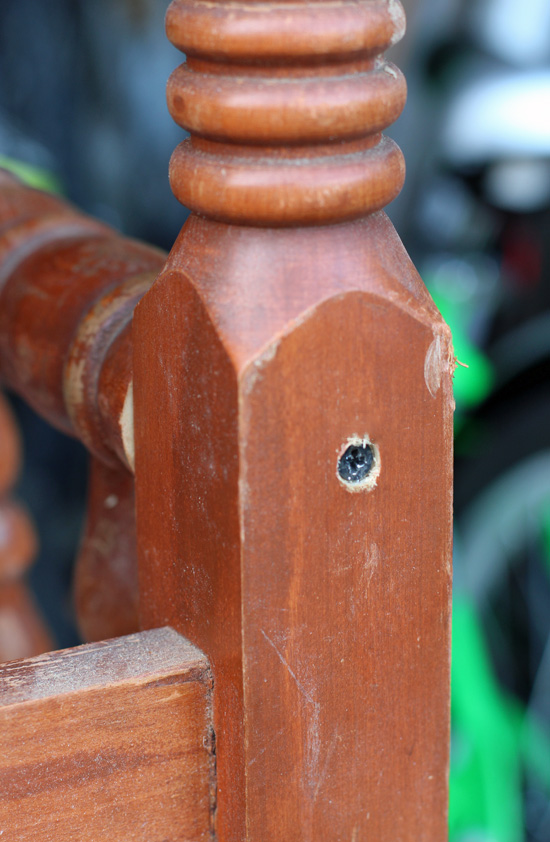
Then I was able to go back and fill in the holes with Elmer’s Wood Filler, completely hiding them.
After attaching both side pieces, I attached a front piece to connect the two across the front, making sure it was level with the back piece. That is what the seat slats will sit on. I did use my Kreg Jig Jr for that piece. (See how easy that is to do HERE.)
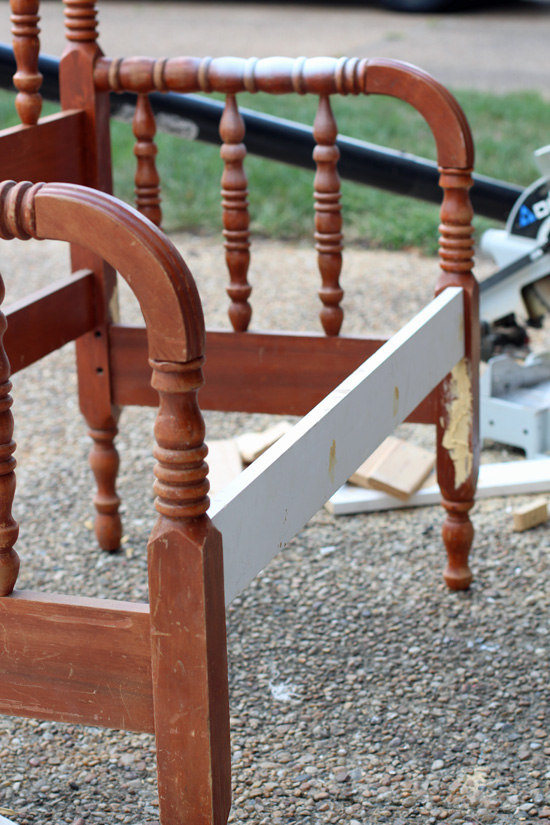
And I filled in all the holes, and sanded them with 220 grit sandpaper when they were dry.
To make the seat slats, I found these slats from my son’s old twin bed that were perfect:
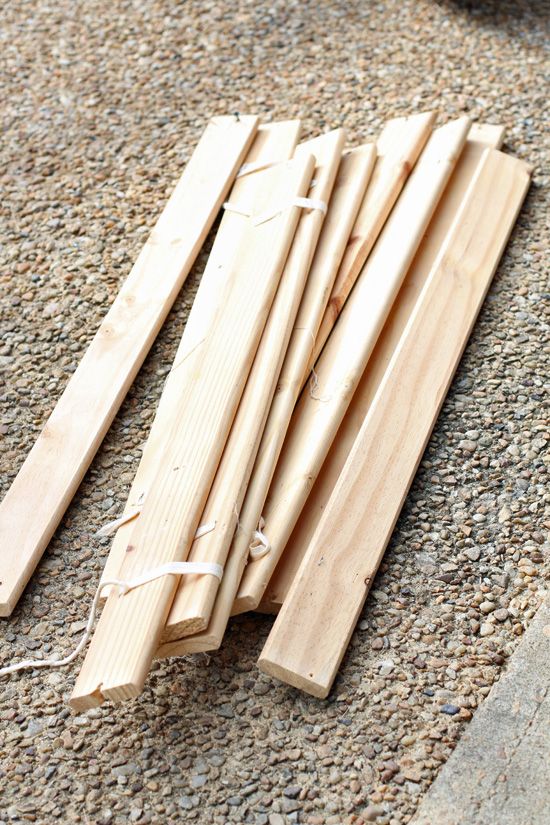
I cut them to fit with my miter saw, but decided to start painting everything before attaching them to the bench.
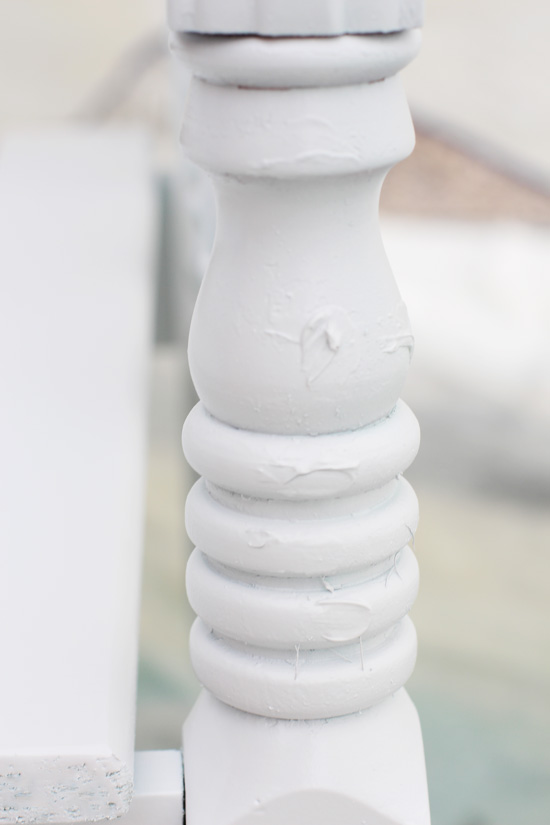
I started with Zinsser Bulls Eye 1-2-3 Spray Primer. It took two cans to do all the slats and the bench.
Then I followed up with a coat of Rust-oleum’s Robin’s Egg Blue spray paint:
I kinda loved it at this point, but stopping here would not have added the “layers” needed for this theme, so I kept going by adding petroleum jelly to all the areas I didn’t want the next coat of paint to stick to. Then I followed up with a couple of coats of Rustoleum’s Universal All Surface Satin white (my favorite spray paint for furniture)…
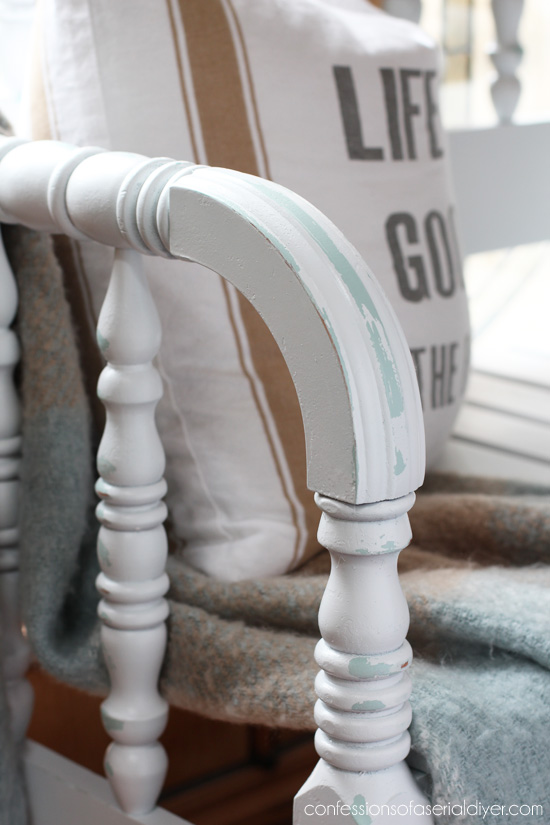
You can see the petroleum jelly smeared on under the paint in that photo above.
Then when the paint was barely dry, I took a clean soft cloth and wiped all the areas where I had applied the petroleum jelly, to reveal the blue beneath.
I added the slats using wood glue and my nail gun.
I decided not to worry about filling in the tiny holes.
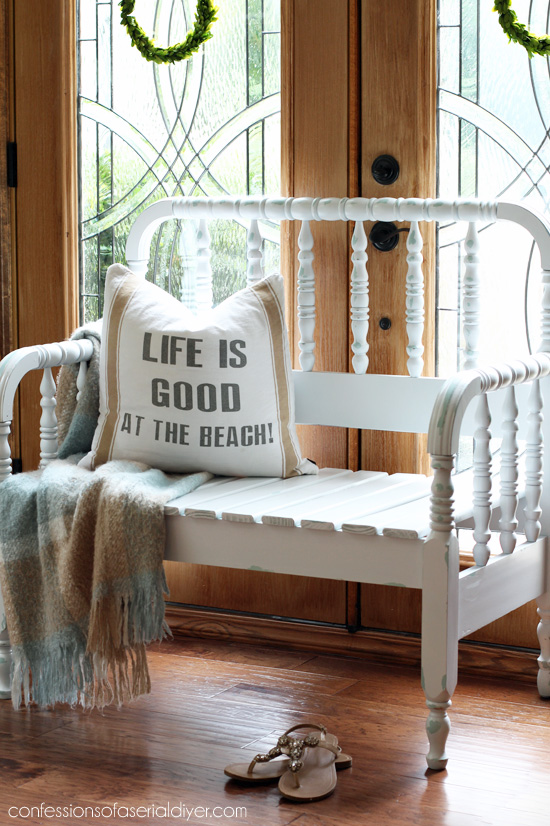
The pillow and the throw came from HomeGoods last year. The closest I could find to this pillow online was here on Amazon.
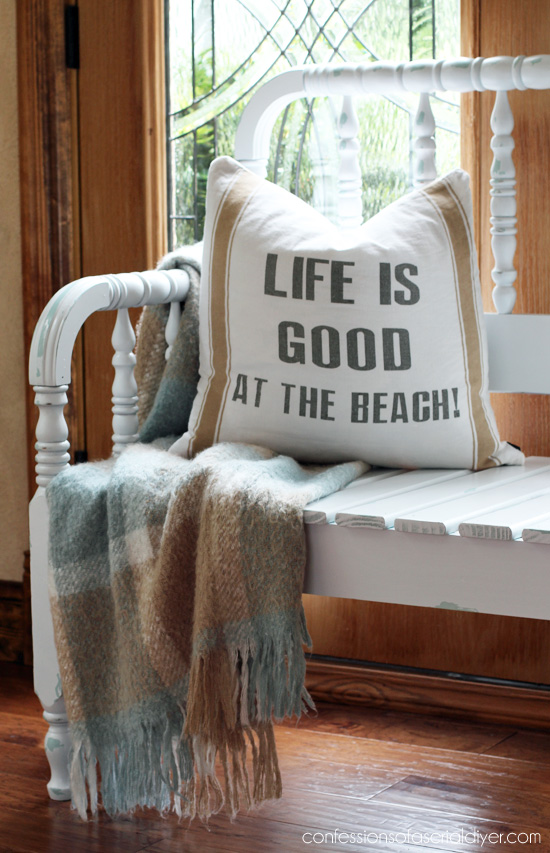
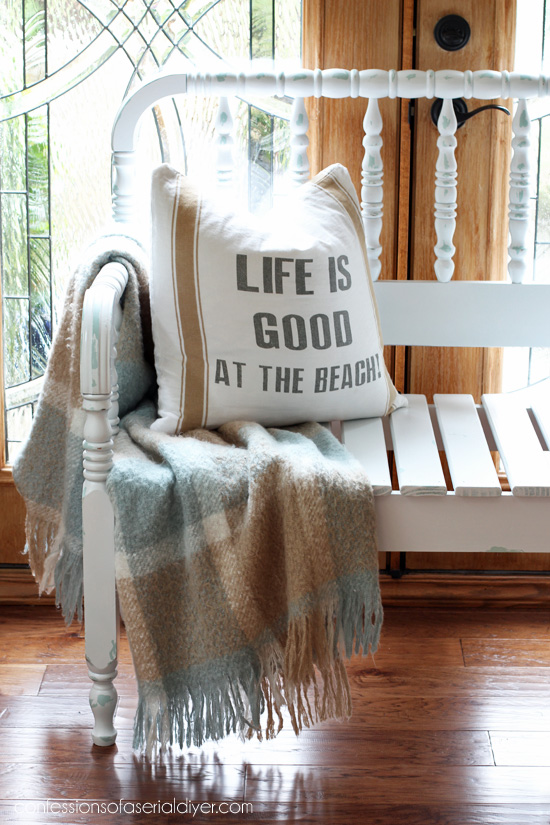
I love this layered chippy look. It’s very subtle and the colors give it that calm coastal vibe I love so much.
Spray paint is fantastic for projects like this where a brush would take way too long. Unfortunately it isn’t cheap. I spent about $30 in paint for this project, but with the bed only being $20, that wasn’t too bad.
My boys have all taken turns sitting on it, even my biggest boy. Now I just need to get it out of my house before anything happens to it…if this rain ever lets up!
Want to see how my furniture flippin friends have been inspired to add layers? Check out their makeovers below! 🙂
I’ll be back next week with the makeover of one very sad jewelry box:
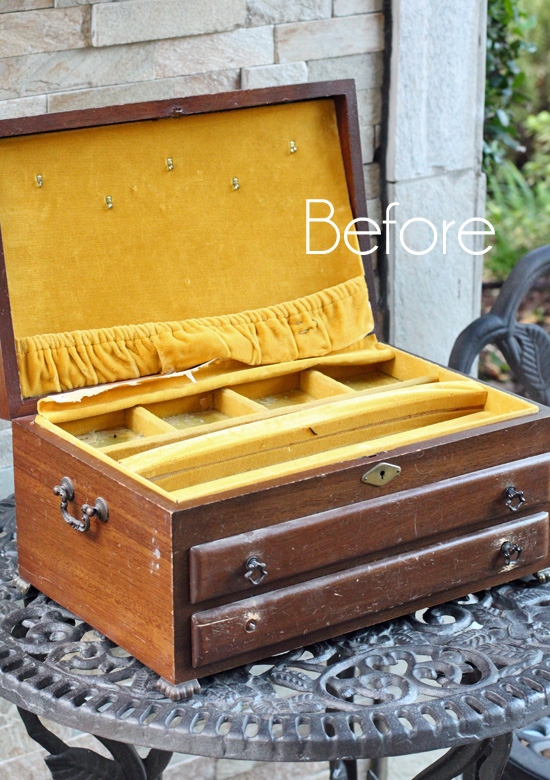
Update: Check out how this jewelry box looks now HERE!
XO,
![]()
Don’t Miss a Thing!
If you like what you see, there are several ways to follow along!
Email/Subscribe * Facebook * Instagram * Pinterest * Twitter


Susie@TheChelseaProject says
This is perfection to the max! Love the spindles — and the colors!! Swoon. You just knocked this one outta the park. Great makeover, as always. Susie from Chelsea Project
Christy says
Oh wow, thanks so much, Susie!! XOXO
Jody says
My neighbor gave me a set like this. Thanks to you for showing a being able to follow pictures of how you did it. First day of fall will find me sawing the footboard in half. Yippie!
Christy says
Oh awesome…perfect timing then! Good luck and have fun with it! 🙂
JamieK says
Love Love this bench! I’m on the hunt now for sure!! Thank you!!
Christy says
Thanks, Jamie! Good luck in your search! 🙂
Lindsay Eidahl says
We love making benches from beds and this one takes the cake. It is so pretty!!! Great job!
Christy says
Thanks, Lindsay! I do love a good headboard bench too…they are just so charming! XO
Wendi@H2OBungalow says
Christy this is so pretty! Those spindles and the shape are perfect for stunning headboard bench like yours! Love and pinning!
Christy says
Thanks, Wendi! I fell in love with this set when I found it, but there it sat lol. Glad to have finally found a use for it! 🙂
Marie from The Interior Frugalista says
You always rock the headboard benches, Christy! This is definitely one of my favorites because I love the look of the spindles. The Robin’s Egg is so pretty peeking through the white. Pinning and sharing 🙂
Christy says
Aww thanks, Marie! Those spindles speak to me too…wish I had room to keep this one! XO
Karin Chudy (ART IS BEAUTY)a says
I have an old headboard and footboard in my shed. I have been waiting for inspiration! I think this may have done it!
Just Beautiful!
Hugs,
Karin
Christy says
Oh good! Glad you are feeling inspired, Karin thank you!! XO
Donna Gonzalez says
I have a full size head and foot board (my childhood bed) just like that and have been wanting to turn it into a bench. Thanks for such explicit directions. Hopefully this will give me the motivation to tackle my project!
Christy says
You are so welcome, Donna! This was actually a bit simpler to do than some of the others I’ve tackled. Turning your bed into a bench is a perfect way to be able to continue to cherish it for years to come! Best of luck with it! 🙂
Molly Nye says
What size is the bed frame? I have a twin that I would love to do this with.
Christy says
I believe it is a twin! 🙂
Norma says
I looooooove when you turn headboards into benches!!!! This is gorgeous as usual. I would love to do one myself. Very inspirational!!!
You are amazing Christy!
Christy says
Thank you SO much, Norma! I really do love to make them…there’s just something so charming about a headboard bench! XOXO
Annie (Canada) says
✋ Awwh….LOVE IT! ✋ I might, ok probably, ok for sure will have to ‘borrow’ this idea ???? Thanks Christy
Christy says
Thanks, Annie! Yes, do it! Then send me pictures! 🙂 🙂
Zanetta says
I rarely like headboards made into benches because many times they look just like that…they miss the mark. Have to say you nailed it! One of the best looking bench makeovers I’ve seen. Great job, thanks for all the inspiration.
Christy says
Wow thanks so much, Zanetta! I think the spindles are what make this one extra sweet. 🙂
Rosalie says
What a clever idea. I think the bed-frame bench is absolutely adorable.
Christy says
Thank you, Rosalie! 😀
rose l. says
Because of the spindles I would want pillows to lean on, not lean on the spindled back.
Christy says
I agree! It is quite deep, so there is plenty of space for pillows!
Barbara says
Christy, the bench looks fantastic. Love the colors. I will now be on the lookout for a spindle bed to try my hand at this. Thanks for the inspiration.
Christy says
Thanks, Barbara! I’m so excited to have finally done something with this bed, now I can look out for another too! XO
Becky says
Haha, first thing I saw on that tag was the date… I’m not the only one! It must feel good to get this one DONE! Beautiful work, as always. I would have paused at the blue stage too, because that was reaaaaly tempting! I love the layers though.
I JUST learned how to use my Kreg Jig Jr. that my husband got for me a few months ago. I’m not a fan of “new stuff”, so it took a while to nerve up to it, but I LOVE IT now (and yes, I realize it’s pretty simple, duh)! Haha, I ‘m a little over excited to see you using yours, and to such a great end! : )
Christy says
Thanks, Becky! Ha ha I had to show that I’m not kidding when I talk about how long some things have been hanging around lol! Yes, so glad it is DONE! I love my Kreg Jig Jr…I use it mostly for benches. 🙂
Pamela Martin says
Your talents still amaze and delight me.
*Smiles*
Christy says
Aww I’m SO thrilled to hear that, Pamela thank you!! XO
Marcie Lovett says
As soon as I saw the photo of that delicious headboard and footboard, I knew you’d make a bench! That was one ambitious project, but so worth it. The color is lovely and it turned out beautifully. I thought you would have used your paint sprayer for something like this.
Christy says
Ah you know me too well, Marcie! So glad you like it! I thought about using my sprayer, but then I would have had top wax all those spindles. Spray paint with a sheen doesn’t really need a sealer, so I cheated and used spray paint! 🙂
Tania says
Beautiful! I’ve been wanting to try making a bench from a headboard for awhile, it looks pretty easy! But first I have to clear our some of the projects in my garage too!
Tania
Christy says
Thanks, Tania! I know exactly where you’re coming from with needing to clear out the garage first…I am s-l-o-w-l-y getting there! XO
Addie says
You got the ” Coastal Vibe” with this one!!!! It’s a beauty!!!!
Take Care 🙂
God Bless!!!
Addie
Christy says
Thanks, Addie! You know how I swoon over coastal! 🙂
Paula@SweetPea says
I know that you were glad to get this piece out of your garage and I don’t blame you for procrastinating with all of those spindles. Uggh!
The end result is beautiful and I love how you layered blue and white paint. This shouldn’t last long in your booth!
Christy says
Thanks, Paula! Yes, I am so thrilled to be finally getting to these older projects. Hoping for a quick sale! XO
Grandmas House DIY says
What a great idea! We would be really excited to have you at our link party called To grandma’s house we go!
Christy says
Thank you! 🙂
Jen @ Girl in the Garage says
LOL! I always have to throw a blanket over the chairs I redo because my boys always try to climb up and sit on them! I think I’d flip if Doritos stains ended up on them. 😉 This bench is beautiful and the distressed look with vaseline is so pretty. I don’t think I’ve seen you do that before.
Christy says
Thanks, Jen! I’ve done this technique on smaller pieces before, but not furniture. I love the chippy effect it gives. And ha ha yes that’s me too! I am always so relieved after getting my pieces out of the house and safely to my booth! XOXO
Karen Marie Kedzuch says
Christy,
YOur bench is adorable made from a bed. Beautiful.
Happy Creating,
Karen Marie
Christy says
Thank you, Karen Marie!
andi says
I love this. I bought an antique headboard/footboard (no spindles, but you get the idea!) for Phil to build a bench out of for me. You know he doesn’t let me play with the power tools. =D We haven’t started it yet, but I just love yours. 🙂
xo
-andi
Christy says
Thanks, Andi! I just love the charm of a headboard bench. Can’t wait to see yours when you (Phil) get it done! 😀
Lucy @ Patina Paradise says
The touch of Robin’s Egg Blue peeking from under the white is just perfect Christy! Pinning for future reference! ;o)
Christy says
Thanks, Lucy! XO
Kerryanne @ Shabby Art Boutique says
Totally loving this chippy shabby bench Christy. I love everything you make, but this one is gold!! Thanks for sharing on Shabbilicious Friday. I know I’m making a habit of this… just letting you know that I’m featuring this project at tomorrow’s party.
Hugs ~ Kerryanne
Christy says
Thank you SO much, Kerryanne! I only participate in a couple of parties these days so I truly appreciate the features! XOXO
Pamela Groppe says
First thing I thought of when seeing all those spindles was how much work brush painting that would be and that I would turn to spray paint.
I see that is what you thought too. 🙂 I have seen those bed sets at the thrift stores, now I need to actually buy one. I think a bench like this would be perfect beside my Painting Cottage!
Christy says
Ha ha yep! I did not want to paint all those spindles by hand! 🙂
Karen Marie Kedzuch says
Christy,
Your layers look fantastic! I think the 30 dollars on paint with saved time is a win. You did a gorgeous job talented lady.
Happy Creating,
Karen Marie
Christy says
Thanks so much, Marie! I agree the expense was well worth the time I saved! XO
Jody O says
I love this you did a great job!
And the aging was perfect !
Christy says
Thanks so much, Jody! XO