Hey there awesome Friends! I am really excited about today’s makeover! I’m sharing how I transformed a pair of chairs I found at the thrift store at least two years ago. Isn’t that ridiculous? I knew they were going to be a ton of work, so I just kept overlooking them.
Well I am SO thrilled that they are finally done!! I’ve included a few affiliate links so you can find the products I use.
Bonus!! Five of my furniture fixer upper friends are also sharing furniture makeovers today as well so be sure to look for those at the bottom. That’s like five extra makeovers today!
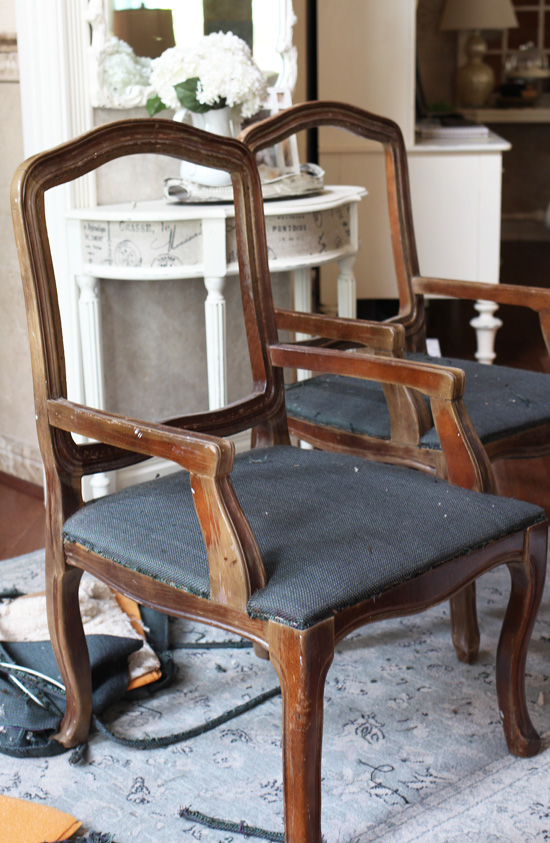
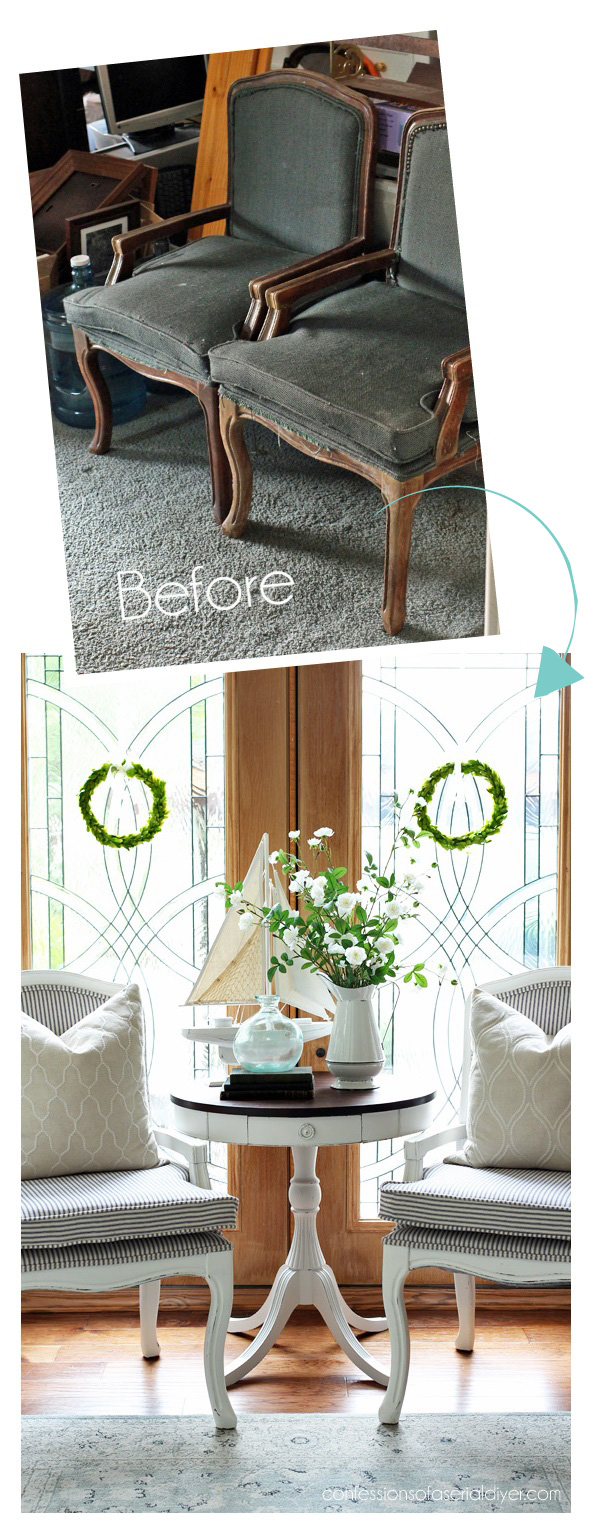
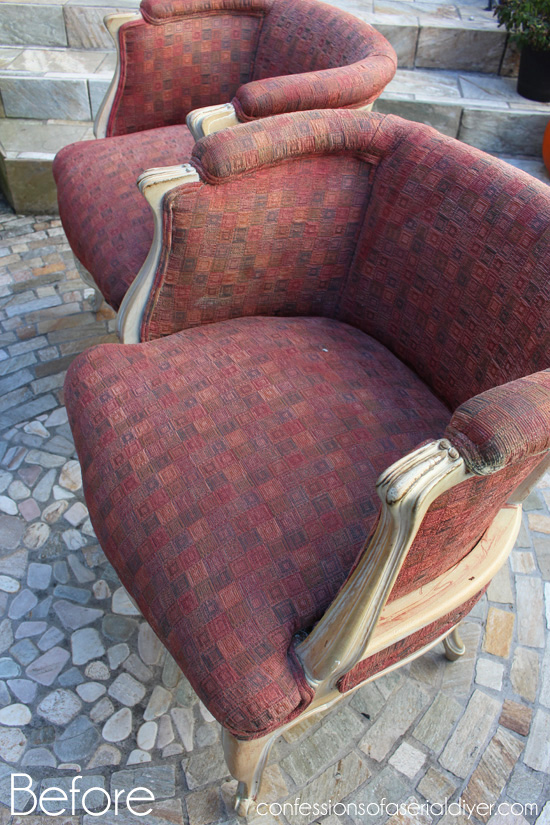
Check out these beauties before:

Yeah not so beautiful, eh? They were $35 each and 20% off that, so around $60 for both chairs.
That upholstery was so gross, but the bones really were pretty, and I had high hopes that new paint and fabric would erase any traces of the sad office from whence they came.
I’m pretty sure it worked:
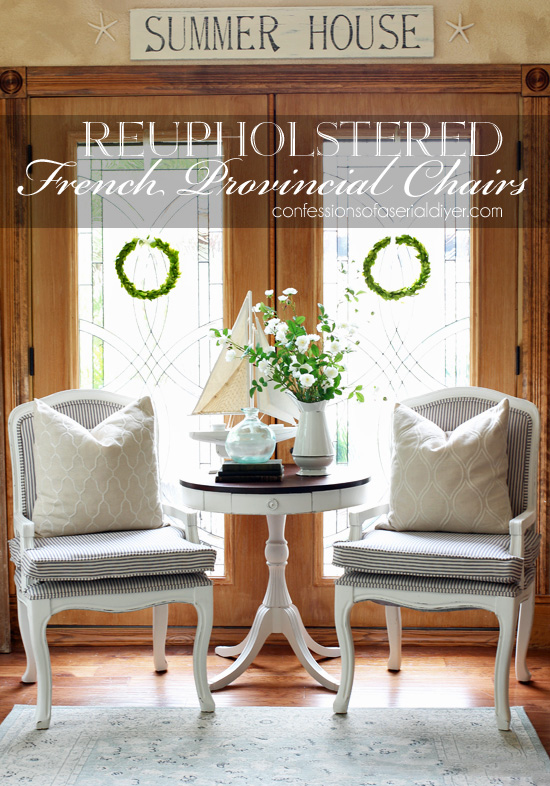
Yes??
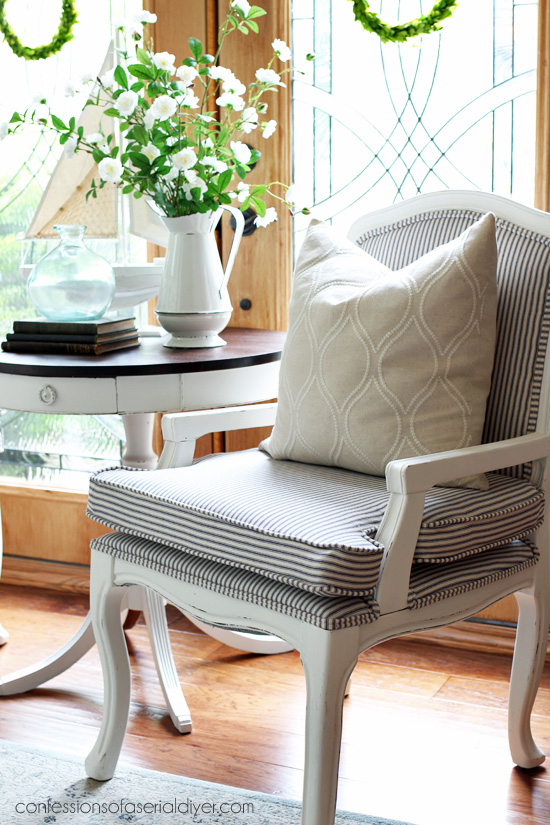
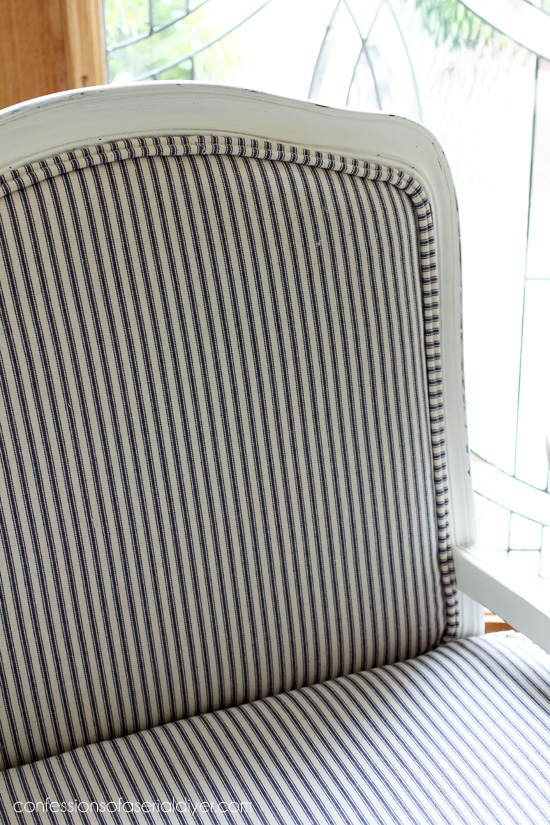
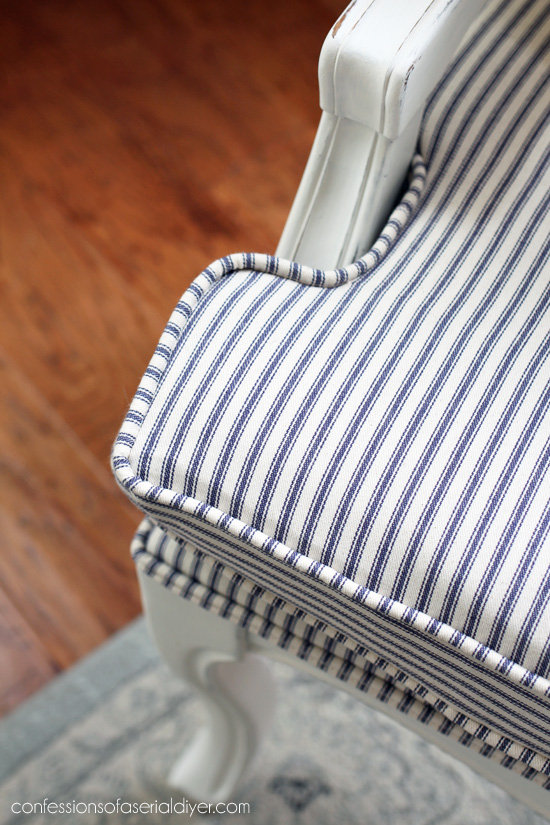
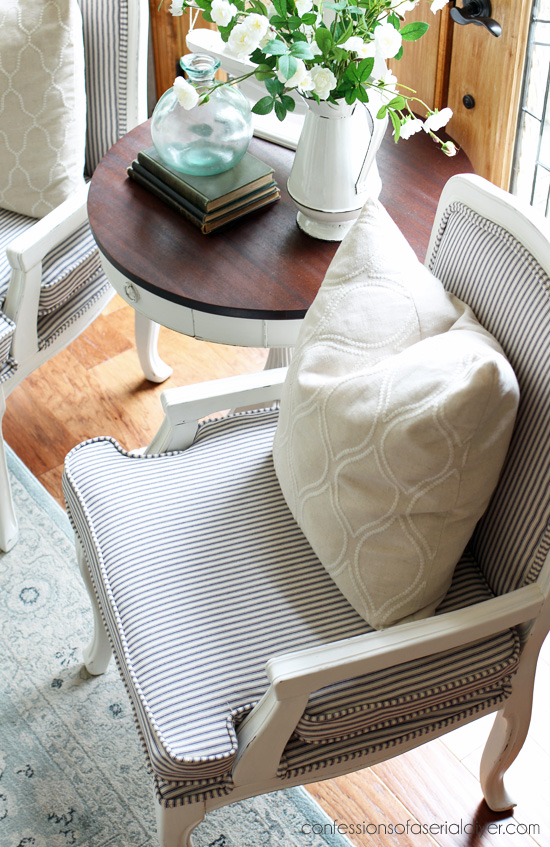
I chose a blue and white ticking for this set and I am so thrilled with how they came out. I found it at Hobby Lobby (no affiliation) for $7.99/yard and used my 40% off coupon so I was able to cover both chairs for less than $30!
I’ll be honest, I was dreading this project. The original fabric on these chairs was held on with about three hundred thousand staples. There were four layers to the back alone and each layer was stapled in place. That’s a LOT of staples to remove.
It took me nearly two days, but I got it done…
Thank goodness I had this little helper:
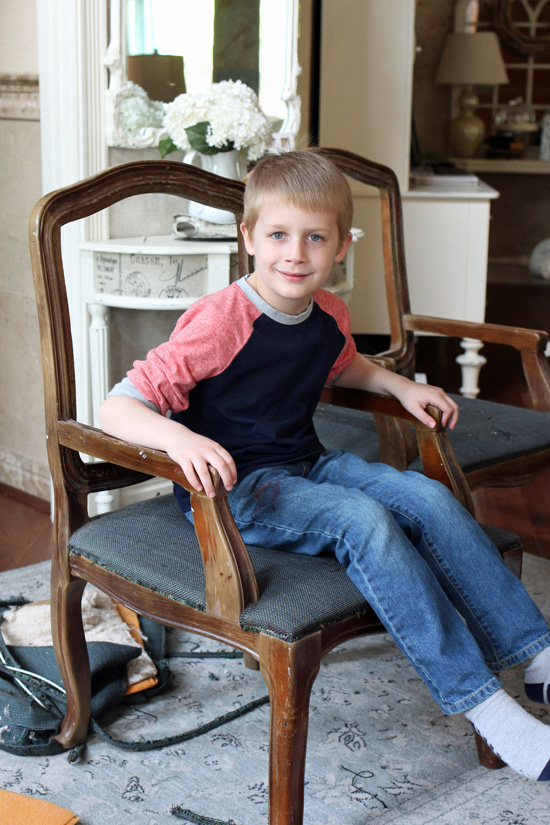
Well I’m not sure about the helper part, but he did keep me company. 🙂
This upholstery staple remover was a HUGE help though, along with my pliers:
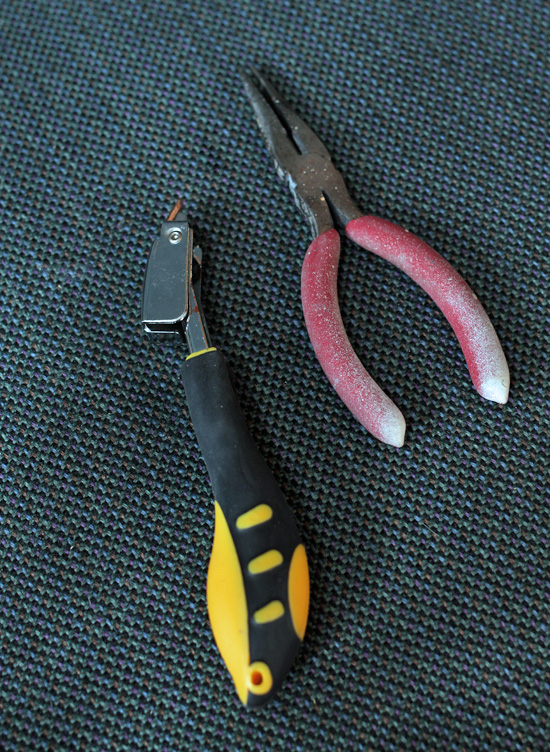
That was the hardest part by far.
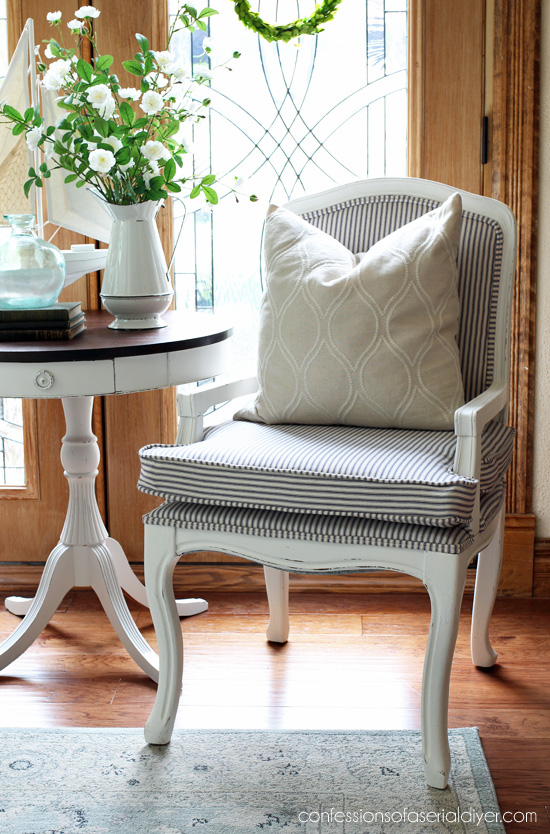
I sanded the chairs to remove any flaking areas. Then I painted them in Behr’s Bit of Sugar mixed 75/25 with Cottage White, made into DIY chalk paint. (Recipe HERE.) The white in the fabric was just a bit off-white, so I wanted the chairs to be as well.
Then I sanded a bit and sealed them with Annie Sloan’s clear soft wax.
Now for the FUN part!
I began putting these gems back together using batting and my cheapo Stanley light duty staple gun. It is seriously like $8. I love that thing and it works great, perfect for my small hands.
Here is a quick pictorial with basic instructions in case you have a similar project to tackle: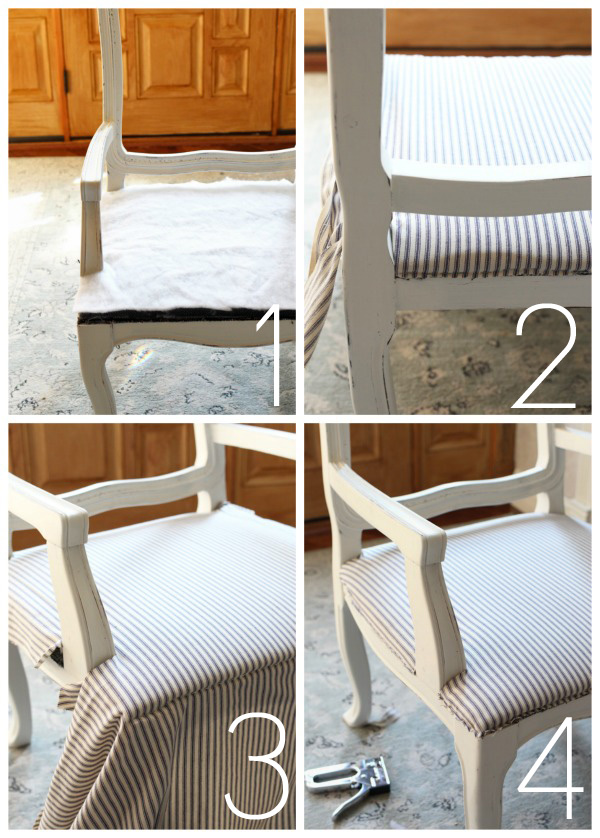
- I added a layer of batting to the seats to cover that old fabric, and so they would be smooth through the ticking fabric.
- Then I stapled the fabric in place along the back edge. I used 3/8″ staples.
- I stapled the fabric along the front edge and followed with the sides, being sure not to stretch the fabric too much which would distort the stripes.
- I trimmed all the edges as closely as I could with my fabric scissors. (Sharp scissors are a must here.)
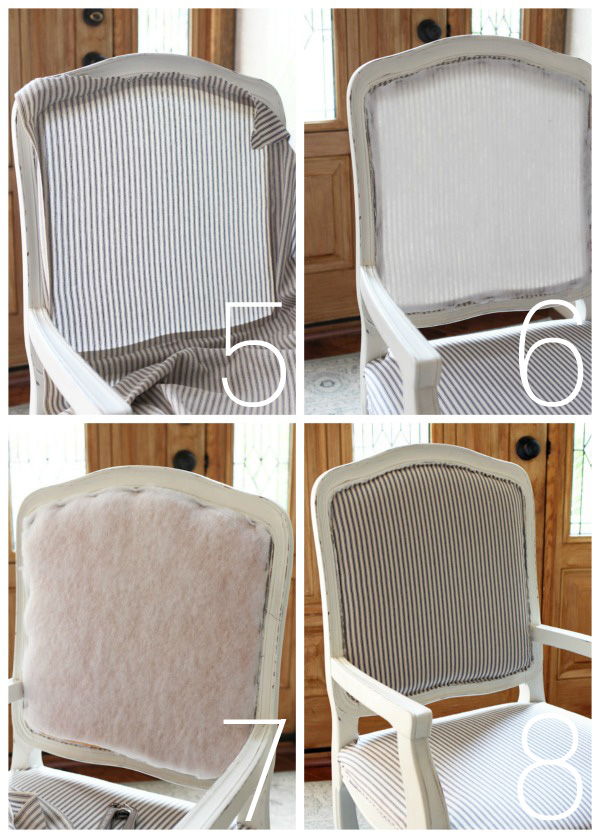
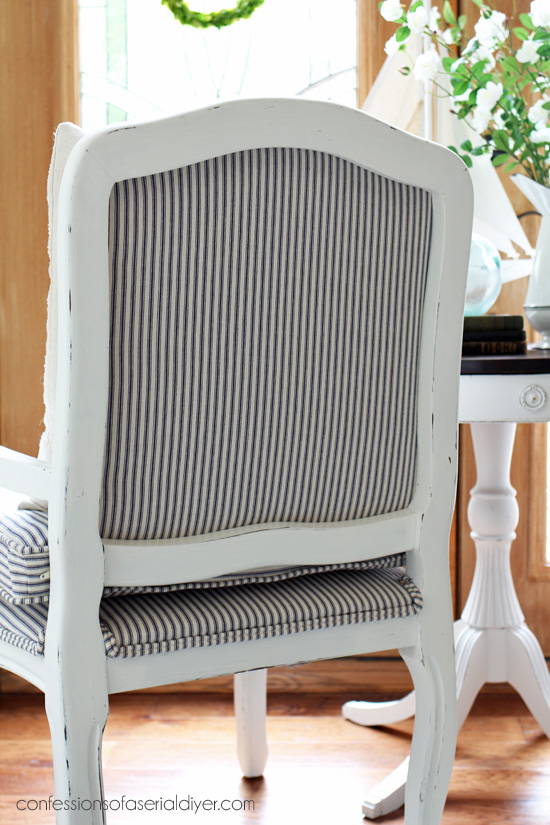
5. Next I stapled my fabric to the chair back with the right side facing out. This is what will be seen from the back.
6. Then I added a layer of batting, stapling it in place.
7. I reused the cardboard and foam that was original to the chairs since it was in good shape. I added both of those pieces, followed by another layer of batting.
8. Finally I added the fabric, and trimmed the edges with my fabric scissors.
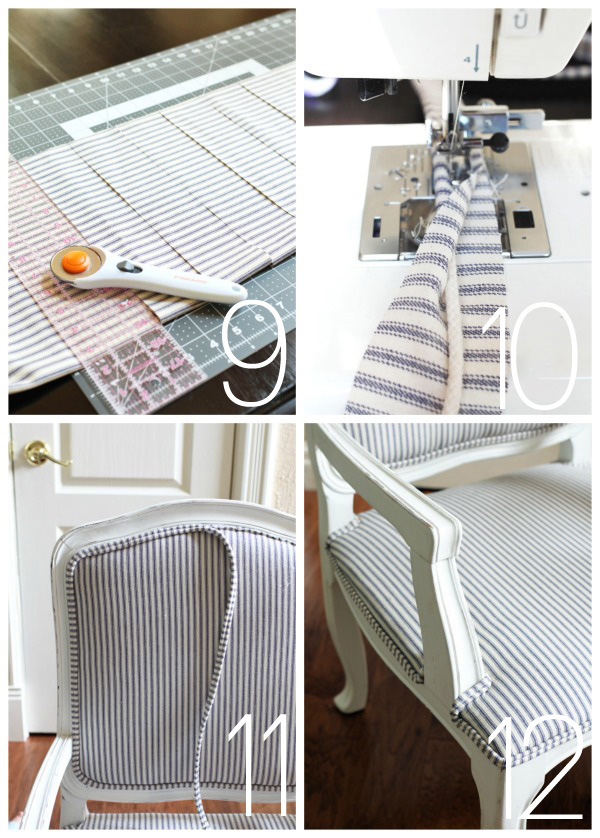
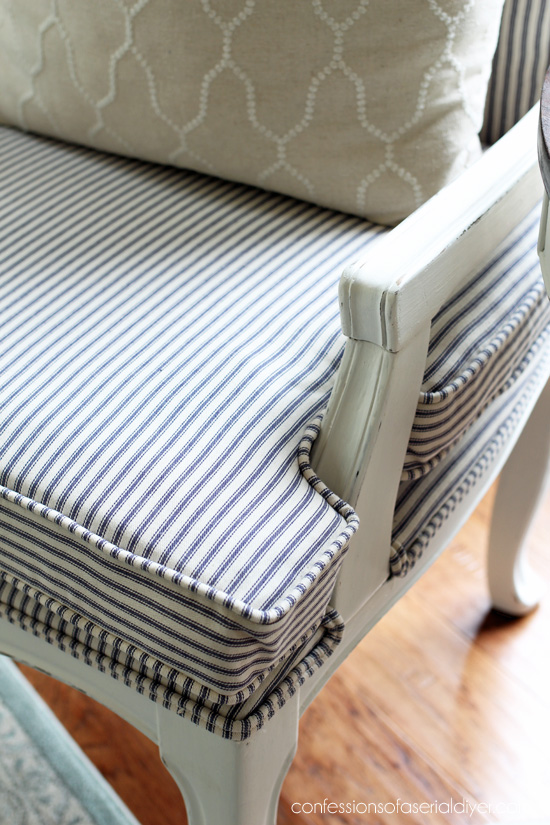
9. To cut the fabric for my double welt trim, I used my rotary cutter, straight edge and cutting mat. (I have this set HERE)
10. I sewed double welt piping as seen in THIS step by step tutorial. Seriously, if you can sew a straight line, you can do this!
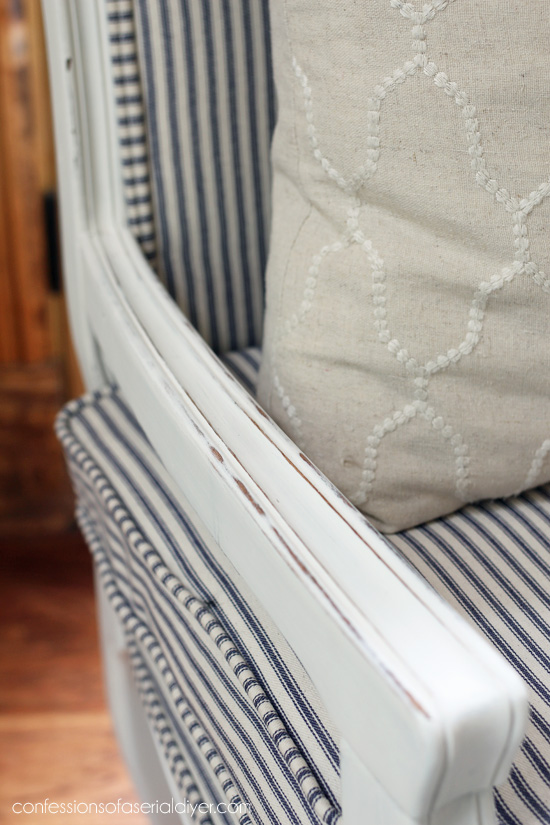
11. Then I attached my shiny new double welt trim using hot glue.
12. I added it to the top and the seat to hide all the staples.
Here’s my little helper again. I am usually working outside or in the garage. I think he enjoyed me working inside for a change.

Every time I took a photo, he had to have his photo taken too, and of course I obliged. 🙂
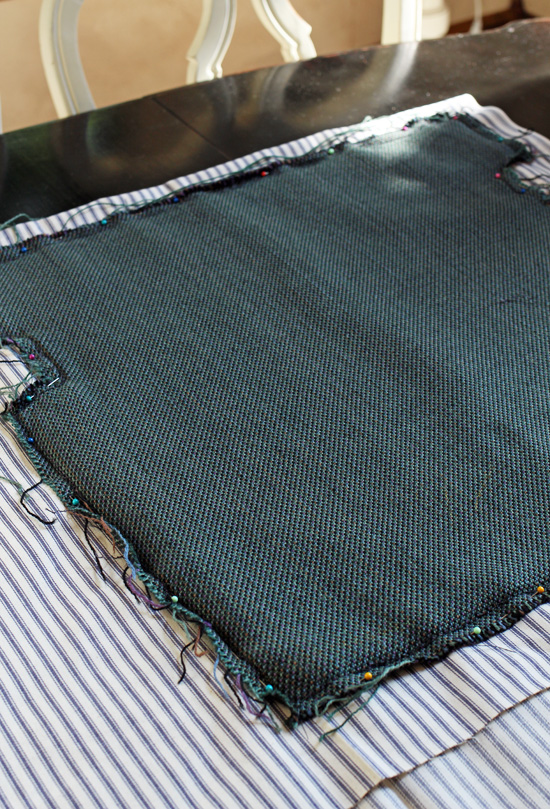
This set also came with a cushion for the seat. I created a new slipcover for it using the old cover as a pattern:
You can read how to make a cover for a cushion in THIS cushion cover tutorial from when I slipcovered my sectional.
Here are all my pieces ready to go:

The first one was a breeze, but the second one required a couple of redos to get it right. That’s the beauty of sewing; if at first it comes out a wonky mess, pick out the seam and try again.
I like the extra layer of comfort the cushion adds.
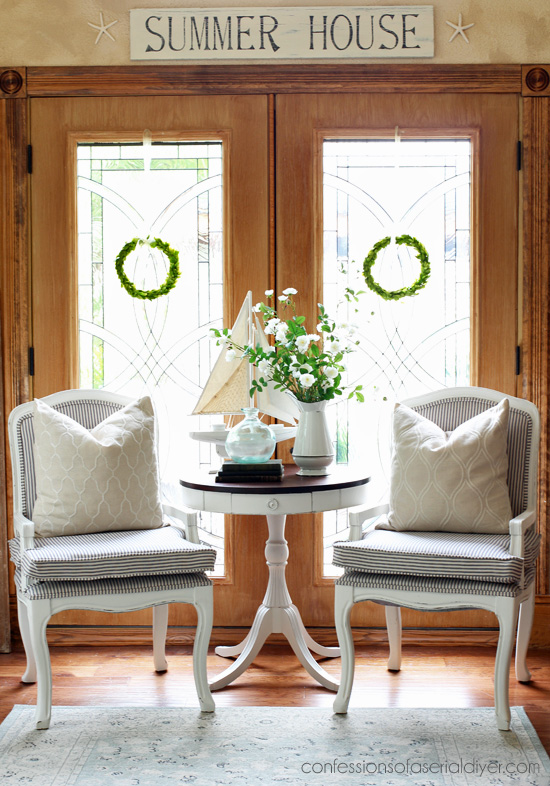
You may remember I shared the makeover of this drum table in January:
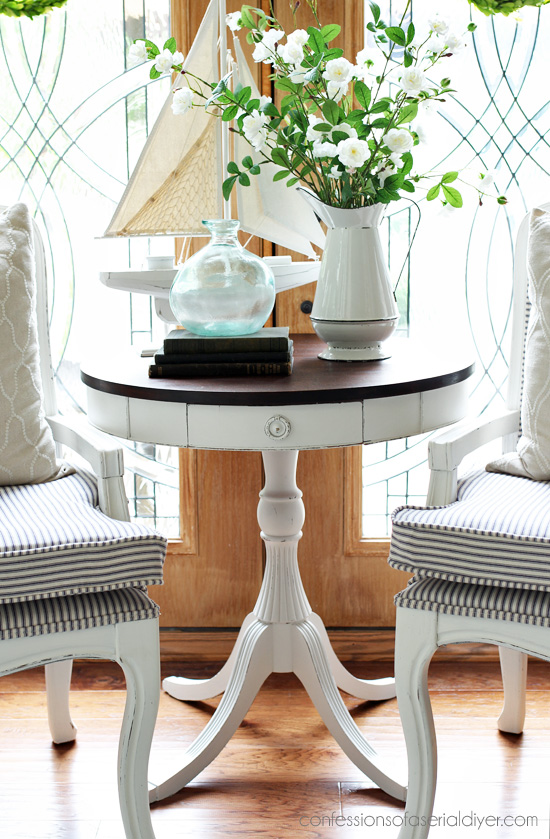
It was very neglected when I found it. See that makeover HERE.
I put it in my shop and then decided to go get it and bring it back home. I love the contrast of the darker stained top with these chairs.
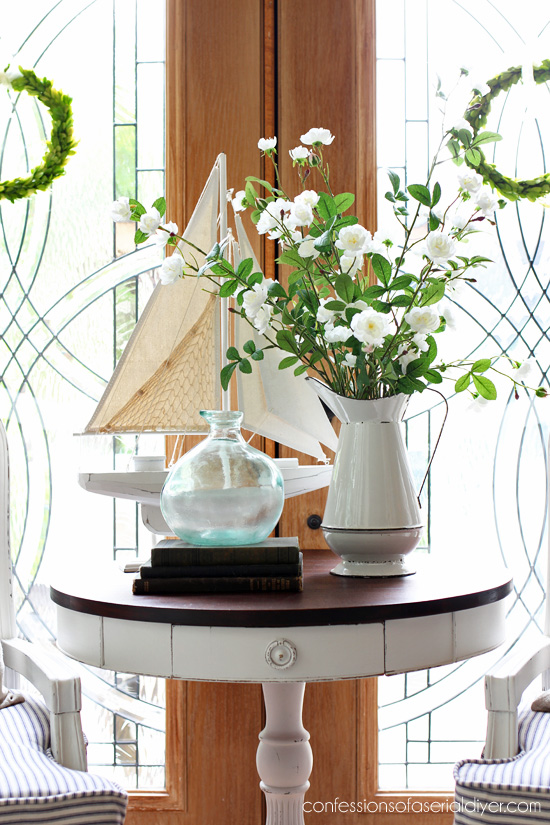
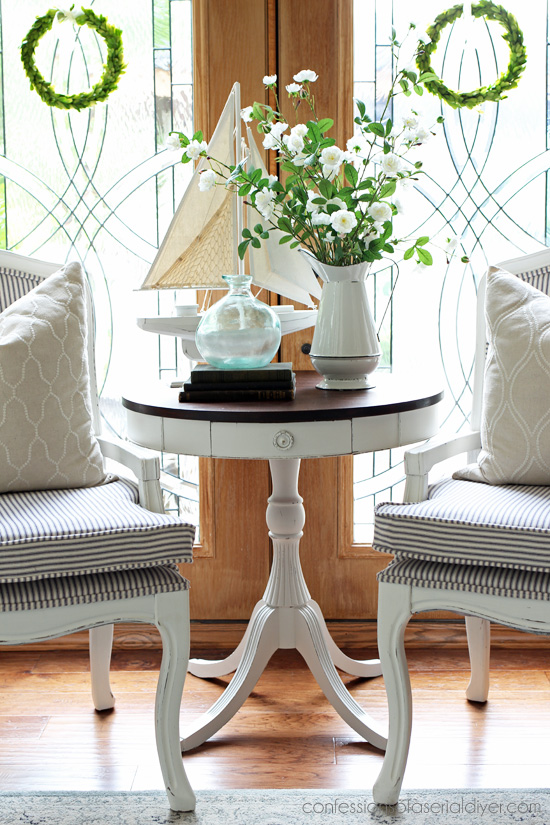
The back is a great opportunity to add another coordinating fabric, but I chose to stick with the ticking to keep it simple:
Guess what I’ll be doing with these? Keeping them!
I just love how they turned out, and they look great flanking my media cabinet in place of the chairs I had there previously.


I’m so excited with how these turned out, and honestly that I was able to save them at all.
Don’t forget my friends are sharing furniture makeovers of their own today!
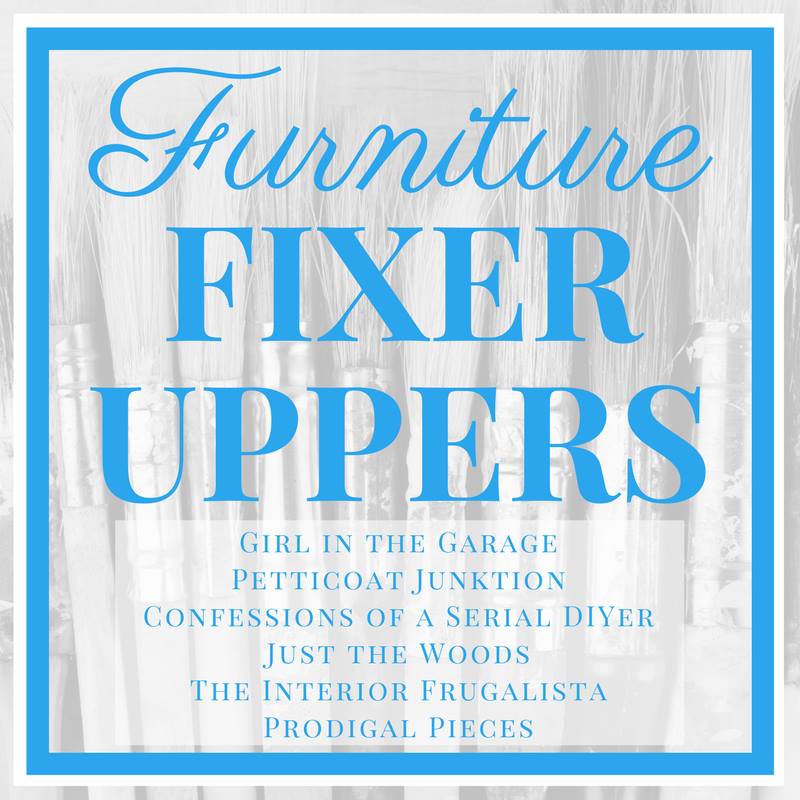
Click the links below the image to see the afters.
Hope you enjoyed this makeover! Here’s another set I redid that you might like:
See how they turned out HERE!
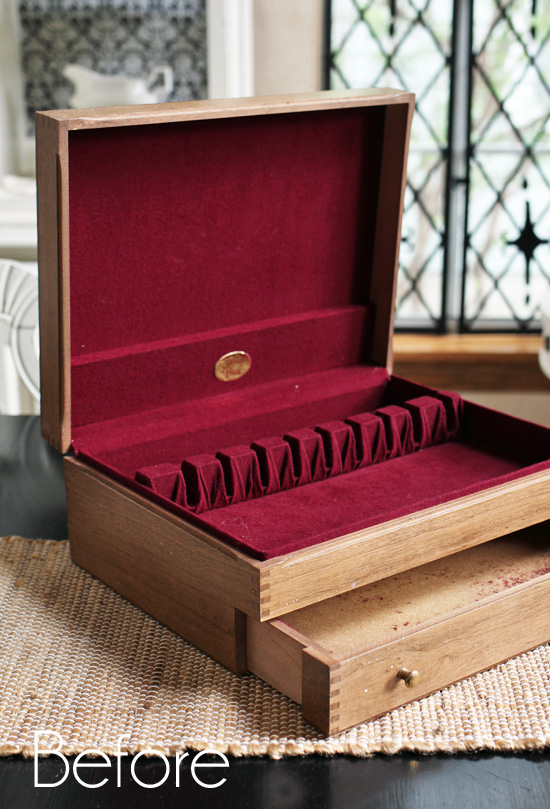
I’ll be back on Tuesday sharing how I updated this flatware box:
It’s going to get HOT here this weekend, but at least no rain! Hope it’s nice where you are! 🙂
UPDATE: Check out what I did to update this boring box HERE now!
XO,
![]()
Don’t Miss a Thing!
If you like what you see, there are several ways to follow along!
Email * Facebook * Pinterest * Twitter * Instagram


Mary Kaiser says
Let me think, one word to describe your transformation, AMAZING !!! You never cease to amaze me!
Christy says
Aww thank you, Mary!! I’m so glad I chose to keep to keep them! XOXO
ELIZABETH says
The chairs are stunning. Very well done!
Christy says
Thank you so much, Elizabeth! XO
Larissa ~ Prodigal Pieces says
When I first saw your before picture my hands started to hurt! Oh, the joy of removing upholstery. I liken it to wrestling a large cat for days! 😀 Your hard work paid off and your pair is stunning! You know I love me some ticking. Beautiful!
Christy says
Oh ha ha! Yes I call it upholstery arthritis! My hands weren’t too bad this time…using that upholstery staple remover really did help, but yeah I think I’d rather wrestle the large cat lol! Thanks, Larissa!! XOXO
Melanie says
What a great post! Loved seeing the processes of all these makeovers. You did an awesome job with the chairs.
Christy says
Thanks so much, Melanie! XO
Janie Hayes says
Beautiful as always, Christy. And again, thank you so much for the detailed instructions!
Christy says
Thank you, Janie! You are so welcome! XO
Debrashoppeno5 says
What a beautiful job. I would love to hire your helper as I have a chair that I started and now I am procrastinating. All the nails, it is that old.
Christy says
Thanks, Debra! He’s for hire lol…will work for Cheetos! I totally get why you are procrastinating on yours, they are a ton of work, and nails are even harder! XOXO
Marcie Lovett says
Magnifique! I was wondering how you could part with these, but I also know you can’t keep everything. Enjoy them!
I have that same flatware chest and I’ve been struggling to find the right finish. Looking forward to seeing it and hoping to get outside and do some painting of my own since the weather turned!
Christy says
Thanks, Marcie!! It’s usually not too hard to send things to the shop since I am so limited on space in my house, but I just could not part with these and I had the perfect spot for them! Enjoy getting outside! XOXO
Barb says
You’ve done a fantastic job of reupholstering your chairs. I love the way they turned out. They look very professional! The table between the chairs is beautiful, also.
Christy says
Thank you so much, Barb, I appreciate that! XO
Christine says
They’re absolutely perfect! Thanks for sharing and inspiring me.
Christy says
Thank you so much, Christine and you are welcome! I’m glad you are feeling inspired! XO
Suzan Oxenreider says
Really lovely! I have a passion for ticking and love how you used it on the chairs. I have a chair project that is sitting in my bedroom and has been there for 4 years. I am almost inspired to work on it!
Enjoy the dry weather. It will be pretty warm here in SE Pennsylvania but nothing like the heat they are predicting for Tidewater this weekend. Seems like a good time to hit Sandbridge!
Christy says
Thank you, Suzan! I know how you feel about your chairs, upholstery projects aren’t my favorite either! And yes, it will be a perfect weekend here to hit up the beach!! XOXO
Becky says
Ooooooh, these are beautiful! I love everything about them! I’m so glad you get to keep them too! : ) You have the best tutorials. I look at this, and I’m ready to leap up and grab my so-so chair and re-refinish it! You make it look so simple! (NOT easy, just simple!) Fantastic job! Fantastic helper too. Nothing like a little company when you’re yanking staples and shooting them back in. : )
Christy says
Thank you, Becky! You could totally do this!! It is really a pain to remove all those staples, but not too bad to put back together at all! XOXO
Jenna says
Wow Kristie, great job! Bravo!!
Christy says
Thank you, Jenna!! XO
Josie says
Your blog is one of my top favs. I get so excieted when I open up my e-mail and see that you have a newly completed project. I think to myself, I wonder what she’s created this time!! 🙂 The chairs are beautifully done. Bravo!!!!
Christy says
Aww thank you, Josie!! You just made my day!! XOXO
Eileen says
Lovely job! So impressed.
Christy says
Thank you, Eileen!! XO
Janice says
What a great job turning these chairs into beauties. I’ve always loved ticking fabric. You never disappoint your followers.
Christy says
Thank you so much, Janice! I’m a sucker for ticking as well! 🙂 XOXO
Carol S says
Great job, Christy! I have 2 chairs with peeling “pleather” on them. Not old, but they have lots of great detail. Can’t wait to get them going with paint and new fabric. Always appreciate extra instruction on reupholstering since I do not have much experience in that area. Thanks for the details. Any luck on finding more of that fabulous French postal fabric you have used in many of your projects? I have a some left to use on my chairs, but that probably will be the end of my stash. I miss Hancock’s.
Christy says
Thank you, Carol! Upholstery is hard work, but not too difficult at all. I have not found our beloved fabric, but I did learn that Michaels has bought out Hancock Fabrics! It looks like they will just be selling online, but I would love to be able to buy that fabric again! XOXO
Marie|The Interior Frugalista says
You do such beautiful upholstery work, Christy. These chairs are stunning! Don’t blame you for wanting to keep them, especially after two days of hard labor removing all those stables!
Christy says
Aww thank you, Marie! Your upholstery projects always amaze me! XO
Patty says
Oh my goodness – I LOVE those chairs! I’m terrified of doing upholstery, your chairs couldn’t possibly be any prettier – wish I lived nearby! And such a handsome helper – had to make the job easier 🙂
Christy says
Thank you, Patty, I’m so glad you like them! I just could not let them go ha ha. And yes, love having my little helper close by! 🙂
Maria says
Love them – and so impressed that all of the stripes line up! Question – as you worked around where the arms meet the chair base – did you staple that as well or fold it under and cover with the welting?
Christy says
Thank you, Maria! I just folded the fabric under around where the arms meet the seat, and then covered it with the welting. 🙂
Kathy Owen says
FANTASTIC! I would never have the patience to try this. Sewing the piping alone would kill me. I simply adore the chairs. The fabric is perfect.
Christy says
Thank you so much, Kathy! You could totally do this!! And I never heard of piping killing anyone haha! You sound like Nancy lol…she is the queen of no-sew! 🙂 XO
Jen @ Girl in the Garage says
Girl I swear we must have the same stash of furniture… I also have a pair of chairs like this (no separate cushions though) that I’ve been dreading for years! I’m going to attempt them within the next couple months though, I gotta get through my overflowing garage! Seriously you did an amazing job with these. The ticking fabric was a little unexpected (it’s not French script LOL) and I’m glad you’re keeping them! They’re like a trophy after all that hard work. xo
Christy says
Thanks, Jen! I too have SO dreaded tackling these chairs! I finally told myself that I would just take the old upholstery off and then take a break, no pressure to keep going…knowing full well that I would keep going ha ha! I seriously have like three furniture pieces left in my garage and that is it! I am trying not to be such a hoarder but it is hard. I want to buy, redo, buy, redo, instead of buy buy buy buy buy, redo lol. And yes I felt the same way…these are like a reward for all my efforts. 🙂 So excited I had the perfect spot for them! XOXO
Janice says
Beautiful job on the upholstery, very professional. Glad you are keeping them!
Christy says
Thank you, Janice, I appreciate that! I’m so happy to be keeping them too! 🙂
Annie (Canada) says
Awesome job Christy! They look amazing. You’re just so talented 🙂
Christy says
Thank you, Annie, you are so sweet!! So glad you like how they turned out! XOXO
Suzanne says
Christy, You did a beautiful job on those chairs. I can see why you want to keep them. I am in awe! Also, you have a great model/helper. Suzanne
Christy says
Thank you, Suzanne! I’m so glad I had a spot for them. And yes, I am very lucky to have that little guy to keep me entertained! 🙂
Rose Lefebvre says
Boy, I sure wish you lived by me!!!! I love how you definitely improved these chairs!!
Christy says
Thank you, Rose! I’m so thrilled to be keeping them! XOXO
Constance Colvin says
Christy! You are the Beethoven of DIY! Not simply skilled but GIFTED! Just awesome! I could practice all day long and still never create and play the way you do! Please give us March Madness again! 😀
Christy says
Oh wow, Constance, thank you! I really appreciate that!! I’m hoping to bring MM back next year…I would love to be able to meet ya’ll here every day!! XOXO
Sue Duffy says
“Yes?” Yes! Wow!
Christy says
Thank you, Sue!! XO
Fran says
These are gorgeous! I LOVE the tutorials – the best I’ve seen yet. Thanks so much for sharing your expertise!!
Christy says
Aww thank you, Fran, I appreciate that! Glad to share! 🙂
Sue says
Oh my goodness, Christy! Those chairs are lovely! You are amazing! I love your blog and all of your renovations are right up my alley! I wish I lived closer! You have so many things I would love to have in my home.
P.S. Love the picture of your cute little guy! He is precious!
Christy says
Thank you, Sue! You are so sweet!! I’m thrilled that you enjoy what I share. And yes, I treasure that little fella! XO
Val Wilkinson says
Love the chairs. Lovely work. Where did you get the sign Summer House. I have been looking all over for it. Any info would be greatly appreciated. Thank you
Christy says
Thank you, Val! I made that sign back in 2014. It was a Pottery Barn knock-Off. They don’t sell it anymore, but I share how I made mine here: https://www.confessionsofaserialdiyer.com/pb-inspired-summer-house-sign/ 🙂
Bonnie says
Those chairs are perfect and they look really good next to your table. I love the material that picked out! Your little boy is so cute 🙂
Christy says
Thank you so much, Bonnie! I love the ticking fabric as well, and thanks…I think I’ll keep that little cutie pie too! XO
Nancy @ Artsy Chicks Rule says
They look amazing Christy! You always do such a great job with upholstery! And who keeps stash that long?!!! Hahaha 😉 (me!) Love your little cutie model too. xo
Christy says
Aww thanks, Girl! I have been dreading tackling these chairs for so long!!! Would you believe I only have three pieces of furniture left in my garage? Yay!! Brennan wanted me to take pics of him every time I took a pic of my chairs. Then he wanted to see them in my camera lol. XOXO
Julie Briones says
These are BEAUTIFUL, Christy. I don’t blame you for keeping them! Love the fabric you chose, too! What will you do with the other chairs you replaced?
Christy says
Thank you, Julie! I’m so glad a had a spot for them. I washed the slipcovers on the others and took them to my booth yesterday. XOXO
PrettyPotato says
These are amazing! What a transformation, I love them <3
Christy says
Thank you so much!! XO
Paula says
Your chairs look great and I’m so glad that you are keeping them!
Christy says
Thank you, Paula! I think that even if I didn’t have the perfect spot for them, I would have found one! XOXO
Karen Marie Kedzuch says
Christy,
You really knocked this upholstery project out of the park. I am thrilled you are keeping these stunning chairs and your table. Honestly they look like they were made for your home. Upholstery can be a breeze or a bear. Matching all the stripes in the ticking is not an easy task. Congrats on an awesome project.
Karen Marie
Christy says
Thanks so much, Karen Marie! I am so thrilled I get to keep them as well! XO
Christina in FL says
Oh Christy, I have no idea how I missed this!!! Beautiful!! I adore ticking and you got such a great deal. 🙂 The upholstery staple remover looks amazing. Did you use a standard hand squeeze type staple gun? I have a hard time getting staples all the way in on projects then have to hammer them in the rest of the way. How did you deal with putting in the staples? Teach me oh wise one!
Okay, now I am going to go look at your post about the flatware box. 🙂
Create on!!! PS… love the color!!
Christy says
Thank you, Christina! I am so thrilled with how they came out…especially since they’ve been sitting in my garage for so long! I use a light duty stapler and light duty Staples. I have found that they are every bit as sturdy since you are using so many of them, and it is much easier for me to get the staples in all the way pretty easily. ????
Christina in FL says
Wow, great info! I have a heavy duty stapler so that is my …er… challenge! It is even hard to squeeze the handle. Good to know I can use a light duty (everything) and still get great results. 🙂
Create on!! :)))
Christy says
Yeah, girl! The light duty is much easier to handle too. 🙂
Kerryanne - Shabby Art Boutique says
I’m so glad you decided to keep these gorgeous chairs for yourself Christy. You’ve done and amazing job on transforming them and I know it must have been a big job removing all the old upholstery. Well done on another fabulous furniture make-over.
Pinned!!
Hugs,
Kerryanne
Christy says
I am thrilled that I was able to keep them too! Thanks, Kerryanne! XOXO
Lesley says
As all your makeovers, the chairs are stunning. Keep up the good work. I really appreciate your blog. One of the very view I subscribe to.
Christy says
Thanks! I appreciate you following along with my crazy makeovers! XO