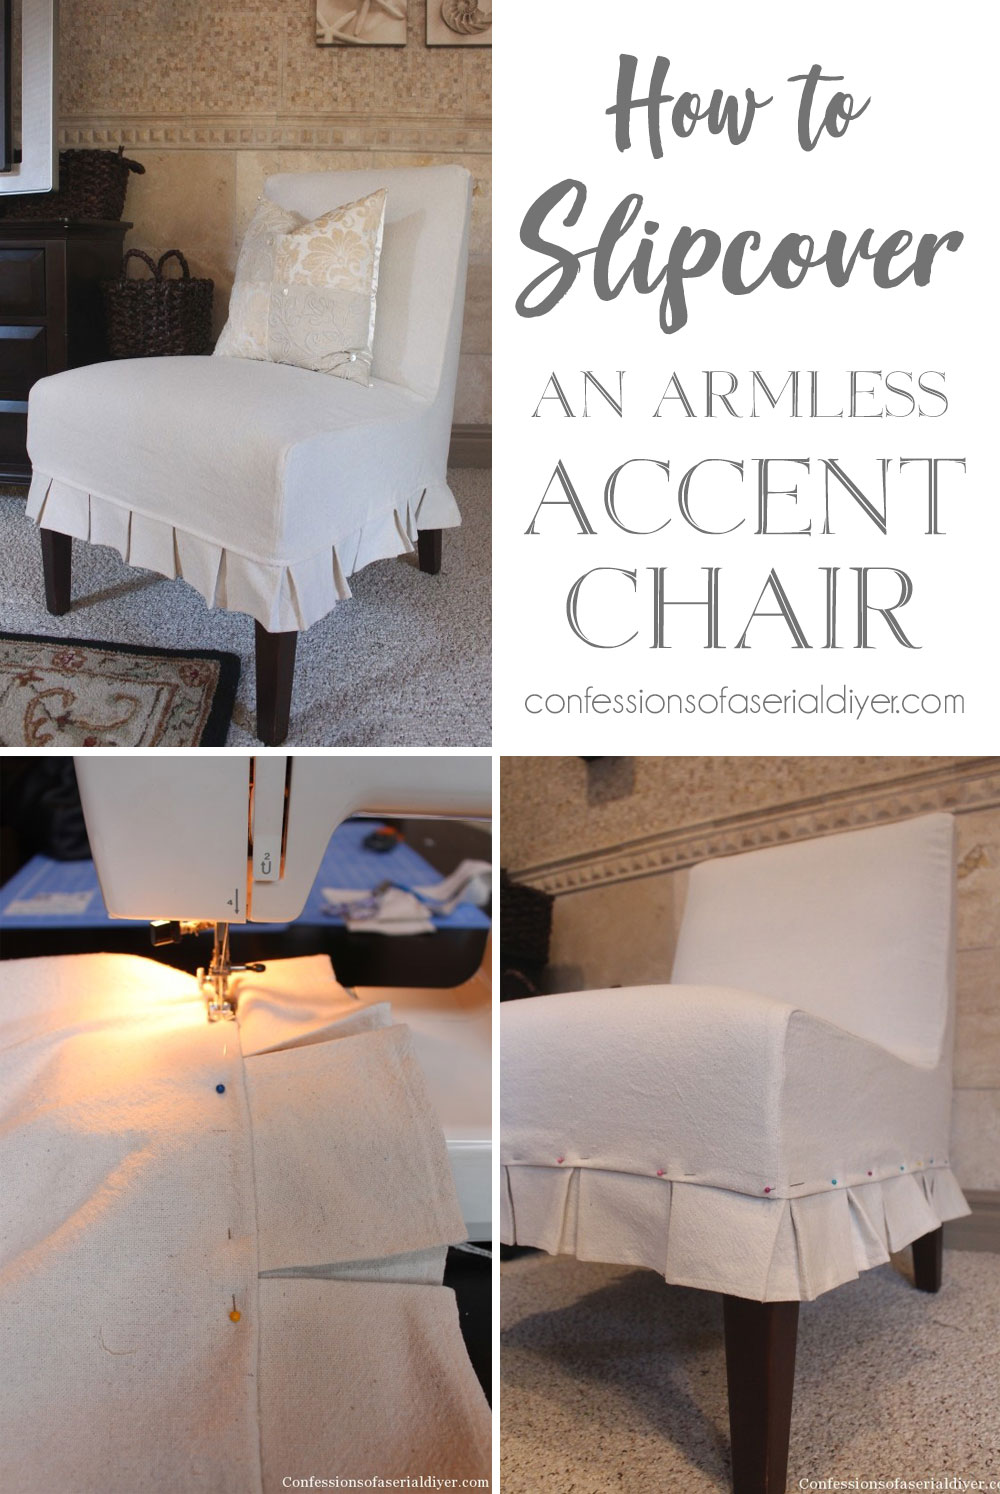
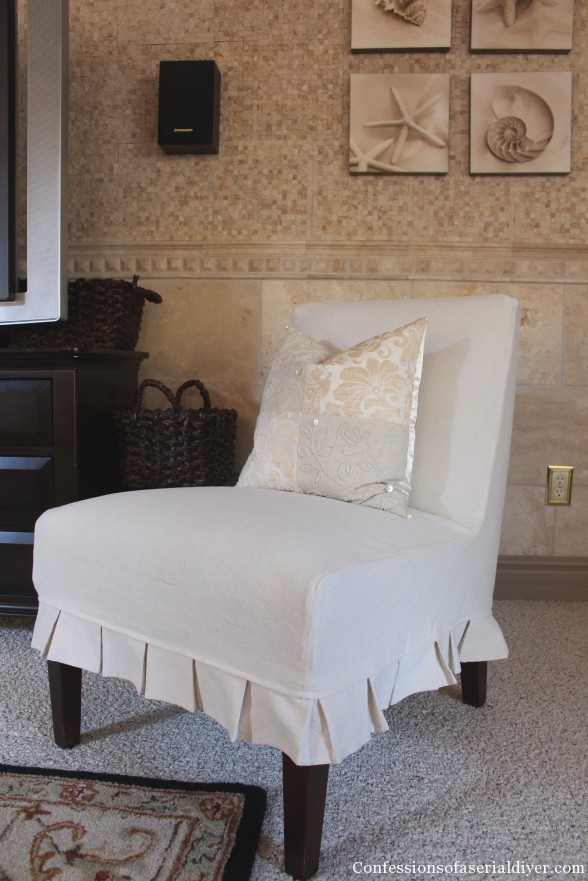
A couple of years ago, my Mother-in-law gave me two beautiful accent chairs in the most perfect shade of blue. I loved them immediately. It didn’t hurt that they looked brand new and were free!
Take a look:

These days I’m looking to lighten up my living room a bit. We don’t get a ton of natural light in there, so I’m starting with these chairs. (Shh…don’t tell him, but that cabinet is also on my hit list.)
The easiest way to give them a new look was to slipcover them:

A little less business…more casual. Also much more cheeto fingers-proof since I can just throw them in the wash!
In just an afternoon, I have a whole new look and it wasn’t too difficult to do. To save on cost I used a drop cloth, which I bleached using Miss Mustard Seed’s method. I purchased a 12 x 15, but only used half for both of these chairs. That worked out perfectly since I only bleached half of it anyway!
Let’s make a slipcover!
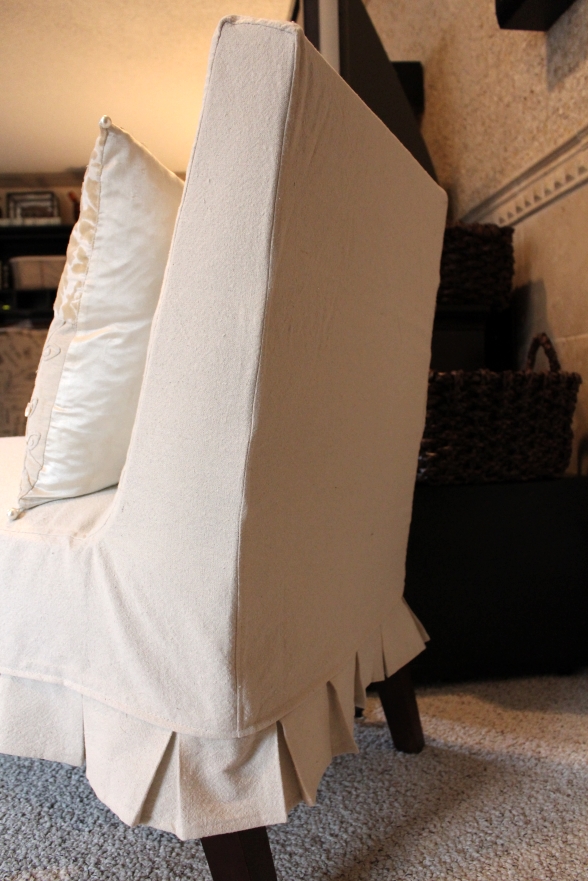
To cover this particular chair, I decided to follow the chair’s original seam lines, so this cover consists of one piece down the center front to back, and two side panels.
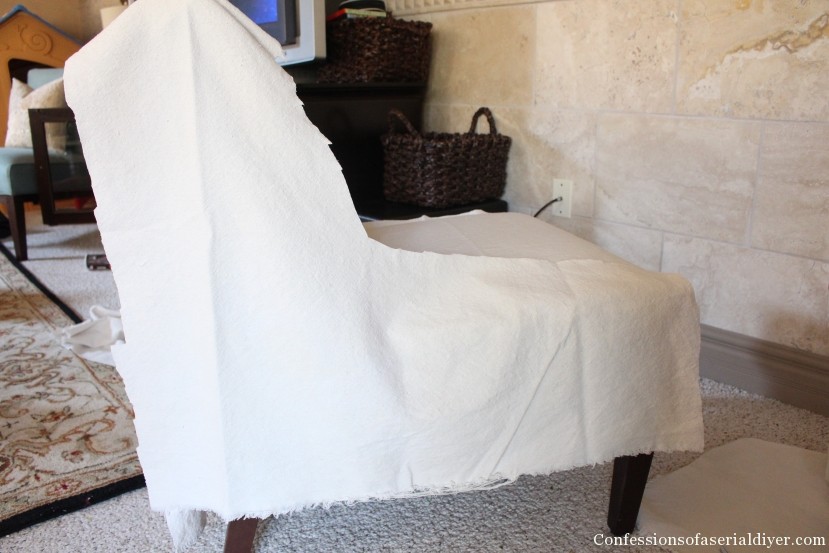
To start, I draped my fabric over the chair, being sure to cover from the bottom front all the way down the back of the chair:
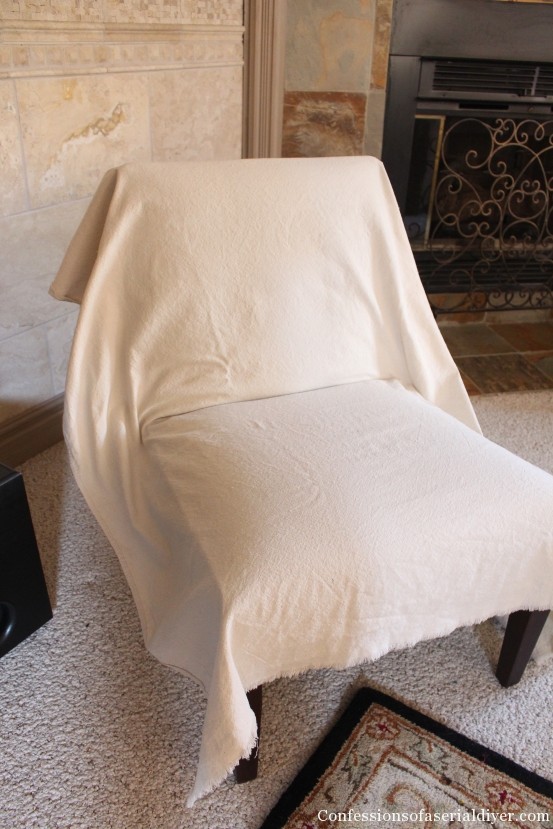
Then I trimmed within 1-2 inches of where the seam would be:
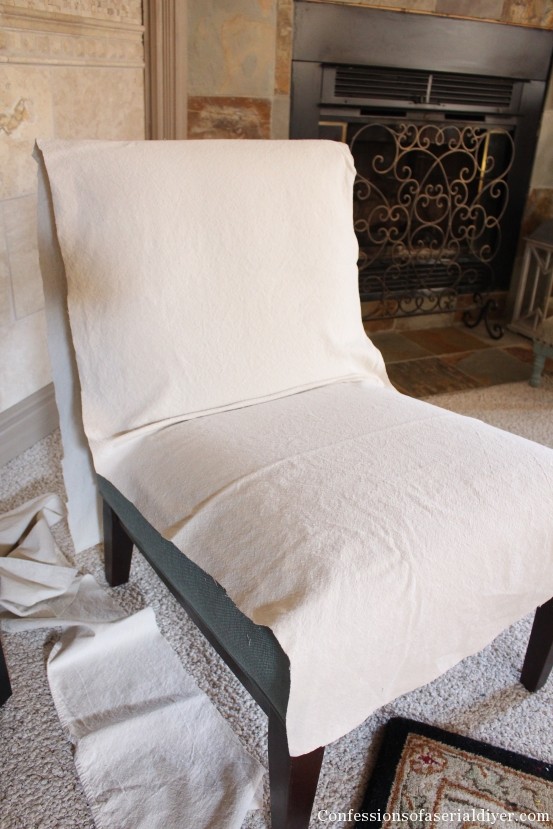
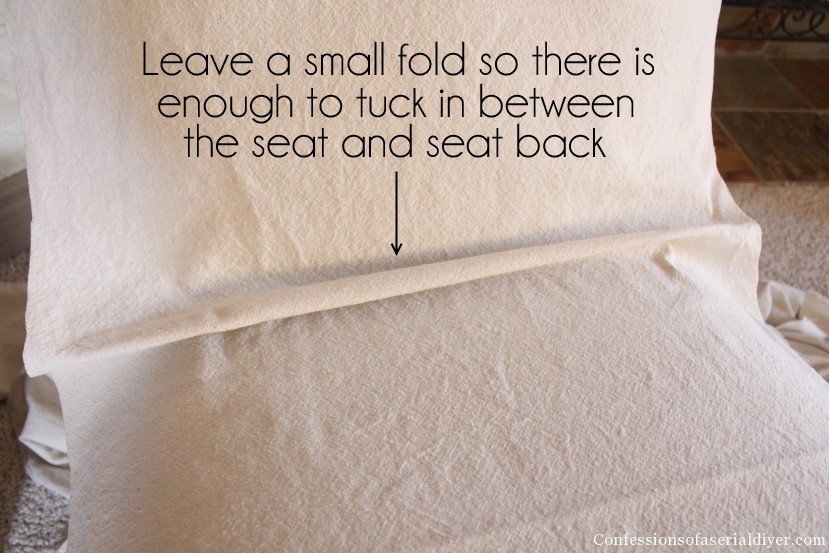
Notice I kept a small fold of fabric between the seat back and seat bottom, so that I would have something to tuck into that crevice to keep the cover neat.
Then I draped my side fabric also. I ended up pinning it in place with a couple of straight pins to anchor it while I pinned it to the center panel.
I pinned away, then trimmed off any extra when I was finished pinning.
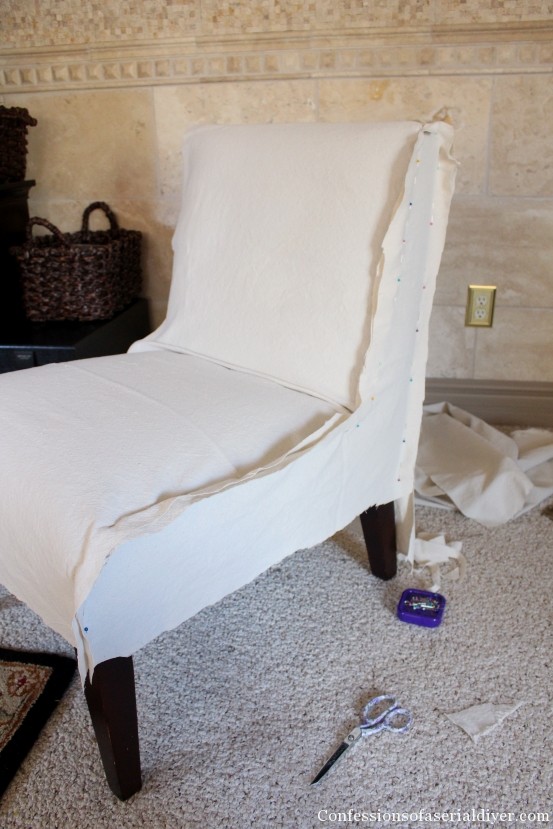
I butted my pins right next to one another around the turns to get a snug fit.
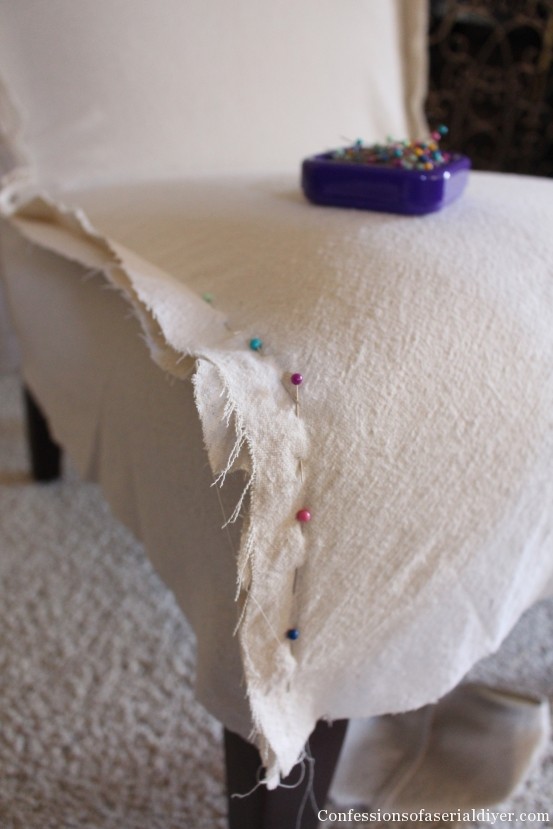
Next I sewed my seams, removed my pins, and did a test fit.
It’s okay to make a mistake!
Here you can make any necessary adjustments. I tested them right-side-out, looking for any weird puckers and had a couple of spots I wasn’t thrilled with. I turned them inside-out again and put them back on, undid the seam in a couple of places and repined. After sewing, they were much better on the second test fit.
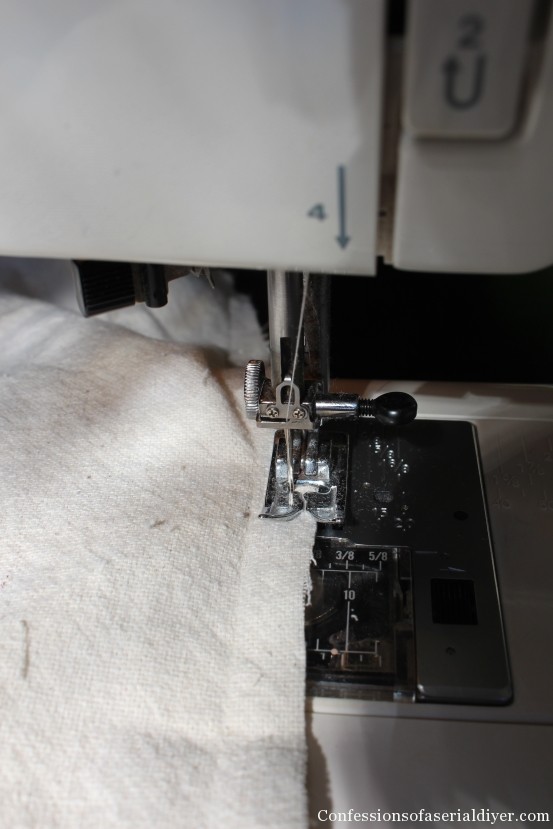
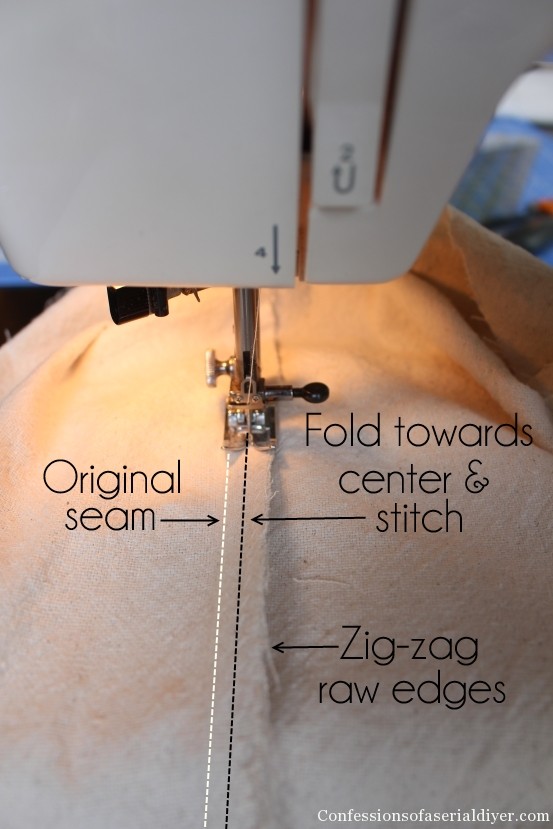
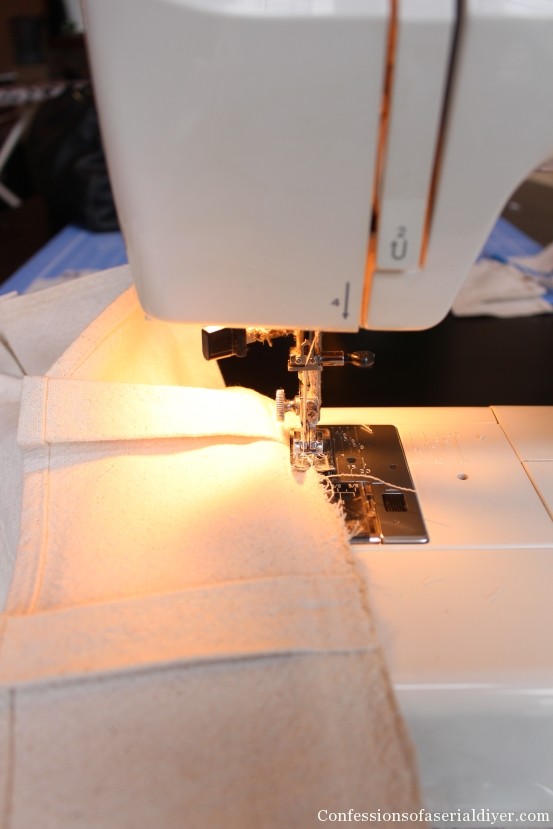
When I was happy with my fitting, I trimmed the excess fabric at the seams to around a quarter of an inch. Then I sealed my seams by running a zig-zag stitch on the widest setting, all the way around. If you skip this step, you will have unraveling at the seams when you wash them. (I may or may not have learned this lesson the hard way.)
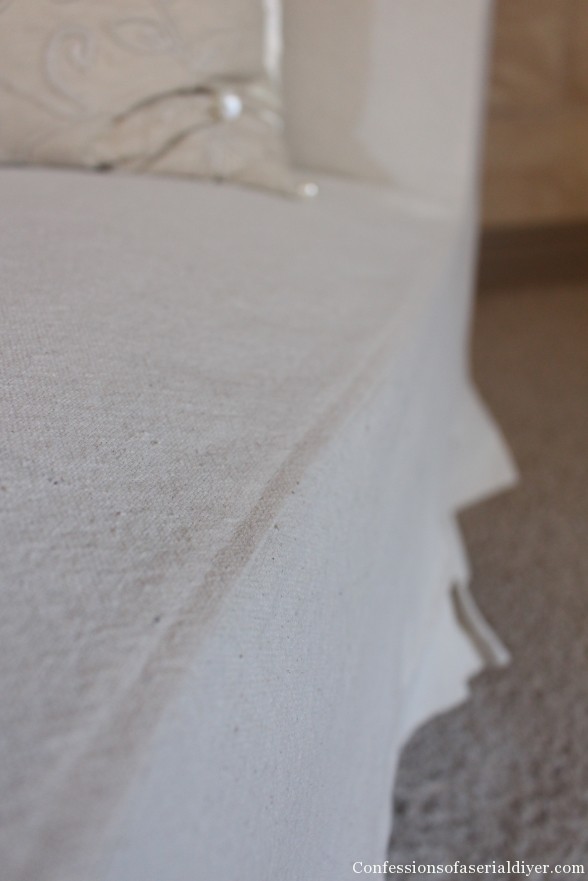
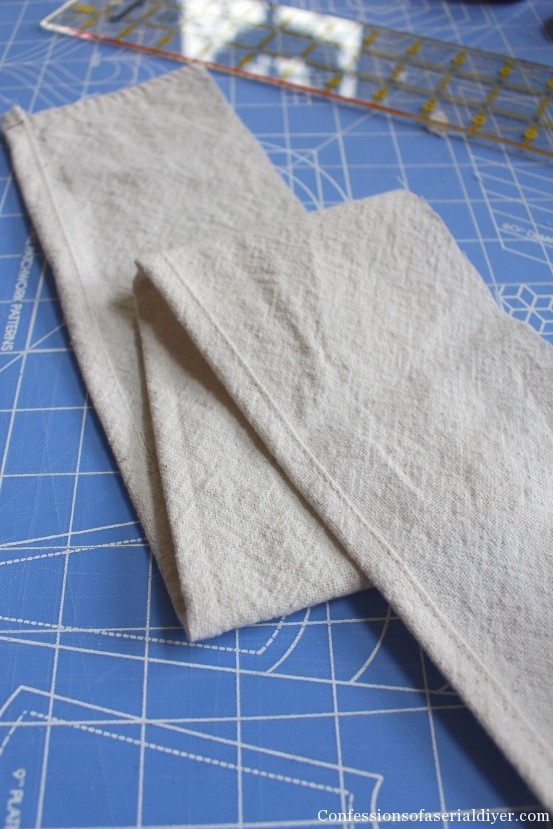
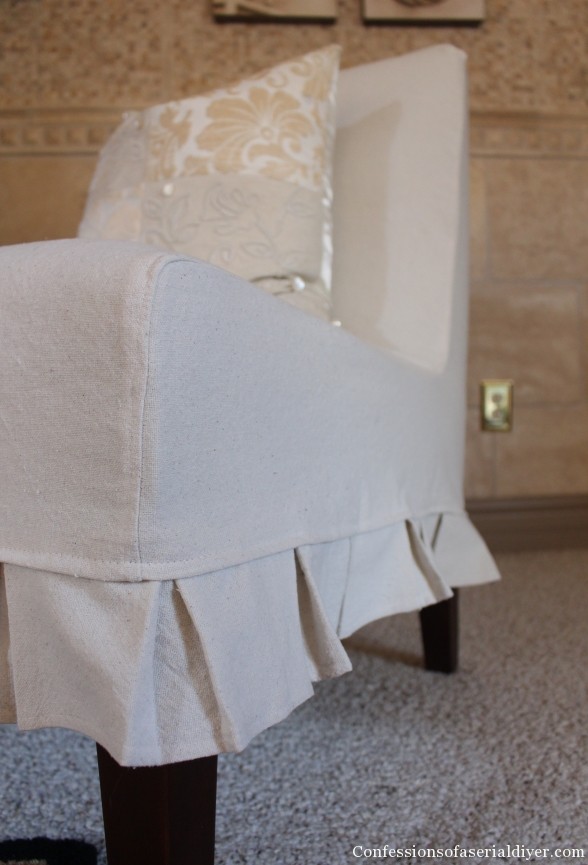
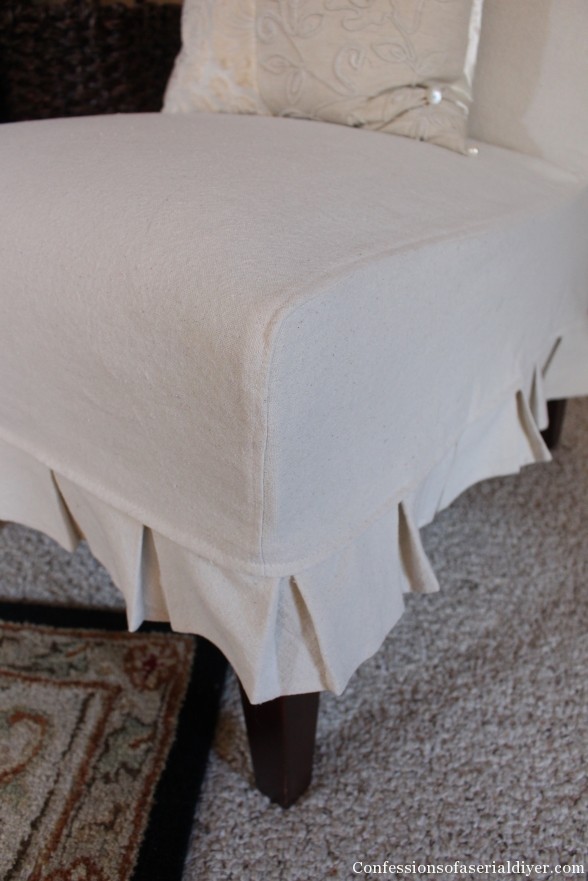
I opted not to add piping since I was going for a more casual feel, but I did give them a double stitched seam, which you can see in detail here:
Making the Skirting
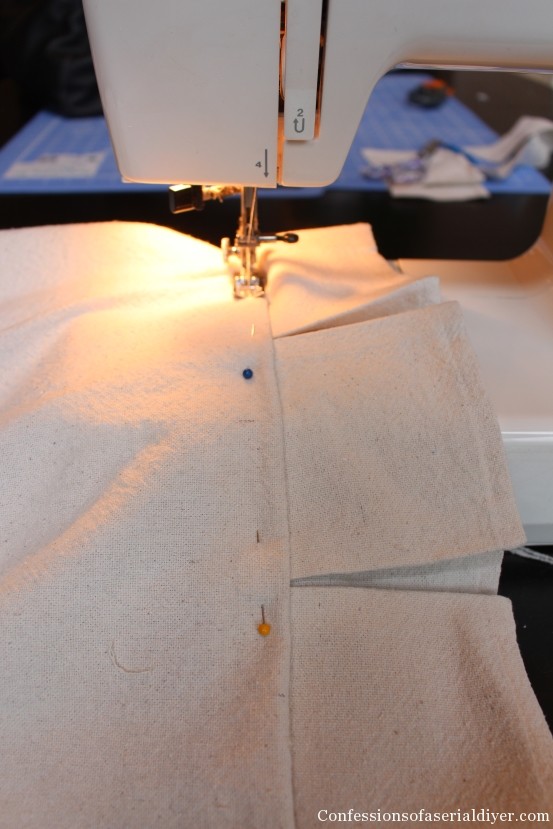
To make the skirting, I cut my fabric into 5″strips.
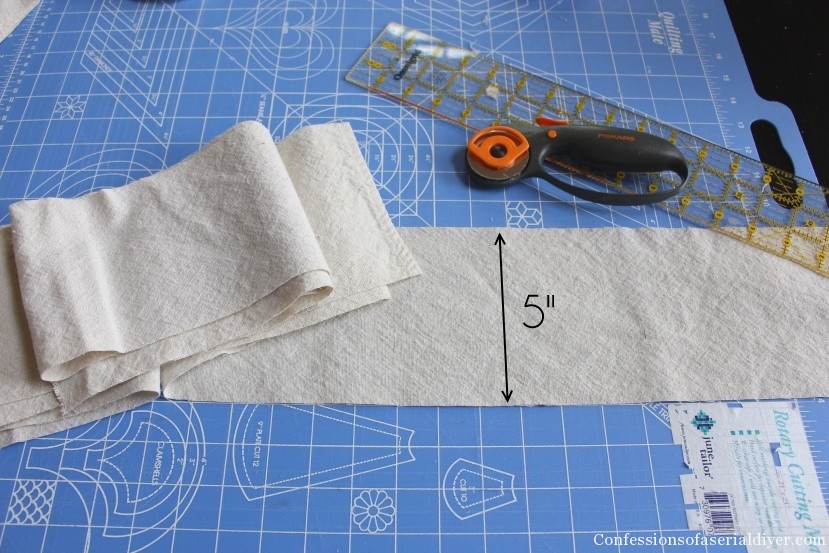
For the skirting, I used almost twice the circumference of the chair. This required me to sew a couple of strips together lengthwise to get the length I needed.
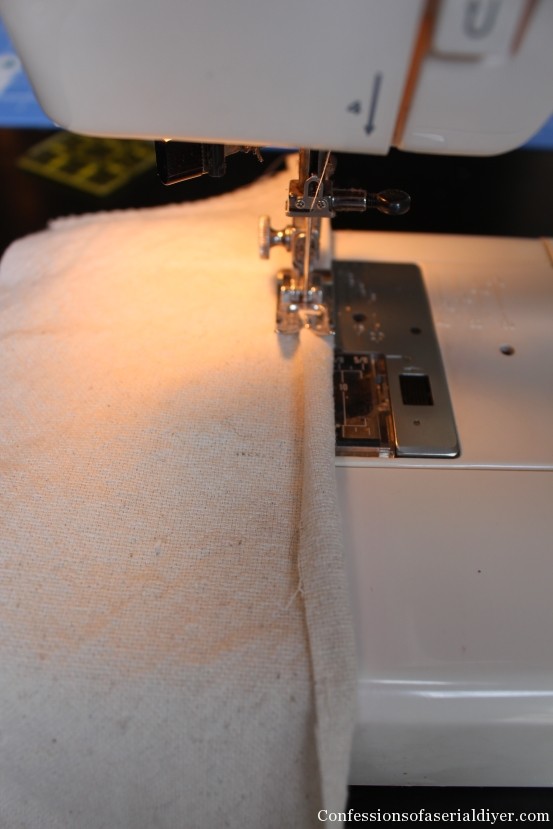
I sewed the bottom hem by folding it very slightly, then folding it again to get a nice clean seam:
Next I made my gathers 4″ apart, pinning each fold in place.
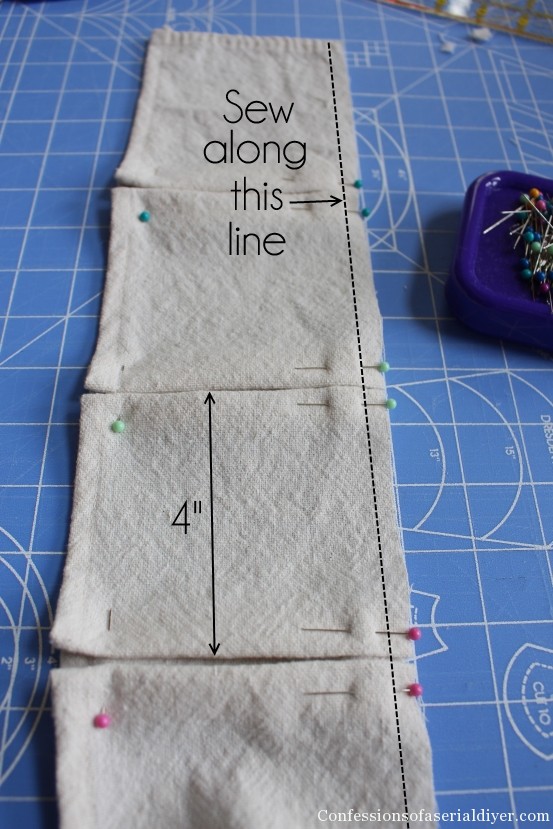
Then I sewed as indicated and gave it a good ironing to set the folds:

Attaching the Skirting
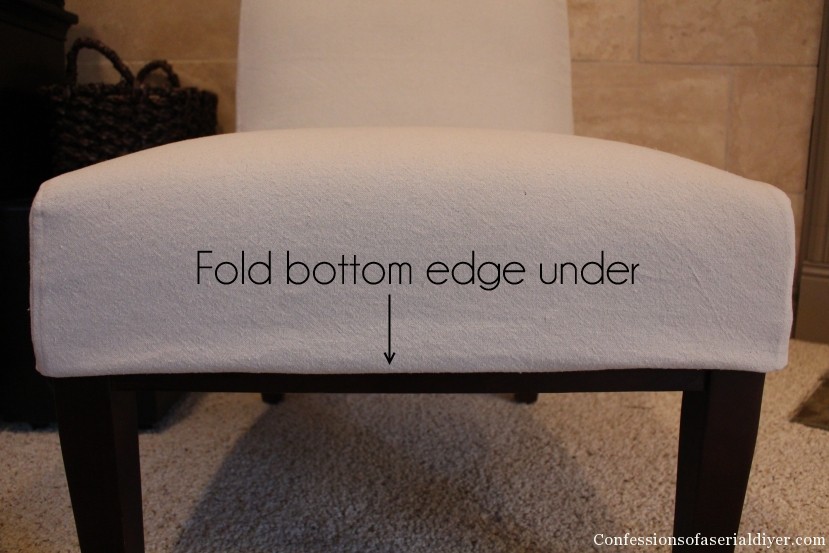
To attach the skirting, I started by folding the bottom raw edge of my slipcover under. (You may need to pin it under first if your slipcover comes past the bottom edge of the seat.)
Next I pinned the skirting behind like so:
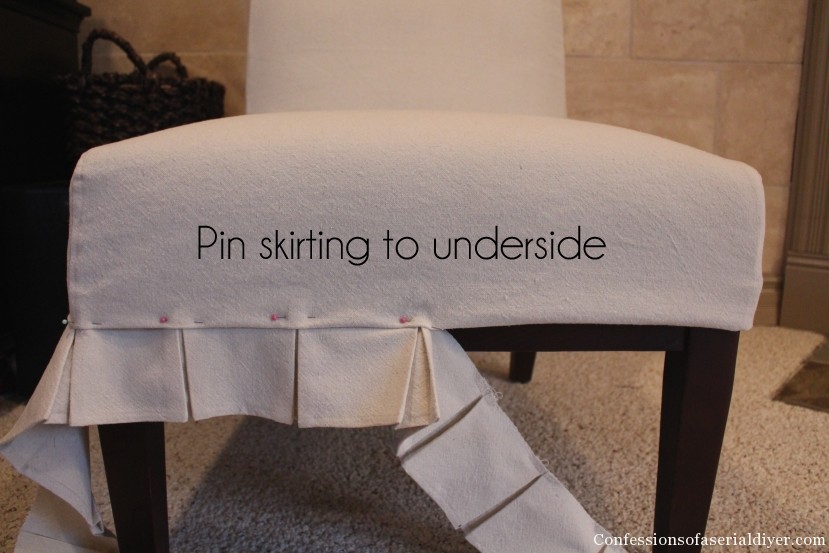
I like to add it this way because I can see the finished product as I go and make adjustments as needed before I reach my sewing machine.
I continued to pint it all the way around.
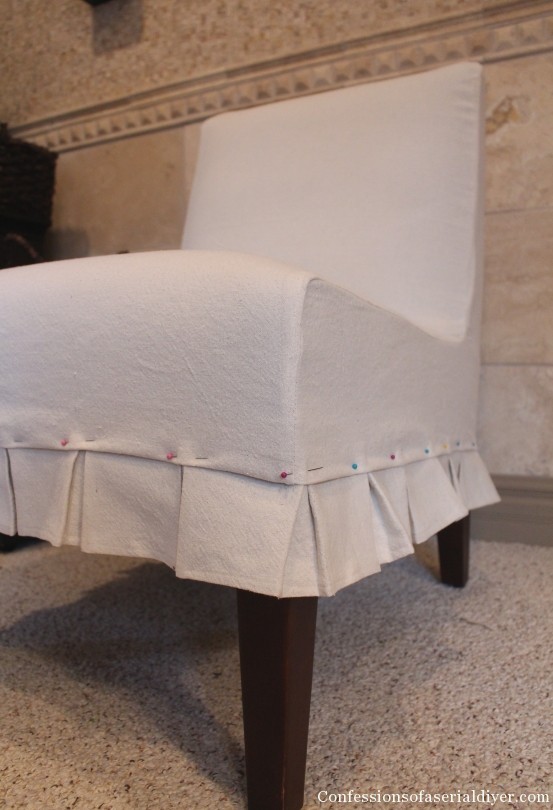
Then I sewed it in place. Again , I’m about a quarter of an inch from the edge.
Pretty!
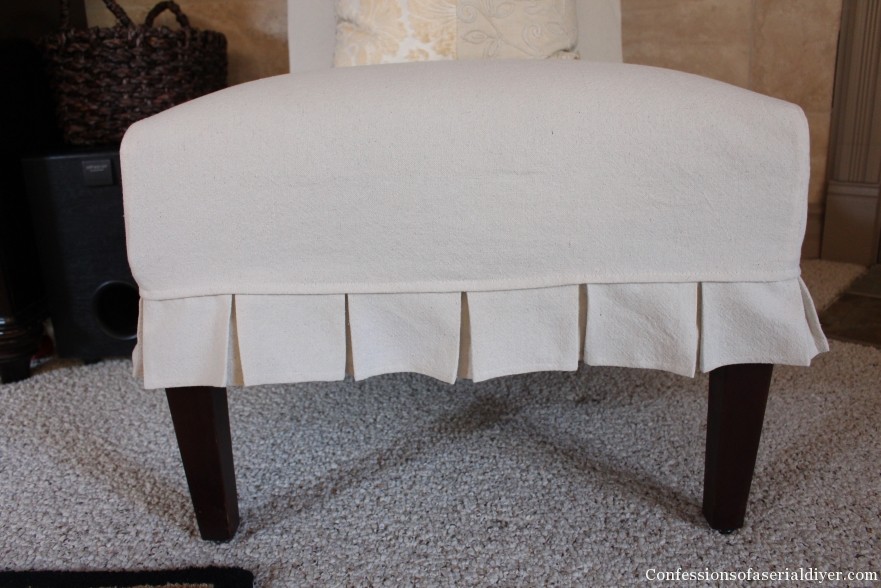
Don’t forget to seal the raw edges of this seam too:
I’m really pleased with the new look and feel of these chairs.
Before…
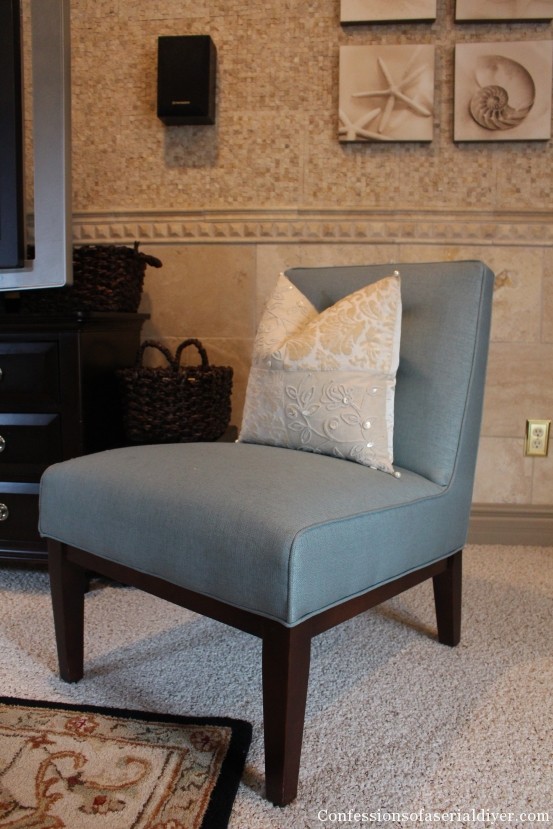
With a new fresh look:
I can always remove the covers later if I want to show the blue again, but for now they are making my room feel lighter already!
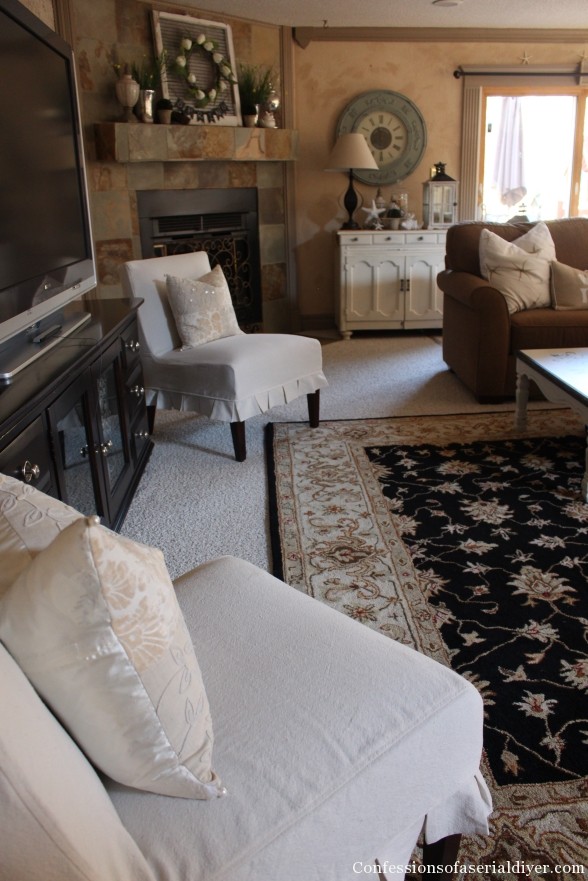
This simple update only cost around $8 per chair. You just can’t beat that!
Here’s another simple slipcover for a sofa that you might like:
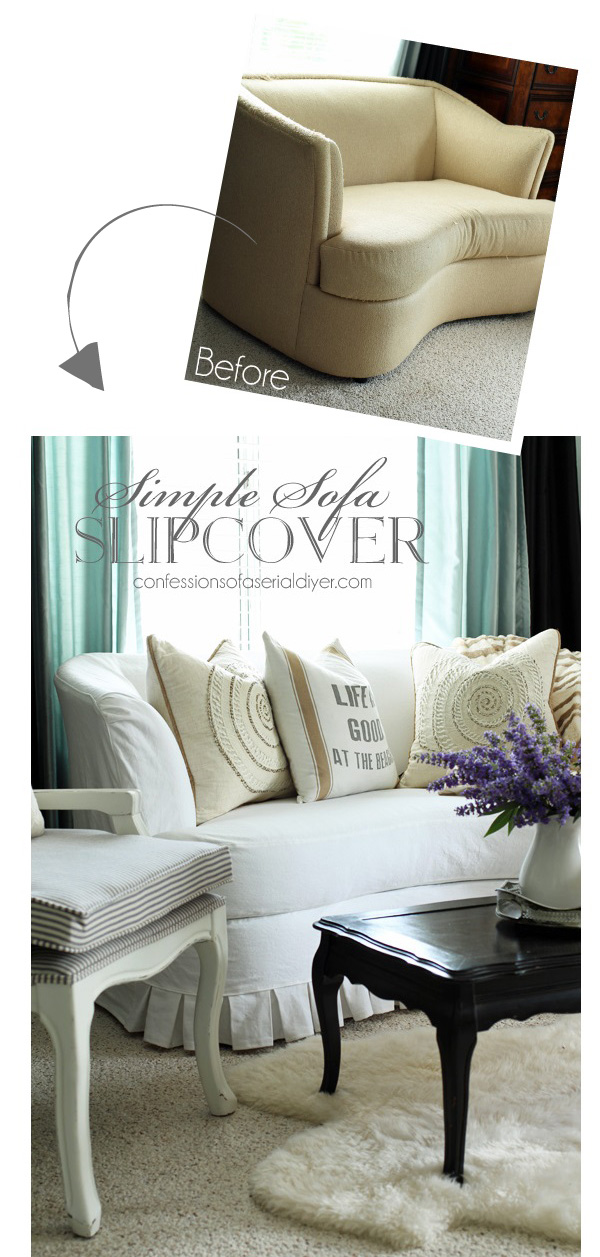
See more of this tutorial HERE!
And a bit more advanced version is this sectional slipcover:
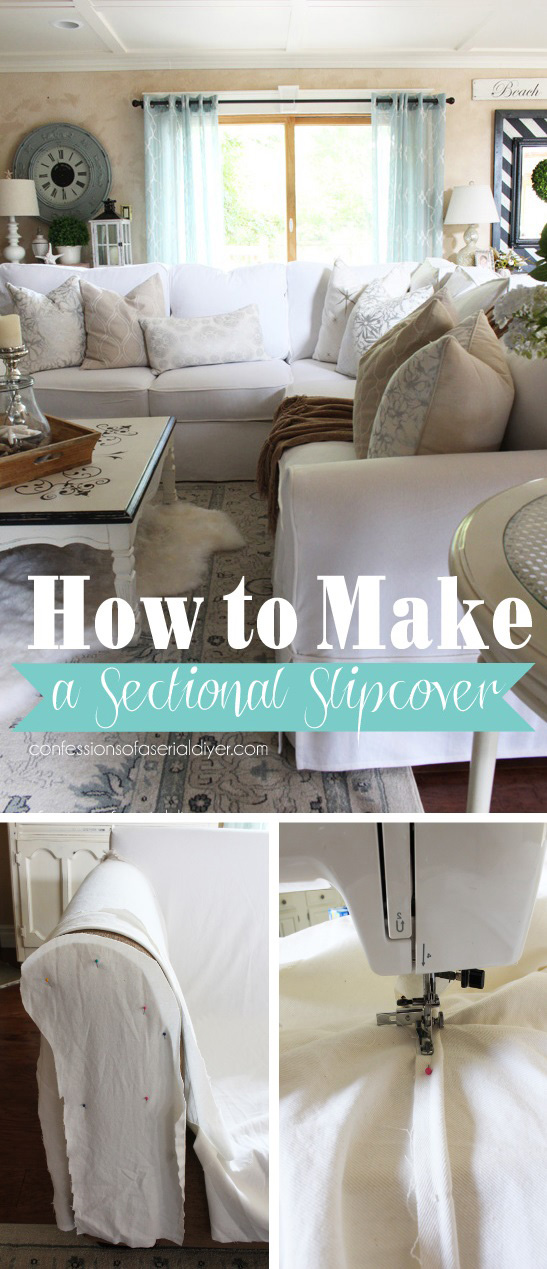
That REALLY lightened up our living room! See that tutorial HERE!
XOXO,
![]()
Don’t Miss a Thing!
If you like what you see, there are several ways to follow along!
EMAIL * INSTAGRAM * FACEBOOK * PINTEREST * TWITTER


Lauren @ The Thinking Closet says
Oh my goodness, could that ruffle around the bottom be any cuter? You and your furniture transformations never cease to amaze me. Kapow! (Christy does it again.)
Christy K. James says
Thanks so much, Lauren! Hope you have a fabulous weekend! XO
Ashley @ 3 Little Greenwoods says
Wow! I should be so proud of yourself! The slipcovers look great! I am not a sewer but your step by step tutorial looked fairly easy to follow.
I would love for you to share this project at my Show-Licious Craft and Recipe Party. Join us on Saturday mornings at 8:00 am EST!
~ Ashley
Christy K. James says
Thanks, Ashley! Just linked up 🙂
Ashley @ 3 Little Greenwoods says
So excited that you shared your DIY Slipcovered Chair with us! Pinning!
Thank you so much for sharing your creativity with us at Show-Licious Craft & Recipe Party! Please join us again next Saturday morning at 8:00 am EST.
~ Ashley
Paula@SweetPea says
Awesome job! Slipcovers are so intimidating and your step-by-step directions make it seem totally doable! The lighter look definitely brightens the room. This teacher gives you an A+ on this project! 🙂
Christy K. James says
Thanks, Paula! SO glad you stopped by for a visit this morning. Have a great weekend! XO
Shelley says
Wow-you are SO talented! You make this look so easy-I’m going to try this. Thank you for sharing your talent!
Christy K. James says
Awesome! Thanks, Shelley! 🙂
Michelle says
Thanks so much for this. I’ve been wanting to attempt this on an old parson’s chair, but all the tutorials I’ve seen have seemed way beyond my simple sewing skills. I doubt mine will look as good as yours, but I’m finally ready to give it a try!
Christy K. James says
Awesome, Michelle! You should definitely give this a try. 🙂
Celia says
Hi Christy! Your slips are perfect! Your tutorial is awesome! Is the ruffle extended across the back or did the back part of the large piece come straight down the back (having the ruffle end at the back corners)?
Happy Saturday!!
Celia
Christy K. James says
Thanks, Celia! The ruffle wraps all the way around. I added a photo to the tutorial so you can see. 🙂
Celia says
Aw thanks Christy – you’re the best!!
Christy K. James says
You are SO welcome 🙂
Linda Petersen says
Absolutely beautiful! The room looks very “springy” & light. Thank you for sharing how it’s done~~~I love your blog & tutorials!
XO, Linda
Christy K. James says
Aww, thanks Linda! Your sweet comment made my night! XO
Andi says
They look lovely!! But mostly I was distracted by your TV. THAT’S MY TV that I LOVE and MISS!!! Now I have a stupid smart TV that drives me crazy. All I want is my Sony back. It’s sitting in the basement. Boo.
Maybe if I make some slipcovers I’ll feel better. I’d feel even better if you made them for me.
-andi
Christy K. James says
My husband loves his TV. Unfortunately it’s full of hundreds of tiny blue dots that show in the dark areas. We desperately need a new one! Some of the newer ones are all weird though… like you’re watching a play or something. I don’t like those at all! Come on over, we’ll drink some wine and make a big slipcover for your beloved Sony 🙂
karen says
Wow. You did a really nice job. Often slips look sloppy or handmade. Yours look wonderful. I might just be inspired.
Christy K. James says
Thanks, Karen! I’m so glad you like them! 🙂
Suzanne says
Your slip covers turned out wonderful. Love the pleated ruffle on the bottom and the drop cloth fabric. Pat yourself on the back for a job well done!
Thanks for sharing,
Suzanne
Pieced Pastimes
Christy K. James says
Thanks so much, Suzanne! I’m really pleased with them 🙂
Wendi @ H2OBungalow says
Christy, Boy did I need this Tutorial! I have 2 armless chairs that need to be recovered and I’ve been waiting to find good instructions. Awesome project, thanks for sharing.. and you did a beautiful job too 🙂
Christy K. James says
Thanks, Wendi! Getting started is the hardest part, I promise. Once you decide to start, you’ll have new covers in no time. 🙂
JaneEllen says
I am so impressed with how you made those slipcovers. WOW. Had you made slip covers before, if not you sure got it down, noticed you have some very good sewing habits also. I was taught by my Mother and an Aunt that was a professional tailor. Sad to say I’ve forgotten too many tips she showed me but I work my way thru projects little at a time. If I get stuck and feel like ripping something apart I put it down til I’m ready to tackle in better frame of mind. I’ve been wanting to make a slipcover for a chair I bought at Habitat few years ago. It’s more like a club chair tho, wish it was same as your chairs. My other idea was just to staple fabric on chair in increments and cover seams with trim. I already have the fabric but been waiting til I’m in right frame of mind, lol. When that will be who knows.
Seeing how you did your slip cover so professionally looking I’m inspired to give it a try.
THanks for wonderful inspiration. Happy days
Christy K. James says
Thank you for leaving such a thoughtful comment, JaneEllen! I have a club chair in my bedroom I’d like to recover soon also. Not sure how to go about it just yet, probably in sections like you said. My mom started letting me play around with her sewing machine when I was ten or so and by about 12, I could sew pretty well. Been doing it ever since. My methods may not be technical, but they work. 🙂 Have a great week!
JaneEllen says
Sorry forgot to tell you what an exceptional tutorial you gave us. Thanks so much.
Marie @ The Interior Frugalista says
You make this look so easy Christy! I have six brown leather parsons chairs in my dining room that I’ve been itching to reupholster in a linen fabric but scared stiff to tackle them in case I ruin them. You just answered my prayers girl and I’m off to buy some drop clothes ASAP! Thanks so much for your easy to follow tutorial and inspiration – so appreciated.
Christy K. James says
Yay! I’m so glad you feel inspired! I think it’s the part where I said, “It’s okay to make a mistake” ha ha. No problem, pick out the seam and repin! Honestly, the most painful part was bleaching the dropcloths…only because it was a bit time consuming. Making the covers wasn’t bad at all. 🙂
Marie @ The Interior Frugalista says
LOL, yes that comment definitely reduced the stress about tackling this but what surprised me most during your tutorial is the realization that I have enough sewing skills to do this…successfully (finger’s crossed). Where do you usually buy your drop clothes?
Christy K. James says
I answered straight from my email, Marie. Let me know if you didn’t get it 🙂
Krista @ the happy housie says
These are seriously amazing Christy – you are quite the talented seamstress! Pinning!
Christy K. James says
Thanks, Krista! I love sewing projects, because you can create things in such a short amount of time! 🙂
Karen says
Your chairs turned out beautifully! Thanks for the great tutorial.
Christy K. James says
Thanks, Karen! I’m so glad you stopped by 🙂
Darrielle Tennenbaum says
Your chairs look so great–I am impressed!
Christy K. James says
Thanks, Darrielle!
Nancy @ Artsy Chicks Rule says
What a fabulous tutorial Christy!! (even for a no sewer like me!) They are beautiful…and your home is just gorgeous! 🙂
xo
Nancy
Christy K. James says
Thanks, Nancy! Hopefully you’ll get to see it in person soon! 🙂
Glo. says
I have four parson chairs that I need to make slipcovers for. LOVE your instructions! I feel like I can actually tackle the job now. Do you mind sharing where you purchased your drop cloths? I’ve purchased some that are way too thick and have imperfections in them. Thank you!
Christy K. James says
Sure, Glo! I purchased them at Lowes. I bought the 12X15 and used a quarter of it for each chair. They were really stiff, but softened nicely with bleaching and washing. 🙂
Juju says
Christy,
I really like the slipcovers, especially the way the pleated skirt gives a little bit of formality to the slipcover, but the fabric you used keeps it casual.
Really great job!
Juju
Christy K. James says
Thanks, Juju! I am pleased with the outcome and the fact that they’re washable!! My 16 year old cat decided that was the perfect spot to expel a hairball…ew!
Mandy Hank says
Stunning Christy! I have a chair with arms that I want to recover. It’s a fabulous red velvet but it doesn’t match the house-might need to hit you up on that for some help!
Christy K. James says
Sure! It shouldn’t be too hard if the lines are pretty straight. 🙂
Jeanette @ Creating a Life says
Gorgeous covers and a wonderful tutorial. Thanks so much!
Jeanette
Christy K. James says
Thanks so much, Jeanette!
karen@somewhatquirky says
Great tutorial! The chairs look great, but the tutorial is even better!
Christy K. James says
Thanks, Karen! So glad you like it! 🙂
Kathryn Griffin @TheDedicatedHouse says
Christy, they look amazing! Such a fab tutorial! Thank you for sharing. You will be one of the features tomorrow at the Make it Pretty Monday party at The Dedicated House. Hope to see your prettiness again tomorrow at the bash! Toodles, Kathryn @TheDedicatedHouse
Lee says
What a great tutorial, it has given me some encouragement to cover two very similar chairs I own. The only problem is mine do have arms but apart from the arms identical to yours. I was going to pay for a professional to re-cover them but think I will have a go first of all making some slip covers myself.
Lee 🙂
Christy K. James says
Oh I love that you feel inspired, Lee! There’s no better feeling than completing a project yourself! Good luck 🙂
Rhonda says
These slipcovers are so cute & you did an amazing job! I love using drop cloths for my projects as well, it’s hard to tell that it’s not an expensive cut of fabric, and your’s look expensive!
Christy K. James says
Thanks so much for the sweet comment, Rhonda! You can’t beat the durability of a drop cloth either! 🙂
Natasha in Oz says
What a great tutorial. Your chair looks fabulous. I’ve just pinned this and given your post a +1!
Thanks for sharing at the Say G’day Saturday linky party.
Best wishes and hope you can join in again this weekend.
Natasha in Oz
Christy K. James says
Thanks, Natasha! XO
Shellie says
This looks absolutely amazing! I’ve been looking for a tutorial on how to do this–especially since I’ve sewn ONE thing my whole life–but this breaks it down to something even I think I can manage. How long did it take you to complete this project? Also, can you suggest what I can do if i don’t want to make the ruffles? Is there another “closing” that you would recommend to complete the chairs?
Christy K. James says
Glad you found me! I made both slip covers in one day no problem. If you didn’t want the ruffle, I would just fold the bottom hem over twice and sew a nice clean stitch. Good luck! I’d be happy to answer any questions you have a long the way!
24/7 in France says
Well done, looks great, and a thorough tutorial for all of us – Bravo!
Christy K. James says
Thank you! I hope you find it helpful. 🙂