Amazing friends, I am so excited about today’s makeover! I’m joining my Furniture Fixer Upper crew and I have the perfect project piece! My friends have furniture flips of their own to share today so be on the lookout for their projects at the bottom.
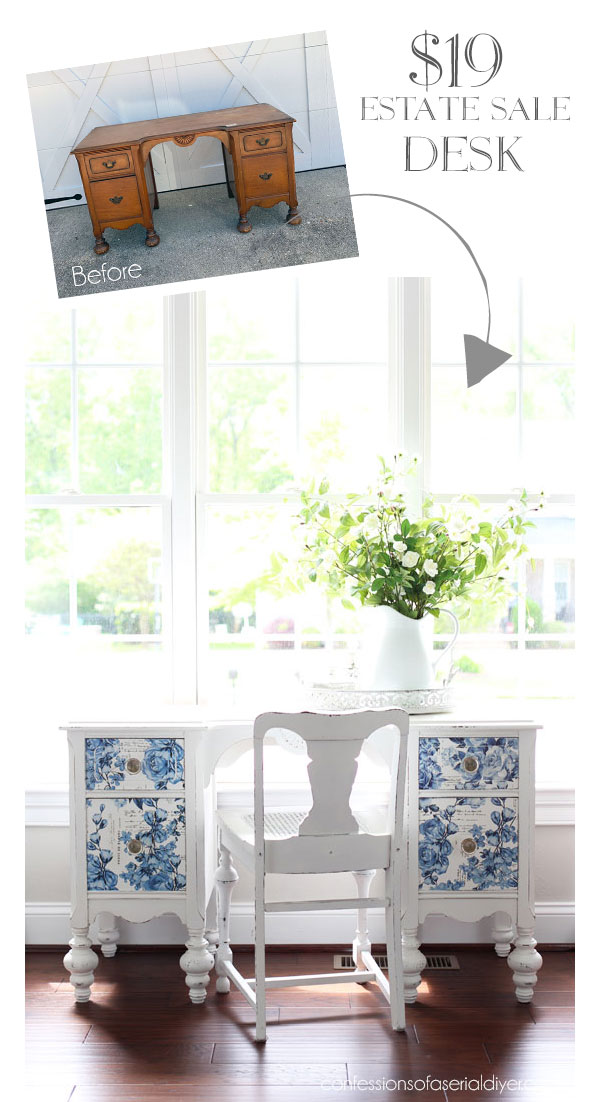
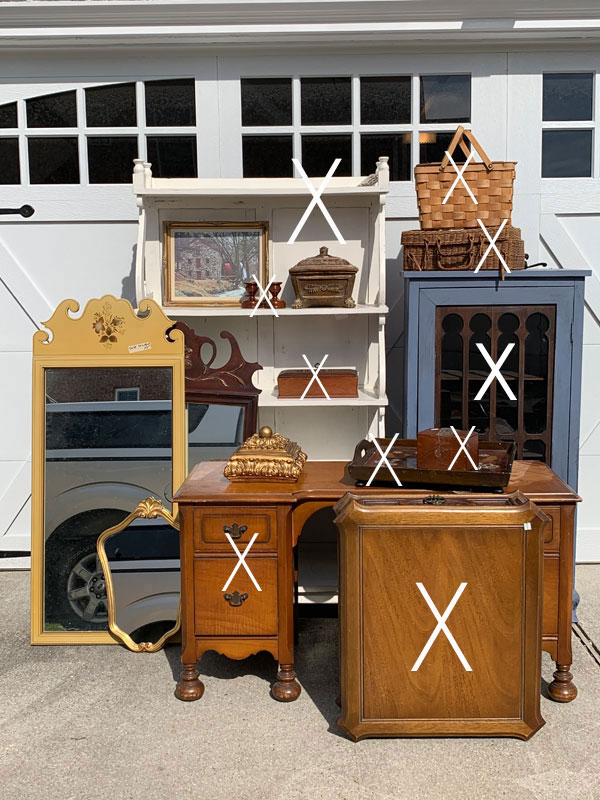
I found this desk at the same estate sale where I found the fretwork cabinet and the shelving unit I already shared from this haul…
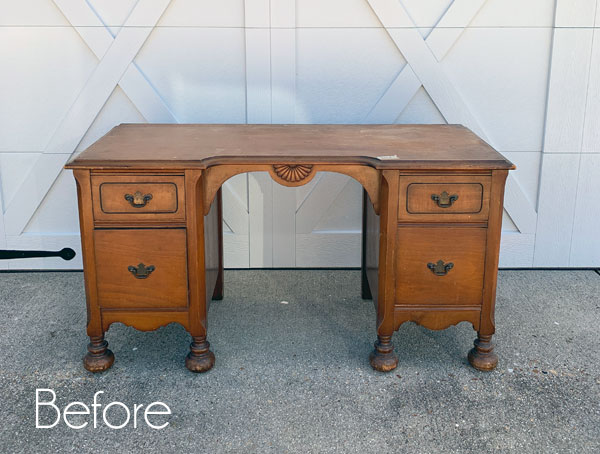
It was marked $38, but since everything was half off, I got it for just $19! That was a hard deal to pass up!
Unfortunately, when I got it home I realized it was super short, as in the smallest chair I could find could barely fit under it. I immediately regretted buying it.
Then I found a solution!
First, let’s see how it turned out, shall we?
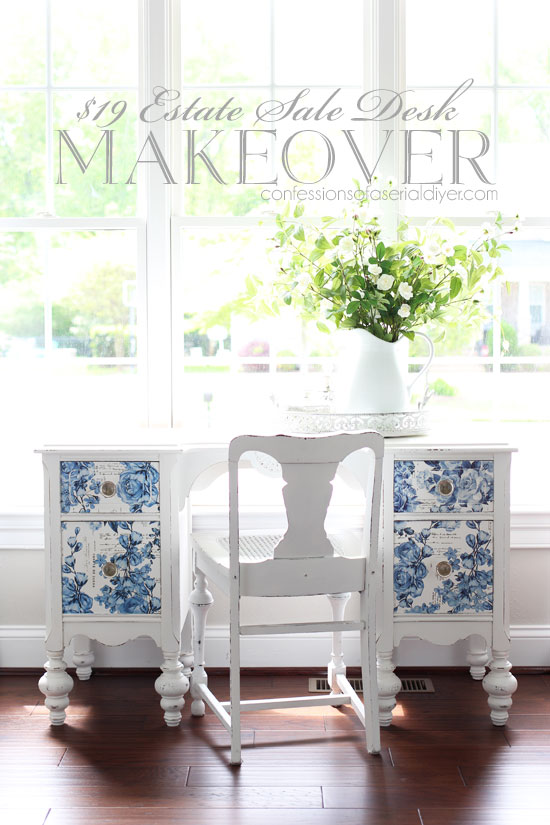
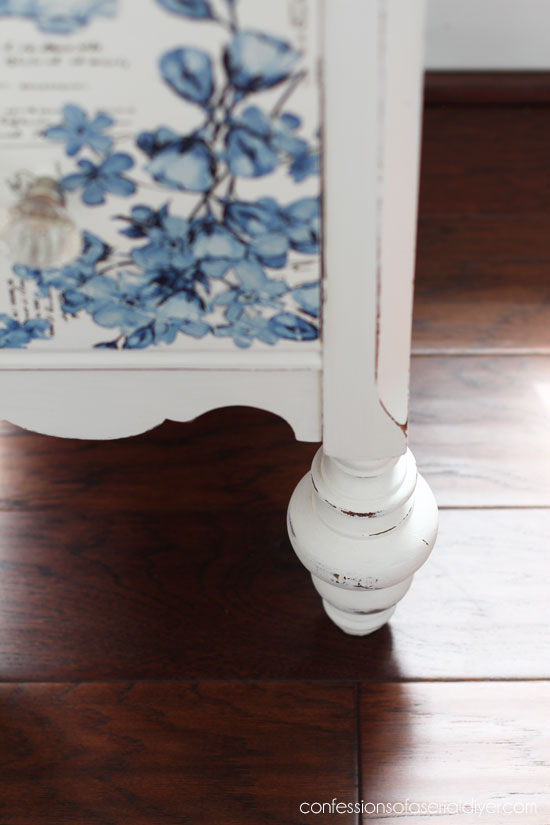
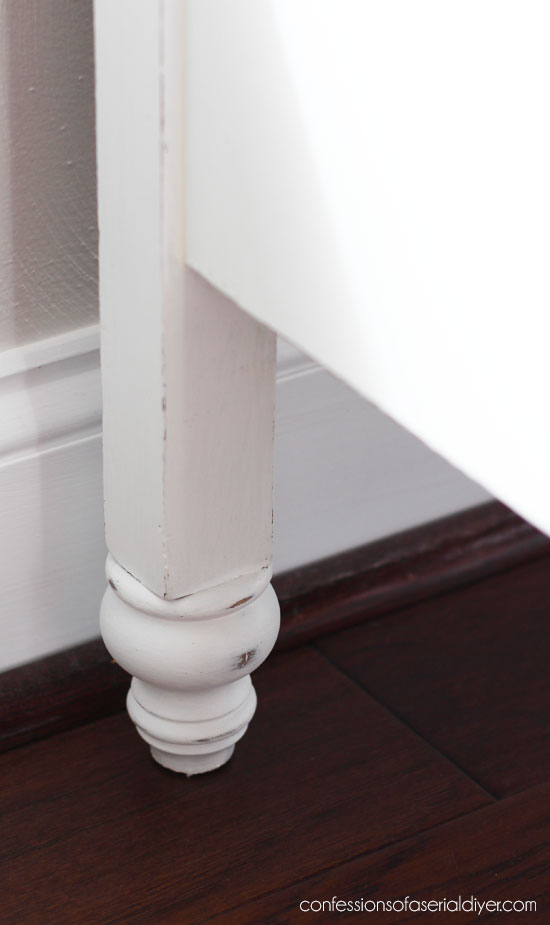
See how I was able to add another 3″ to the height? I added more feet to the existing feet! I think the legs look even better than before! Don’t you?
I’ve included a few affiliate links so you can find the products I love.
I started searching for feet that I could attach to the existing legs. I didn’t have any luck looking locally, so I searched Amazon and found these wooden turned feet that were just perfect!
A set of four was $17.99:
![]()
I ordered two sets since my desk has eight legs.
Then I gathered a few other supplies to attach them.
![]()
I found some dowel screws in my Dad’s woodworking supplies. They probably could have been a bit thicker, but they did the job. I also used a pair of Channellock pliers, a drill, a drill bit for pre-drilling, and wood glue.
Here’s how I did it in case you have a similar issue:
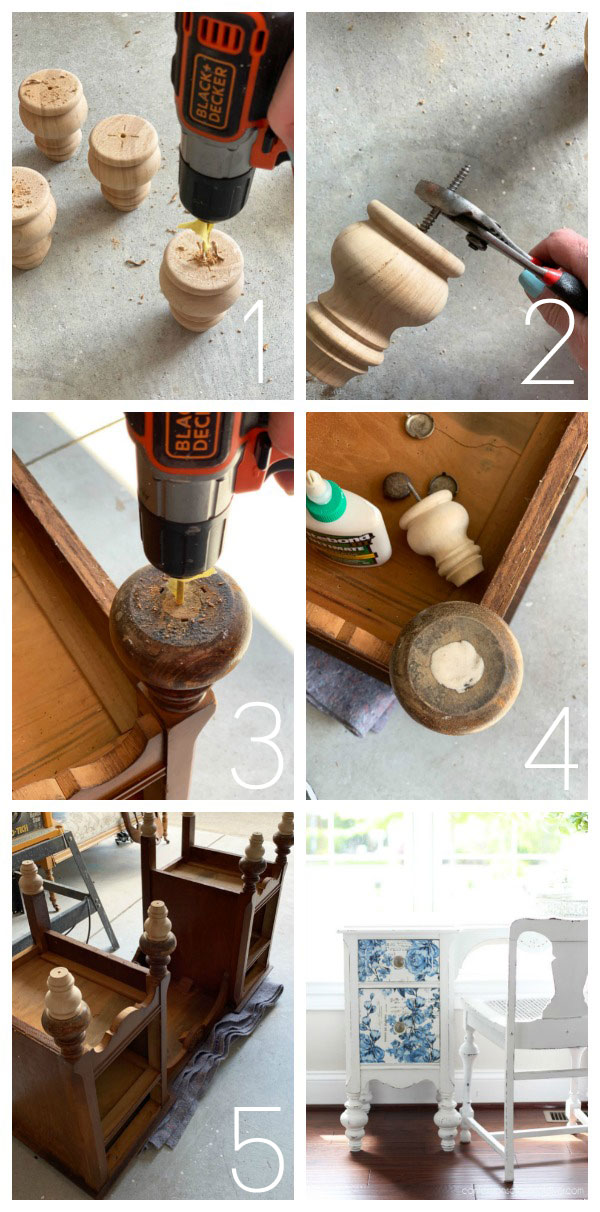
1. You can find feet that already have screws in them, ready to be attached to your furniture, but these did not. I first pre-dilled holes in all the feet with a drill bit that was just slightly smaller than the dowel screws I used.
2. I used my Channellock pliers to help screw one end of the dowel screw into the bottom of the feet.
3. Then I pre-drilled the bottoms of the existing feet as well.
4. I sanded the crud off the bottoms of the existing feet and added a dab of wood glue.
5. Then I screwed the new feet into the existing feet.
They look like they’ve always been like that, right?
I used my staining cloths in walnut on them:
![]()
That way when I sanded later, they would show stained wood through the paint like the original feet:
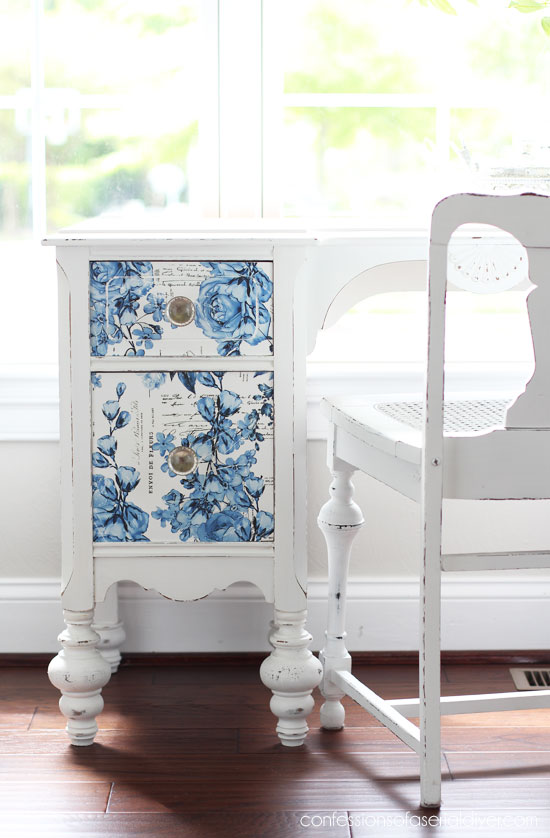
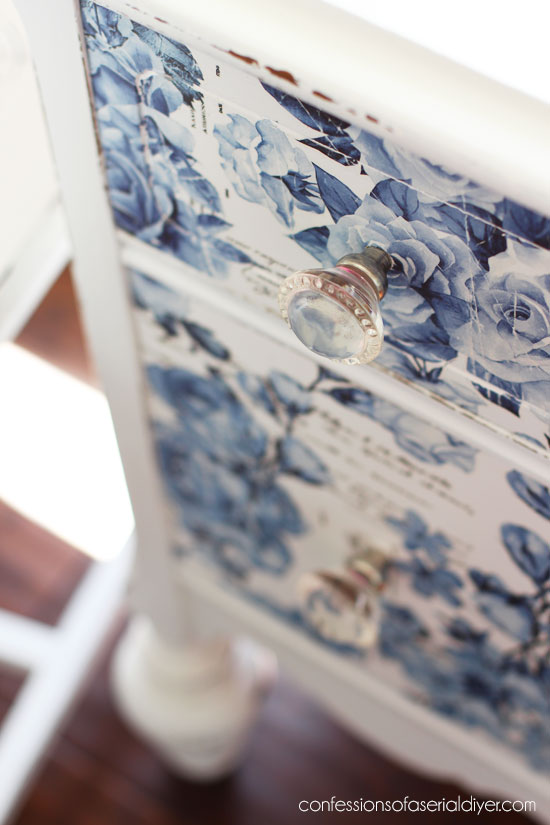
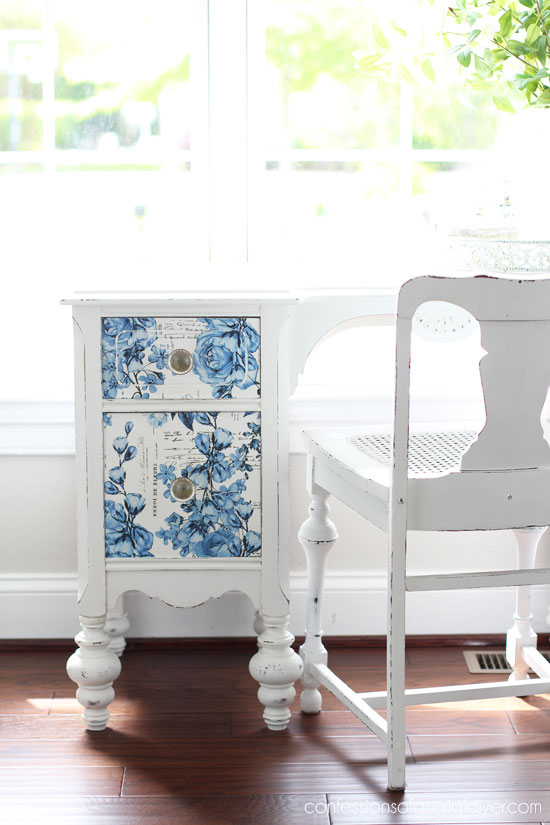
And let’s talk about the star of the show… those beautiful blue drawers!
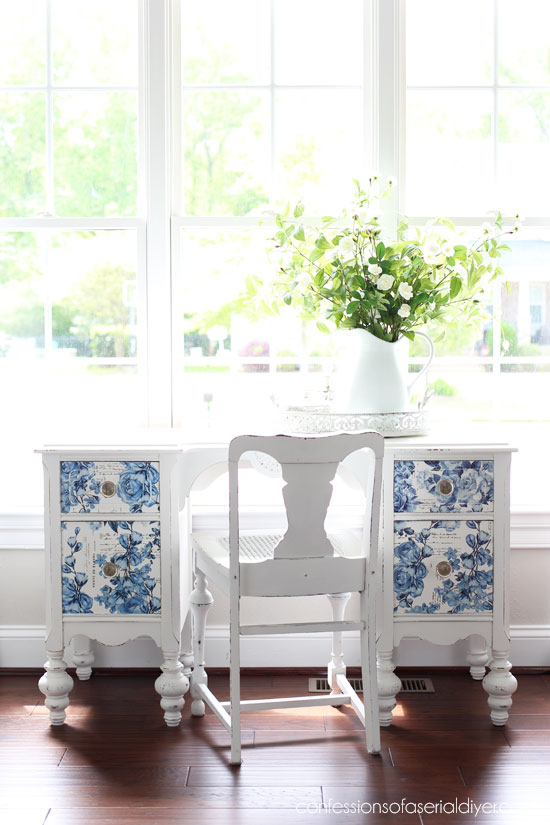
I used a gorgeous transfer from Prima Marketing called French Ceramics.
![]()
I’m going to show how easy they are to use, but first, this little lady needed some fixing!
After adding the new feet, I removed the old hardware from the drawers and filled the holes with wood filler. I also had a couple of areas on the top that needed help:
![]()
That appeared to be water damage. I removed any loose veneer and filled the area with wood filler also. When the wood filler was dry, I sanded everything smooth with my rotary sander:
![]()
(Find those small dolly wheels HERE…great for moving large pieces! Thanks, Kandice!)
After having unusually stubborn bleed-through issues on the inside of my fretwork cabinet, I decided to try Boss in white by Dixie Belle.
I love Dixie Belle products! I ended up with this on one of the drawers after my first coat of paint:
![]()
Booooo. So I gave all four drawers and the desk a coat of the Boss in white:
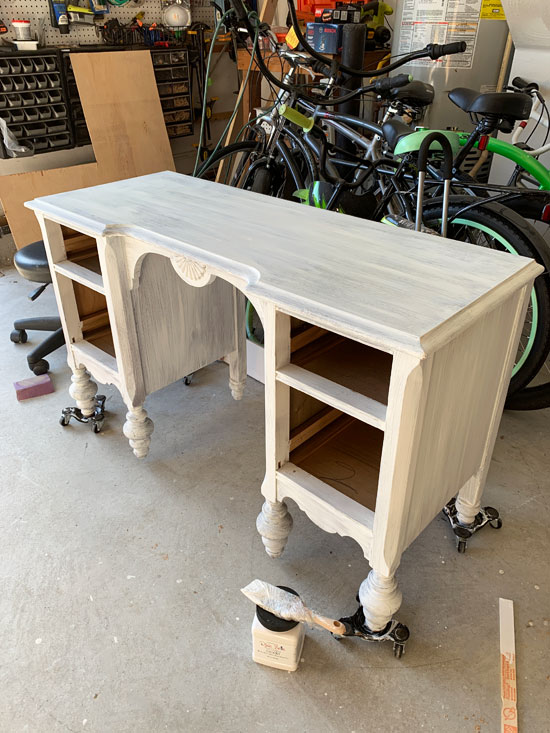
Glossy surfaces do require a light sanding first like any regular primer, so I just hit everything lightly with 220 grit sandpaper just in case.
I’m super impatient so I like to get on with it, but I decided to leave it to sit overnight before painting.
The next morning, I gave it two coats of white paint.
And guess what? NO bleed-through woohoo!
![]()
I sealed the with with Dixie Belle’s Clear Satin Topcoat using my favorite brush for applying sealers.
How to Apply a Furniture Transfer
Here’s how easy the transfers are to apply:

1. In this package, there were three sheets of transfers that were 11″ X 22″, instructions, and a burnishing tool.
2. I peeled the backing back on one of the sheets and lined it up with the corner of one of the drawers. It’s a bit sticky. I pressed it lightly across the surface.
3. Next, I took the burnishing tool and rubbed it firmly across the entire surface.
4. Then I used a razor blade to trim the excess all around the edges.
5. The last step is to peel the clear sheet on top away, leaving the transfer behind on the drawer. If any pieces of the transfer are still stuck to the clear top sheet, lay it back down on your surface and burnish it a little more.
And that is it! I couldn’t believe it was so simple. I added another coat of the clear satin topcoat for protection. You can see there are what appear to be scratch marks across the design, but they are part of the transfer…
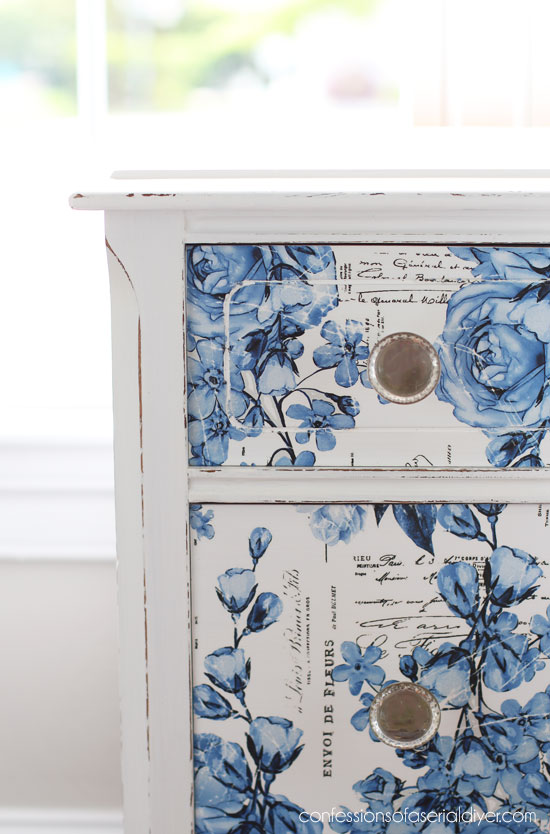
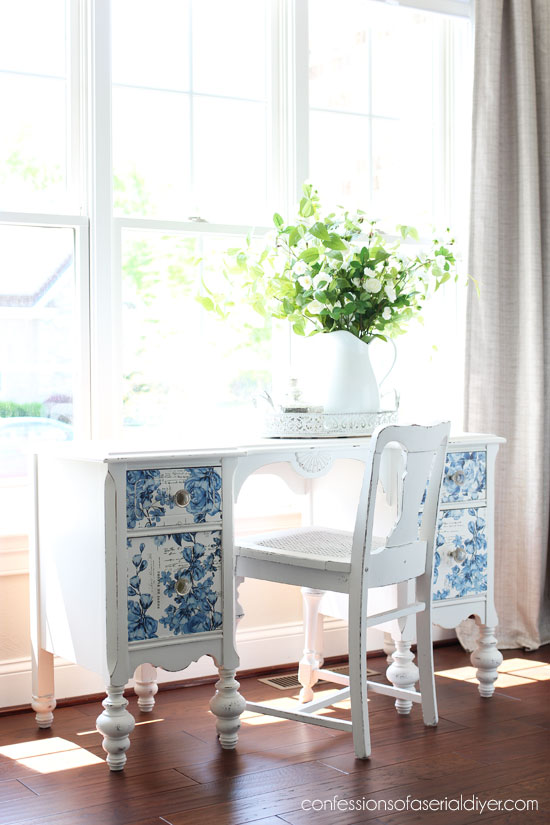
The drawers got a simple navy blue print:
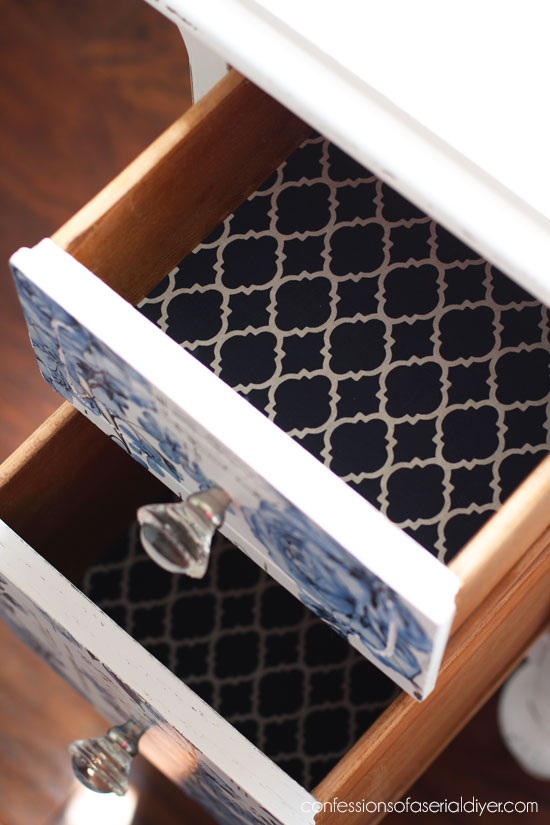
See how I line my drawers HERE.
And these glass pulls from Hobby Lobby work great since they are pretty but don’t take away from the pattern on the drawers:
Another peek at those pretty new feet!
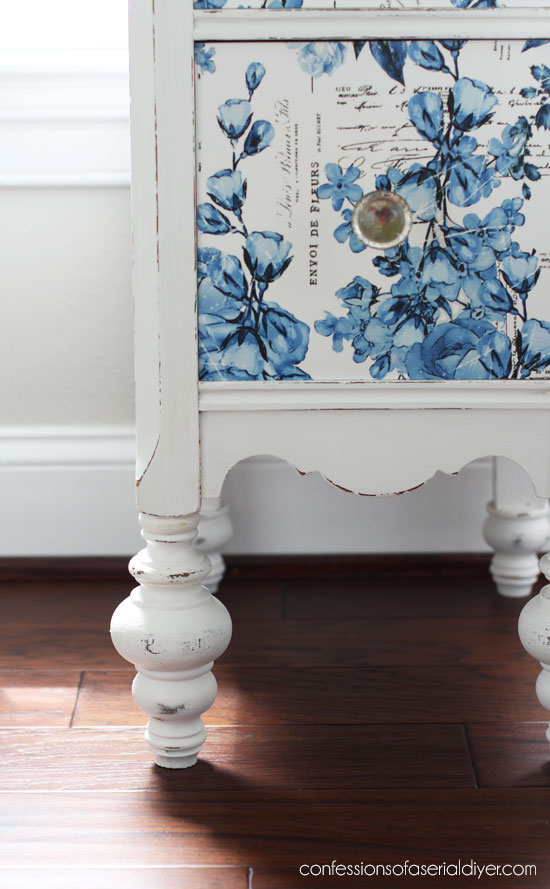
The straight legs at the back got them too and I think they totally work!
I am so tickled at how well this desk that I regretted buying turned out!
My total out-of-pocket including the desk, the transfers, the hardware, and the new feet is $91. Not too bad for a beautiful new desk!
Don’t forget to check out what my talented furniture flippin friends have for you today as well!
Looking for even more fantastic furniture flips? See all my Furniture Fixer Upper transformations HERE!
That’s all the furniture in this group done!
If you missed any of these makeovers, you can find them all here:
Estate Sale Shelving Unit Makeover
$6 Thrift Store End Table Makeover
Thrift Store Baskets go Coastal
$24 Estate Sale Cabinet Makeover
I’ll meet y’all back here on Tuesday with this mirror I picked up for $6.25!
![]()
Have a fantastic weekend! Hope some sunshine is in your forecast!
UPDATE: I think this one will surprise you! See how it looks now HERE!
XO,
![]()
Don’t Miss a Thing!
If you like what you see, there are several ways to follow along!
Email * Facebook * Pinterest * Twitter *Instagram


Rose Lefebvre says
Love it! You have such talent!
Christy says
Thank you so much, Rose!! XOXO
Larissa ~ Prodigal Pieces says
Just gorgeous, Christy! Genius idea for the feet and the transfer really dressed it up. Yay!
Christy says
Thank you, Larissa! I love how the new feet worked out! XOXO
Mary Kaiser says
Wow! You are so creative, I love that you kept plugging along and slayed all the problems you discovered on this desk, I bow to you my Queen of DIY!
Christy says
Aww thank you, Mary! Ha ha thankfully this blog doesn’t let me quit! XOXO
Janie says
Beautiful! How clever!
Christy says
Thank you, Janie! XOXO
Janice Holt says
These transfers are new to me but love them. Gives furniture a shabby chic look I think. The blue is beautiful on the desk and what a good job on the legs.
Christy says
Thank you, Janice! I just love the way you can change up a piece of furniture with these beautiful transfers! Now I want to buy more ha ha! XOXO
Jody says
Love the desk and I want to try the transfers. How cool they are. I use your recipe for chalk paint but am confused about Dixy Bell. I shall Alexa them. Kidding I will find their web site. I had my grandpa’s desk that was in his office in the warehouse. The storage sold all my things by accident and I am sick.
Christy says
Thank you, Jody! I just love these transfers! If I didn’t make my own chalk paint, I would use Dixie Belle’s…love their products! I remember you telling me about your storage unit. I know that must have been so hard for you… I’m so sorry! XOXO
Paula@SweetPea says
It looks amazing, Christy! I love the transfers.
Christy says
Thank you so much, Paula! They were really easy to work with! XOXO
Christina in SW FL says
Christy, the extra lift those additional feet gave it makes it look balanced. Before, those huge knobby feet looked swollen. 🙂 Great job. Love the white, of course. I’m glad you bought this also!
Christy says
Thank you, Christina! They look swollen ha ha…that is true! They look more balanced now. XOXO
Joni Gonzales says
Those legs look better than the original! And it’s funny you had a chair that has similar legs. Did you have any trouble putting the transfer on over the detail on the upper left drawer? The rounded rectangular around the knob? I notice it is white in the after. I can’t tell if it’s raised or engraved but it’s neat that it turned out white. The after is stunning. When you hit snag after snag like this do you just merrily keep going or do you get super frustrated like I would and wish you could pick it up and throw it? Lol just curious. And I would love a post on how you take such beautiful after photos.
Christy says
Thank you, Joni! Right? I think they look better too. The transfer did not stick in the small groove that is on both top drawers and I didn’t try very hard to remove the excess that was hanging in there. I’ll tell you…if it weren’t for this blog and the fact that I need stuff to share, I’m sure I would have a stack of pieces I quit on ha ha! As for the photos, a good camera is a must. I have a Canon Rebel T5i that is several years old now, but still going strong, and I use mostly a 50 mm lens and switch it up with a 35mm lens. I also took Kevin Palmer’s Shoot Fly Shoot online photography course. I swear I learned just about everything I needed to know in the first couple of videos. I also use Photoshop Elements photo editor. As for staging, a nice head-on shot is always pleasing to the eye in my opinion. XOXO
Jan Cordani says
This is EXACTLY what I’ve been looking for ! If only we lived a little closer …..
Well done on the pretty desk, I absolutely love it
Christy says
Oh darn…wish you lived closer!! Thank you, Jan! XOXO
Cheryl Atkinson says
Hi Christy! I’m so glad you bought the BOSS. Dixie Belle has such great products and I was just thrilled for the shout out. I love how you added height to the desk and the transfer is gorgeous. I used your Bit of Sugar recipe on my daughter’s baby changing table and i love it. You are pretty awesome!
Christy says
Thank you for the recommendation! I love Dixie Belle products too so it’s no surprise this worked so well. Glad the Bit of Sugar worked out for your grandbaby’s changing table…thank you!! XOXO
Bar Sperling says
Christy, this desk is just stunning!!!!!!!!
I’m a big fan of your work and follow your blog for some time now, your work just getting better and better!!!!!!
Christy says
Thank you so much, Bar!! I really appreciate that! XO
Nancy @ Artsy Chicks Rule says
OMG, too funny! I saw your comment on my post today so had to come look. And we even both said *we are rebels” and didn’t want to wait to apply the transfer! Bahaha! We are the same person! Hahaha Absolutely love this, by the way. That blue and white is perfect! Aren’t these great? I can’t wait to use them more! xoxo
Christy says
Ha ha we are the same…insert laughing emoji…it’s so true!! I love it! XOXO
Karen says
Wow! What a successful and stunning makeover! Those legs look like they’ve always been part of the desk! Maybe the existing legs had been cut down for some odd reason?
Also, I LOVE the blue flower transfer! It looks amazing with the white!
K
Christy says
Thank you so much, Karen! I am so happy the legs worked out as well as they did! Someone mentioned it was actually a dressing table and it used a bench instead of a chair. I guess that makes sense! XOXO
Sue Croft says
It turned out very cute. I am thinking it was a lady’s dressing table in it’s first life not a desk. That is why it was so low. A stool would have been used with it and not a chair. I very much enjoy watching your makeovers.
Christy says
Thank you, Sue! I believe you are correct as someone else mentioned that they had the whole set that once belonged to their grandmother. And yep, indeed they used a stool. 🙂 XOXO
Sharon Austin says
AMAZING, I love it! The things you manage to do blow me away. Btw, It’s so different from your normal coastal look, you caught me off guard LOL. see you next week!
Christy says
Aww thank you, Sharon! I love to create so the fact that ya’ll enjoy what I share is such a gift to me! Glad I was able to surprise you this time! XOXO
Marie says
My jaw dropped at the $19 price tag, whaaaaat! You’d never find a piece like this at that price around here. I thought the legs on this piece were lovely but your genius idea took them to a whole other level! LOVE the blue and white combination and the transfer you chose is stunning!
Christy says
Right?? I had no idea it would work out so well at the time, but I just could not pass on it for that price! Thank you, Marie!! XOXO
Becky says
Those new feet… !!! They look SO MUCH BETTER than the original! So pretty! The whole desk is so pretty! Beautiful job!
Christy says
Thank you so much, Becky!! I am beyond thrilled that they worked out so well! XOXO
Denise says
Frigg’n LOVE it Christy… and $19 omgosh that’s almost free! The feet look amazing and I’m so happy you tried a furniture transfer…arent’ they amazing?! And thanks for the shout out. 🙂 Pinned! XO
Christy says
Thank you, Denise! I just had to jump on the transfer train and I think I’m hooked!! They are amazing for sure!! Glad to give the shout out…I love everything that you do! XOXO
Cecilia from Georgia says
Christy, you make this transfer look so easy! Denise does such lovely work and I covet the large pieces she produces. Seeing your cute vanity inspires me and I may try something small to see if I can handle the transfer. Thanks for the great idea of adding feet to the short desk….looking forward to the mirror! Take care! XOXO
Christy says
It really is very easy, at least on these simple drawers! I love Denise’s work as well…very talented! I hope you’ll give these a go…you can totally do this! Thank you! XOXO
Ivana Carmon says
Originally this wasn’t a desk, it was a ladies dressing table. I have the exact same one – it’s supposed to have a really pretty mirror that attaches to the back. It is arched at the top and actually is three mirrors. Also has a bench like chair that doesn’t slide under.
I have the complete bedroom suite that belonged to my grandmother from around 1935. Love what you did!!
Christy says
Thank you so much for the information, Ivana! I bet the whole set is just lovely and how wonderful that you have it passed down from your grandmother! XO
Robyn Wright says
“First, let’s see how it turned out, shall we?”……….my jaw literally DROPPED!! That is absolutely STUNNING. So fresh, so feminine, so pretty! LOVE it!!!
I, too, ordered the furniture dollies after seeing Kandice use them. They should arrive soon.
Christy says
Yay! I’m so glad you like it, Robyn!! Thank you!! I think it might be my favorite, probably because I had remorse about buying it once I got it home lol! Those dollies are excellent for moving large pieces with ease! XOXO
Mary Loveland says
You were spot on, correcto mundo with those added on feet, makes the whole piece look more in proportion. Really good job on your makeover. Will be really curious to see how fast this sells. Good luck and can’t wait to see more.
Christy says
Thank you, Mary! I agree that it looks more proportionate now. Hoping for a quick sale! XOXO
Julie Briones says
Just gorgeous! Are you putting this in your booth? So smart to add the feet, too! 😉
Christy says
Thank you, Julie!! Yes, this will be headed to the booth! XOXO
Leslie says
Christy to the rescue again! No more stacking books under my small desk to make it higher, just add feet … why didn’t I think of that?!¿
Thanks again … all the best …/leslie
Christy says
Well I am so glad I could help lol! XOXO
Mary says
Christie that is one amazing transformation. The blue transfers make it so extra special. Thanks for a great tutorial.
Christy says
Thank you so much, Mary! My pleasure! XOXO
Jen @ Girl in the Garage says
Giiiirrrrllllll. I am so in love with this makeover! Adding the extra feet on the bottom was genius, and it looks like it was always like that! Those transfers are fabulous and I have a few I’ve been itching to use, it’s been a long time since I used one. Now I just need my arm to get better so I can put all my makeover ideas into action ????????
Christy says
Thank you, Jen!! I am so in love with these transfers…they are like magic! And I agree the feet totally work! I am so glad for that! Hope your arm is better soon. Have a great weekend! XOXO
Petra says
I’m so glad you did it blue and white ???? it’s perfect! Also, the ‘feet’ actually look SO much better! I hope you find a lovely buyer soon! Have a great weekend!
Christy says
Thank you, Petra! So glad you like it, and yes I’m thrilled that the feet worked out as well as they did! Enjoy your weekend too! XOXO
Marcie Lovett says
Those big, bulbous onion feet on the original piece really made it unappealing to me. Adding the extra feet not only made it more functional, but also lightened the Gothic feel. I had to laugh when I saw the feet cost more than the desk! Totally worth it, though. And the transfers are pretty fabulous. I’ve seen them on so many pieces, but this is the first time I’ve actually seen them being applied. Thanks for sharing this beautiful transformation, Christy!
Christy says
I totally agree about the feet! They were very heavy before. I’m happy adding the new feet worked out so well. Love the transfers! Now I want to buy more lol! Thanks, Marcie! Have a great weekend! XOXO
kandice kullmann says
this is downright breathtaking. I love everything about it. Im speechless!!
Christy says
Aww thank you so much!! That means a lot, my friend! XOXO
Kaycee says
Wow, just wow! I love everything you did to make the desk so flipping beautiful!! I agree with you, the legs look better with your added feet! Beautiful job girl!
Christy says
Thank you so much, Kaycee! I really enjoyed seeing this one come together! XOXO
Cecilia says
Oh wow! I love the transfer – it got my attention right away. Just beautiful! And the added feet look like they’ve always been there! Great job.
Christy says
Thank you, Cecilia! I feel like I’ve found a new toy with the transfers lol! Hope you are enjoying your weekend so far! XOXO
Terry Fontaine says
You have really set the bar so high! Not many other bloggers can match your skill. I do have one question. What is the benefit of putting a coat of sealer on before adding the transfer?
Christy says
Oh wow thank you SO much, Terry! It will be hard for me to come back from this one too ha ha. As for the sealer…when I was getting ready to add the transfer to the drawers, I read in the instructions that the recommended wait time after painting was 48hrs to a week. I needed to apply them that day. I figured it had something to do with the paint not allowing the transfer to adhere properly unless it had time to cure, so I decided to seal the paint and go ahead and apply the transfer. It worked flawlessly. Now I need to test the transfers on a freshly painted piece and see if there really are any issues. I just didn’t want to take my chances with this set. Sorry for the long response…hope that makes sense! XOXO
Kerryanne says
Oh Christy, I’m thrilled every time I see a new project from you. This one is fabulous and how amazing are those transfers!!
Thank you for sharing your make-over at Create, Bake, Grow & Gather this week. I’m delighted to be featuring it at the party tomorrow night and pinning too.
Hugs,
Kerryanne
Christy says
Aww thank you so much, Kerryanne! I loved working with these transfers! XOXO
Carolyn.albert Albert says
I’m doing my first chalk paint project on an old desk. The desk is painted and now needs the wax. I waxed one side ( the side no one will see) got to start somewhere. I didn’t do such a great job, can I do a 2nd coat of the wax? Thanks
Christy says
Yes you can! I rub it in really well and then immediately go back over it in long strokes in the direction of the grain or the direction that I painted. You do have to work fast as it starts to set up quickly. Good luck!