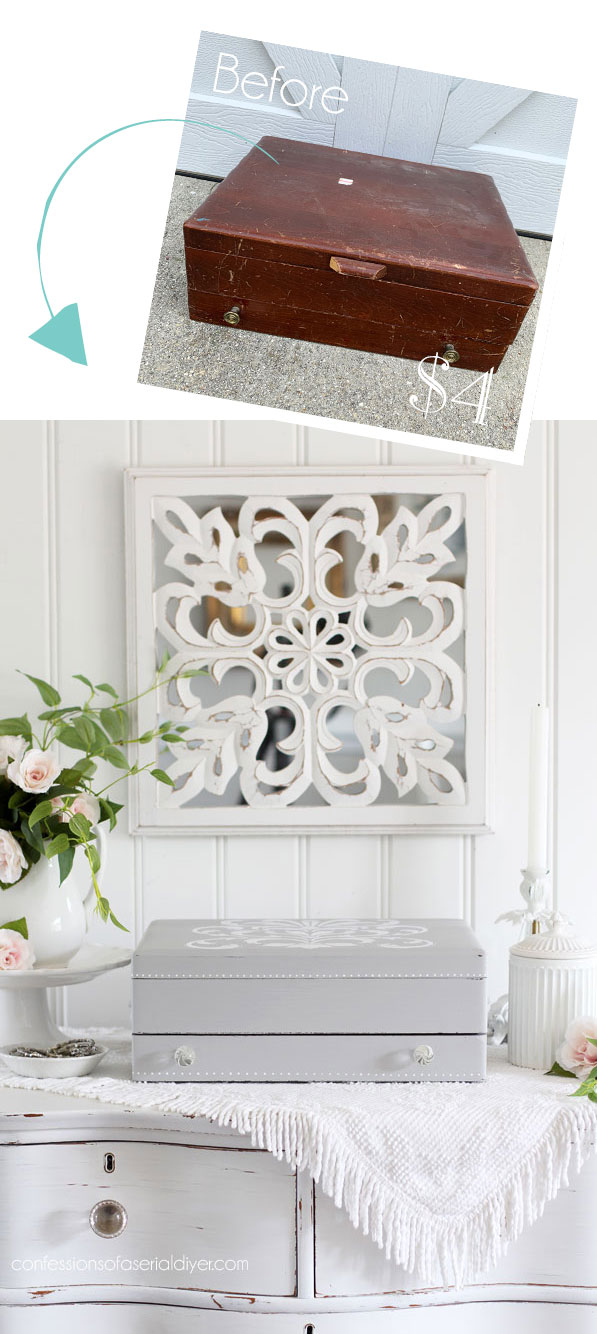
Hello amazing friends!! Who’s up for another thrifty makeover? Me!! That means one more project I can cross off the to-do list, and today’s makeover is especially satisfying since it has been taking up residence in my storage room for at least the three years we have lived in this house!
Here’s a look at this beauty before:
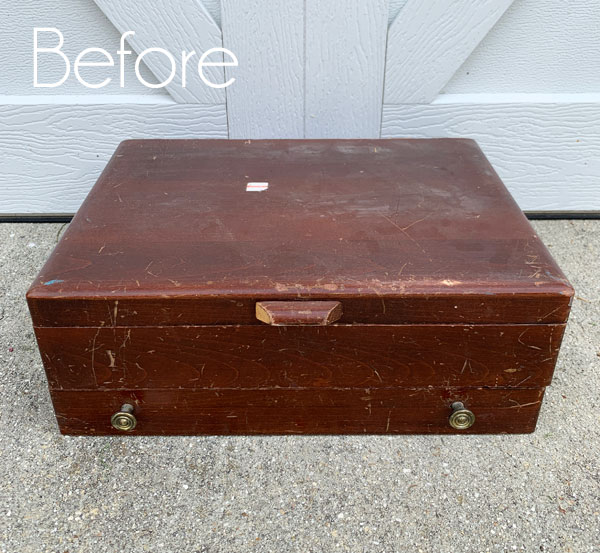
And by the looks of it, there was good reason for this to be sitting untouched as long as it did! I finally added it to my End of Summer Thrift Store Haul so I could get it out of that room.
I had a few of these boxes at one time and took them outside on a nice day and did the messy work of removing the insides on them all at once, so the hard part was already done and the inside was ready to go:
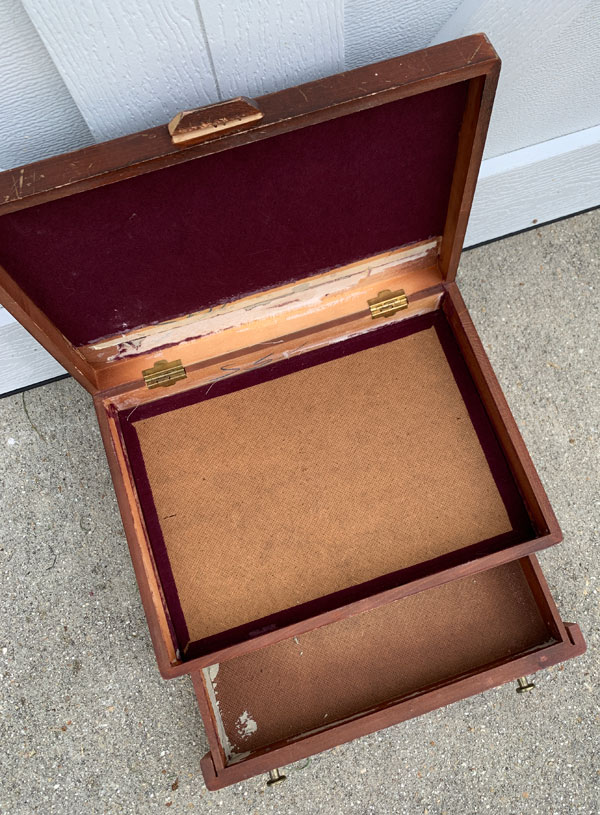
There is no secret formula for removing the innards of these things, just a good pair of pliers and some sweat equity! I’ve included a few affiliate links so you can find the products I love.
I started the outside by filling in a few deep scratches with Dixie Belle’s Mud and sanding smooth with 220 grit sandpaper.
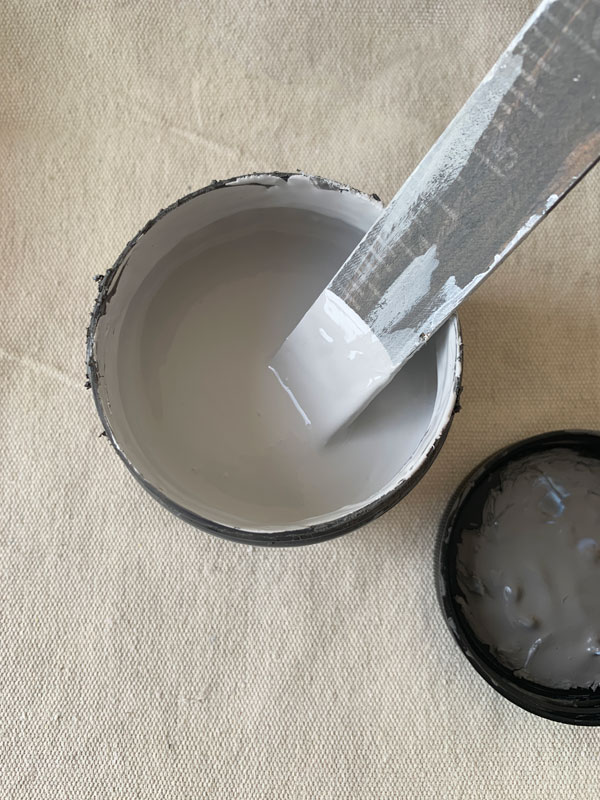
I really wanted a soft gray, so I pulled out my Hurricane Gray that only had about a third of the jar left and filled it the rest of the way with Cotton to get this lovely soft gray color:
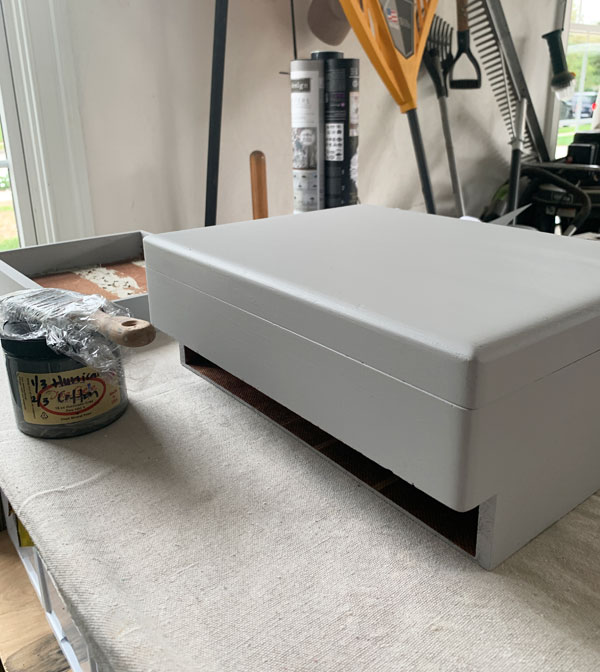
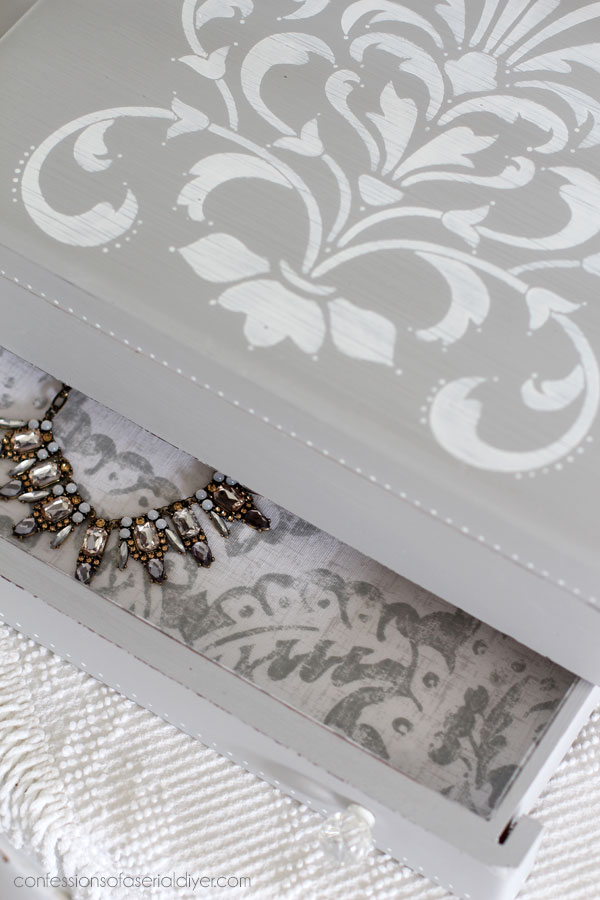
I gave it two coats and decided to dig through my stencils to find something to dress up the top.
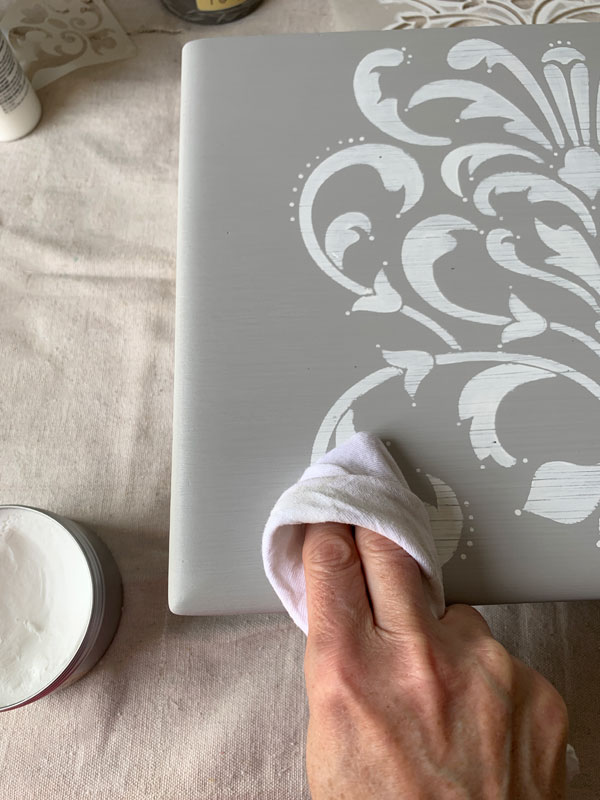
I used spray adhesive on the back of the stencil and then placed it on the top. I used a small brush to brush in the stencil using white acrylic craft paint:
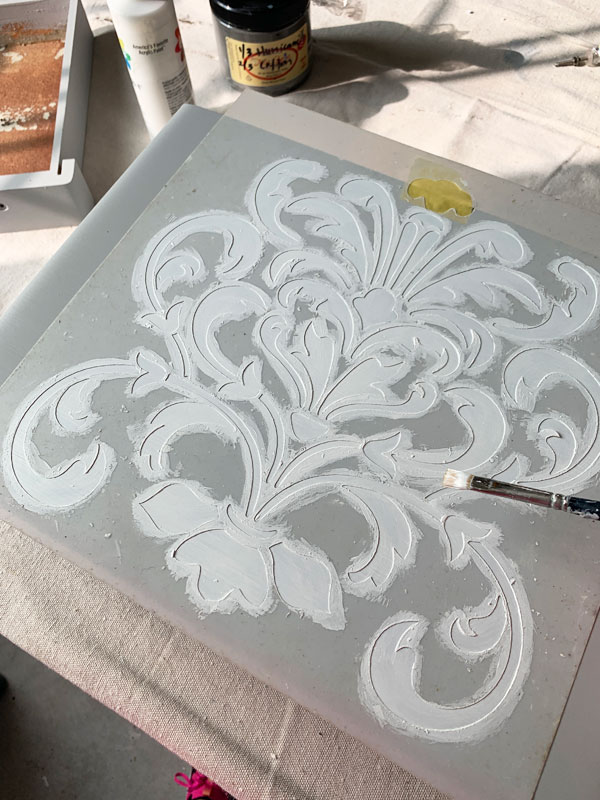
I like to use a brush rather than a pouncer but you can use either. I just try to brush away from the edges as much as possible. I don’t recall where I found this stencil, but I think maybe Michaels?
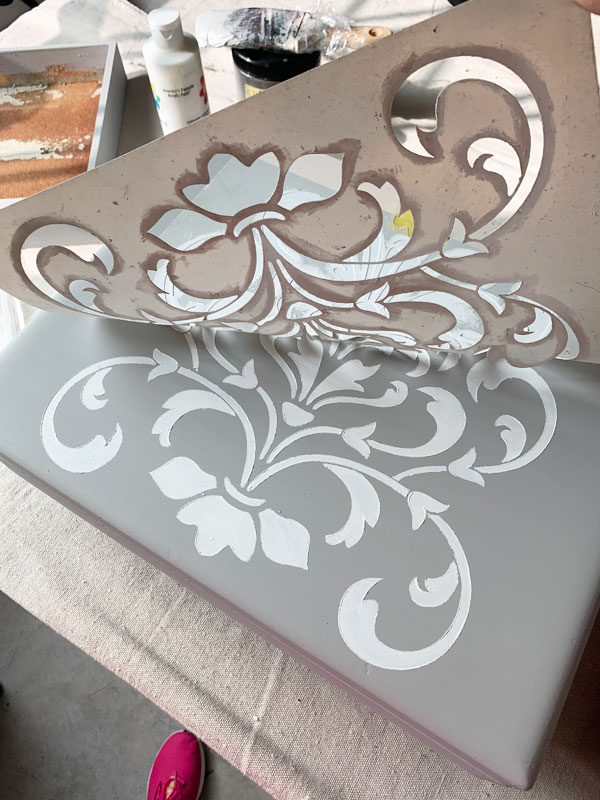
I applied three coats of paint and removed the stencil while the paint was still wet:
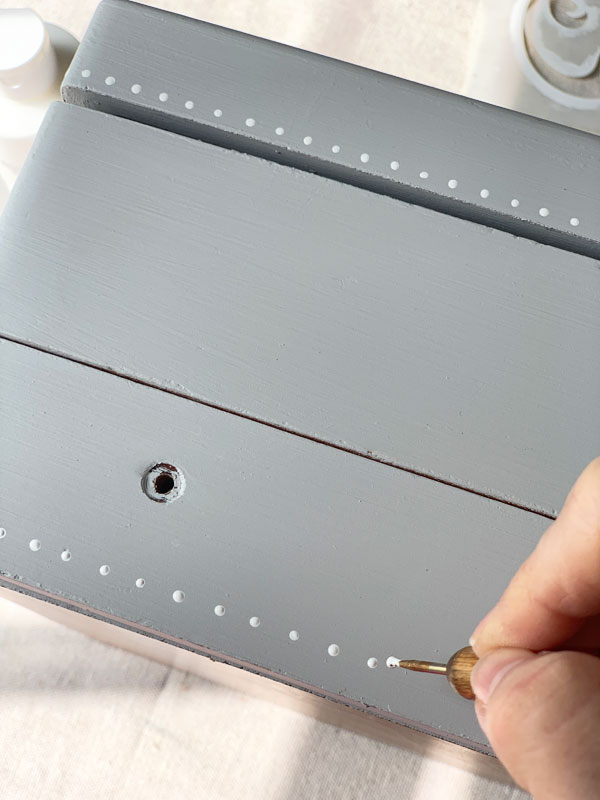
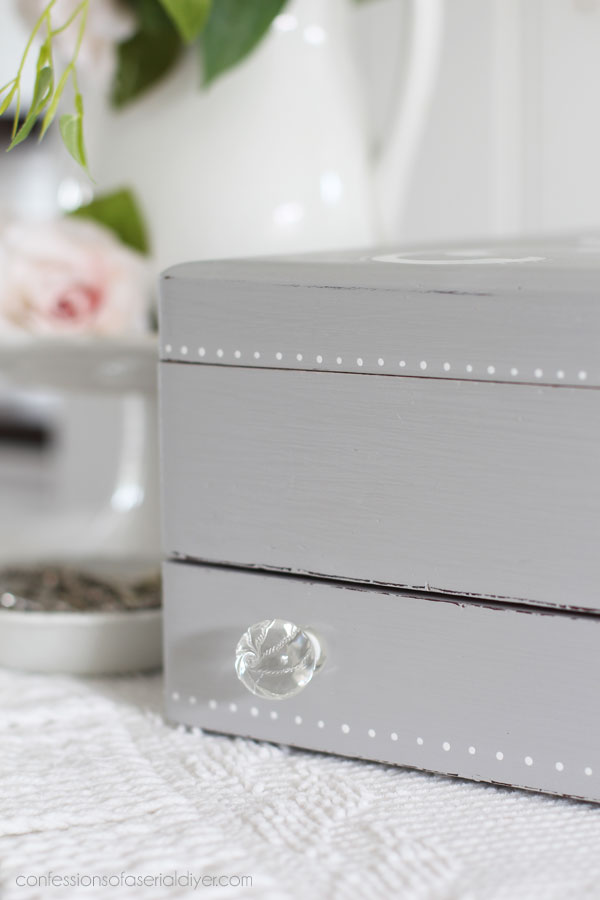
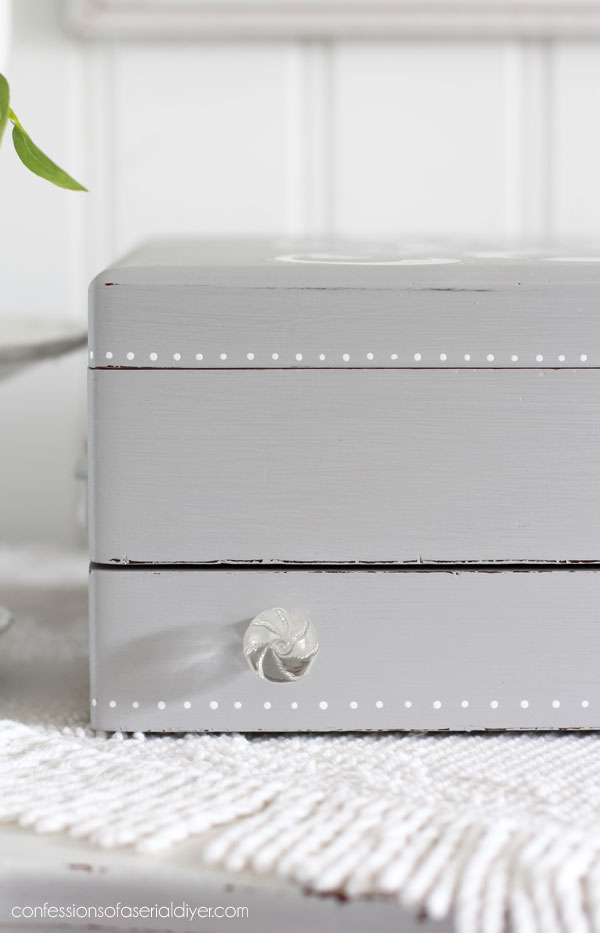
Then I went back and added some fun detail with tiny dots using my stylus dotting tool:
When the paint was completely dry, I sanded with 220 grit sandpaper, including across the stencil, going from edge to edge:
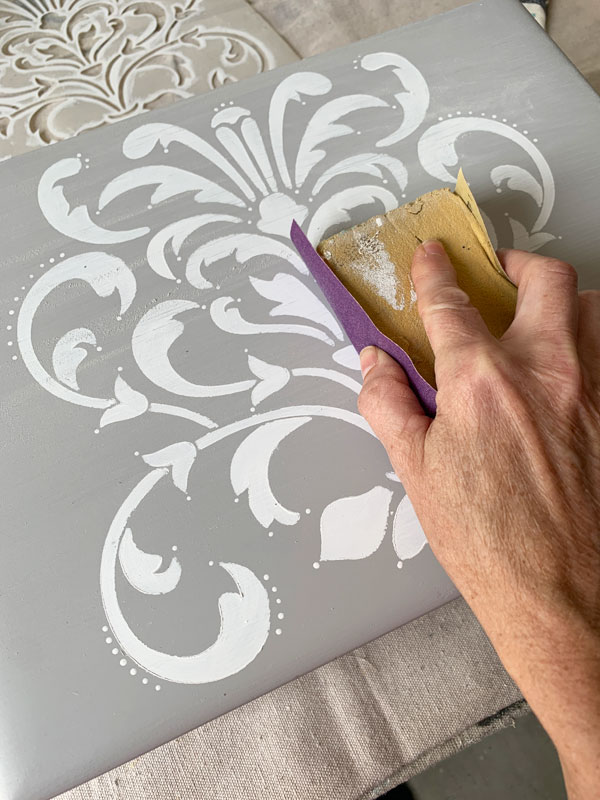
This smooths everything out and leaves a lovely finish. You can see I added some dots to the top as well.
I sealed this piece with clear wax, applying it with a wax brush and then buffing it with a clean, soft cloth:
This is Dixie Belle’s clear wax. It looks white but goes on clear, and it is water based, so it doesn’t have the harsh smells that some of the other brands do.
Although I pretty much use the Clear Coat or Gator Hide for all my furniture pieces because it is much easier to apply, I don’t mind using wax to seal these smaller projects.
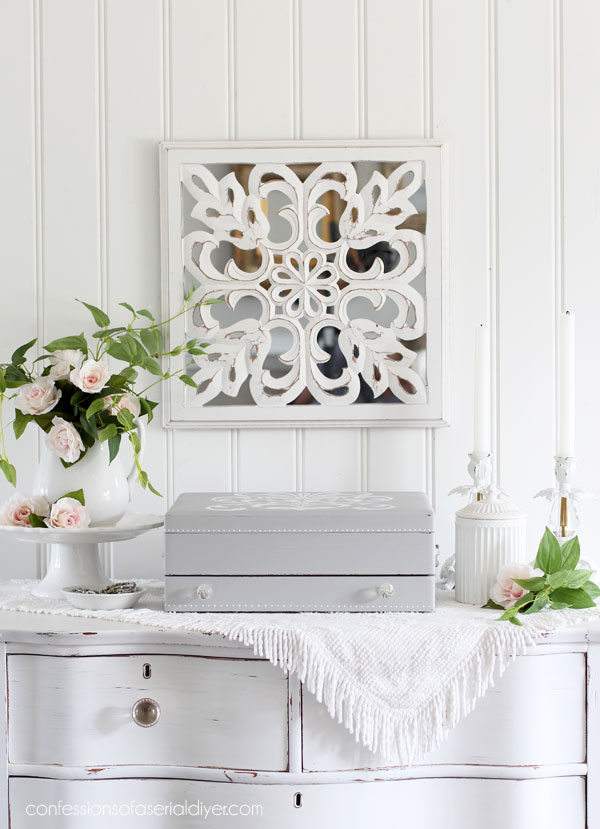
Are you ready to see the finished box??
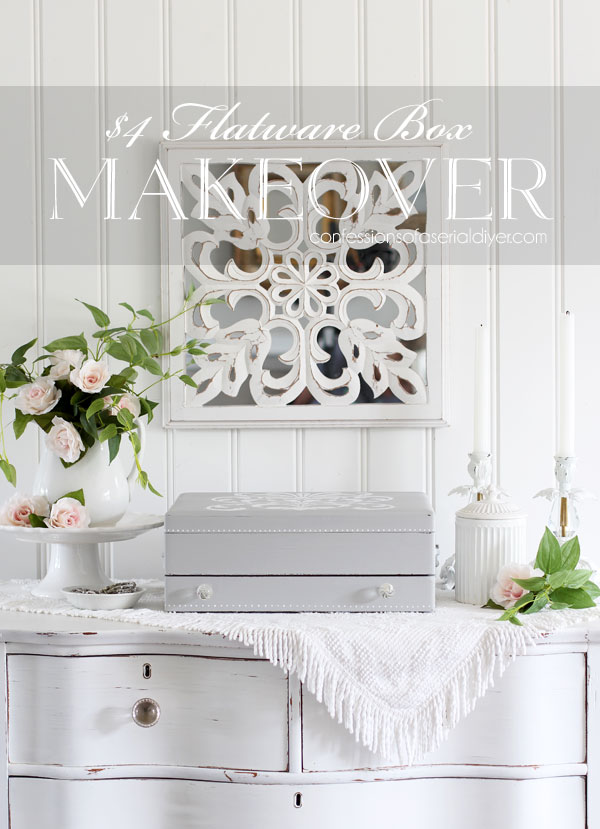
It turned out so pretty compared to the ugly before!
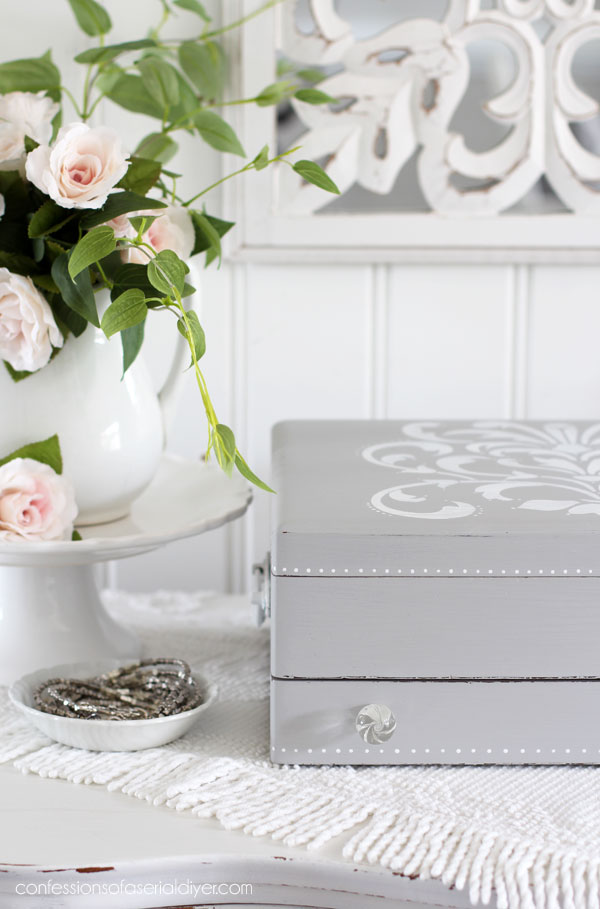
This custom Dixie Belle color turned out so soft and lovely. I think it ended up being about 1/3 Hurricane and 2/3 Cotton.
And this pretty stencil was just what this box needed! You can see how smooth it looks after a light sanding…
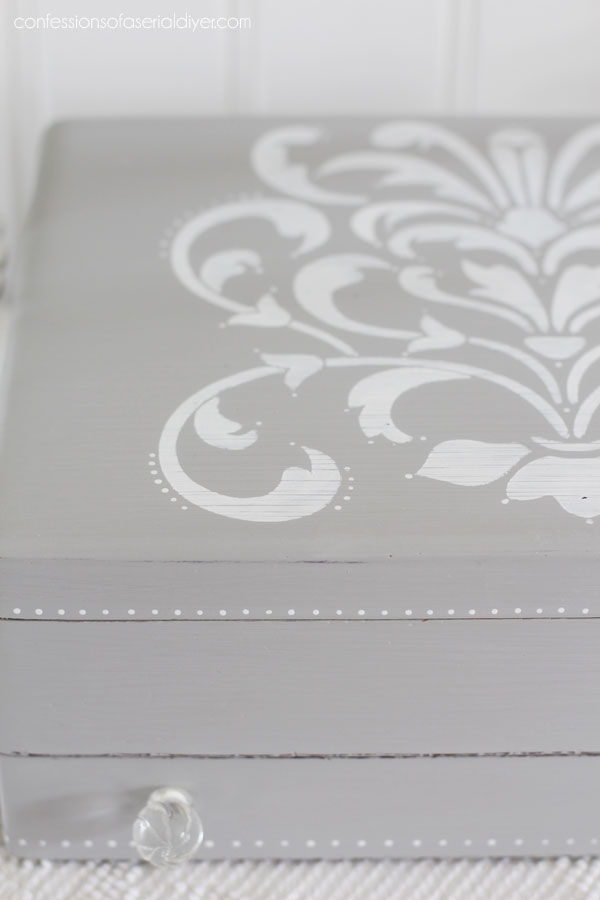
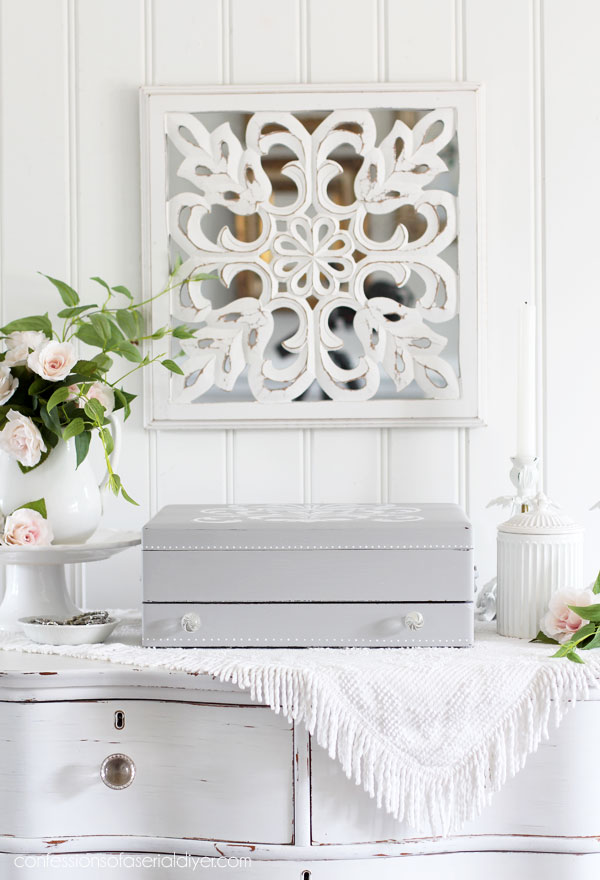
I found these sweet glass knobs at Hobby Lobby…
I removed the ugly wooden one that was on the top altogether and just left it without.
I added these handles on the sides that I had in my stash, but I think they originally came from Hobby Lobby also…
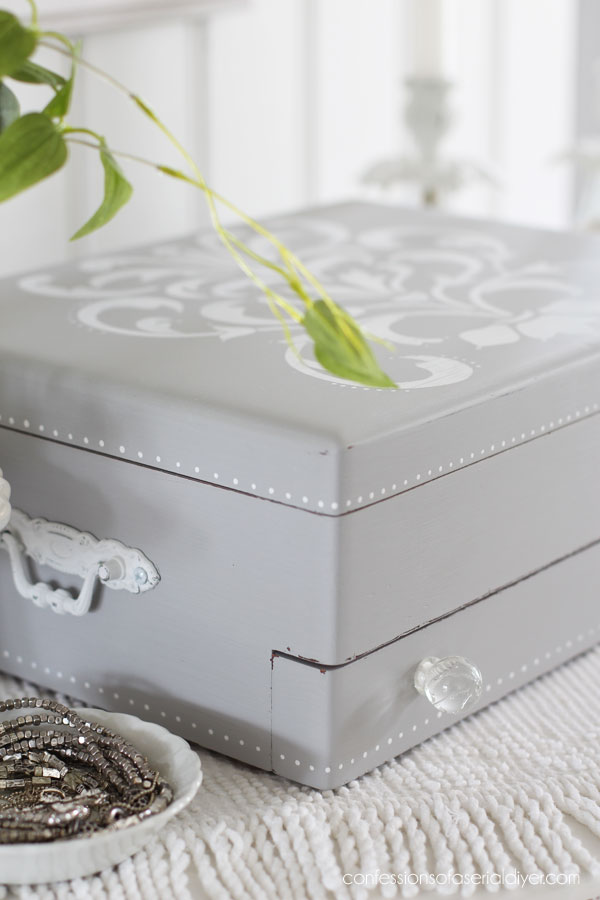
A little paint fixed them right up, and how sweet are the little dots that go all the way around? I didn’t measure them out…just eye-balled them.
And of course, I had to make the insides pretty too!
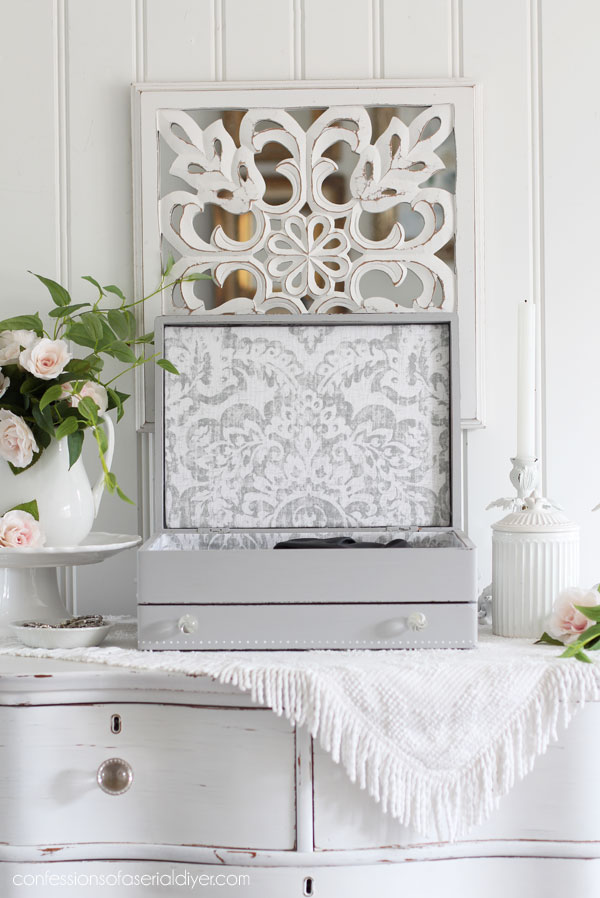
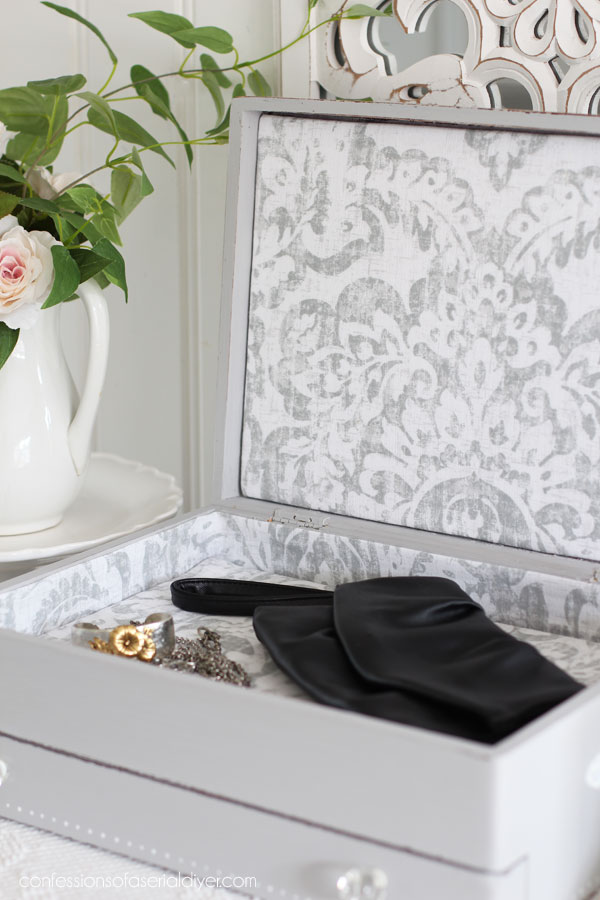
I share how I line boxes with fabric in this post!
I am thrilled to finally be able to cross this one off the list!!
If you missed anything so far, you can catch up below:
Thrifted Buffet Lamps Makeover
Yard Sale Sewing Machine Table Makeover
Yard Sale Sewing Machine Table Makeover
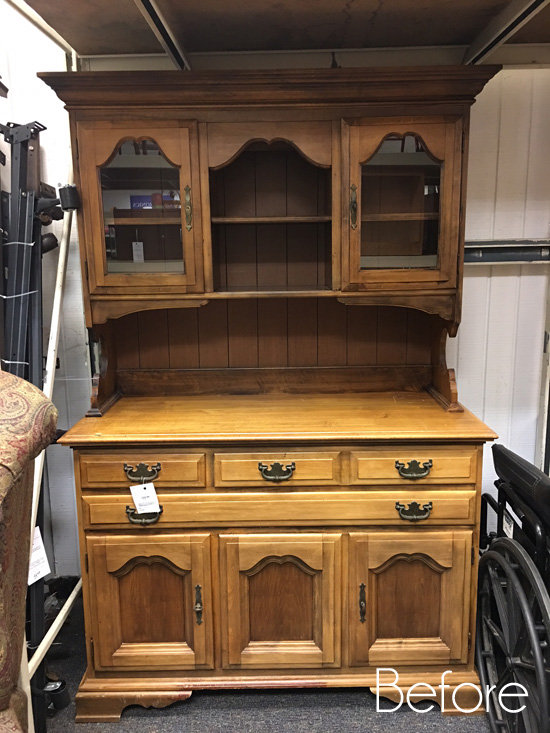
I have family coming in town to surprise my Dad for his birthday, so I’ll be back with this oldie but definitely goodie:
Have a great weekend!
UPDATE: See this pretty hutch now and a clip from my Dad’s surprise party HERE now!
XOXO,
![]()
Don’t Miss a Thing!
If you like what you see, there are several ways to follow along!
EMAIL * INSTAGRAM * FACEBOOK * PINTEREST * TWITTER


Maryellen Webber says
I love the custom paint you made for the flatware box and that stencil is perfect! Great job!
Christy says
Thank you, Maryellen! XOXO
Robin Simonds says
This project was amazing to me. You are very talented. Where is your shop? I would love to visit. I have followed you for awhile now. You really do inspire. Thank you.
Christy says
Aww thank you, Robin! I appreciate that! My booth is in the Virginia Beach Antique Mall here in Va Beach! XOXO
Cheryl Atkinson says
Hi Christy!! I am so happy you shared this post today and I will tell you why. I have that exact box. I have a similar stencil and of course some Dixie Belle paint. I hope you dont my if I copy cat you. I am still in a creative funk. Almost to the point that I was thinking about quitting and giving up my booth. Just so much going on in my life but you give me so much inspiration and I’m so grateful to you. I will definitely have to go back and read how you line the inside. This post was just what I needed. Thank you!
Christy says
Oh I am so happy to hear you are feeling inspired, Cheryl! Copy cat away! Sometimes immersing yourself in a creative project is good for the soul. Take care! XOXO
Janice Holt says
I love these boxes you do. You certainly don’t cut corners and the inside always looks as good as the outside. Also thanks for sending me the link to your Christmas Village houses you painted. I’ve seen others but as with all your things, yours just has that classy look to them that others don’t. Have a great week-end.
Christy says
Thank you, Janice! And you’re welcome! I keep looking out for another small Christmas Village to paint, but haven’t had any luck…maybe I will as we near the holidays! Enjoy your weekend too! XOXO
Cecilia from Georgia says
Rags to riches! Love it and the dots are so cute! I have a silver chest that I have actually painted and haven’t been inspired to finish but I gotta try the dots. I just ordered a stylist so that will be fun to play with ;). I am so lazy when I have to pretty up the insides but looking at your box gets me going to finish mine. Great job and thanks for the inspiration!
Christy says
Thank you, Cecilia! The stylus is a fun tool! And the insides are my least favorite part too lol! XOXO
Mary Kaiser says
I LOVE how that turned out. The inside fabric is perfect and I love how the stencil and simple dots make such a statement. Great inspiration for me once again as I think I have a old silverware box in my stash!
Christy says
Thank you, Mary! My fabric stash is low, so I was glad to find something that worked! XOXO
Rosie says
Sweet transformation! The added touch of the little dots along with the stencil gives it character. Have a great weekend!
Christy says
Thank you, Rosie! It was fun to be creative with the dots! Enjoy your weekend too! XOXO
ColleenB.~Tx. says
I love what you done to the box. Absolutely Gorgeous. Love how you added handles on the side. Great idea.
You giving me ideas on what to do with the 2 boxes that my mother had instead of them just being stored away. I just may have to paint one up to give to our new great grand baby for her to store all her little treasures / keepsakes in.
Great decorative keep-sake box to keep & save them small baby treasures in.
Have a Wonderful day and an enjoyable weekend.
Take care, stay safe, & stay healthy.
Christy says
Thank you, Colleen! Congratulations on your new grandbaby! One of these boxes would be lovely to store all those sweet baby treasures! Have a great weekend too! XOXO
ColleenB.~Tx. says
Thank You.
Our new Great Grandbaby ( our 5th Great grandbaby by the way) was born in April but haven’t had the pleasure of meeting her yet as our grand daughter’s husband is stationed in Colorado and we’re in Texas but do receive pictures but it just isn’t the same as seeing / meeting her in person. Hopefully we will get to meet our newest family member around the holidays.
Christy says
Aww I know it must be hard not to be able to squeeze her in person, but what a blessing! XO
Petra says
What a perfect shade of grey 😀 And I’m obsessing over those dots 😀 xo
Christy says
I love this shade too! Dixie Belle doesn’t have a really soft grey in their color pallet, so I’m so glad to have one to go to now! And the dots were fun to play with! Have a fantastic weekend!! XOXO
Christina says
Wow, super cute! Love the custom grey color, the stencil and the dots… the dots were an inspired addition! What a perfect lining. You always knock it out of the park Christy!!!
Christy says
Thank you so much, Christina! XOXO
annette pierce says
I read where you remove taping and stencils before the paint is dry…why and how do you keep it from smudging on your piece. thanks annette
Christy says
Hi Annette! If you wait for the paint to dry, you run the risk of pulling up the paint. You prevent that when you pull it off while the paint is still wet. I used spray adhesive on the back of the stencil to hold it in place. That keeps it from shifting and prevents smudging. XOXO
Deb Pugliese says
Oh, it came out absolutely lovely, as always! The dots are the perfect finishing touch. You’re making me wanna make a thrift store run today, though I never find the great stuff that you do. Maybe this time!! Love that wood plaque on the wall above the box, too! I have one like that and now I know what I’m going to do with it. Thanks for always inspiring me, Christy!
Christy says
Aww thank you, Deb! I am having a harder time finding treasures these days, I’ll cross my fingers for you!! XOXO
Sue Mellette says
Christy, I love what you did to the jewelry box! The color is so pretty and the stencil really does dress this piece up! But what I really think completes the look is your signature lining! It mimics the stencil and looks as if it were always a part of the jewelry box. I also love the glass knobs! Can’t go wrong there! Thanks as always for sharing your talents with us.
Christy says
Thank you, Sue! My fabric stash is getting a bit low, so I was so glad to find that one! And aren’t those glass knobs so sweet? I picked them up a while back and was so happy to have something to use them on! Have a lovely weekend! XOXO
Mikki Gilmore says
I LOVE this piece! Your work is so beautiful. I have a question about stencils. I purchased some from JoAnn’s by Fab Lab. These are small, the sheets are 7×10 and have 8 to 10 designs on each sheet. They also have what I would call a right and a wrong side. I can’t determine which is which. They have a tiny ridge around the edge of each stencil. Would you consider the ridge the top or bottom, right or wrong side of the stencil? Thanks for your help! XOXO Mikki
Christy says
Thank you so much, Mikki! Hmmm…I’m not familiar with those stencils, but I would assume the raised edge would be the top? Otherwise, I’m not sure it could lay flat? It seems they should have instructions included. I hope you are able to figure them out! XOXO
Carmen says
Happy Thursday!
I must say that was a nice surprise to see the finished product and the color selection was refreshing. I love the glass knobs.
Great job!
Happy Findings!
Carmen
Christy says
Thank you, Carmen! XOXO
Valorie Davis says
Very pretty. I did a similar box with a stencil, but used spackle instead of paint, which added a raised stencil. I used Dixie Bell Bunker Hill Blue on the box with the white raised stencil.
Christy says
Thank you, Valorie! Yours sounds so pretty!! XOXO
Patty says
Christy, I think this is my favorite of all these boxes that you’ve painted – and they all have been lovely! I have one that was my Mothers – in terrible condition. She passed away in March at age 92. I’ll try to do it justice using your creative touch as my guide :). Thanks for all the inspiration that you share – I’m not the only fan who loves you!
Christy says
Aww thank you so much, Patty!! I’m so sorry to hear of the passing of your mother, but it sounds like she lived a nice long life. You could redo her flatware box and use it to hold precious memories of her, perhaps? Take care! XOXO
Mary says
You always resurrect these boxes from the depths of Hades so Beautifully! This one is no exception. I can’t believe it’s been three years you’ve been in your home. I watched you guys every step of the way with that. You have such good taste❤️❤️❤️ Love your work. BTW, what is the tool you used to do the dots called?
Christy says
Aww thank you so much, Mary!! And yes, three years…can you believe it? We always called that tool a stylus, but when I was searching for it on Amazon, it is called a Stylus Dotting Tool. I linked to it in the post. 🙂 Have a great weekend!! XOXO
Mary says
Thank you, thank you, thank you! for changing our world, one piece/one project at a time 🙂 This little box has a whole new life now that you have redeemed it. 🙂 Love your projects Christy! Keep up the beautiful work!
Christy says
Aww you are the sweetest, Mary! I appreciate that so much! I feel honored to get to share my makeovers with all of you!! XOXO
Dianne Noffke says
Christy this a wonderful transformation. How you come up with these ideas I’ll never know but I agree with the other posters, you have great taste and you don’t cut corners. I love everything that you do and you give me so many ideas. If only I had a steady hand, painting would be so much easier.
Christy says
Thanks so much, my friend! I don’t cut corners on anything I plan to sell, but don’t look at the backs of the pieces or inside the drawers of the pieces I do for me ha ha! Have a great weekend! XOXO
Lizzy says
Perfection!
Christy says
Thank you, Lizzy! XOXO
Mary Loveland says
The box make over is wonderful, the dots genious! Another save from the landfill! Have to ask how you are feeling with your son in college; are you getting by okay?
Christy says
Thank you so much, Mary! I was a hot mess on the verge of tears the entire first week after Jack left, but after that, I was good. He settled in nicely and really likes it, so that helped! Thanks for asking! XOXO
Kathy M says
You never cease to amaze me with your transformations! I am in love with the dots! I doubt I could make them so straight and perfectly spaced though. LOL
Christy says
Thank you so much, Kathy! You just might surprise yourself! I had to stay close to the edge to keep them straight lol! XOXO
Melva says
Oh my, what a beautiful transformation! But then again, your projects all come out lovely. The attention to detail makes it look over the top. Thanks for the inspiration!
Christy says
Thank you, Melva! I appreciate that so much! XOXO
Joanne says
Another perfect transformation! I have one of my mother-in-law’s silver chests with monogrammed flatware still in it. I should do a version of your re-make. So pretty. Awesome job, again!
Christy says
Thank you, Joanne! Yes!! There’s no reason why the outside can’t be as lovely as the silver inside! XOXO
MrsSW says
Hi Christy – I think this is the prettiest box yet. 🙂
Sheila
Christy says
Thank you so much, Sheila! XOXO
Lauri says
I love everything you do, Christy, but those dots are the cutest! I’m obsessed. I have to try that soon.
Christy says
Thank you, Lauri! I started by adding them to the stencil on top and then I couldn’t stop lol! XOXO
Sherri says
Hi! I just visited your adorable shop! We are at VA Beach, but I escaped and left my husband and son playing Battleship in the hotel room on this rainy day! It was wonderful to see your lovely work in person! I was so happy to see the Dixie Belle products in person too. I was boring and got two waxes, white mud and pearlescent glaze, all of which I will be working with for the first time! The lamps and wooden box you just refinished are dang gorgeous! Thanks for all of your inspiration!
Christy says
Oh yay!!!! I’m so glad you got to stop by! I was in there at around 2:40 or so and dropped off the box and picked a few things up, so you must have come by after. I’m sorry I missed you! And thank you!! XOXO
Micah says
Beautiful!
Christy says
Thank you, Micah! XOXO
Marietta Walker says
You are so talented and I love scrolling to the second picture. You repeatedly take my breath away. You really do nail it EVERY DARN TIME. It’s amazing. I want that stencil! Any chance you remember where it come from. I would love to get it if you have an affiliate link to it! I have a ton of boxes to get started on!
I cannot thank you enough for sharing. You give me so much inspiration; I am humbled. I have some chairs to finish and then I will start my own blog and web site! I am excited.
Christy says
Thank you so much, Marietta!! I really appreciate that! I have had that stencil for years, so I don’t recall exactly where I purchased it, but my best guess would be Michaels. Happy creating!! XOXO
Kathy Blumenberg says
Lovely transformation! Thank you for sharing!
Christy says
Thank you, Kathy! My pleasure! XOXO
Marie says
You always do such a beautiful job on these flatware boxes, Christy. Love the stencil/dot detail. You gave me a great idea for my flatware box that we use for it’s intended purpose. It’s heavy to carry and I never thought to put handles on it. Thanks for the inspiration!
Christy says
Aww thanks, my friend! I bet handles would make it easier to carry! XOXO
Kathy W F says
As always, it’s beautiful. The custom color is just right and the stencil adds so much to it. Question….Hobby Lobby knobs are so unique but the threads on them are so long. Do you trim them and if so how? Love your projects!
Christy says
Thank you, Kathy!! I use a dremel-like took made by Black and Decker to trim them down. I have also used a very fine blade hand saw to cut them down in the past. XOXO