Hey there, beautiful friends! Who’s up for a sweet makeover? Today I’m sharing how I redid a fabulous thrift store find and how I lined the drawer of it with fabric.
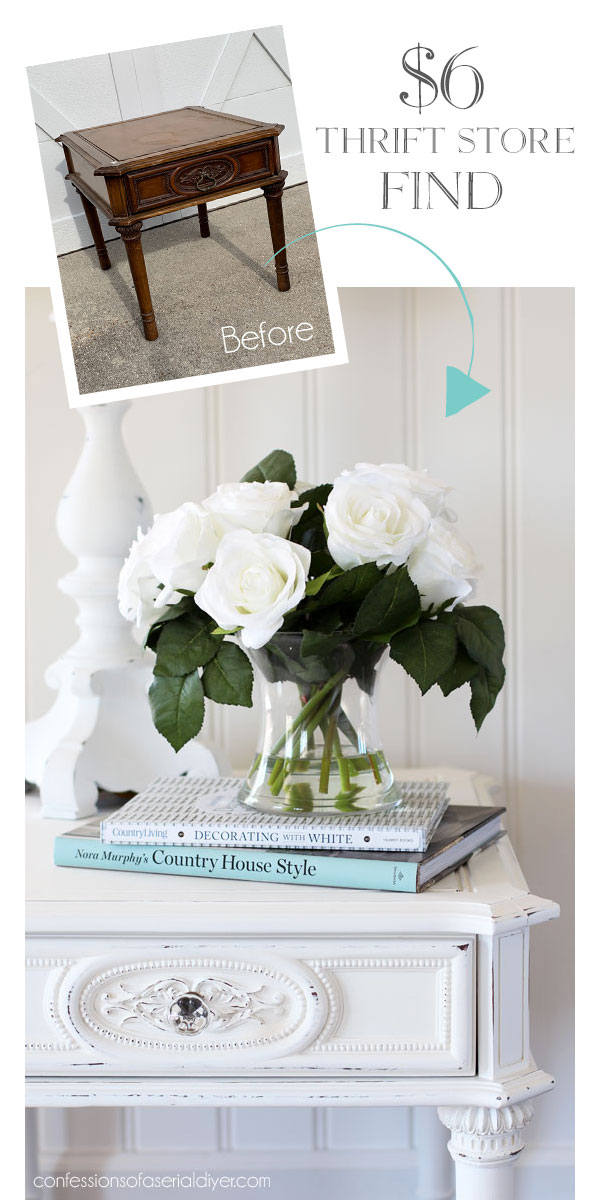
Today’s project piece is this end table I picked up for $6.25:
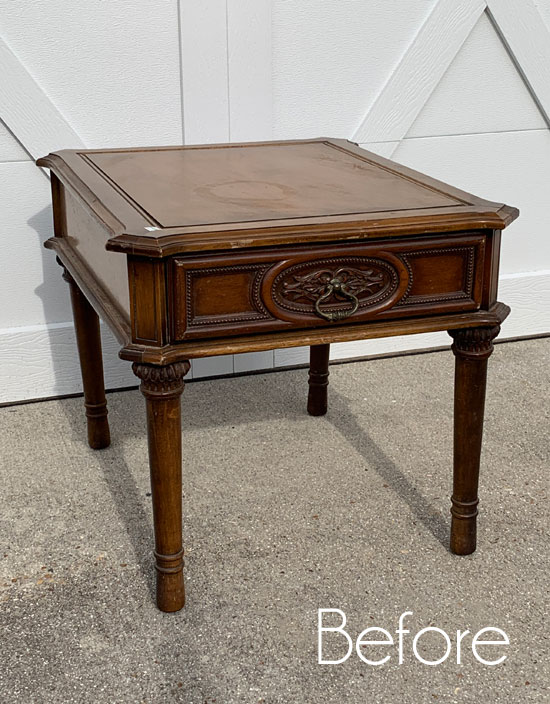
Can you believe it was only $6?

It looked more like this when I found it:
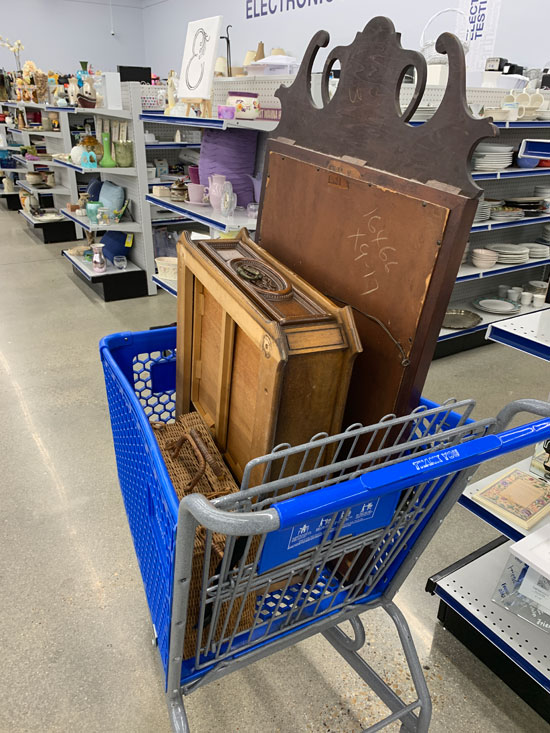
The legs had been removed and tucked inside. Maybe that’s why it was so cheap.
I didn’t attempt to assemble it in the store to make sure it would go back together properly, but for that price, I figured I would take my chances.
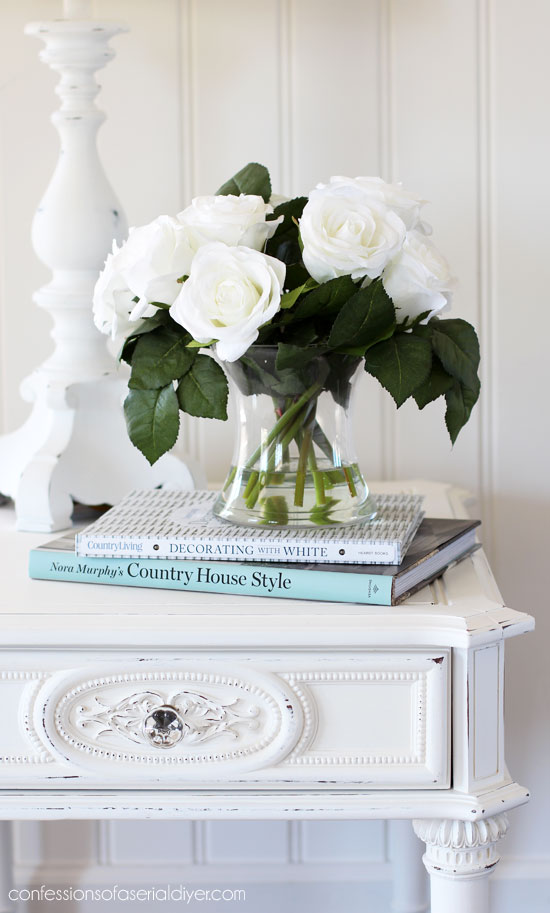
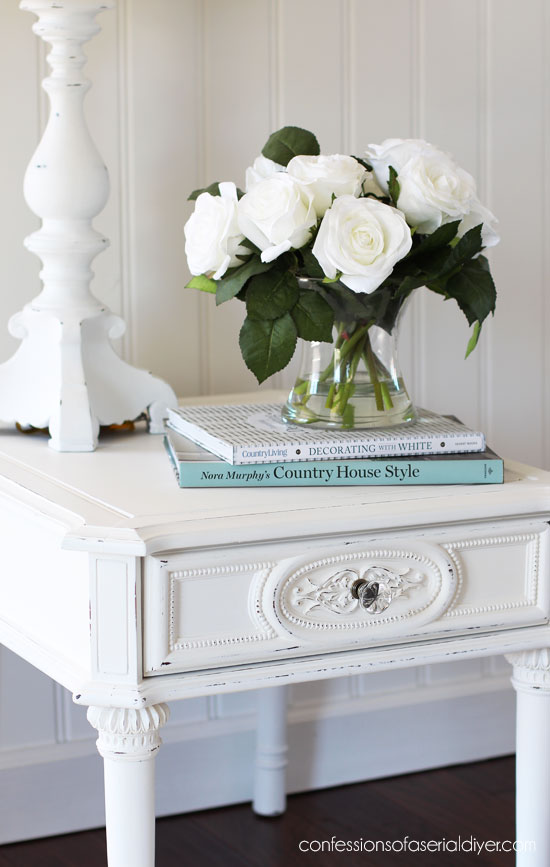
I don’t usually pick up many single end tables these days, but again, the price was right, and it has beautiful details that I just couldn’t resist!
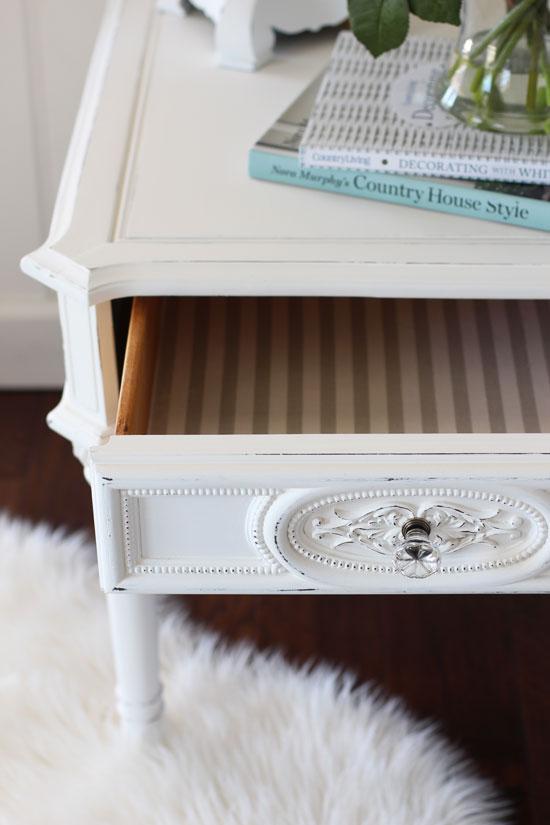
It didn’t need anything more than a simple paint job:
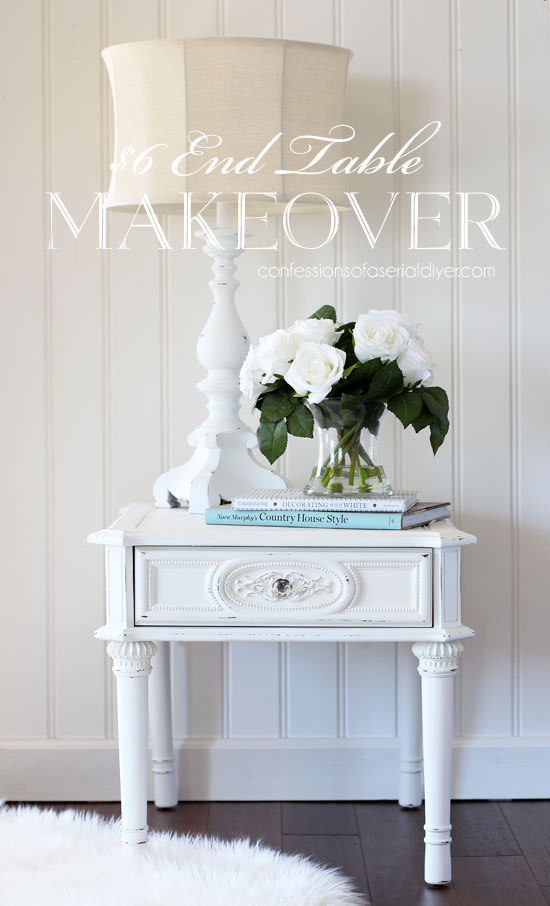
Just look at all those lovely details…
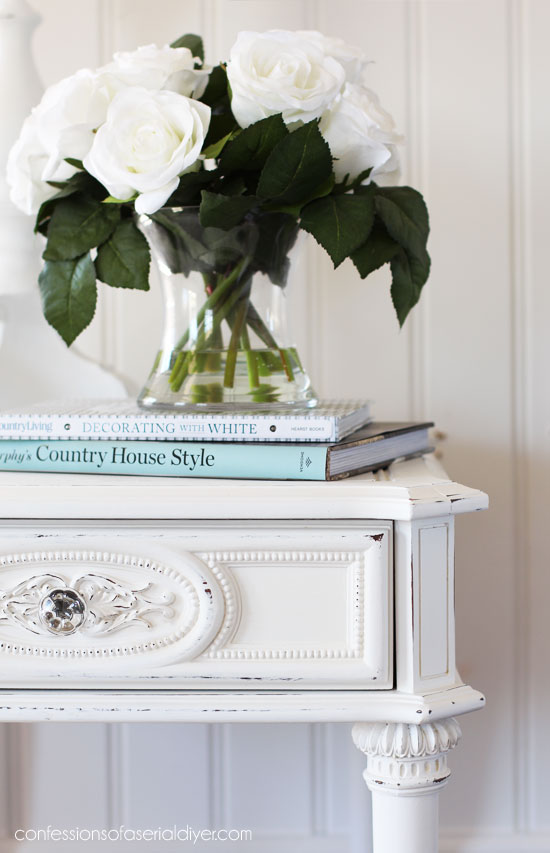
Anything more would have taken the focus from the pretty parts.
This is my favorite white, Bit of Sugar by Behr, made into DIY chalk paint. (Recipe HERE.) I’ve included a few affiliate links so you can find the products I love.
It took three coats. Then I gave it a light sanding with 220 grit sandpaper which helped highlight some of those details.
I used Dixie Belle’s clear Satin topcoat to seal. For everything but the top, I used my favorite brush specially designed for sealers by Wooster…
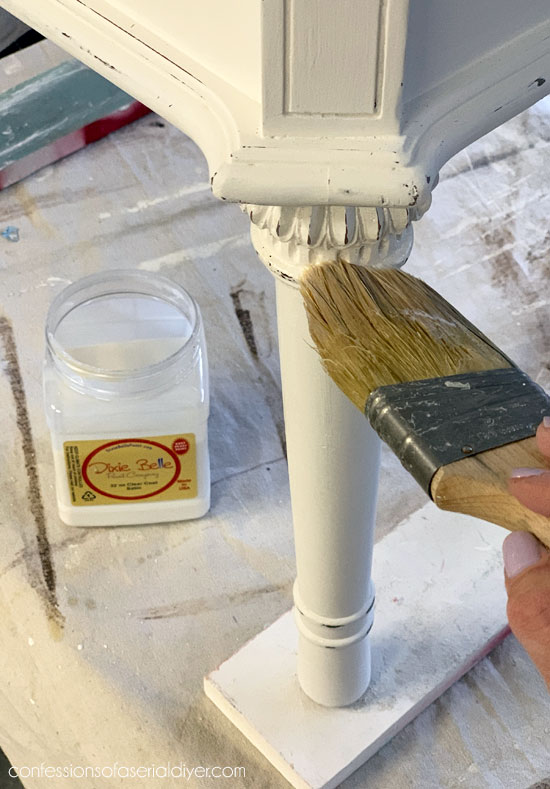
I’ve learned the hard way that if the sealer pools in those details, it will yellow, so applying it with a brush sparingly in those areas helped to avoid that. (If it does yellow in those areas, just paint right over it and be more carfeul sealing the nex time.)
I could have used my brush for the top as well, but I’ve discovered how easy it is to seal flat surfaces using a sponge applicator! This Dixie Belle sponge is awesome!
I really love how quickly and easily it applies the sealer. (They are very reasonably priced too at only $3!)

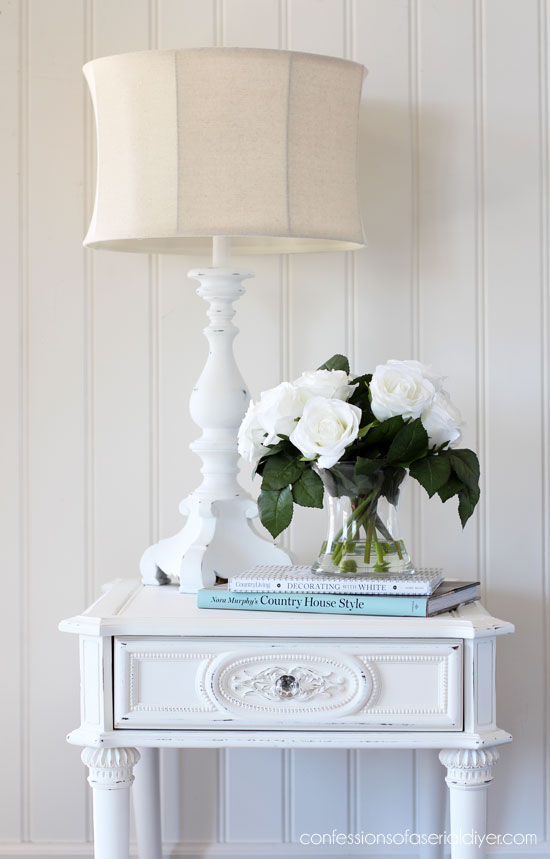
I replaced the pull with this pretty glass one I had in my stash, originally from HomeGoods.
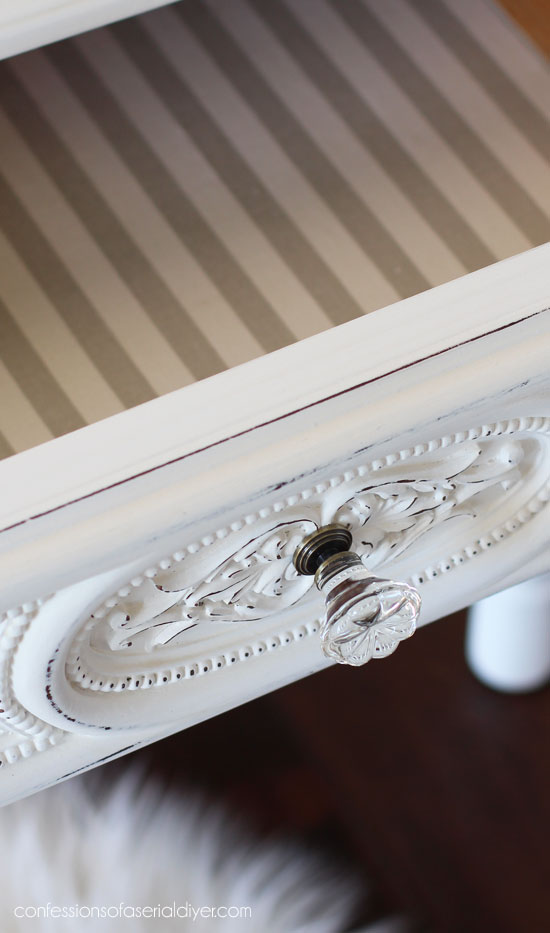
The drawer got some of this leftover fabric from our dining room chairs…
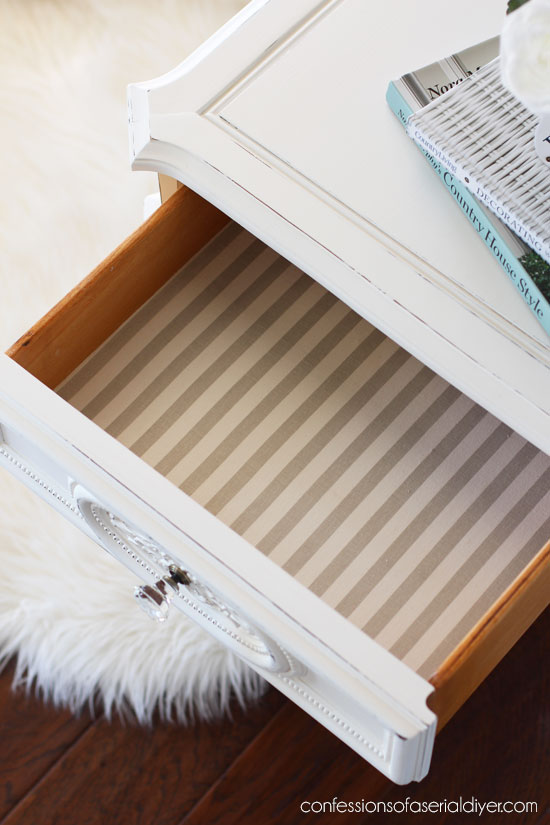
Since I used fabric with a white background this time, I primed the bottom of the drawer first. I have had drawers bleed through on light fabrics before so I didn’t want to take any chances this time!
I just taped off the sides with FrogTape and used left over primer from our kitchen cabinets:

I pulled the tape off as soon as I was finished with the second coat. You can skip this step if you choose a darker fabric. (Which I usually do!)
I made a quick video this time to share how easy it is to add fabric to your drawers:
If you have trouble viewing it, you can see it on YouTube HERE.
Easy, right? You can find that rotary cutting set HERE.
Another project done! Yay!
I’ll meet y’all back here on Tuesday with my Trash-to-Treasure gals sharing what I did with these baskets:
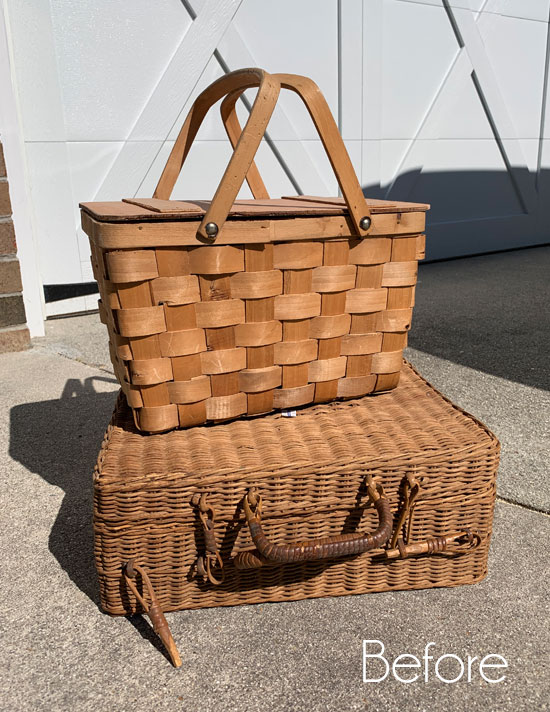
UPDATE: See how these baskets got a fresh new look HERE now!
Have a great weekend!!
XO,
![]()
Don’t Miss a Thing!
If you like what you see, there are several ways to follow along!
Email * Facebook * Pinterest * Twitter *Instagram

")


Rose Lefebvre says
What can I say…you hit it out of the ballpark again.
Christy says
Aww thank you, Rose!! Have a great weekend! XOXO
Mary Kaiser says
Beautiful now for $6 wow! I love the video for adding the fabric to the drawer, you make everything look so easy, yet look so cute while doing it!
Christy says
Aww thank you, Mary! Yes this was a steal! I grabbed it as soon as they put it out on the floor. Glad you enjoyed the video! Enjoy your weekend! XOXO
Sheila DelCharco says
Those details are so pretty! Very much worth the price tag!
Christy says
Thank you, Sheila…yes absolutely! XOXO
Christina in SW FL says
Very cute makeover Christy, you saved it! 🙂 Thanks for the video on lining the drawer. Very straightforward process. You know I adore light colors so this whole makeover looks so crisp and clean. The glad knob is just right!
Have a great weekend!
Christy says
Thanks, Christina! You’re welcome on the video…it’s always nice to see it in action! Have a great weekend too! XOXO
Michelle says
You did a great job on this end table, Christie! Simply beautiful!
Christy says
Thank you so much, Michelle! XOXO
Janice Holt says
Very pretty table and yes it does have pretty details. I love that you always line the inside of the drawers. Enjoy you working through your “stashes”.
Christy says
Thank you, Janice! Lining the drawers is always a nice finishing touch. Glad to hear you are enjoying seeing me work through each stash. I think I need to raid my storage room for round #4 and get that room cleared out! 🙂 XOXO
Cheryl Atkinson says
I love this little table and all its cute detail. You sure brought that back to life. I am so glad that I got to actually watch you line a drawer. You do not know how bad I am at that. I am going to buy that cutting mat thingy. 🙂 you should do move videos. I would subscribe to your channel in a heart beat. Thank you!
Cheryl
Christy says
Thank you, Cheryl! I’m glad you enjoyed the video…sometimes it really helps to see the process in action! And that cutting mat and rotary cutter set is awesome…I use it all the time! Hoping to do more videos, so stay tuned! XOXO
Donna says
Very pretty transformation!
Christy says
Thank you, Donna! XOXO
Cecilia from Georgia says
Hi Christy! I love the bead details on this table and the table too. You will sell this one quickly! My latest note to self….when buying OOPS paint don’t always go by what color is dribbled on the outside of the can;) I bought what I thought was a pretty lime green (well, that color was all over the outside label) and when I got home it turned out to be a strange dark green. Lesson learned…Can’t wait to see what you do with the wicker thing. XOXO
Christy says
Thank you, Cecilia! oh no!! That is a bummer…I’m glad you mentioned that as I will be more careful next time with the oops paint! XOXO
Mari says
Thanks for the tutorial on the fabric drawer! And may I ask the color of gray in the room where you are doing the video?
Christy says
My pleasure, Mari! That color is Campfire Ash by Behr and I love it! I used it in almost all the rooms in our house! 🙂
gwen says
always a delight! i can’t wait for you to tackle the mirror in that shopping cart!
Christy says
Thank you, Gwen! That mirror is so pretty…it will be fun to do! XOXO
Denise Zdziennicki says
I wouldn’t be able to resist all the detail for a mere $6.25 either! And even if it didn’t have legs, with all your talent and creativity, I’m 100% sure you would have still come up with something amazing! Pinned 🙂 Have a super day my friend. xo
Christy says
Right? Honestly, when I first saw it, I thought it was missing the legs and I was ready to buy it anyway ha ha! Thank you so much! Enjoy your weekend!! XOXO
Cecilia says
Gorgeous, Christy! I love that you took a chance with the table even though it was all in pieces. It really paid off. I think this one might be one of my favorites – the details are amazing on it and the paint really makes it shine!
Christy says
Thank you, Cecilia! I actually thought at first that it was missing the legs, and I’m not sure what I was going to do with it, but I was ready to buy it anyway ha ha! XOXO
Rose says
Loved the video. I always wondered how you applied the fabric. Thank you for this.
Christy says
Thank you, Rose! You are so welcome! Glad it was helpful! XOXO
Becky says
Goooorgeous! I didn’t even see the beautiful details before you “painted them out”, haha! (Errrr… “pointed”/”painted” same thing, right? OK, I’m in a goofy mood! Too much coffee!)
I’m going to have to try one of those sponges. I keep hearing good things of them!
What a deal, $6.25, AND not having to wrestle those legs around!
Christy says
Ha ha thank you, Becky! Yes the details were totally lost in that dark wood. The sponges are awesome…kind of the same concept as using a sponge brush, but I don’t like those at all. You can apply nice even pressure with the sponge applicator so it works so much better! XOXO
Kimberly says
Such a pretty little table. SIX DOLLARS?! You did a great job. Just picked up a small stack of baskets at the thrift store this week. Can’t wait for Thursday. 🙂
Christy says
Thank you, Kimberly! A steal for sure! See ya Tuesday! XOXO
Michelle says
Did you sand it before painting it?
Christy says
No sanding needed when using chalk paint! You can see my full tutorial for painting with chalk paint here: https://www.confessionsofaserialdiyer.com/how-to-paint-furniture-using-chalk-paint/ XO
Marcie Lovett says
I definitely would have walked past the original table, but not now! Love how it turned out, Christy. The crystal knob is perfect and it was fun to watch the fabric lining go in the drawer. I always think of it as a technique to cover a stained drawer, but maybe I need to line all my dresser drawers now. ????
Christy says
Thank you, Marcie! I think I might have left it there had it been put together, but I’m so glad I took a chance on it! I always line the drawers of my project pieces, but none of mine at home are lined lol! XOXO
Robyn D Wright says
Christy. do you keep your brushes wrapped all the time or only while you are working on a project. How do you keep it from drying out?
Also, was this table real wood?
Christy says
Hey Robyn! I only keep my brushes wrapped while working on a project. I might even use them for two or three projects, and then I give them a good wash and hang them up to dry. I keep them hanging between uses. This table is real wood. 🙂
Jody says
I just love older furniture like was in my mom’s and grandparents houses. I do not mind painting them because they sparkle. And thank you with how to make chalk paints.
Christy says
They sure don’t make furniture like they used to! I love having older pieces in my home, and yes, paint makes them sparkle! XOXO
Mikki Gilmore says
I LOVE all of your makeovers, and this one is super nice with an original price tag of $6. I have a question slightly off topic… Your white rose arrangement. I seem to remember you made this. I can’t remember what you used as the “water”. Is it resin?
Christy says
Thank you, Mikki! I bought this one at HomeGoods, but I did make a smaller version which you can revisit here: https://www.confessionsofaserialdiyer.com/how-to-make-a-faux-real-flower-arrangement/ I share all the products I used in that post. XO
madelyn arias says
Hello, that end table came out beautiful . How do you avoid brush marks when using chalk paint? TIA.
Christy says
Thank you, Madelyn! A good brush makes a big difference. A 2 1/2″ angled Purdy brush is my favorite for minimizing brush strokes. Also brushing in the same direction across the entire surface and using a light hand on the final coat. Then sanding well with 220 or 320 grit sandpaper after everything is dry. XO
Hester says
I am wondering why you didnot paint the sides of the drawer?
By the way, your blog with all the renovations are fantastic (exactly the best of all).
Christy says
Hi Hester! The sides of the drawer were in good condition. You run the risk of having sticking drawers when you paint the sides, so I only do that if they are in really bad shape. Thank you so much!! XOXO
Jamie says
Thanks for the video. Quick question- do you ever Mod Podge over top of the fabric to protect it from marks or stains?
Christy says
Thanks, Jamie! I don’t usually Mod Podge over fabric. It will change the look slighltly, and then you would need to seal it with a poly so that when you wet it to clean it, it doesn’t reactivate the MP and make it sticky, since it is like a glue. If the fabric were to get really dirty, it would be easy enough to just pull it out and replace it. Hope this helps! XOXO