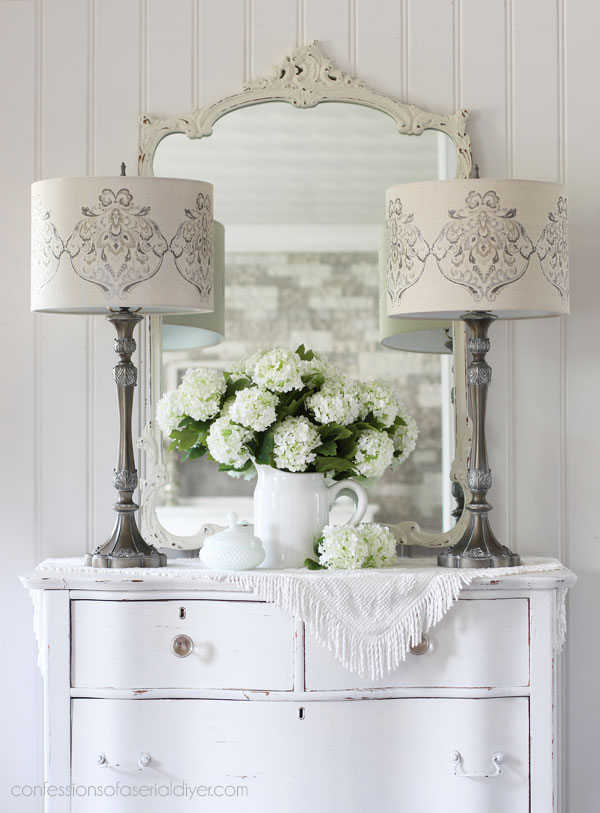
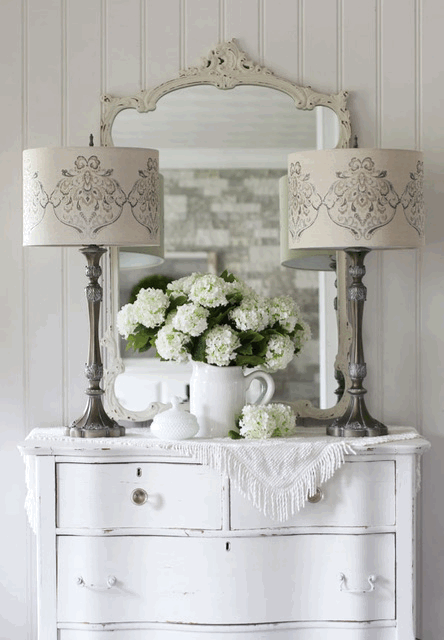
Hello dear friends! I’ve got another Spring Haul project completed! Although I’ve got two lamps to share today, this post is more about how adding a transfer to a lampshade can give your lamps an entirely new look!
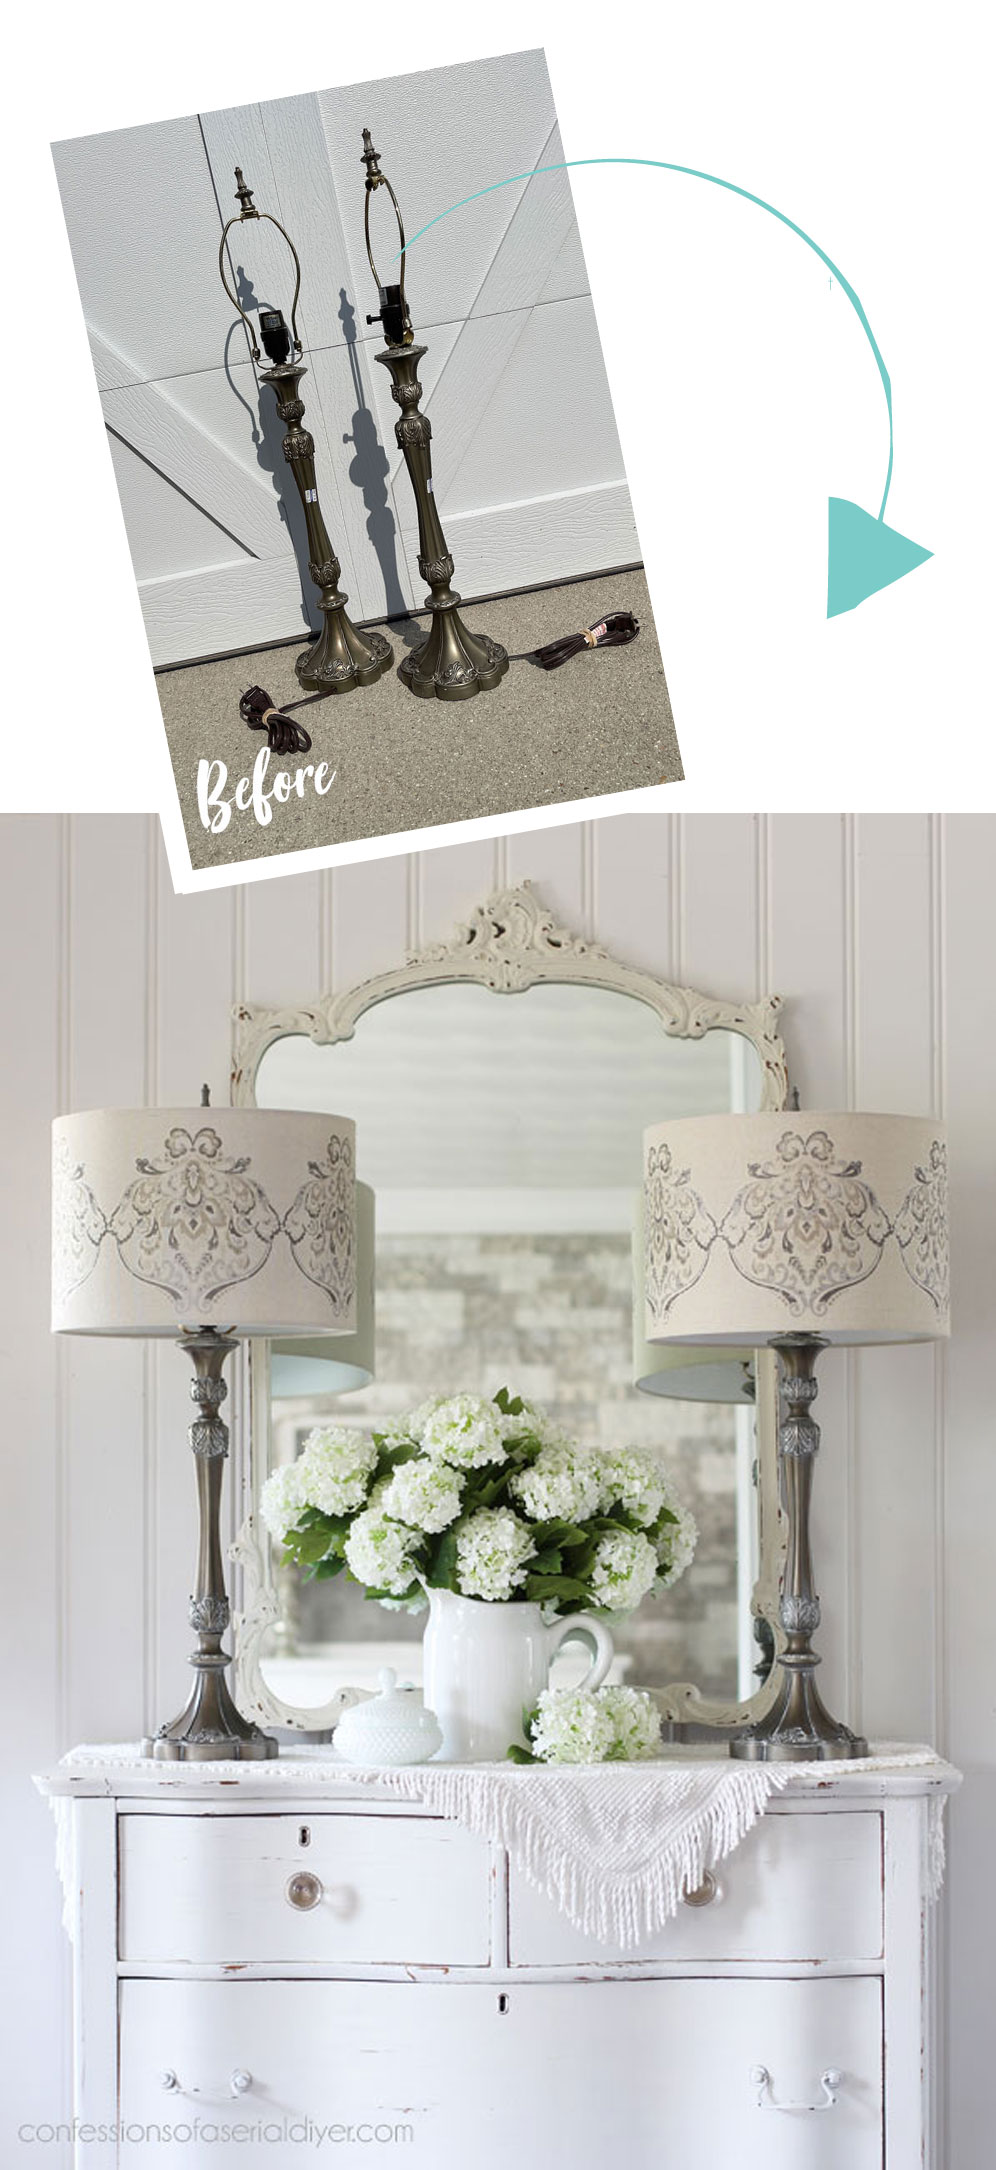
These pretty lamps I picked up for $10 each at the thrift store were already quite pretty in my opinion:

But I did intend to paint them.
However, plans changed!
When I was searching for two lampshades in my stash that matched, I found these:
![]()
The top one I had picked up at HomeGoods a while back, and the bottom one I found at the thrift store on clearance for only $1.98!
The shape and size were identical!
However, these plain shades didn’t do much for the lamps and I wasn’t feeling very inspired when deciding on a color for the lamps that would work well with them, so I decided I would fancy them up a bit with a transfer!
Y’all may remember this lamp I shared as part of my last smalls post where I added a transfer to the shade:

That sold right away! So, I thought I would pretty up these shades the same way!
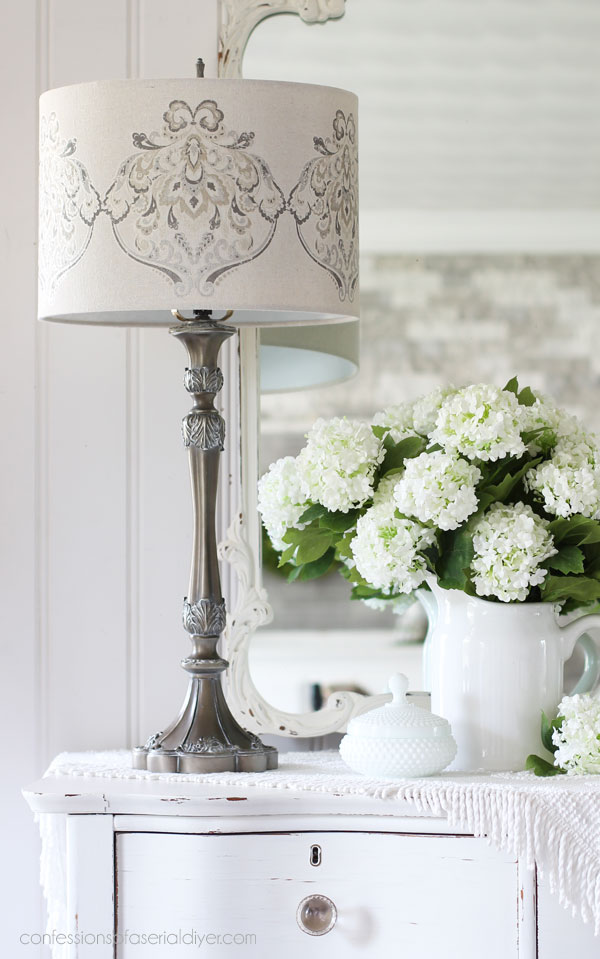
I ended up pulling out this Antique Damask transfer:
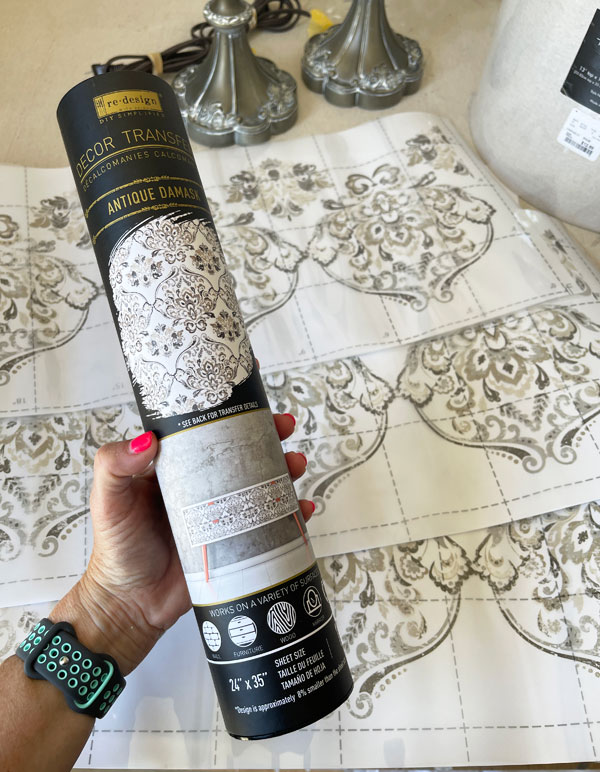
It appeared to have more blue in it from the image on the front, but when I pulled it out, there were more tans/greens which was an almost perfect match for the lamps as they were!
Adding a transfer to a lampshade
To add this transfer to my shade, I first cut apart the parts I wanted to use:
![]()
(My shades were new and wrapped in plastic, however if you are updating existing shades in your home, I would recommend cleaning any dust off of them with a lint roller or packing tape first.)
Next, I lined up the transfer where I wanted it to go, and with my hand firmly underneath for support, I burnished the transfer to the shade.
The transfers come with a burnishing tool, but I found this craft stick to work a bit better since transferring the transfer to a shade takes just a bit more effort:
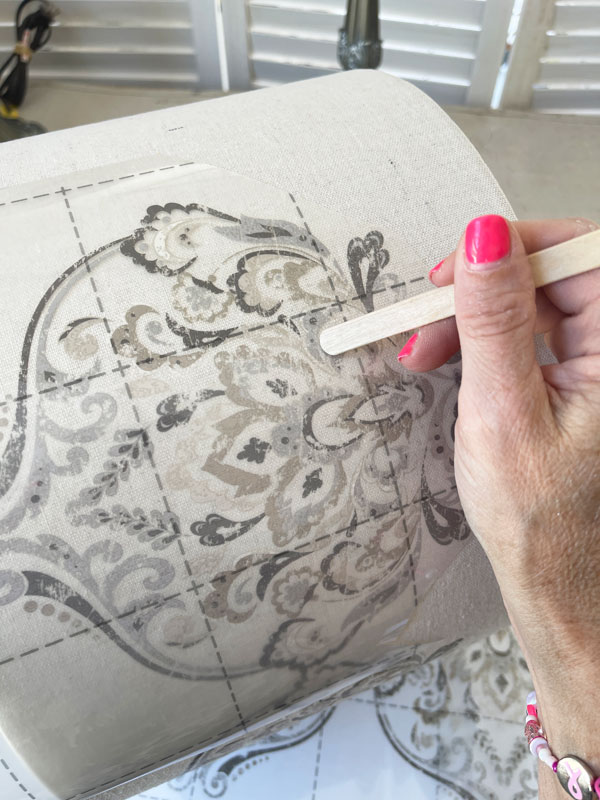
Again, you will want to put your hand directly under where you are rubbing for support.
The lamps
Because the lamps already matched so nicely as is, I just decided to highlight the details with a little Whitewash Glaze:
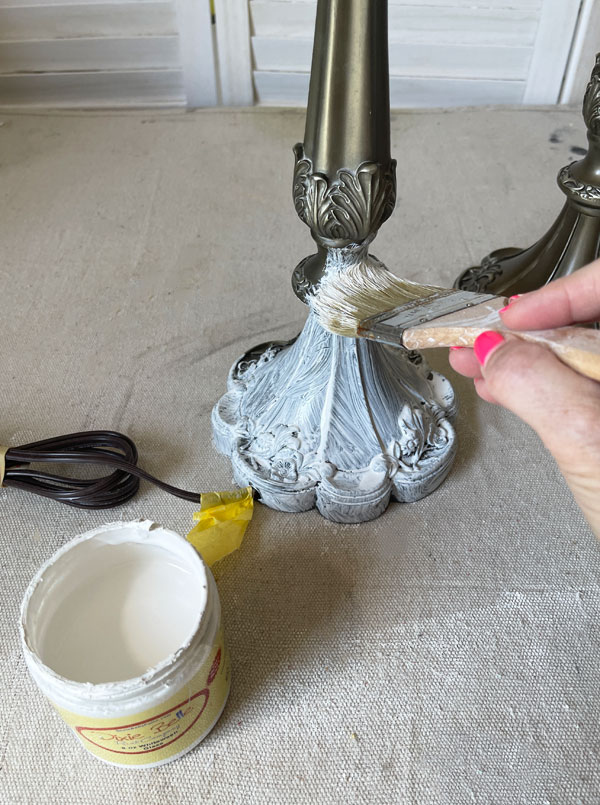
After applying it with a chip brush, I wiped away the excess with a clean cloth:
![]()
Here is the difference with and without:
![]()
Glaze acts as a sealer, so that was it, and this simple makeover was complete!
The After
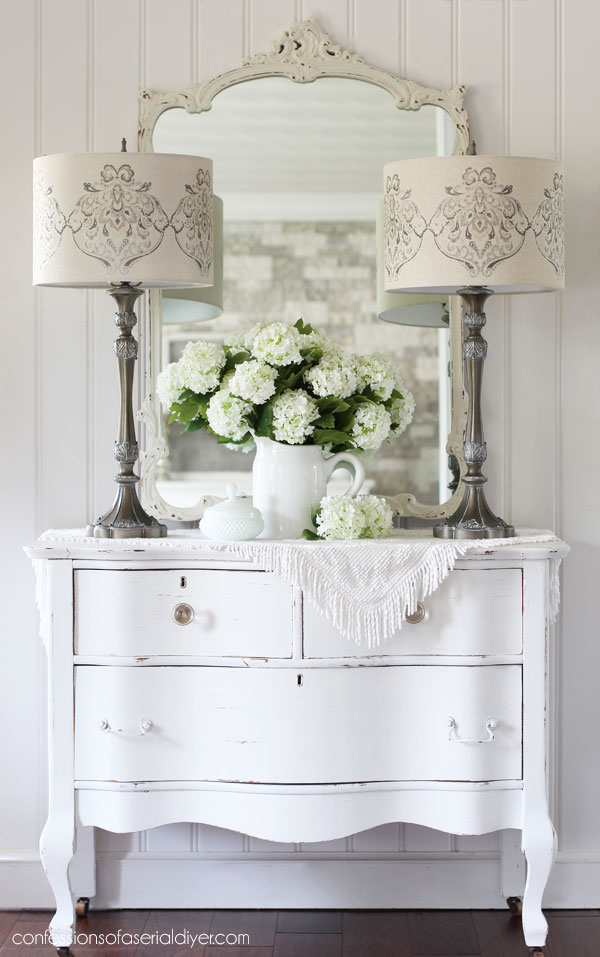
The shades really add so much and work so well with those pretty lamps!
This transfer came with three sheets, so I still have one left to use on another project, plus the parts I cut off the top.
![]()
The glaze softened the original color a bit also.
![]()
And the transfer doesn’t go all the way around the lampshade, but it doesn’t need to.
![]()
I didn’t seal the transfer with anything.
Here’s a peek at how they look lit:

Another one done, only TWO to go!!
You can visit any of these makeovers at the links below!
$5 Thrift Store Box Makeover with Transfer
Chalk Painted Basket
No Sew Fabric Basket Liner
Shabby Candlesticks
How to Paint Fabric (chair makeover)
Painted Dresser with Transfer
Painting the Smalls #17 (lamp, small box, horse, napkin holder, and mirror)
Side Table Makeover
Metal Bread Box Makeover
Ballerina Decoupage Paper Box
Petite Side Table Makeover
French Provincial Night Table
Repurposed Cigar Box
Antique Oak Chair Makeover
Painting the Smalls #16 (candlesticks, small box, tray)
Stenciled Mirror Makeover
Hutch Makeover
To my friends here in the US, have a safe and happy Fourth of July!
I’ll see y’all back here on Tuesday with this wall shelf my sister was tossing:
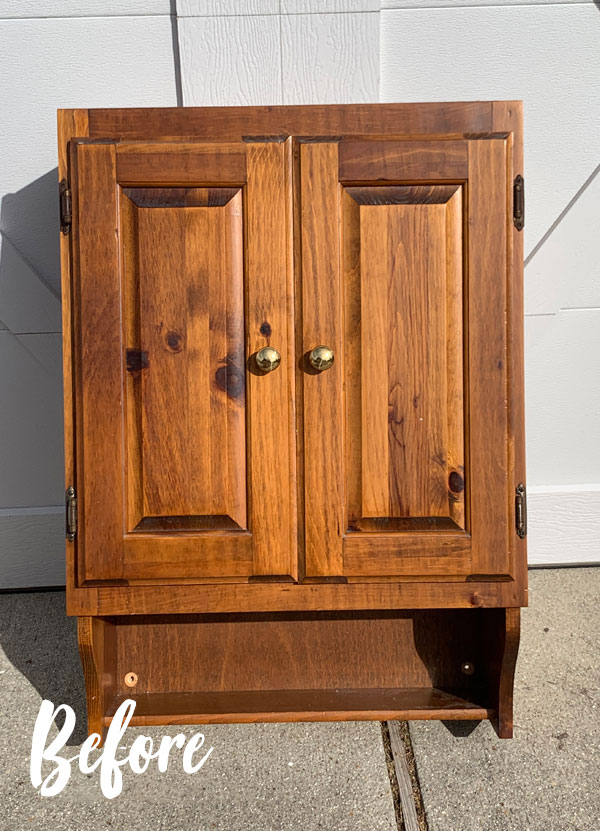
UPDATE: This is a replay you don’t want to miss! See how I transformed it HERE!
Have a fabulous weekend!!
XOXO,

Don’t Miss a Thing!
If you like what you see, there are several ways to follow along!
EMAIL * INSTAGRAM * FACEBOOK * PINTEREST


Get FREE SHIPPING on all orders over $50. No code needed at checkout! Orders under $50 always enjoy $8 flat rate shipping! Most orders ship same or next business day!


Petra says
When you said you weren’t going to paint them I thought oh dear! But that glaze is amazing!!! And I knew that whatever you did it was going to look pretty! Well done, they’re lovely 😊
Christy says
Thanks so much, Petra! I was sure I would paint them, but I ended up not needing to lol! XOXO
Mary Kaiser says
Wow they turned out so beautiful! Those will sell in your booth really fast! I love how the white glaze was just enough to soften the metal just enough! You are so talented to think of that!
Christy says
Thank you, my friend! I hope so! And yes, I love how the glaze does that! Have a fantastic weekend! XOXO
Janette says
Another gorgeous do-over, love the shades, wow.
Have a lovely 4thJuly, enjoy.x
Christy says
Thank you so much, Janette! Enjoy your 4th also ! XOXO
Janice Holt says
These look so pretty and the glaze does soften the base. Love the transfer on the shades. Bet they will sell quickly. Another great make-over. Have a safe and happy 4th.
Christy says
Thank you, Janice! I hope they sell fast! Enjoy your 4th too! XOXO
Sharon says
I love the transfers on the lamps! They look like they were made to be together!
Your projects inspire me often as we seem to have similar tastes when thrifting. 🙂 I have a small gift/home decor (repurposed of course) in the North Georgia mountains and am also a fellow Dixie Belle Retailer! I would LOVE to know how you did the photo with the lights coming on and off!
Thank you and keep the inspiration coming!! <3
Christy says
Thank you so much, Sharon! It’s so nice to ‘meet’ a fellow retailer!! I used an app on my phone called ImgPlay (all together, no spaces) to make the gif. It’s really easy to use! Have a great weekend!! XOXO
Marcie Lovett says
They are charming, Christy! I was sure you’d paint them, but this treatment works beautifully with the new shades and that transfer is the perfect finishing touch.
Christy says
Thank you, Marcie! I was sure I would paint them too ha ha! XOXO
Marietta says
You did it again!
Christy says
Thank you so much, Marietta! XO
Anissa says
what about using something like a wooden rolling pin instead of your hand underneath while burnishing on the lampshade?
i really love how these turned out and i will definitely pay more attention to the lamps when i’m thrifting now!
Christy says
Thank you, Anissa! Using my hand worked fine, but you could certainly try a rolling pin. You just need something to stabilize the shade from underneath while you rub. I hope you find some shades on your hunt! XOXO
Niki says
Very cool. I think this transformation just brings the lamps upscale! The color will go with just about anything.
Happy Independence (1776) Day Christy!!
Christy says
Thank you, Niki! Yes, very versatile color indeed! Happy Independence Day! XOXO
LORRI R says
I really like the transfer on the light shade..very unique..looks like transfers can be put on a variety of mediums. 😍
Christy says
Thank you, Lorri! Yes, they sure can! XOXO
Cheryl Atkinson says
Hi Christy! I just saw this transfer and passed it up but now you know I need it. I love what you did with these lamps. Why didnt you go aall the way around?
Christy says
Ha ha yes go back and get it! This transfer comes with three sheets, and I used two of them on these lamps. The third sheet would not have been enough to take the pattern all the way around evenly, and I didn’t want to open another transfer. XOXO
Linda Amaral says
What a great makeover with just a little effort. Your creativity is inspiring. Thank You!!
Linda
Christy says
Aww thank you so much, Linda! XOXO
Celia says
These lamps turned out really pretty, you have a good eye for embellishments. I have two similar lamps with silk lampshades that I would like to paint and possibly add a transfer. Do you think that would work on this type of material? Thank goodness you are there to help solve my problems!
Christy says
Thank you, Celia! I have spray painted textured silk shades before and it worked great…I would use flat spray paint for that. I haven’t tried a transfer on them though, but I don’t see why it wouldn’t work. XOXO
Tissy Ramsey says
Simply elegant and beautiful!
Christy says
Thank you so much, Tissy!! XOXO
Karen Thompson says
How beautiful are these! I love them! No doubt another great job. I so enjoy seeing your posts and everything you do. You give me so much inspiration, now I just need your energy to get it all done because I would love for my house to be decorated with so many of your project pieces! Guess I’ll just have to move to Virginia 🙂
Christy says
Thank you so much, Karen! I really appreciate that! This blog really keeps me on track lol! XOXO
Janet says
These lamps & shades look awesome!! as all your project do!
Christy says
Aww thank you so much, Janet! XOXO
Becky says
Love these! The transformation is great!
Christy says
Thank you so much, Becky! XOXO
Geri says
Hi Christy,
Love the lampshade transfer that you put on these! They turned out so pretty, thank you for sharing your beautiful work with us, I look forward to seeing that sewing box as I’ve passed them up in shops before!
Christy says
Thanks so much, Geri! I’m so glad you like them! I’ll be back with the sewing box on Tuesday!! XOXO
Caye Cooper says
Wow and WOW!! Great job, Christy! I think what a chore it would be to apply the transfer with your hand under the shade, making sure the design stuck. They look lovely, but then, What else can we expect??? 🙂
Christy says
Aww thank you so much, Caye! It really wasn’t too bad at all, but did take some patience lol! XOXO
Melva says
Wow! I just love how these lamps turned out. The shades have just the right amount of color to go perfectly with the shades. 👍🏻
Christy says
Thank you, Melva! I’m so thrilled they fit so well! XOXO
Josee says
Those are just awesome!!!!!!!!!!! They are beautiful and more so once lit. What a great vision you have.
Christy says
Thank you so much, Josee! I appreciate that! XOXO
Cara says
Love these!
Christy says
Thank you, Cara! XOXO
Deanna says
Love the new look with the glaze. A perfect addition to make the details pop. Karma finding the two different shades that went together perfectly with the added transfers. Another great transformation! Hope you’re enjoying your summer.
Christy says
Thank you, Deanna! The glaze was just enough to tone down the color and bring out those pretty details for sure! And yes, I was so excited that I had two shades that worked so well…they were the only two I had in my stash that matched lol! XOXO
Laura Lee says
Christy, I love how the lamps and shades turned out. Question: were the lampshades perfectly smooth, or dud they have a slight texture (like linen)?
Christy says
Thank you, Laura! These were smooth. XOXO
Ruth Anne says
Transfers on lampshades are a beautiful thing! Your lamps turned out so nicely! I had one of those sewing organizers that didn’t last long in my (former) booth–I’m sure yours will sell well too, especially after you give it the Christy treatment!
Christy says
Aww thank you so much, Ruth Anne! Yes, always hoping for a quick sale! XOXO
Denise says
These are gorgeous! And I love the giff with them turning on! 🤗 have a super long worry my friend! XOXO
Christy says
Thank you so much Denise!! I forgot to show the last lamp I did with the light on, so I made sure to capture that this time lol! XOXO
Karen Moroe says
Beautiful. They look so fancy now.
Christy says
Right?? Thank you, Karen!! XOXO
Denise E. Hubbard says
Christy, the finished lamps turned out beautifully! I also love the white mirror that you staged the lamps with. Enjoy your posts!
Denise
Christy says
Thank you, Denise! I forgot to link to that mirror. It was one I redid back around 2016. It was a $25 thrift shop find, and I just had to keep it! Thank you so much for following along with me! XOXO
Kay says
Love the transformation, well done!!
Christy says
Thank you, Kay! XOXO
Cecilia says
Those turned out so pretty! It’s really amazing what you can do with the transfers too. Who’d of thought about putting them on a shade? 😊 love it!
Christy says
Thank you, Cecilia! I’m really having fun with transfers lately…I’m going to try them on everything ha ha! XOXO
Sheila Pack says
SO perfect. I didn’t think I would like the whitewash, but it really brought out the design elements of the lamps, and ended up just right! LOVE the transfer-on-shades idea! Wonder if you could use a smooth bowl (or other round solid object) underneath the area being worked on to provide support… I can see myself ruining a good lampshade by denting it while applying the transfer, lol. I just love opening your emails, there’s always something beautiful inside!
Christy says
Aww I appreciate that so much, Sheila, thank you! I rubbed pretty hard and didn’t have any issues. However, if your lampshade is older and has become brittle over the years, it may crack with the pressure. Someone else suggested a rolling pin, but it wasn’t too bad just using my hand. Enjoy the rest of your weekend! XOXO
Shirley says
These are absolutely gorgeous! I have several of these type lamps and would love to try my hand at this. Just gorgeous! I can’t say it enough!
Christy says
Thank you so much, Shirley!! XOXO