Hello sweet friends!! Today, I’m sharing a super boring mirror that I turned into an antiqued Christmas mirror!
I had absolutely no idea where this project was going when I started!
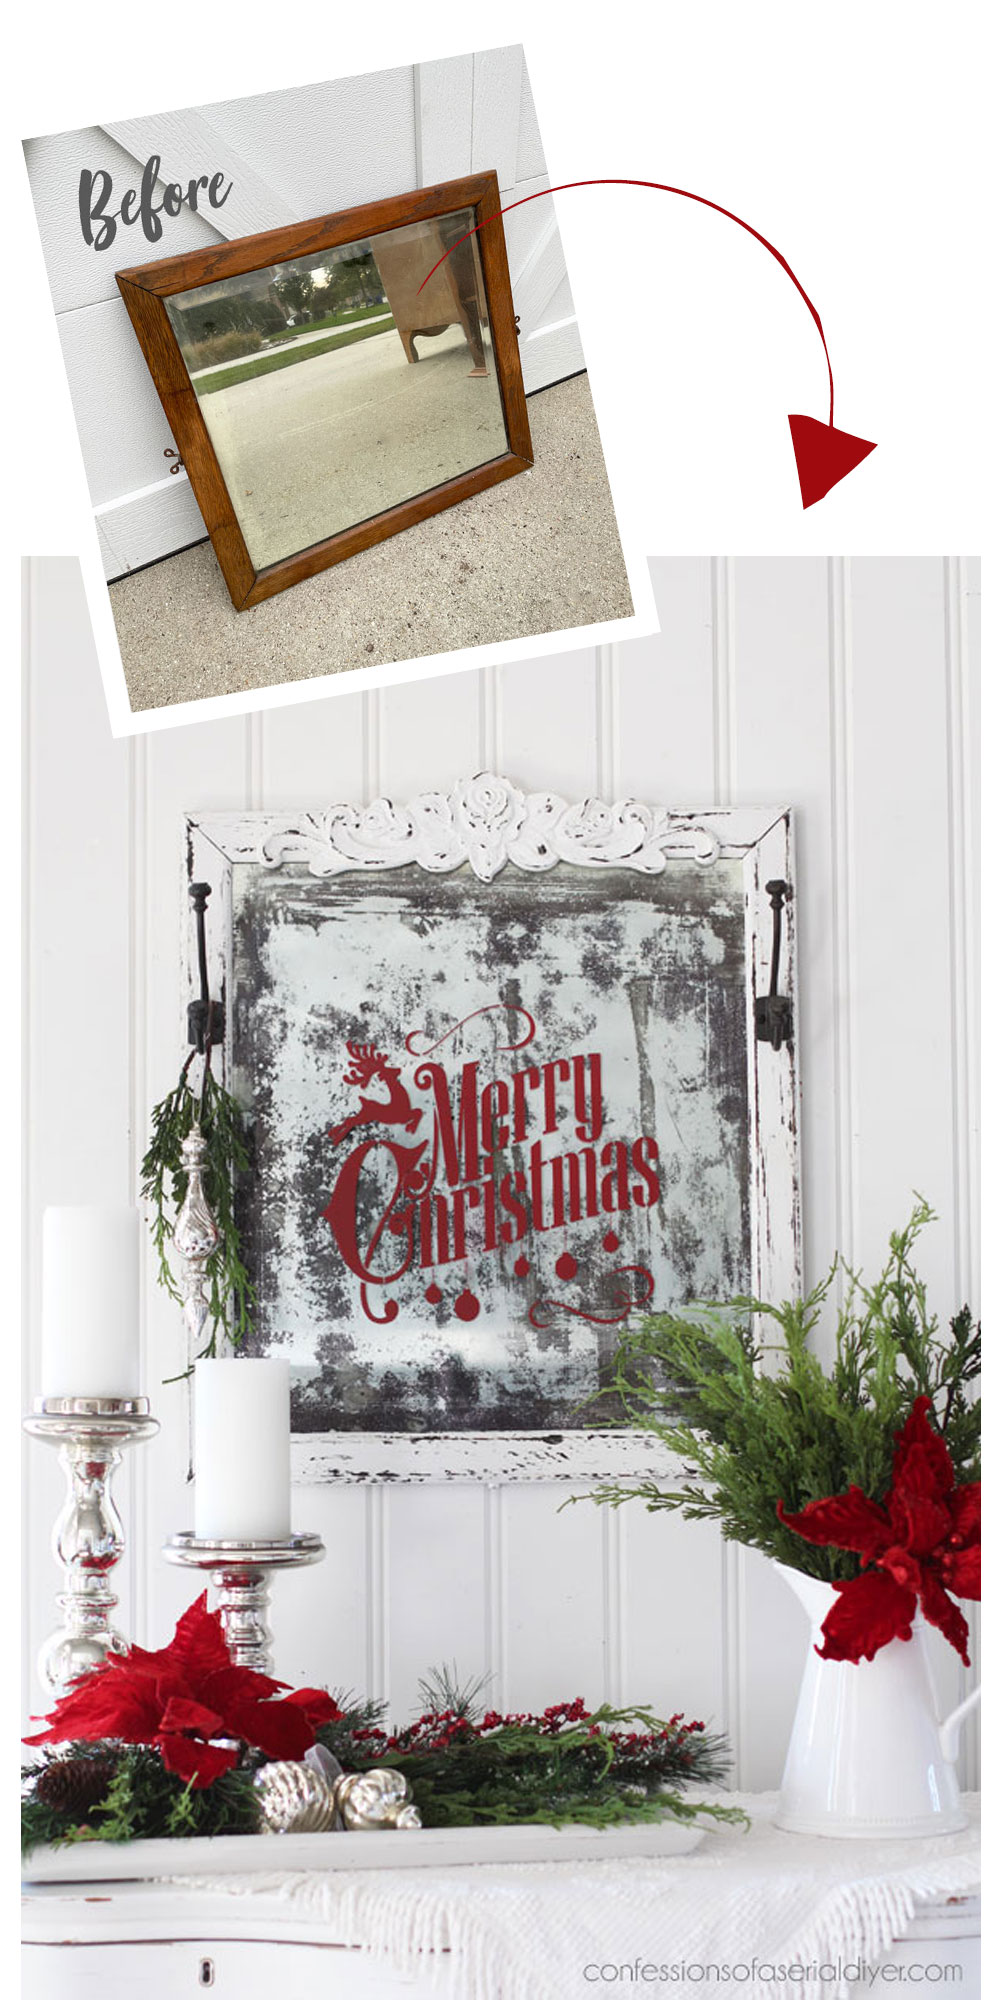
Today’s antiqued mirror project came from the mirror and harp that originally belonged to this dresser.
I redid the dresser, but this mirror that came with it was way too top-heavy for the dresser:
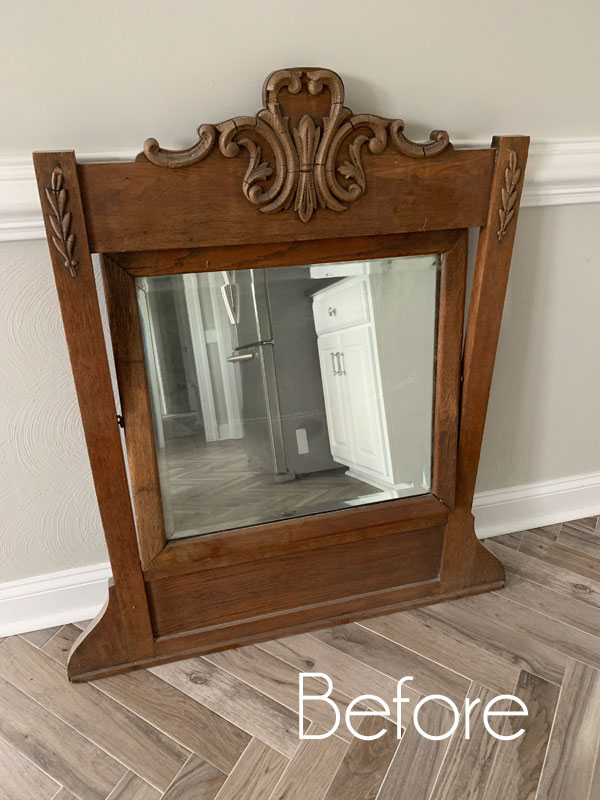
Beautiful, right??
Well, I repurposed the harp and was left with this very uninspiring mirror:
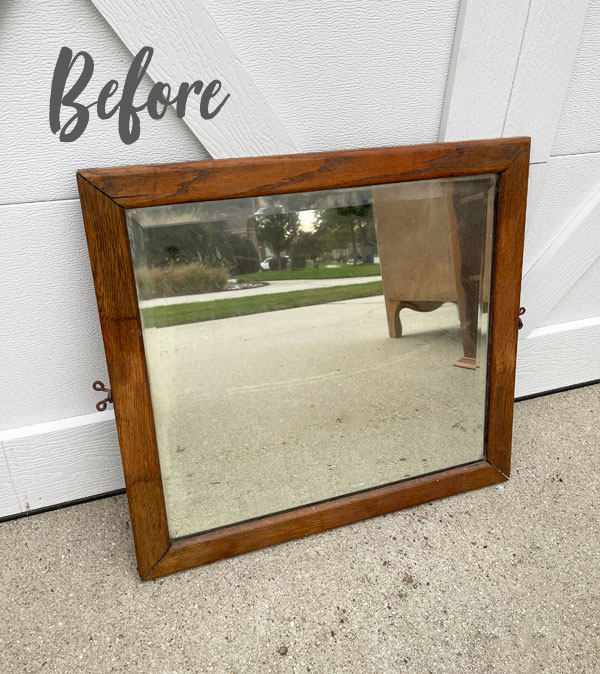
Even worse, when I removed the backing, it was growing something in there:

Ew.
Like I mentioned, I had no idea where this was going, so I felt like I really couldn’t hurt it no matter what I did.
I’ve included a few affiliate links so you can find the products I love.
I started by removing the mirror from the frame and giving it a good cleaning with White Lightning.
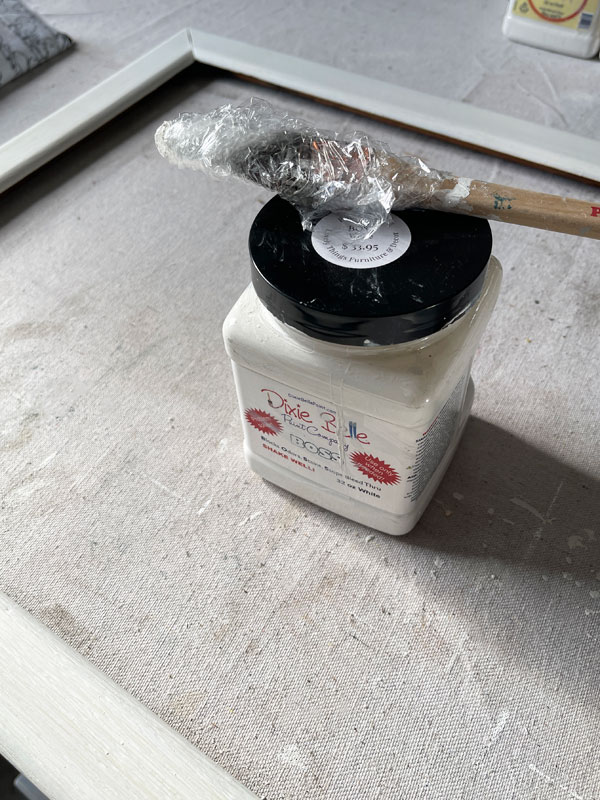
Then I gave the frame a coat of white BOSS to prevent any bleed through as these antique pieces like to do:
I left that to dry and moved on to the mirror.
Antiquing the Mirror
The mirror had some imperfections in it, so I thought this was a great candidate for an antiqued look.
My amazingly talented friend, Denise from Salvaged Inspirations, had shared a gorgeous antiqued mirror redo a while back, and so I decided to follow her tutorial for mine.
See her gorgeous mirror and all the steps she took to create the antiqued look HERE.
It started with Citristrip which I applied and then covered with saran wrap and let it sit for about 30 minutes:
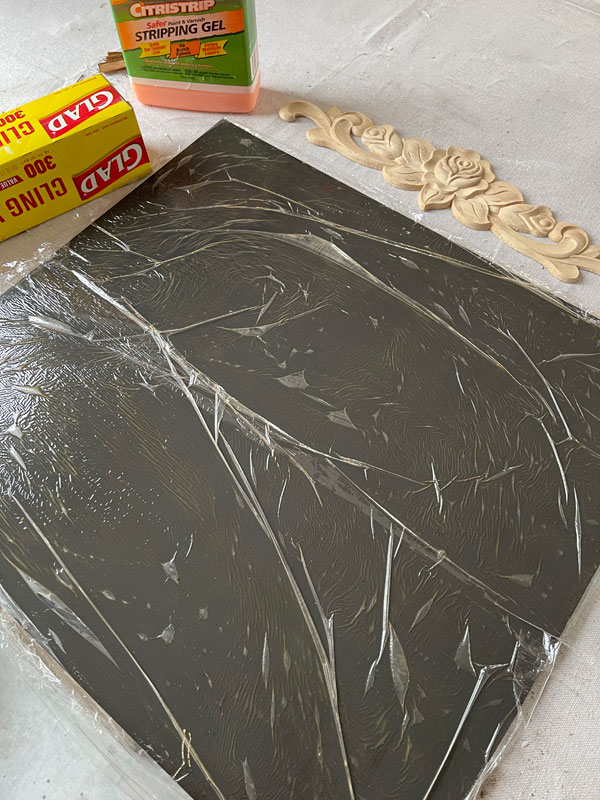
This is suppose to allow the gray paint on the back to be removed without damaging the mirror beneath.
UH-OH!
Unfortunately, it wasn’t quite ready, and I scraped off too much, taking it down to the clear glass…oops!
I covered it back up and let it sit for another 30 minutes or so, and then it scraped away without issue.
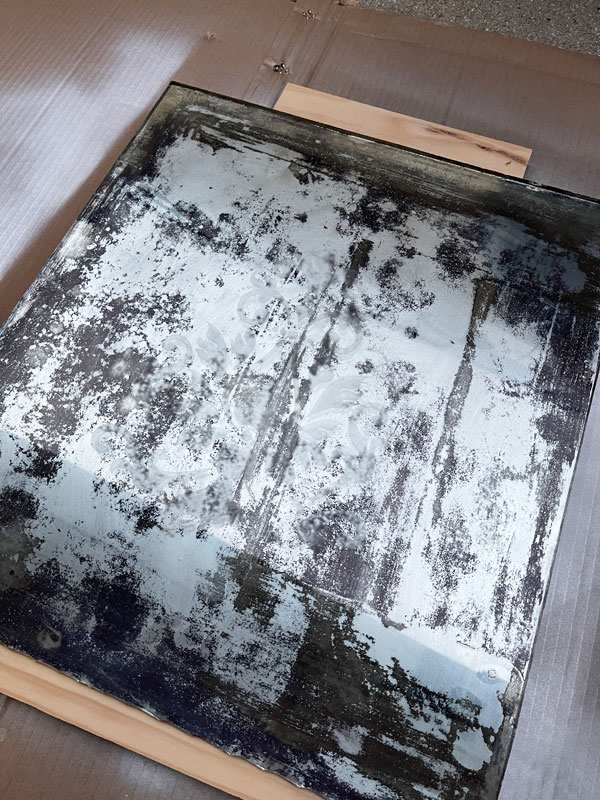
I then followed with the second step of her technique (see that at her link above) which went better, but in the end, I had removed too much of the original mirror ie, I really buggered it up ha ha.
A quick Fix
To fill it back in, I reached for my Mirror Effect spray and sprayed the back of the mirror:
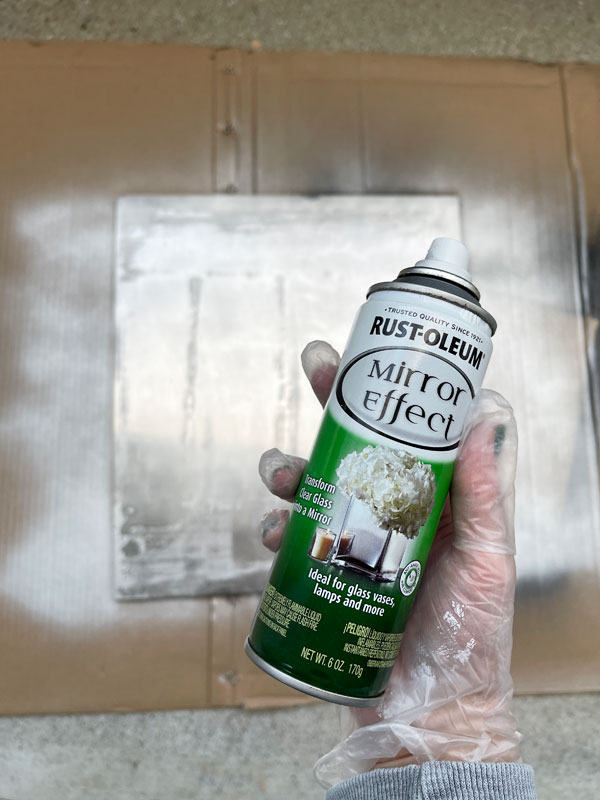
Remember when I said I couldn’t hurt it? Turns out, I could! Who knew??
Adding a stencil
Next, I wanted to add a stencil to the front, and I was torn on whether or not to add a Christmas one. It came down to these two:

I really loved the Christmas one, but I decided to go for something that might sell more easily, the damask one.
I used Frosted Glass spray to get a faux-etched finish that worked amazingly well on this Christmas Mirror I shared a couple of years ago:
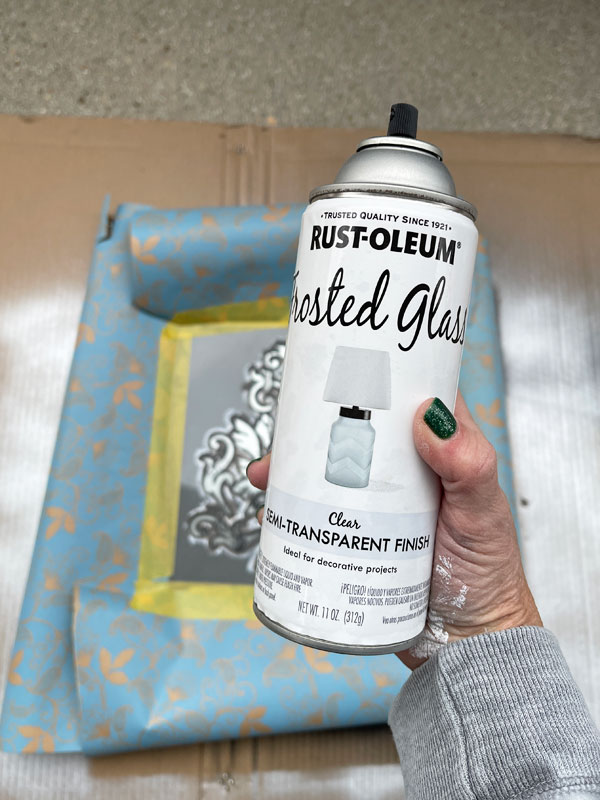
uh-oh #2
Except, it wasn’t so amazing here. It was a FAIL!
You could hardly see the damask print with how busy the mirror was:
I really did a number on that mirror, didn’t I??
But, I will not be deterred!
I used a razor blade to scrape away the faux etching…

And then I tried again, this time going for the Christmas one I really wanted to use in the first place!
And instead of reaching for the frosted glass spray, I found this gorgeous Colonial Red in my stash:
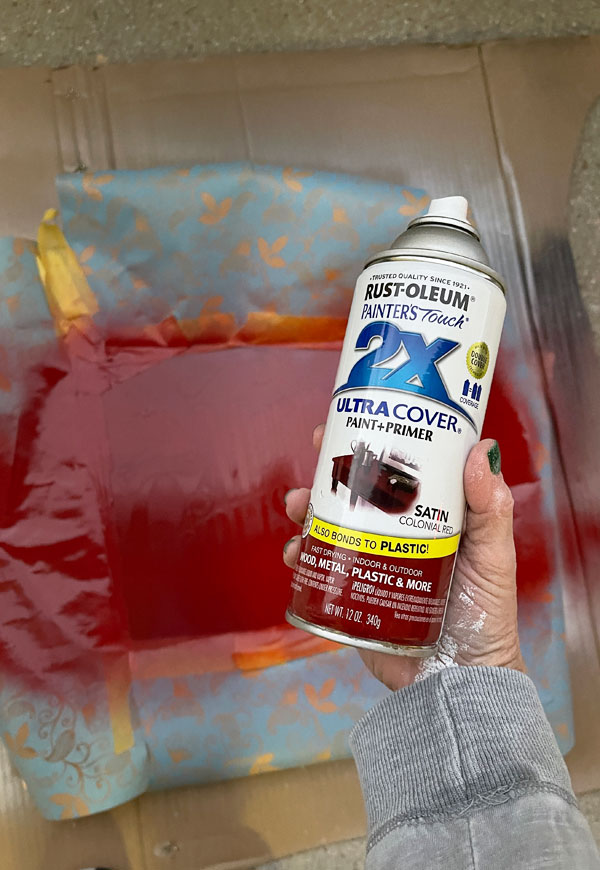
(I sprayed spray adhesive to the back to hold it firmly in place while spraying.)
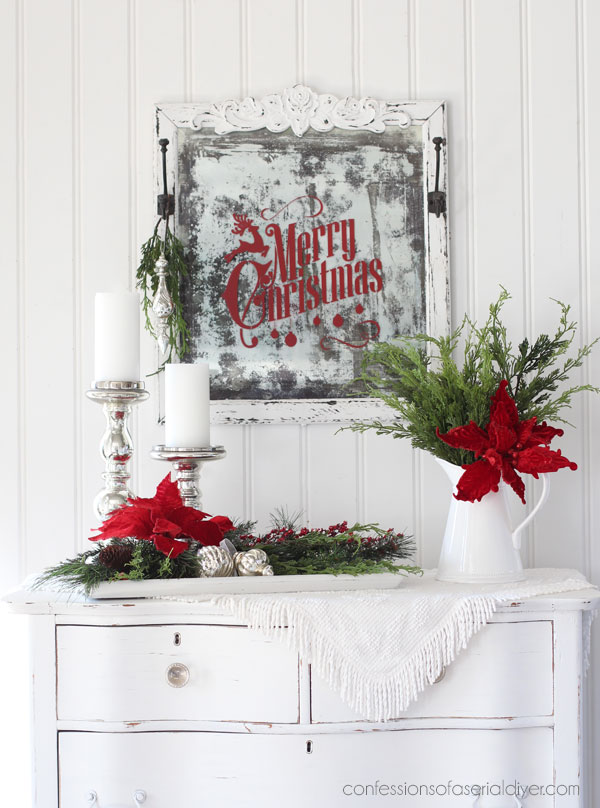
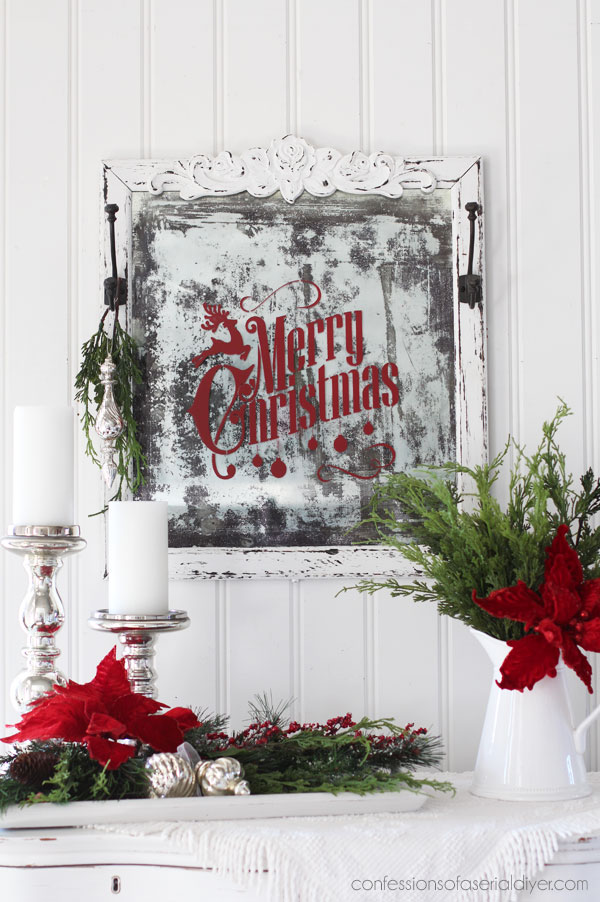
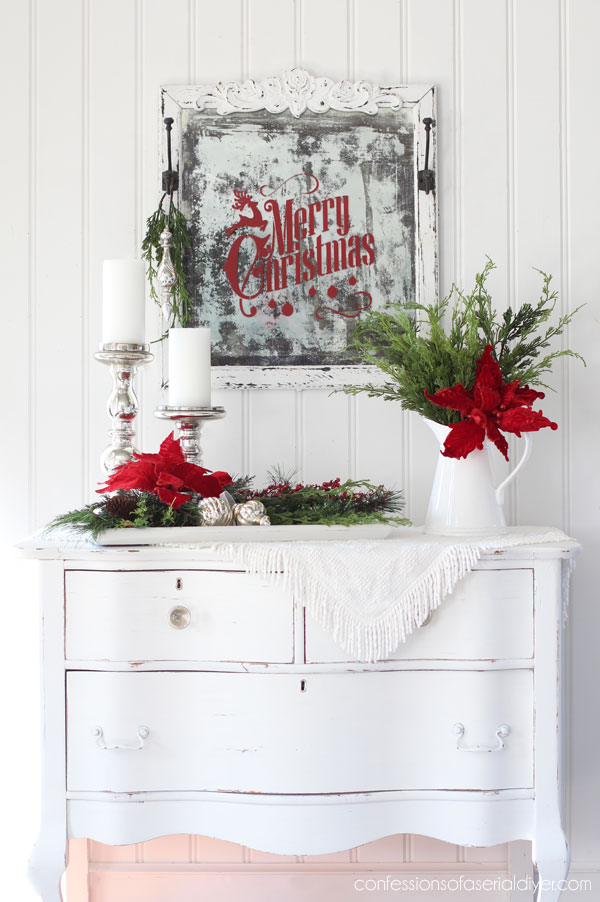
It is officially now an antiqued Christmas mirror!
I then finished off the frame with my favorite bright white, Cotton, and faux distressed the heck out of it using my distressing block. Then I sealed it with Best Dang Wax in clear.
To secure the mirror back into the frame, I added a piece of cardboard to protect the back of the mirror and used my Logan Point Driver to hold it in place:

I then covered the back in pretty Kraft paper using matte Mod Podge to hide all the ugly!
Was I able to save it??
You decide!

This thing was a total hot mess!
But you know what?
I kind of love how it turned out!
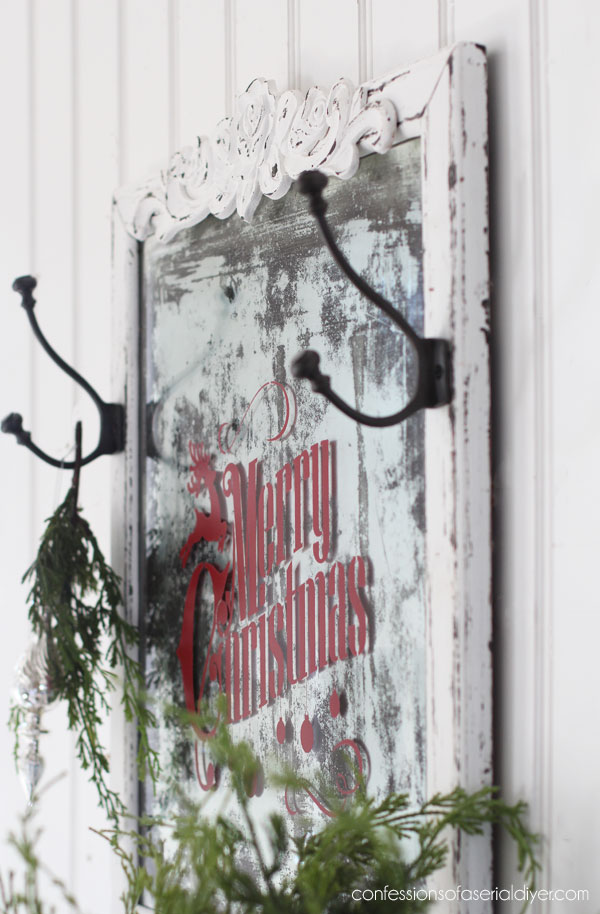
As you can see, I also added the detailed piece across the top…

That was my reason for faux distressing the whole frame. It was originally raw wood and I wanted to really shabby it up.
That piece was also free…my MIL gave me a bag with several unfinished decorative wood pieces that she no longer had a use for. This one was so pretty!
And you can see I also added hooks like I like to do with mirrors…
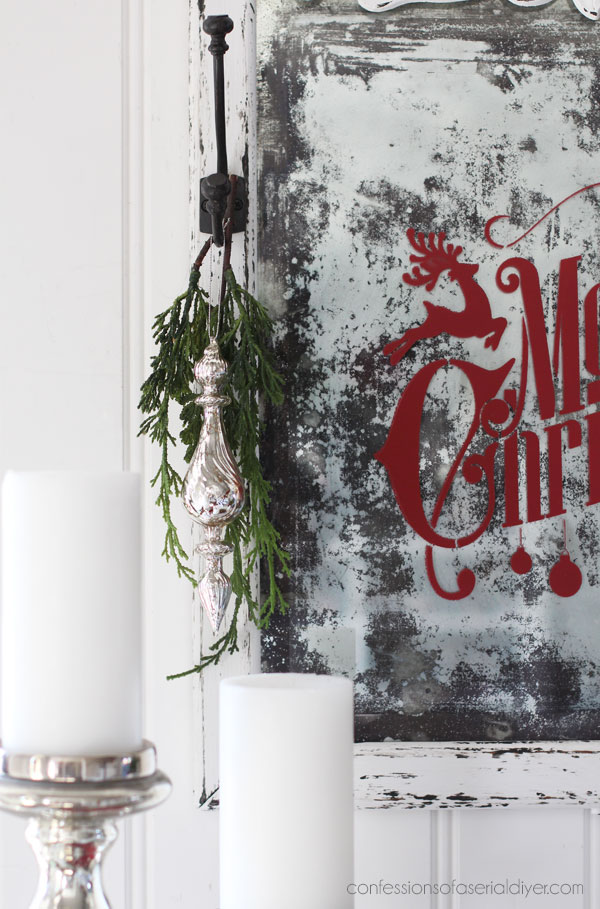
Perfect for dangling pretty ornaments from!

But do you know what this Christmas mirror would be even better suited for?
Hanging stockings!! Right? Maybe an alternative if you don’t have a fireplace!
I don’t usually go for a super distressed look, but I think this works!
What do you think??
Before I close, I have some shop news!
- Dixie Belle has released 12 brand new transfers!!
![]()
I placed my order as soon as I could and should have them in stock this week!
- Dixie Belle will be increasing their prices effective January 1st. The cost of just about everything has gone up, so the following items will increase by one dollar: Chalk Mineral Paint, Best Dang Wax, BOSS, No Pain Gel Stain, Gator Hide, and brushes.
I’ll be waiting until the last possible minute to update my prices in my ETSY SHOP, so get what you need now if you want to save a bit!
- And lastly, many of y’all have reached out to me about Gator Hide. It has been out of stock for some time now. The raw materials used to make it have been sitting in shipping containers off the coast for months now. DB is in the process of reformulating Gator Hide using materials they can source closer to home. Testing is taking time as they make sure it does what they promise it will, but hopefully, it will be back again soon! Meanwhile, the Clear Coat is still an excellent sealer. If you have an item that does require a water repellant sealer, you can always use the Clear Coat for now, and then add the Gator Hide when it is available again.
And that’s all the shop news for now!
I hope y’all enjoyed today’s mirror makeover!
There may have been a lot of bumps in the road, but it sure was fun to play with!
And that is one project closer to completing this FREE haul!! (I call this one free since the three projects I got out of that one purchase have already sold woohoo!)
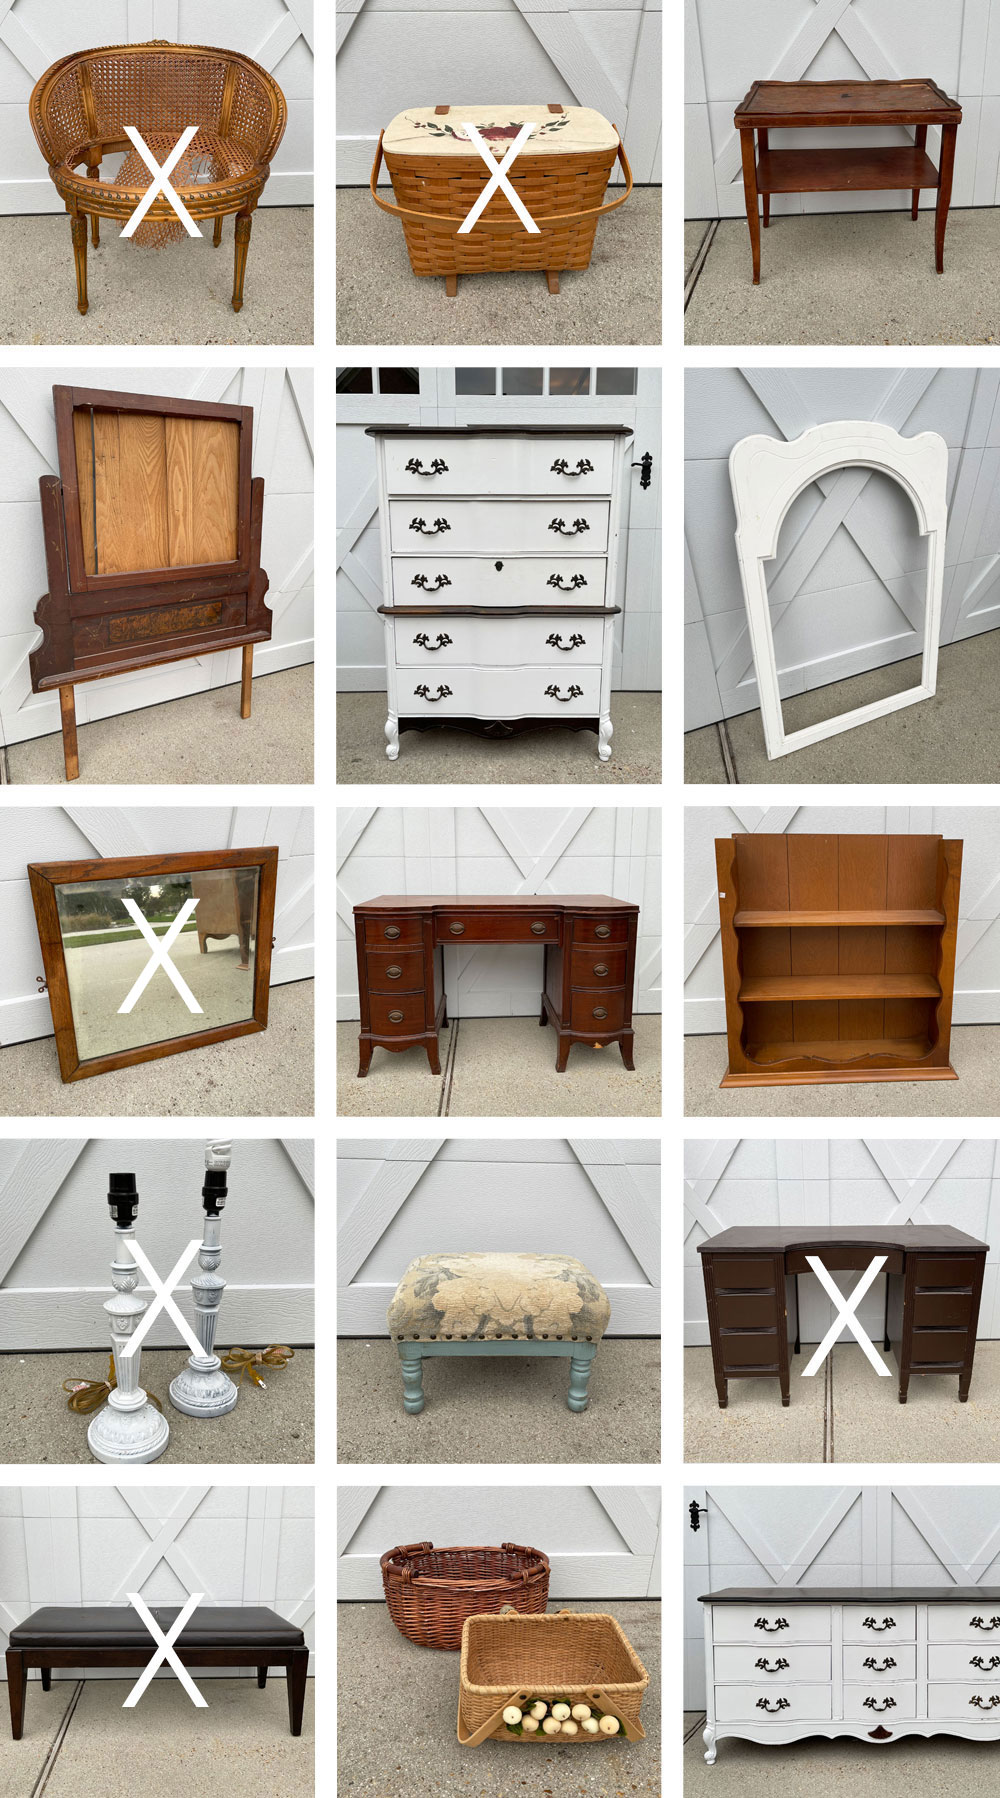
See any you may have missed so far at the links below:
Stenciled Bench Makeover
Stenciled Desk Makeover
Curbside Lamp Makeover with Wax
Longaberger Basket Makeover
How to “Fix ” a Broken Cane Chair
And if you forgot or missed how I repurposed the rest of this mirror:
You can see that HERE!
I’ll see y’all back here on Thursday sharing what I did with this little stool:
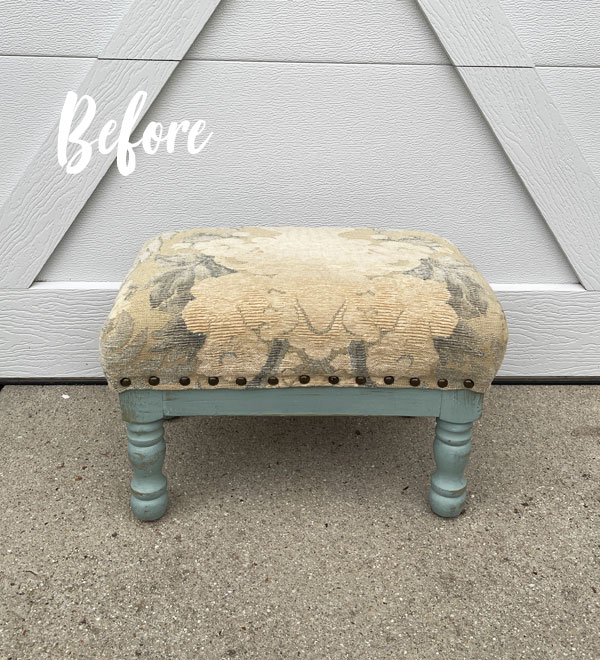
Update: No need to wait! See how this stool looks now here!
See y’all then!
XOXO,
![]()
Don’t Miss a Thing!
If you like what you see, there are several ways to follow along!
Email * Instagram * Facebook * Pinterest * Twitter


Mary Kaiser says
WOW, it turned out so great! How fun that you just kept going when what you were doing wasn’t working! You can’t mess stuff up Christy as you are the fairy princess of DIY!! Everything you touch with your princess dust turns to beauty! I love it!
Christy says
Thank you, Mary! You are the best! I figured it could only go up form where it started ha ha! Have a wonderful day!! XOXO
Jenell says
Wow, love this mirror! Its amazingly beautiful & what a great save!
Christy says
Thank you so much, Jenell! XOXO
Joni Gonzales says
Holy cow, Christy! I love it! I would have given up for sure. I’m glad you didn’t. It’s gorgeous!
Christy says
Thank you so much, Joni!! I was very determined ha ha!! XOXO
Janice Holt says
You definitely did not mess that mirror up. It looks great now. You certainly have patience but like you, I can’t stand for something to outdo me. Another beautiful redo.
Christy says
Thank you so much, Janice! Yes, I would not be outdone ha ha!! XOXO
Christina says
Christy, I love the stencil and the idea of the mirror. Just a bit too much black on the mirror part for my taste. It would be great for hanging stockings, great idea!
Christy says
Thank you, Christina! The black is the original mirror lol, maybe I should have scraped it all off? It was fun working through anyway, and yes…perfect for stockings! XOXO
Robin says
It would have been really good for Halloween. I followed a tutorial 6 years ago (using vinegar?) on a curbside mirror to use as spooky decor for my house.
Christy says
Ooh yes, absolutely! I’ll have to search out that method if I ever decide to give it a go again! XOXO
Victoria Eubanks says
I would say that you definitely redeemed the “hot mess”, lol! It turned out lovely!
Christy says
Aww I appreciate that, Victoria! Thank you!! XOXO
Niki says
I think that if I decorated for Christmas this would be a piece I put up. It is very versatile with the hooks on it. You could hang stockings or a scarf and mittens, ornaments or Christmas greens. It would look nice in an entry/foyer display, or on a mantle.
Christy says
Thank you, Niki! Great visions of what it could hold! The more I look at it here in my office, the more I want to keep it…and I just might! XOXO
Cecilia says
Glad you persevered! Love the distressed Christmas mirror it ended up being. Reminds me a bit of mercury glass which I just love. It’s not a plain Jane anymore!
Christy says
Thank you so much, Cecilia! Yes, it does have a very distressed mercury glass feel to it for sure! XOXO
Janice says
I LOVE HOW IT TURNED OUT!!!
Christy says
Thank you so much, Janice!! XOXO
Sandi says
I love your mirror, it’s gorgeous! Hugs,
Christy says
Thanks so much, Sandi! XOXO
Michelle Bagby says
Love love love it!
Love the stunning red but esp love the usefulness of it!
Ornaments, stockings…anything can go on those hooks.
This is something I’d definitely pack away and bring out each year!
(and that’s saying something! “0)
Congrats on yet another stunning piece!
Mic
Christy says
Aww thank you so much, Michelle! I am really thinking I might keep this one! XOXO
Marcie Lovett says
Of course you were undeterred, Christy! 😁 So charming now, no one would guess what a hot mess it was before you finished. I do love the look of antiqued mirror, but it’s not terribly practical. Using it as a background for the stencil redeems it, and adding hooks takes it up a notch. Brilliant idea to use it to hang stockings where there’s no fireplace.
Christy says
Thank you so much, my friend! I’m so glad it worked out in the end, and yes, I just love the idea to use it for stockings!! XOXO
Debbie in TX says
I think it turned out very nicely with the distressed finish. The hooks and the ornamental detailed piece added to the top are the icing on the cake. I can just see some stockings hanging on it with maybe a few twinkle lights around to make it sparkle!
Christy says
Thank you so much, Debbie! Ooh adding lights…yes! I love that idea! I’m thinking I might just have to keep this one! XOXO
Barbara Moran says
Absolutely beautiful!! Great job.
Christy says
Thank you, Barbara! XOXO
Cara says
Christy! I am absolutely in love with this mirror! I love how you shared how you thought you may have messed up, but it is perfection! I do not like just a little bit of Christmas, I love a whole lotta Christmas so this would be a perfect addition to anyone’s home. Thank you for sharing! Maybe one of these days when I have more time I will be able to try this project myself! LOVE IT!
Christy says
Aww yay!! Thank you, Cara! I am so glad you love it! I keep eyeing it here in my office…it just might be a keeper! XOXO
Sue Mellette says
I really love this effect! Outstanding in my opinion!! I love the contrast of the dark shabby look and the beautiful shade of red! This redo just speaks Christmas. Thanks for all the details in this makeover. Thanks, too, for the update to your shop! Have a grand week!
Christy says
Thank you so much, Sue! I’m so glad you love it! I was really unsure until I added the bold red and that sealed it for me! Have a great rest of your week too!! XOXO
Dayle Stofferahn says
Love this mirror and the stencil you used. Sadly there’s no link to where to get this stencil……
Christy says
Thank you, Dayle! I always like to link to the products I use, but I purchased this a couple of years ago from a shop on Etsy that is no longer in business. This is another shop I like that has some really pretty ones: https://www.stencilrevolution.com/collections/christmas-stencils?page=4&grid_list=grid-view XOXO
Denise Zdziennicki says
You really went at this one didn’t ya…lol. You turned it into a gorgeous vintage beauty and I love the way you decked it all out for Christmas. I totally agree with Mary K – you ARE the fairy princess of DIY my friend. Everything you touch turns to gold. XOXO
Christy says
Aww you are the best, Denise! Thank you so much, my friend! I’m glad this one didn’t do me in ha ha! XOXO
Cecilia from Georgia says
That mirror was a test of your willpower! It turned out beautiful. I used Denise’s tutorial in 2019 and had a terrible time with the Citristrip. Her directions are great but I tried to hurry. I thought it turned out wonderful but couldn’t sell it. I painted the frame turquoise so maybe that’s the problem. I bet yours flys out of your booth! Hopefully the stool will be easy peasy! XOXO
Christy says
Ha ha yes it was! Thank you, Cecilia! I was impatient also, but glad it worked out. The more I look at it here in my office, the more I want to keep it…I just might! The stool was a breeze, thankfully! I hope you are enjoying the season, my friend! XOXO
Holly says
Christy, Love it!! It will definitely sell quickly if you decide to sell it! Love the pop of red, everything turned out just gorgeous!
Christy says
Thank you so much, Holly! I think the pop of red definitely saved it! XOXO
Petra says
That is a pretty Christmas decoration – would look amazing by the front door 🙂 Red and white look SO crisp for winter decor don’t they? Have a great week 🙂
Christy says
Thank you, Petra! Yes…this would be perfect in an entry if you had the space for it, and red and white are so lovely at the holidays! I hope you are enjoying your warm winter! XOXO
MrsSW says
Usually when I keep going and going the project gets worse and worse. Good save. The stocking idea is good – will you display it that way?
Please let us know when it sells. 😉
Sheila
Christy says
Thanks, Sheila! I’m thinking of keeping it! XOXO
Mary says
Stunning transformation Christy! I so appreciate your vulnerability in sharing how the project wasn’t working…but you kept at it and Wowza! Beautiful and inspiring! thank you!
Christy says
Thank you, Mary! Things don’t always work out how we imagine them in our heads…thank goodness for plan C ha ha! XOXO
Cheryl says
I love it! It turned out beautiful!!
Christy says
Thank you so much, Cheryl! XOXO
Jeannie says
I love reading your blogs. I like how you go through your thought process and share the fails and also tips on the way you do things. I usually learn something here and there plus get to see your adorable creations!
I had bought one of those distressing blocks since it was on clearance, but honestly didn’t know what it was for until reading your blog after it sat in my workspace for a while! Lol!
Christy says
I appreciate that so much, Jeannie! Thank you! That distressing block is fantastic!! XOXO
Addie says
mmmmm……wouldn’t it have been easier to make it a chalk board? or a bulletin board? It does have the vintage Christmas vibe!!! But the others could be used all year.
Christy says
That would most definitely have been easier lol, but I really wanted to have a go at that technique. (Plus I have another frame in this haul that will end up a chalkboard.) And not to worry as the stencil can easily be scraped off with a razor blade, but I’ve decided to keep this and use it in my decor! I really love that vintage Christmas vibe! Have a great weekend, my friend! XOXO
Becky says
A save of a save! 😆 Crazy the mess we can get our little DIY selves into, isn’t it? In the end you get such a COOL, one-of-a-kind piece though! …It’s almost worth it, haha! Your mirror came out beautifully! I love the stockings idea. 😊
Christy says
Thank you, Becky! Ha ha yes! I was determined to use that mirror so I just kept going, but it now looks almost like a vintage mercury glass piece and I really love the outcome! I hung it in our living room yesterday! 🙂 XOXO
Kim J says
I love this! I have a similar mirror, $5 thrift store, I wasn’t sure what I wanted to do. After seeing this I might do something similar but with a phrase that applies to everyday. It’s just me so I don’t decorate for Christmas anymore. Definitely adding lights and hooks!
Christy says
Thank you, Kim! Have fun transforming yours, and be patient with the Citristrip lol! XOXO