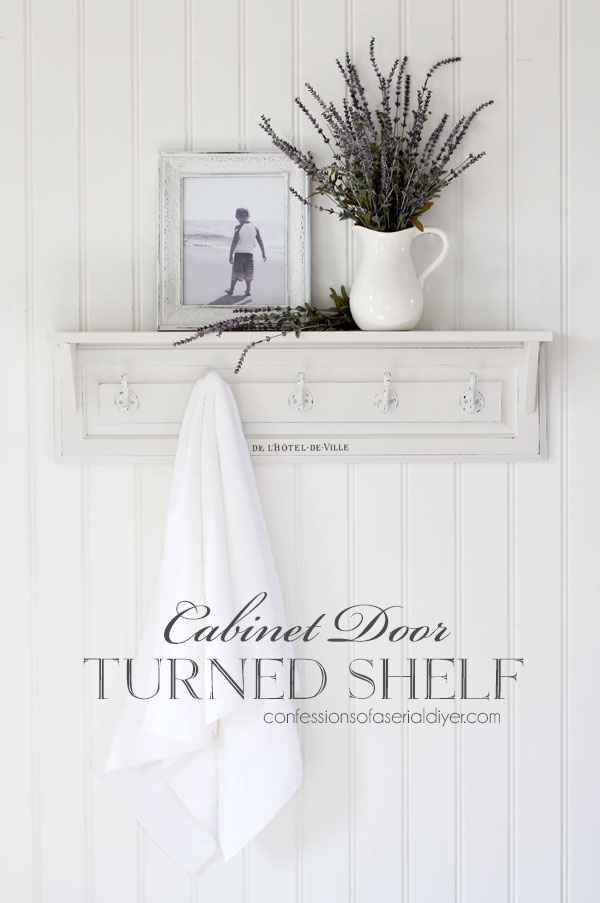
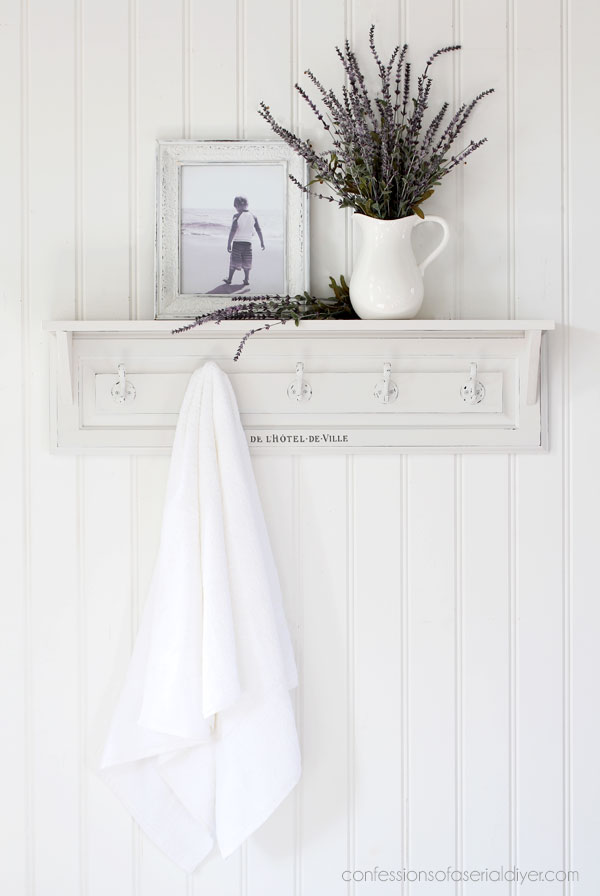
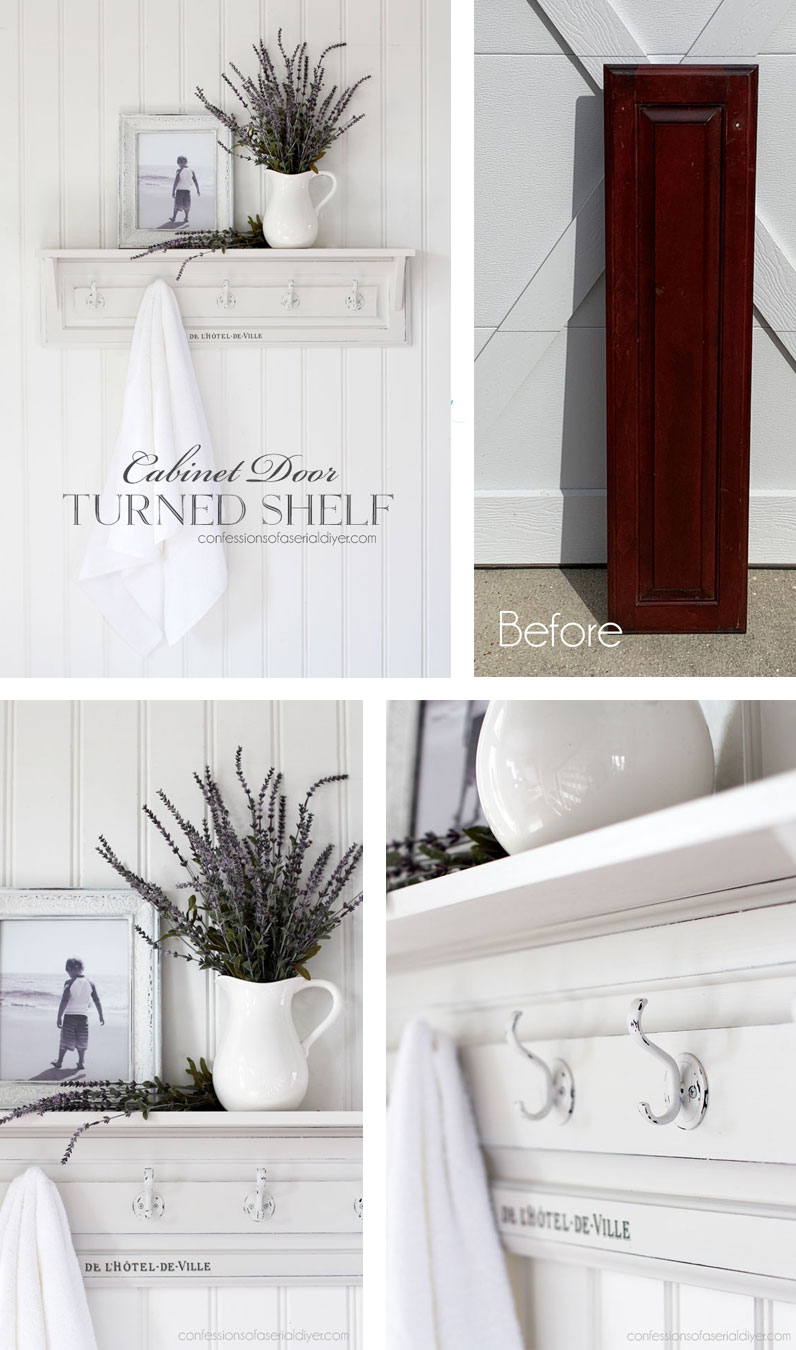
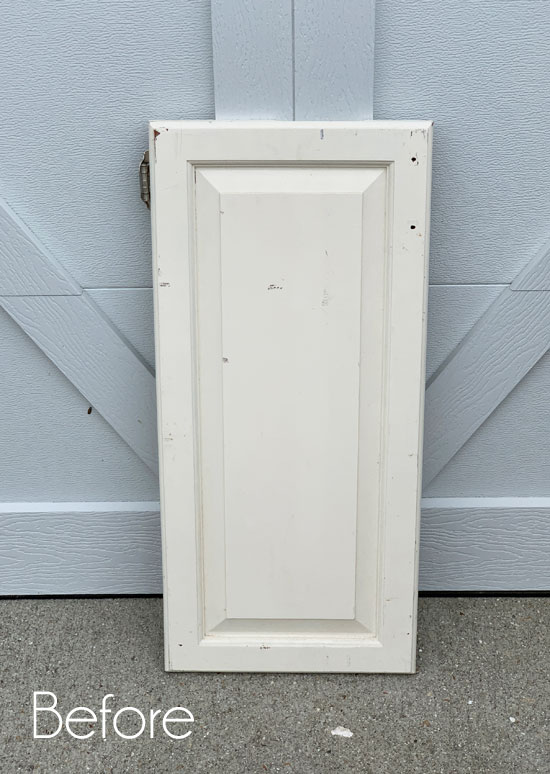
Hello sweet friends and welcome to Trash-to-Treasure Tuesday!! Today, I’ve got a cabinet door turned shelf for today’s trashy makeover!
I saved from this skinny cabinet door we removed the cabinet from our kitchen in 2018:
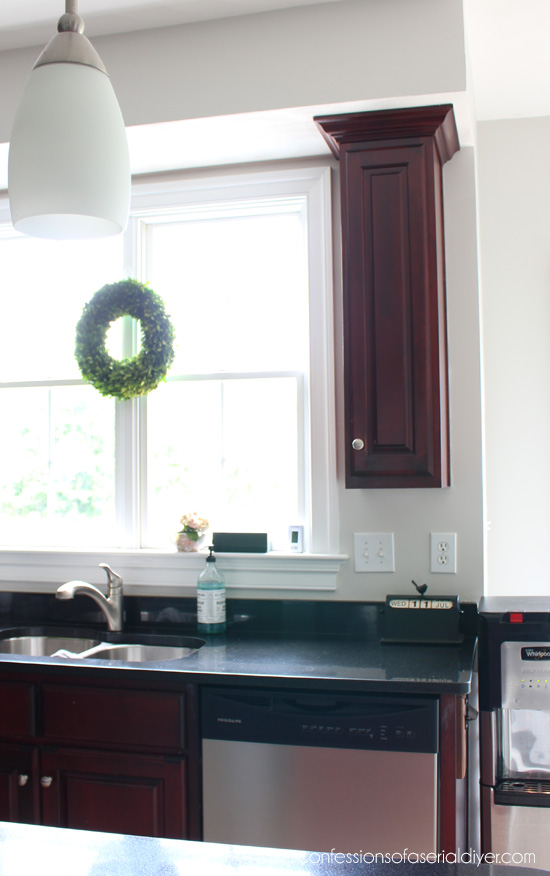
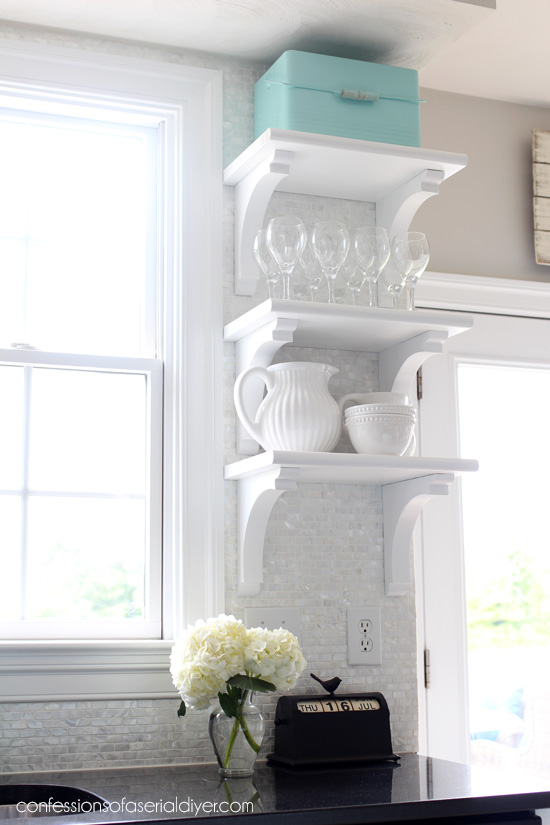
It was so narrow that it hardly held anything, so we replaced it with open shelving when we redid our kitchen:
That left me with a lone skinny cabinet door:
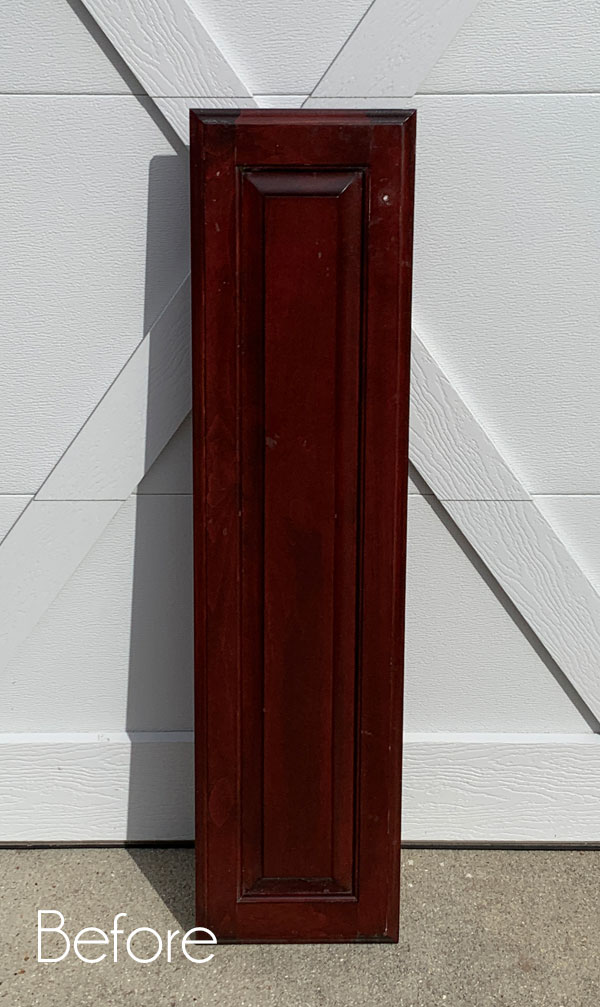
We redid our kitchen in the Summer of 2018, so that means this cabinet door has been hanging around for two and a half years! Shame.
I finally added it to my Biggest Thrifty Haul of them all just to get it done! I’ve included a few affiliate links so you can find the products I love.
I always thought I would turn it into a sign and call it a day, but after turning a headboard into a shelf in December, I thought I would do something similar with this one and turn this cabinet door into a brand new shelf.
To make my new cabinet door shelf, I started by filling the knob hole with Dixie Mud filler in brown.
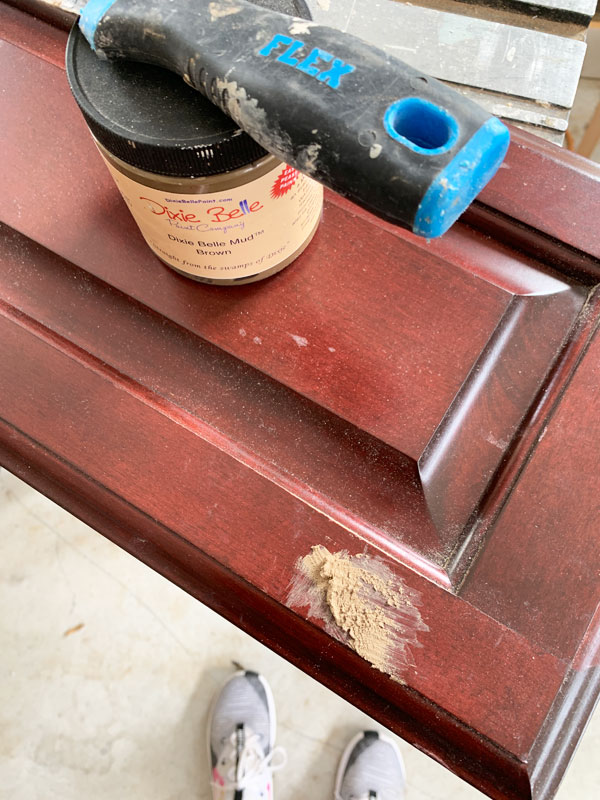
I let it dry for a few hours while I worked on another project. Then I sanded it smooth with 220 grit sandpaper.
Building the Shelf
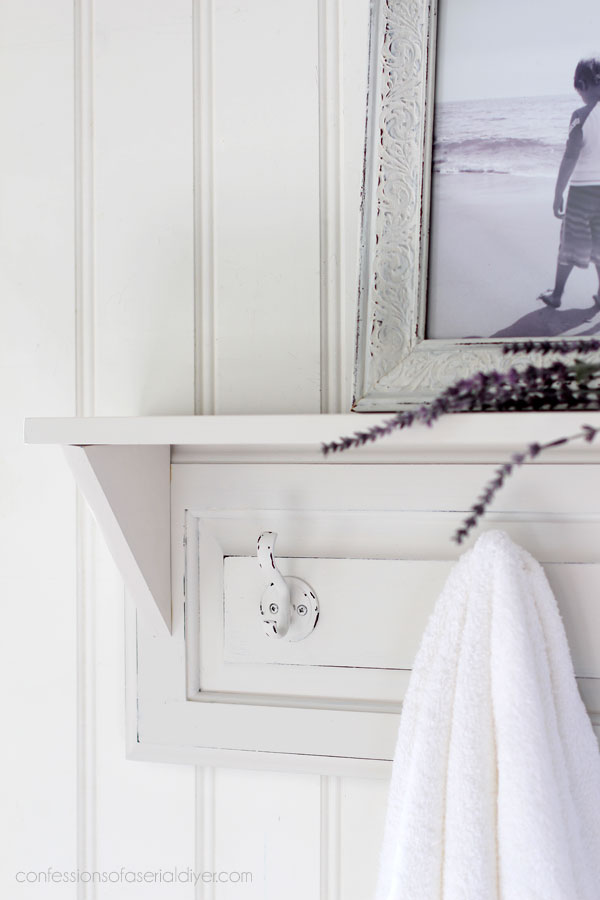
To build my shelf, I needed brackets. I had these pretty ones that I bought at Hobby Lobby, but they ended up being too big:
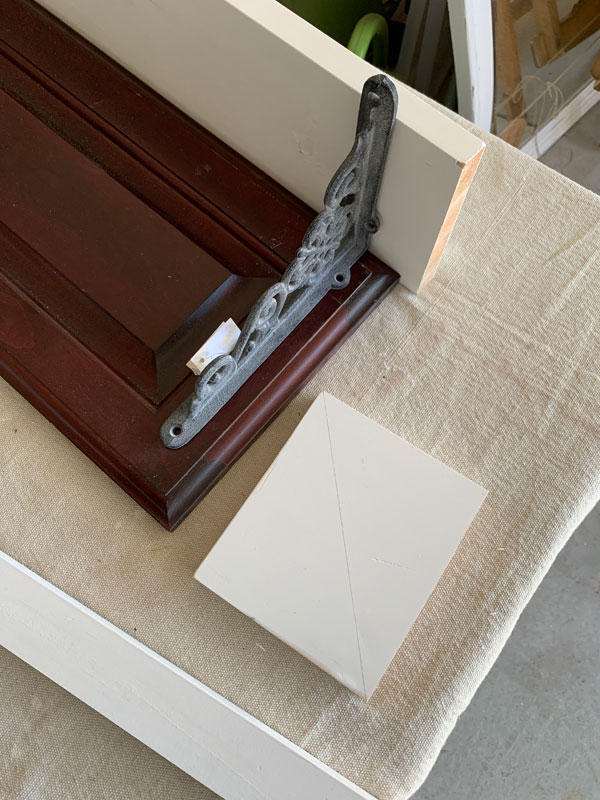
So I took a piece of the wood I used for the shelf and created brackets with them using my sliding miter saw to cut the wood:

I cut mine like this, but it would be safer to lay the wood flat against the back and cut it on a 45 degree angle. Use extreme caution when cutting things this small. I recommend holding it in place with a clamp while you cut.
I also cut my primed 1×6 (purchased at Home Depot) to length and did a dry test fit:
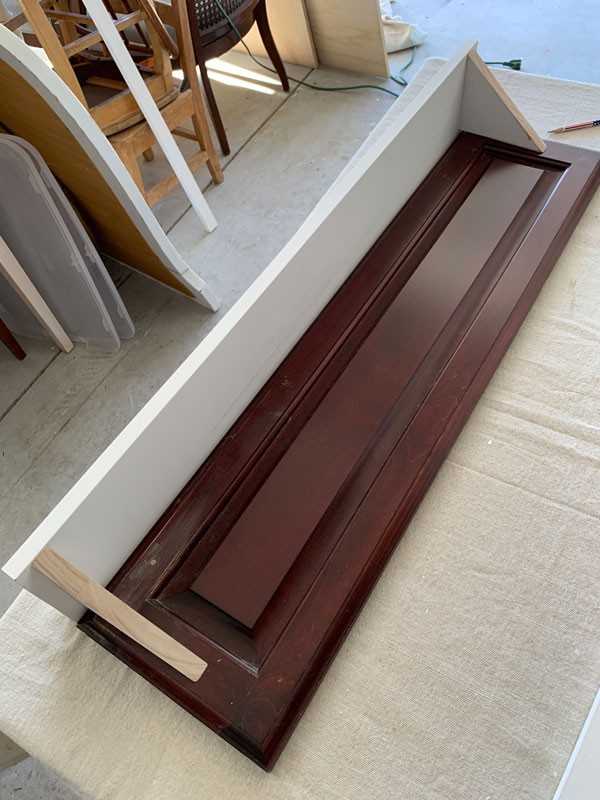
These brackets aren’t as pretty as the Hobby Lobby ones, but these were free and they did the job!
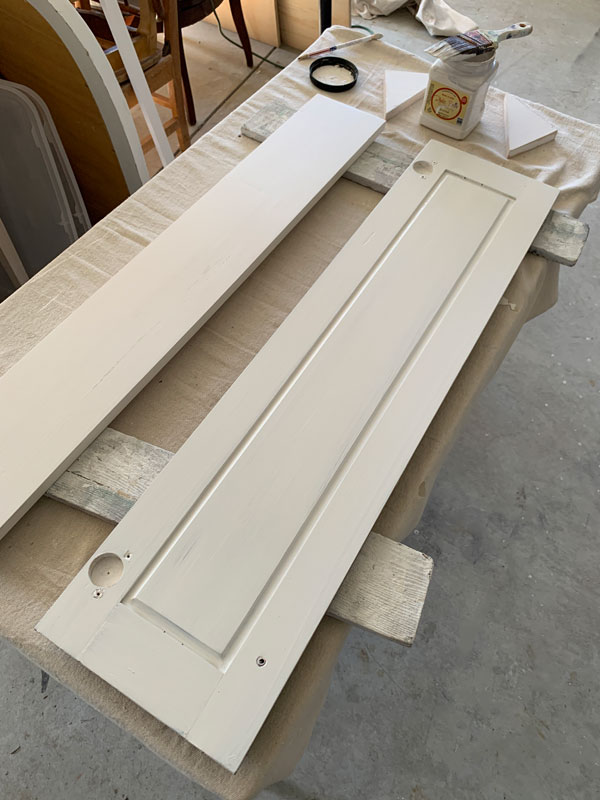
Sand and Paint
I gave the wood pieces that I cut a quick sanding to smooth out any rough edges and then painted everything in two coats of Fluff:
Assemble
To assemble the cabinet door shelf, I added a thin bead of wood glue to the top edge of the cabinet door and used my nail gun to attach the new shelf. (This is an awesome nail gun because it uses fuel cells rather than a bulky, obnoxious compressor, and they last forever.)
Then I added the brackets and used wood glue and my nail gun to attach them also.
I sanded lightly all over with 220 grit sandpaper and sealed with Clear Coat in satin using the blue sponge applicator to apply it.
Adding hooks
I found these hooks at Lowes and painted them in Fluff also:
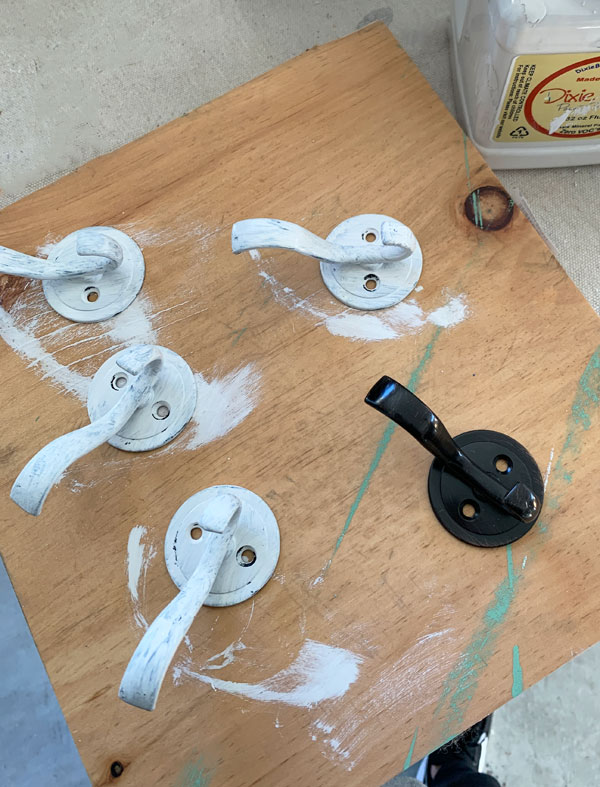
I gave them two coats and sealed with the satin Clear Coat also. Fluff is awesome in that it covers completely in just two coats.
I added D-ring hanging hardware to either side and it was complete!
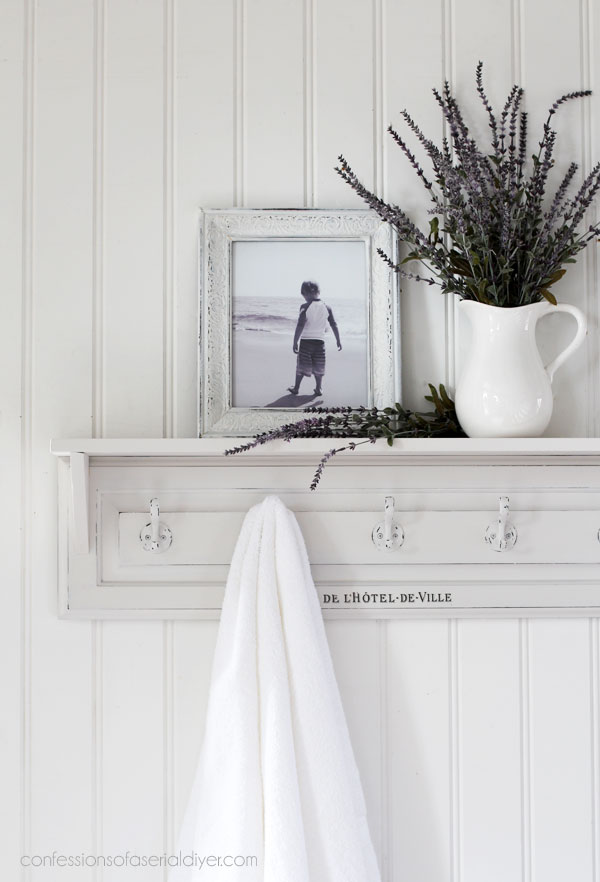
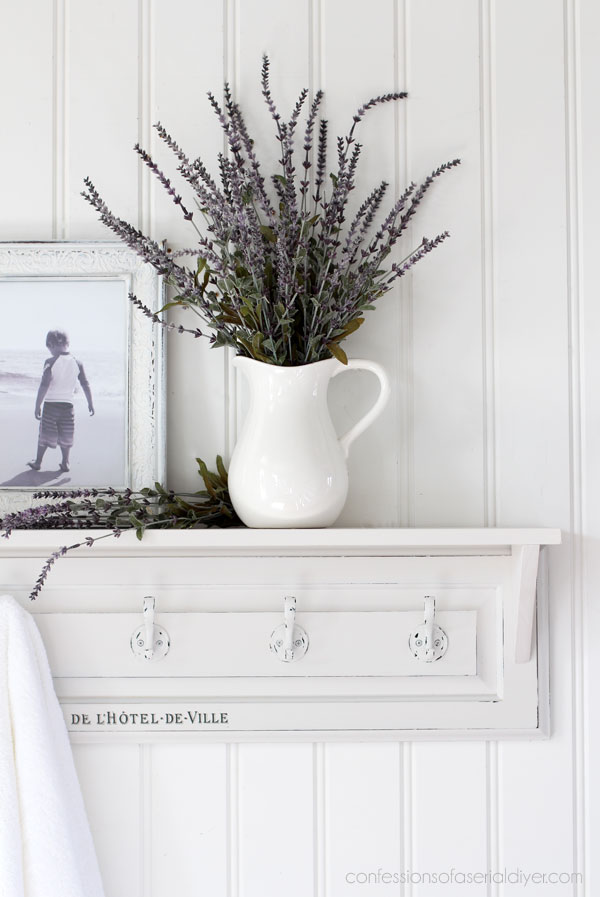
The After…Cabinet Door turned Shelf
Well, almost.
You can see I added a little something to the bottom edge…
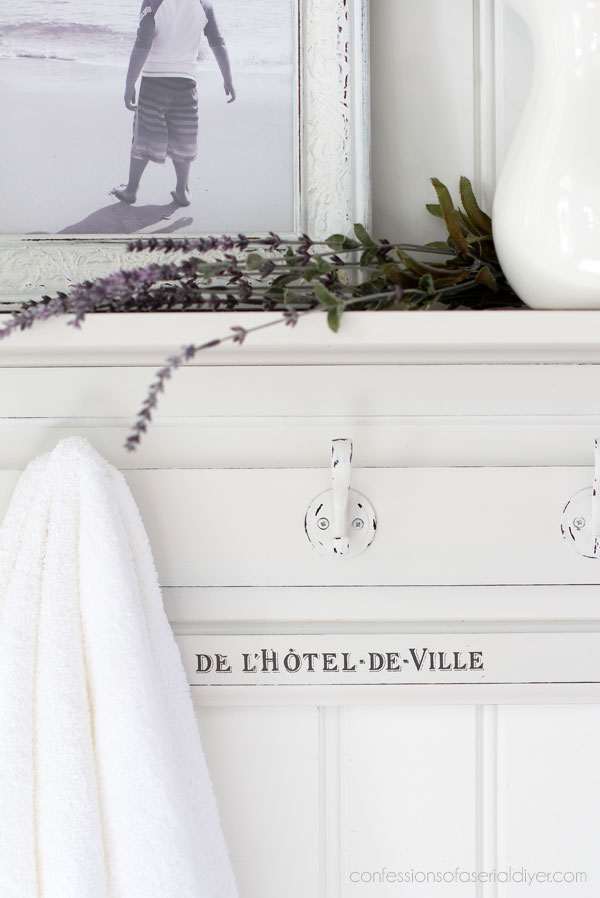
It looked a bit naked, so I went in search of something I could add to it and found this transfer in my stash:
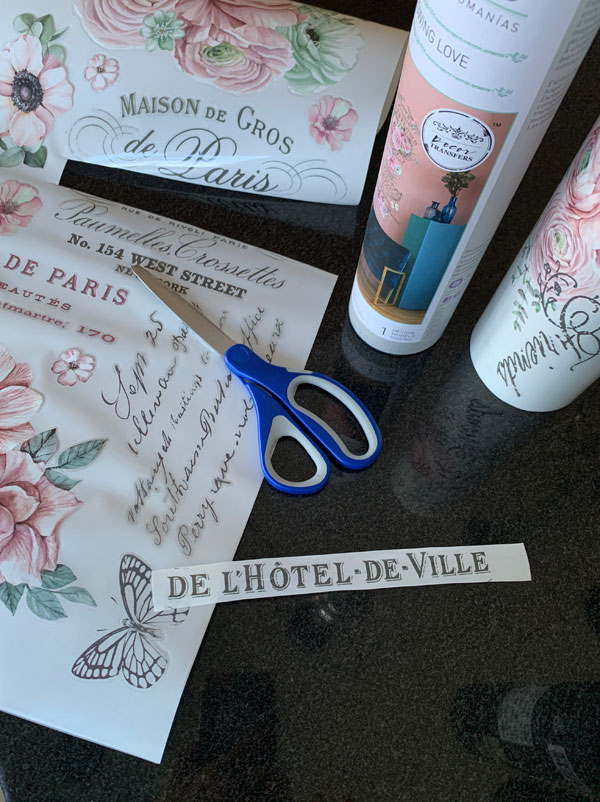
I cut the De L’Hotel-De-Ville out and added that along the bottom.
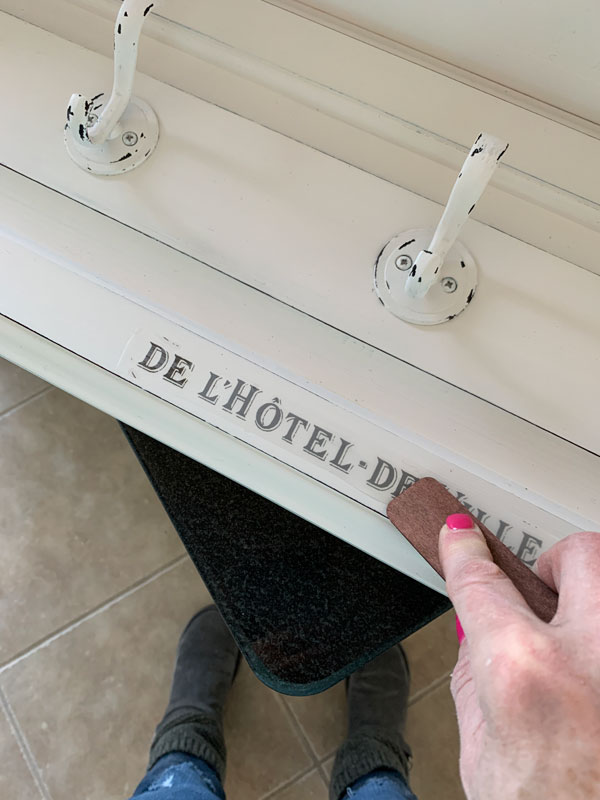
I added another coat of Clear Coat over it and now it was complete!
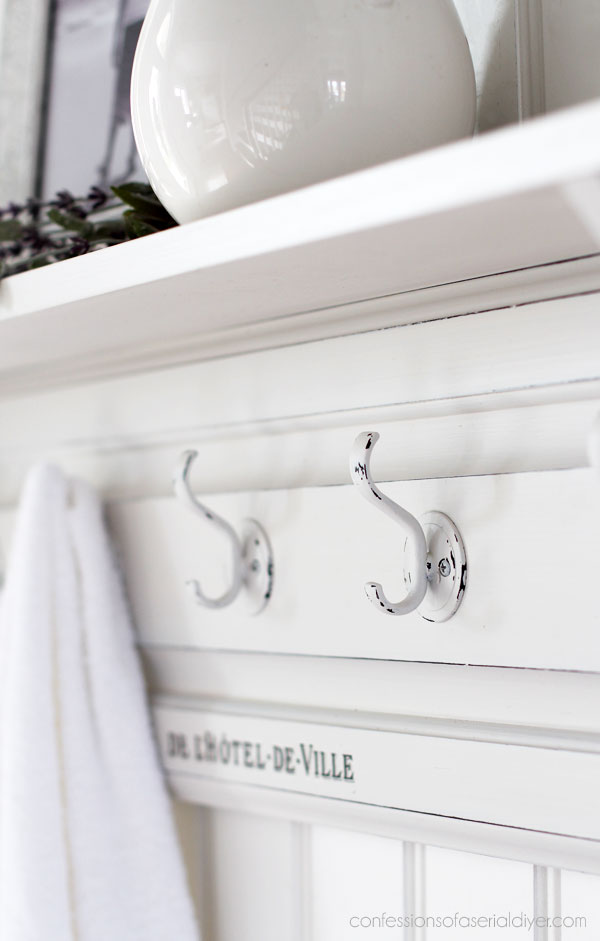
To get that shabby look on the hooks, I just used my fingernail to scratch off paint here and there.
And although the shelf brackets are rather primitive, they do the job…
I kept it neutral enough that it could fit in just about any space. You can always add a pop of color with accessories!
My sweet babe on the beach…
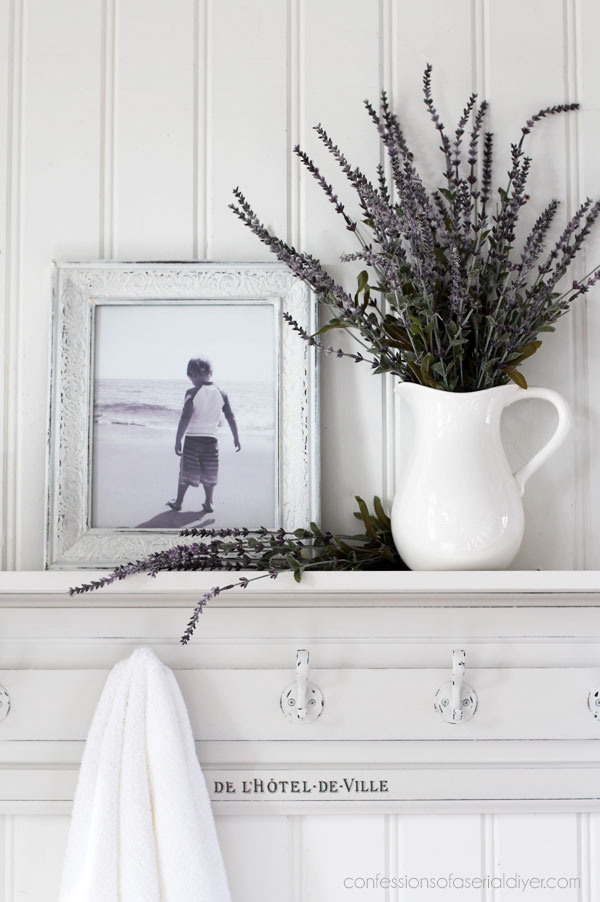
This photo lives in my office, so it makes it into photo shoots quite often.
Can I tell y’all how happy I am that I finally did something with this cabinet door?!
Don’t go anywhere just yet, my trashy friends (ha ha) have makeovers for you today too!!
And that’s another piece knocked off the list woo hoo!

If you want to revisit any, you can see them all at the links below:
Painting the Smalls, Holiday Edition (Five of these pieces are in this post!)
Kudzu Painted Side Table
REPURPOSED HEADBOARD AND FOOTBOARD
VINTAGE SECRETARY DESK MAKEOVER
$3 THRIFT STORE HEADBOARD REPURPOSED
WALL CABINET REPURPOSED
WINDSOR ROCKER MAKEOVER
DROPLEAF TABLE AND CHAIRS MAKEOVER
And if you want one more idea for a cabinet door…check out what I did with this one HERE:
I’ll be back on Tuesday with this piece from my booth that hasn’t sold:
![]()
I decided to take a sweet reader’s advice on how to redo it! Meet me back here on Thursday to see what it is!!
UPDATE: No need to come back…see how I gave it a gorgeous new look HERE now!
XOXO,
![]()
Don’t Miss a Thing!
If you like what you see, there are several ways to follow along!
EMAIL * INSTAGRAM * FACEBOOK * PINTEREST * TWITTER


Mary Kaiser says
Oh it is so cute now. You can’t rush creativity, it took you 2 1/2 years to create such a work of art. Rome wasn’t built in a day you know! LOL! Sometimes the best things come from waiting to create AMAZING! I love all of your works of ART!!!
Christy says
Thank you, Mary! No…sometimes it just takes two years for those ideas to come to me ha ha! You’re the best! XOXO
Larissa ~ Prodigal Pieces says
Beautiful save! And your home is gorgeous
Christy says
Thanks so much, my friend! XOXO
Janice Holt says
You always just add the right touch to your projects. The transfer just gives it what it needs. I also love the open shelves you put in your kitchen where you took this down. Thanks again for a great job. Oh and Happy New Years.
Christy says
Thank you so much, Janice! And yes, the open shelves worked out so much better than that weird cabinet. Happy New Years to you too! XOXO
Cheryl says
❤️ another amazing trash to treasure. You and your trashy friends are my kind of people! I’m beginning to think I need some “transfers” in my life in 2021…. so pretty and the ‘just what it needed’ final touch.
Christy says
Aww thank you, Cheryl! Trashy friends are the best lol! And yes, high time you tried a transfer…they are awesome! XOXO
Christina says
Love the shelf! Thanks for the tip about the clamp on small cuts! Love the fluff color and the extra sumthin’sumthin’ looks marvelous! Way to go!
Enjoy your week and I can’t wait to see what’s next!
Christy says
Thank you, Christina! Enjoy your week too!! XOXO
Toby Peplow says
LOVE LOVE LOVE!!!!
Christy says
Thank you, Toby! XOXO
Rosie says
Clever transformation! I would have thought to make a sign as well but this turned out better. Great job!
Christy says
Thank you, Rosie! I’m glad I went this route! XOXO
Phyllis says
Of course, I love it. Love all your pieces.
Christy says
Thanks so much, Phyllis! XOXO
Deanna says
What a perfect shelf! The transfer adds just the right touch.
Christy says
Thank you, Deanna! XOXO
Cecilia from Georgia says
You make these projects look so easy!! What a perfect way to use a cabinet door and other scraps. I wish I hadn’t seen that nail gun!! Now that is the bomb and I will be trying to justify getting one! Love T2TT!!
Christy says
Aww thank you, Cecilia! My husband bought that nail gun for me several years ago for Christmas and it is awesome! The fuel cells are about the size of two C batteries end to end and last me forever! SO much better than a noisy compressor! XOXO
gwen says
Love this easy upcycle.
I do have a few questions though. What are those holes when you were painting it? I thought you’d filled the pull hole and then there are two rather large ones. Are we looking at the back of the panel where the pull and the hinges were? But then the back would have the same design as the front, does it? Can you explain that photo a bit more?
Using your miter saw can be tricky – did you change the angle of the cut to 45 degrees so that the board was flat along the guide? that’s what you SHOULD do.
I AM paying attention Christy, hope you don’t mind my questions!
Christy says
Thank you, Gwen! Yes, that was the back side and those large holes were where the hinges were. And yes, you are absolutely correct about the cutting on a 45 degree angle. In that moment, I never thought to do that ha ha. I just clamped it and cut them both at once! XOXO
Sue Mellette says
So clever. I love how you transformed a door into a shelf. I particularly like the addition of the transfer. This would be so cute in any house! Thanks for sharing.
Christy says
Thank you, Sue! I’m so glad I hung onto that door! XOXO
Catherine Cave says
Love this idea for a narrow cabinet door. Also love that you filled the space with open shelving. We are hoping to re-do our kitchen this year and I love your ideas that I hope to incorporate with our new kitchen.
On a side note, from a post you had before Christmas…I really do miss shopping the Pier 1 after Christmas sales. That’s where I bought some
of my bests things!
Christy says
Thank you, Catherine! Yes, the open shelving works so much better in that space than that awkward cabinet did. And I do too! I know you can shop online at Pier 1, but it’s just not the same. Best of luck on your kitchen redo! XOXO
Denise - Salvaged Inspirations says
Trashy friends…whaaaaat….🤣… you’re too funny! LOVE your new shelf. What a great way to salvaged and repurpose! XOXO
Christy says
Ha ha!! Trashy in the best way lol! Thank you, my friend!! XOXO
Sandi says
I just love it!!! I also love what you replaced it with. The shelves in the kitchen. Hugs,
Christy says
Thank you, Sandi! XOXO
addie says
Gotta love a good save!!!! YOU are the Queen of good saves!!!! This is a great one!!!!
Happy new year 2021!!! xoxo
Christy says
Thank you, Addie! I’m so glad I hung onto that cabinet door, even if it took me over two years to use it ha ha! Happy New Year to you too!! XOXO
Nancy @ Artsy Chicks Rule says
That was meant to be a shelf! Perfect, love it! xo
Christy says
Thank you, my beautiful friend! XOXO
Cate Cooper says
I love what you’ve done with this! It’s just such a great idea!
Maybe I’m wrong, but I thought I felt a bit of wistfulness to your comment about the shelf brackets being “primitive”. To solve that situation, couldn’t you just use a stencil (in a dark color) on the brackets, that looks like scrolling or scrolled metal? It isn’t perhaps the perfect solution, but maybe one that “makes it just right”.
Either way, it looks great. Good job!
Christy says
Thank you, Cate! I think the lines of the shelf were so simple, that I was really hoping the scrolly brackets would add a bit of pretty, but the primitive ones totally work and your idea might be a great touch! XOXO
Leticia Beam says
So very nice! you are so creative! I love it…
Christy says
Thanks so much, Leticia! XOXO
Sharon L Austin says
I was really expecting it to be a sign, but it looks great as a shelf too!! Happy new year!
Christy says
Thanks, Sharon! I always thought that’s what I would do with it, but nope ha ha! Happy New Year! XOXO
Marcie Lovett says
It’s so pretty, Christy. Love when you find uses for cast-offs like this!
Christy says
Thanks so much, Marcie! XOXO
Jen @ Girl in the Garage says
Your cabinet door turned shelf is so pretty, Christy! When I saw the Before photo I thought it was much larger for some reason, haha. I wondered what you were going to do with such a big door! 🙂
Christy says
Thank you, my sweet friend! And ha ha! Those pictures can be deceiving! XOXO
ROSE LEFEBVRE says
Such a great idea. I love this!
Christy says
Thank you, Rose! XOXO
Marie B. says
Happy New Year, Christy! Popped over for a long-overdue visit to find your repurposed door (I remember that cabinet removal). Sweet save!
Christy says
Happy New Yea, Marie!! I’m so glad you stopped by! Thank you!! XOXO
Michele M. says
Oh, Christy! You did it again! Well done – what a transformation.
And why on earth did the builders put up such a skinny cabinet? Glad you fixed that too – the open shelving is awesome too.
Christy says
Thanks so much, Michele! Wasn’t that skinny cabinet odd? Glad we banished it ha ha! XOXO