Hello beautiful friends!! I am so excited you’re here today because I’ve got a fantastic coastal inspired dresser makeover to share with you!
It’s Furniture Fixer Upper day also, so look for three more furniture flips from my furniture flipping besties at the bottom!
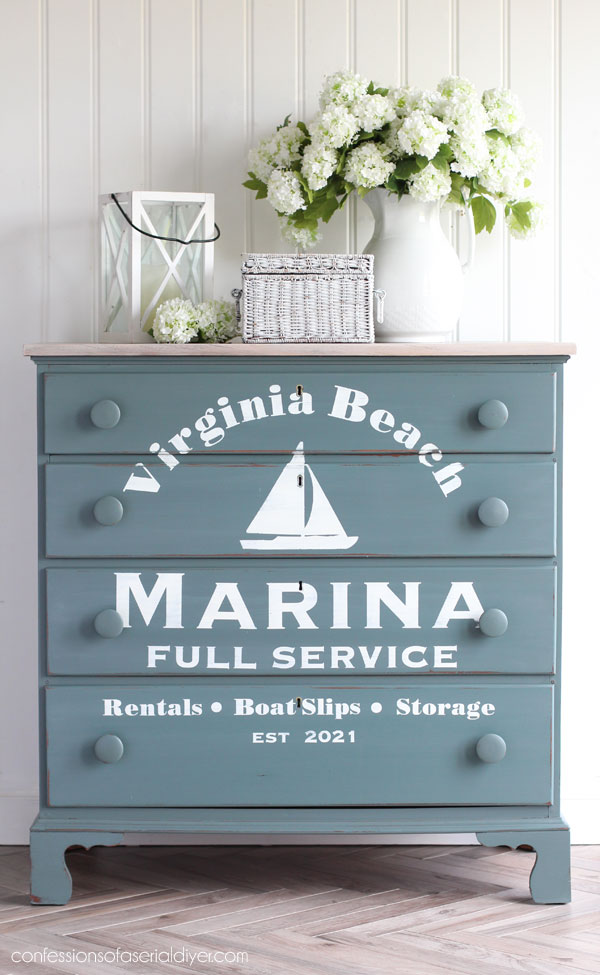
Coastal Inspired Dresser
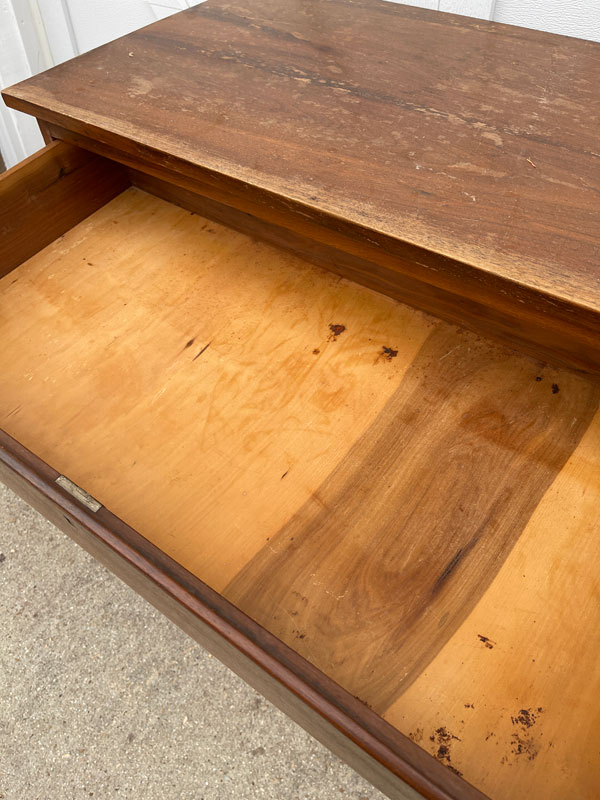
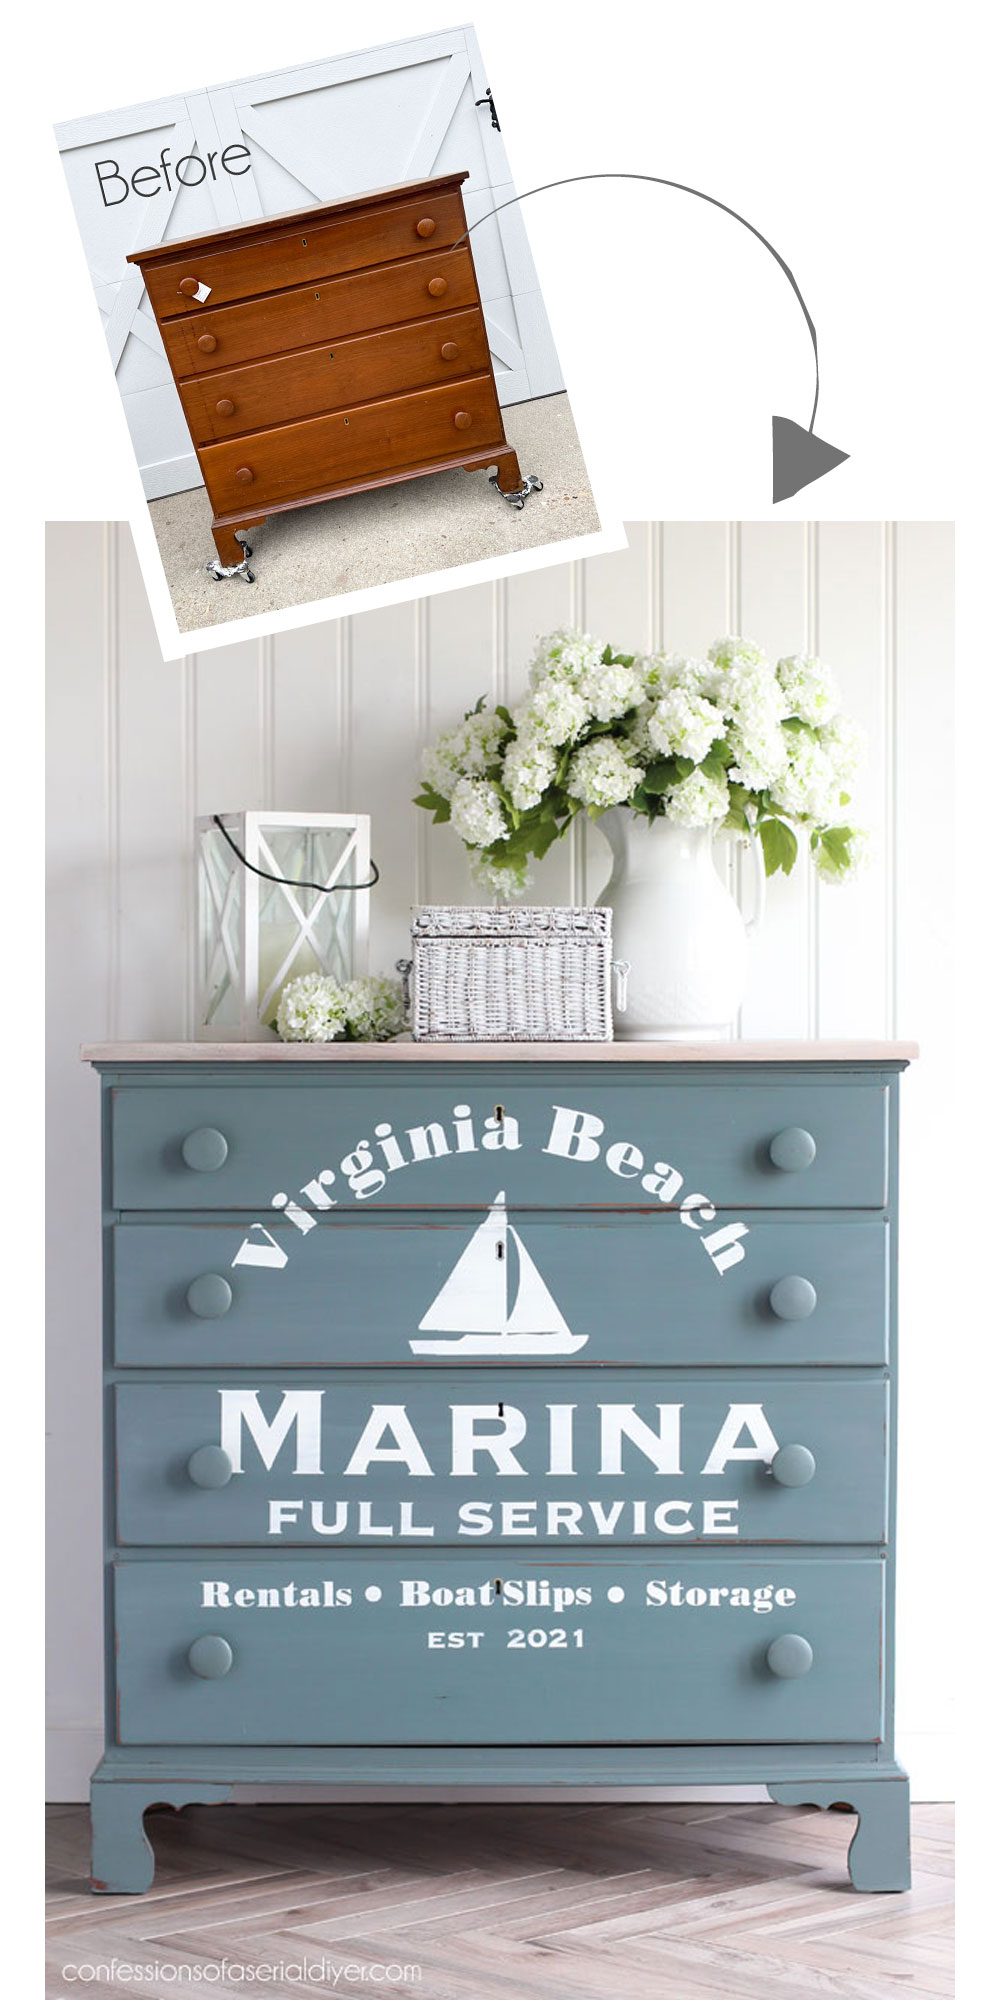
Here is today’s project piece:
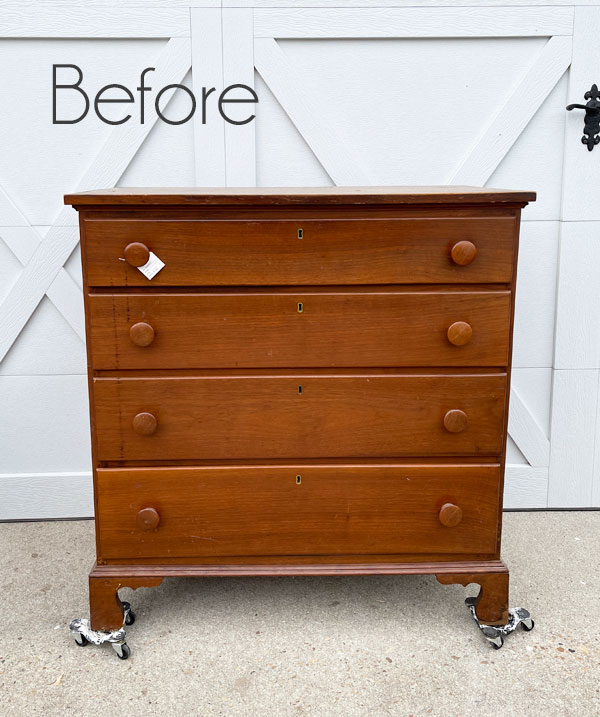
I picked this up at the thrift store recently for a steal at only $35! I’ve included a few affiliate links so yo can find the products I love.
The top wasn’t in the best condition, but my orbital sander worked its magic on it:
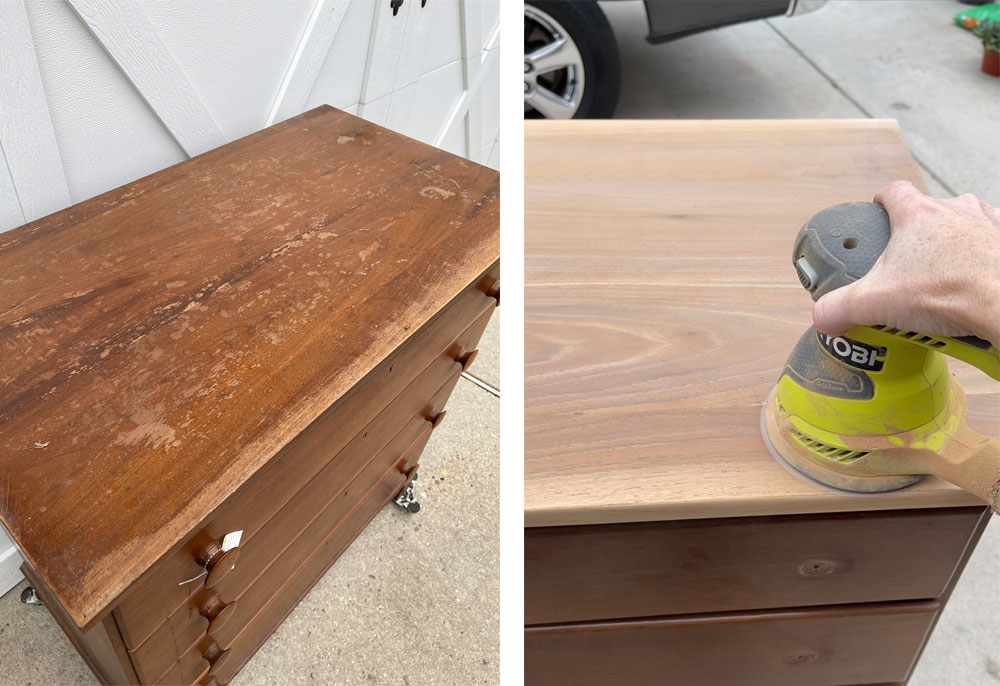
I started with 120 grit sandpaper, followed by 220 grit.
It also had a couple of splits on one side and another on the opposite side which I was able to fill with Dixie Mud:

I sanded it smooth with my orbital sander also once it was dry using 220 grit sandpaper.
Luckily for me, these were easy fixes!
Cleaning
After the sanding was done, I gave it a good cleaning with White Lightning. I you decide to clean after filling holes, avoid those areas. I forgot to clean before mudding.
This thing didn’t look too bad, but my water says otherwise!
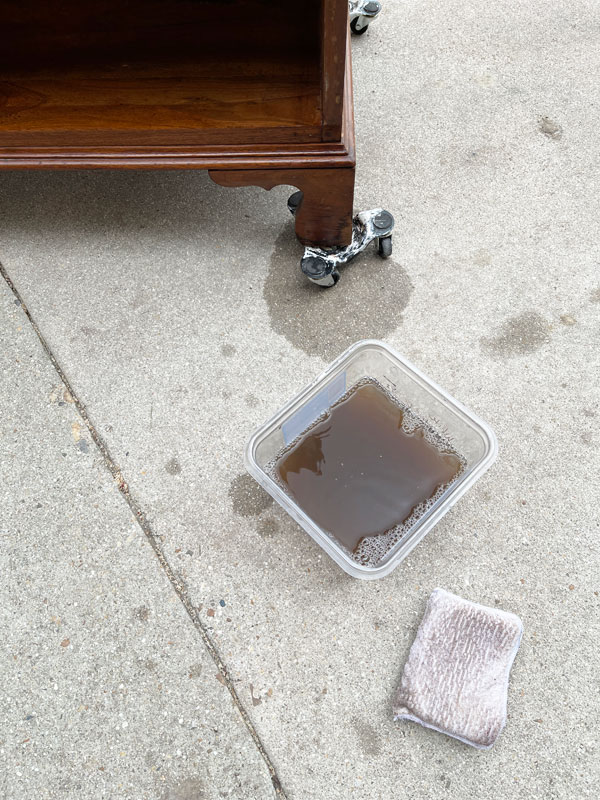
I swapped it out for clean water and gave everything another wipe down, and I was ready for paint!
Paint
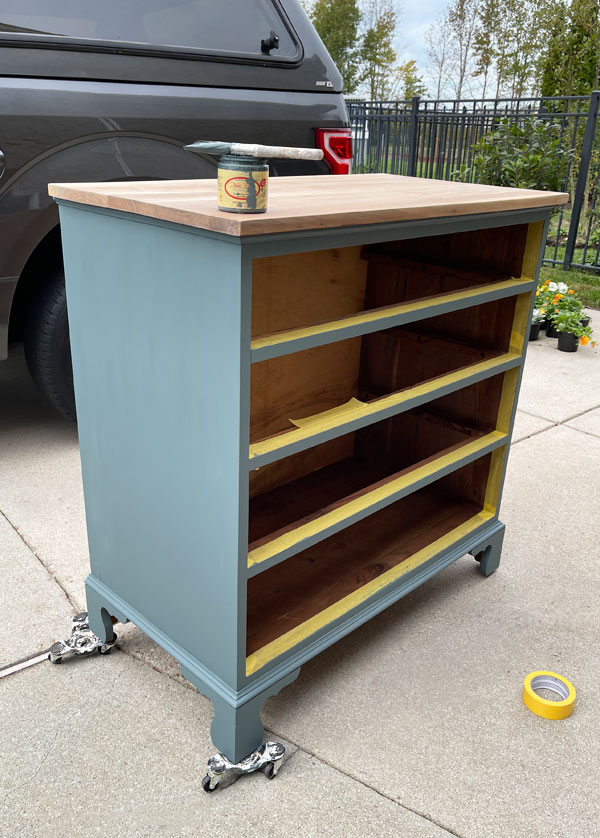
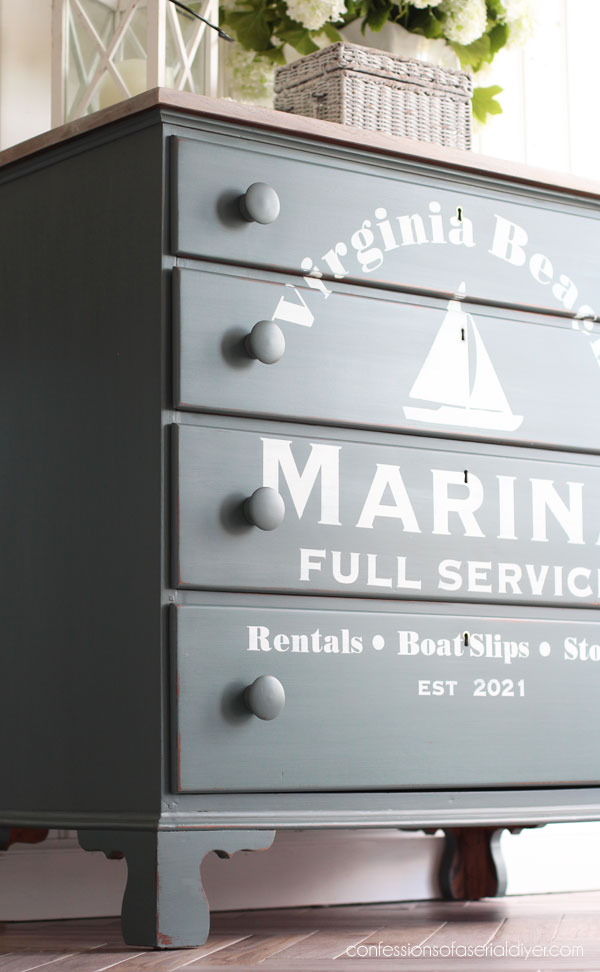
I chose a color I haven’t used before for this one: Stormy Seas.
It is a gorgeous blue gray, and I gave it two coats:
Perfect for a coastal-inspired dresser!
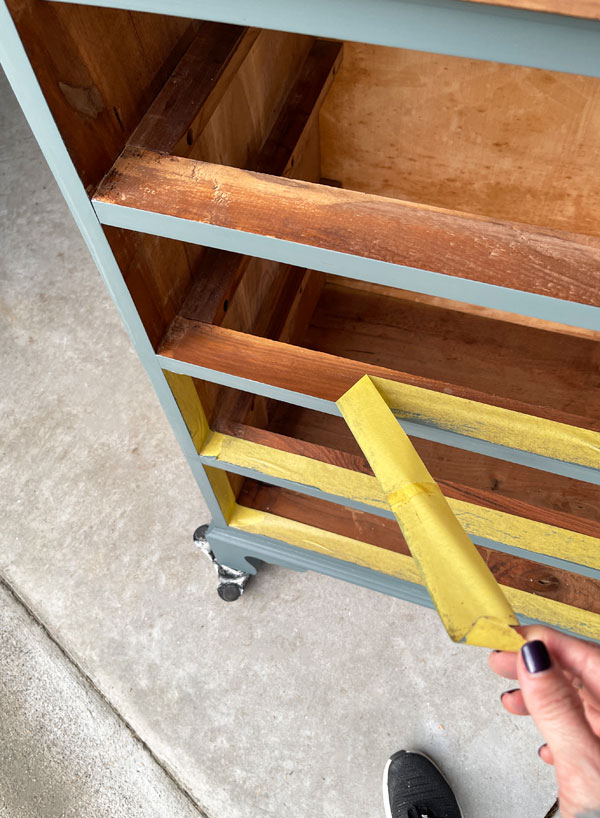
As you can see, I taped off the inside edges. I like nice crisp lines!
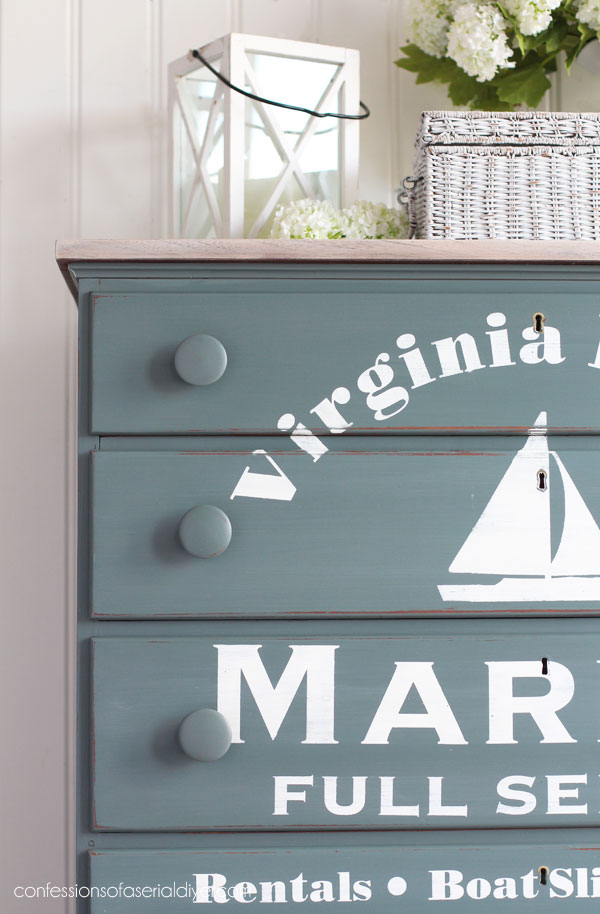
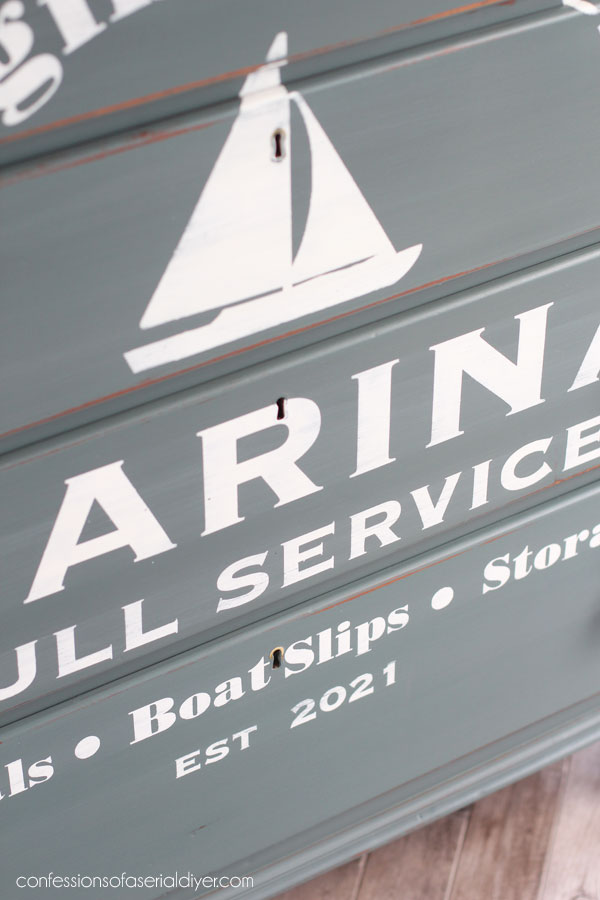
Adding typography
Then I decided to create a typography design to add to the front which I did in Photoshop Elements. Then I uploaded it to my Silhouette Cameo and cut a “stencil”. (See how to do that HERE.)
Piecing everything together and lining it all up properly is the hardest part and takes patience, but I got it done!
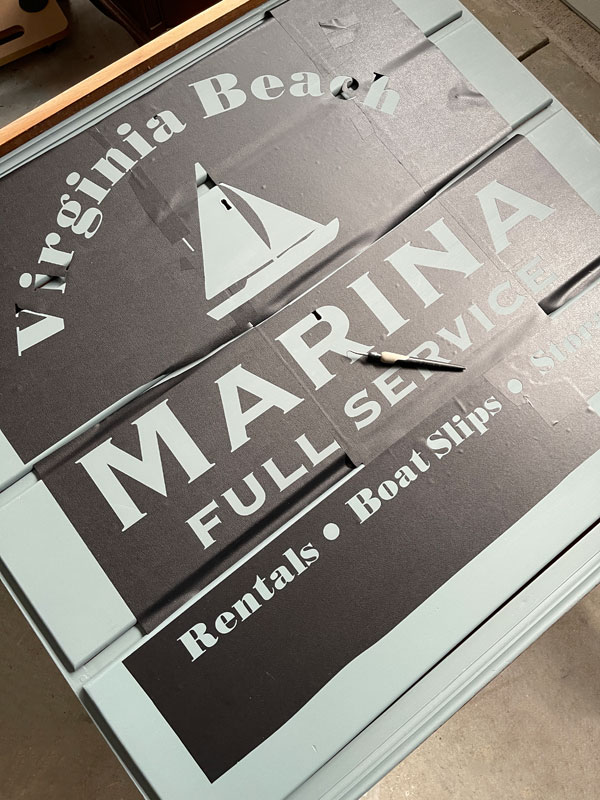
I used my Silhouette weeding tool to remove all the pieces, and then I was ready for paint.
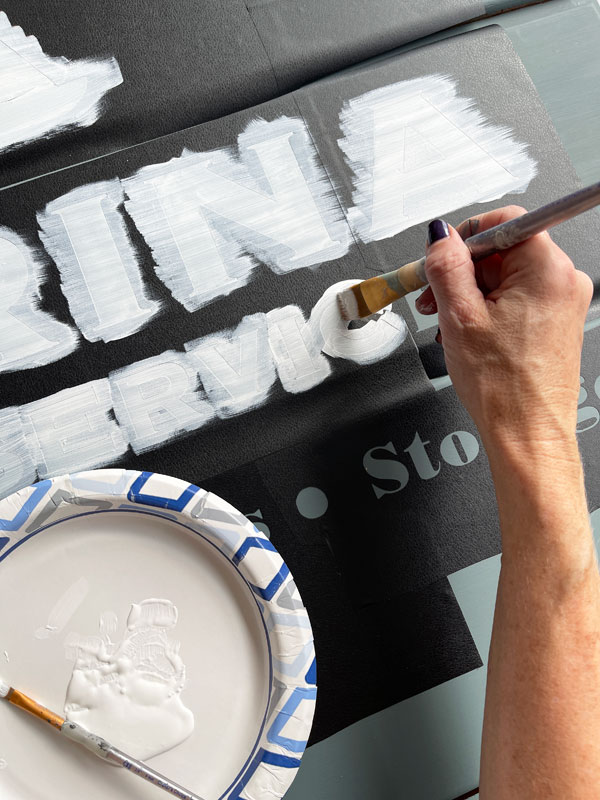
For this, I chose acrylic craft paint and a smaller craft brush to fill in the “stencil”:
I used black contact paper here, so I was able to brush across it without much risk of paint bleeding underneath.
Three coats gave me full coverage, and I removed the stencil right after applying the third coat.
I don’t worry too much about imperfections because once it is dry, everything gets a good sanding with 220 grit sandpaper:
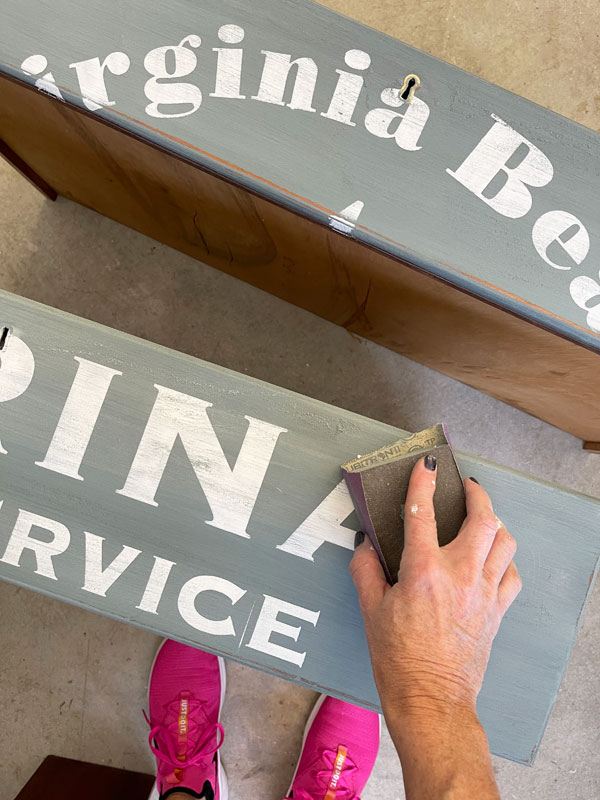
This will smooth out most imperfections.
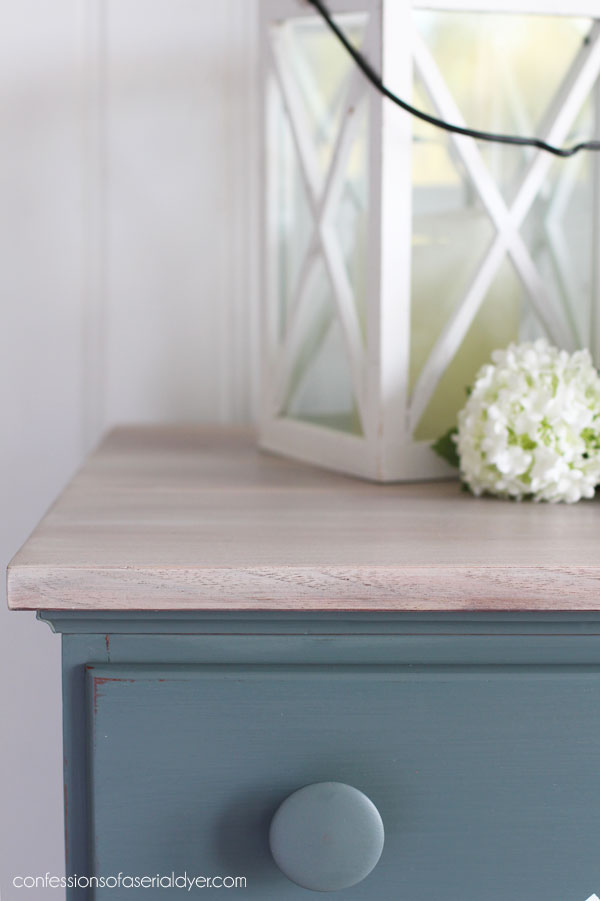
Staining the Top
For the top of the dresser, I knew I wanted a stained finish.
Before applying the stain, I gave it a once over with wood conditioner. This will yield a nice even finish.
For this piece, I chose Voodoo Gel Stain in White Magic and applied it with an applicator pad:
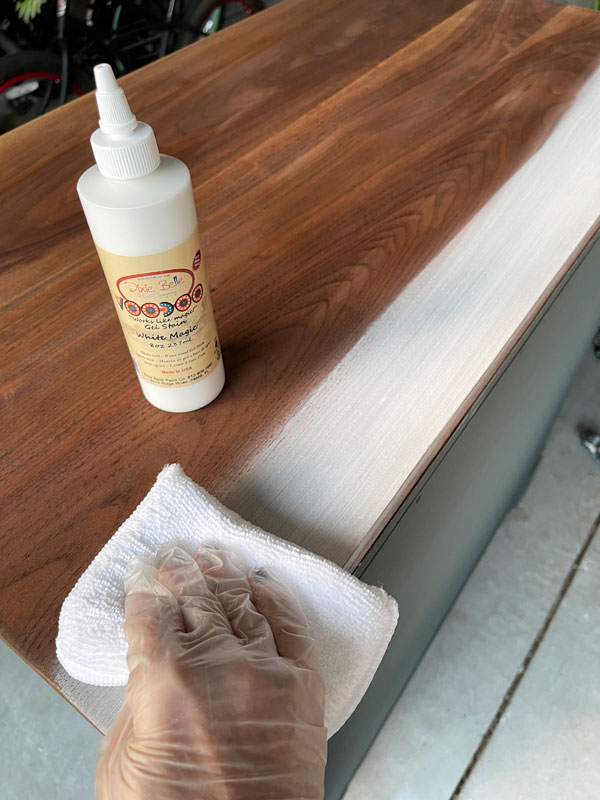
I love the Voodoo gel stains because they are water based for easy clean up and have little to no odor. Be sure to give them a good shake before using. I applied it to my pad and then used the pad to apply it to the top of the dresser.
Seal
To seal this dresser, I went with my favorite sealer for most furniture pieces: Clear Coat in the Satin finish.
I gave it two coats all over, including the top using the blue applicator sponge. The sponge makes sealing SO much easier!
*HOT TIP*
This time, I took the scissors to my sponge and cut a little off each side:
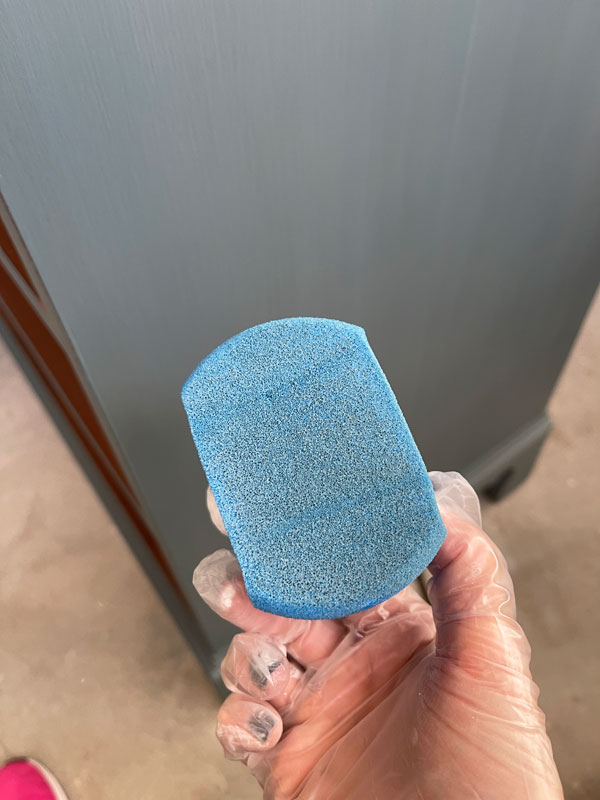
That way, I could get right up against the edges!
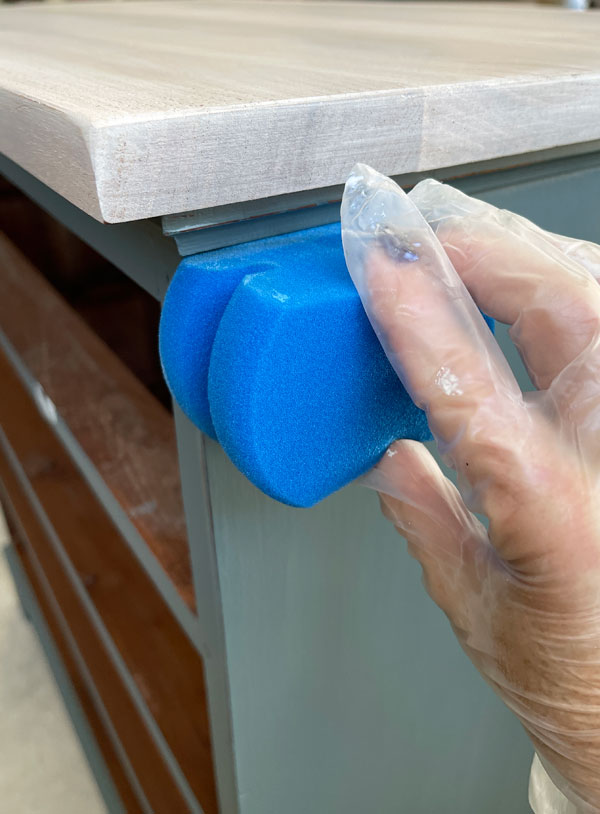
It worked marvelously!
And this makeover was complete!
The result
I love how this one turned out!

This is such a great blue!
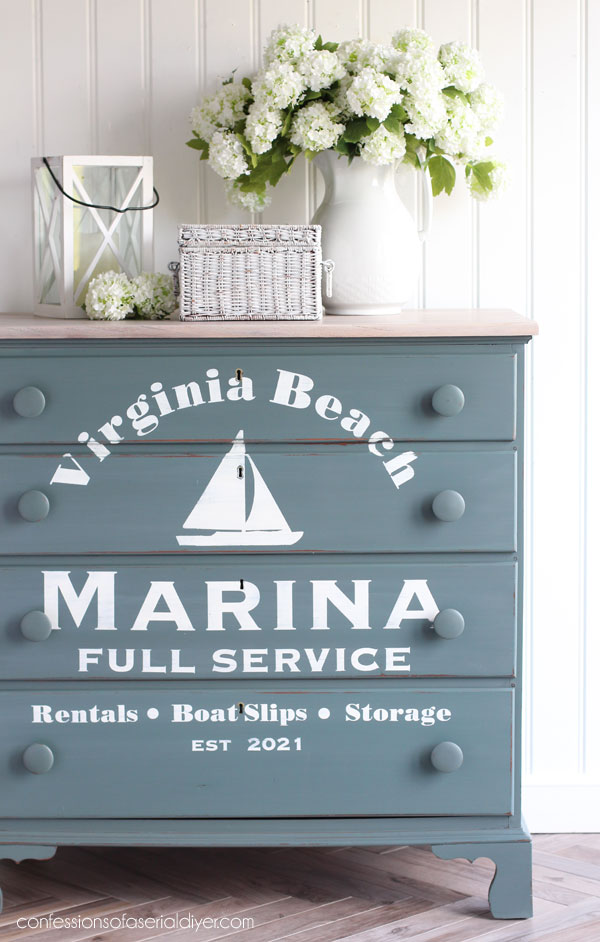
I struggled with what to do about the letters that fell in the cracks, but I just ended up joining them by hand…
How about that top? The white stain works so well with this look:
The Drawers
Y’all know I like to pretty up my drawers!
These ones weren’t the prettiest to start:
I used a razor scraper to remove as much of the yuck that was stuck on as possible. After taping all around the edges with FrogTape, I painted them in one coat of Stormy Seas.
Then I taped them off to add stripes! They were painted with two coats of Cotton. I removed the tape immediately after the second coat:
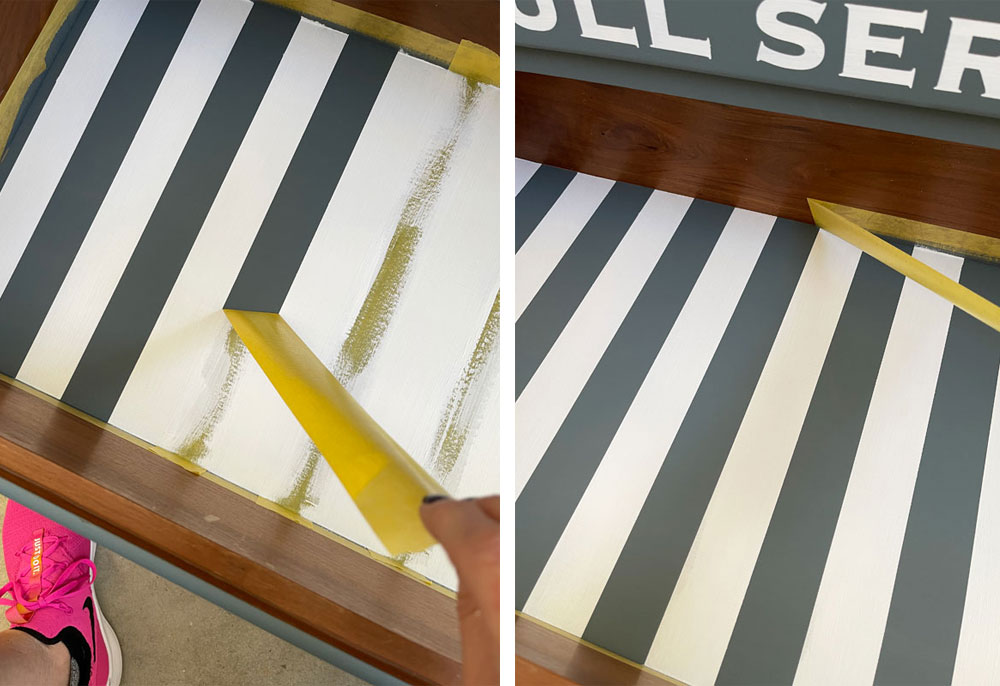
Removing the tape is so satisfying!
See how I space out my stripes the EASY way HERE!
Y’all know I couldn’t call this a coastal makeover without stripes somewhere, right??
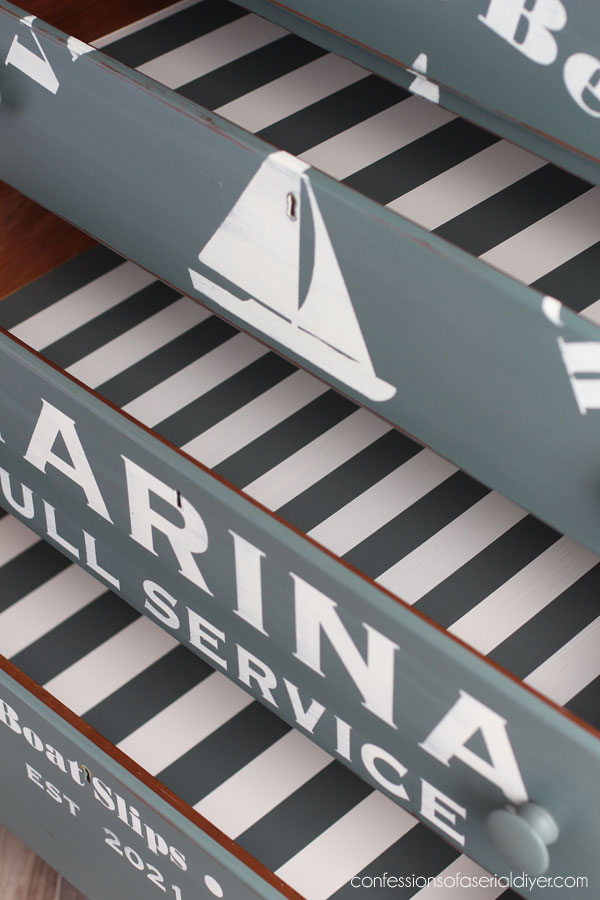
This is a great alternative to lining drawers with fabric! The sides of the drawers were beautiful, but the bottoms were a cheaper wood and not in the best condition, so this was a great way to fix that!
As for the knobs, I chose to use the originals and just paint them the same color as the dresser:
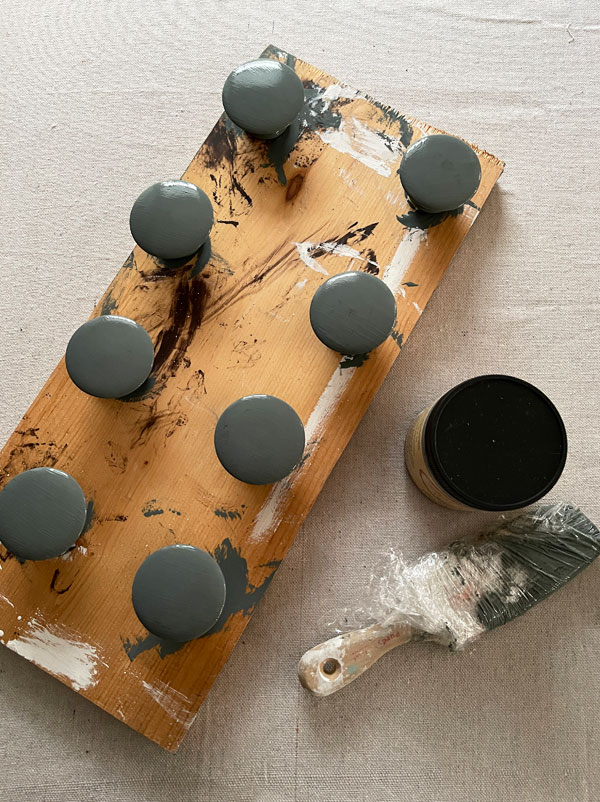
Drilling holes in a piece of scrap wood allowed me to paint them more easily!
And now they let the typography be the star of the show!
I hope you enjoyed this makeover as much as I enjoyed bringing it to life!
My friends have three more furniture makeovers to share with you today!
I’ll be popping in this weekend with a nighttime Halloween tour, so be on the lookout for that.
UPDATE!! See it HERE now!!
And if Halloween’s not your thing… I totally understand! Skip to my next thrifty makeover HERE…it’s a round up!
Have a safe and fun Halloween weekend!!
XOXO,
![]()
Don’t Miss a Thing!
If you like what you see, there are several ways to follow along!
Email * Instagram * Facebook * Pinterest * Twitter


Rose Lefebvre says
Such a great look. I applaud the design and color!
Christy says
Thank you so much, Rose!! XOXO
Leanne Smook says
OMW I love this! That stencil on the front is just perfect for it.
Christy says
Thanks so much, Leanne! XOXO
Petra says
One of my fave pieces you’ve done 👍 gorgeous!
Christy says
Aww yay!! Thank you so much, Petra!! XOXO
Denise - Salvaged Inspirations says
Love this coastal makeover and GREAT tip on the sponge! XOXO
Christy says
Thank you, my friend! Cutting the sponge worked so well!! XOXO
Denise says
You are the best!!! Love it!!!
Christy says
Aww I appreciate that, Denise! Thank you! XOXO
Toby Peplow says
Beautiful!!! Great job!!!
Christy says
Thanks so much, Toby! XOXO
Lorrie S says
I love this makeover!
Christy says
Thank you, Lorrie! XOXO
Janice Holt says
Great color and graphics for this makeover. Another job well done. We have a new meteorologist on our local channel which comes out of Huntsville, AL. She is from Virginia Beach also. Her name is Danielle Dozier; by any chance do you know her? Have a great week-end.
Christy says
Thank you, Janice!! That name doesn’t ring a bell. Enjoy your weekend too!! XOXO
Christina says
Beautiful makeover!! Love how you let the typography shine. The white stain… didn’t see that coming and it works so well! The drawers are wonderful. Another great job Christy!!! (Love the color also!)
Christy says
Thank you so much, Christina! I’m so glad you enjoyed this one! XOXO
liz says
This makeover turned out fantastic! You are so creative when it comes to transforming these larger pieces.
Christy says
Aww I appreciate that so much, Liz! Thank you! XOXO
Mary Kaiser says
Oh MY it is so beautiful now!! I love the color, and especially love the stripes in the drawers. What an amazing transformation. This dresser will last about 10 seconds in your shop. I will have to find something to do in that color!! Such an inspiration!
Christy says
Thank you so much, Mary! I don’t know why it took me so long to use this gorgeous color on something! XOXO
Sharon L Austin says
Love it! I just can’t figure out why you keep making custom pieces for my place at the lake and then refusing to give them to me!! 😉 It’s probably a good thing I don’t live near your booth.
Christy says
Ha ha!! I am so sorry! This would be amazing in a lake house!! XOXO
Maryellen Webber says
What a stunning makeover!!! Love the color and the stained top. Have a Happy Halloween Christy!
Christy says
Thank you, Maryellen!! Happy Halloween!! XOXO
Dalila says
Looks nice, Christy! I like the blue color, too. However, it looks dark gray in some of the pictures…
Christy says
Thank you, Dalila! It does look a bit different in different lights…definitely a blue, but with some gray too! XOXO
Julie A. Henry says
BEAUTIFUL AS ALWAYS! YOU HAVE MENTIONED BEFORE WHILE CLEANING A PIECE THAT YOU’VE USED LYSOL WIPES. DO THEY WORK WELL AND IS THERE ANY RESIDUE FROM THE WIPES LEFT ON THE PROJECT? I KNOW YOU WIPE THE PROJECT DOWN WITH CLEAN WATER AFTER BUT WAS CONCERNED ABOUT THE PAINT/STAIN WORKING ON A PIECE. THANK YOU FOR YOUR TIME, I WILL BE HEADING FOR FLORIDA IN NOV. AND LOOKING FORWARD TO DOING SOME ITEMS I FOUND THERE FOR OUR HOME. HAPPY PAINTING…..STAY SAFE!
Christy says
Thank you so much, Julie!! Yes, I used to use wipes instead which worked great, but you can go through a ton of wipes trying to get these dirty pieces clean. When I couldn’t find them in 2020, I started using the White Lightning and it is awesome, and just more cost effective. I did not rinse after using the wipes though. Have fun working on your pieces!! XOXO
Dorothy Loose says
Christy this turned out beautiful. I love the blue/gray colour and the contrast of wood on the top. The stencil is the icing on the cake! Love it
Christy says
Thank you so much, Dorothy! XOXO
Donna Nance says
You are so talented! I’m guessing this piece will sell quickly.
Christy says
Thank you, Donna! I hope so! XOXO
Niki says
Anything coastal brings a smile to my face. Living in middle America and being completely land locked doesn’t lend way for much coastal design, but I sneak some in here and there.
It turned out very cute Christy.
P.S. I like the new format!
Christy says
Thanks so much, Niki! A little coastal decor adds some summertime vibes all year! XOXO
Marcie Lovett says
Too stinkin’ cute, Christy! I know this one’s going to fly out of the booth if you can bear to let it go 😉
I thought the top was laminate, surprised to see that beautiful grain underneath. You picked the perfect color, and thank you for answering my question – But where are the stripes? 😂
I actually do have a question – why foil on the wheels? To keep them clean or to keep the furniture from sticking to them?
Christy says
Thank you, Marcie! Yes, it is all wood! And ha ha..now you know I couldn’t call it coastal if it didn’t have a stripe in there somewhere! The wheels don’t have foil…that’s paint. 😀 XOXO
Diana Cosgrove says
You are amazing Christy! The upright dresser came out beautiful! Thanks for sharing… I look forward to your posts! Diana
p.s. I am starting the big mirror this weekend!
Christy says
Aww thank you so much, Diana! Have fun with your mirror! XOXO
Sue Duffy says
Love it! As always.
Christy says
Thank you, Sue! XOXO
Kim says
I love seeing you turn these plain Jane dated dressers into gems! That would look great in a little boy’s nautical themed bedroom! I always admire your steady hand filling in the stencils and your perfect stripes. Mine never turn out that sharp and perfect-but I haven’t had years of practice like you! It’s perfect.
Christy says
Thank you, Kim! It would be great in a boy’s room, and it’s a great size! I credit FrogTape for the crisp lines…it is awesome, and it helps that the contact paper is adhesive, so that helps to give nice crisp edges too! Just saying, I had some help lol! XOXO
Connie Douglas says
Well darling girl you have done it again! You just keep amazing! That is so beautiful! Keep it up. I love seeing your gorgeous work!
Christy says
I appreciate that so much, Connie! Thank you! XOXO
Becky says
Whoa. That came out even better than I could have imagined. What a beautiful little dresser now! The striped drawers are the cherry on the top! Fantastic!
Christy says
Yay thank you, Becky!! I had fun reimagining this one for sure, and you know I had to throw some stripes in there somewhere! XOXO
Teresa Farrell says
Oh Christy, she is beautiful! I love it and the design you did is awe inspiring. Beautiful makeover.
Christy says
Aww thank you so much, Teresa! I’m so glad you enjoyed it! XOXO
Debra Hubbs says
I love everything about this piece! I just painted a desk in Stormy Seas. Love that color. You take everything a step further and the final result is always beautiful.
Christy says
I’m so glad you love it, Debra! Thank you!! Stormy Seas is just lovely…I’m surprised it took me so long to try it! XOXO
Laura says
Lovely makeover on the chest! Here’s a question, and maybe you have answered it before, but where can I find the “wheelie things” you use while working on your furniture? I think they could come in handy around the house. Many thanks!
Christy says
Thank you, Laura! I found the dolly wheels on Amazon here: https://amzn.to/3GwCm7H They’re great! XOXO
Leticia Beam says
Fantastic job!
Christy says
Thank you, my friend! XOXO
Kathy says
You never cease to amaze me!!! You have a lot going on n your head!!! That piece is beautiful!!!
Christy says
Aww thank you so much, Kathy!! I’m so glad you enjoyed this one! XOXO
Dakota says
Goodness! This is just gorgeous! Thank you for all the helpful tips as well!
Christy says
Thank you, Dakota! You are so welcome! XOXO
Jen @ Girl in the Garage says
What a great score, and it turned out fabulous! You know I’m loving that stained top too! xo
Christy says
Thank you, my sweet friend! I already had three dressers and two desks in my garage, but I was not leaving the thrift store without that one lol! I love a stained top also! XOXO
Kathy Owen says
Gorgeous. You always do such detailed work Christy. Truly professional!
Christy says
Aww I really appreciate that, Kathy! Thank you, my friend! XOXO
Bonnie says
That is a BEAUTIFUL blue grey. Is that one of the Dixie Belle? Once again you took a piece and made it your own. One thing I always loved about following you was your before and after photos. Makes you relook at a piece when you are out that you can make it over with your steps. Happy Halloween 🎃 look forward each year to your spooky Ness
Christy says
Thank you so much, Bonnie! This is Stormy Seas by Dixie Belle! I’m surprised it took me so long to try this one. Happy Halloween, my friend! XOXO
Shirley says
As much as I am not a fan of beach decor, I have to say this is the prettiest color I’ve seen for beach decor and this looks really nice!
Christy says
Thank you, Shirley! It is a lovely color! XOXO
Sharleen Engel says
Love , love, love it
I have a huge piece of foam ., looks similar to what you have in the pic. Do you think I can cut it into smaller pieces and use it for sealing purposes
Christy says
Thank you, Sharleen! It wouldn’t hurt to give it a try! I say test it on a scrap piece and see how it does! XOXO
Cheryl Atkinson says
Hi Christy! Great tips and tricks in this one. Thank you! This turned out so good.
Christy says
Thank you, Cheryl! This was a fun one to work on! XOXO
Anne Stockwell says
This looks so cute! My house is definitely not “Beach Style”, but I love the look of this. And I really appreciate the detailed instructions on your project posts, and also the product links. I can certainly adapt them to my own style.
Christy says
Thank you so much, Anne! XOXO
Lily says
Thank you so much for mentioning about those side slits that run from top to bottom. I always have such a hard time with those! I feel they still show even after filling/sanding and painting. It came out so beautiful!! Like always!! 🙂
Christy says
Thank you so much, Lily! It is a shame when things like that happen to these otherwise solid pieces. You can still faintly tell where I filled those side areas on this one too, but the darker color does camouflage it a bit. XOXO
Mary says
I think this is one of my all time favorites! Using the white stain on top was a great idea and really keeps the beach vibe going. The dresser looked like maple to me and that stuff can get so beat up and it just comes flying back with some TLC. Great job!
Christy says
Aww yay! Thank you so mcuh, Mary! I really enjoyed this one also! XOXO
Julie Kohl says
Hi Christy. I just started following you and I am so inspired. I just bought my first piece to refinish – a wine bar. And I have some questions. It is wood (maple?) with probably some sort of shellac or whatever giving it that slight shiny finish that’s common on older pieces. My desire is to paint the bottom white and refinish the wood top, restaining it a bit darker. I’m trying to determine steps and which products to get. Can you help? My understanding from your posts is to:
1-Sand the top (I already ordered your ryobi sander)
2-wipe everything down w/white lightening, then clear water
3-stain the top (suggestion for stain?)
4- paint the bottom with my chosen paint (I love your color “fluff” but I may use my kitchen cabinet paint as this item will be in the kitchen) My question on this step is – don’t I need to at least lightly sand the bottom of this cabinet before painting for the paint to adhere? I see you painting straight after cleaning on most pieces) Are there certain paints that adhere better and don’t need sanded or primer first?
– if I plan to slightly distress the painted edges I would do that now with sandpaper.
– after painting I would seal everything w/the satin sealant you use.
**I very much appreciate your advice! Thank you!
Christy says
Hi Julie! I love that you are inspired!! If you choose to use regular paint, you will need to sand and prime first. If you use chalk paint, you can go right to painting as it has excellent adhesion properties. If you plan to distress, I would definitely go with chalk paint…distresses so easily and yep, you just do that with 220 grit sandpaper. All the other steps you mention are just right! Have fun with your project!! XOXO