Hello sweet friends!! We are moving right along on our kitchen update, and today I am back to share how I gave our range hood a custom look for around $50. I had shared a couple of ideas of what I liked in this post HERE, but they had different range hoods than we did, so I had to figure out how to build a range hood cover that worked with the one we have.
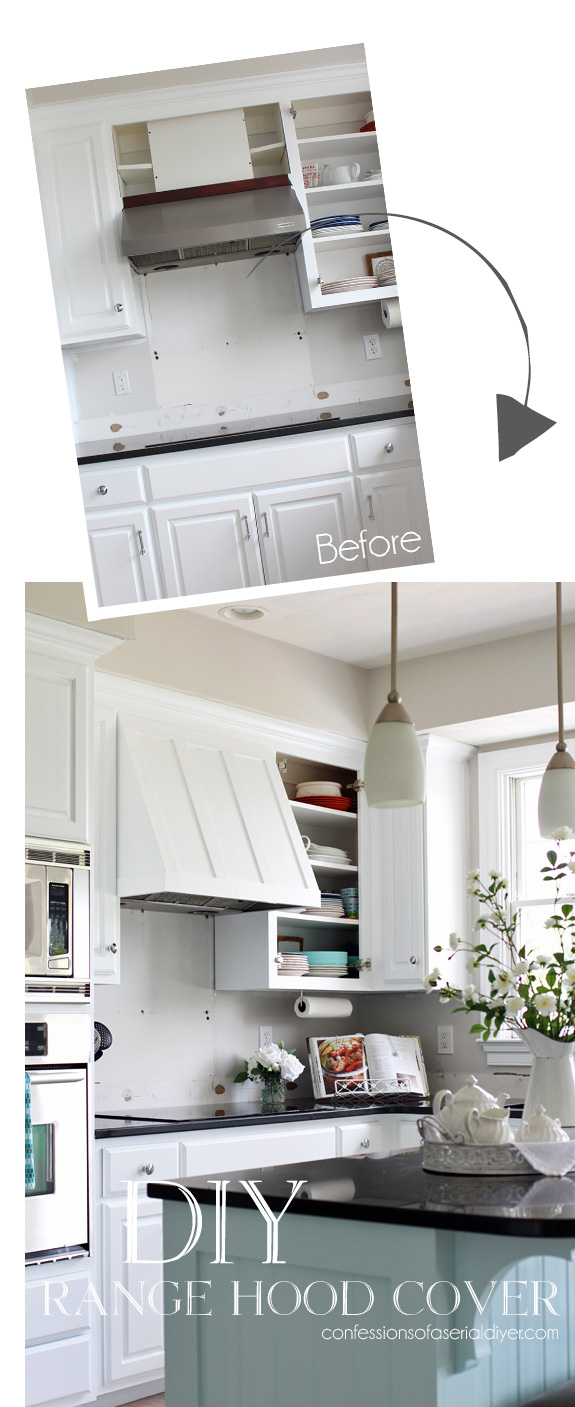
First, let’s remember what it looked like before:
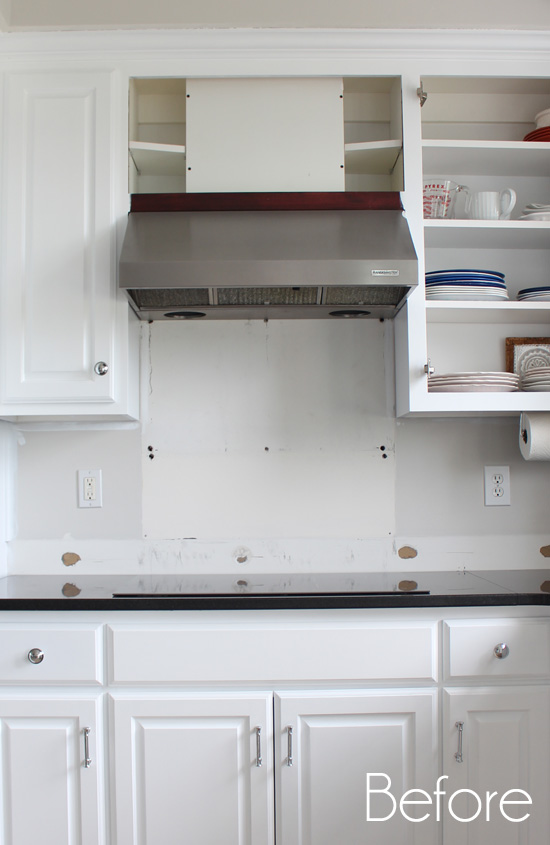
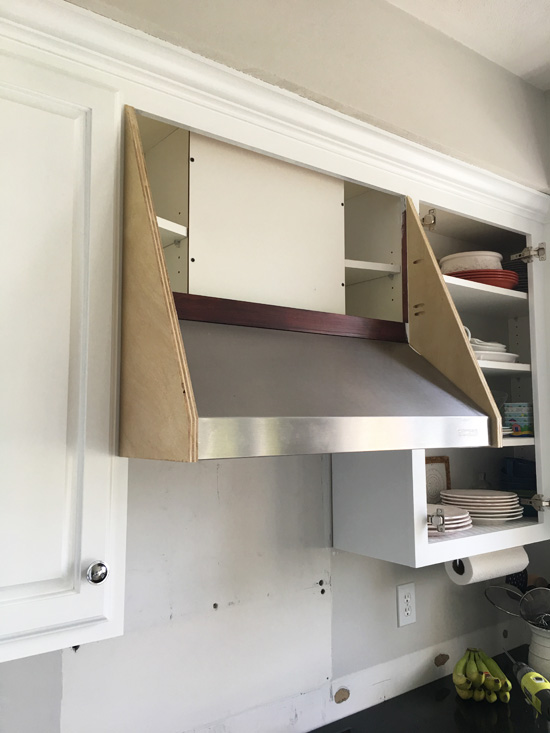
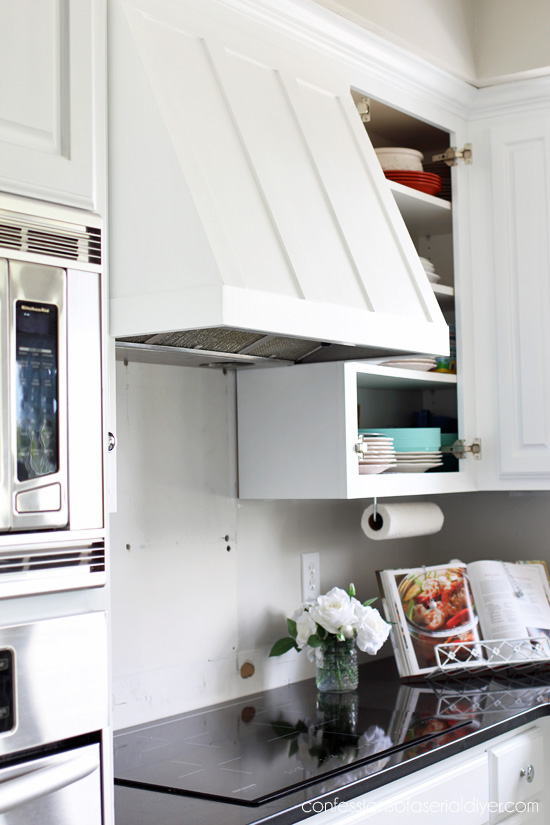
There were two small cabinet doors above it, but that storage space was mostly taken up with the vent pipe, leaving very little usable storage.
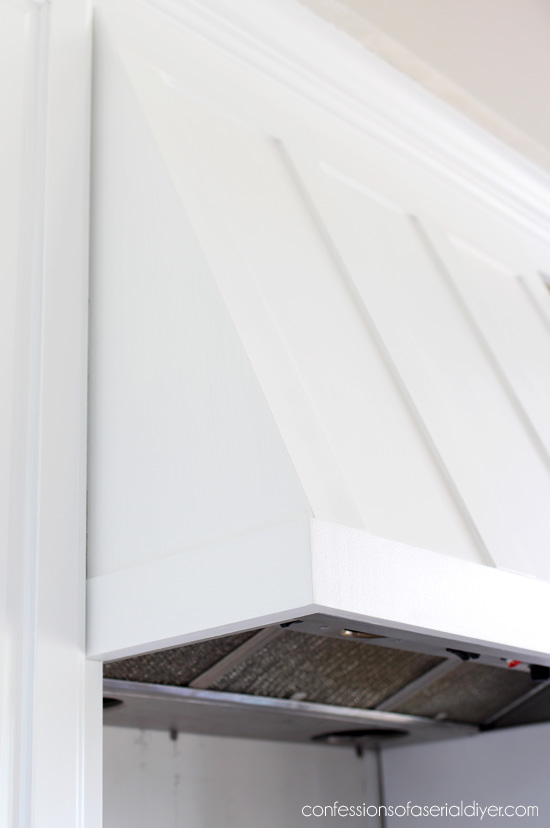
And I don’t think we’ll miss it at all:
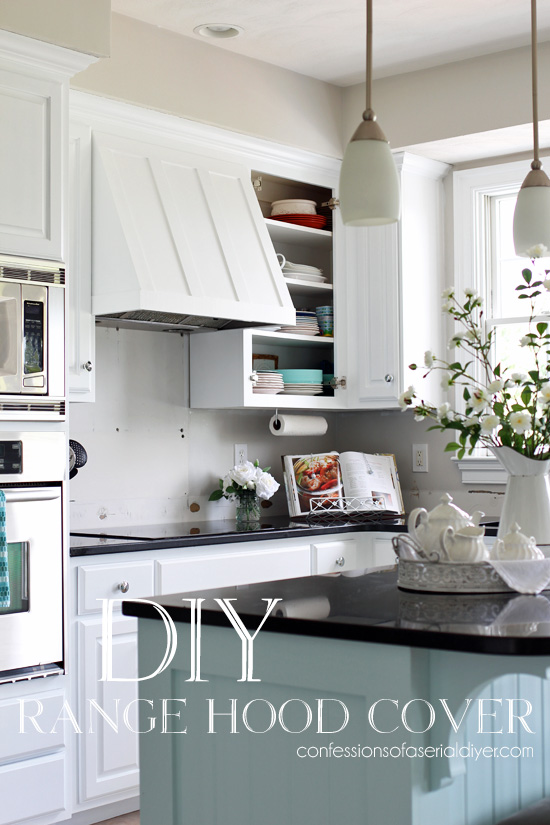
What do you think?
This was not terribly difficult to do once I figured out how to go about it.
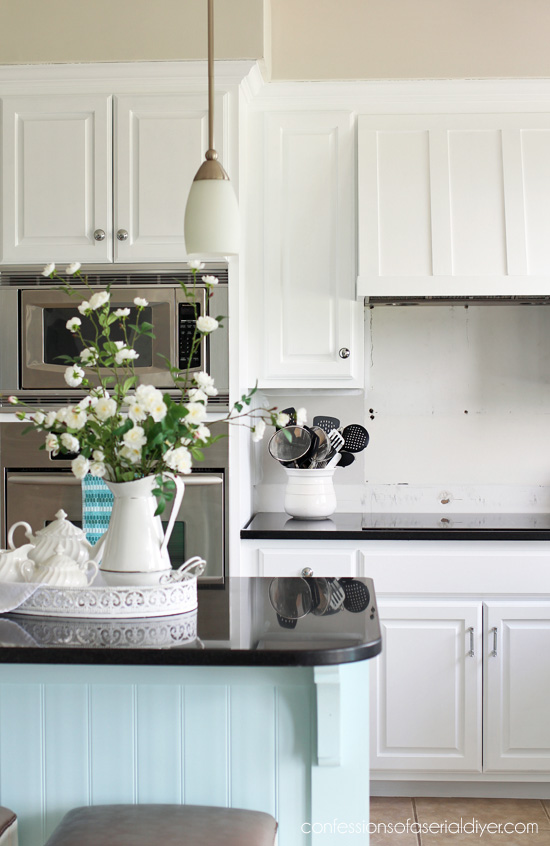
I hate that the bare wall and open cabinet are detracting from the pictures, but you can imagine how it will look when it’s all done. I’ve included a few affiliate links so you can find the products I love.
Of course I took photos of each step to share with you so you can create this look if you have a similar range hood.
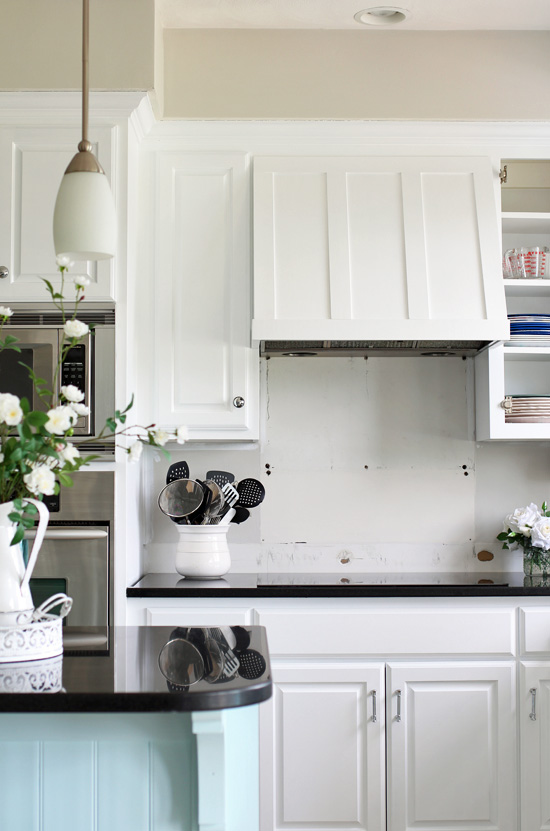
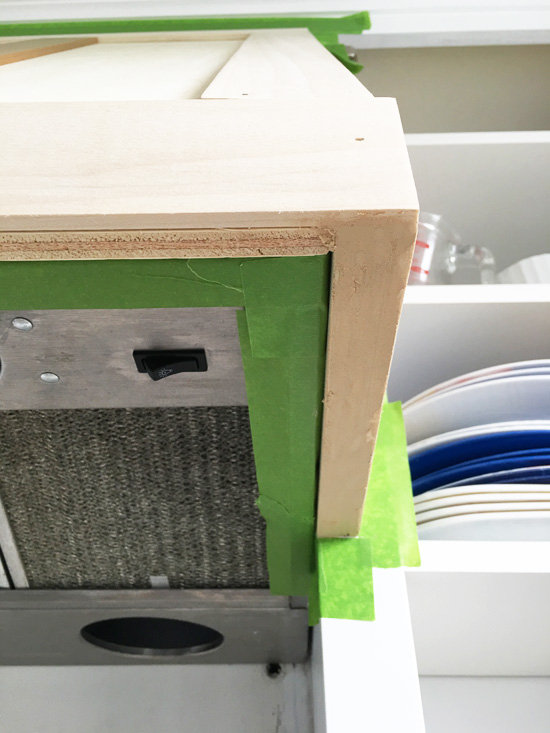
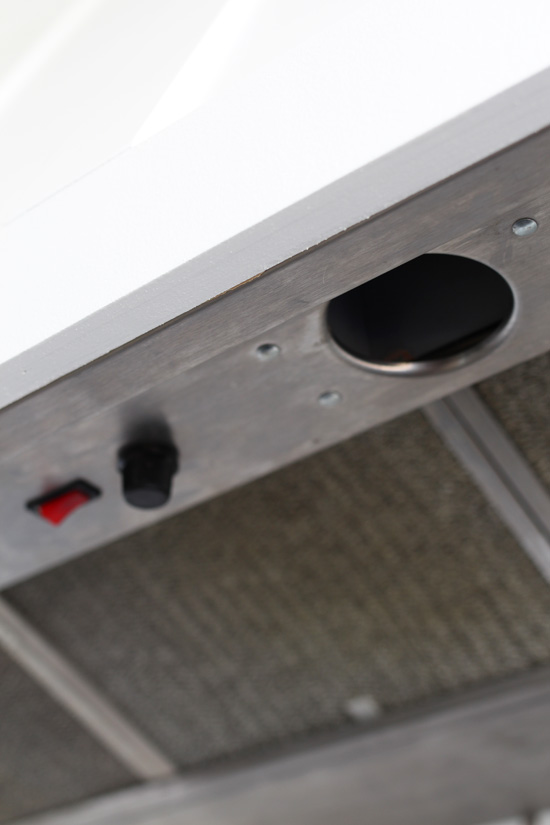
First of all, all of the buttons to work the vent and lights are underneath and still can be easily accessed…
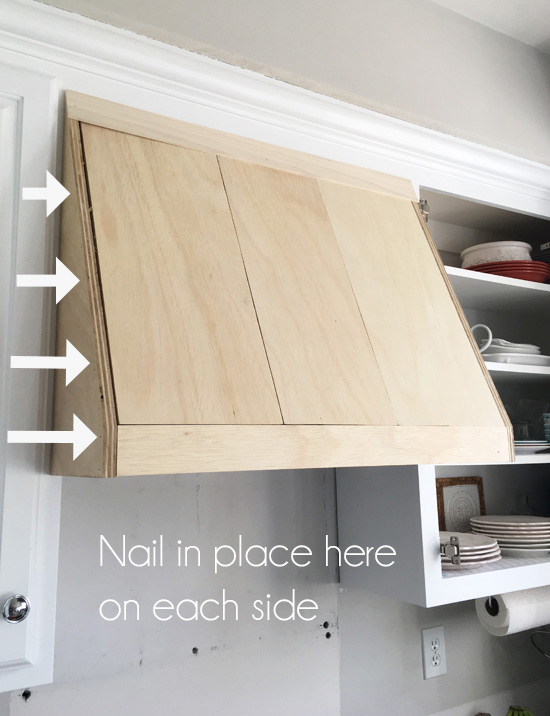
As you can see, I simply encased the existing vent in wood. (Someone clean that vent!)
Here are the supplies you will need:
- (2) 2×4 sheet of sanded plywood in 1/2″ thickness (The Home Depot)
- (1) 2×4 sheet of sanded plywood in 3/4″ thickness (The Home Depot)
- poplar strips (I used (6) .25 x 2.5 x 36 pieces) (The Home Depot)
- circular saw
- miter saw
- Kreg Jig Jr
- Kreg Jig Screws
- Drill
- Nailgun
- Wood filler/putty knife
- Brown Kraft paper
- pencil
- extra pair of hands
1. Start by prepping your space. I laid down brown paper on the counter under our range hood, and taped off the stainless parts with FrogTape.
2. To create the range hood cover, you’ll need to cut these basic pieces first:
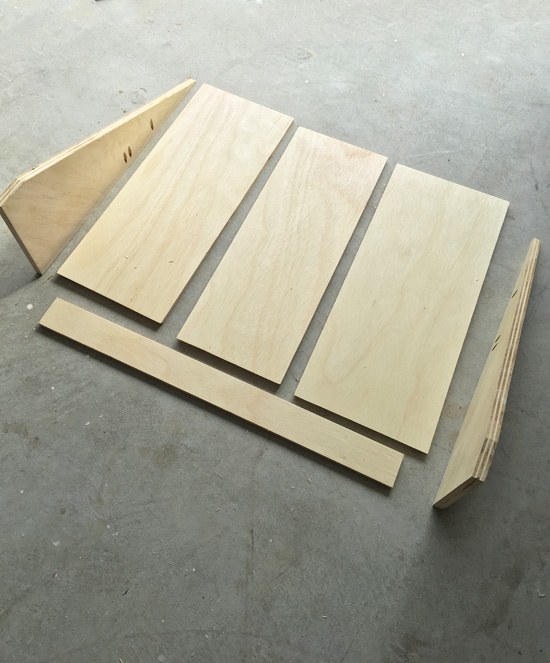
3. The three pieces in the center are the front panels and I started with those using the 1/2″ ply.
The top of each panel rests just inside the lip of the top of the cabinet opening. I mitered the bottom edges to 30• so that they would sit flush with the thin strip that will span the front of the range hood. The reason I cut three panels is because my miter saw will only cut pieces up to 12″ in length. However, together they are the exact width of the cabinet opening, which is also the exact width of our range hood.
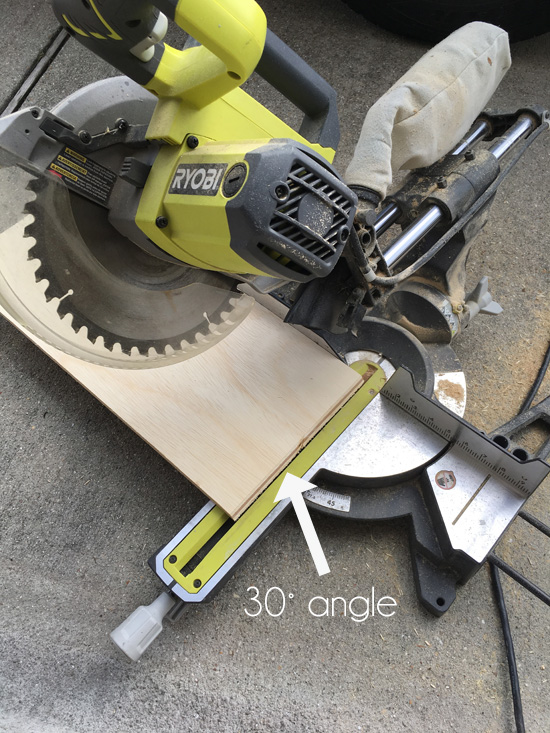
The seams will be covered by the poplar pieces, so be sure to cut where you know those will go.
I joined them together with poplar scraps and small screws:
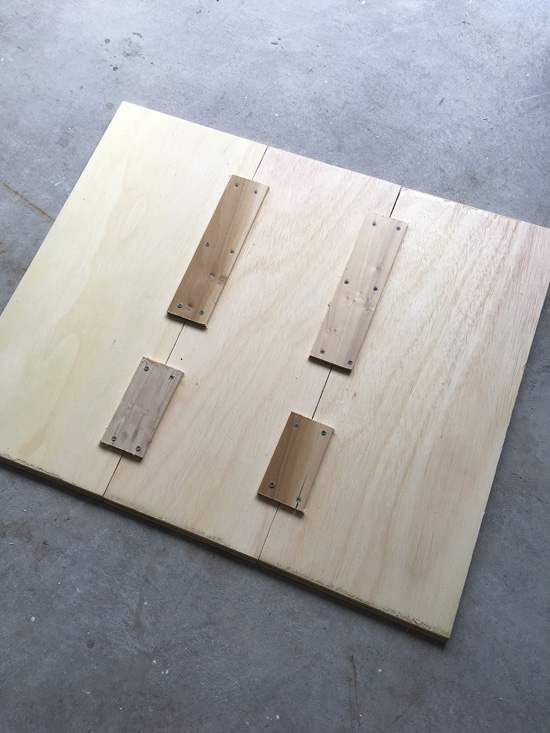
A biscuit joiner would be ideal if you have one of those but I do not.
4. Next I cut the narrow piece for across the front of my range hood using my circular saw.
5. To determine how to cut the triangular side pieces, I had my son hold one of the front panels in place, then I butted my sheet of 3/4″ ply right up against it and flush with the cabinet. I traced the long edge with a pencil. Then I had him hold the narrow front piece in place as well and traced the rest of the way. (It was only the two of us, so unfortunately I did not get a good photo of that step.)
I cut those pieces with my circlular saw (great for larger cuts on larger pieces) as well:
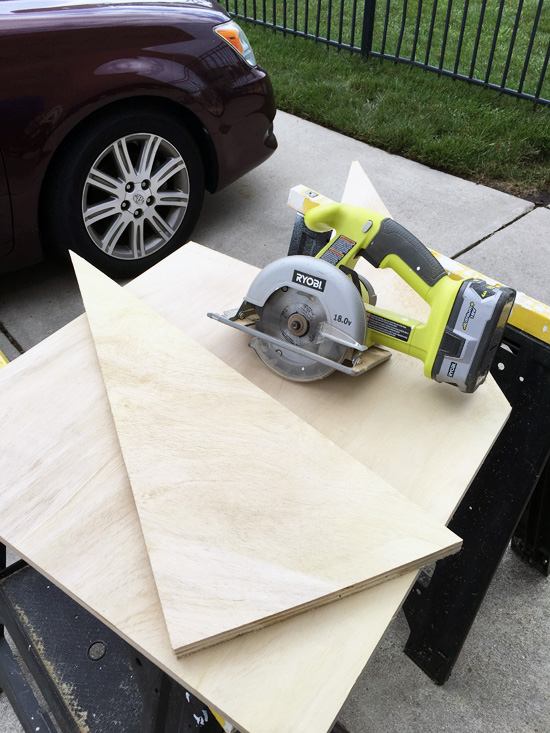
As well as my miter saw (perfect for smaller cuts on smaller pieces): 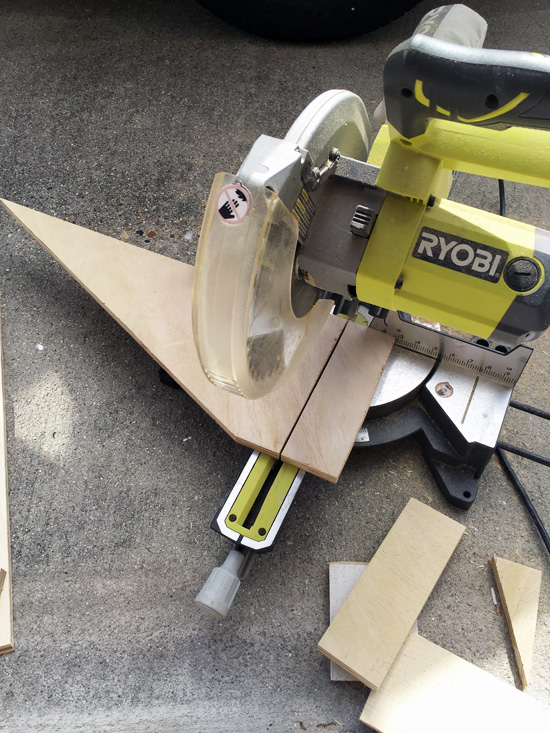
6. Next I used my Kreg Jig Jr and drill to drill three pocket holes on each side piece:
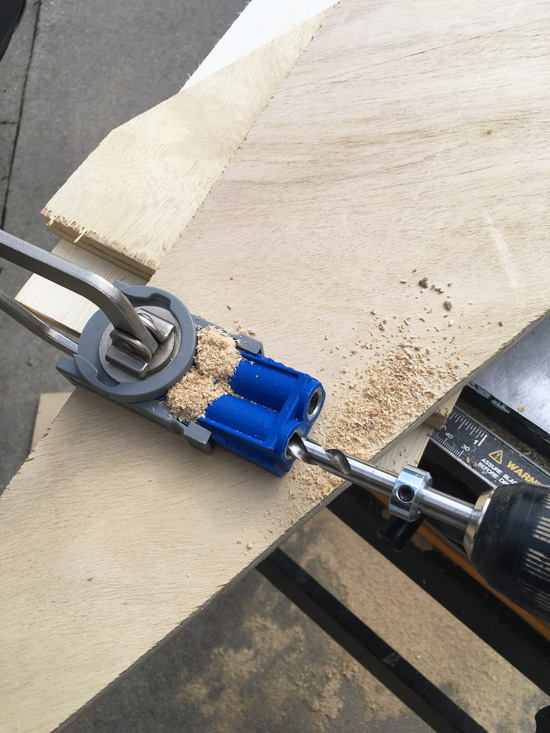
This tool is the reason I chose to use 3/4″ ply for the side pieces. This handy tool is perfect for attaching pieces at a 90• angle.
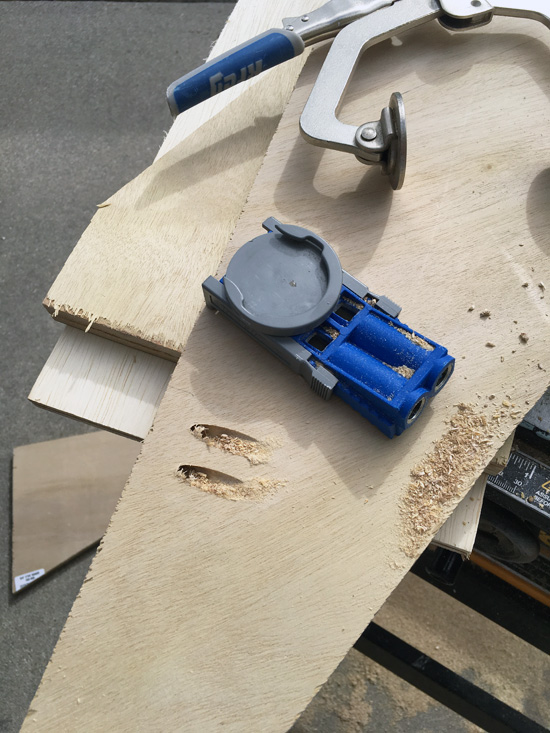
7. I attached these pieces to my cabinetry first using Kreg Jig screws:

8. Then I attached the piece across the front in between the two side pieces with my nailgun:

9. The center panel was next. I had help holding it flush in place while I secured it with my nailgun through the side pieces:
I started to add the first poplar strip across the top before I took that photo, but the top sits flush with the outside edge of the top of the cabinet opening.
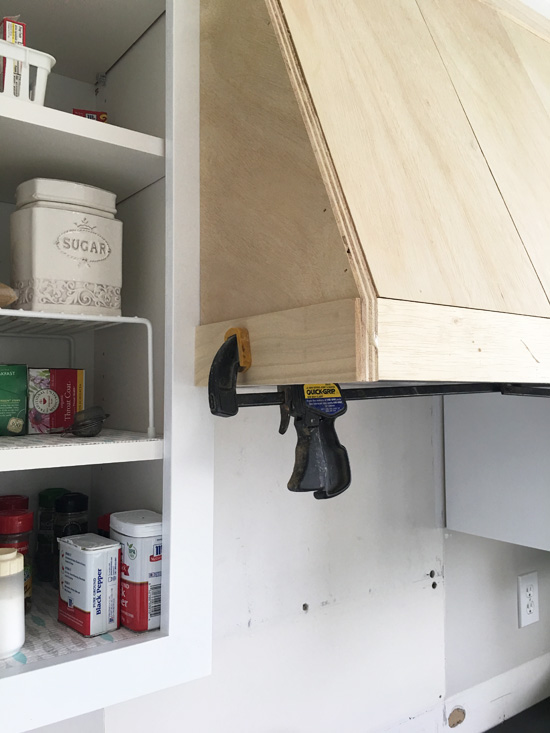
10. I then added a strip of poplar across the top, bottom, and bottom sides equal to the width of the new cover. I held the bottom sides in place with wood glue. I was able to attach the bottom front piece with my nailgun on either side, and then secured it with wood glue across the front…
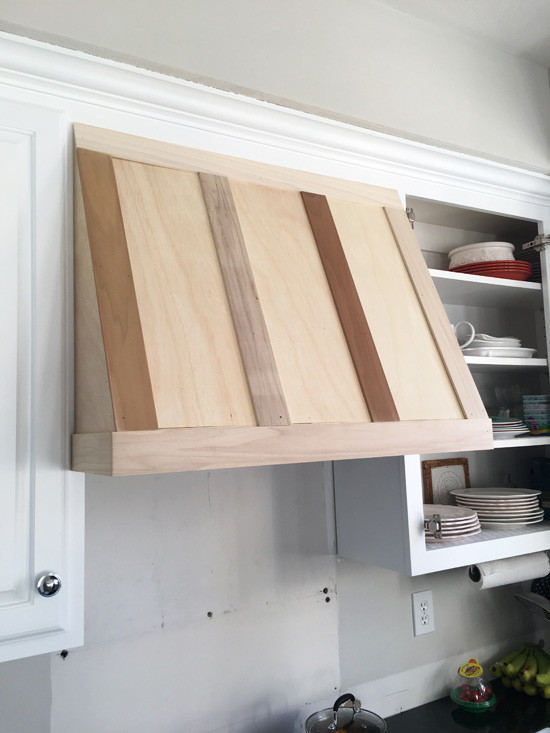
11. Then I added the four strips across the front, securing them with wood glue and my nailgun where possible and just wood glue in places where the metal range hood was directly underneath:
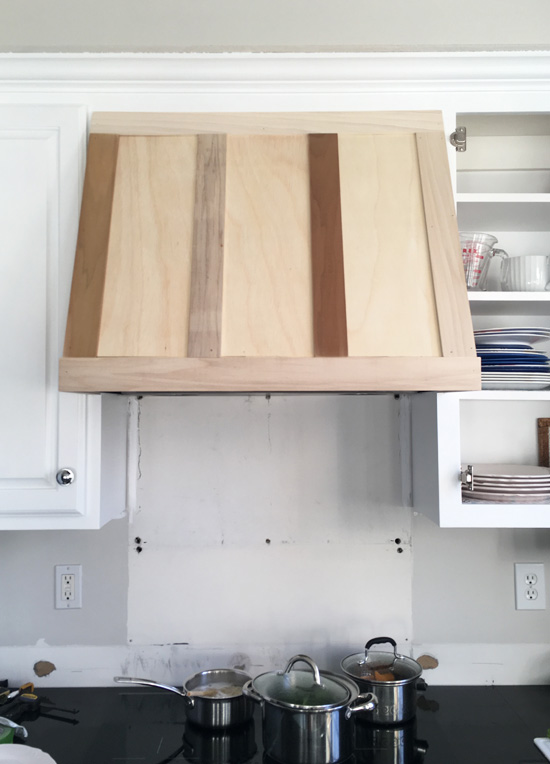
I had planned to add another bead of decorative trim at the top and bottom of that narrow front piece, but as you can see I am already pretty close to the cabinet door on that left side so I called it done at this point.
I filled the holes with wood putty and caulked along the slats on top and along all the inside edges. I also filled in the underside with wood putty and a putty knife to eliminate the look of plywood. You can see where I started on the right side:
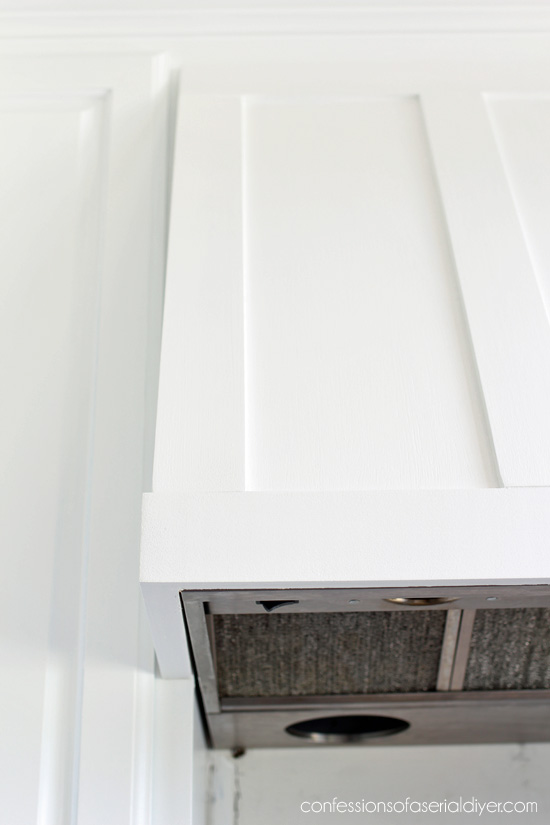
I sanded it smooth when it was dry, and then primed and painted and that was that! You can see how smooth that bottom edge looked after a good sanding:
It looks like one solid piece of wood.
I love the charm this new addition to our kitchen adds!
Even if the backsplash is still not done…the pendant lights have yet to be changed out… and two doors awaiting glass panels are still in the garage.
I used the same paint and primer on the range hood cover that I used on the cabinets: Kilz premium primer and Behr’s Ultra Pure White in a Satin finish, right off the shelf. I cut in the same using a brush, and rolled out the rest with a 4″ foam roller made for cabinets that I purchased from Lowes.
If you missed how I made over the island with beadboard, you can visit that HERE.
That’s one project closer to completing this kitchen update!
I’m hoping to be able to share our new pendant lights on Thursday!
UPDATE: Yes!! The new pendants installed, and you can see them HERE now! 🙂
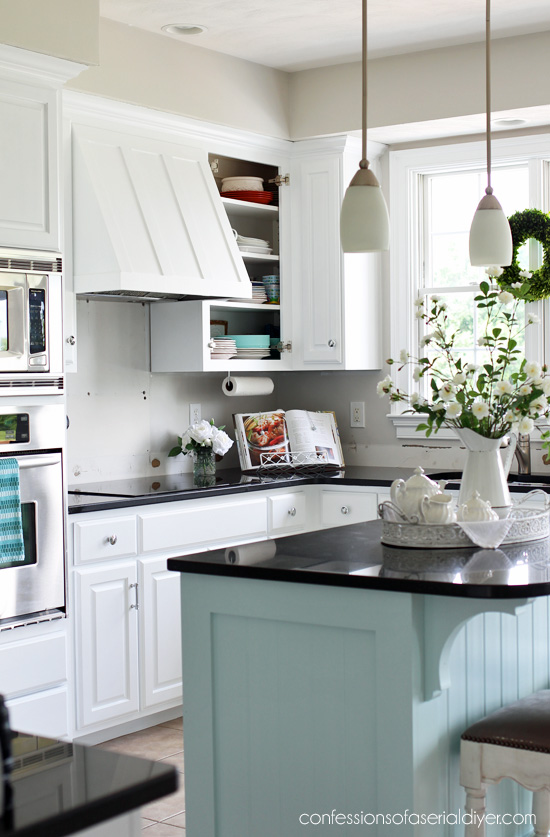
UPDATE #2: Here is our brand new range hood cover in our completed kitchen: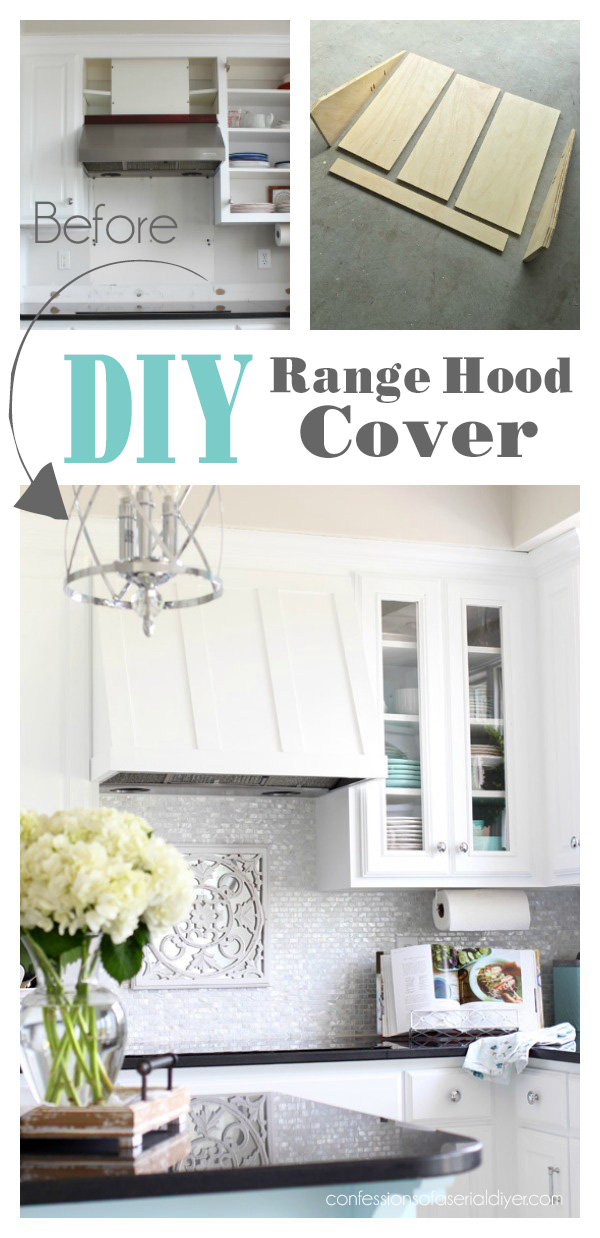
XOXO,
![]()
Don’t Miss a Thing!
If you like what you see, there are several ways to follow along!
Email * Facebook * Pinterest * Twitter * Instagram


Mary Kaiser says
Wow, I can’t believe how beautiful that turned out., it looks totally amazing!! I love your instructions once again they are a step by step I CAN DO IT!!! It looks so great in your kitchen. Great job, husband has to be proud of you, I know I am!!
Christy says
Thank you SO much, Mary!! I appreciate that! My hubby really likes how it turned out. Our kitchen is really coming together! XOXO
Sandra Long says
Hi Christy, once again I am in total awe of your skills! This hood looks like something a professional cabinet maker custom made for your kitchen. I originally thought that the island was the crown jewel of the kitchen, but now I think this hood has the biggest impact in the over all look of this transformation. It is just amazing !!!!!
Christy says
Aww thank you, Sandra!! I’m thrilled with how it turned out! XOXO
Christina in SW FL says
Christy, you did a marvelous creation! I adore how your creative mind works. The hood cover looks perfect.
Christy says
Thank you, Christina!! One more project down! XOXO
JamieK says
Absolutely Perfect! ❤️❤️ You never cease to amaze me! Your kitchen is going to be Beautiful!
Christy says
Thank you, Jamie!! Only a few projects left woohoo!! XOXO
Jody says
Very nice. Finishes off the kitchen nicely Jody
Christy says
Thank you, Jody! XO
Janice Holt says
Love it. You never cease to amaze me.
Christy says
Aww thank you, Janice! XO
Cecilia says
Wow! Another home run! Looks fantastic, Christy! I am loving your kitchen makeover. What a difference!
Hugs, Cecilia
Christy says
Thank you, Cecilia! Not too much left to do now! XOXO
Michele Branham says
WOW! it looks awesome!!!!
Christy says
Thank you, Michele! XO
Margie Bramer says
It is all looking very beautiful!
I am wondering what you are thinking about concerning the floors at this point?
Tile going or staying?
Christy says
Thanks, Margie! I’m still going to see what I think after I clean the grout, but it looks like it’s going to stay for a bit. XO
Linda D. says
Wow. Just WOW. The kitchen looks a thousand percent better already, and this hood cover is the BOMB! I am in awe.
Christy says
Aww thank you, Linda!! I am so pleased with how it came out! XOXO
Laura Werley says
First, I love the way you just tackle the projects when you have made up your mind on how to move forward! I remember when I used to have that much energy. You have done a beautiful job updating the kitchen and making it into your style. I love how the island and the range hood turned out ( the cabinets are beautiful, too). I’m just amazed at the transformation and applaud you on your painting and carpentry skills. You go girl!
Christy says
Thank you so much, Laura!! When I tackle a space like this, I can’t wait to see it finished, so I go go go until it’s done ha ha. I’m so glad you like it so far! XOXO
Betty Messer says
Everything is looking awesome Christy! I love the bead board and the color on your island. My kitchen cabinets are currently painted a tan color and I am considering maybe changing them to white. I think it would brighten up my kitchen as the current color seems to absorb light instead of reflect it. Your project is definitely encouraging me to go for it! Thanks for all the inspiration!
Christy says
Thank you, Betty! Yes I think a nice bright white would brighten your kitchen right up! I’m glad you are feeling inspired! Good luck with it! XO
J Fr says
Your range hood cover turned out fantastic. Before I start a similar project I need to figure out how it can be removed when the stove hood system needs repair or replacement.
Christy says
Thank you! The cover is not attached to the range hood in any way, but rather I built the cover around it, so you should be able to still pull it out from under the new cover if need be. XO
Kellie says
All I can say is WOW, you do amazing work and your kitchen is looking brand new!!!!!
Christy says
Thank you, Kellie!! XO
Ange says
You made that project look pretty easy and doable for those of us that are DIY challenged. Another great job. Bet the lights will be amazing.
Christy says
Thank you, Ange! I was hoping it would seem doable by sharing how it came together. The lights are gorgeous! Can’t wait to share! XOXO
Susan Pearson says
You continue to amaze and encourage me!! Your kitchen make over is beautiful!!!
Christy says
Aww thank you so much, Susan!! XOXO
Karen says
I LOVE this! This is such a great idea and it turned out beautiful! I’m going to do this in my kitchen! Thank you for sharing!
Christy says
Thank you so much, Karen! I hope you do! XO
Jennie Smith says
Wow! Just wow! It looks like it’s been there the entire time. I love the simplicity and size of it. It’s not overwhelming but it takes the kitchen up a notch. You did an amazing job and you made it look so easy along the way. Thanks for sharing!
Christy says
Thanks so much, Jennie!! XO
JennieLee says
You’re amazing…I love seeing every step in ALL your make-overs and new creations, and wish I had the knowledge, tools, and ability (guts) to do them. I’ve had a little jigsaw for 2 yrs and haven’t pulled it out of the box yet! Keep the creative juices flowing????
Christy says
Aww thank you, JennieLee! You need to bust that jig saw out and put it to work lol! Hopefully one day you will get the courage to give it a try! 🙂 XO
Arrilla says
You are amazing! You will tackle anything and it looks great! Congrats!!!
Christy says
Thank you so much, Arrilla! XO
Kaycee says
Christy, wow, what a beautiful hood you built! You are really doing such an awesome job on your kitchen, well done!!
Christy says
Thank you, Kaycee! It’s getting there!! XOXO
Donna says
I am impressed! Well done!
Christy says
Thank you, Donna! XO
Marie-The Interior Frugalista says
You rocked those power tools, Christy! It looks really good 🙂 Pinned and also sharing with a friend who just last week was talking about wanting a custom range hood in her kitchen.
Christy says
Aww thanks, Friend!! Yes this wasn’t too hard to do at all! XOXO
Ruth says
I am just blown away by your ingenuity-like wow!! Beautiful job- beautiful kitchen- so love it☺️
Christy says
Aww thank you so much, Ruth!! XO
Marcie Lovett says
You are a genius! So entranced by the hood, I didn’t even notice the missing backsplash at this point. This is a fantastic project and you make it look so easy. It reminds me of Extreme Makeover Home Edition – a new kitchen in no time flat! Seriously, you have done an amazing job within a short amount of time, Christy. Thanks for inviting us to share the journey.
Christy says
Thank you so much, Marcie! I am so excited about how it is all coming together. The lights are in now, so I can’t wait to get started on the backsplash!! And I love that ya’ll have been here encouraging me every step! XOXO
Robyn Wright says
What do I think? It’s PERFECT!!!!
Christy says
Thanks, Robyn!! XOXO
Addie says
LOVE IT!!!!! SSSSoooo much better!!! I wish you were my neighbor!!! That old kitchen is coming along…I knew it would. The easiest way to clean those fan vents…..is just throw them in the dishwasher!!!…but you probably already knew that! XXOO
Christy says
Thank you, sweet Addie!! And I actually never thought to put those in the dishwasher…genius!! Thank you!! XOXO
Cyndi J says
I’m so impressed! It looks great and huge kudos to you for tackling this and figuring it out. Wonderful job and so beautiful!
Christy says
Thank you, Cyndi! I was so excited when I finally cane up with a plan! XO
Carolyn Evans says
I just love your kitchen!!! It’s beautiful ❤️
Christy says
Thank you, Carolyn! XO
Becky says
WOW. What a beautiful job here, it makes a HUGE difference! Well done!
I’m feeling good too, cuz I DO have a biscuit joiner, and used it intensely when building the kitchen in my last house. …Woo-hoo, I have a tool that Christy doesn’t!!! Haha! : )
Christy says
Thank you, Becky!! And ha ha…yep that is one tool I do not own! Now I need one lol! XOXO
Patty says
Perfect, Christy!! 🙂
Christy says
Thank you, Patty!! XO
Beth Beard says
Looks beautiful! ????
Christy says
Thanks, Beth! XO
Gina says
It’s all looking so awesome and bright. Great job on the hood cover. What a difference white cabinets make. How are you feeling about the tile floors? They look fine in all the pictures, kind of match your wall color.
Christy says
Thank you, Gina! I think I’m OK with the floors as well. I picked a backsplash that will tie it into the space better, and of course it still needs a good cleaning. But yes, I think it is probably going to stay! XO
Carla says
I love it! You did an amazing job on the new range hood!
Christy says
Thank you so much, Carla! XO
JANET SCHEN says
You did a great job on the hood! It looks like a professional job!
Christy says
Thank you, Janet! I am really pleased with how it turned out! XO
Julie Briones says
You just continue to amaze me! So beautiful, and it looks like it came with the cabinets! 😉 thanks for the awesome tutorial, too! BTW, I featured you on my new Tuesday Turn About post today… Hope that was okay! 😉 (let me know if not, no offense will be taken at all!)
Christy says
Aww thanks, Julie! And absolutely! I always appreciate a feature! XOXO
Mary S says
Your kitchen looks so VERY nice!!! Well done.
Christy says
Thank you, Mary!! XO
Paula says
You are amazing, Christy! I love, love what you’ve done to your kitchen! From the painted cabinets to the improved island to the new vent hood cover, it all looks sooooo good! Love!!!
Christy says
Aww you are so sweet, Paula! Thank you! I am really pleased with how it is coming together so far. It has exceeded my hopes for sure! XOXO
Alice says
Your kitchen is turning out beautifully. I can’t wait for days to go by so I can see what else you have made more beautiful…I like your style and the talent you have to make something look completely different than it did before…Keep up the good work, Christy!!!
Christy says
What a lovely comment! Thank you so much, Alice! This kitchen makeover has been a lot of work, but so rewarding as well. I too love to see these projects come to life! Thank you for following along with me! XOXO
Kathy Schmitz says
Your kitchen looks great and what seemed like a long project got done pretty quickly! You made it look easy! I have custom oak cabinets in great condition, but im thinking of painting them white, but believe the grain will show through. Any tips to avoid or minimize that?
Christy says
Thank you, Kathy! Everything has moved pretty quickly for sure. I don’t have any secrets to hide the grain in your cabinets, but my thought is…painted white with a little grain showing through is way better than oak, right? I painted a bedroom suite for my parents that was made of oak, and it actually painted up very nicely. Good luck! XO
Maureen Vasily says
Christy, I just saw this and, once again, wish you were my next door neighbor. You have done a spectacular job on the range hood as well as the cabinets themselves.
Christy says
Aww thank you so much, Maureen! I appreciate that!! XOXO
gwen says
hi Christy! I’d already saved a photo of your range hood and now I’m super excited to have the step-by-step instructions! it looks fabulous and SOMEDAY I hope to do the same! thanks!
Christy says
Oh awesome!! You got this…go for it! XOXO