Happy Thursday, amazing Friends!! I might be sitting back relaxing on a beach somewhere today, but I wouldn’t miss giving you your biweekly dose of creative inspiration!
I pulled this project out of my archives because it is THE perfect Mother’s Day gift! That is if she has an outdoor space.
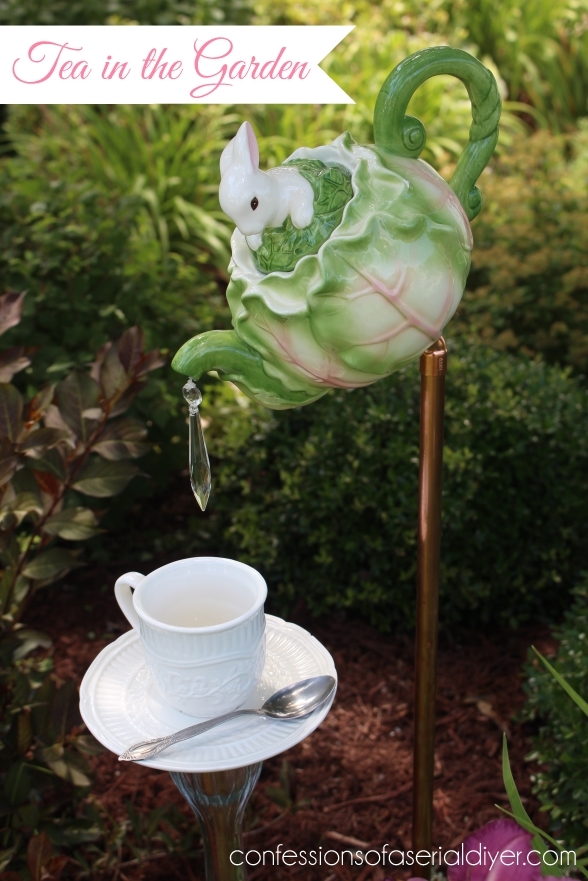
Several years ago I bought a cute teapot garden feature at a craft market. I shared a photo of it as part of my Front Yard Garden Tour that year, and had countless requests for the tutorial. After giving it a good looking over, I created one of my own so I could share how you can make one too!
Here is my version:
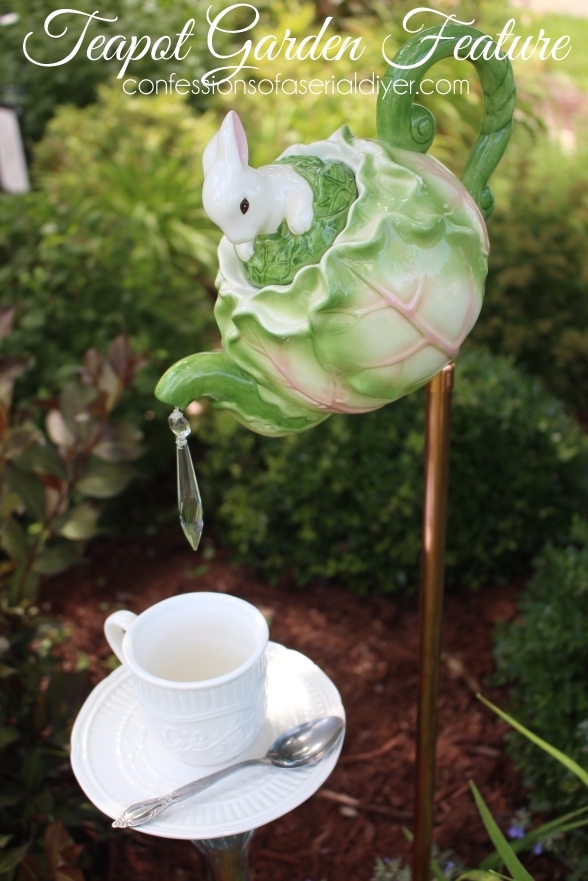
Cute, right? With all the adorable teapots floating around out there, imagine the possibilities! I found this one a thrift store for $2, and I knew immediately what I wanted to do with it.

Supplies
To get started, you’ll need the following supplies:
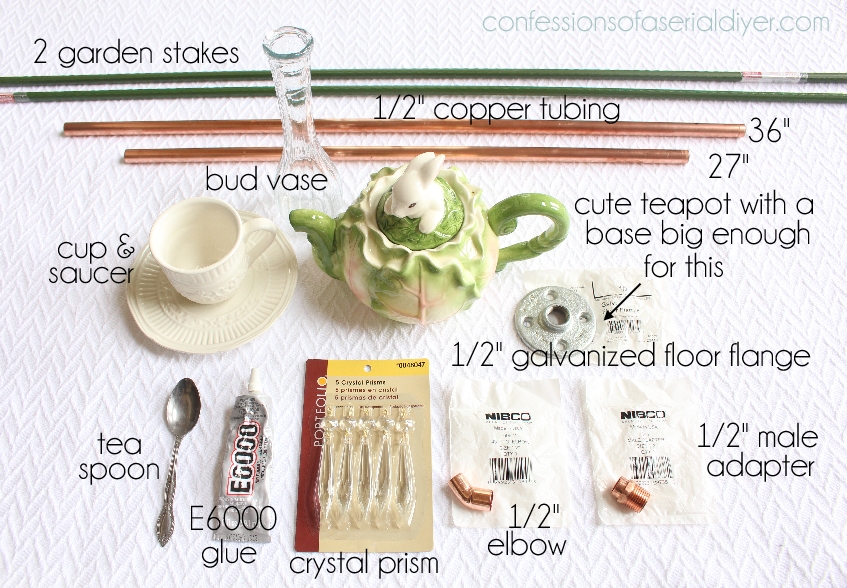
- Two garden stakes
- 1/2″ Copper piping cut to the lengths shown
- Clear bud vase (thrift store)
- Cup and saucer (HomeGoods)
- Tea Spoon (thrift store)
- Teapot with lid and a large enough bottom to fit flange (thrift store)
- 1/2″ Galvanized floor flange (or copper if you can find one)
- 1/2″ 45 degree Copper Elbow ( a sweet reader said it is called a “short sleeve” elbow)
- 1/2″ Copper Male Adapter
- E6000 Glue
- Crystal Prism (I found this pack of five in the lighting section at Home Depot, but this only requires one…also available at Hobby Lobby.)
- Cotton ball (not pictured)
- Cotton Swab (not pictured)
- Glue gun/ glue (not pictured)
- Fine fishing line (not pictured)
and one of these:

My hubby calls it a tubing cutter. This is what I used to cut the copper piping, super easy!
Let’s Get Started!
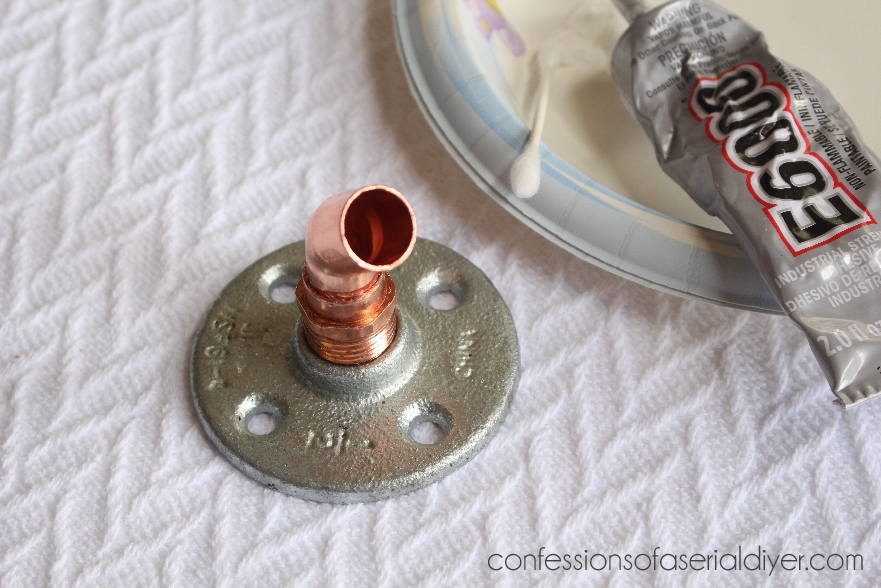
The first step is to add little E6000 glue, using a cotton swab, to the threads of the male adapter, and then screw it into the floor flange. Then also using a cotton swab, add glue to smaller rim of the elbow:

Then insert it into the male adapter. Set them aside to dry.
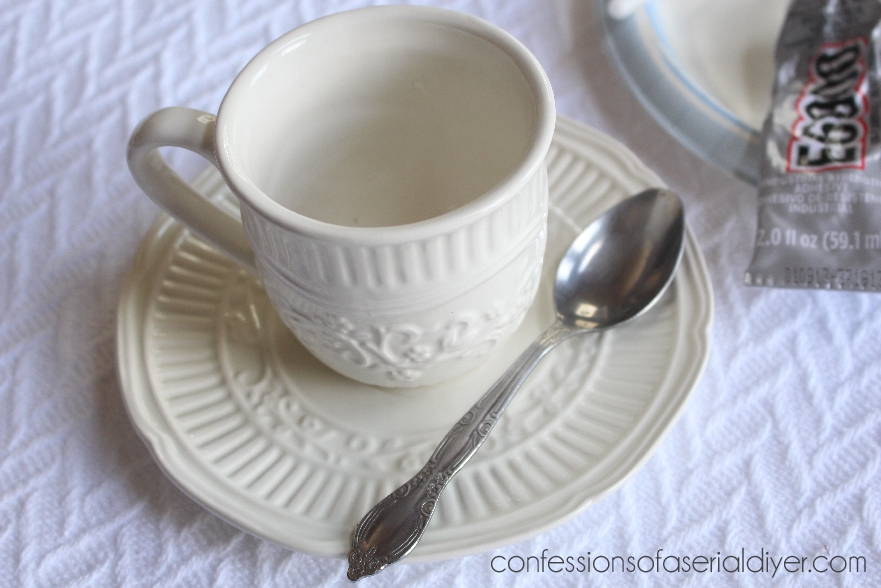
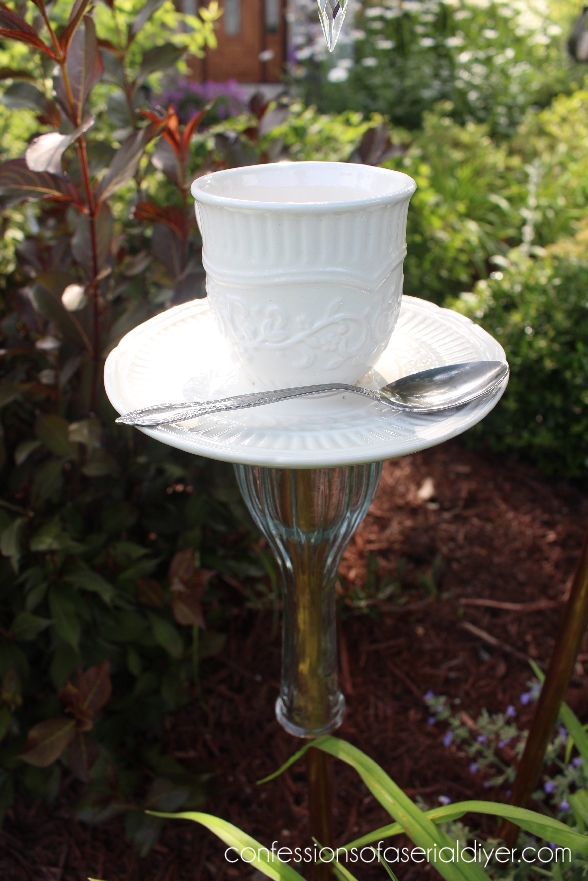
Next grab your cup and saucer. Apply E6000 glue to the bottom of the cup.
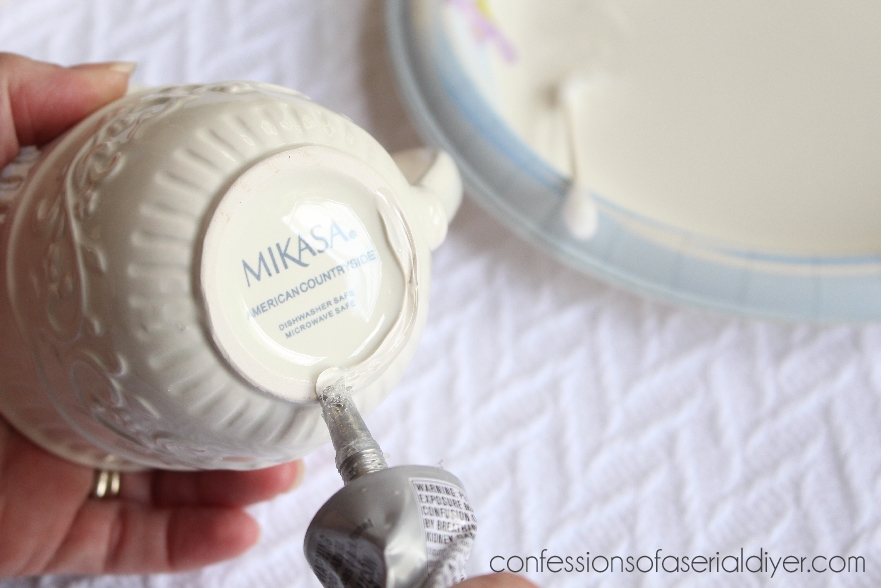
Glue to the saucer. Then apply glue to the spoon back and the backside of the top of the spoon handle, and attach it to the saucer.
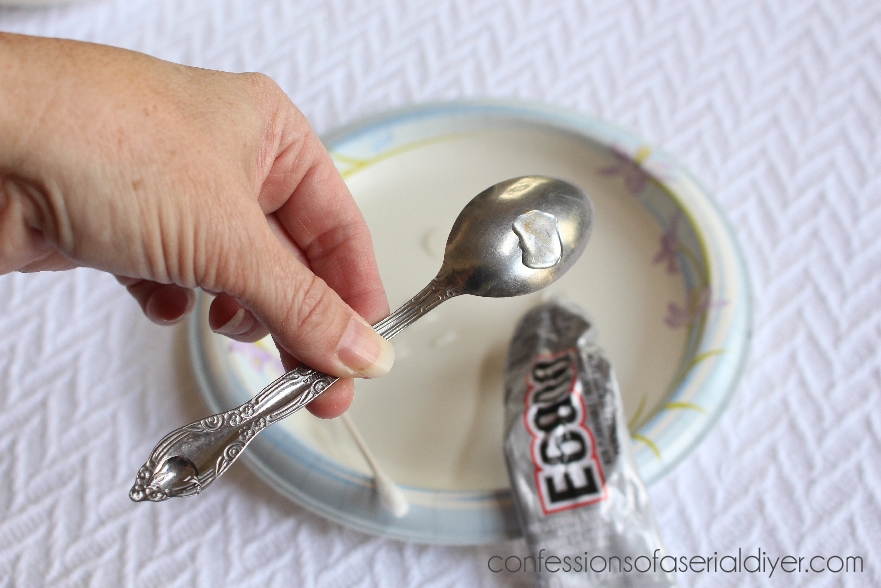
I found this cup and saucer at Homegoods for $3.99. The spoon was a thrift store find.
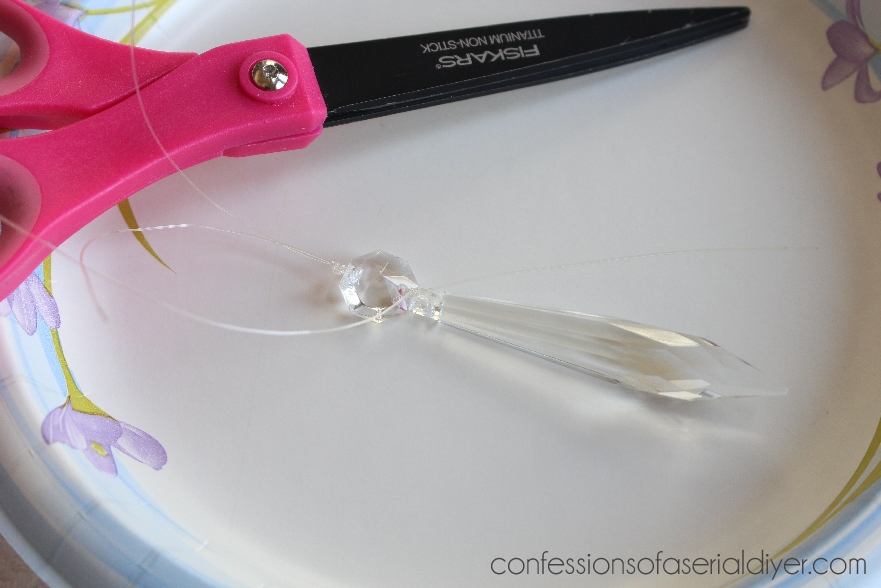
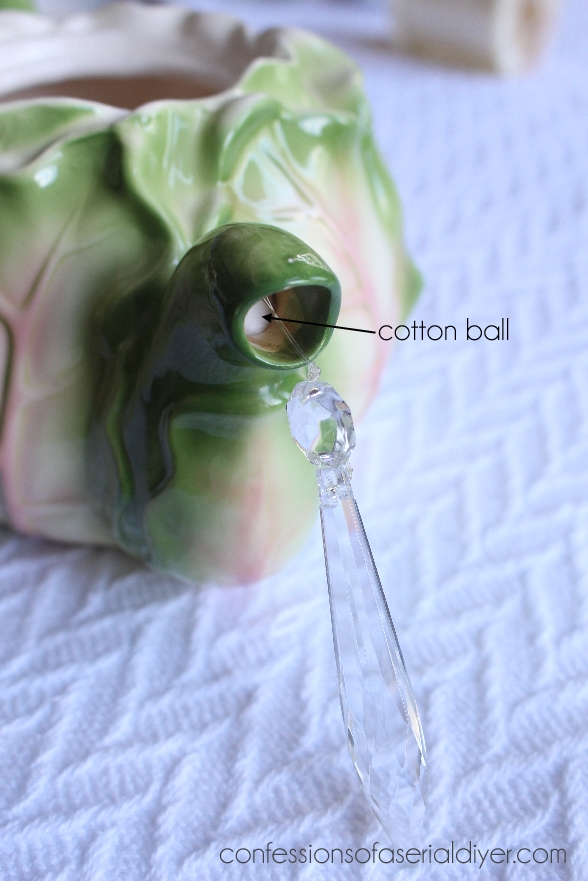
Set aside to dry. Replace the gold wire in one of the prisms with fine fishing line, so it will appear more water-like. Leave about six inches of thread attached at the top.
Grab your teapot and the cotton ball. Apply E6000 to the cotton ball.
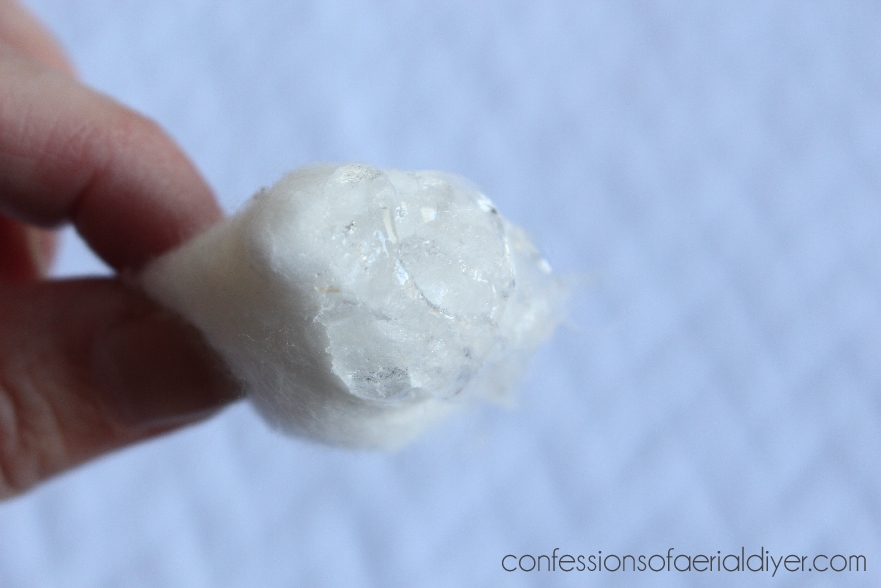
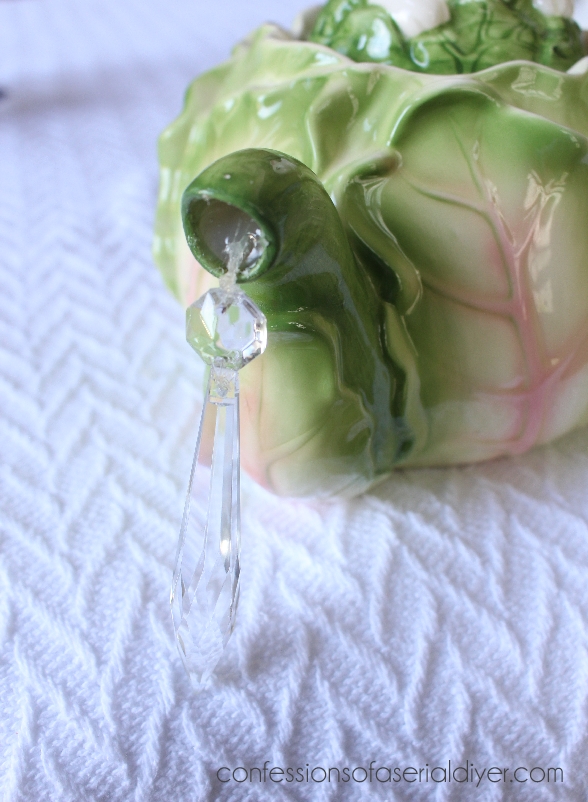
There you have it, a picture of a cotton ball with glue on it. What can I say, I like to be thorough. Insert the extra fishing line through the spout of the teapot, then insert the cotton ball into the spout from the inside:
This small cavity will be filled with hot glue once the E6000 dries. Now you can glue the lid of your teapot in place.
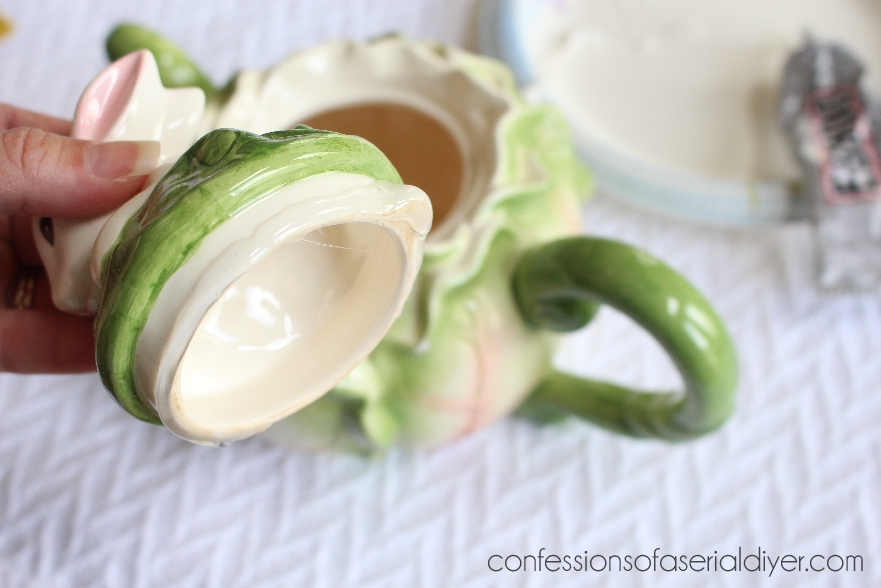
Once the glue has dried, fill the spout opening with hot glue. You will need to hold it at an angle so that it will not drip out, until it firms up, about 5-7 minutes.
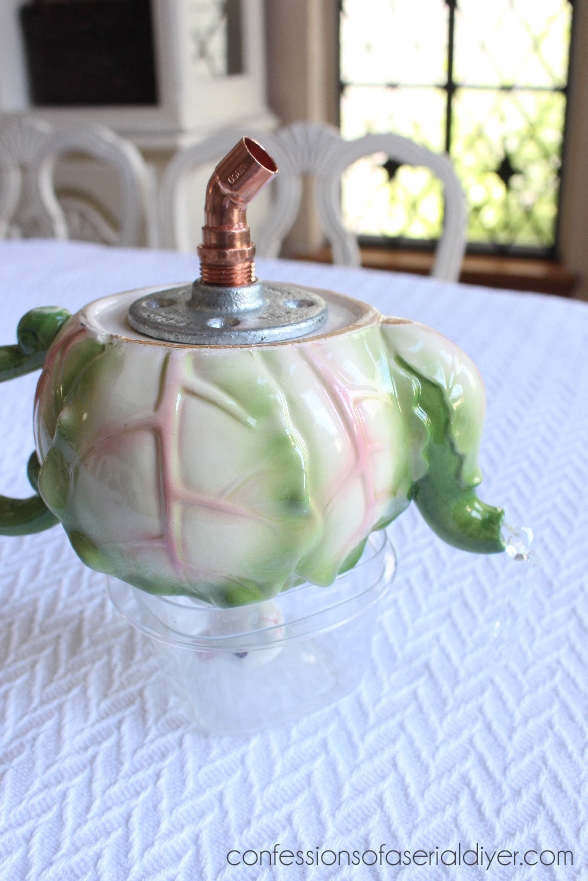
Find a container that will hold your teapot upside down. I used a Rubbermaid container. Apply E6000 glue to the bottom of the flange and attach to the bottom of the teapot, with the elbow angled toward the spout like so:
Next, turn your cup and saucer upside down and glue the bud vase to the bottom.
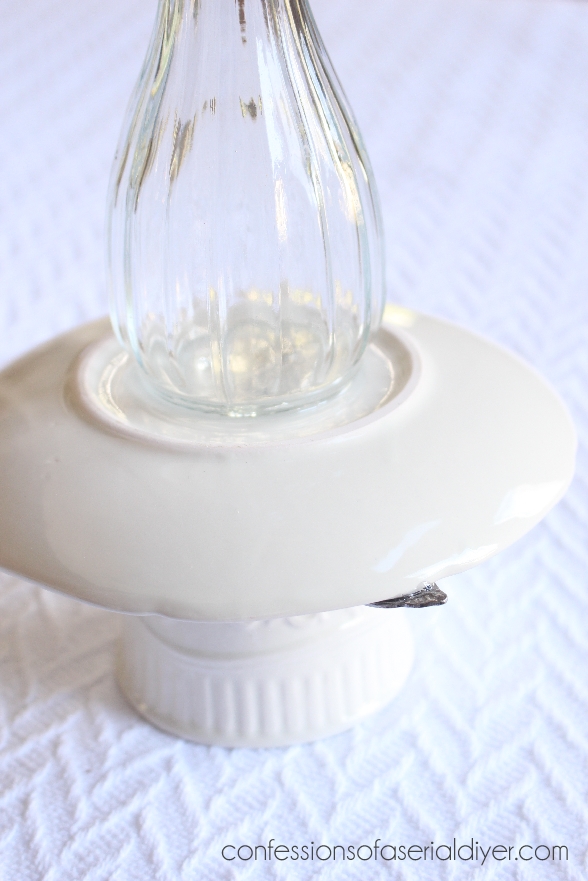
That’s pretty much it! Allow both pieces to dry overnight.
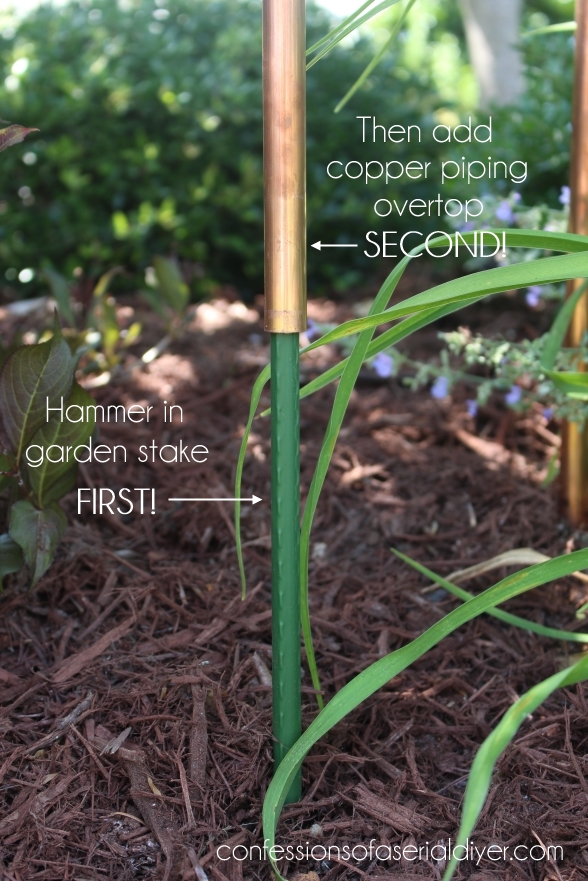
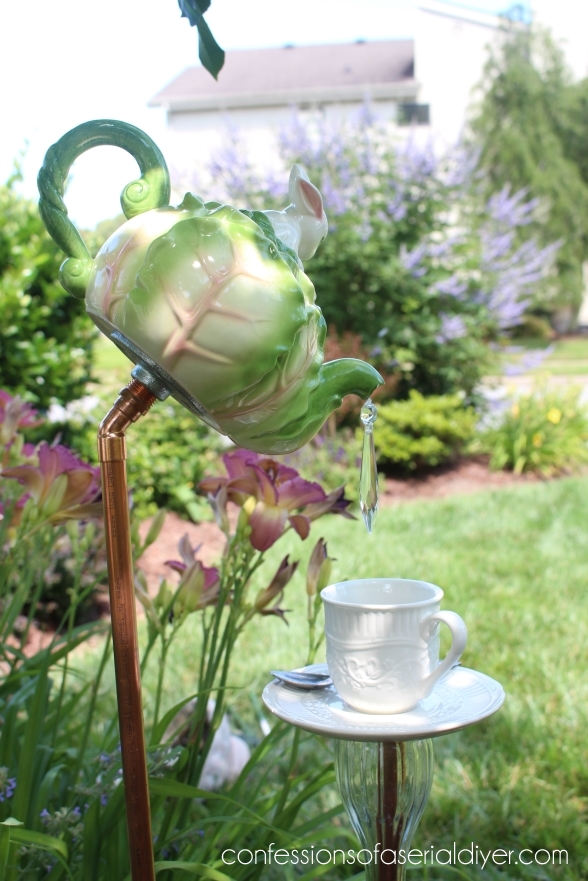
Install it Properly
To install your beautiful new creation, first hammer in the garden stake, then apply the copper piping over it. DO NOT HAMMER THE COPPER as it will become distorted and your teapot will not attach to the fitting properly.
Add teapot…
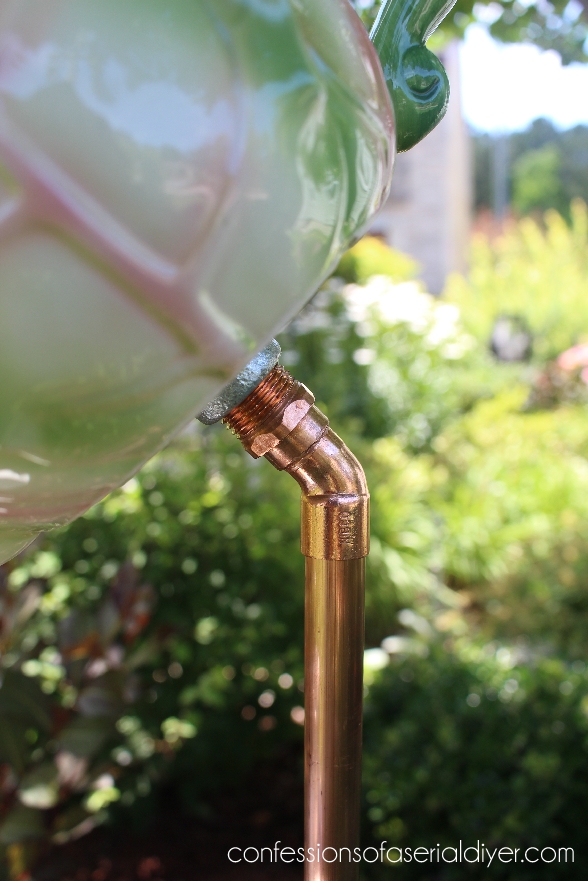
This is not glued in place, for easier storage if you decide to remove it during the Winter months. Position the stake for the cup and saucer centered directly below the dangling crystal. The bud vase should easily slip over the copper piping.
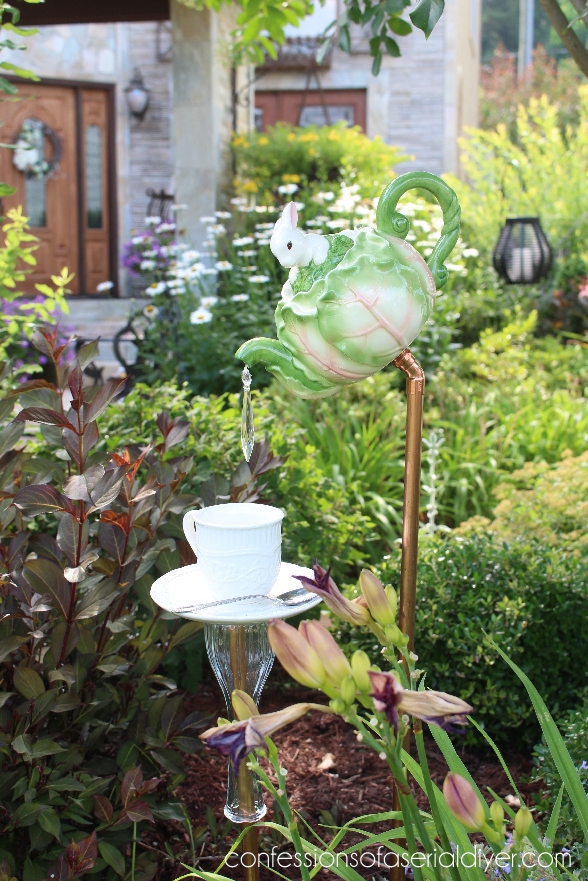
Tada!
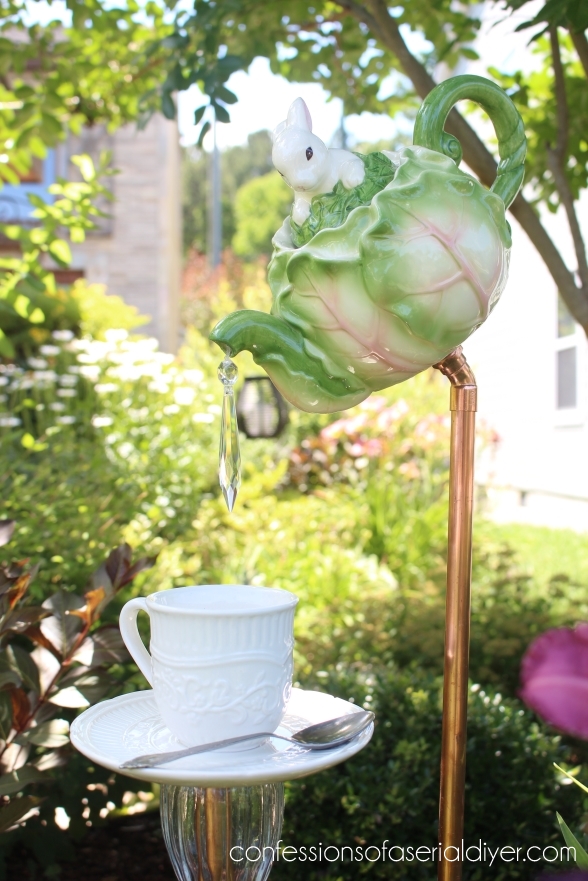
Here is the view from the back:
This was in my front garden at our last house. Oh how I do miss my garden!
That wasn’t too bad, right? The total cost for this was a bit more than I would usually spend on such a project, even with a thrift store teapot, bud vase, and spoon. Out of pocket I spent around $36 for this, but it’s totally worth it! Wouldn’t this make a fantastic gift for Mother’s Day?
Meet me back here on Tuesday to see what became of these $2 estate sale spindles:
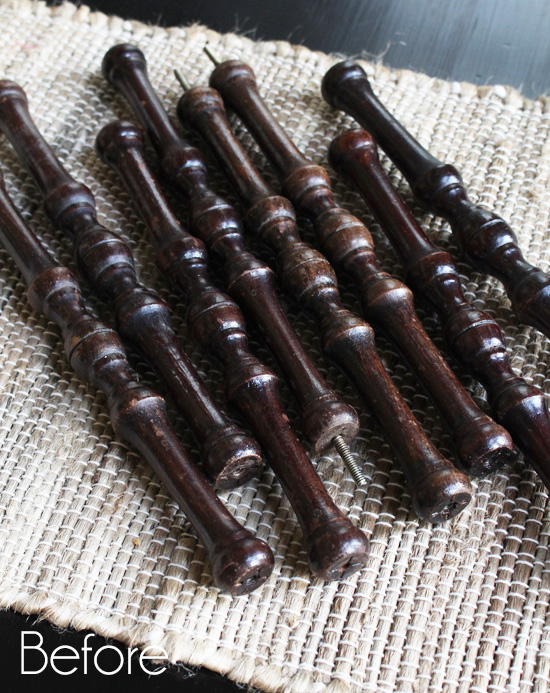
UPDATE: See what I did with them HERE now!
Ok I have to get back to my vacation now…y’all have a wonderful weekend and I hope the weather is treating you kindly wherever you are! 🙂
XO,
![]()
Don’t Miss a Thing!
If you like what you see, there are several ways to follow along!
Email * Facebook * Pinterest * Twitter * Instagram


Christina in SW FL says
Christy, this is super cute and super thorough! I love the idea yet would have to (somehow) adapt it so it isn’t a mosquito maker here in Florida.
Christy says
Thanks, Christina! Been in Florida for the past two days, and I know what you mean…mosquitoes are everywhere! Enjoying your beautiful weather though! XOXO
Moriah says
My MIL would love this!! My daughters and I will get busy ????. Thank you!
Christy says
Ooh yes…perfect for a gift! XO
Marcie Lovett says
How cute, Christy! You got every detail on this one.
Christy says
Thanks, Marcie! XOXO
Karen Moore says
Absolutely love this project. This post is the reason I started following your blog. I have made 2 of these and always get lots of comments. You are so creative. Hope you’re having fun on your vacation.
Christy says
Aww yay!! I love this one too! Thank you, Karen!! XOXO
sharon austin says
I have something similar in my garden and I’ve been forever trying to figure out how to replicate it. Thanks for figuring it out and sharing!!
Christy says
You are so welcome, Sharon! Glad I could help! XOXO
Marilyn says
i like how the clear bud vase gives the illusion of flowing water–at least in your photos. Have a great vacation!
Christy says
Oh yep…sure does! 🙂
Ange says
What a sweet addition to the garden. You’re so very creative. ❤️❤️❤️
Christy says
Aww thank you, although this was not originally my idea. Glad I could recreate it to share the how-to though! XOXO
Margie says
That is so sweet.Enjoy the beach & family.
Christy says
Thank you so much, Margie! XOXO
Joan says
I made one for myself! Love it and have gotten many compliments on it.
My only suggestion is you be more detailed in list of materials. It isn’t just a elbow you need, it is a 45 degree street elbow. .Other than that went great! Wish could post a picture.
Christy says
Yay! I think when I purchased my supplies, I found just what I needed and didn’t realize there were lots of options to choose from with elbows. I did update the post to be more specific on that part though. I’m so glad you made one for yourself! XOXO
MaryJean says
Really cute idea! Especially if you have a cute teapot that has a chip in it, like mine does! LOL
Hope you’re enjoying your vacation and sprinkle some warm weather from the plane on your way back! I heard someone say that we are having two Februarys and no March this year. In other words, it’s still cold here.
Christy says
Absolutely! Our vacation was lovely and I can’t say I’m glad to be back to cold rainy weather here today! Spring has to be on its way eventually right?? Here’s hoping! XOXO
Cheryl says
Thank you so much for sharing the ‘how to’s’. Most don’t give the full version of how to do it and now I can make one of my own. Thank you again for sharing, I love yours!!
Christy says
It is my pleasure, Cheryl! Thank you!! XOXO
Holly says
Have a wonderful vacation – you deserve a break!
Christy says
Thank you so much, Holly! We had a wonderful time! XOXO
Mechelle says
I do believe this has been my very favorite project of yours. I remember when you posted it once before. And I still haven’t found the right teapot for me. Can’t wait to try this one myself.
Christy says
Oh yay, thank you! I too am on the lookout for a new teapot as this one didn’t make it in the move unfortunately. Good luck in your search! XOXO
Norma says
ADORABLE!!!
Christy says
Thank you, Norma! XOXO