Who’s up for a furniture makeover?? Today’s project is the perfect piece to share how to apply sealer with a sponge! I made a video and everything…it is so much easier! I’ll also be linking to another quick video sharing how I got the whitewash finish I’m sharing today, so be on the lookout for that also.
Amazing friends, be sure to look for my Furniture Fixer Upper crew’s projects at the bottom also!
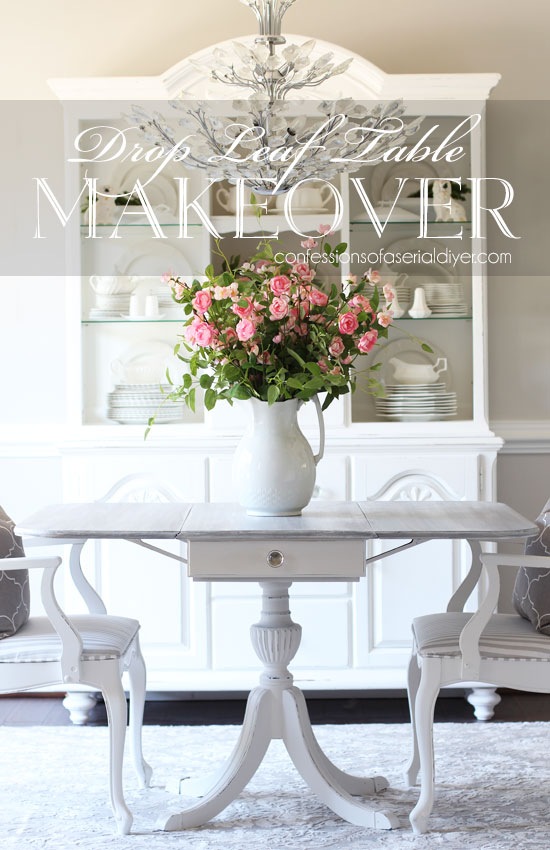
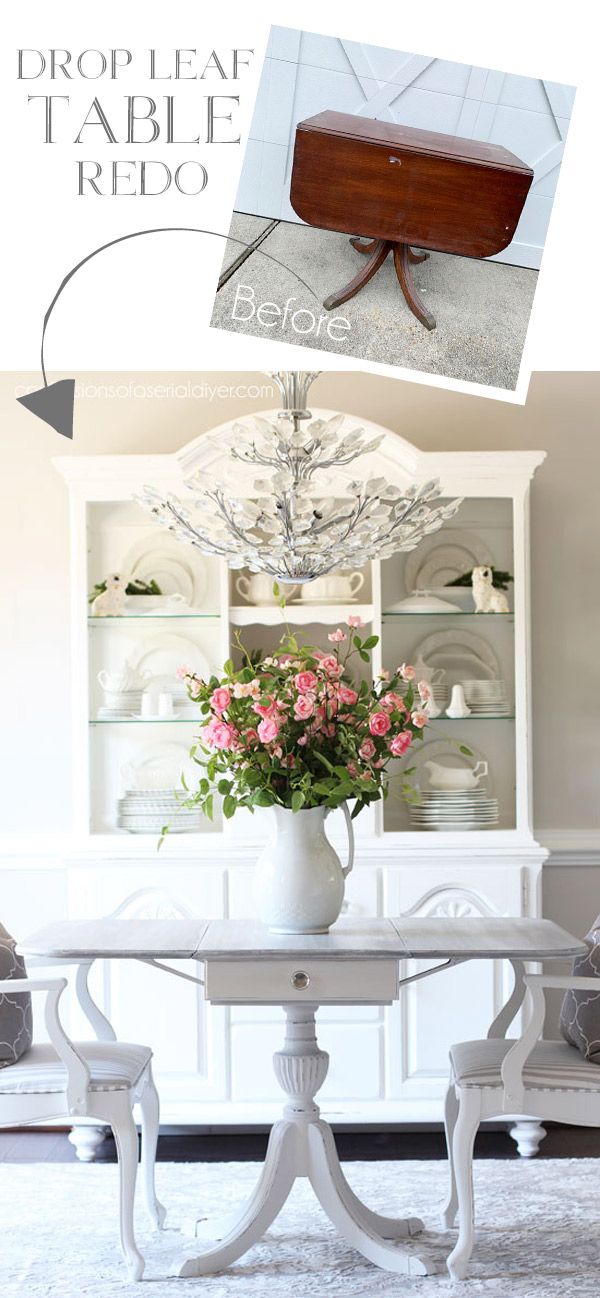
My project for today is this drop leaf table that I am suffering from a slight bought of amnesia over:

I have zero recollection where or when I found it or how much I paid for it! I’m pretty sure it moved with us two years ago, and it may have been a yard sale find, but I’m totally fuzzy on that.
I knew when I pulled it into this haul that I wanted to whitewash the top of it. I’ve included a few affiliate links so you can find the products I love.
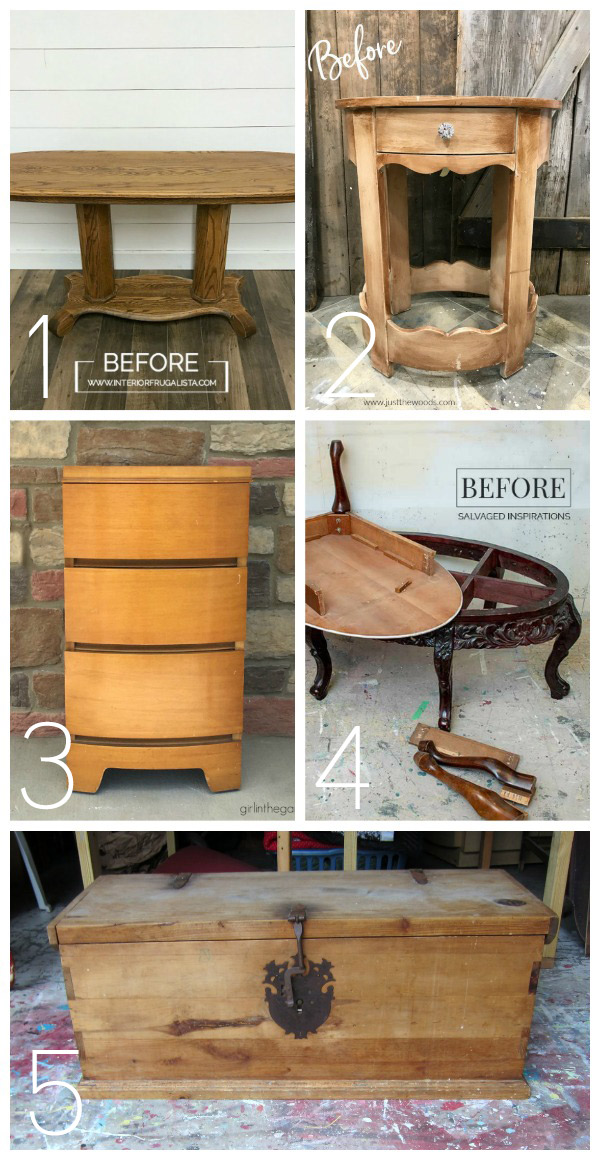
My fellow Furniture Fixer Upper (I was about to turn that into an acronym, but that didn’t look very nice lol) gal pal, Denise from Salvaged Inspirations shared a stunning gateleg drop leaf table a few months back, and when I saw the stain she used, I thought it would be a great base for a whitewash treatment and was anxious to give it a try.
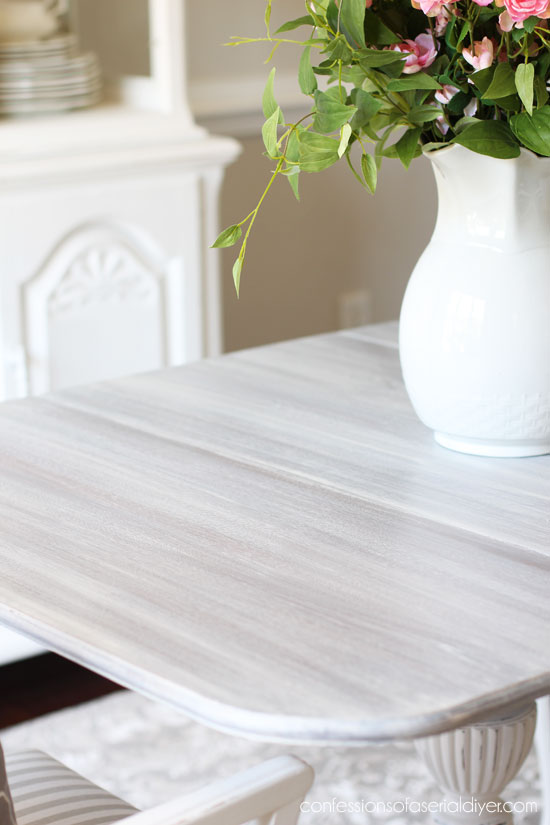
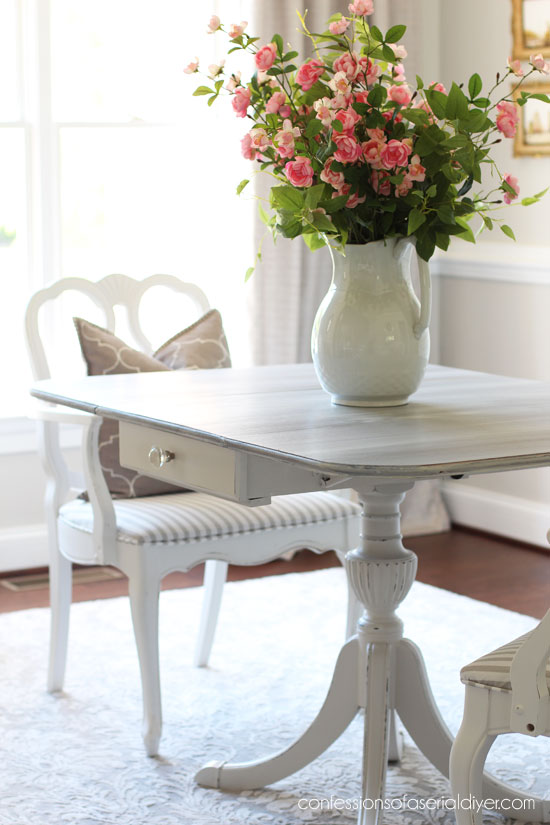
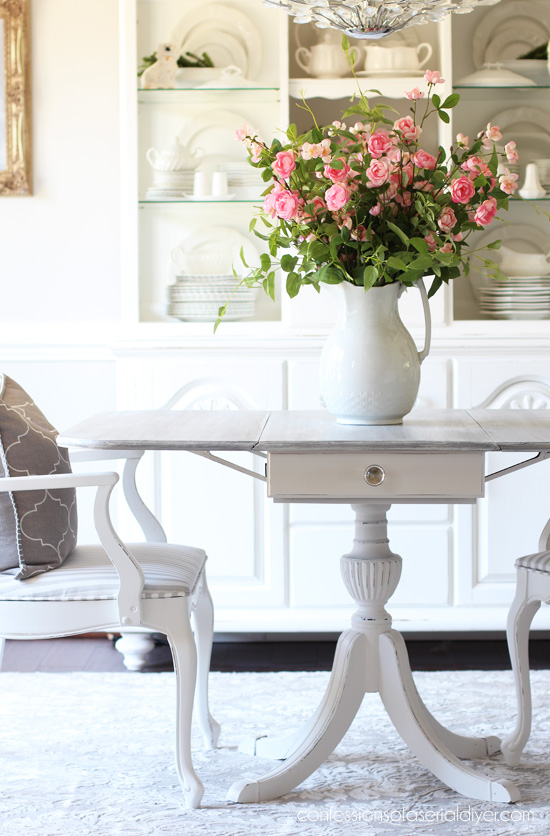
First, here is how this table turned out:
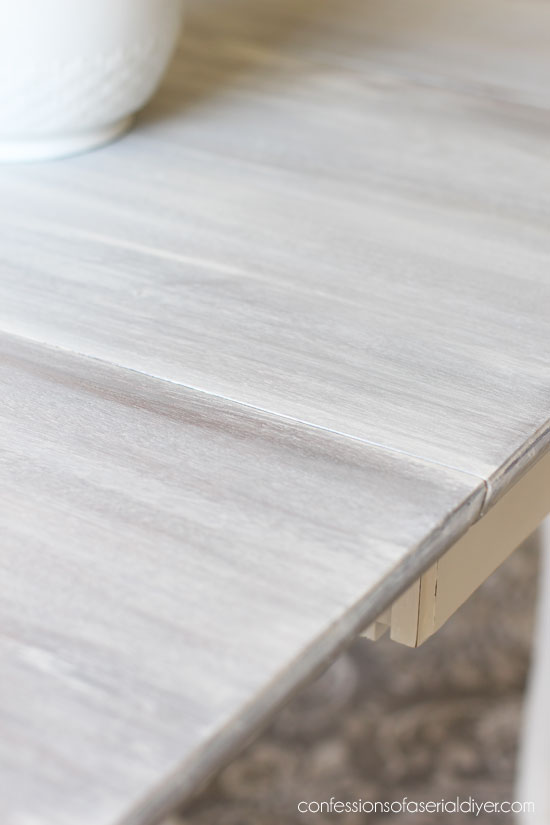
I’m pleased to say the Up in Smoke gel stain worked great as a base for whitewashing!
Sand
The top of this table was pretty scratched up before, so I started this makeover by sanding the top using my rotary sander:

BOSS
I started with the underside of the table and the base, priming them with BOSS sealer and stain blocker in white:
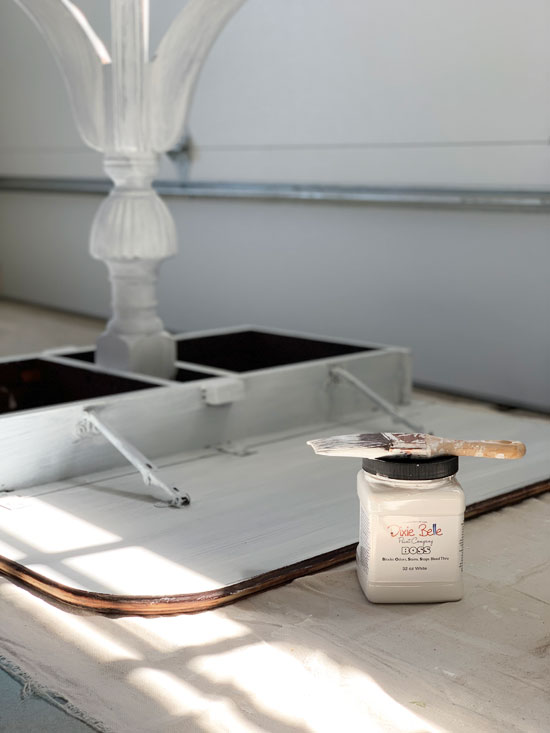
I knew this table with its red undertones would be a bleeder, so I started off right by sealing in those pesky tannins. I gave it two coats and let it dry overnight. It worked fantastically!
Paint
Then I painted the underside and base in FLUFF:
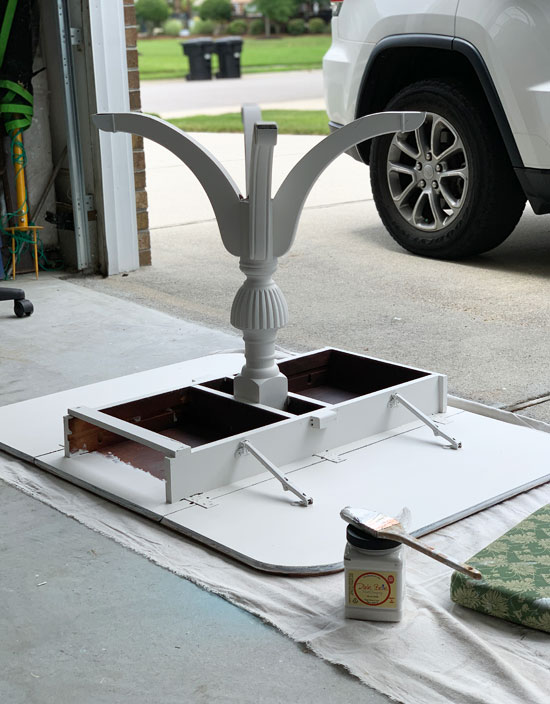
Fluff is more of a vintage-looking white than a bright white. It usually covers in just two coats.
Stain to prep for whitewash
Then I flipped it over and started on the top with Up in Smoke Voodoo Gel Stain:
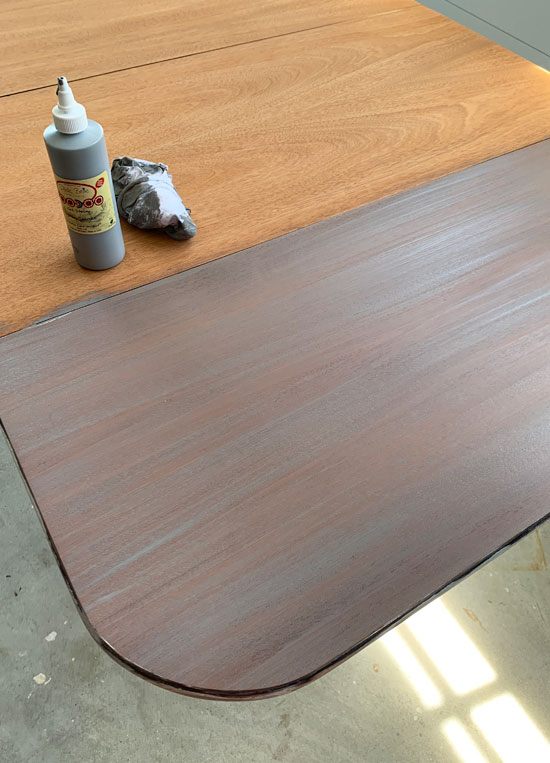
I like that it comes in a squirt bottle which makes it really easy to apply, I squirted it on and wiped it off with a clean cotton cloth. (**Be sure to give it a good shake before applying just like any stain.) This table has red undertones, so I didn’t quite remove all of the gray stain. And after the first coat was dry, I added another:
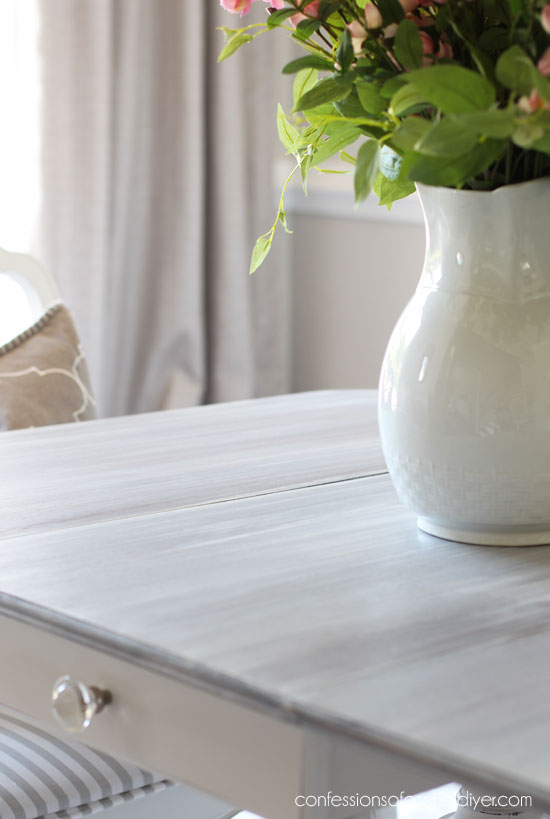
Whitewashing
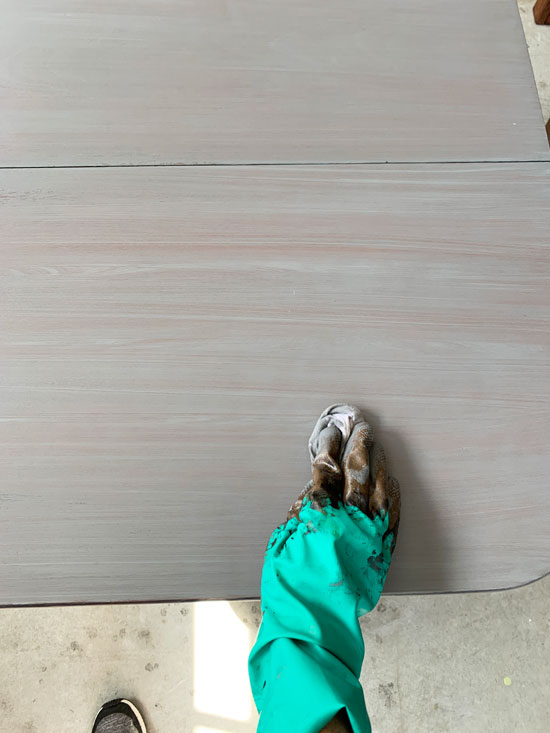
My goal was to get more of a gray base while still allowing some of the wood grain to show through. For the whitewash effect I was after, I watered down Fluff with one part water to two parts Fluff and applied it with a brush, working in sections…
Then I went back with a damp cotton rag and wiped it back off. I tried to work in straight lines across with the grain of the wood.
I added a bit more water to my rag to blend it in a bit more when I was done. You can keep adding paint or water until you get a look you like.
I created a video sharing how I applied this technique to a step stool that you can see in this post HERE.
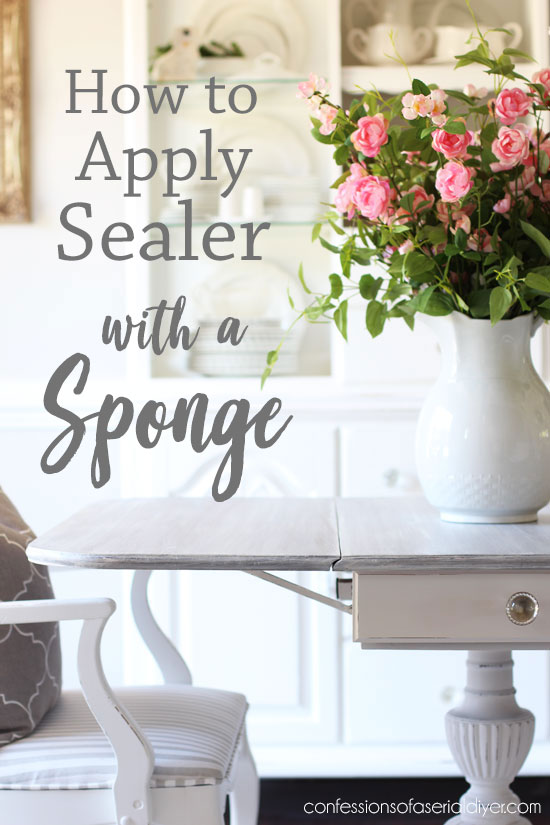
How to Apply Sealer with a Sponge
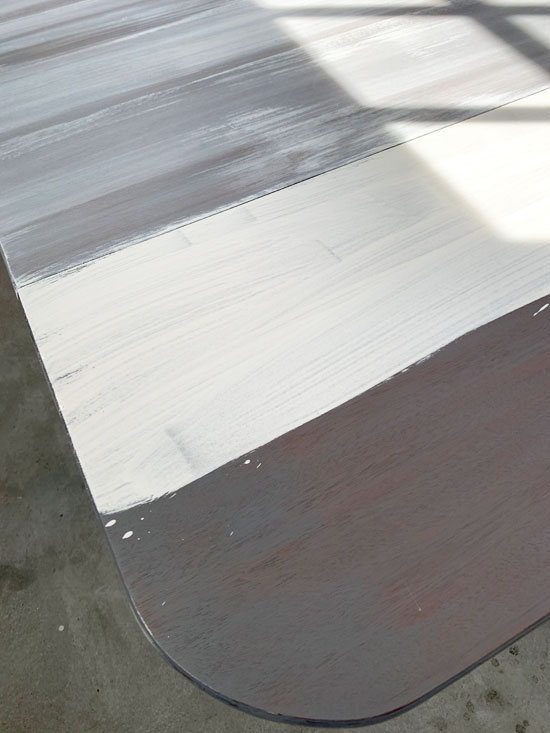
I very lightly sanded the top and then to seal, I used Dixie Belle’s Clear Coat in Satin.
Here’s the video I promised showing how I applied it with DB’s blue sponge applicator:
(If you have any trouble viewing the video, you can view it on my YouTube channel.)
Using the sponge is so much faster and easier! The satin clear coat leaves behind a beautiful buffed look. It is also available in a flat finish.
One coat should be sufficient, but I gave just the top two coats for extra protection. I don’t think this table will get daily heavy use as a kitchen table might, however, if that were the case, I would have used Gator Hide instead. I would apply it the very same way.
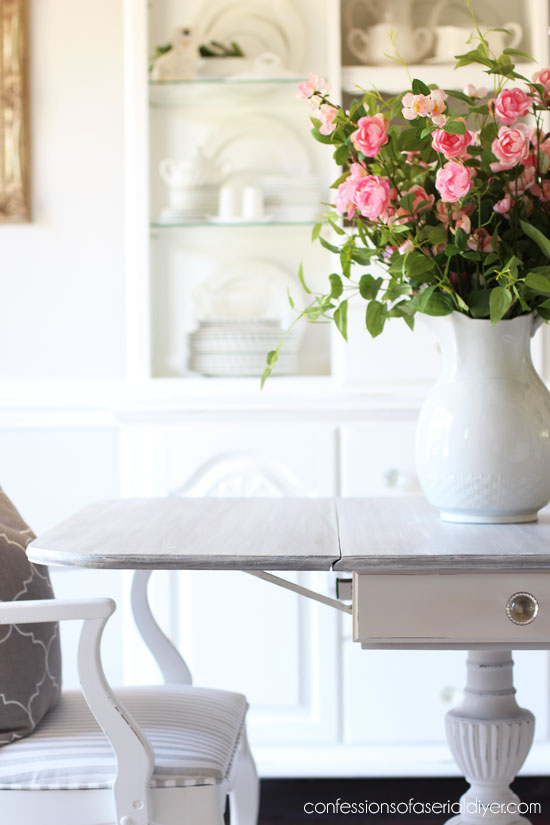
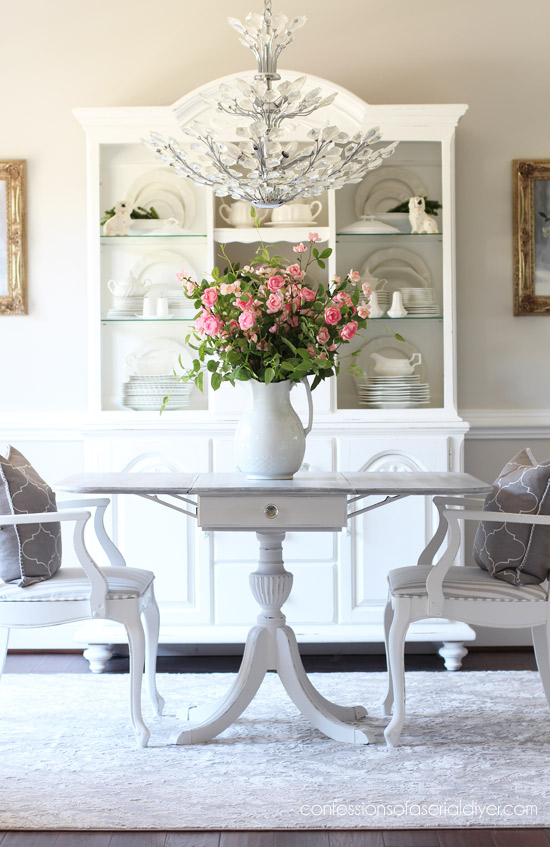
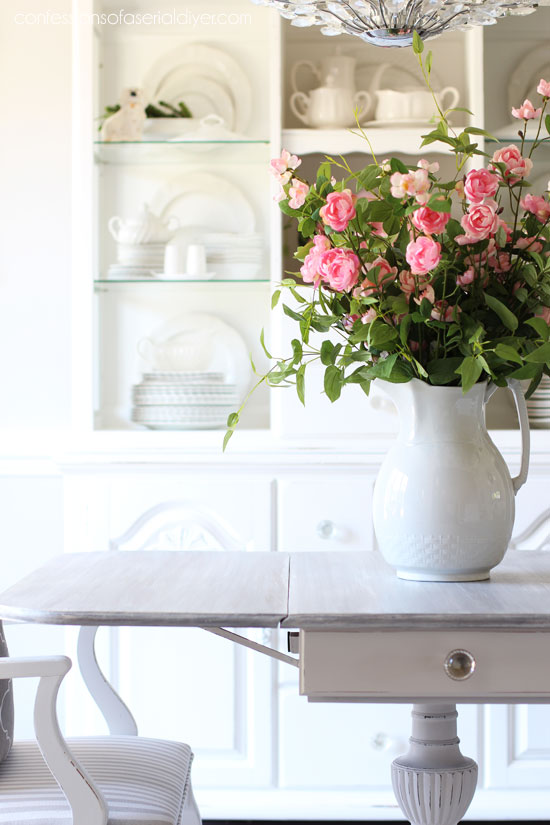
This table looks great paired with my dining room chairs!
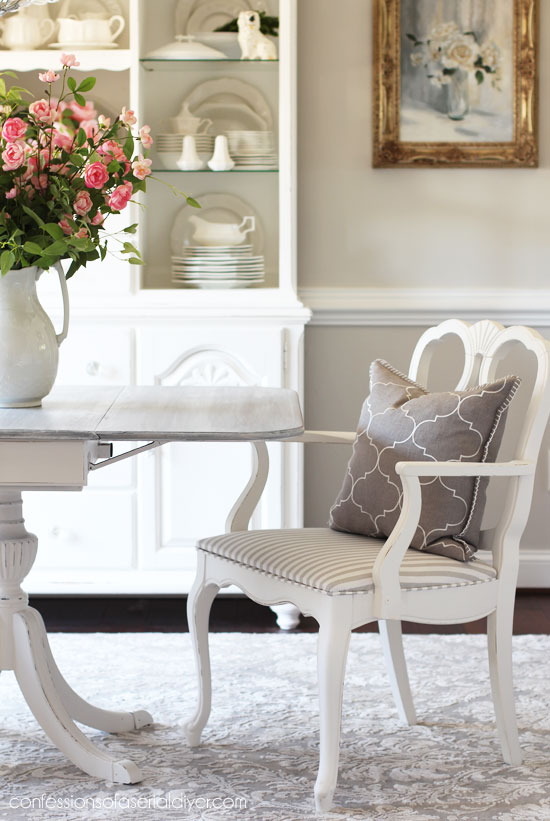
The rug was a lucky HomeGoods find and works perfectly in here.
I wish I’d have taken a photo of our dining table smashed into the opening of the kitchen just to the right of this photo lol.
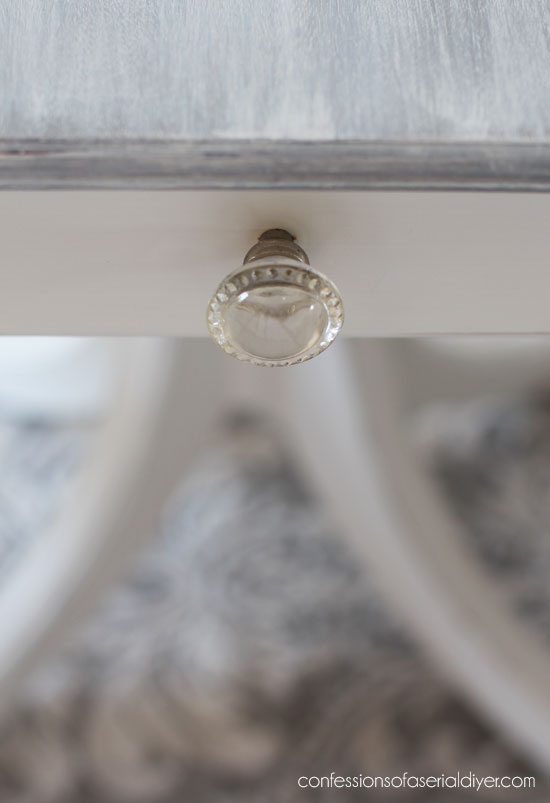
The original drawer had a dated brass pull that I replaced with this pretty glass one from Hobby Lobby…
The inside of the drawer got a pretty paper liner…
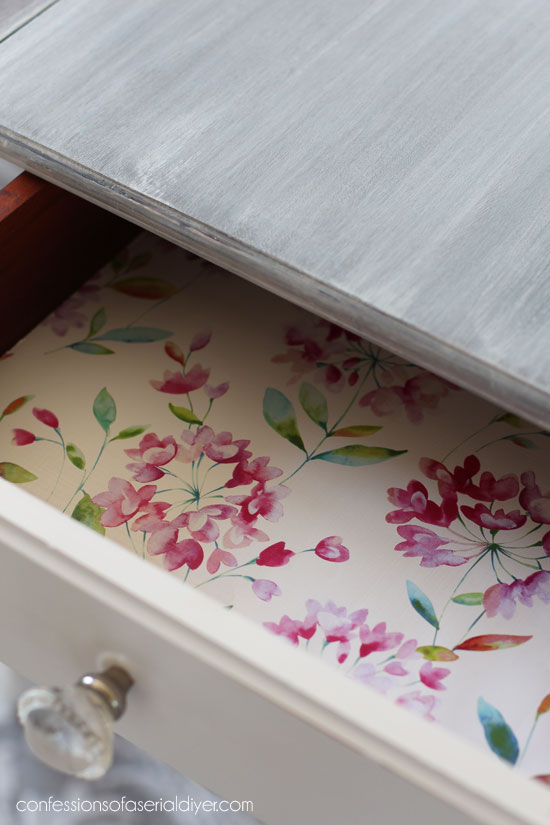
This is Martha Stewart wrapping paper I spied at TJ Maxx. It had a nice weight to it, so I thought it might be pretty for drawers like this that won’t get a lot of heavy use. It is held in place with double-sided tape.
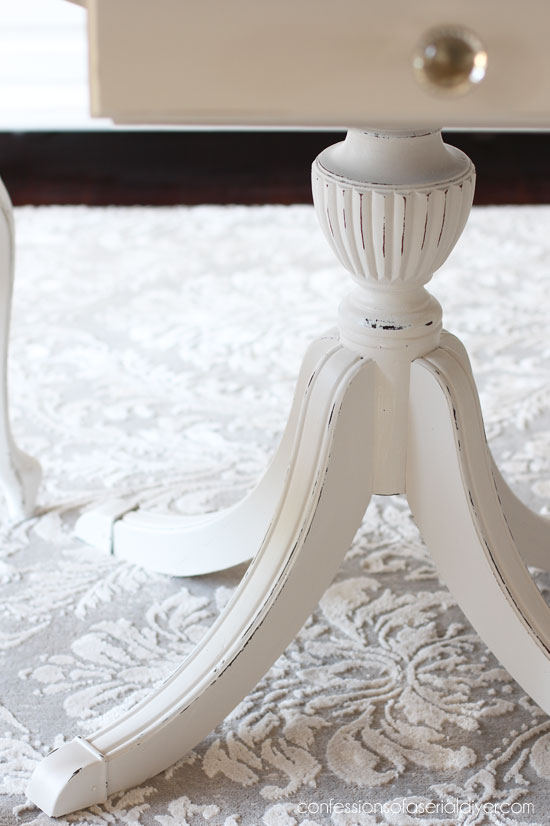
Here’s a better look at this paint color…dreamy!
Don’t forget…there are five more furniture flips from my friends to see today!
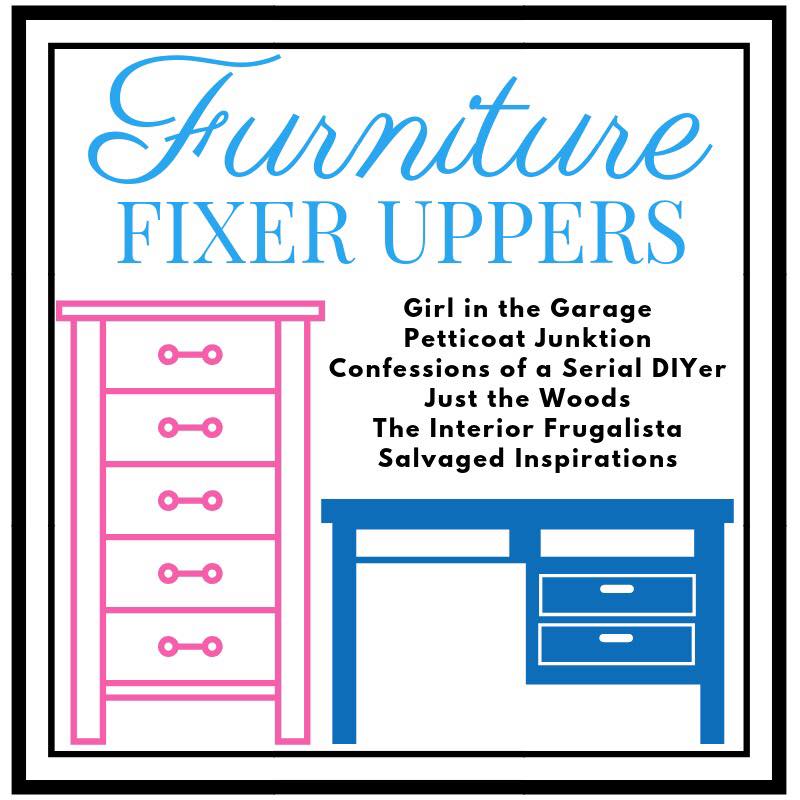
Want even more Furniture Inspiration? Visit all of my Furniture Fixer Upper makeovers in one place HERE!
I hope you enjoyed these makeovers! I know I enjoyed finally completing this mystery table!
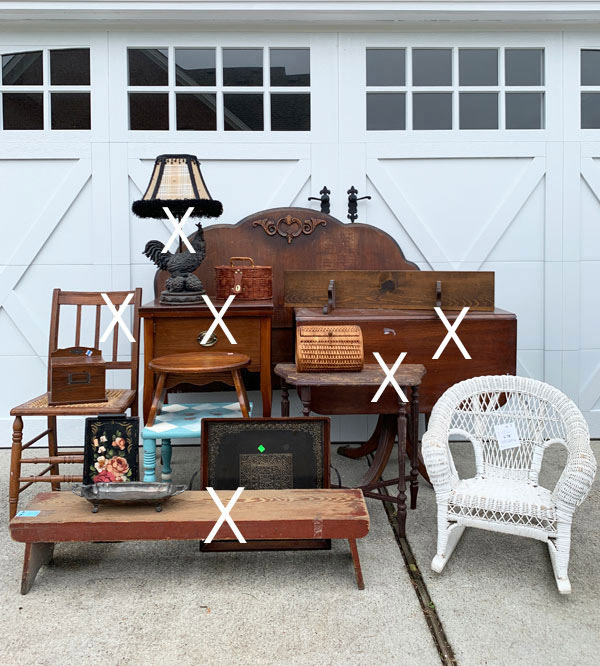
If you missed any from this haul so far, see them all below!
$6 Thrift Store Bench Makeover
I’ll meet y’all back here Tuesday sharing what I did with this wicker chair:

And I promise I didn’t leave it white! 😀
UPDATE: See what color I chose for this cute chair HERE!
Have a great weekend!!
XOXO,
![]()
Don’t Miss a Thing!
If you like what you see, there are several ways to follow along!
Email * Facebook * Pinterest * Twitter *Instagram


Petra says
Well I just love it. And your staging is FABULOUS 🙂 I’ve always wanted to try that look but I’ve never had quite the project to try it on. I’m looking forward to seeing your cane chair and I’m imagining you’ve painted it blue? But then I think soft grey!!! I’ve been waiting to see what you’ve done with the chair since I first saw the photo of the grouped furniture. Have a great weekend! xo
Christy says
Thank you, Petra! I appreciate that so much! See you Tuesday with the chair! Have a great weekend! XOXO
Mary Kaiser says
WOW that is some kind of transformation!! Holy You never cease to amaze me with your talents on your makeovers, you are the BOMB!!!
Christy says
Aww you are the best, Mary, thank you so much! XOXO
Christina in SW FL says
Christy, the table looks great! I imagine it was tedious doing the gaps where the leaves fold down. Nevertheless, it looks really great. I’ll say again, I adore how you LIGHTLY distress your paint.
Have a great weekend!!
Christy says
Thank you, Christina! It wasn’t too bad actually, but remind me to stay away from the drop leaf tables for a while ha ha! XOXO
Denise - Salvaged Inspirations says
Absolutely stunning Christy! And brilliant to add a white wash over the top to cut down the red under tones. Going to watch your vid now. ????
Christy says
Thanks, Denise! I loved your table when I saw it and it was in the back of my mind for this one! My video is boring, but informative ha ha! XOXO
Susan Ann says
I enjoy seeing your make over projects and particularly like that you post step by step directions and product links. However, I think your real forte is staging. I just love seeing your final photos of how the furniture can be displayed. They look so inviting and are always perfection!
Christy says
Aww thank you so much, Susan, I really appreciate that! The staging is the fun part for me!! XOXO
Marie says
Christy, it’s so pretty painted white and you did an amazing job on the top! Love the Duncan Phyfe style base too.
Christy says
Thank you, sweet friend! I love these pedestal bases too…paint really highlights the details on them! XOXO
Nancy @ Artsy Chicks Rule says
This turned out so great, Christy!!! I love it and your cute video too! ???? Great job! xo
Christy says
Thank you, my beautiful friend! XOXO
kandice kullmann says
This came out so pretty! I have up and smoke and fluff and never even thought to pair them together! I love it!
Christy says
Thank you, Kandice! I love how they worked so well together! XOXO
Connie Bebout says
Oh Christy !!! You’ve done it again ! Back in the day,my grandma had the entire Dunkin Phyfe dining room set ,..I thought it was pretty,but so dark. This table done over in white with grey is absolutely beautiful!!!
Christy says
Thank you, Connie! I’m so glad it worked out so nicely! XOXO
Carla says
I really like this ‘whitewash’ effect on the table top. You continue to amaze me with your painting creations!
Christy says
Thank you so much, Carla! XOXO
Marcie Lovett says
I love those old tables and was amazed at the gorgeous wood you found on the top after sanding. I cannot believe it took that whitewash look, I was sure it would end up pink. You can create almost anything with paint, Christy!
Christy says
Thank you so much, Marcie! I didn’t even consider that the red would turn the top pink! I’m so glad it worked out well!! XOXO
Julie Briones says
Again, you did your magic on this table! Love the whitewashed top, and the sweet glass knob! Going back to see a few I’ve missed… busy days here!
Christy says
Thank you, Julie!! Busy leading up to Haven, right? Have a blast! XOXO
Kathy Owen says
Your table is beautiful Christy. I have the hardest time trying to wipe in straight lines. You did a great job!
Christy says
Thank you, Kathy! I go back over it several times trying to get my lines straight lol! XOXO
Debra Wise says
So gorgeous, Christy! An amazing makeover!
Christy says
Thank you so much, Debra!! XOXO
Marthe says
Do you know if there is some place where i can buy Dixie Belle paint in Canada
Christy says
Hi Marthe! I looked for retailers in Canada and came up empty, so I have emailed Dixie Belle directly and will let you know what I find out from them when they respond! XO
Marthe says
Thanks, appréciante that
Christy says
Hey Marthe! No problem at all. I Haven’t heard back from Dixie Belle yet, but I dug around on FB and found a retailer in Alberta that ships! She sells many paint brands, including Dixie Belle. Here is a link to the paints on her site: https://www.absoluteserendipity.com/online-store/Paint-c32940378 Hope this helps! XO
sharon austin says
Oooooh, I love everything about it!!
Christy says
Thank you, Sharon! XOXO
Lori L Sovis says
I love seeing this project I have a very similar table and chairs that I want to refinish to match a gorgeous buffet with the same legs. I want to do it in a cadet blue shade. Can I achieve the same look on the top of the table with a deeper shade? I’m also curious why you chose to paint the brass feet. I love the look!!
Christy says
I’m so glad you enjoyed this one, Lori! I don’t see why you couldn’t achieve this look with a deeper shade. I think that would be really pretty! As for the feet, the top has gray tones and I didn’t want the gold tones of the brass to fight with that so I just made them disappear. 🙂 XOXO
Jackie C says
LOOOOOOVE this!
Really appreciate you showing how to apply the sealer to the top!
Christy says
Thank you, Jackie! You are so welcome! XOXO
Wendy Howell says
I think this is my new favourite! It is identical to the one I have here crying out for help. Can we trade LOL?
Christy says
Yay! Girl…spray it! SO easy!! XOXO
Jen @ Girl in the Garage says
Christy this turned out just gorgeous! I love the lightly layered look with the whitewash effect. xo (typed from my plane seat… Lol)
Christy says
Thank you, Jen!! Safe travels, my friend!! XOXO
Lorraine Castellon-Rowe says
Love that top!! It’s perfect with the creamy white on the bottom!!!
Christy says
Thank you, Lorraine! I love this color combo too! XOXO
Lorraine Castellon-Rowe says
❣️????
Kerri says
Love how the top of this table turned out! I have a drop-leaf table I have been putting off doing. I may try this technique. Thanks!
Christy says
Thank you, Kerri! XOXO
Karen says
Did you wet the sponge with water to make it damp before you dipped in in the sealer when you were sealing the table?
Christy says
Hi Karen! No, I used it dry, but the sealer is water based so a damp sponge wouldn’t hurt anything. XOXO