Hello amazing friends! Today’s thrifty makeover is another flatware box makeover! After this, I have only two pieces left before I get to reveal my brand new haul!!
Here is today’s subject:
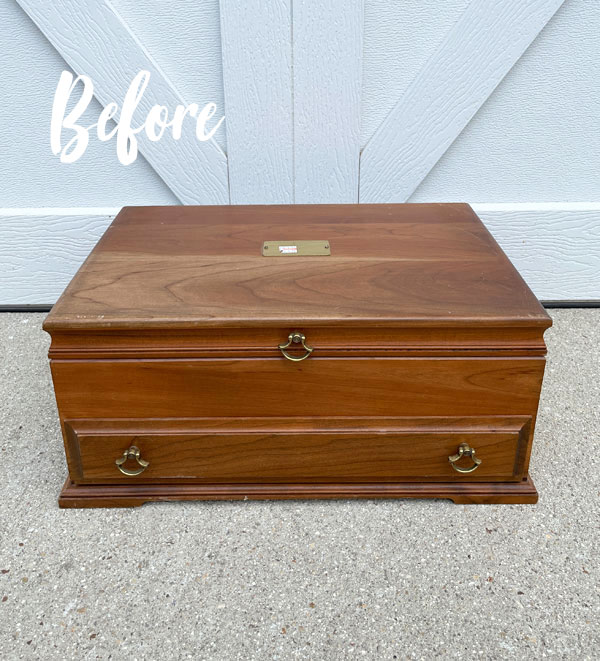
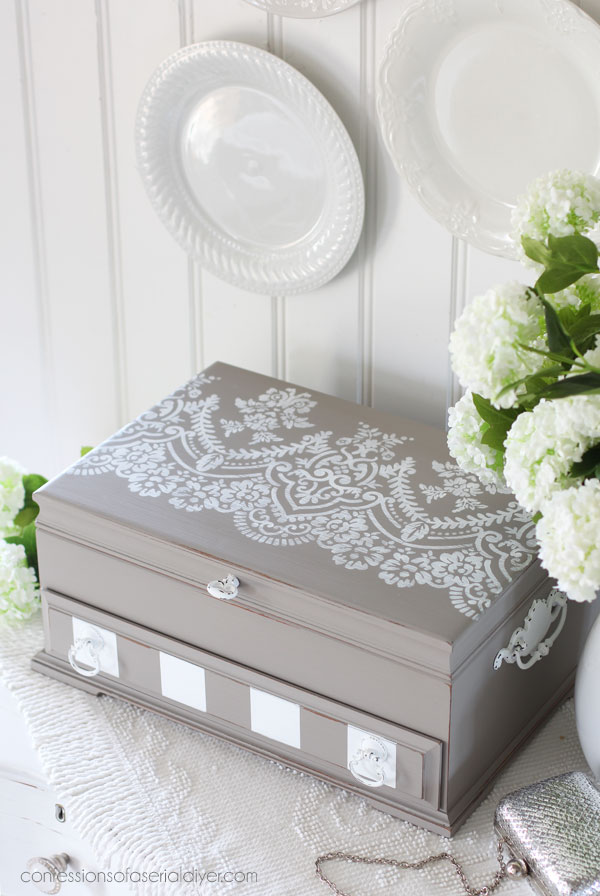
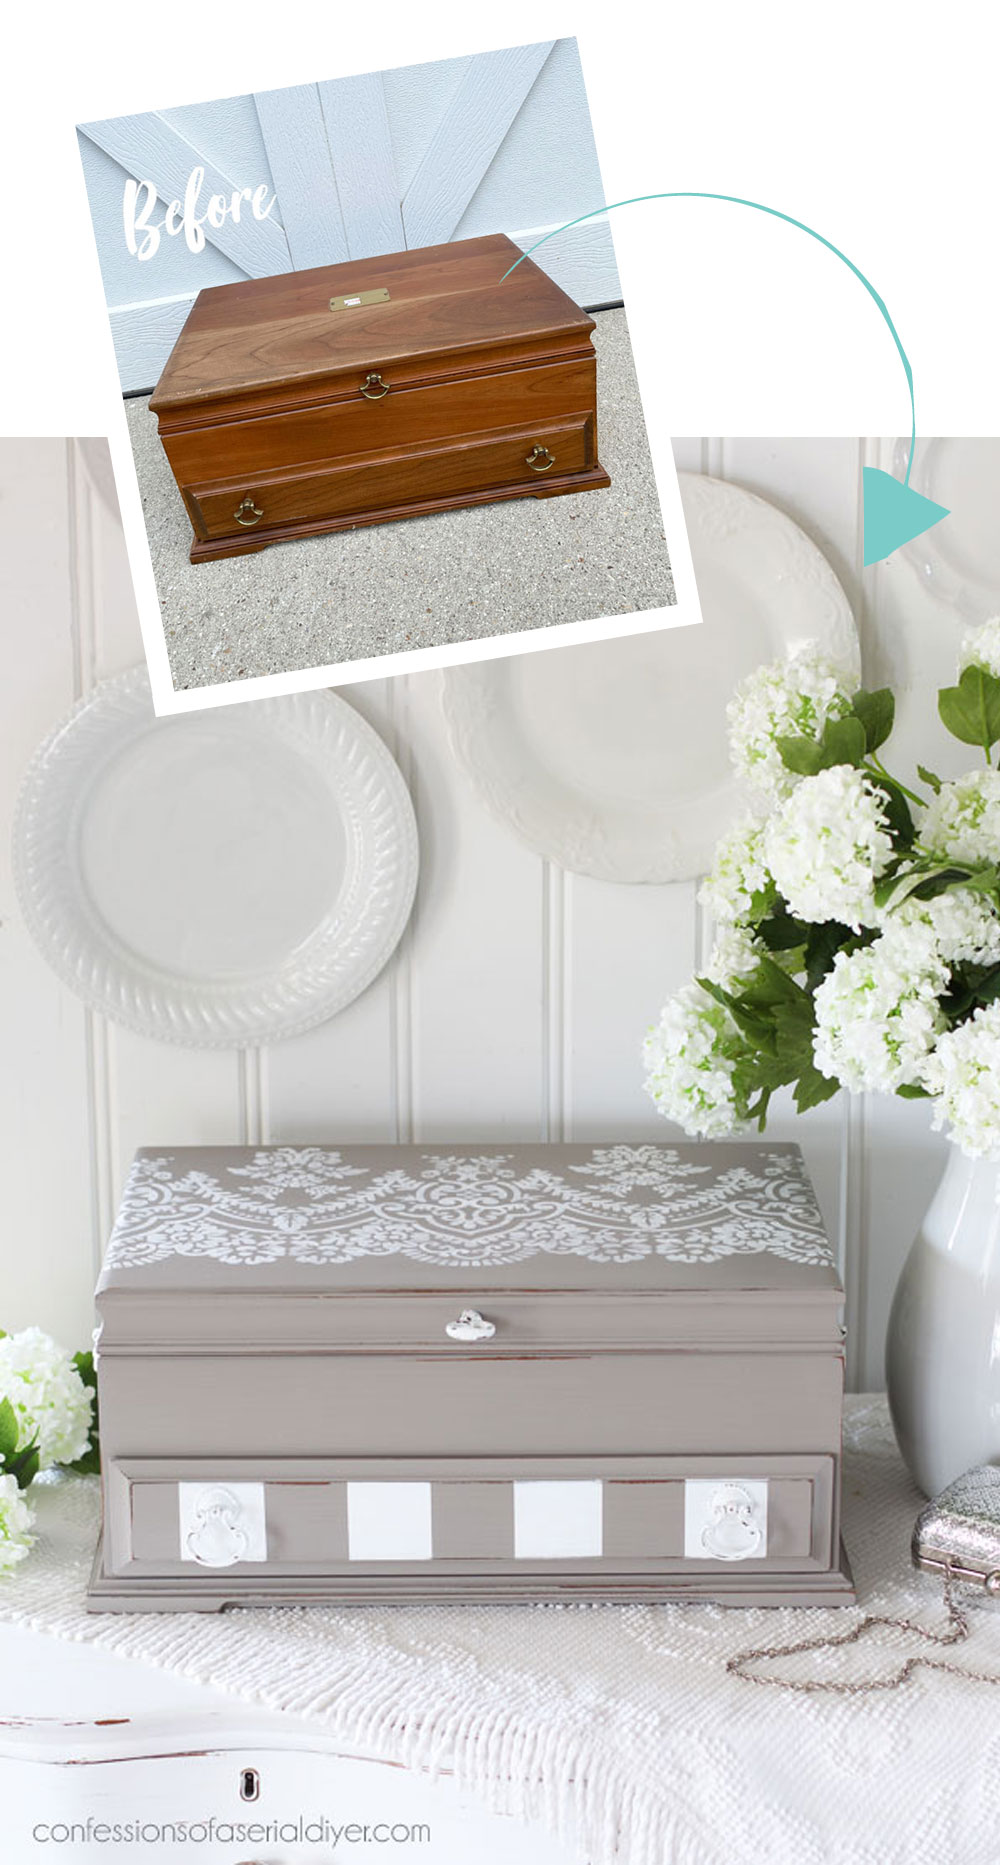
How pretty is this box? It was a steal too at $6.75 at the thrift store.
It did have a few scratches, but overall the outside was in really nice shape!
I’ve included a few affiliate links so you can find the products I love.
Clean
I started this makeover like I start most of my makeovers…with a good cleaning with my go-to prep cleaner, White Lightning. I mix one TBSP with a half gallon of warm water for most projects.
However, I only mixed half that for this piece. These terry cloth pads are perfect for the job:
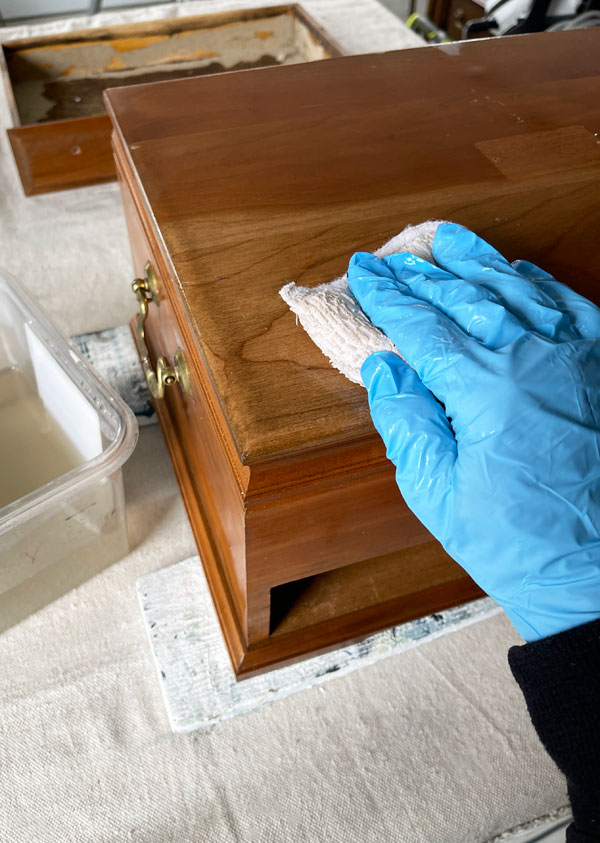
Once it was clean, I swapped my water out for clean water and wiped it down once more to remove any residue.
Fill holes
This box had a brass plate on the top that was likely meant to be engraved, but this one was not. I decided to remove that and fill the holes with Dixie Mud:
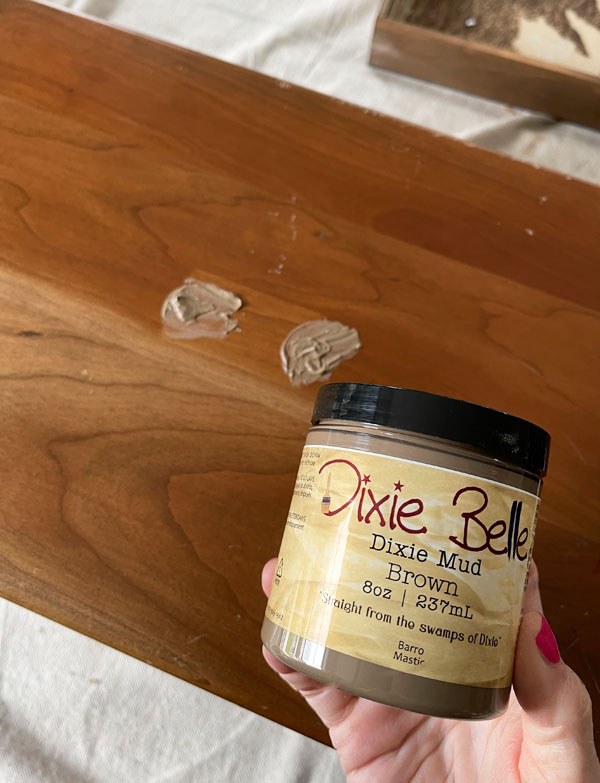
I left that to dry for a few hours while I worked on another project. Don’t rush this part if you want good results. It kind of reminds me of White Out back in the day…it was always so hard to wait for it to dry!
Once it was good and dry, I lightly sanded the area to smooth it out. Mud is water soluble, so its a good idea to clean first, then Mud. Then you can just vacuum up any sanding dust and wipe it down with a clean, soft cloth.
Paint
Now I was ready for paint, and I chose this gorgeous French Linen color:

As you can see it practically covered in one coat, but I did give it two using my favorite Mini Angle brush.
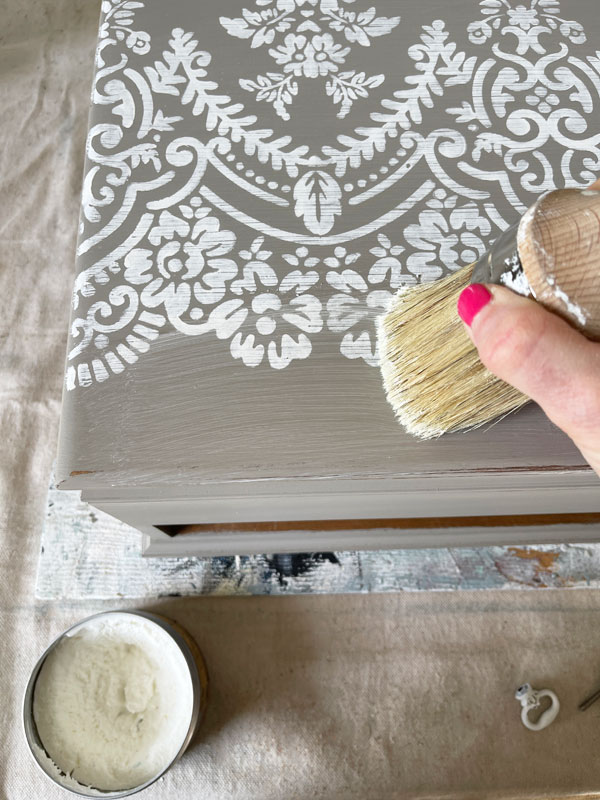
Adding a stencil
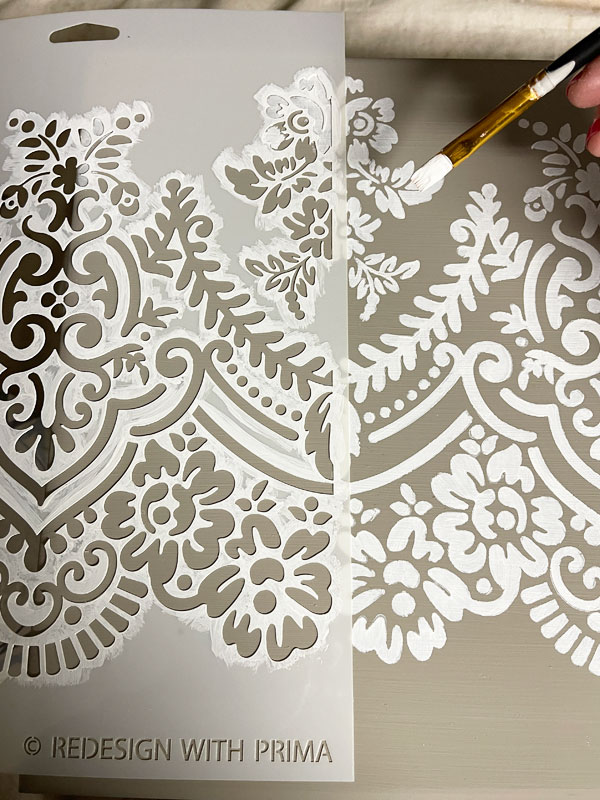
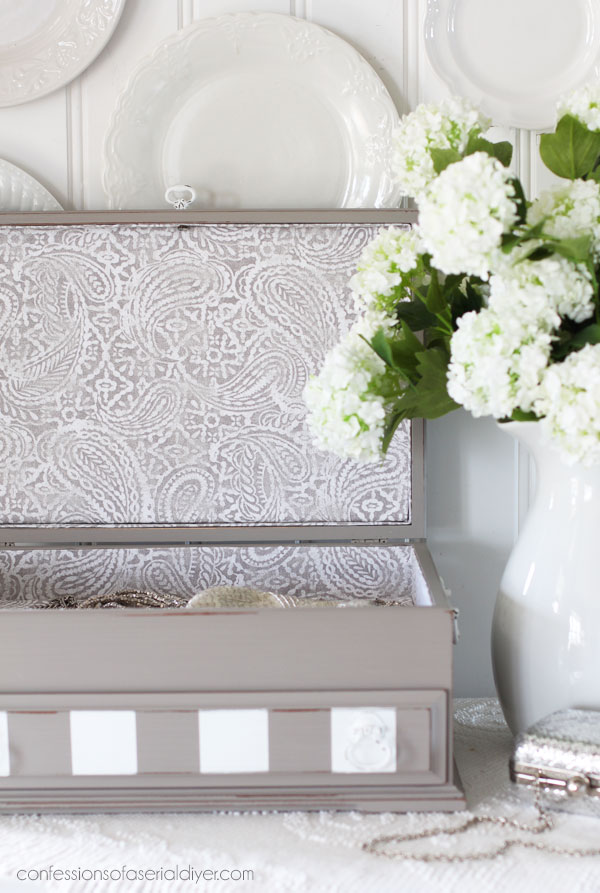
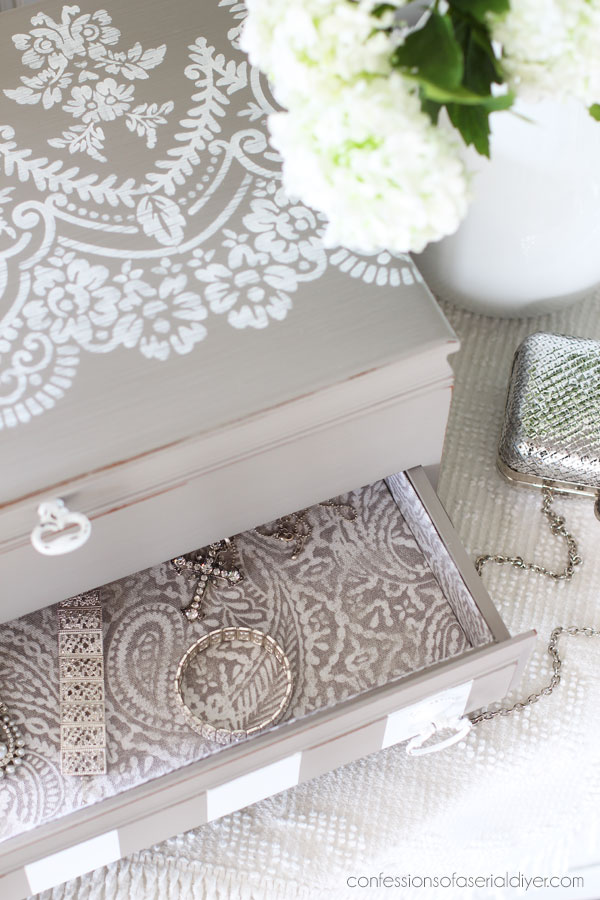
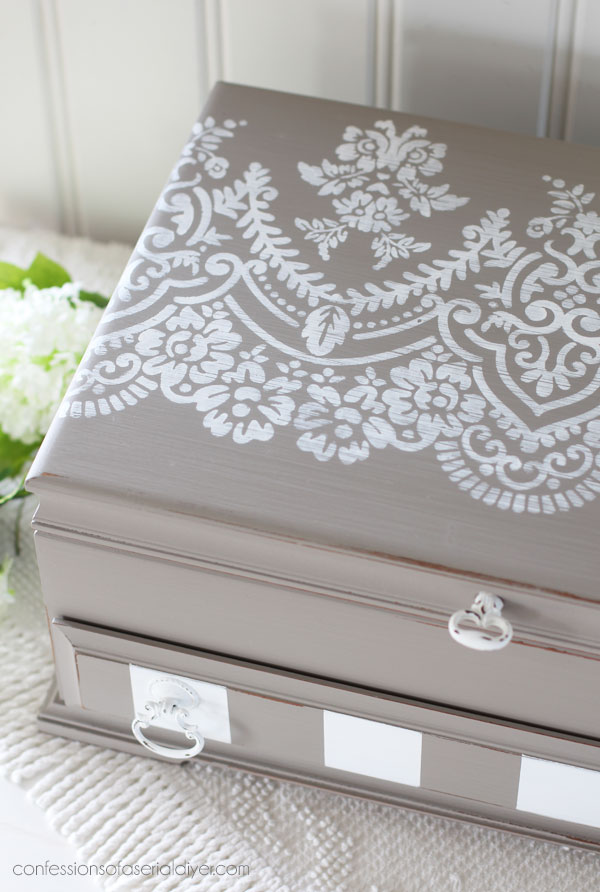
I decided on a stencil this time for the top of this one. I have added several Redesign with Prima stencils to my Etsy Shop and this is one of them called Elegant Lace:
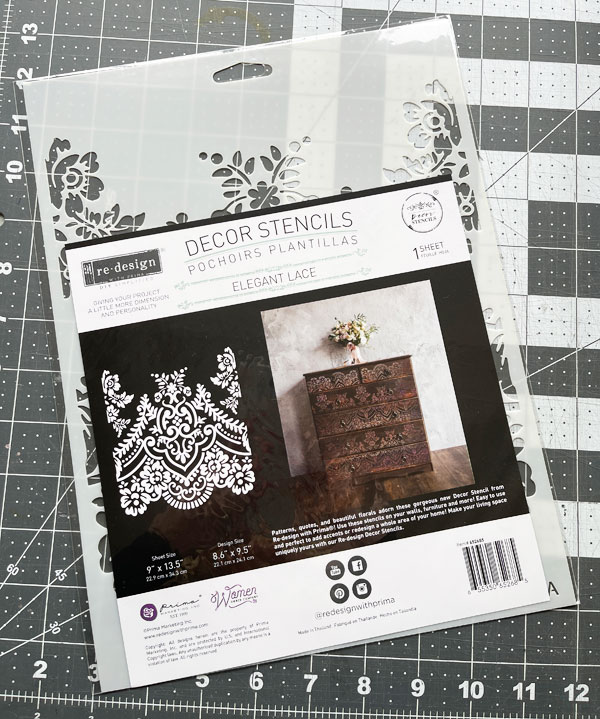
This is one that I knew I wanted to use on something as soon as I got it in!
I like to add a little spray adhesive to the backs of my stencils to hold them in place and prevent paint from seeping under:
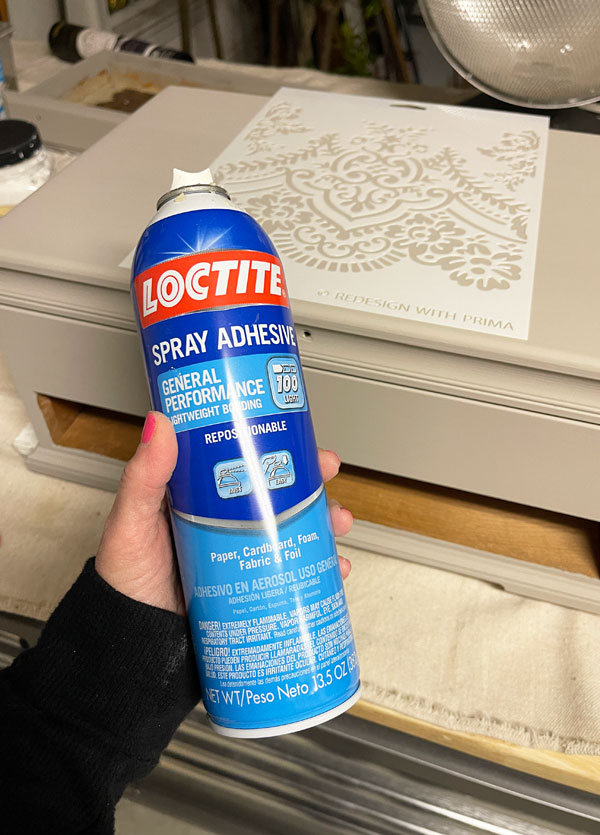
It can be removed with mineral spirits later if you like your stencils really clean.
Then I used a small brush to fill in the stencil. I prefer acrylic craft paint to fill them in since it’s easier to wash off the stencil than chalk paint. I gave everything two coats and then removed it right away:

Of course you can always use a pouncer, stencil roller, or whatever method you prefer to fill in the stencil. I’ve tried a few methods and always come back to this way.
I let the stencil dry a couple of minutes so I didn’t transfer any wet paint to the next section, then I added a bit more spray adhesive and lined the pattern up.
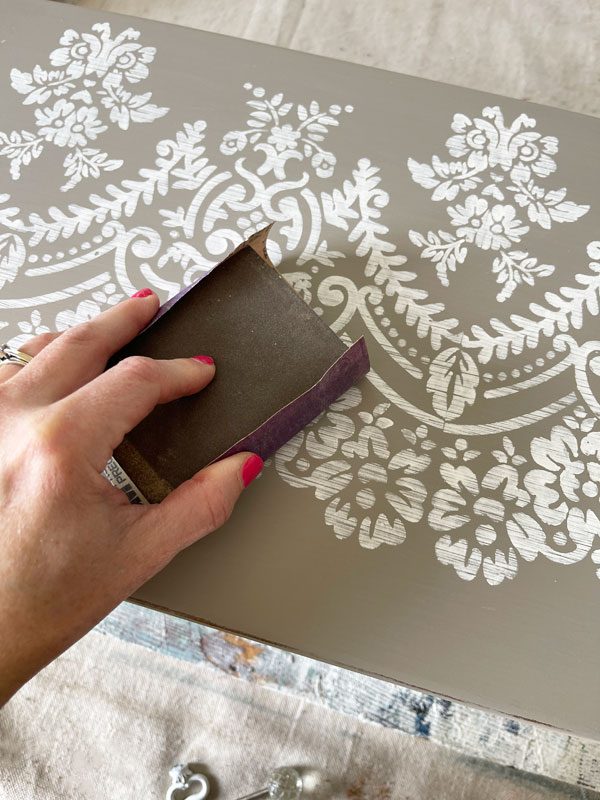
Once it was done and dry, I lightly sanded across the entire surface with 220 grit sandpaper wrapped around an old sanding sponge to smooth everything out.
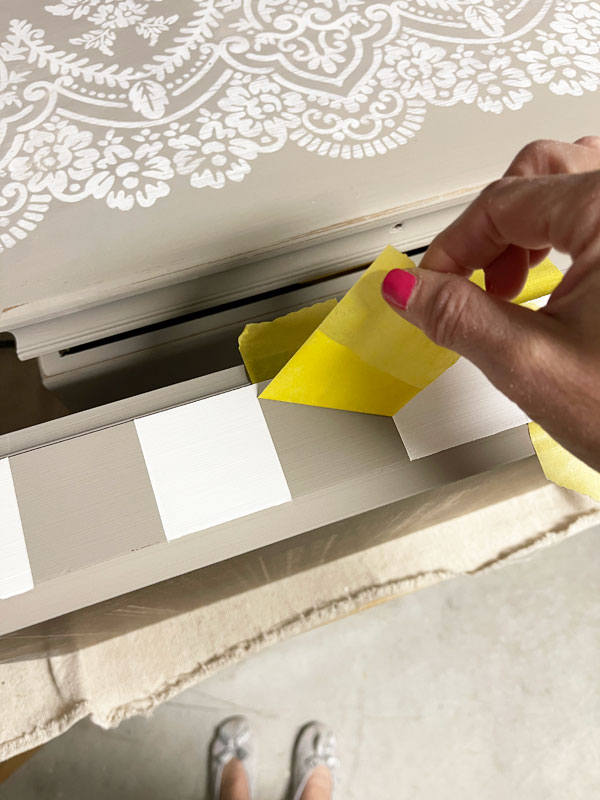
I then decided to go back and add something to the drawers of this one…super simple stripes, using FrogTape (my favorite painting tape).
I removed the tape as soon as I applied the second coat:
Seal
The final step on the exterior of this box was to seal. I used Best Dang Wax in Clear that I applied with the Best Dang Brush:
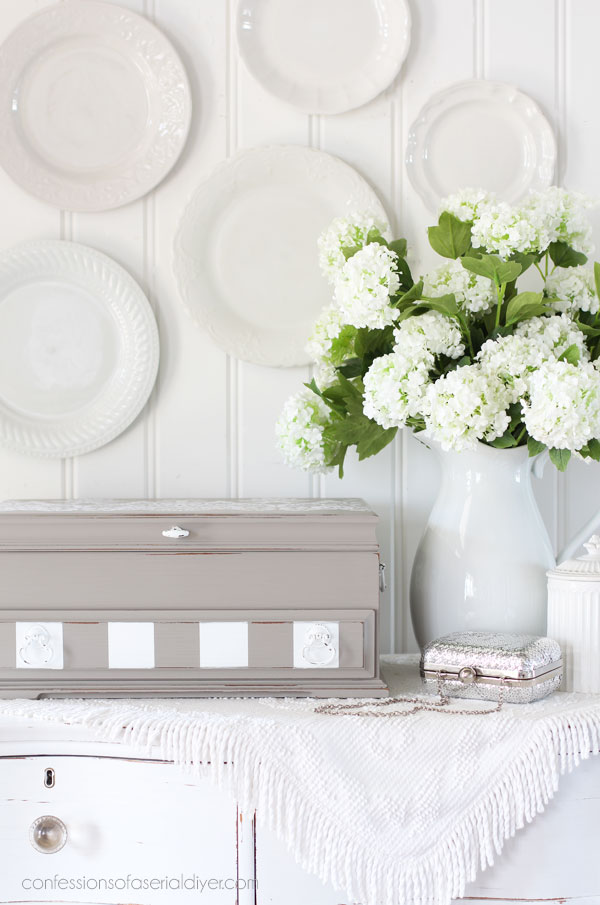
The Big Reveal
Here is how this thrift store flatware box looks now!
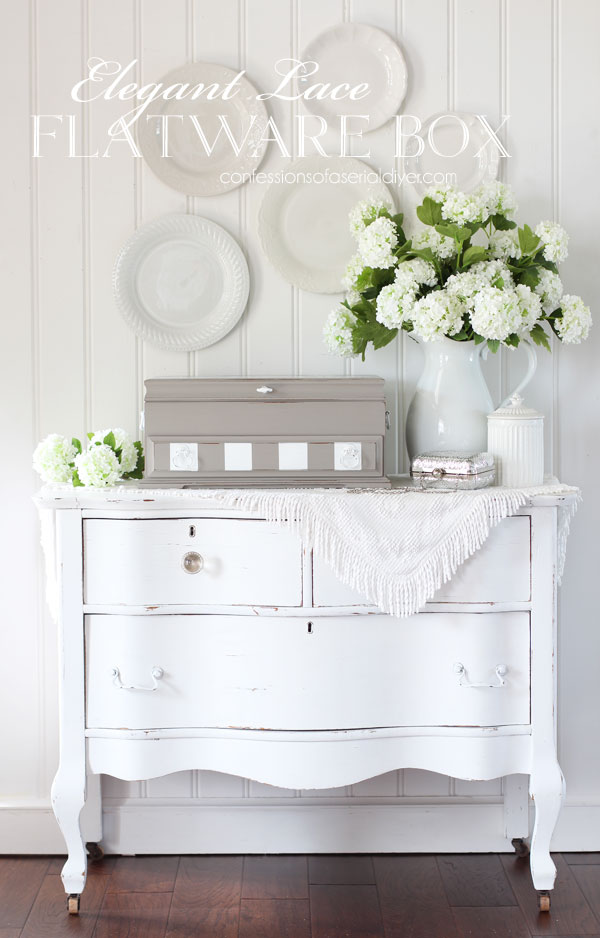
This French Linen color is so warm and lovely…
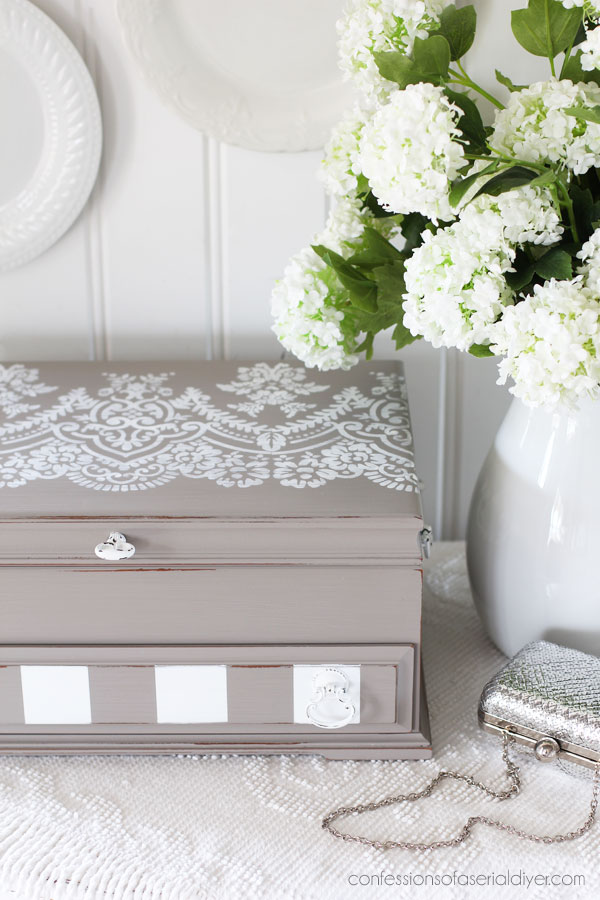
But all the pretty is really on the top…let’s get in a bit closer!
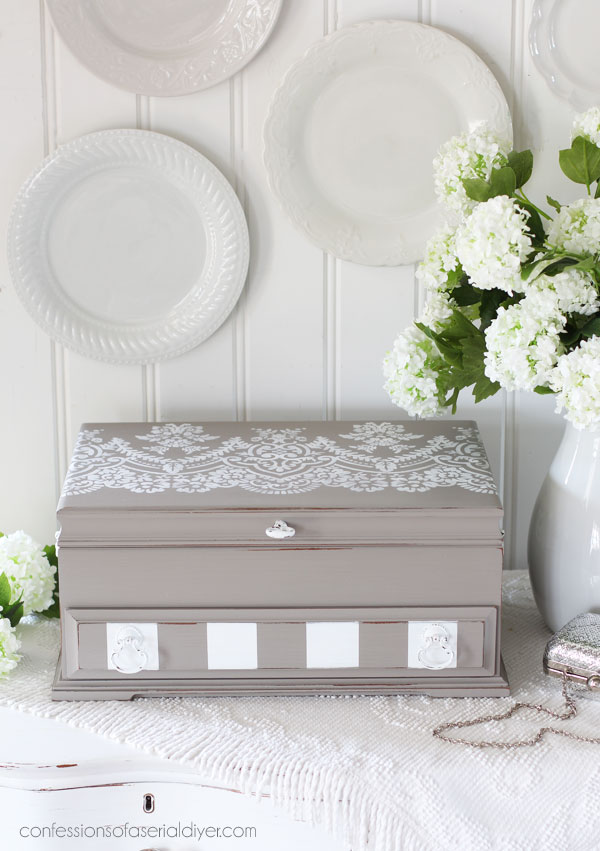
This Elegant Lace stencil really is so elegant!
The inside
You know I had to do something with this hot mess:
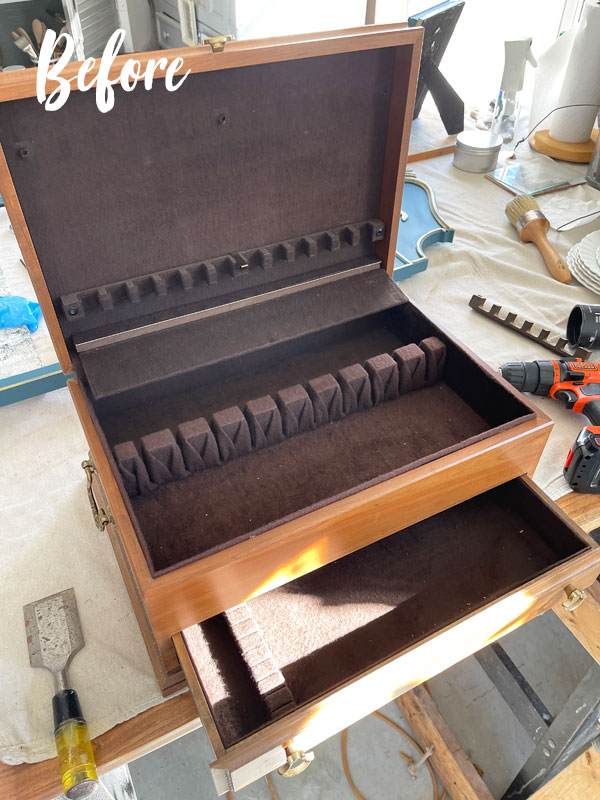
I ripped all of that out as much as possible:
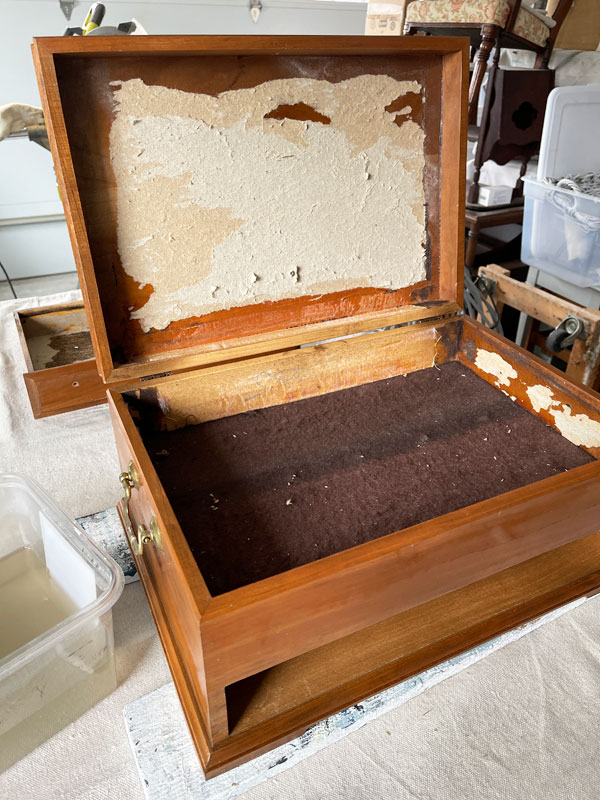
The rest will be covered so that was good enough!
See how I line these boxes with fabric in this detailed post.
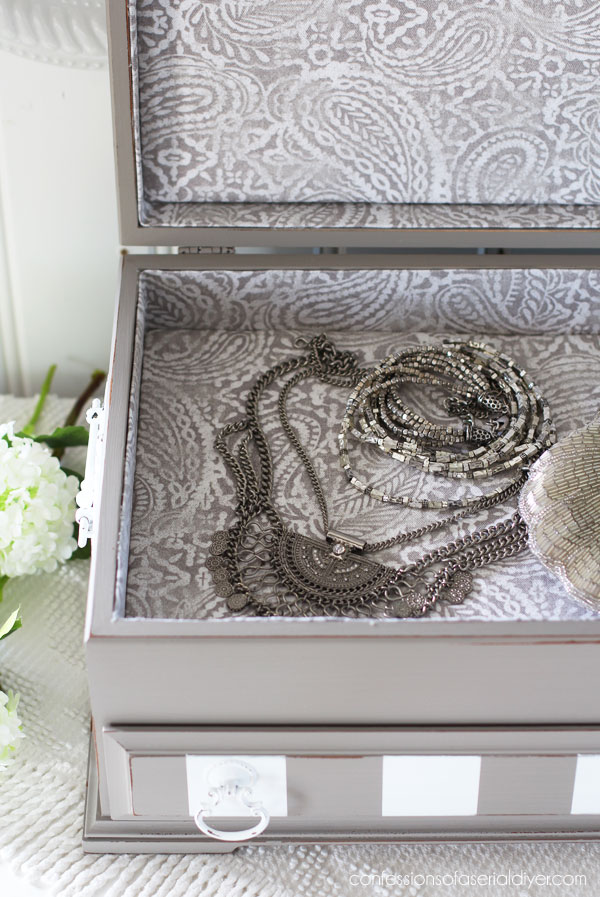
And here is how the inside looks now:
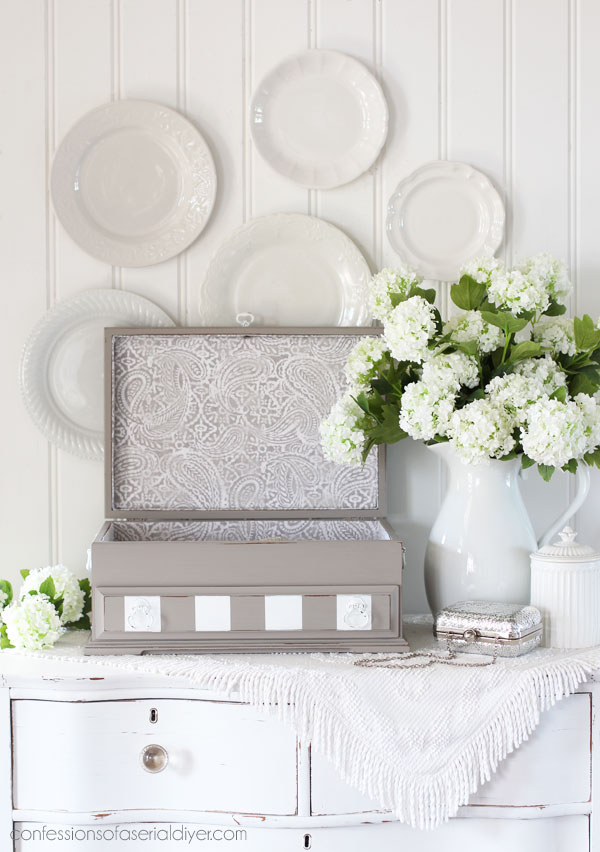
I couldn’t find enough of anything in my stash that I liked, so I ran up to Walmart since ours has a small fabric section and picked up two precut yards of this pretty paisley fabric:

It matched perfectly!
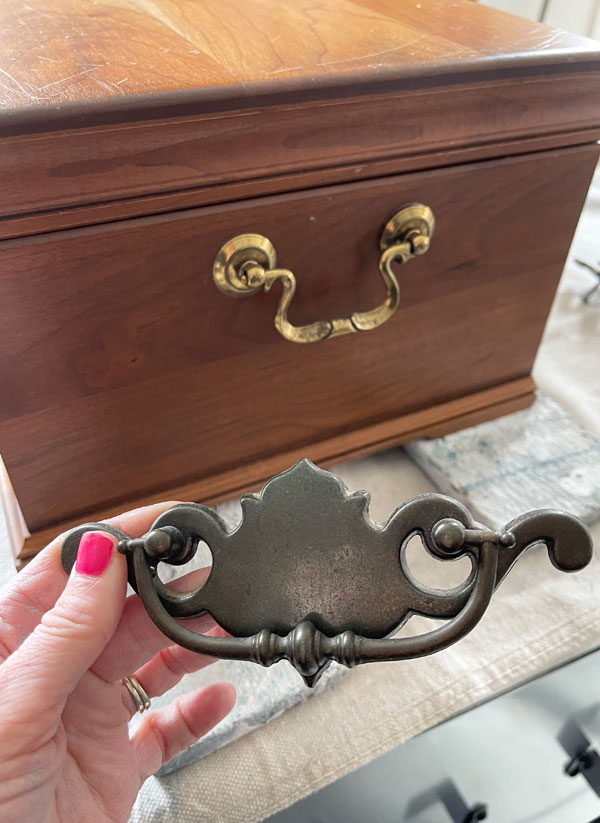
The Hardware
I switched up all the hardware on this box also.
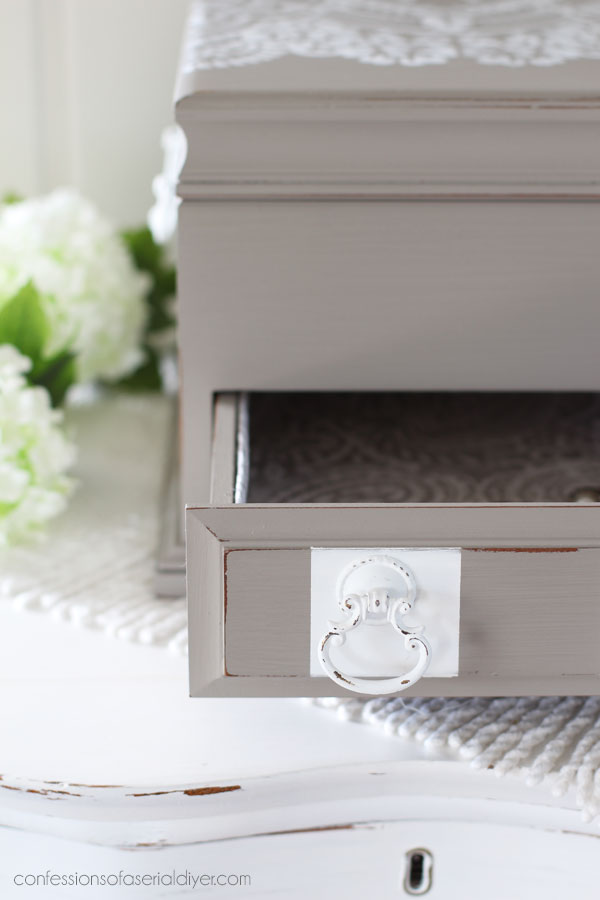
The original side pulls were meh, so I found these curvier ones in my stash:
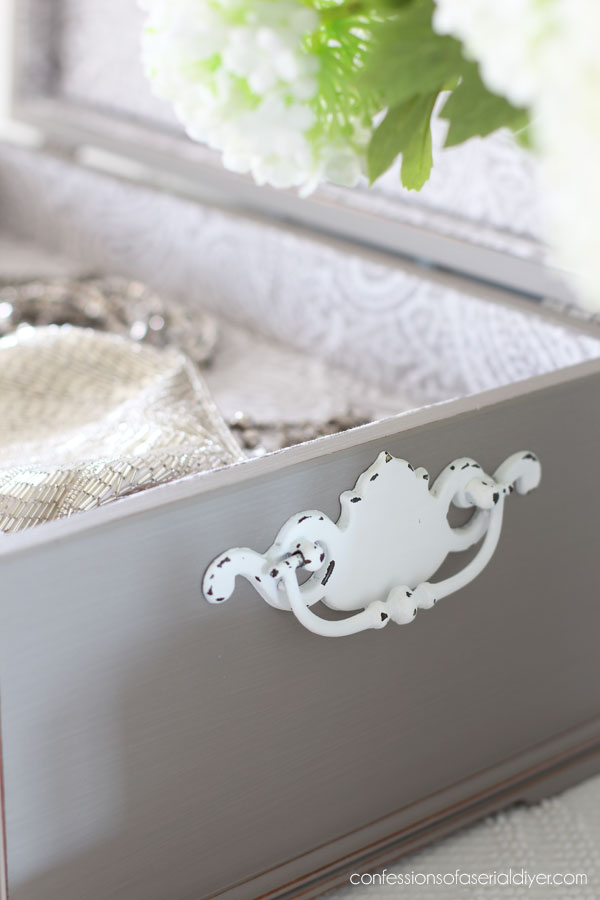
I spray primed them with Rustoleum spray primer and then painted them all in two coats of Cotton…
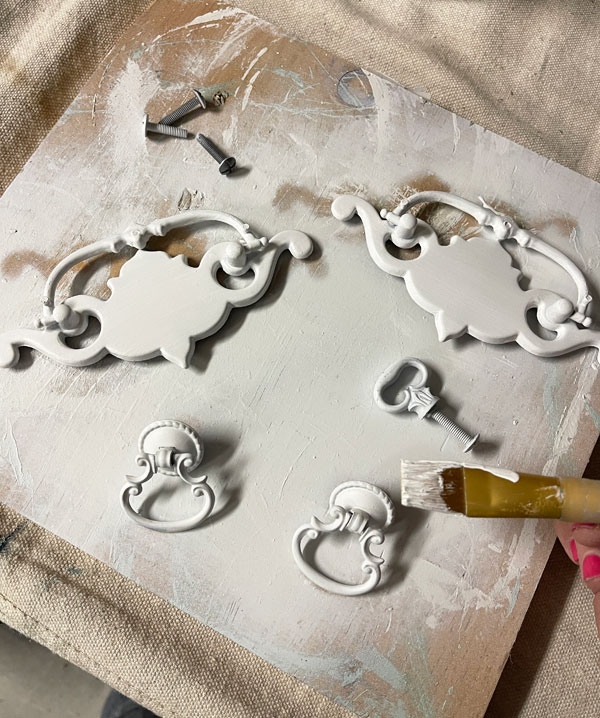
I scratched them with my fingernail here and there to shabby them a bit and then sealed them with the clear wax also.
The original drawer pulls were very small…I found these in my stash also:
I just love these boxes! There are just so many ways to reimagine them!
And that is another one done!
Here are the links to every piece I’ve done so far from this huge haul:
Gilded Mirror Makeover
Three Thrifty Lamp Makeovers
Flatware Box Upcycle with Vintage Post Transfer
Updated Thrift Store Wall Art
Painting the Smalls #19
Picture Turned Chalkboard with Transfer
Serpentine Dresser Makeover
Mirror Makeover with Transfer
Flatware Box Upcycled for Christmas
Upcycled Picnic Basket with a No Sew Liner
Painted Empire Dresser
Neutral Rocker Makeover
Pink Painted Night Table
Mass-Produced Shelf Makeover
Repurposed Cabinet Door
Oak Drop-Leaf Table Makeover
Child’s Rocker Makeover
Vintage Banker’s Chair Makeover
Terra Clay Paint Case Makeover
Tea Kettle Makeover
Tray Update with Stencils
Painting the Smalls #18
How to Turn a Spindle Bed into a Bench
Dated Shelf Makeover
80’s Clock Repurposed
Stenciled Demilune Table
DIY Fabric Lamp Shades & $5 Thrift Store Lamps
Thrift Store Dresser Makeover
I’ll be back on Tuesday with the mirror, and then I’ll just have the table left!! I am still on the hunt for chairs for it, so I’ll be shopping hard this weekend!
UPDATE: Unfortunately, I ran into issues with the last two pieces, but you can see my brand new haul HERE now!
OR, jump to the very first makeover of this new haul, this desk:
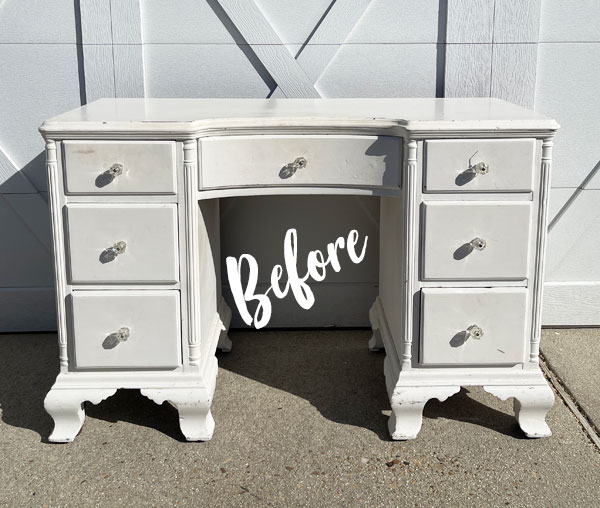
See the after HERE now!
Enjoy your weekend and I’ll see y’all next week!
XOXO,

Don’t Miss a Thing!
If you like what you see, there are several ways to follow along!
EMAIL * INSTAGRAM * FACEBOOK * PINTEREST


Get FREE SHIPPING on all orders over $50. No code needed at checkout! Orders under $50 always enjoy $8 flat rate shipping! Most orders ship same or next business day!


Mary Kaiser says
Oh I LOVE it! The color is so beauitul and I can’t beleive how well the color of the fabric you found matches it!! I have two boxes in my stash that I need to work on, maybe I can find some time to get them done! I am going to retire in a year and I am so looking forward to having more time to work on things that I want to do instead of what my boss wants me to do!!!
Christy says
Thank you, Mary! Yes, I was so excited to find that fabric as I knew my choices would be limited. You will so enjoy having all that free time for nothing but creating and grandbabies!! XOXO
Rose Lefebvre says
Another winner!
Christy says
Thank you, Rose! XOXO
Janice Holt says
Another gorgeous flatware box. I always enjoy them but I enjoy everything you redo. This one is so elegant looking. Great stencil choice. Have a great week-end.
Christy says
You are the sweetest and I appreciate it so much, Janice, thank you! Enjoy your weekend as well! XOXO
Janette says
Another beautiful make-over, what a gorgeous box and the fabric inner matches it perfectly.xx
Christy says
Thank you so much, Janette! That fabric was a great find! XOXO
Cecilia says
Such a pretty color and stencil design. Can’t believe you found fabric that matches so perfectly! This turned out great!
I’m super excited about the 4 oz jars of paint. I’m looking for the perfect storage piece for my art studio and want several bright colors so that size will be just what I need.
Christy says
Thank you, Cecilia! I know…I knew my fabric choices would be limited, but that was just perfect! And yay…I’m so excited about the smaller sizes of paint…perfect for the smaller projects or colorful ones! XOXO
Cheryl Atkinson says
Very pretty! Love this stencil. That was a nice box to start with. Love it!
Christy says
Thank you, Cheryl! It really was a great box to start! XOXO
Denise Zdziennicki says
Love that stencil and lining… and your cute little slippers!😉 Beautiful as always my friend! XOXO
Christy says
Thank you so much, Denise! And ha ha…nothing like sneaking out to the garage before bed in my slippers to add those stripes lol! XOXO
Sheila Holzberger says
Where do you sell your completed pieces, and what’s the price range of your redone flatware boxes?
Christy says
Hi Sheila! I sell my pieces locally here in Virginia Beach in an Antique Mall. My flatware boxes usually go for $45-$55. XOXO
Marcie Lovett says
Another beautiful makeover, Christy. The new hardware is more substantial for that big box and the fabric looks like it was made this project!
Christy says
Thank you, Marcie! I love when I can find just the right hardware in my stash…that is not always the case lol. That fabric was such a lucky find too! XOXO
Shari Clines says
This turned out so beautifully! Thanks for the inspiration!
Christy says
Thank you so much, Shari!! XOXO
Michele M. says
The French Linen color is an absolute fav of mine. I love a warm neutral and oh my gosh that fabric for interior was spot-on perfect! I truly love the way this turned out. Except for one thing. With all the girlie swirly awesomeness the block stripes don’t work with it. They don’t play well together – though I’m always always “yeah, whoot, stripes!” I am not with this one. I think I’d like to have seen that part just the FL color and possibly a long skinny stencial “border” alone the flat piece above it instead. And let the drawer pulls shine a bit all on their own. No offense, please. Just my unwarranted opinion. Otherwise it’s perfect to me.
Christy says
Ooh yes, I love the French Linen too! It’s such a rich, lovely color. The drawer definitely needed something and I really love the bold stripe but I hear ya! XOXO
Karen Barnes says
You are truly amazing, thanks so much for sharing and peeking my interest again.
Christy says
Aww I appreciate that so much, Karen, thank you! XOXO
Robin says
I always love your reimagined flatware chests – so varied (Halloween, Christmas, different colors & patterns). They are harder & harder to find where I am. This one is especially large (I think you’ve done 2 of them) so I would imagine that you price them higher. Another great outcome!
Christy says
Thank you, Robin! There are so many possibilities with these boxes, so almost always grab them when I see them! XOXO
Charleen says
This is beautiful A very lively transformation. Have a wonderful day. Good luck on finding chairs.
Christy says
Thank you so much, Charleen! I did find chairs, but none that will match the table lol, so that project will have to wait a bit! XOXO
Jeanne says
I have my silver in one of these boxes and I think of it every time you redo one. Maybe I’ll redo the outside at least.
Is it time for a new booth photo for us? 🙂
Christy says
Ooh yes… you get to skip the hardest part of removing the insides and get right to the fun part! I will share another booth update in the spring! XOXO
Cheryl says
So beautiful! Love everything about it, the color, the fabric, the stencil and the stripes. Well done!!
Christy says
Thank you so much, Cheryl! This one was such a pretty box to start! XOXO
Wendy Watson says
Hi What kind of glue did you use to attach the fabric with please
Christy says
Hi Wendy! I used hot glue. I linked to the tutorial for how I line my boxes with fabric in that post that shares all the details. 🙂 XOXO
Petra says
Christy, this is one of my fave pieces of yours – just love it – the colour, the stencils, the fabric, everything 😀 xo
Christy says
Aww yay! Thank you, Petra! I dropped it off at my booth on Thursday and it sold the next day! 🙂 XOXO