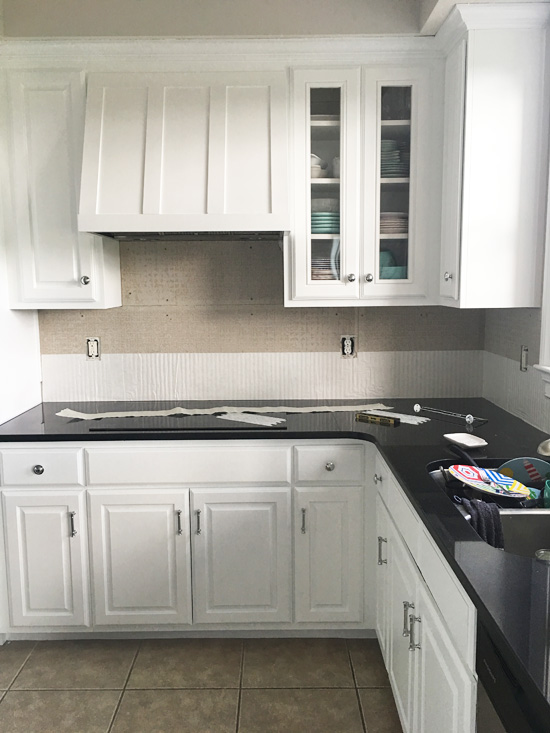
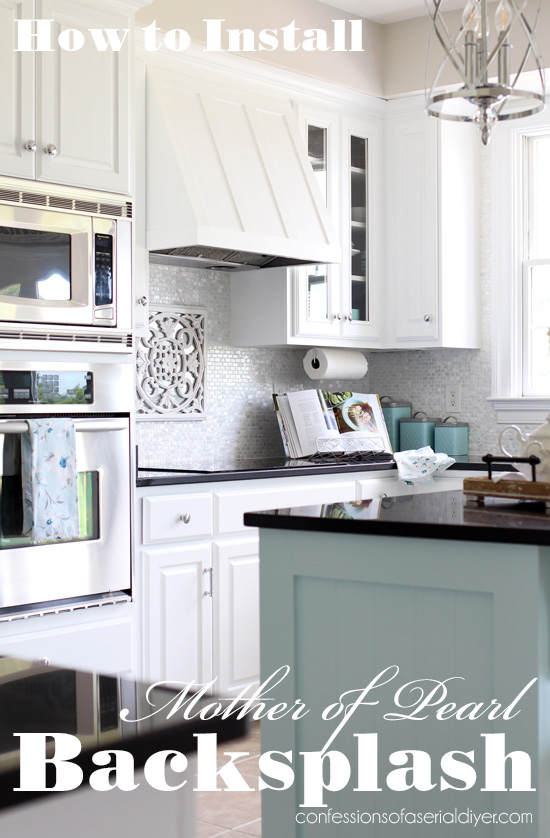
Hello beautiful friends! Today I’m sharing how I tiled the backsplash in our kitchen.
I’ve included a few affiliate links so you can find the products I love.
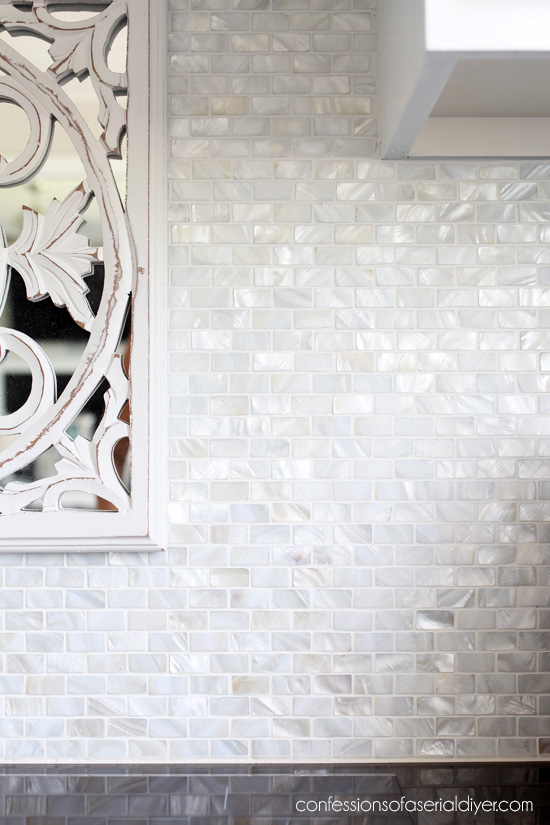
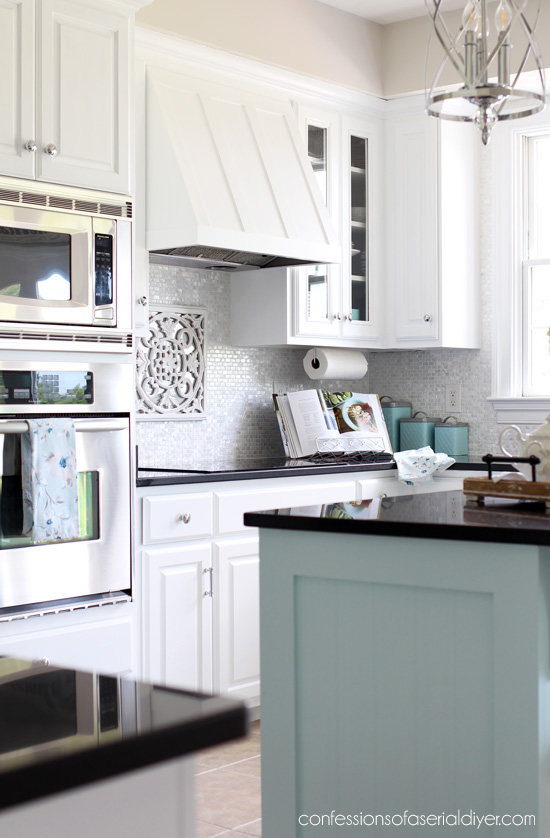
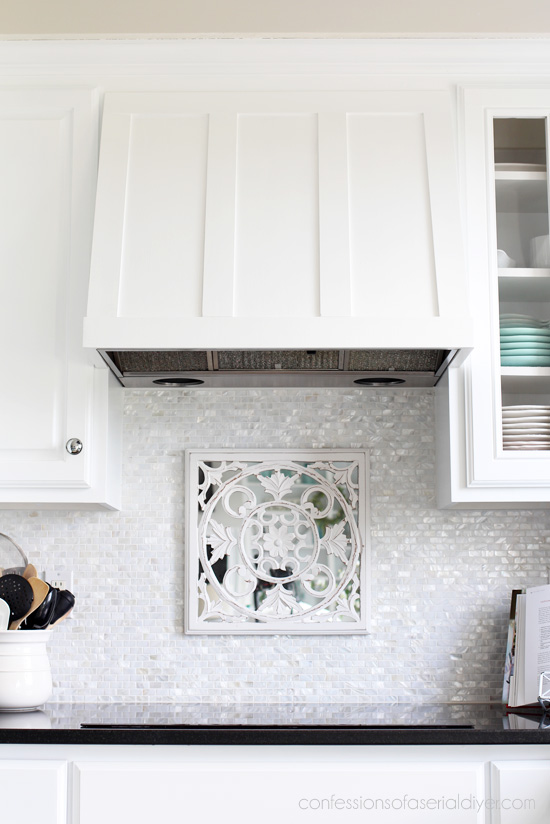
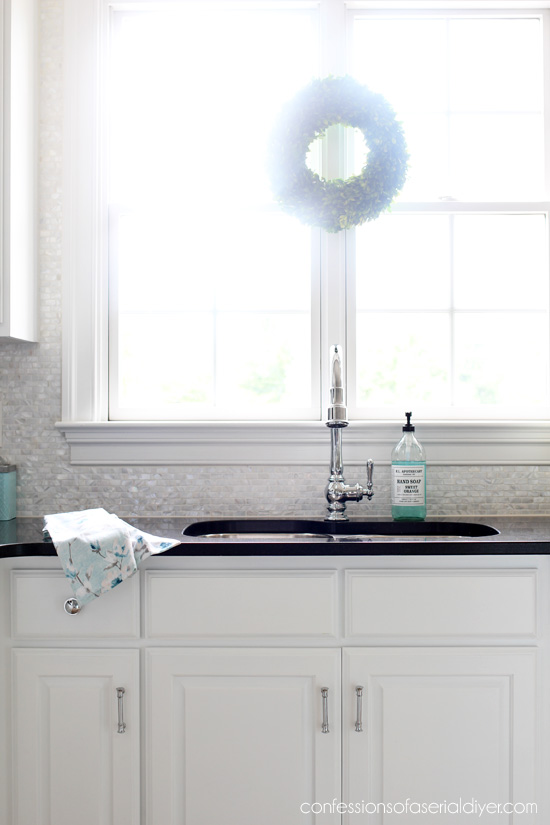
I installed this gorgeous mother-of-pearl tile:

I was searching for options on Amazon and found this one HERE.
It is sold in packs of six 12 x 12″ squares like this:
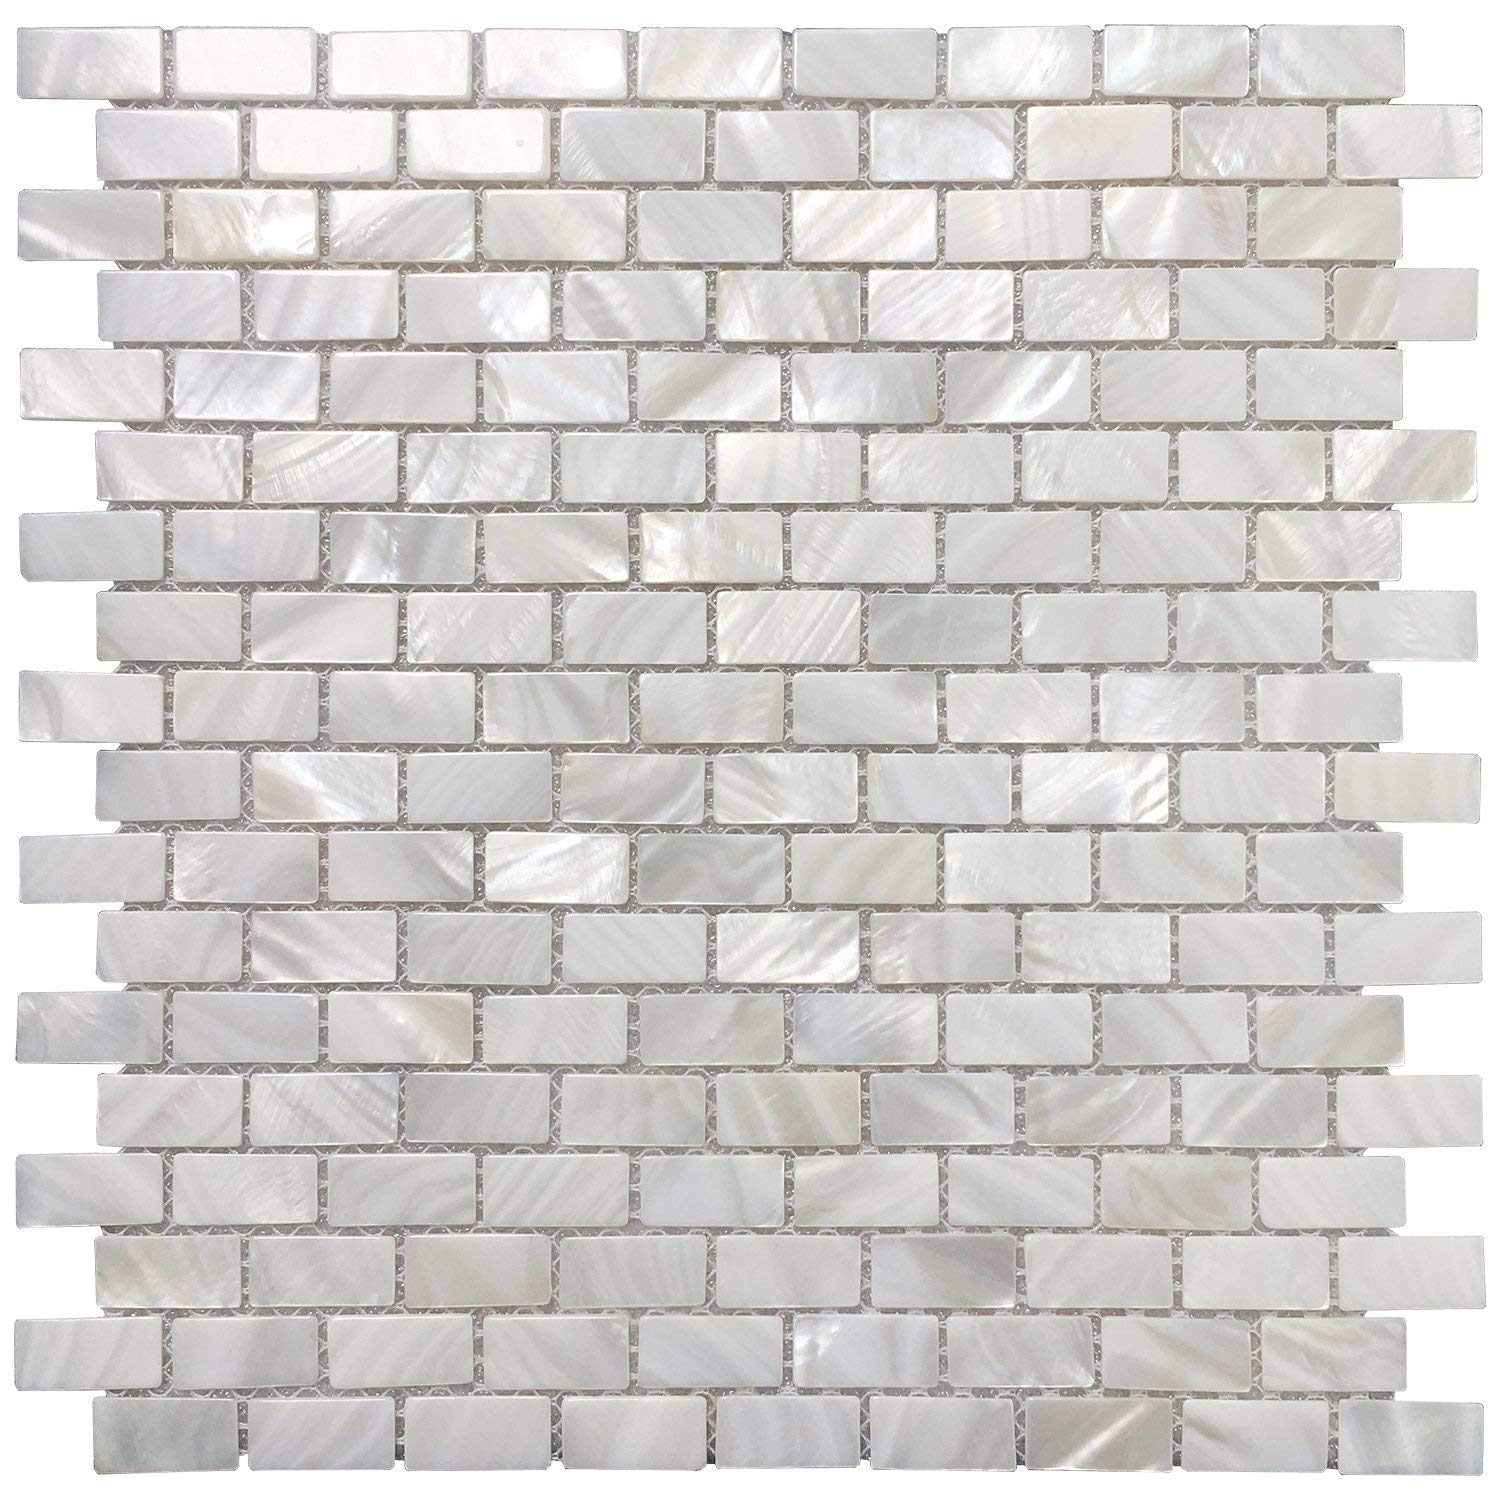
Because it is genuine mother-of-pearl, it is very thin. (Strong, but thin.) I did a few things differently than I might have if the tiles were regular thickness.
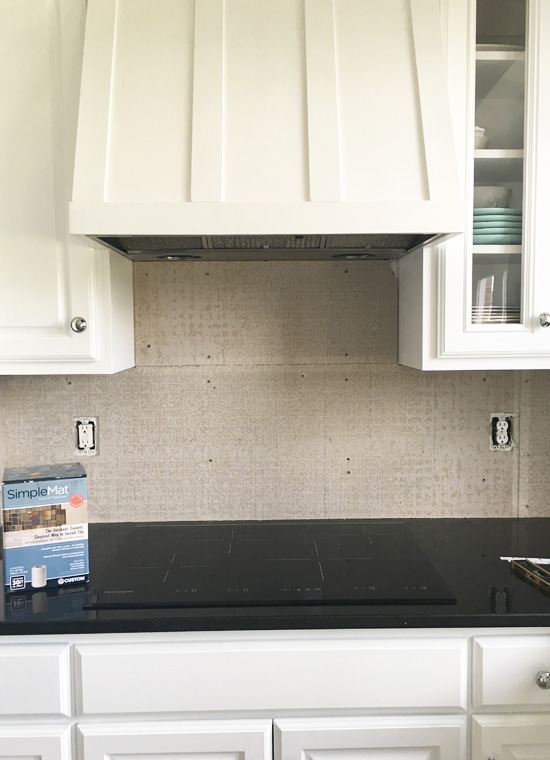
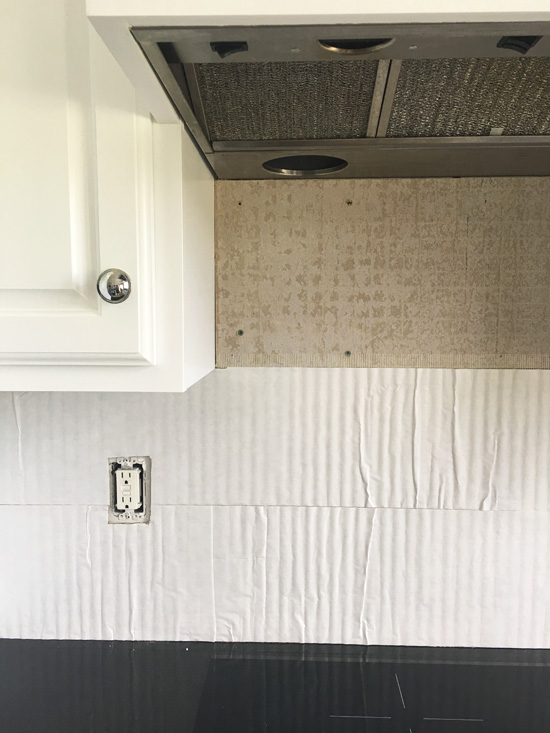
You can absolutely adhere this tile right to your existing wall if it is in great condition. In our case, after removing the 4″ granite backsplash we had originally, there was a small gap between the counter and the wall, and hanging the tile right on the wall would have left too big of a gap to caulk in my opinion. I opted to add a layer of 1/4″ thick HardieBacker cement board to the walls to bring it out enough to cover that gap. It is sold in 3′ x 5′ sheets at the Home Depot. The added bonus of adding the cement board is that it is designed to be mold resistant, which definitely doesn’t hurt.
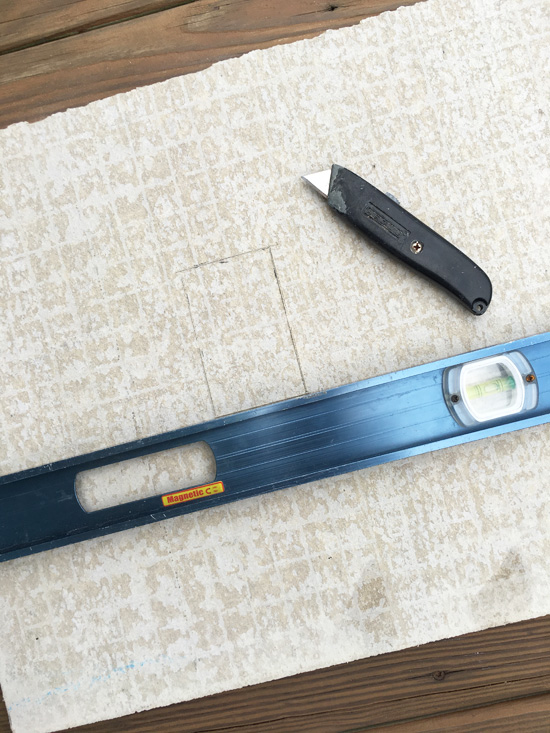
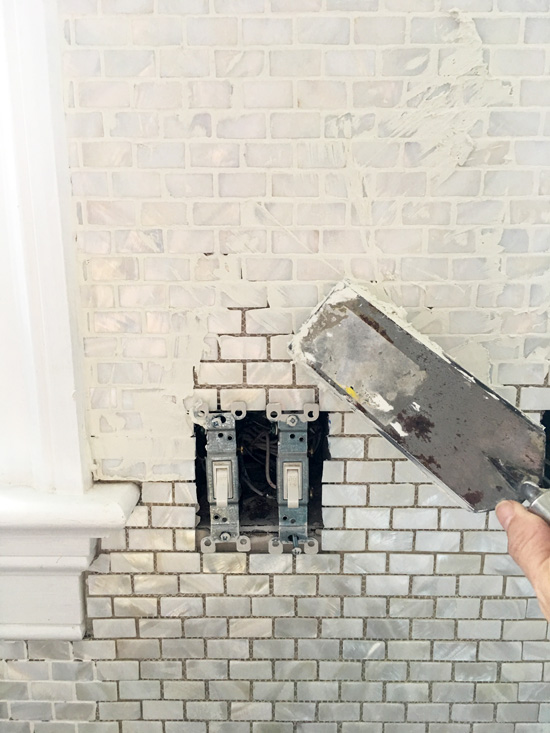
I started by cutting the cement board as needed to cover my walls. It can be pretty easily cut using a utility knife to score it and then breaking it along the score line. I was also able to cut the outlets the same way, by scoring where I wanted to cut it and using a hammer to knock it out:
I hung it by screwing it right into the studs:
To find the studs, you can use a stud finder, or look at the underside of your cabinets to see where the cabinets have been screwed into the wall. That should be a stud. Then measure 16″ from that point and you should find another stud and so on.
Since the screws wouldn’t lay flat enough if I used them where there was not a stud, I opted to secure the cement board in those areas using my nailgun.

I taped the seams with fiberglass tape. It also calls for mudding those seams with mortar, but since I wasn’t planning to use mortar to attach my tile, I skipped that step.
If you’re lucky, you can skip right to this step!
I chose not to use mortar because the tiles were so thin that I imagined it to be a big mess if I used mortar to attach them to the cement board. Instead, I opted for this product:
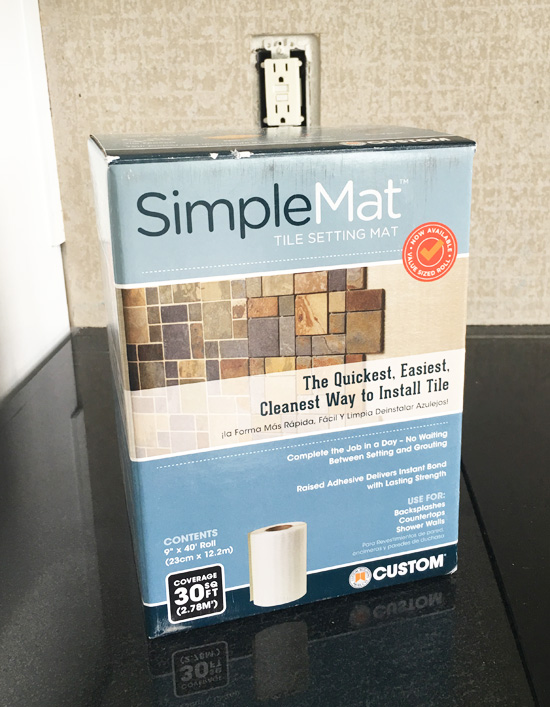
This was super easy to use and saved a lot of mess! It is adhesive on both sides and basically you stick it to the wall, peel off the backing, and stick your tiles on it.
Here it is going in:
It comes in a roll or in small sheets. I used a little of both. The roll made it really easy to hang these long pieces. I continued butting the pieces together until all the walls were covered.
I peeled off the backing as I was ready to hang each section of tile. Then the tile just sticks right to it:
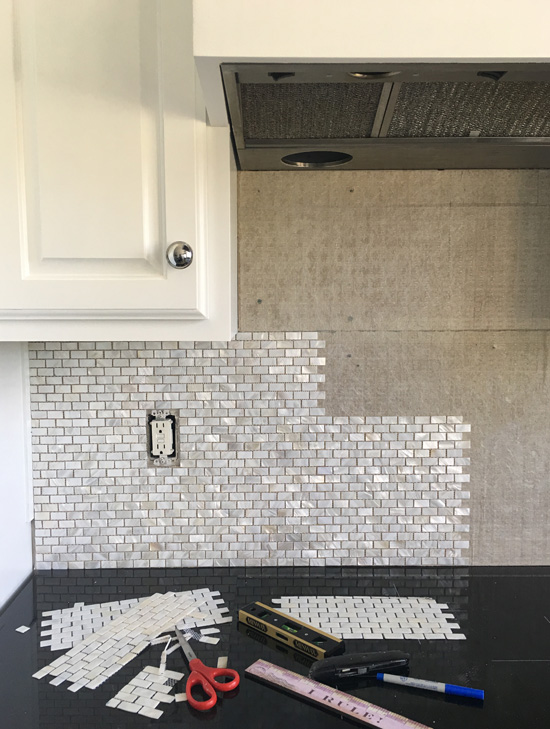
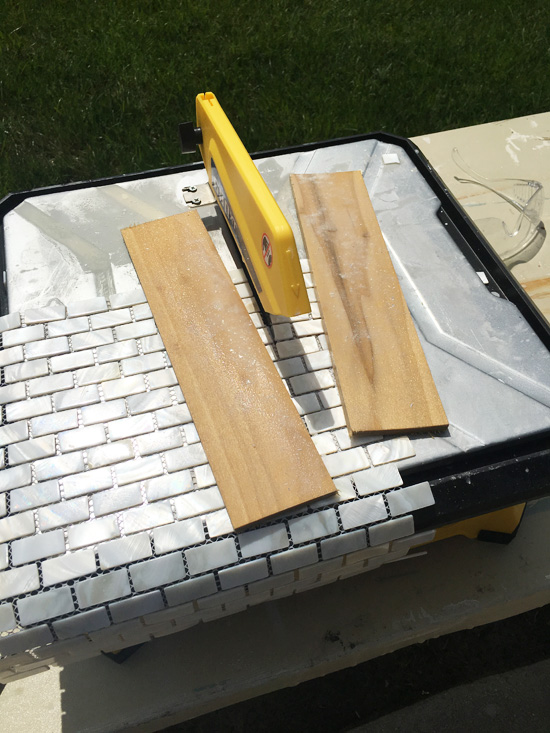
I started here and worked my way to the right, using my level to be sure it was straight. I used two methods to cut the tiles. The first is our tile saw. Because the tiles are so small, I used two pieces of scrap wood to help guide the tile through the saw:
I also used glass tile nippers:
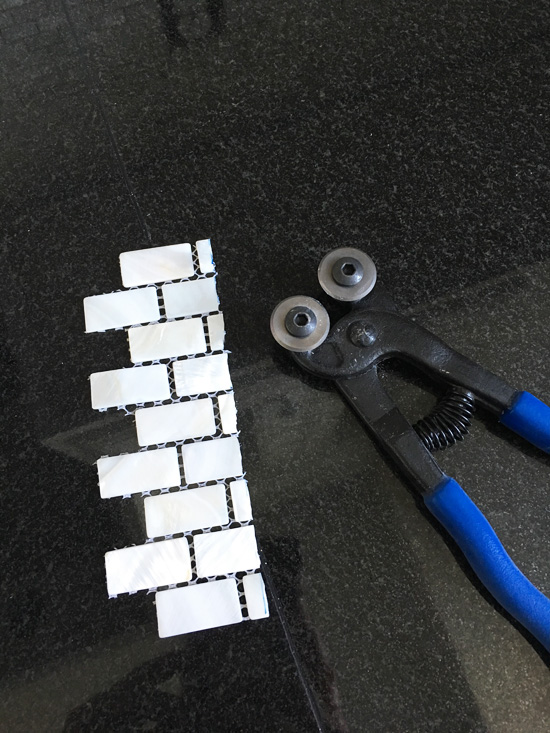
These worked great. You could probably install this tile using only these if you needed to, as long as you wear gloves to protect your hands. If a piece is cut wonky, just pull it off the mesh and replace it with a better piece.
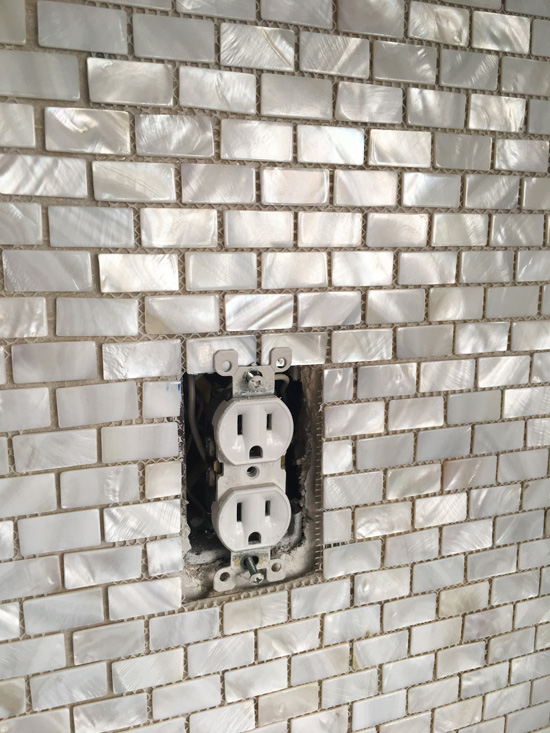
The nippers worked great for the pieces around the window detail as well. (See next photo.)
There is no need to let it cure like there is with mortar, but I did find that the longer the tile was attached to the Simple Mat adhesive, the harder it was to pull off, so I let it sit overnight.
Then I gathered my supplies for grouting:
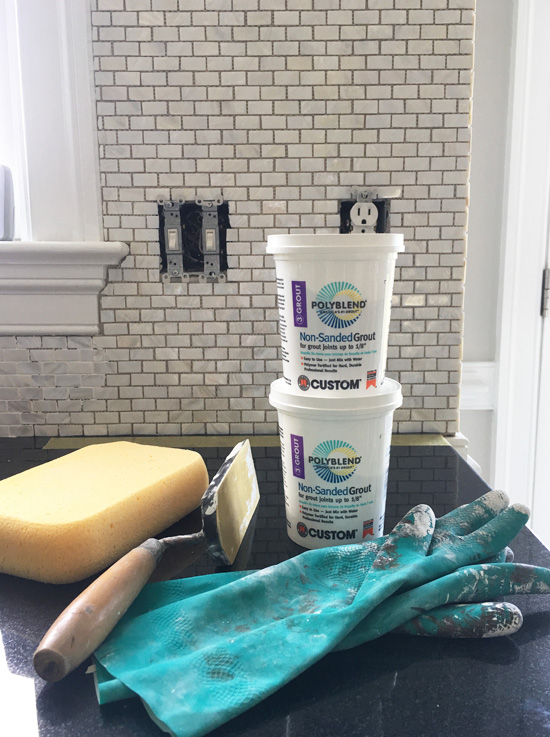
- non-sanded grout (I used Bright White)
- sponge
- gloves
- grout float
- water
I used non-sanded grout for this tile as sanded grout would scratch my beautiful tile. (Non-sanded grout can be used in joints under 1/8″.) It is available in a 10 lb bag or these 1 lb tubs. I found mine at The Home Depot. The 10 lb bag is much cheaper, but I started with a couple of these so I stayed with them. I ended up using four total. If I were to do it all over, I would buy the larger bag and mix it in a five-gallon bucket with a mixing paddle for my drill.
I followed the mixing instructions on the container, letting it sit for 10 minutes after mixing, then mixing one more time before using. Then I spread it on the tile and into the joints with my float:
It is suggested not to apply more grout than can be cleaned within 30 minutes of firming. I let each section set up for about 10 minutes or so before going back over it with my damp sponge. Use as little water as possible as too much water can weaken the joints. Again, follow the instructions on the grout label.
Let it sit for two hours and then use cheesecloth to remove any haze.
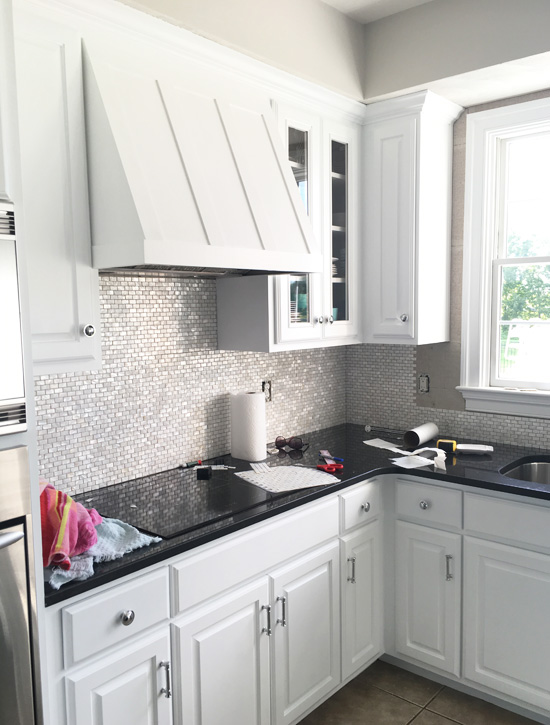
The tile took on a whole new look after grouting:
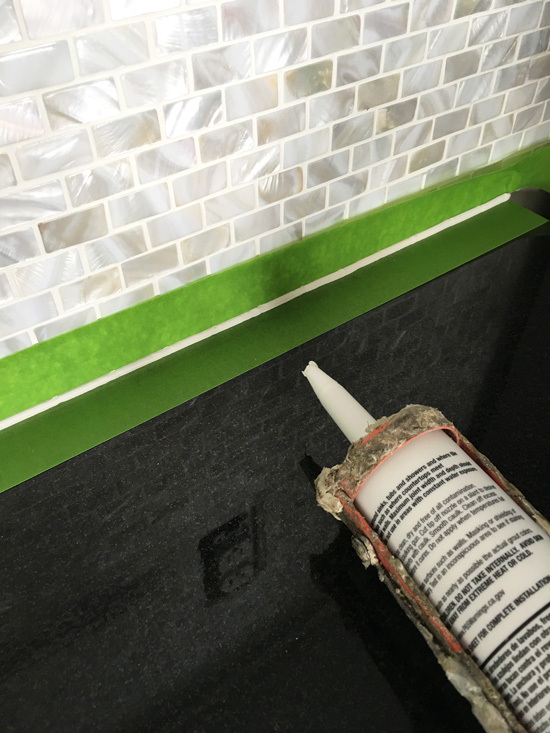
The next step is to caulk any seams. Here is what you’ll need:
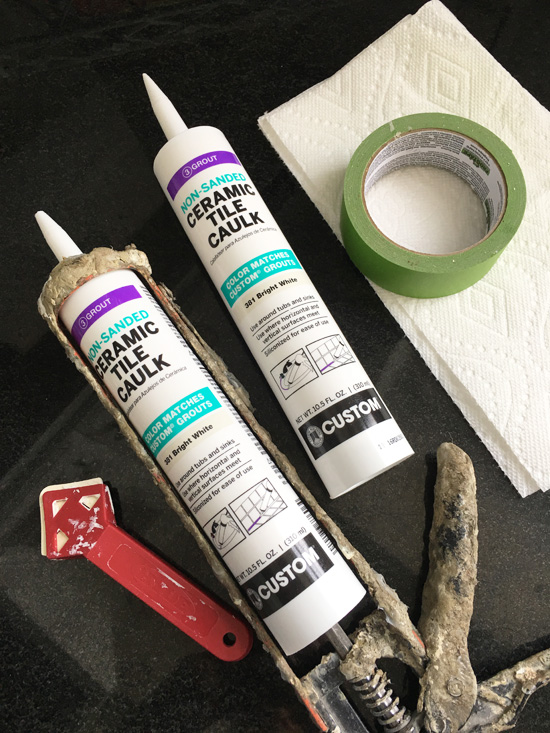
- Tile caulk
- Caulk tool
- FrogTape
- Caulk gun
- Paper towel to wipe excess caulk from the tool as you go
The same company that makes the grout I used also makes a tile caulk to in colors to match. For the seams where the tile meets the walls and where the tile meets the counters, I chose to use the caulk. It is less susceptible to cracking in those areas.
{UPDATE: This has held up fabulously everywhere except for the area directly behind the faucet. At about the three year mark, that started to break down a bit from all the water. I ended up redoing that section with silicone caulk made for wet areas. }
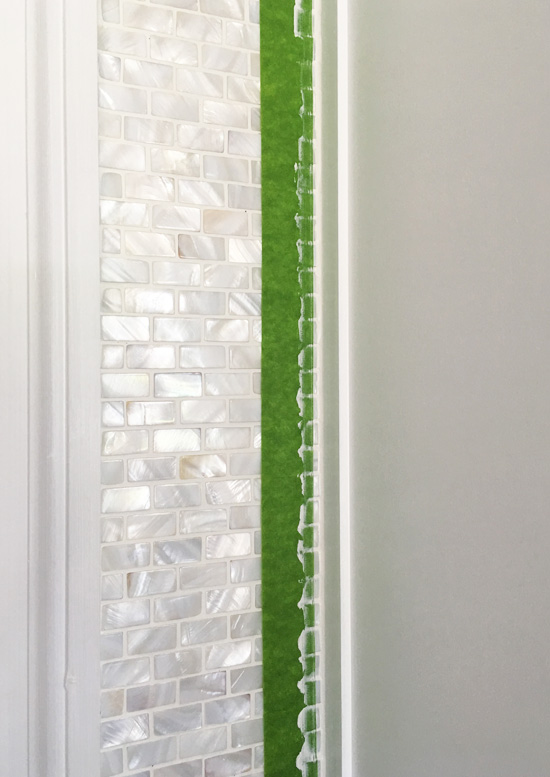
To do this I started by taping off my tile and the counter so that I would get a nice straight line of caulk along my seam:
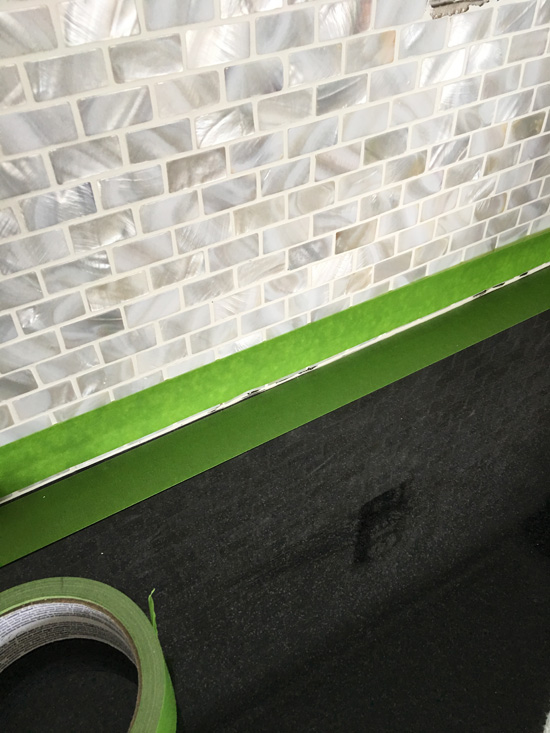
Then I added a bead of caulk:
TIP: To stop the caulk from continuing to ooze out after you release the trigger, pull the release as if you were going to remove the caulk from the gun. It will release the pressure and stop the oozing right away.
I used my handy caulk tool to remove the excess…
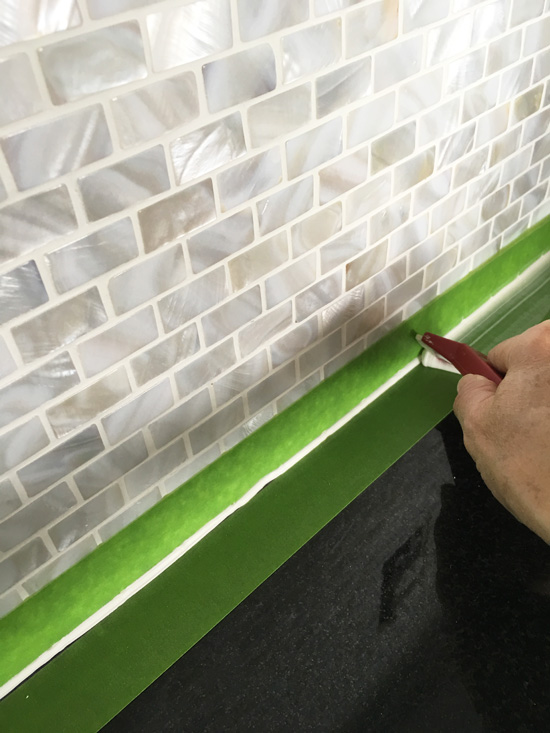
Then I immediately pulled back my tape and voila! A beautiful straight line:
This was especially important since my grout is bright white and our counters are black. This would be a real mess had I not taped it off first.
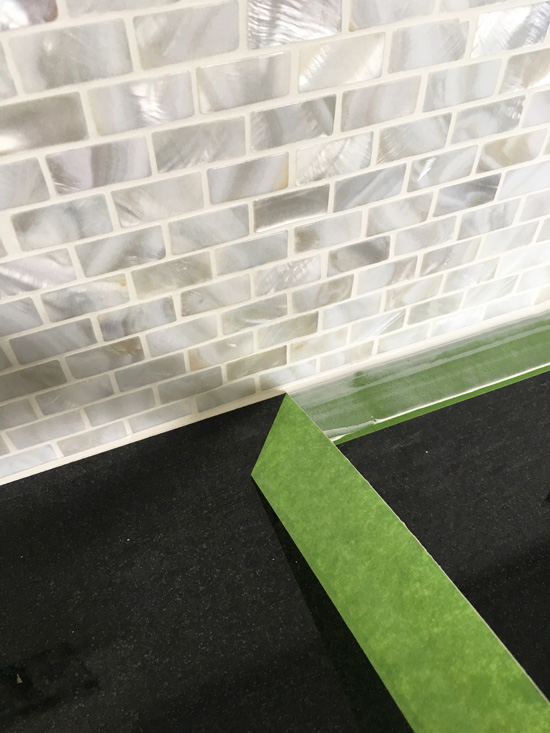
I also used this method along the wall trim for a nice neat edge:
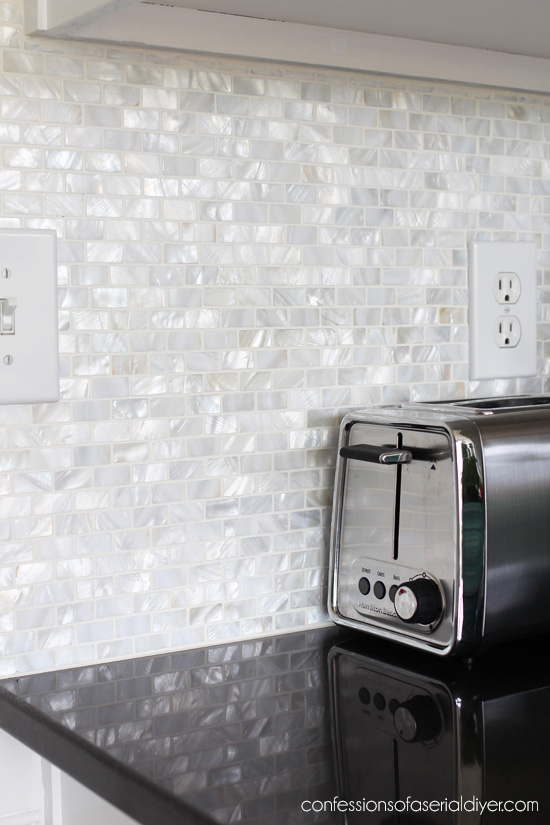
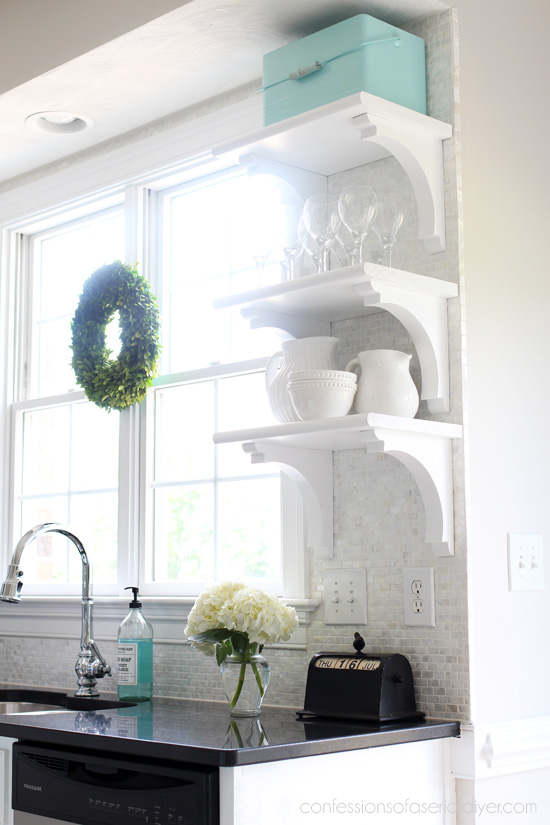
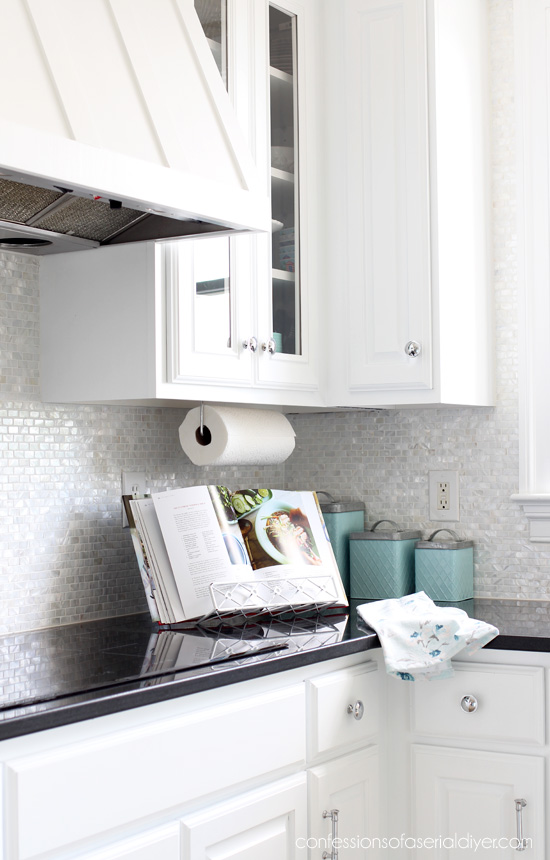
To finish off the edge on the open shelf wall, and to cover the backer board, I chose to run a row of tiles lengthwise along that edge:

The final step is to seal the grout, which I have not done yet. For now, I am enjoying our beautiful new backsplash!
I have done a few tiling projects in the past and this tile was pretty easy to work with in comparison. If a piece didn’t cut right, I could just pull it off and replace it. Very user-friendly!
If you missed any of my other kitchen makeover-related posts, you can find them here:
New Pendant Lights and we have Glass!
Kitchen Island Makeover with Beadboard
Kitchen Makeover Progress: We have paint!
How to Paint Kitchen Cabinets: A Step-by-Step Guide
How to Add Glass to Cabinet Doors
Would you believe me if I told you I had already started another house project?? I’ll be back on Tuesday to share the details! 🙂
UPDATE: Check out what big project we’ve taken on this time HERE!
Have a great weekend!
XOXO,
![]()
Don’t Miss a Thing!
If you like what you see, there are several ways to follow along!
Email * Facebook * Pinterest * Twitter * Instagram


Petra says
You must be so pleased – it’s lovely and bright and white 🙂 And I love those small white shelves too 😀
Christy says
I am…thank you so much, Petra! Looking forward to playing with the shelves for the Holidays! XO
Mary Kaiser says
Wow that looks easy when you show all the steps. It is certainly beautiful. I am looking forward to seeing your next home project. It all looking so amazing!
Christy says
Thank you, Mary! It always helps to see something broken down into steps. Looking forward to sharing our next project! 🙂 XO
Heide says
WOW, Looks stunning. What a beautiful kitchen makeover.
Christy says
Thank you so much, Heide! XOXO
Susan Caldwell says
Thanks for sharing this great tutorial!
Christy says
My pleasure, Susan! XOXO
Susan says
I am absolutely gaga for this tile backsplash. Your kitchen, and the renovation that created it, is at the top of my favorite’s list. I’m so impressed with what you’ve done. Now if I could just make myself realize that I can do it, too.
Christy says
Wow thank you so much, Susan!! I am so glad you love it too! You would be amazed at what you can accomplish when you go for it! XOXO
Christina in SW FL says
Oh my stars, Christy, you did a phenomenal job here! The mother of pearl looks so gorgeous! Gotta love Frog tape! 🙂 YOU turned me on to that and I am thrilled. 🙂
Enjoy your sparklicious kitchen!!
Christy says
Thank you, Christina!! FrogTape is amazing for sure! Have a great weekend…I’ll just be here enjoying my new kitchen! XOXO
Joni says
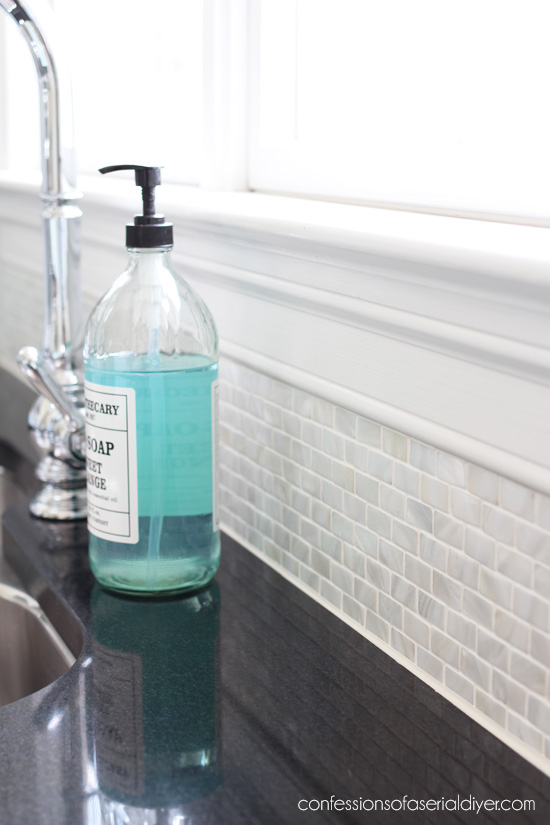
First off – OMG gorgeous! Thanks so much for sharing such detailed instructions! How did you do backer board in the area around the shelves? Did you remove them or piece it in around them? And how is the board not visible in the photo showing the tile in the shelf area (the last photo in the instructions before the overall photos)? And, finally, where did you get that hand soap bottle? It’s exactly what I’ve been looking for! I don’t need the blue soap, altho it’s a beautiful detail in your kitchen, just the bottle. Thanks! I’m so glad I found your blog!
Christy says
Thank you, Joni!! I added the shelves after the tile was installed. Are you referring to the edge…not showing the backer board? I added that row of tiles going lengthwise to cover the backer board. They just barely covered it. I love that hand soap bottle too! I bought it from HomeGoods and it originally had orange scented soap in it. When it was empty I refilled it with soap to match my kitchen! 🙂 XOXO
Joni says
Ohhh I see it now! Sorry my question wasn’t clear – I was typing on my phone and left out some of my question. I totally didn’t notice it the first time that the tile “wraps” around the backer board Great idea! And yum, love orange scented soap. Honestly, I thought you bought clear soap and colored it because it matches your other blues so well lol. I guess that wouldn’t make sense, though, since it would then stain people’s hands – duh. Thanks for answering!
Christy says
Ha ha yep! And the orange scented soap was awesome… then I found a refill bottle of dial in my color lol! XO
Kellie says
I absolutely love your kitchen. It turned out beautiful!
Christy says
Thank you so much, Kellie!! XOXO
Jo says
Wow…your new backsplash is just beautiful! Thank you for sharing the detailed instructions and product sources, Christy. I am very impressed with the results of your kitchen makeover!!
Christy says
Thank you, Jo! I am glad to share! XO
Betty Messer says
Awesome tutorial Christy with great tips! I am not familiar with Simple Mat but it looks like it was easy to use and is a real time-saver! Thanks for sharing and I love your blog! Keep up the great work!
Christy says
Thank you SO much, Betty!! Simple Mat was new to me as well, but it seemed easy to use. More costly for sure, but much cleaner to work with! XOXO
sharon says
Stunning, love the mother of pearl. Thanks so much for the mini tutorial. How is the Simple Mat working out? I’ve read mixed reviews but have had mastic fail too which is far more disastrous since it ruins the tile. It’s great to know there may be a viable alternative.
Christy says
Thank you, Sharon! I am in love with this backsplash. The tiles are really thin, so I think the Simple Mat worked great for these tiles! So far so good! XOXO
sharon says
Christy, It’s good to hear how well it’s holding up. I’ve been considering installing a similar backsplash in my kitchen but have been very intimidated. This seems far easier than mastic and with far better results.
Christy says
Yes, I found it very easy to work with, and less mess for sure! 🙂
Marcie Lovett says
That kitchen is just magnificent, Christy! Yes, I do believe you’re already onto another project and I can’t wait to see what it is.
Christy says
Aww thank you, my friend! And ha ha you know me well! Excited to share our next project! XOXO
sharon austin says
That’s an awesome tutorial; I have an ugly formica backsplash I’ve been wanting to get rid of and had no idea how to go about it; I think this could work & it’s something even I could do myself! You give me HOPE, girl and for that, I thank you!!! LOL
Christy says
Thank you, Sharon! This could be a fantastic solution for you, and you can totally do this yourself! XOXO
Jackie C says
THIS! The details you take the time to give your readers, is what sets you apart from ALL the rest! And also why you are the only DIY blog I subscribe to. Your backsplash is ❗️GoRgEoUs❗️Thank you ????
Christy says
Aww you are SO sweet, Jackie!! Thank you! You know I love to share ALL the details! XOXO
gwen says
what a wonderful choice choosing Mother of Pearl – it looks spectacular against your black countertops!
the one thing I plan on doing (WHEN I manage to redo our kitchen!) is to move the outlets under the bottoms of the cupboards so they aren’t on the backsplash. we have so few appliances that we use the outlets for and I think it’ll be a much cleaner look.
Christy says
Thank you, Gwen! I love the idea of moving the outlets…I didn’t even know that was a thing. Genius! XO
gwen says
hi Christy! I’m not sure outlets at the bottom of cabinets IS A THING! it’s just an idea that I’ve had. the boxes will take up some space in the cupboard, so not sure how it’ll work. but it’s worth a shot! Loved looking at this post all over again. It’s absolutely gorgeous and now I’m looking forward to your landscaping project!
Christy says
Thank you!! I think your idea is great! XO
Lizzy Leff says
Fantastic work! Thank you for posting the step-by-step. It may come in handy one day. You picked the perfect backsplash for your kitchen. Beautiful!
Christy says
Thank you, Lizzy!! I figured I better share it before I forget how I did it lol. XOXO
Debbie in TX says
This was a very interesting post. Thanks for sharing your methods with us. When we installed a new backsplash in our laundry room, we used the same tile adhesive mat and grout, and it worked like a charm. Makes the job quite easy, and it has held up well so far. I really am loving the shimmery mother of pearl in your kitchen.
Christy says
Thank you, Debbie! I loved working with the Simple Mat too…so much less mess! XOXO
Shelley says
I have really enjoyed reading about your kitchen renovation, and this one was perfectly timed since I am about to do a kitchen backsplash. Yours is just beautiful!
I do have a question though – – I love the open shelves that you have in your kitchen. Did I miss the segment where you told how you attached them?
Did you attach your shelves first and then tile around them, or did you tile the backsplash first and then put the open shelves on top?
You have done such a beautiful job!
Christy says
Thank you, Shelley! It has been fun for me to share the process as well! I installed the shelves after I installed the tile. I had located the studs prior to hanging the tile and marked them with tape on my countertop. Luckily there were studs right where I needed them. (If not I would have had to use anchors.) After the tile was hung, I was able to mark where I wanted my holes to be, predrill with a drill bit, and then screw my screws in between the tiles. I doubt I’ll ever remove the shelves, but if I want to in the future, I just have to regrout where the screw holes are. Hope this helps! XO
Jennie says
Another win! This is absolutely beautiful from top to bottom. It just brings everything together and is just the right amount of bling! With the bonus of really easy to follow instructions.
Thanks for sharing!
Christy says
Thank you so much, Jennie!! That shimmer really sold me on this tile! XOXO
Lisa Johnson says
WOW!!!!! Your backsplash turned out absolutely gorgeous! I love mother of pearl, too, and am so glad to read about the new adhesive roll method of sticking the tile to the wall. I have seen it in stores for a couple of years, but hadn’t seen or heard of anyone actually using it yet. Thank you for your post. I’m definitely going to incorporate some form of shell backsplash in my next home!
Christy says
Thank you, Lisa!! Yes that adhesive worked fantastic for this project! It is pricier than regular mortar, but so much less mess! XO
Robyn Wright says
**Sigh** I have no words….stunning!
Christy says
Aww thank you, Robyn!!!! XOXO
serena grace says
backsplash is wonderful love it thank you
Christy says
Thank you, Serena! XO
Margie says
You make it look so easy,was always afraid of tile……well I have a large wooden tray in need of a makeover going to try it thanks for great break down. Who knows might lead to larger projects.
Christy says
This tile was not intimidating to work with at all! Good luck on your tray!! XO
Linda G says
So impressed with your entire kitchen. Beautiful. Wondered if you were able to move the sheets of tile once they were put on the mat?
Christy says
Thank you, Linda!! I did have to pull a few pieces back off here and there and you can get them off, but they are on there pretty good! XO
Melinda says
Nice job! One question remains with my husband asking:..How were you able to cut the tile where the electrical outlets are? Any way it is amazingly beautiful!
Christy says
Thanks, Melinda! I used the glass tile nippers you see in the post to cut the tiles around the outlets. XOXO
MaryJean says
That Frog Tape sure makes getting a straight line easy! Gotta love it! Your kitchen looks fantastic!
Christy says
It sure does! love that stuff! Thanks, Mary Jean! XOXO
Alicia Cannon says
Looks beautiful! You mention that you removed the 4” granite backslash. Have you previously posted about how you did that and how the countertop looked underneath the removed piece?
Christy says
Thanks, Alicia! I did not post about it on its own, but did mention it in a previous post. I had a hard time removing the piece that was against the cabinet that houses the oven, so I used a heat gun to help melt the adhesive and then pried it off with a pry bar. The rest of the granite backsplash that was attached to the wall came off quite easily with just a little bit of prying with the pry bar. The counter looked perfect underneath except there was a silicone caulk strip that I had to remove. I used a straight razor blade to scrape it right off really easily and that was it! Unfortunately the counter under the piece that was next to the oven had a piece cut out of it that was covered by the backsplash, but too big not to recover when we were done, so we added that one granite piece back.
Janice says
Gorgeous!
Christy says
Thank you, Janice! XOXO
Denise Cartiglia-Alberti says
Sooooo AWESOME!! It looks absolutely fabulous!! You are a true inspiration to women – you demonstrate that we can do anything men can do – I’m so impressed with your skills that I may just try to tile something in my own house. Thank you so much for the best tutorial I’ve ever seen online (or even at Home Depot) You have a true gift for teaching.
Christy says
Your comment totally made my day, Denise, thank you SO much!! We can absolutely do anything we put our minds to! I love to share in hopes that it will inspire others to tackle projects they never thought they could!! XOXO
Donna says
The whole kitchen is gorgeous! Love the tip about caulking…perfect line.
Christy says
Thank you, Donna!! I saw the guys who installed our glass shower doors in our last house do that with silicone. So smart! ????
Becky says
Fantastic! I like the way your tile choice is still white and able to be decorated with a new look anytime you want, but unique, not just plain. It has sparkle! Nice tutorial here!
Christy says
Thank you! I too like that it is still neutral but unique! 🙂 XO
Tyler Carley says
Hi Christy. I love the way your kitchen is turning out it looks gorgeous! What type of tile did you use (like the brand) and where did you purchase it from? I’m loving the color/look, and I’m actually getting ready to redo my countertops and backsplash. I’d love to hear before I get started!
Thanks!
Tyler
Christy says
Hi Tyler! Thank you! I included a link to them in this post…I found them on Amazon! XO
Lyn says
It’s beautiful!!! Great job, but what did you do about the wrinkles in the Mat?? Would they make the tile stick out or did you flatten them somehow??
Christy says
Thank you, Lyn! There were no wrinkles in the mat; that was probably the paper backing you saw that I removed prior to hanging the tile. Simple Mat made it so much easier to hang! 🙂
Jennifer says
Hi Christy,
Like yourself we had a four inches (of 6 x 6 beige) backsplash the we had taken out when replacing our same countertop with quartzite.
I’m (I say I am because Hubby is not a fan) considering the same exact MOP backsplash for our kitchen, but hesitating for a couple of reasons:
1. I love everything fancy, but wanted to know if the MOP is too
modern/overpowering/feminine looking – so much so that I will tire of it in a
couple of years?
2. Will the fact that this tile is much thinner than the average tile, create issues OR
make it look cheap when installed (all the pictures I’ve looked at make the tiles so
stunning, but not sure if ‘real life’ holds the same status).
3. How did you accommodate for the outlets? I ask because when our original
backsplash was removed, the metal outlet boxes are sticking out and we are
not sure how we can accommodate that with this tile being so thin. Did you
experience the same, or did the backboard take care of that issue if you did?
4. If you didn’t have that gap between your countertop and the wall, would you still
have used backboard or skip it? (I’m asking because I’m not sure due to the tiles
being so thin if the wall behind it has to be perfectly flat for an even and leveled
install.
Sorry for all the questions. Your Kitchen looks STUNNING!
was removed
Christy says
Hi Jennifer! Thank you! So here’s my two cents for what it’s worth…I absolutely LOVE this backsplash and so I had no hesitation when I was deciding on it for our kitchen, but I did order just one box first to be double sure I would like it. I taped up several sheets and then stared at it for a day or two and I was sold and so was my hubby. I recommend you do the same. I probably would still have added the backboard, which was not that hard to install at all btw, because like you, I did not want our backsplash to look cheap and thin…mostly on that one side where the wall ends to the right of our sink. You would have seen how thin it was had I just adhered it to the wall, but the backboard gave it a bit more depth. These tiles are thin, but strong…they are only thin because genuine mother of pearl is not thick. They look even more amazing in real life, I promise! The backboard should help with your outlet issue as well. And the backboard I used is mold and mildew resistant so if for any reason, water got behind the tile, I wouldn’t have a big mold issue to contend with. I hope this was helpful…good luck in making your decision! XO
Jennifer says
Gosh thank you for the speedy, and detailed, response back Christy! I did order two different colored samples a couple of weeks ago. One is identical to yours and the other one is much lighter (it’s the grout less MOP). It’s very difficult to tell how the full space will look with just two 1/3 samples. I, personally, prefer the grout less (whiter/lighter colored), and hubby prefers the same one you have installed in your kitchen.
We are also looking to do the same as you have with the under cabinet hood. We took out our over the range microwave a couple of months back and have been searching for a slim under cabinet hood, with lights and control buttons underneath, so we can build a wood hood for and have been having a difficult time finding the right one!
Thank you again for the response. Your designs are fabulous!
Christy says
You are welcome! Good luck to you with your kitchen! 🙂
Alida Gorizzan says
Hi there, I am almost ready to install mine. Question, could you let me know what colour of grout you used, and possibly what colour your kitchen cabinets are? Thanks!!!
Christy says
Hi Alida! I used Bright white non-sanded grout. You can find it here: https://amzn.to/2olH5lN and at Home Depot. The paint color we used for the cabinets is Behr Ultra Pure White in a satin finish, right off the shelf. XO