Amazing friends, welcome back! Do you love a distressed finish, but don’t love the sanding part? Today, I’m sharing a super simple way to achieve a fantastic distressed finish by layering paint instead!
This is a piece that one of my best friends gave me back in the Fall:
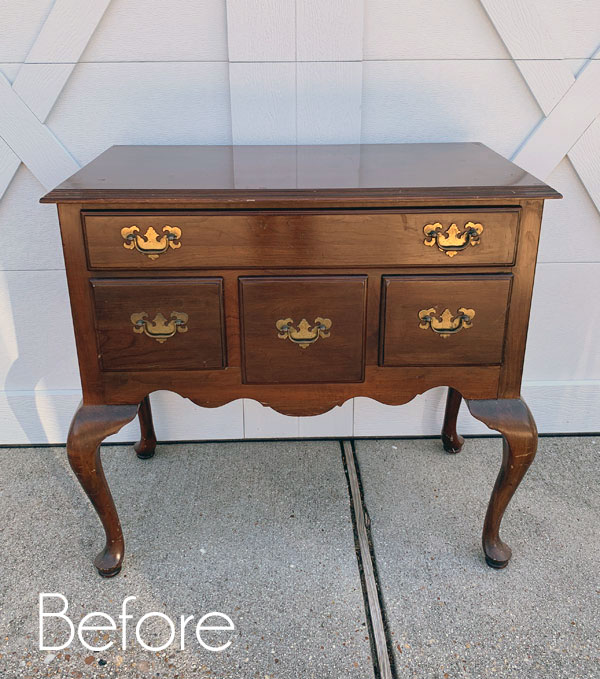
I didn’t exactly know what to call it, but thanks to Ellen and Rebecca for letting me know it is called a low boy! I can totally see that now!
My friend dropped this off when she dropped off this cabinet to paint for her. It’s Ethan Allen and in great shape aside from a couple of small blemishes on the top.
After painting this frame that I shared in my Painting the Smalls post on Thursday:

I had a request to show more about how I did it, so I thought this lowboy was the perfect candidate for a layered distressed paint finish! I’ve included a few affiliate links so you can find the products I love.
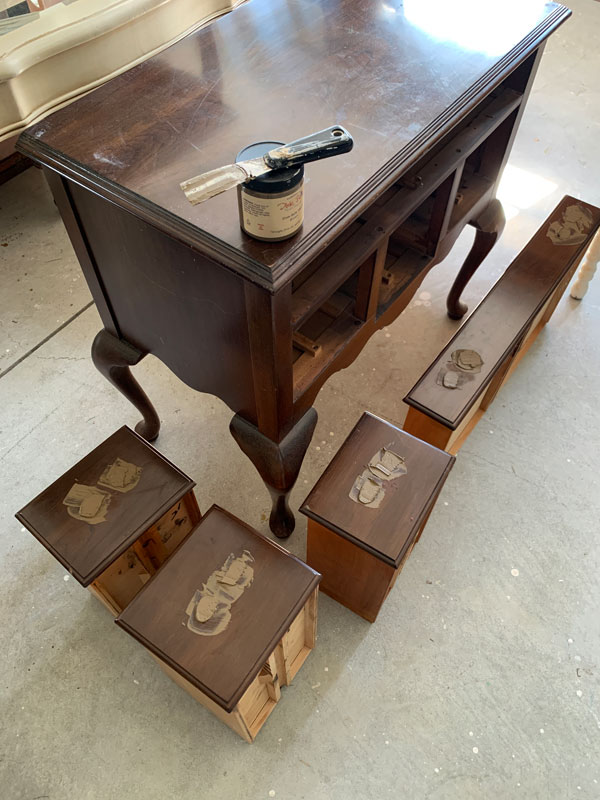
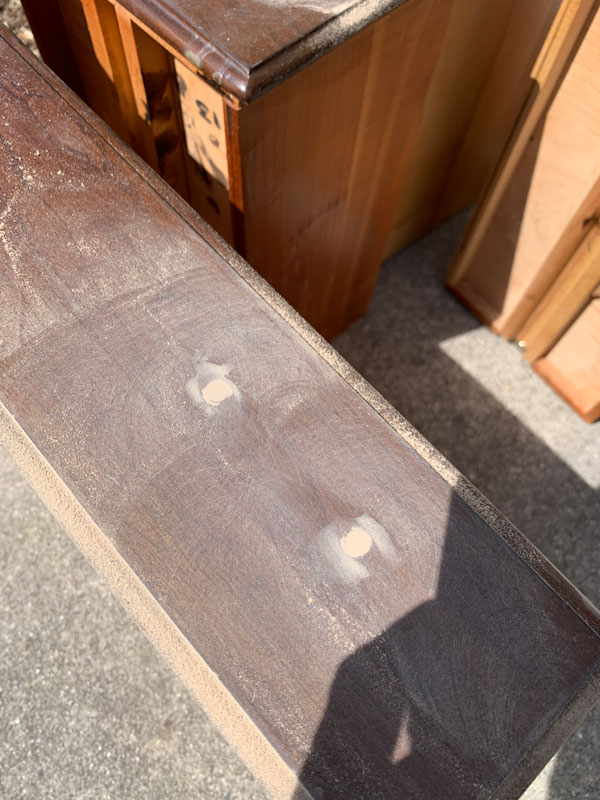
I started first of all by filling the holes where the old hardware was using Dixie Belle’s Mud in brown:
Don’t rush this part. I let this sit overnight so that it could dry all the way down in the holes. When I sanded the next day, the filler still wasn’t flush with the rest of the drawer in a couple of places, so I added a small amount more and let it dry in the sun for about an hour.

When I sanded it smooth with 220 grit sandpaper, it was completely filled and smooth:
How to Layer Paint for a Distressed Finish
Once I vacuumed up all the dust with my shop vac and gave all the pieces a final wipe-down with a clean soft cloth, I was ready for paint.
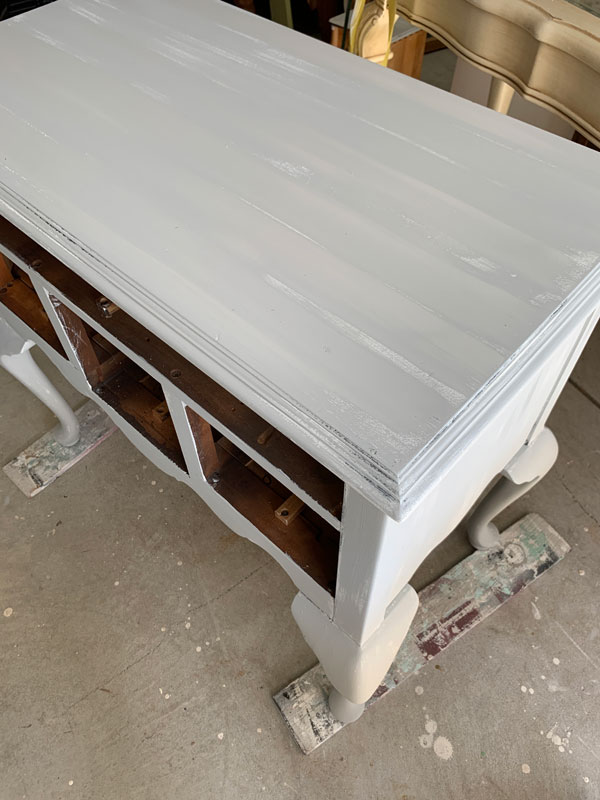
I gave everything one coat of Dixie Belle’s Cotton, leaving some of the wood to show through in several places:
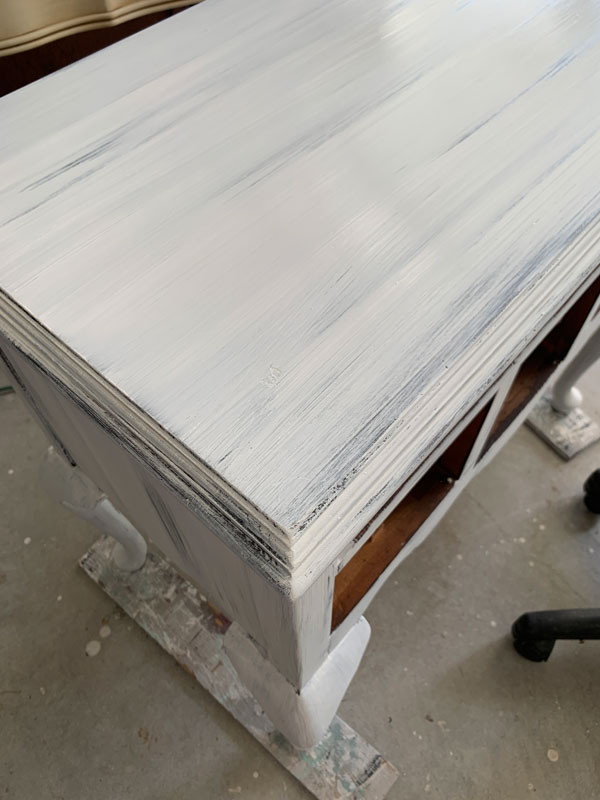
I still painted in nice, even strokes, moving from one edge to the other without stopping, but I was purposely leaving areas unpainted.
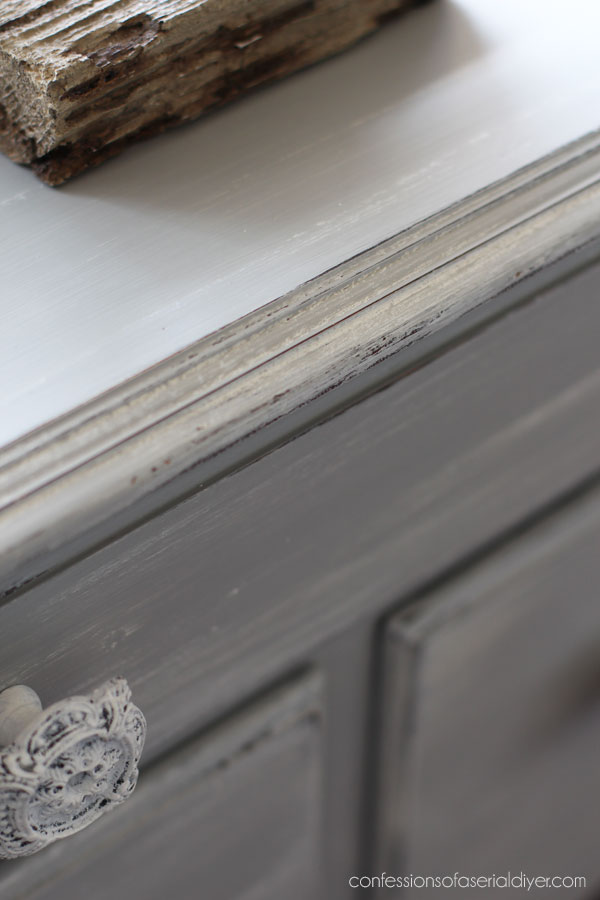
When that was dry, I followed up with a 50/50 mix of Dixie Belle’s Manatee and Cotton:
I also made sure not to completely cover the white or the wood areas that were peeking through.
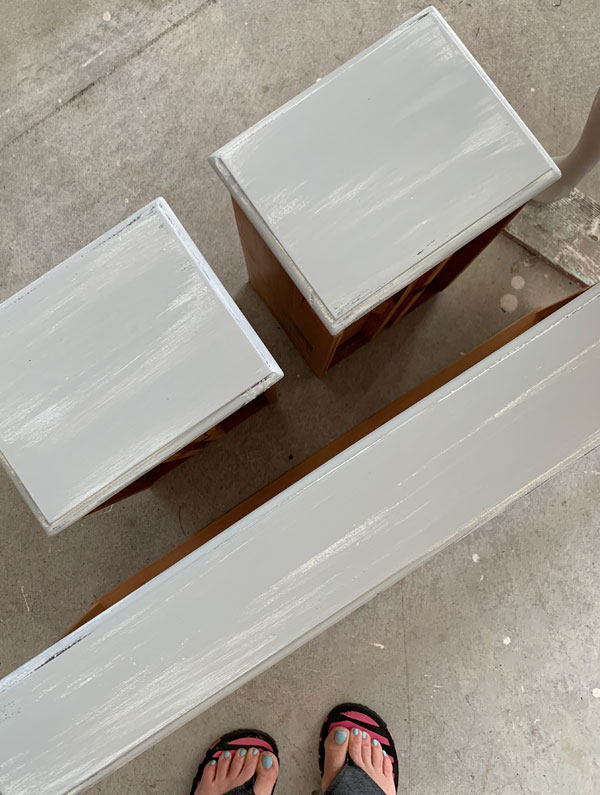
Then I used 220 grit sandpaper (wrapped around an old sanding sponge) to sand all the surfaces.
I pulled out my shop vac once again to clean up all the sanding dust, and sealed with Dixie Belle’s Clear Coat in Satin, using their blue sponge applicator.
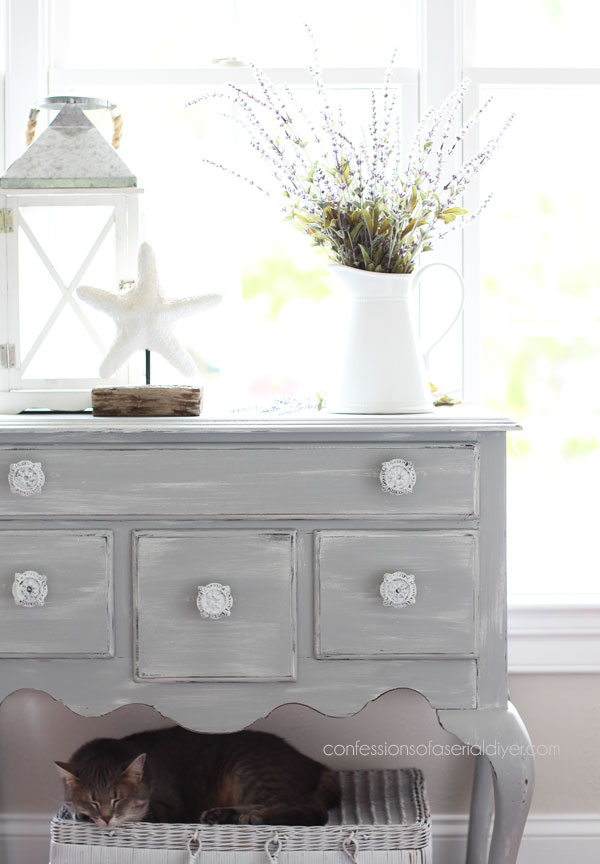
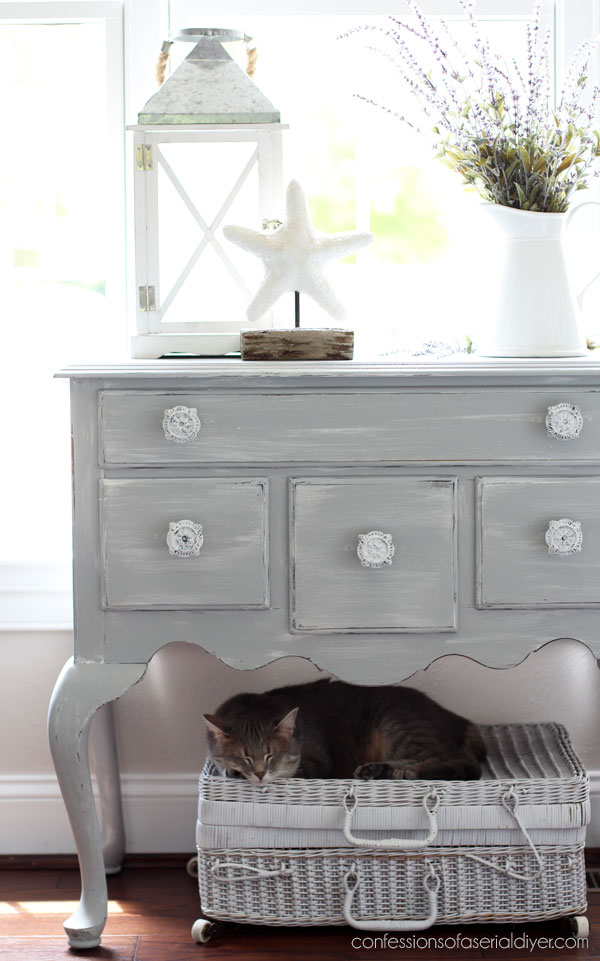
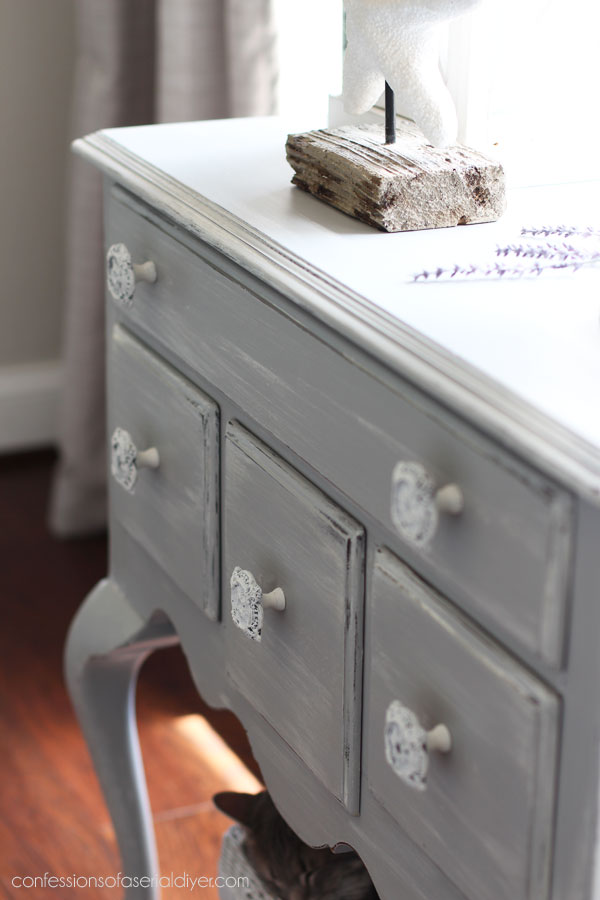
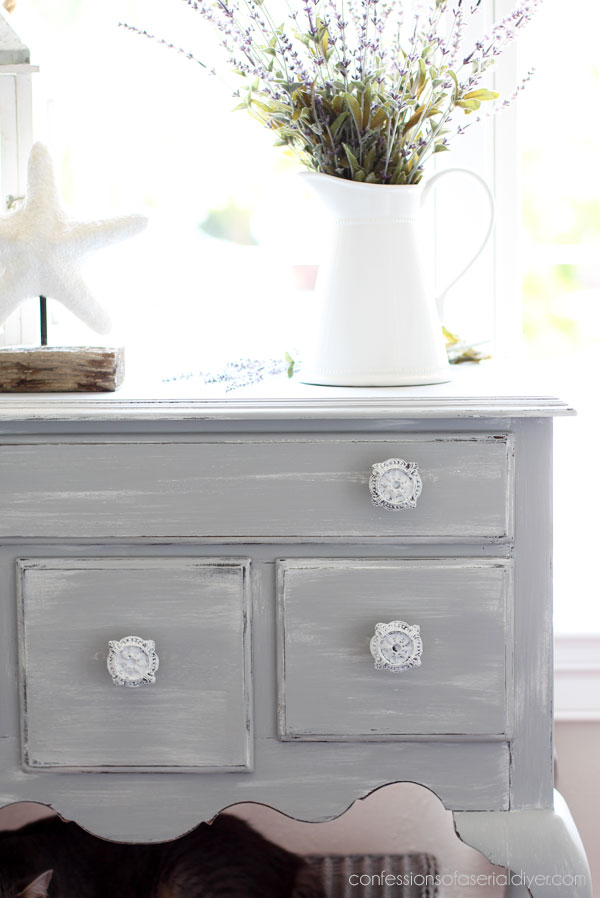
And here is what it looks like now!
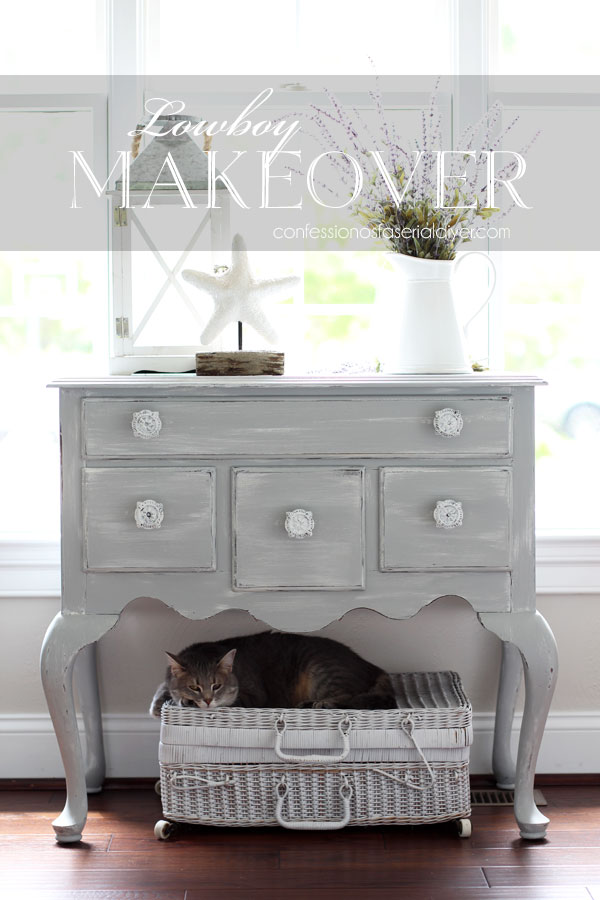
Instead of sanding back the paint, I just didn’t cover the previous layer completely! Can I hear it for LESS work??
And look at my sweet girl! Lyla follows me around everywhere, and she jumped up on this basket the second I put it there…like I did it just for her!
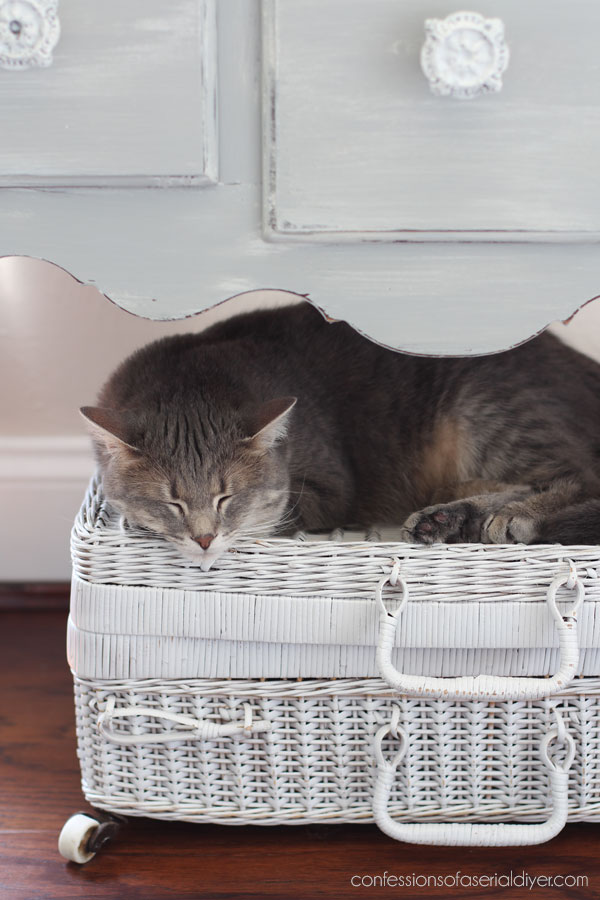
I love this relaxed look…it gives this piece a coastal vibe.
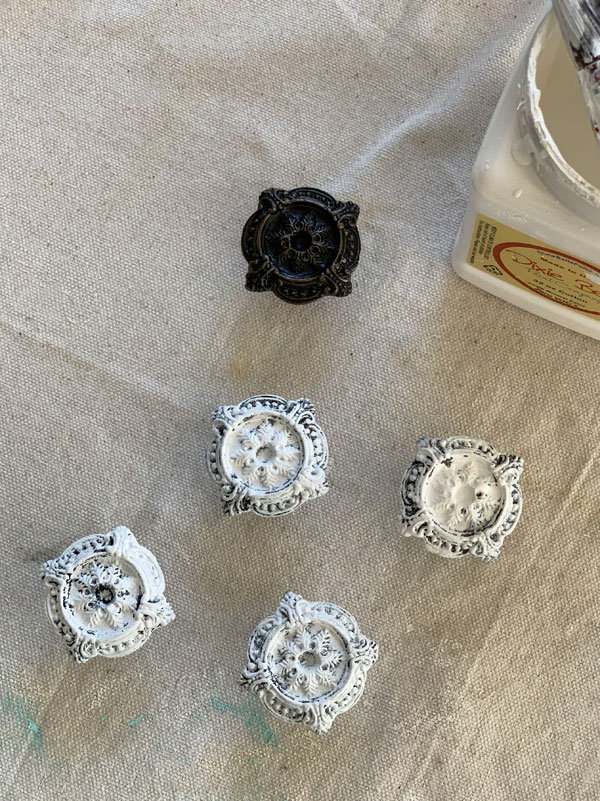
I found the knobs at Hobby Lobby early this year. I painted them with two coats of Cotton, leaving areas unpainted on these as well:
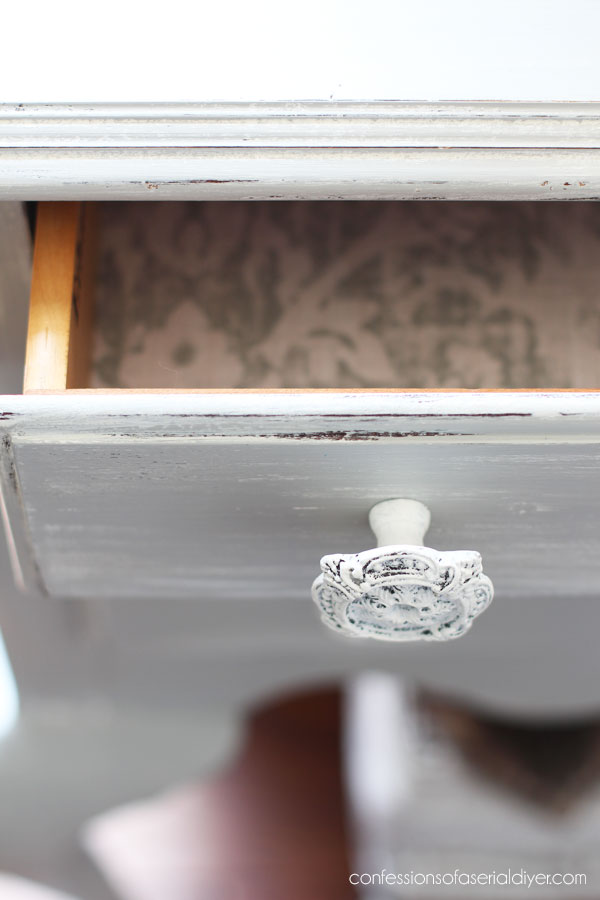
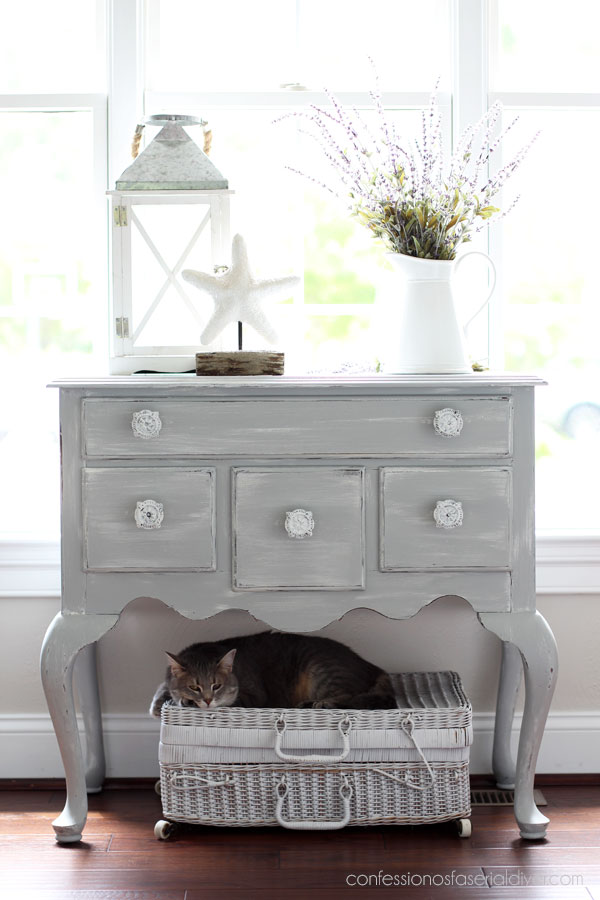
The top drawer got some pretty fabric:
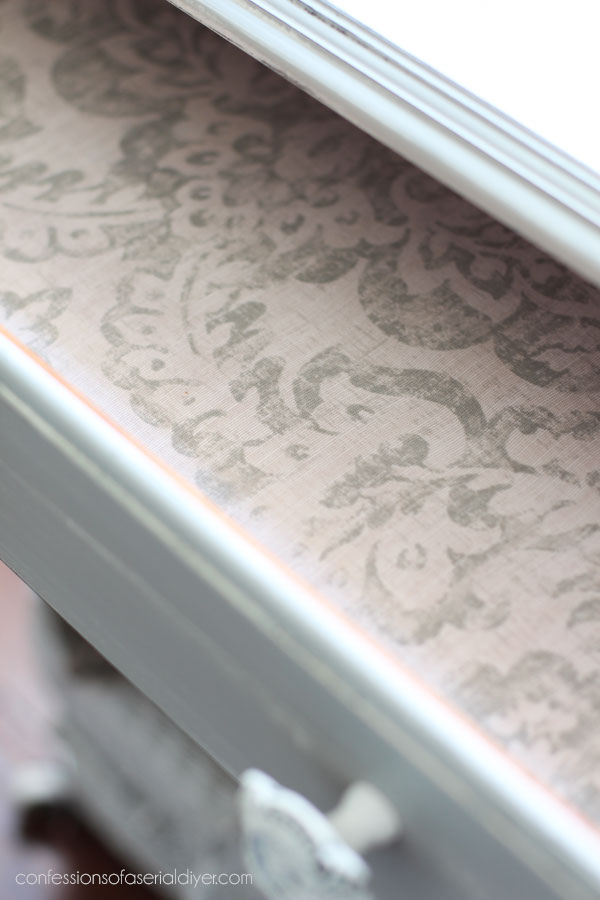
You can see how I line drawers with fabric HERE.
Here’s a closer look at the layers…
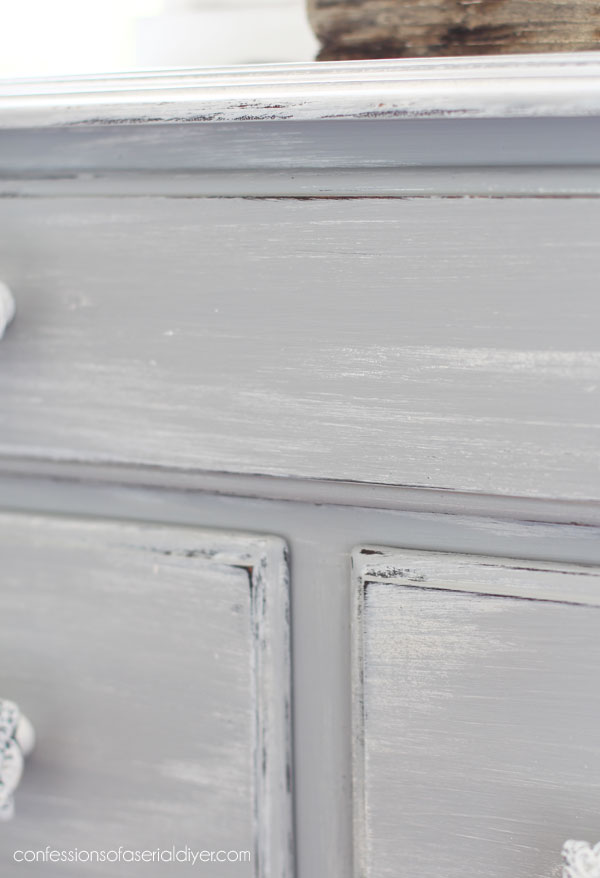
You could get an even more distressed look by leaving more of the original wood finish showing, or by using a lower grit sandpaper like 100-150 to sand after.
This was pretty quick and easy to do!
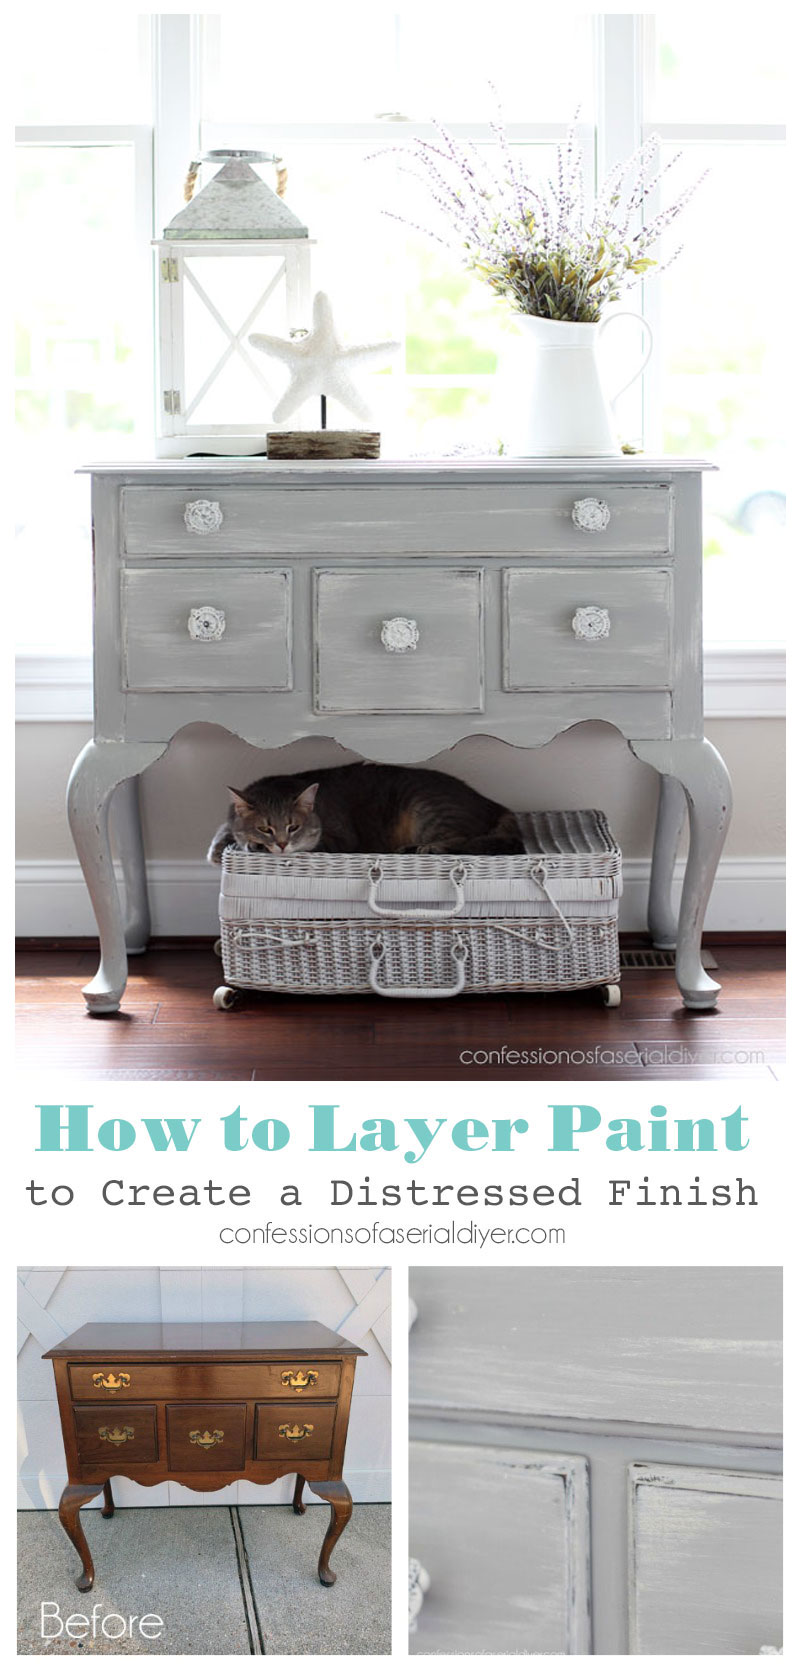 I hope you enjoyed seeing this layered paint process. It is a great way to get a distressed finish without a ton of sanding!
And I’m happy that I’m one project closer to getting to start on my Mother’s day haul!!

If you missed any from this haul so far, you can catch up at the links below:
Queen Anne Table Makeover & Mirror too!
$5 Dressing Table Bench Makeover
Thrifted Metal Wall Decor Makeover and a Brand New Thrift shop Shakedown Video!
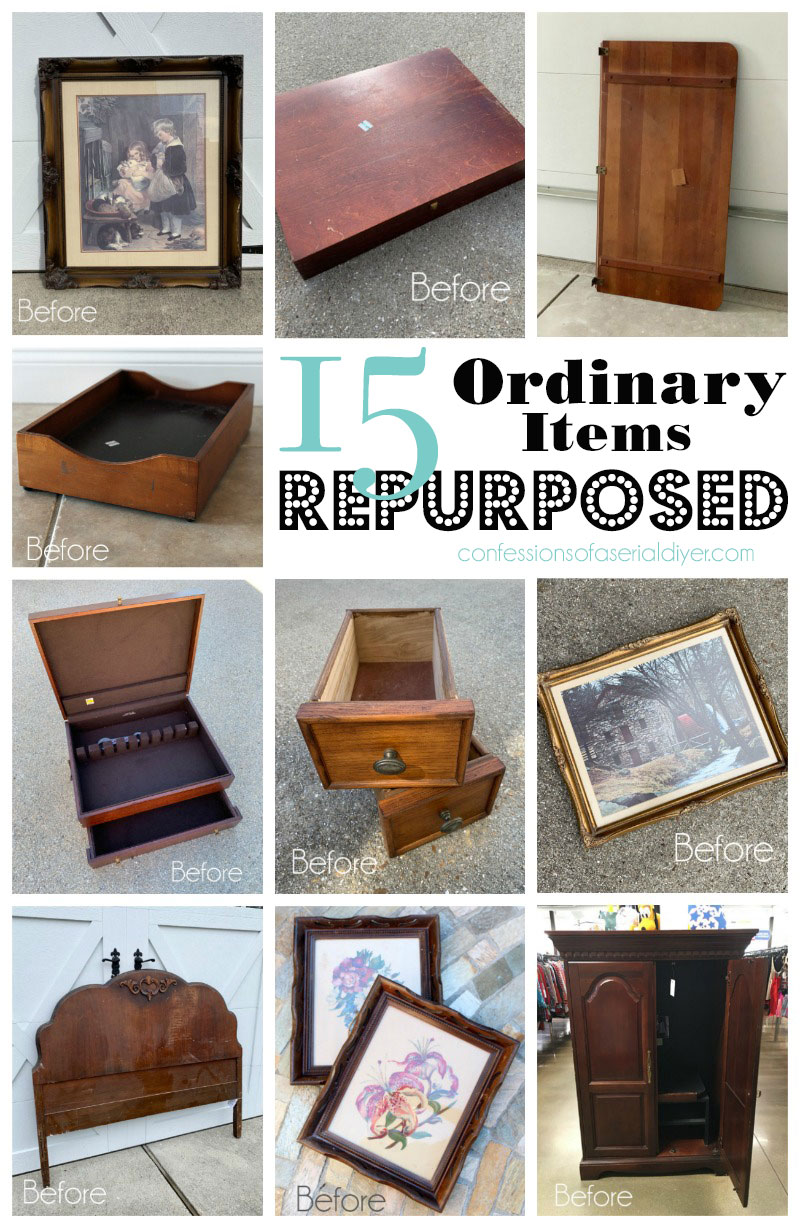
I was planning to share a few frames from my current hall on Thursday but with all the bad weather headed our way, I’ll be sharing a round up of 15 of my repurposed projects instead:
I’m sure y’all wan’t mind!
UPDATE: See what these ordinary items became HERE now!
Have any of y’all been thrifting yet??
XOXO,
![]()
Don’t Miss a Thing!
If you like what you see, there are several ways to follow along!
Email * Instagram * Facebook * Pinterest * Twitter


Mary Kaiser says
Oh it is so beautiful now!! It is so cute with your sweet kitty on the basket under it! She makes the cutest prop! Looking forward to seeing what you do to the frames as I have some and not sure how to redo them. Your always so inspirational!
Christy says
Thank you, Mary! Lyla laid there most of the day lol. See ya Thursday! XOXO
Petra says
I love everything about this piece , including Lyla 😀 and the colour makes me think of bleached driftwood 😀 Just gorgeous!
Christy says
Thanks so much, Petra! Yes…it is reminiscent of driftwood! XOXO
Sheila DelCharco says
I have not been thrifting yet but hauled a carload to the thrift store: the result of cleaning out and decluttering during Covid! I assume you have not been able to go to your booth? Where have you been storing all these completed pieces?? I bet you’ll have quite a haul! Love how the lowboy turned out!
Christy says
Oh I bet lots of people did a good clean-out while staying home! We have been able to get into our booths, actually. The owner encouraged us to use the downtime to clean, etc, so I actually got a chance to paint the shutters on my back wall that I have been wanting to paint. They are back to regular business hours now woot woot! XOXO
Pam Walsh says
I love the look of the lowboy!!! Great job and the new knobs are the perfect addition! Take care and enjoy your week !
Christy says
Thanks, Pam! Enjoy your week also! XOXO
Christina says
Christy, don’t those legs look like it is just going to walk around like a Disney cartoon character? Lyla has grown up into such a beautiful girl!!
xo
Christy says
Oh ha ha..I just imagined a face on the body of it lol…like in Beauty and the Beast ha ha! Lyla is a big girl too…9 lbs! XOXO
Janice Holt says
This may be an easy way but it sure is pretty. Thanks for demonstrating how you accomplished this look. Another great job as usual. I’m so ready to go thrifting but a little apprehensive but maybe before long.
Christy says
Thank you, Janice! I thought I would be so ready, but I too am being a bit cautious! XOXO
Candy says
Beautiful job! Thanks for sharing.
Blessings, Candy
Christy says
Thanks so much, Candy! XOXO
Sandra says
Kitty cat makes the scene purrfect!!!
Christy says
Ha ha yes! Like she posed for it lol! XOXO
Patti says
It came out so beautifully! Love it even more with your pretty kitty!
Christy says
Thank you, Patti! Lyla is the star for sure! XOXO
Judy says
On this Ethan Allen piece did you have to sand the whole piece prior to painting? I know their furniture has a glossy finish. Looks great.
Christy says
I did not sand, just gave it a good cleaning first! Thanks, Judy! XOXO
Sue H Mellette says
Christy, what a clean and more modern look for the lowboy makeover! I love the color and the technique you used. Thanks, too, for your detailed description of the process you use for each makeover.
Christy says
Thank you, Sue!! And you’re welcome! XOXO
Denise Cox says
It’s lovely! I have two questions. Why did you fill in the holes only to replace with new handles? And, explain the relationship of the number of the sandpaper to it’s coarseness. I keep forgetting. You are such an inspiration to me. I wish I had the space to do such projects!!!
Christy says
Aww thank you, Denise!! The old handles had two screws, but I wanted to replace them with these, so I needed to fill the old holes. With sandpaper, the lower the number, the more coarse it is! 🙂 XOXO
Pat E. says
Your makeovers are beautiful and always give me such inspiration! Love the sweetness Lyla added! I also have a tabby girl who is very affectionate!
Christy says
Thank you so much, Pat! Kitties are so sweet! XOXO
gwen says
i love the new look! i’ve stared at my ‘ugly’ bathroom vanity knobs for 16 years and just the other day realized how cute they COULD be on the right furniture! they are not too different from these you added. no worries here, cause ‘we’ never throw anything away!
Thanks for the inspiration this morning Christy!
Christy says
Thank you, Gwen! Sometimes just changing those knobs up with a different piece really does make a difference. And you are so right… we never throw anything away LOL! XOXO
Cheryl Atkinson says
Hi Christy! Lila is so pretty and so is this table. You make everything sound easy but ugh. I am starting to think I’m uncoordinated. Lol. Love the coastal vibe too
Christy says
Thank you, Cheryl! I’ve had a lot of practice, my friend! XOXO
Sue Duffy says
Yea for this look and less work. Love it!
Christy says
Right?? Thanks, Sue!! XOXO
Donna says
Love love love how you redone this piece! Thanks for the inspiration.
Christy says
Thank you so much, Donna! XOXO
Rosie says
I really like how it turned out, great job as usual! I am working on a few different projects myself so I always enjoy what you are sharing thanks☺️
Christy says
Thank you so much, Rosie! XOXO
Ashley says
Hi Christy! Another beautiful job! 💕
Christy says
Thank you so much, Ashley! XOXO
shan says
I did one a lot like this a year or so ago. This would have been much easier and taken less time. I did mine black with copper drawers. It turned out beautiful but you know how it is getting black smooth and even. This is such a fun finish, love seeing your projects. Thank you for sharing them.
Christy says
Thank you, Shan! I bet the black with copper was gorgeous! XOXO
Cecilia from Georgia says
Hi Christy! I love the blend of colors on the top and the chest. Thanks for the idea of leaving some of the natural wood exposed. Were you not afraid this was a bleeder? The drawers are a special touch.
Christy says
Thank you, Cecilia! I wasn’t too worried about this one bleeding because I’m guessing it was made sometime in the 80s. It’s usually more antique pieces that give you trouble. XOXO
Denise says
Super cute Christy! 🌸😊
Christy says
Thanks, my friend!! XOXO
Marie says
Love the coastal vibe you gave this table, Christy, and the new knobs are lovely on this piece.
Christy says
Thanks so much, Marie! I was sure glad to find those knobs in my stash LOL. I had forgotten I bought them when I did! XOXO
Micah says
beautiful! I wish I could do some thrifting but Michigan hasn’t opened up yet. =( At least I can watch you do more amazing makeovers while I wait!
Christy says
Thank you, Micah! I honestly haven’t ventured out much…being a little cautious, but I have to say it is nice knowing that we can go out! XOXO
Patty says
Christy, such a beautiful look for this lowboy – I love it!! Loved the comment about a Disney character – those legs are beautiful! Of course your poster girl, Lyla, makes everything look like a magazine photo! She’s such a beauty. Thanks for sharing – I’m all in for less work and will try this method (once I get my order in to you for paint!!).
Christy says
Thank you, Patty! Lyla walked right in there the minute I set that basket up and made herself comfortable LOL. She makes for a great prop! And yes…me too…less work is always a plus!! XOXO
Marcie Lovett says
Before – eh. But now – someone is going to love that for an entryway. Glad you’re able to get back to business, Christy, you’ve got lots to fill the booth! (and yes, it is time for another tour 😉)
Christy says
Thanks, Marcie! My booth is looking pretty stocked at the moment for sure! XOXO
Ange says
Great layering technique, so easy. Loved the inside of the lowboy. But the best part of this post was your furry little friend keeping you company. ❤️❤️❤️
Vicki Lombardi says
Christy – Love the coastal low boy! You never disappoint! Love your posts and that you explain everything so well. You’re the best!
Christy says
Aww thank you SO much, Vicki!! I appreciate that! XOXO
Debbie in TX says
Loving this coastal makeover, and those knobs are so awesome. The pictures with Lyla tugged at my heartstrings. She is so beautiful. What kitty wouldn’t love a great basket to sleep on?
Christy says
Thanks so much, Debbie! I was just looking at photos of her from when we first got her in September and she looked so pitiful with her bum eye. She is almost 10 months now and 9 pounds. We are so grateful she is healthy! XOXO
Tammy says
Christy, can i pick your brain> how do you use those HL knobs? when i look at them all i can see is that GIANT screw sticking out in my drawer space! UGH! What am I missing here?? BTW, this piece has SO MUCH more character than the original SNORE… boring “Bombay co” look it had before! WINNER WINNER CHICKEN DINNER!
Christy says
Ha ha thank you, Tammy! For this piece, the knobs were perfect, but when they are too long, I use a tool similar to a Dremel. It has a little metal cutting blade you can attach to it, and I just trim them. Before I had that tool, I would use a small handsaw. XOXO
Christy says
Thank you, Ange! You are absolutely right! I was hoping she wouldn’t leave before I got my photos done, but she ended up staying there half the day ha ha! XOXO
sharon austin says
You should take a suitcase, basket, small piece of furniture, or something and make her her own little Lyla bed?? It can match your style and it’d be a fun post!!
Christy says
That is a great idea! She likes uncomfortable places though. Her favorite place to lay in my office is this drawer that I use to hold printer paper lol: https://www.confessionsofaserialdiyer.com/2-thrift-store-drawer-upcycle/ It can’t be comfortable! XOXO
Cecilia says
Turned out great and isn’t that just like a kitty to think the basket was put there for her sleeping perch? Lol.
I have a question – is the old finish on the table slick? I have a couple of bookcases with that slick finish and I need a paint that will stick to them. Will Dixie Belle do that? Thanks!
Christy says
Thank you, Cecilia! Yes she made herself right at home ha ha! Dixie Belle paint will stick fantastically to just about any surface! The only prep I did for this piece is give it a good cleaning first. 🙂 XOXO
Nancy @ Artsy Chicks Rule says
I love this! So pretty and perfectly distressed…definite yes to less work. And just look at your sweet kitty baby, Lyla. xoxo
Christy says
Thank you, Nancy! It was kind of stuffy before, but so relaxed now! And isn’t my baby girl so sweet?? XOXO
ROSE LEFEBVRE says
Once again you have created a great piece! You are so professional!
Christy says
Aww thank you so much, Rose!! XOXO
Bunny Congdon says
Beautiful job! A low boy for a low girl Lyla! Thanks for sharing your talents!
Bunny
Christy says
Thank you, Bunny! She loved that spot ha ha! XOXO