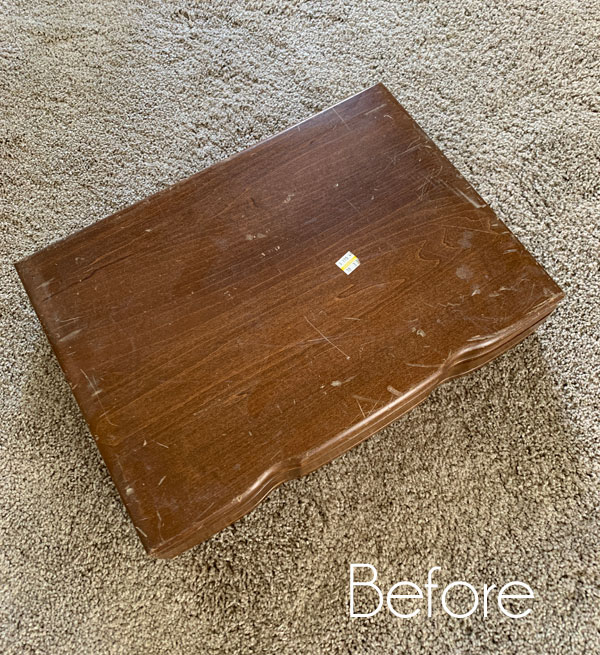
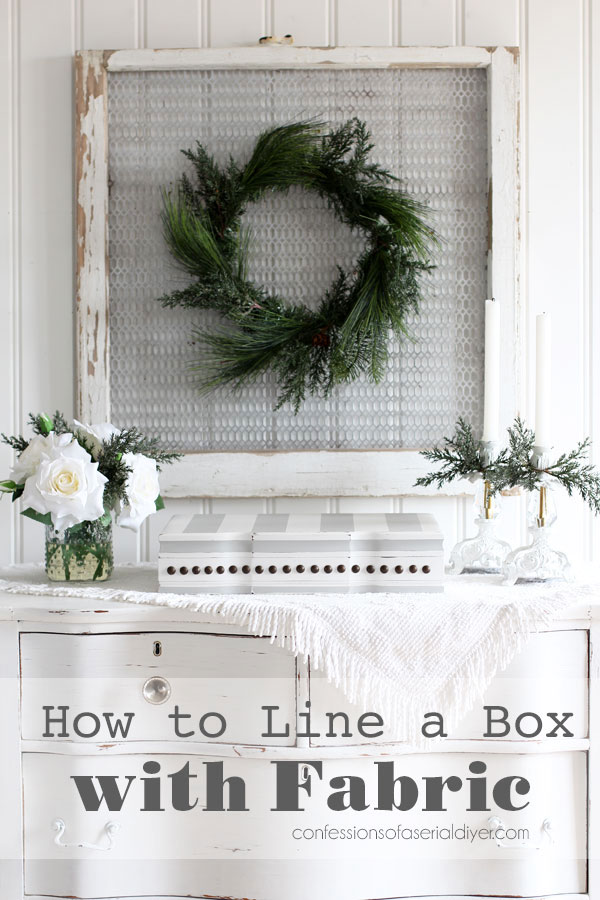
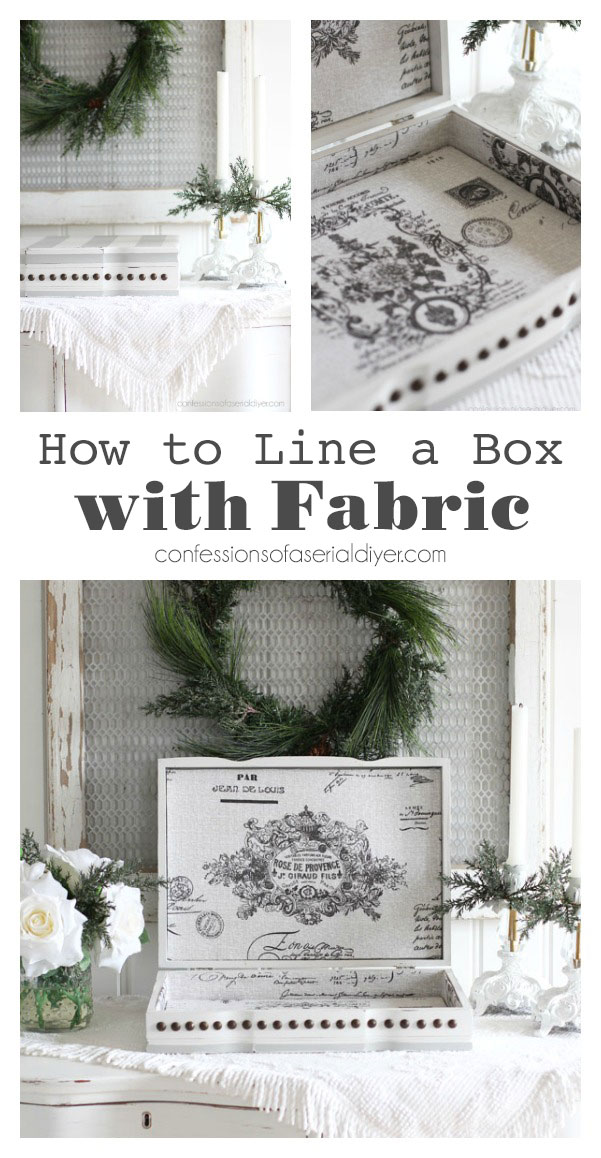
Hello beautiful friends! Today’s makeover is this old flatware box that I picked up at the thrift store for less than $2, and it is the perfect candidate to show you how to line a box with fabric!
Y’all know I rarely pass these up because they can be used to store so many things! The method I’m sharing today to line the inside of this box with fabric can be applied to just about any kind of box!
This one is actually going to serve a purpose in our master bedroom, and you’ll get to see what that is in my big reveal on Thursday!
I found this flatware box several years ago and about a year or so ago, I gathered three of these boxes and tore all the innards out. Then I just let them sit in my storage room. Removing the insides can be a pain, so I was glad to have that job already done. I usually grab my needle-nosed pliers to help yank out all the lining.
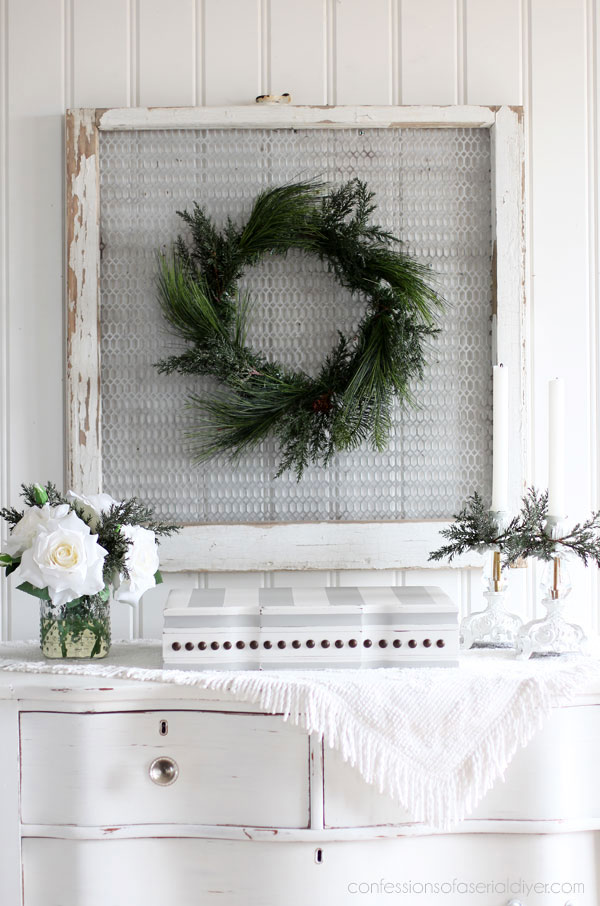
First, here is how this box looks now:
Better, no?
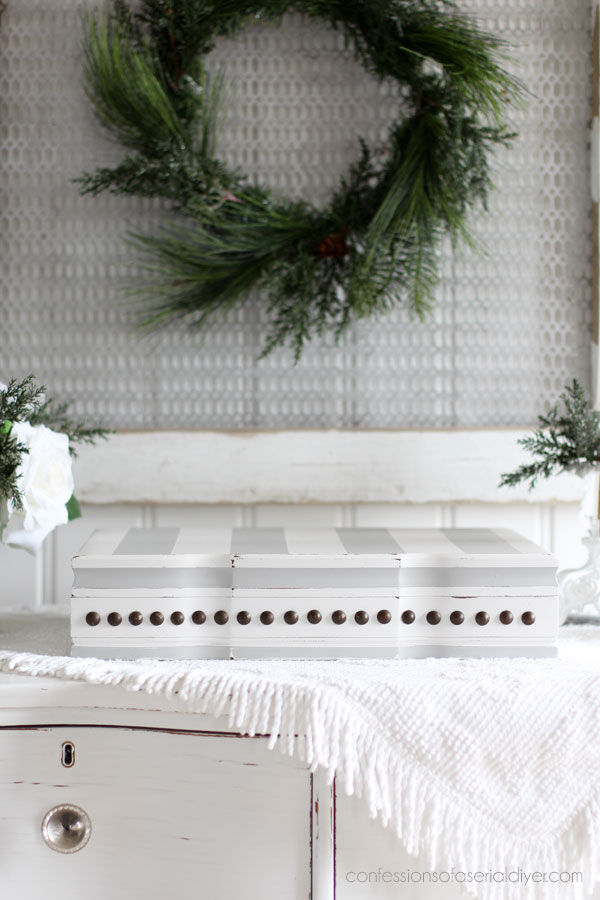
Pretty snazzy for less than $2! And a box like this would make a lovely gift!
I’ve included a few affiliate links so you can find the products I love.
Paint the Box
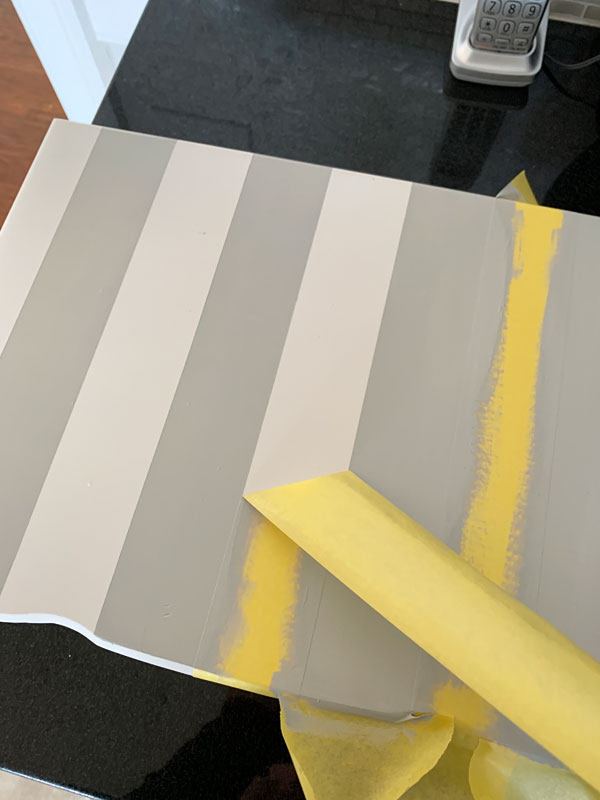
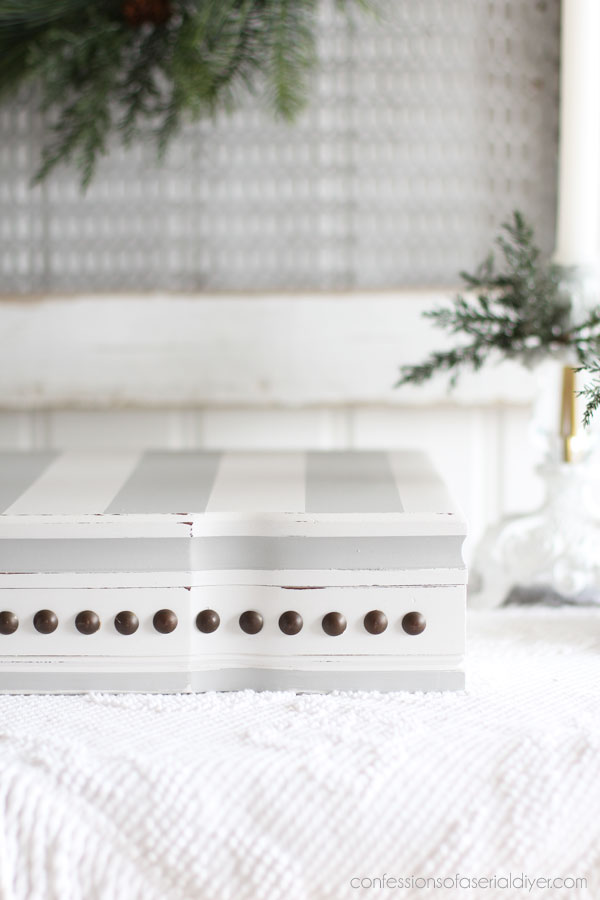
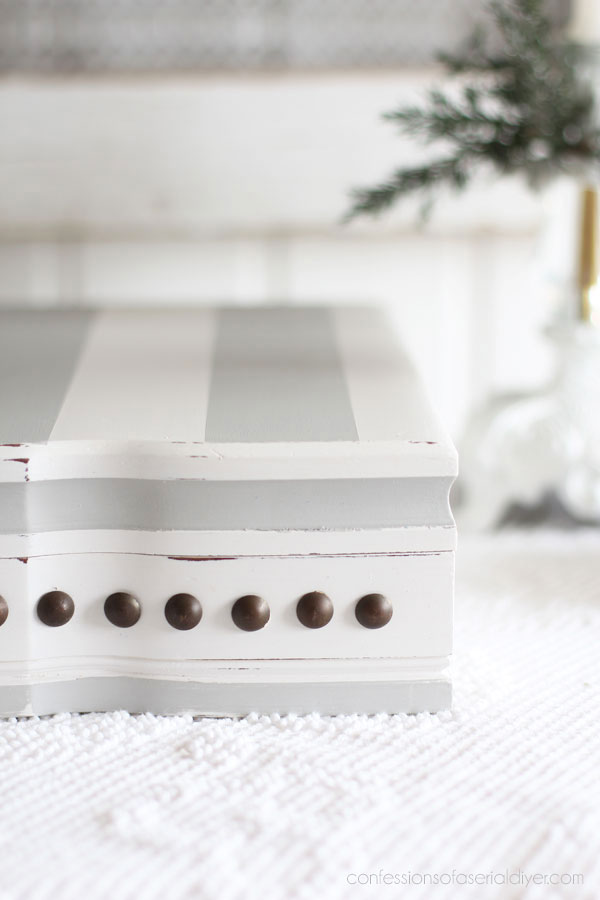
I started by painting the box in Fluff by Dixie Belle. (No sanding or primer needed with Dixie Belle!)
Then I used my favorite tape for painting projects, Frogtape for delicate surfaces to add stripes to the top. Ya’ll know how I love some stripes! I painted in the stripes with a 50/50 mix of Dixie Belle Driftwood and Cotton, and pulled the tape off immediately after applying the second coat:
I then taped off a couple more areas to paint:

I did the bottom stripe as well. (I don’t normally paint in the kitchen!)
When everything was dry, I sanded lightly all over with 220 grit sandpaper. Then I sealed with Dixie Belle’s Top Coat in satin using their applicator sponge.
How to Line a Box with Fabric
The insides of these flatware boxes always look like a hot mess once you remove the lining, but adding a nice new fabric liner to the inside is pretty simple to do!
Here’s how the inside of this one looks now:
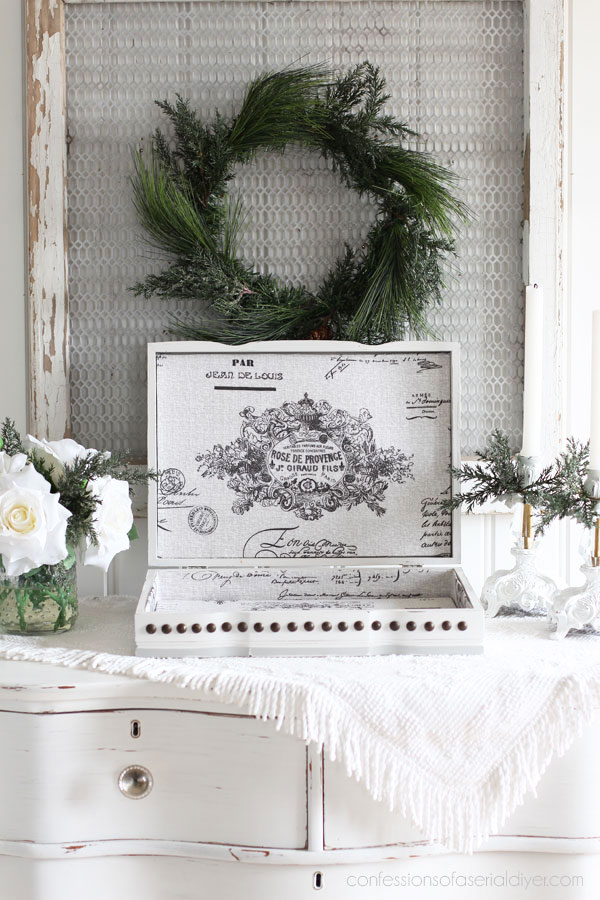
The fabric I used for this box actually came from my favorite fabric store: the drapery aisle at HomeGoods! I can get several projects out of one set of curtain panels.
Here is what else you’ll need to line your box:
- Foam core or cardboard
- Rotary cutter and cutting mat/straight edge set, or scissors and Exacto knife
- Hot glue gun and Hot glue
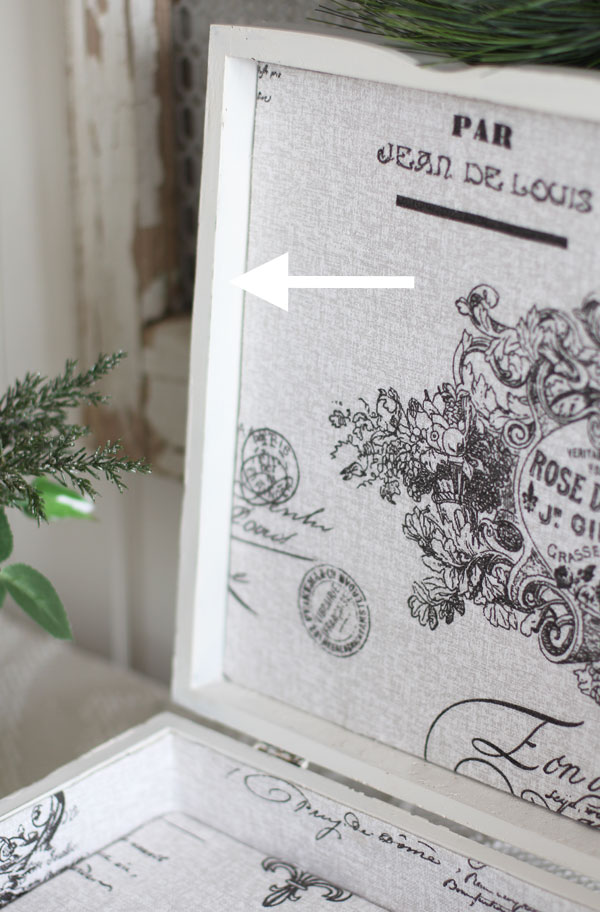
When I was painting the outside, I also painted the inside lip of my box in the Fluff, as well as the sides of the inside of the lid since they were in good condition:
Then I started on the lining process and here is how I do that:
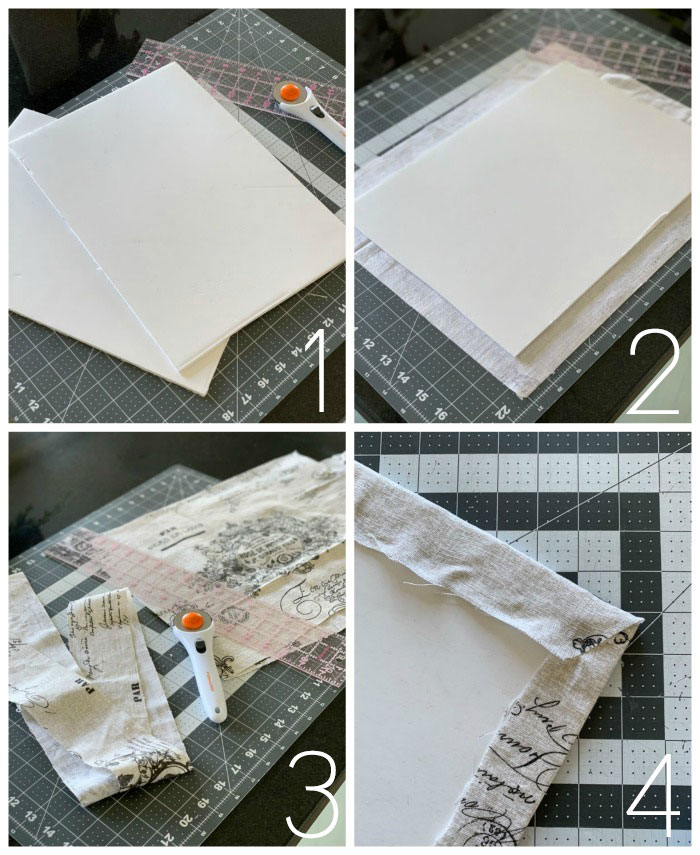
1. First, measure the length and width of the inside of the lid. Also measure the inside of the bottom of the box. Cut the foam core about 1/4″ smaller in both length and width, so it will easily fit once you cover it in fabric. You can use a rotary cutter and straight edge set or an Exacto knife.
2. Cut the fabric to cover the foam core, about an inch larger all the way around. I centered the pattern on mine.
3. Measure the perimeter of the inside of the bottom next. Cut a strip to go all the way around the inside bottom, adding about an inch to the height.
4. Cover both pieces of foam core with the fabric you cut using hot glue to secure it in place. Trim any excess fabric on the corners.
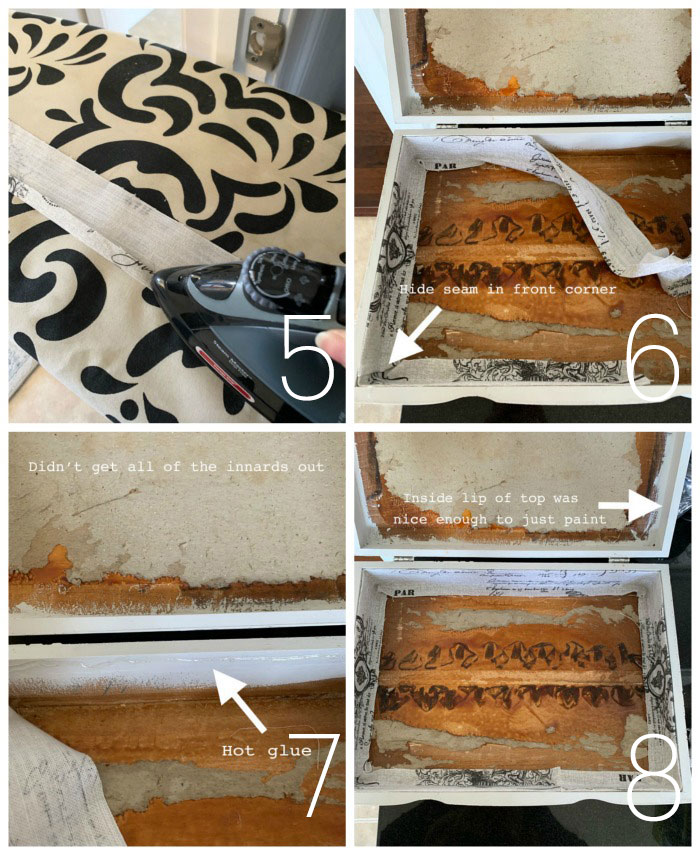
5. Fold the top of the fabric strip you cut for the sides about half an inch and iron.
6. Attach the fabric to the sides of the inside, bottom with hot glue. I had to join two pieces together with hot glue to make the strip of fabric long enough. I started my fabric in the front and hid that seam in the corner. The fabric should overlap onto the bottom by about half an inch.
7. I added a bead of glue to the top of the sides and another bead to the bottom as well. You can see as well that I did not get all of the cardboard liner out that is okay since it will be covered.
8. The sides of the inside of my box lid were in great shape and that is normally the case, however, if yours is not in good enough shape to paint, you can cover that in fabric as well.
The final step is is to add the fabric covered foam core to the top and bottom, securing with hot glue:
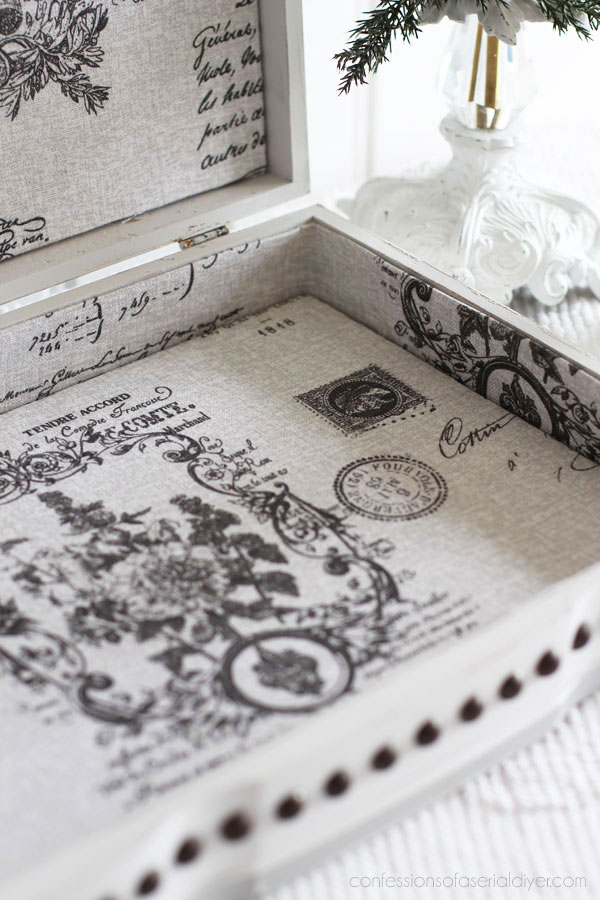
And voila!
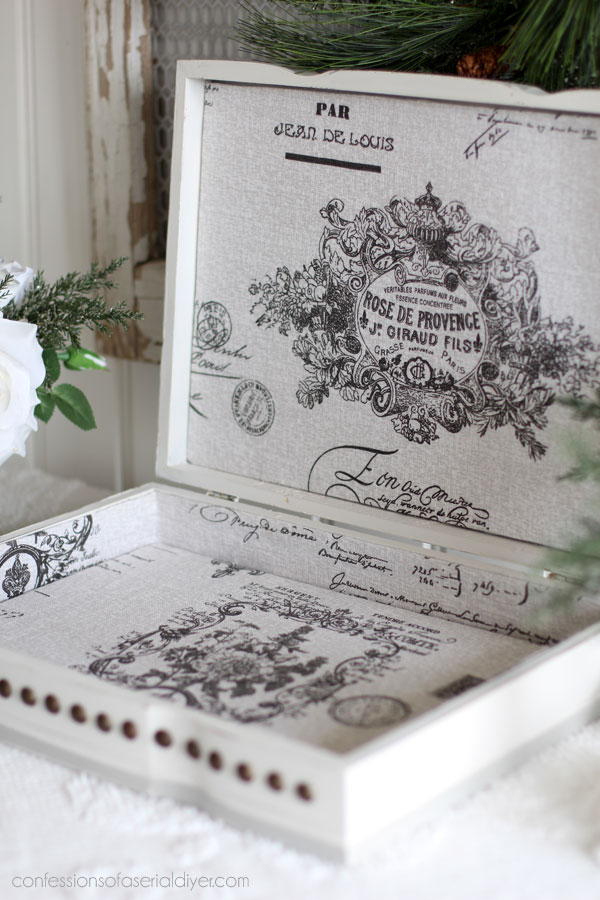
To finish off this box, I decided to add some nailheads that I had in my stash, to the front. I used this nailhead tool to space the nailheads evenly and a hammer to drive them in.

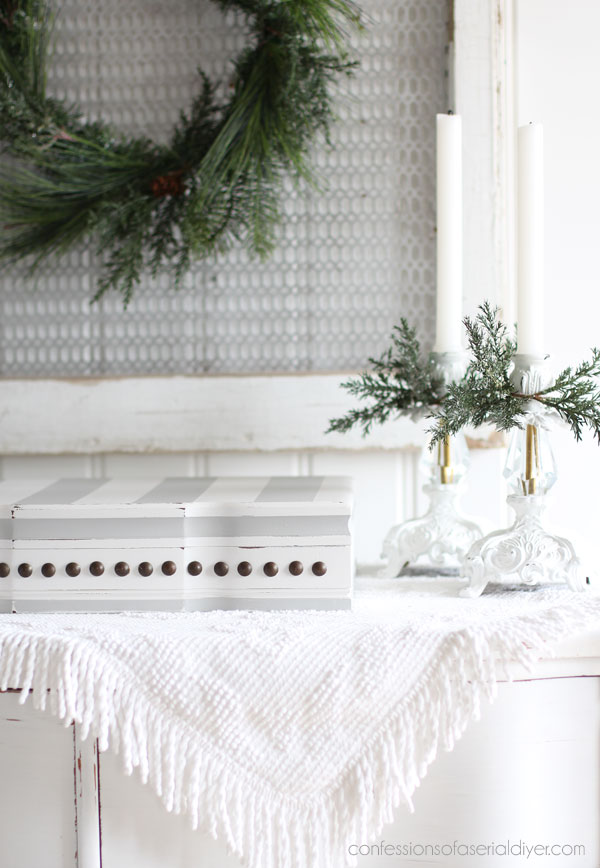
I’m so glad I brought these candle holders back home from my booth…
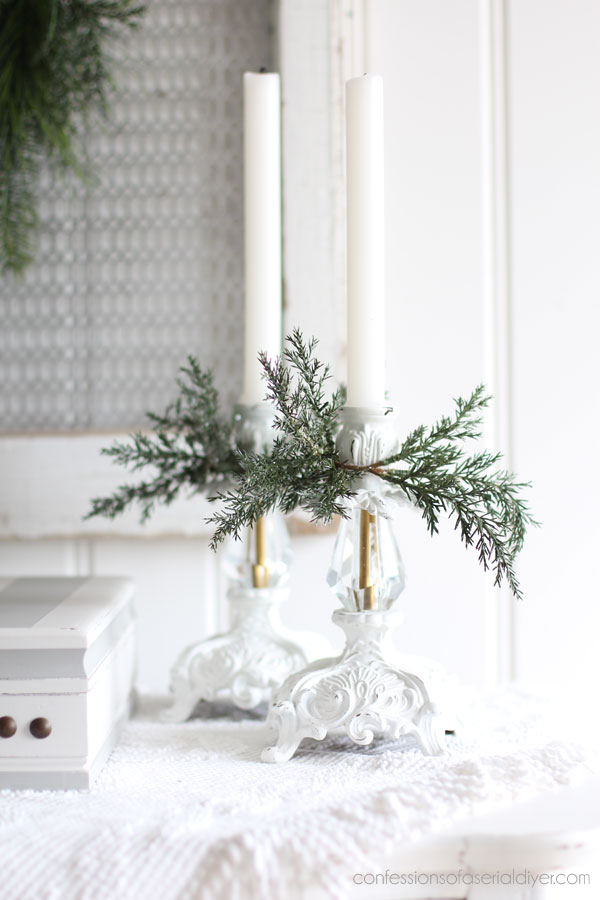
They actually ended up in our bedroom!
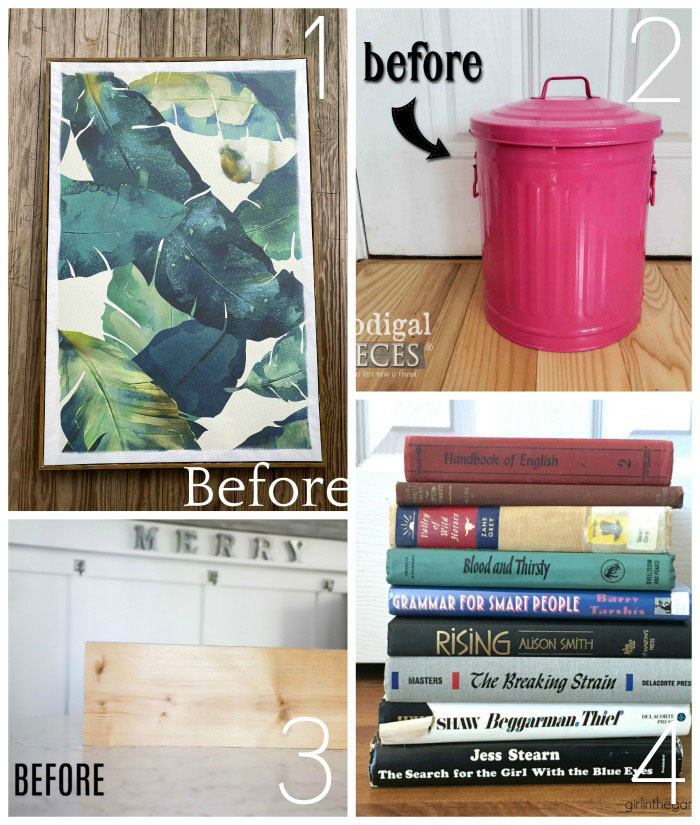
 Don’t forget my friends are sharing their own trashy makeovers today!!

Visit the afters at the links below!
And if you love a good box makeover, I’ve got 12 more for you!
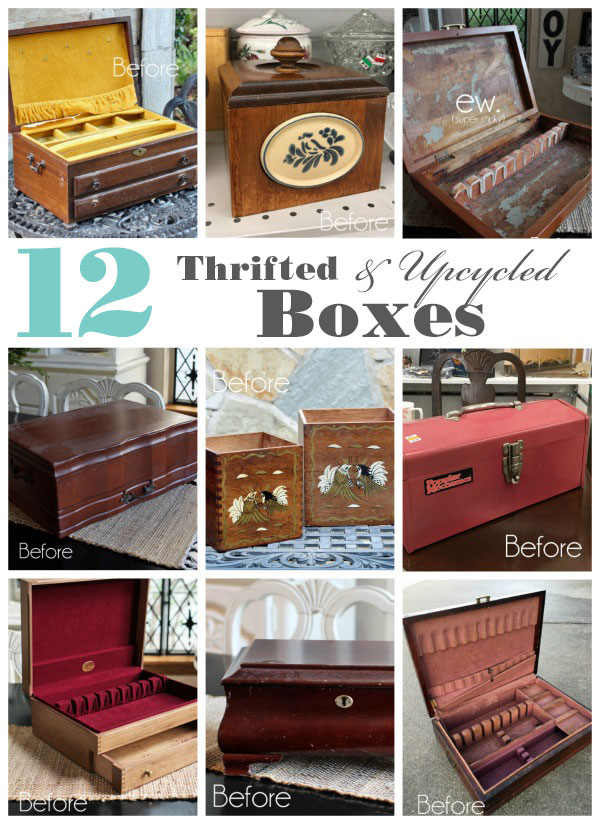
See them all HERE!
I’m so glad y’all stopped by today! I know this time of year is busy!
I’ll be back Thursday for the big reveal of our master bedroom!! (If you missed our sleigh bed makeover, you can see that HERE!)
I’m SO excited that our room no longer looks like this:
UPDATE!! See the big reveal HERE now AND see what function this box plays in our new space!!
Woohoo!!
XOXO,
![]()
Don’t Miss a Thing!
If you like what you see, there are several ways to follow along!
Email * Instagram * Facebook * Pinterest * Twitter


Holly says
Two of the links don’t work.
Christy says
Thanks, Holly! A couple of the girls likely didn’t go live until 5 am…I’m an early bird! 🙂
Holly says
Thanks, that explains it. And I’m just too impatient!!! 😊
Christy says
Ha ha no worries! I’m the same way! XOXO
Mary Kaiser says
I love the box, beautiful! I am so excited for you to have your room redone with no more dark furniture! Dark furniture does not fit your style. I love your tutorials, so easy to do following your easy DIY instructions. I have a silverware box in my stash that I will pull out and do now, when I get a few minutes, maybe after the holidays with the long winter ahead of me I should be able to get some of my stash done. Thanks for the inspiration! Looking forward to the reveal on Thursday!
Christy says
Thank you, Mary! You are so right…that dark furniture just wasn’t me! I just want to keep going in there now haha. And yes, the winter is a great time to pull out all those projects! XOXO
Larissa ~ Prodigal Pieces says
So beautifully done, Christy. Perfect fabric choice. Merry Christmas! 🎁🎄
Christy says
Thanks, Larissa! Merry Christmas to you and yours, my friend! XOXO
Christina in SW FL says
Christy, this is one snazzy, pretty box!! Beautiful job! Cool tool for the nail heads which were an inspired addition. 🙂 Thanks so much for the tutorial! I am looking forward to the big reveal of your master bedroom makeover!! 🙂
Christy says
Thanks, Christina! See ya on Thursday! XOXO
Janice Holt says
Beautiful box and love the nail head details as well as the stripes. Looking forward to seeing the bedroom reveal.
Christy says
Thank you, Janice! I can’t wait to share the completed room! XOXO
BJ Rawson says
This white box is fabulous. Great job!!
Christy says
Thank you so much, BJ! XOXO
Phyllis says
As always, absolutely beautiful. I have purchased one of these I will redo for our bedroom so thank you for the inspiration.
Christy says
Thank you so much, Phyllis! They are great to store all sorts of things, especially in a bedroom! XOXO
Mary W says
I collected old boxes over the years and wanted to display them on a narrow wall in my living room. I thought I could just put small L brackets up, two for each box, and line them up like ladder rungs. My boxes are all old candy boxes and some have mirrors inside. I just can’t bring myself to paint them as some have beautiful paintings on the lid. But, they are just stuck inside a cupboard taking up room by holding old jewelry I never wear or old money I collected ($2 bills, coins, arrowheads, tiny old bottles, and very breakable Christmas ornaments.) My grands will have a blast going through it one day when I’m gone. Do you have any encouraging words to get me moving? I just love the old wood as is!
Christy says
It sounds like you have a fantastic idea for them! Think about how happy you will be when they are all done and displayed the way you imagine! Or, is there a way to display them as-is since you like the wood like it is? XOXO
Denise Cox says
Christy, your box is lovely!! And the nail heads are a nice finish. The candlesticks are quite pretty as well!!
Christy says
Thank you so much, Denise! I just had to go back and get those candlesticks! XOXO
Sheila DelCharco says
I love it when you do these boxes! I don’t need one but I so want to do one!
Christy says
I’m so glad you enjoy seeing them, Sheila! There are so many possibilities… Maybe you can find one and give it as a gift to someone? XOXO
Marie says
Christy, you are the Queen of flatware box makeovers! Another stunner and the fabric is just lovely too.
Christy says
Thanks so much, Marie! I do love a good flatware box makeover! XOXO
Doreen says
Love your updated box! Thanks for the detailed tutorial. I upcycle boxes all the time, so this info will be very helpful.
Christy says
Thank you, Doreen! I’m sure you could use this for your pretty boxes as well! XOXO
Lizzy says
It turned out so pretty. I’ve pinned this one for later use. : )
Christy says
Thanks so much, Lizzy! XOXO
Cheryl Atkinson says
Hi Christy! I love the box. Are you ready for this? I just finished painting one same color, with stripes and i lined my first box ever! Thank to you and your awesome guidance. I went back to one of your old makeovers that looks similar to this one with the French script on top. I did add some french script from a leftover transfer and i decoupaged a napkin on top. I would not have been able to do any of this if i didn’t follow your blog. Thank you!
Cheryl
Christy says
Yay!!!!! I am so excited for you! Isn’t it the best feeling ever to make something beautiful again? I’m sure your box is gorgeous, and funny that ours are very similar! Thank you so much, my friend! Keep on creating! XOXO
Cecilia from Georgia says
I always learn something new from you! The box is beautiful and the nail heads look great! Happy Holidays!
Christy says
I am so glad to hear that, Cecilia, thank you! XOXO
Nancy @ Artsy Chicks Rule says
This turned out so cute! I can’t wait to see your finished bedroom! xo
Christy says
Thank you, my friend! I’m looking forward to sharing it on Thursday! XOXO
Becky says
What a pretty box! I can’t wait to see it in place!!!
Christy says
Thank you, Becky! It worked perfectly for what I needed it for and that’s one more thing out of my storage room! XOXO
Jen @ Girl in the Garage says
Christy, this turned out gorgeous! I love the fabric inside and you shared a great step by step tutorial. And you know I looooove nailheads! xo
Christy says
Thank you, Jen! Yes, you can rock the nailheads for sure! XOXO
Dawn says
Whoo hoo Christy….the bedroom reveal looks terrific n of course the tree is beautifully done and an awesome addition. Dying laughing at the Swiffer snow idea. How cute.
Yes the grapes just disappeared!
Am so inspired. I too coild not open the 4 links but its only 6 am! Will check back….Dawn
Christy says
Thank you, Dawn! I love having a Christmas tree in our bedroom, and that duster idea was great! I’m sure the girl at the dollar tree wondered what I was doing buying all those boxes of them ha ha! The links should be working as the post went live yesterday. I’ll check on them though! XOXO