
Hello beautiful friends! Welcome back to my Posts of Christmas Past series! Today’s Christmas project is going way back to 2014! It was part of the “Rock Your Knock-off Holiday Edition” Tour where some of my favorite blogging friends and I found high-end (and very over-priced) items, and made them for a fraction of the cost.
I chose this Spice Market Stocking from Anthropologie:

This very colorful gem will set you back $48. Hmmm… x four for each member of my crew would have run me about $200! No way! I’d rather spend that on the goodies that will fill them!
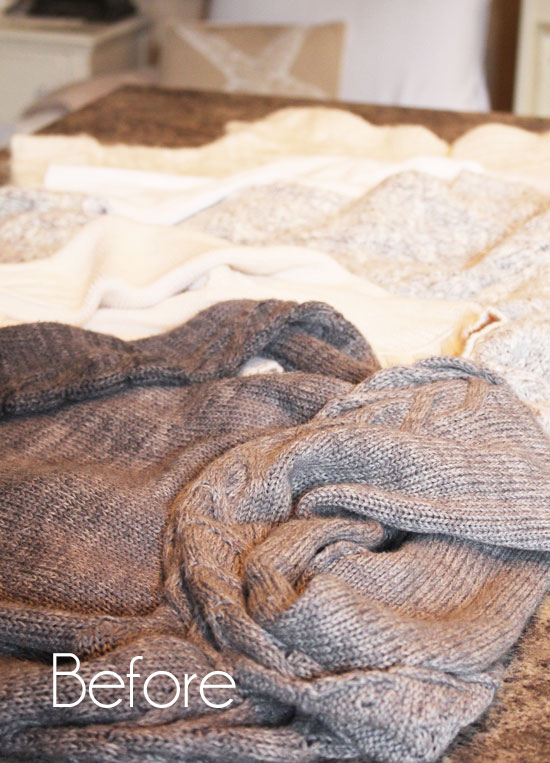
I was all set to head to my favorite thrift store to hunt down some sweaters when I remembered a bag of clothes waiting to be donated in the garage. What luck…I found four sweaters in there that were perfect!
Here are the sweaters I found, including the one in the foreground that came out of my closet, which I ended up not having the heart to cut up:
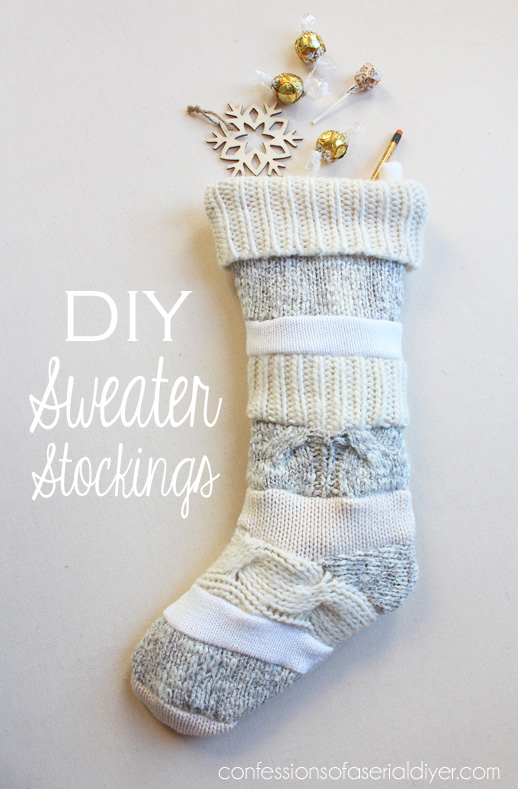
I would usually try to copy as close as possible to the originals whenever we did these knock-offs, but this time, I had to change up the colors to suit my own décor a bit better.
Here is my version:
Want to know what I loved most about this project? It was FREE!
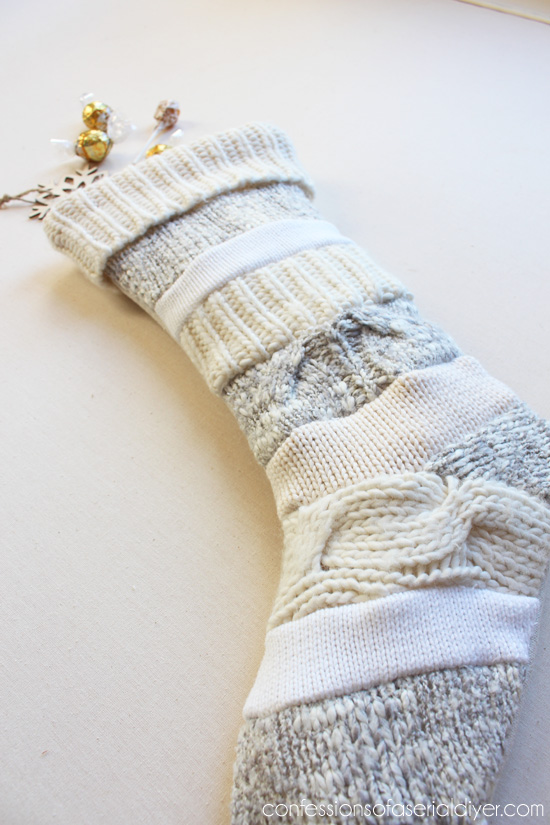
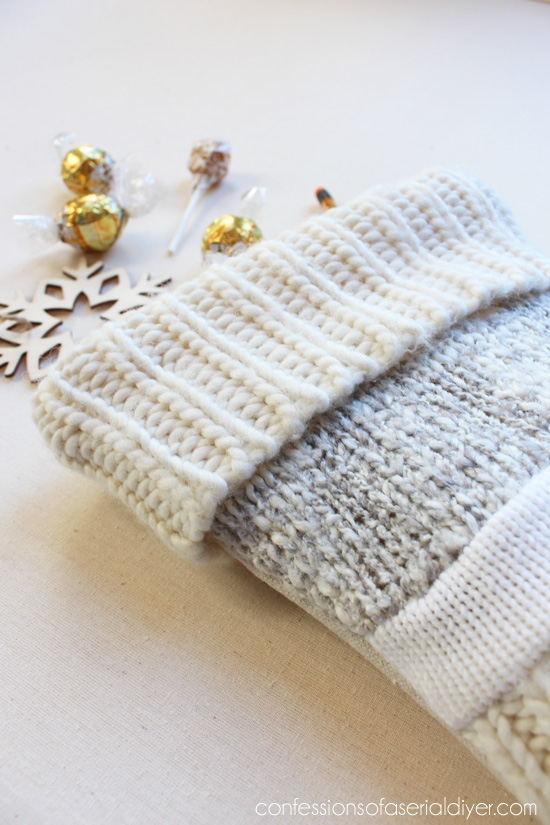
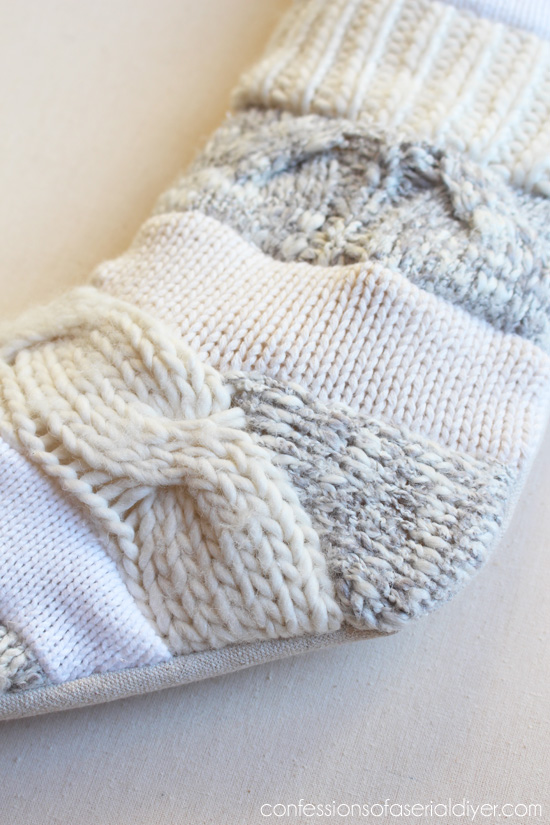
These sweaters were a perfect mix of creams and soft grays.
Making them was pretty simple too. I put together a pictorial for you since there were 20+ photos…
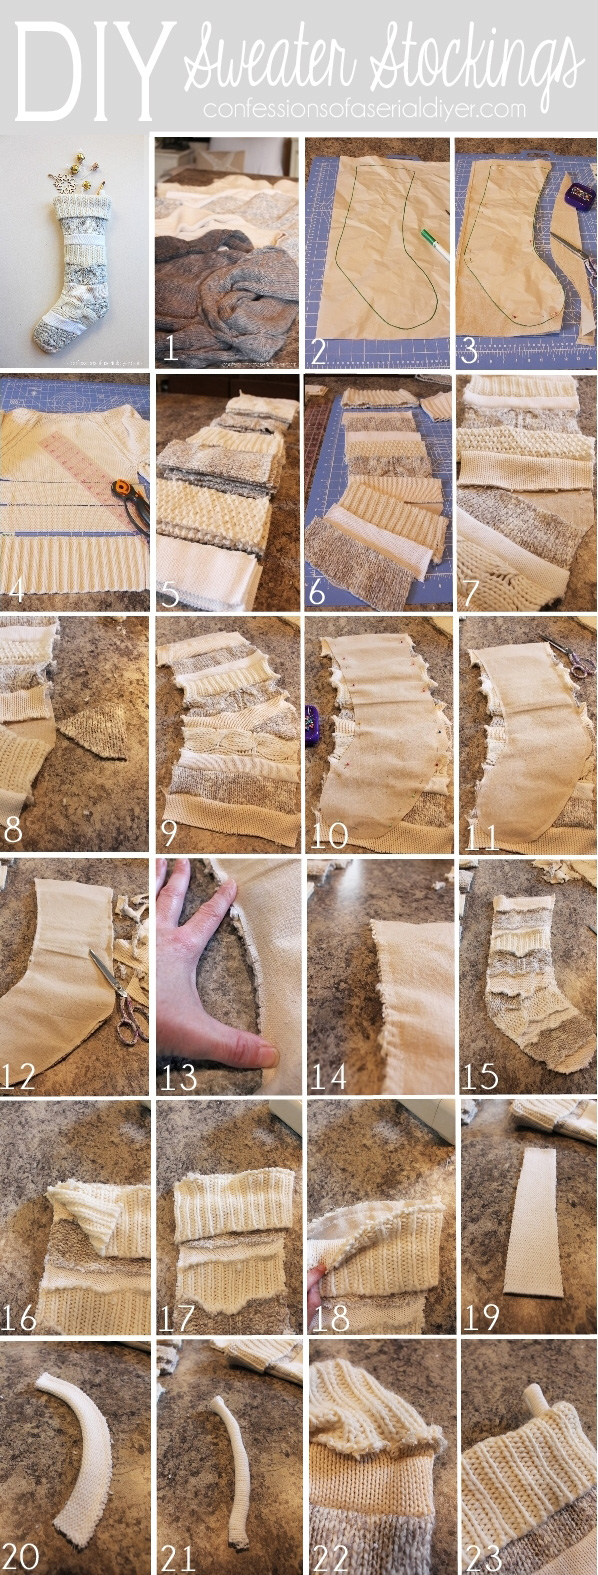
- Gather up your finest sweaters.
- Create a pattern.
- Cut out your stocking back to use as a guide. (I used drop-cloth.)
- Cut your sweaters into strips. Mine varied from 2″-3″strips. Using a rotary cutter set is a life saver here. (I have this one.)
- I cut a lot of strips y’all. You’ll see why soon.
- Lay out your strips to get the look you want.
- Sew each strip together, leaving the strips that will connect to the heel, not sewn.
- Cut a triangular piece for the heel.
- Sew the heel to the top strip first, then sew the top strip + heel to the strip below it. Then SEAL ALL SEAMS by running a zigzag stitch along each seam. (To stop them from unraveling.)
- Pin the back in place.
- Sew the back to the front.
- Trim the excess.
- Make a few tiny cuts along the inside curve of the stocking, so that seam will turn right-side-out nicely.
- Seal the edges all the way around with a zigzag stitch.
- Looks pretty inside out!
- Save the neckline or bottom of your sweater to use for the top of the stocking. Place the side you want to see face down around the edge of the stocking and sew in place, except for where the ends will come together. (At the back of the stocking.) Leave about 1/4 ” unattached at both ends.
- Sew the ends together and seal that seam with a zigzag stitch.
- Also seal the seam where the finishing cuff and the top of the stocking were sewn together. Turn right-side-out.
- For the hanging loop, cut a piece of sweater 2″X 6″.
- fold right sides together lengthwise and straight stitch. Seal with a zigzag.
- Turn right-side-out.
- Fold in two and attach to the inside back of the stocking.
- Voila!
There you have it…in just 23 easy steps ha ha.
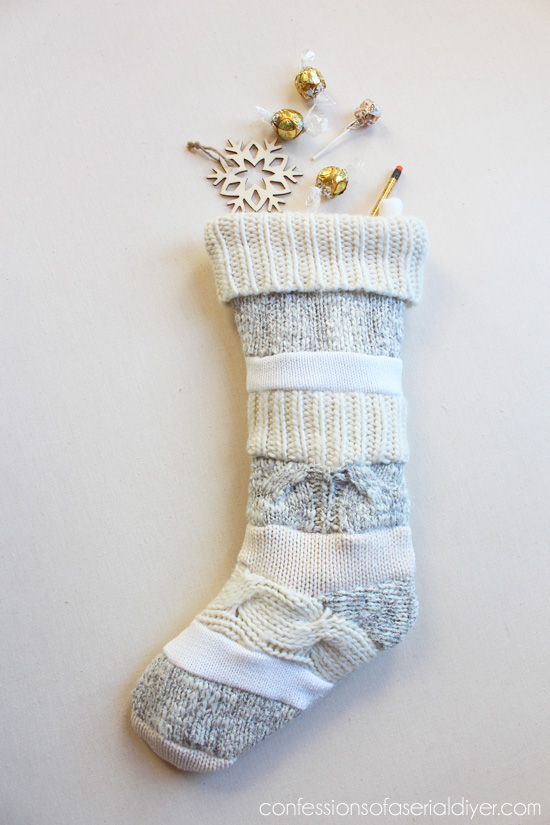
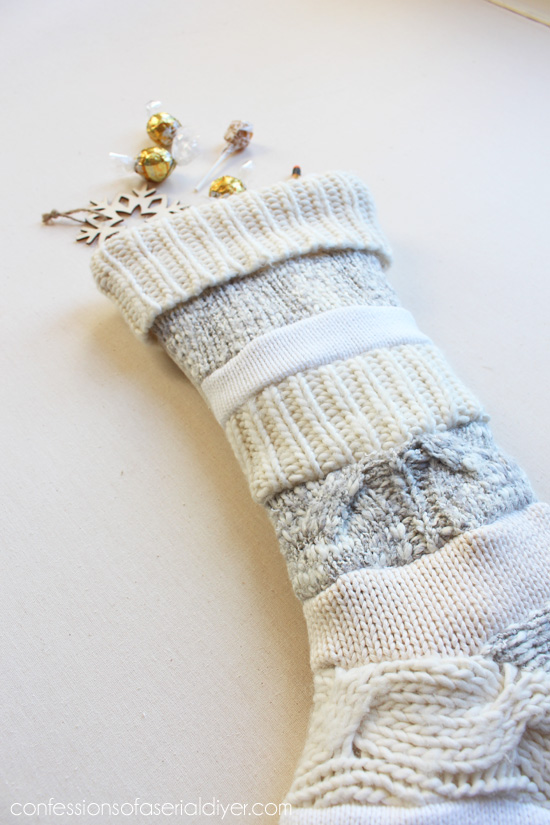
I love the texture of the sweaters for a warm and cozy feel.
Nothing says Winter like a cozy sweater!
I told you I cut a lot of strips in my pictorial instructions… because I made one for each of us!

The first one took me an hour and a half. The fourth one took me 33 minutes. I was going for the look of the Anthropologie stocking, but you could totally keep your stockings all one knit on the front if you find a large enough sweater.
Here they are on the fireplace at our old house back in 2015:

See my whole Christmas Tour from 2015 at our old house HERE.
I found these glittery letters at Walmart and added them so we could tell them apart:

I proudly showed them to my oldest son, Jack, when I was finished and his response was, “Aww can’t I keep my old stocking? These are just made from old sweaters!”
He’s not wrong.
I made his old stocking too, but it’s one of those felt kit stockings with all the sequins and about a million tiny beads. It really is pretty, but it would be so nice for us all to have matching ones. I also made a similar one for my youngest, but my husband is rather attached to one from his own childhood that his Mom made. (It has a clown on it. Anyone out there decorating for Christmas with clowns?? )
I hope you enjoyed this oldie! Was this new to you?
You can see what else I made from the scraps of those sweaters HERE!
And if you missed the first three Christmas makeovers from this series, you can find them below:
DIY FAUX ETCHED CHRISTMAS MIRROR FROM A $7 THRIFT STORE FIND
MASON JAR LIDS REPURPOSED AS ORNAMENTS
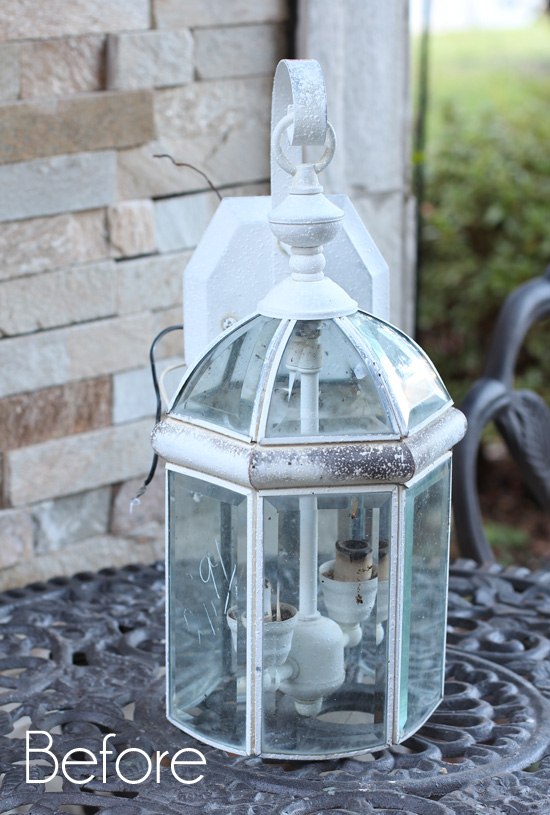
I hope to see you back here tomorrow…I’ll be sharing what I did with this old restore light fixture:
See y’all then!
Update: No need to wait! Check out how cute this old light is now HERE!
XOXO,
![]()
Don’t Miss a Thing!
If you like what you see, there are several ways to follow along!
EMAIL * INSTAGRAM * FACEBOOK * PINTEREST * TWITTER


")

Mary Kaiser says
I remember the stocking when you made them, and the little mittens from the scraps. I like yours way better than the ones you copied. Your colors are much nicer than their version. You are the best at recreating beautiful things out of out dated things that most people would throw away. I bet you could make a silk purse from a sows ear! (My mother use to use that saying), but its true of you and your craftiness! I am having such a fun week looking back with you!!
Christy says
Aww thank you, Mary! The original didn’t really say “Christmas” to me at all, but it was great for inspiration! My Mom uses that expression also lol. I’m so glad I get to hang out with ya’ll every day!! XOXO
Michele M. says
Your stockings look great! And they are perfect for your room and for your mantle. Love it. Thanks for the tutorial, too.
Christy says
Thanks, Michele! This was our old house…it’s nice that having this blog allows me to look back at it! XOXO
Christina says
Christy, these are super cute. Thanks for the detailed tutorial. I do understand your husband and Jack wanting to keep and use their “old” stockings. Sentiment wins. 🙂
Stay warm!! (chilly here)
Christy says
Thank you, Christina! They are good sports and do let me hang my old sweater stockings now ha ha, but their old favorites are safely tucked away. And yes, I actually had to put socks on going to bed last night because it got so cold lol…you stay warm too! XOXO
Maryellen Webber says
Beautiful stockings Christy! I am terrible at sewing, I always greatly admire anyone who sews!
Christy says
Thank you, Maryellen! What I like about sewing is that you can complete a project rather quickly! XOXO
Jennifer says
I love the sweater stockings you made! A few years ago I decided to buy new stockings for the family so they would all coordinate. My family also wanted to keep their original stockings! So we compromised and kept the old ones in storage. and hung the new ones. Now my mantel looks beautifully coordinated and my family is still satisfied. Thanks for the great ideas!
Christy says
Thank you, Jennifer! This made me laugh…isn’t funny how they become attached to things? My boys let me hang these ones now too, but I still have the old ones safely stored away! XOXO
Denise says
Love these, and as always you did a great job!
Christy says
Thank you so much, Denise! XOXO
Joni says
These are so pretty! But we are the same way as your husband with our old stockings. We hang 7 ugly stockings including a Mickey mouse, a penguin, winnie the pooh, and a ninja turtle. I drool over classier stockings but I guess tradition counts more than beauty sometimes lol. It’s fun to see your older projects that I’ve missed!
Christy says
Thank you, Joni! I love that though…sometimes sentiment must win out and kudos to you for giving them what they want! XOXO
Toby Peplow says
Great project Christie!!! Love these!!!
Christy says
Thank you, Toby! XOXO
Beverly says
Yours is gorgeous! That $48 one is hideous. The colors are so garish together. Thanks for the tutorial.
Christy says
Thank you, Beverly! I was not a fan of the original either, but it did offer fantastic inspiration lol! XOXO
Barbara Holmes says
I loves these!!! You are so creative. I am going to try my hand at this.
Christy says
Thank you so much, Barbara! Have fun with yours!! XOXO
Susan says
Hi Christy, I love all of your creations. I have a question about sewing pieces of cut up sweater. I tried to do that one time to make leg warmers but the loose weave of the sweater yarn kept jamming my machine. Did you have that problem? If so, what tips can you give me?
Christy says
Thank you, Susan! I would try a larger stitch maybe? XOXO
Kathy W F says
I have a tip for Susan when sewing the stockings. Reinforce the edges with a piece of cotton fabric. Put the seams together and fold over the cotton strip. Stitch over it joining the strip to the sweater piece. My grandma use to do this so fabric wouldn’t ravel. Hope this gelps.
Christy says
Great tip, Kathy! XO
Sharon L Austin says
Pretty cool; yours is actually much prettier than the store version! I made stockings many years ago, with a matching tree skirt; they turned out great. However, I never thought to use old sweaters! I love how you come up with ideas for repurposing all.the.time. Merry Christmas!!
Christy says
Thank you SO much, Sharon! It always feels good to make things with your own hands, right? XOXO
Kathy W F says
I love your ideas. I took the tour of Christmas past. Love all the vignettes. I think you have a great attitude about enjoying your living space and the season and don’t stress over everything being so perfect, especially with us spending so much time at home. I’ll see what creative thing you do with the light tomorrow.
Christy says
Thank you so much, Kathy! No… you just can’t stress about it. Life has too many stressors already, these days especially! I’ll see ya tomorrow! XOXO
Sandra Magle says
Wow, these are amazing—and my brain went in so many directions of what to do with sweater strips—Loving your final display and the letters are the perfect touch! Hugs, Sandi
Christy says
Thank you, Sandi! Yes… the possibilities are endless! XOXO
Sue H Mellette says
Clever you! I did not see this blog as I was not following anyone then! Ha! Loved that you could replicate the design, but not the colors. I like yours much better! We all seem to get attached to our childhood stockings!
Thanks for sharing this most unusual remake. I am sure it too a lot of time and patience. They turned out great!
Christy says
Thank you so much, Sue! Yes the originals didn’t really look like Christmas to me, but they offered fantastic inspiration! I too have my childhood stocking which I hold dear, but it has become a bit tattered over the years. Funny how we become attached to things! Have a great day! XOXO
p says
Ohhhh, so cute !
A great interpretation using beautiful soft colors.
Great instructions. 😉
Thanks for sharing.
p
Christy says
Thank you so much, P! XOXO
Carol Karl says
I love this! What a great way to use up old sweaters too, and so cute.
Christy says
Thank you, Carol! XOXO