 Hello lovely Friends! Today I’m sharing how I paint a piece of furniture using chalk paint, from start to finish.
In this post I will cover everything you could possibly need to chalk paint a piece of furniture!
UPDATED October 2020:
My product preferences have evolved a bit since this was written, so I have updated this post to reflect those changes. However, my method has pretty much stayed the same!
I have also added a video…look for that at the bottom!!
I hope you find this tutorial helpful!
Because I use chalk paint on most of my projects, I get a lot of questions about the process of painting furniture with chalk paint. I am always more than happy to answer any questions that come my way, but I thought it was about time I put together one helpful post that I can refer my readers to. So let’s get started! I have included some affiliate links so you can find the products I use. Click here to read my full disclosure policy.
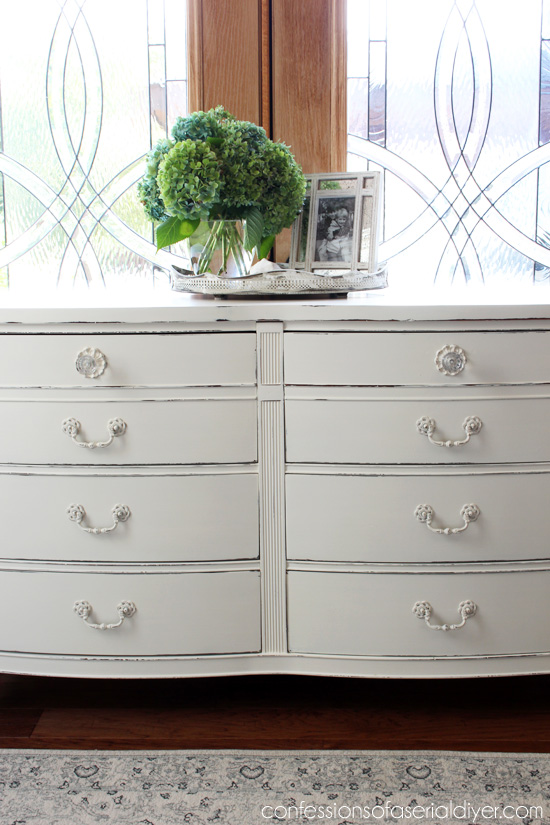
This is my model for today:
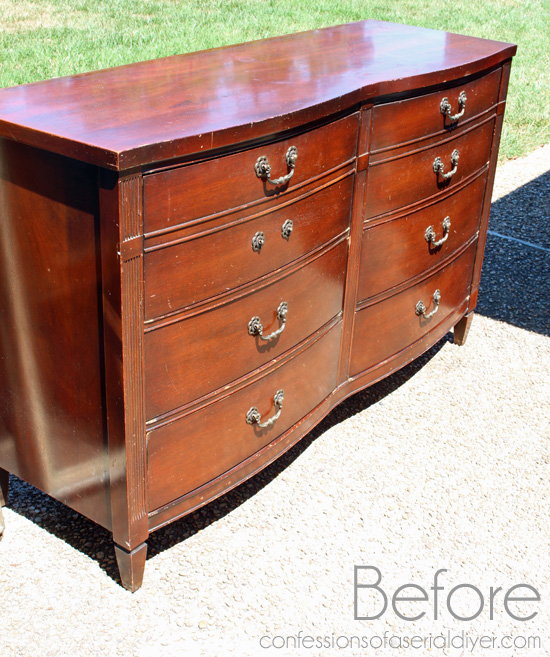
She’s a gorgeous $40 yard sale score that I thought would be perfect for this tutorial.
Here is a reminder of how she turned out:
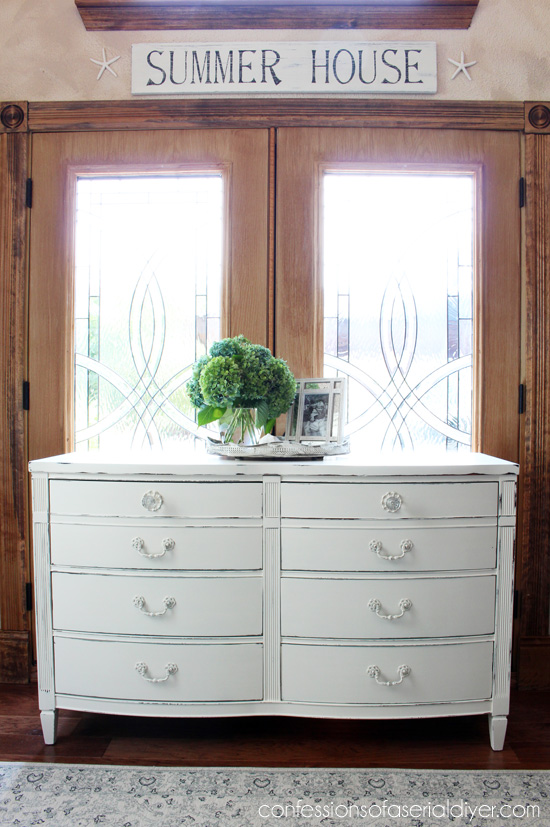
You can see more of this makeover HERE.
This is how I paint a piece of furniture from start to finish, with chalk paint:
Select Your Paint
Let’s start by choosing paint. For the longest time, I mixed my own chalk paint using my go-to chalk paint recipe since I sell my pieces and it is very cost-effective. It works great and I have painted many pieces using this recipe.
If you would rather use pre-mixed chalk-style paint, my favorite is Dixie Belle. I love their products so much that I became a retailer. You can find their products in my Etsy Shop HERE. Their paint has amazing coverage, they have about 70 colors to choose from, and there is no mixing and measuring involved.
Buy a Quality Brush
Now you need a good quality paintbrush. There are two that I use, a 2″ Angle Purdy Paint Brush:
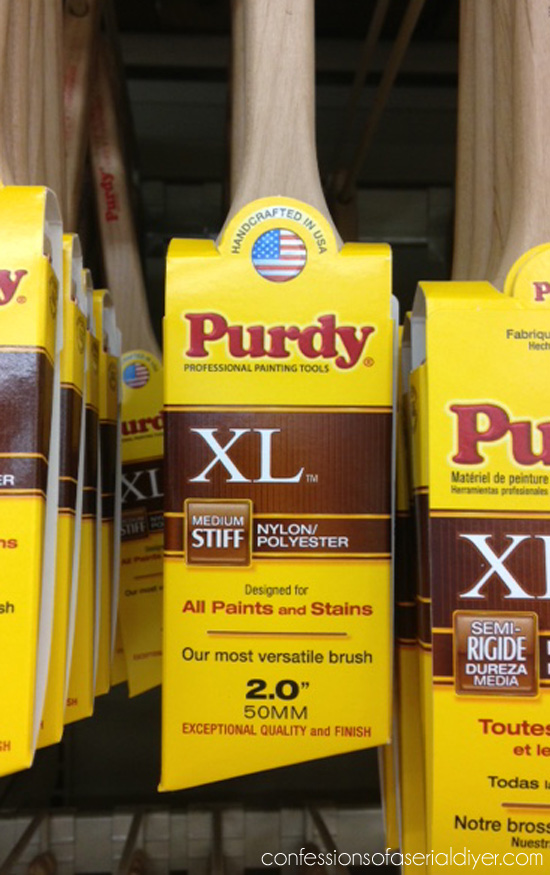
This photo is of the long handled one, but I prefer the short XL Cub version. They will last for years. They are softer at the ends than other brands, allowing the paint to glide on more smoothly and with fewer brush marks. Although you can use a roller with chalk paint, I usually only use a brush. (Clean with warm water.)
And I also love Dixie Belle’s mini angle which is very similar:
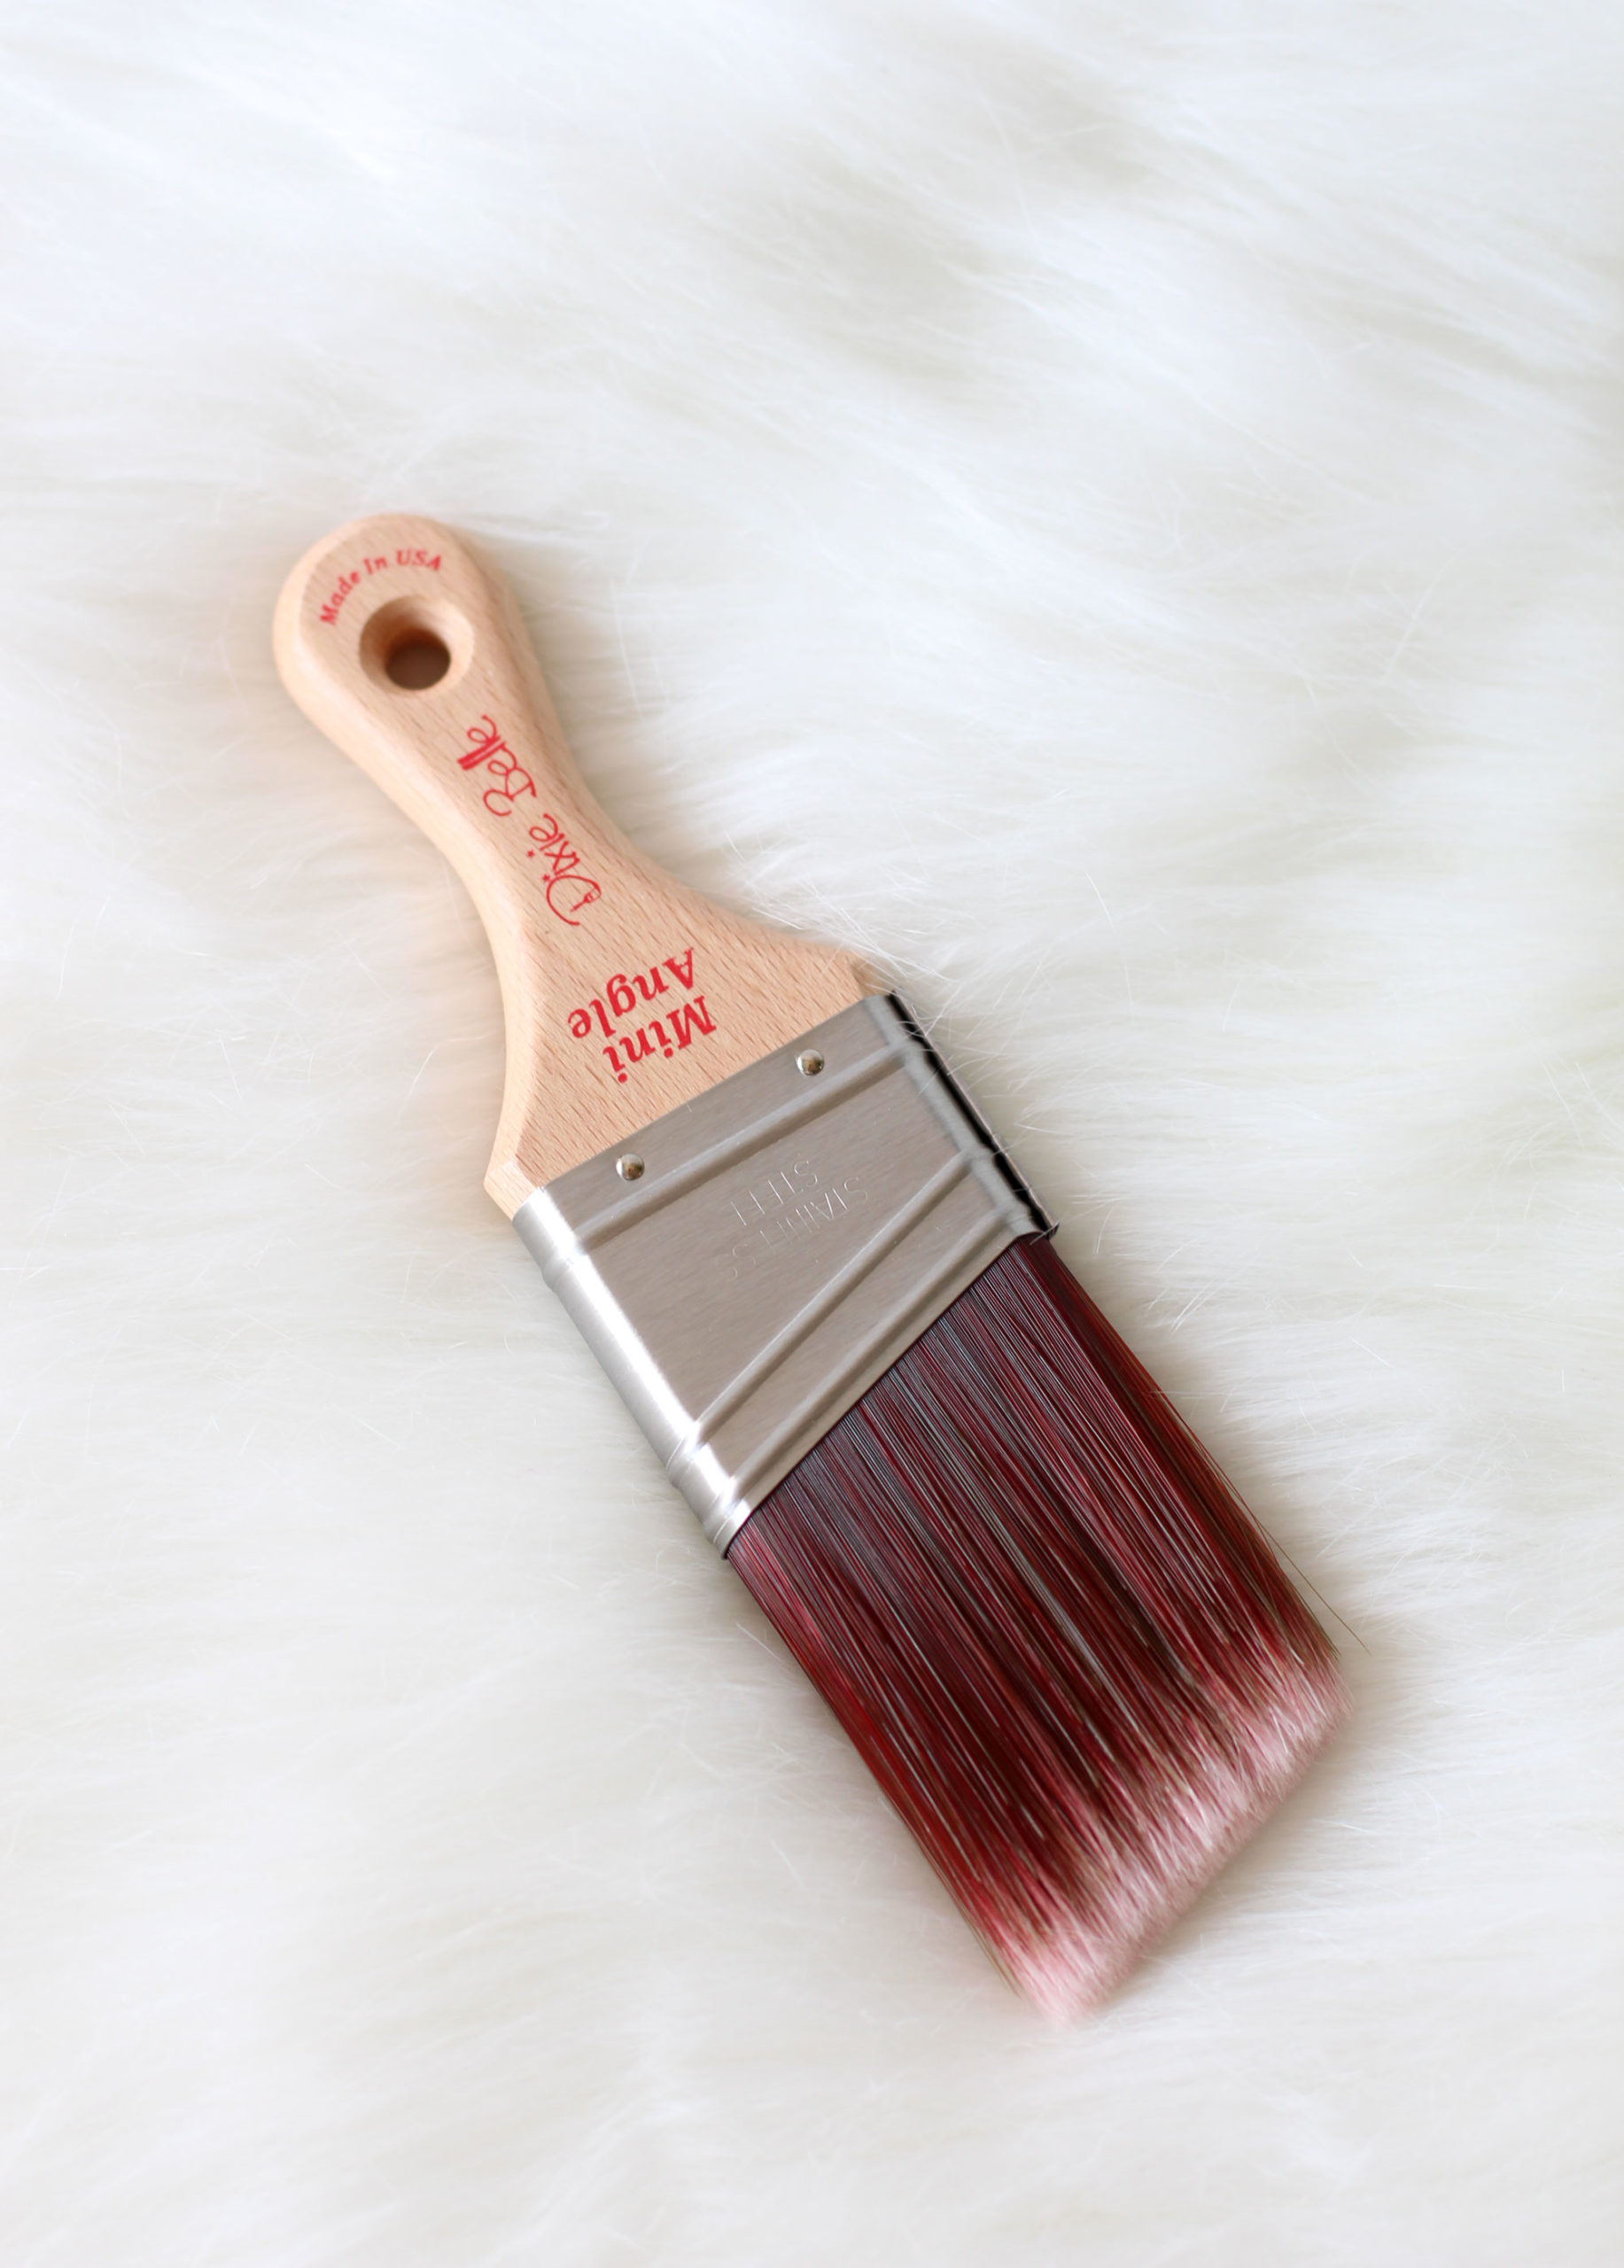
If you prefer a non-angled brush, their regular mini is great too!
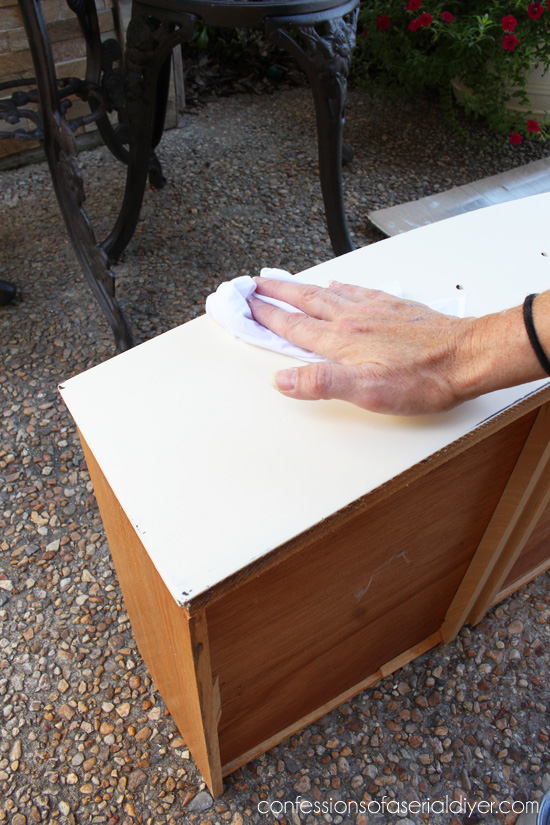
Clean Your Masterpiece
The first thing you’ll need to do is give your soon-to-be masterpiece a wipe down. I used to use cleaning wipes like Lysol or Clorox wipes or even the generic brands which worked equally as well, however with all the joys that came with 2020, so did the inability to find said wipes. I now use Dixie Belle’s White Lightning cleaner and it works fantastically.
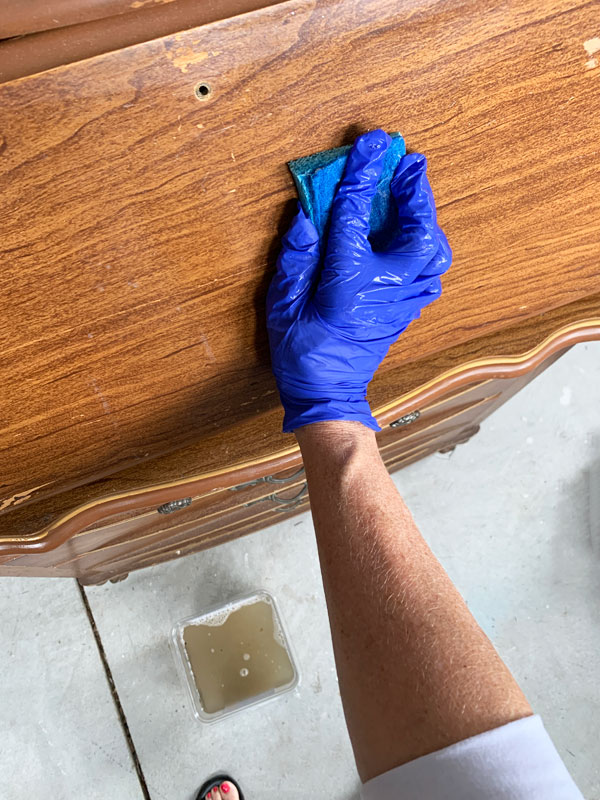
Simply mix one TBSP of White Lightning with half a gallon of warm water in a small bucket and clean with a cloth or sponge. Then change out the water for fresh water and wipe down again to rinse.
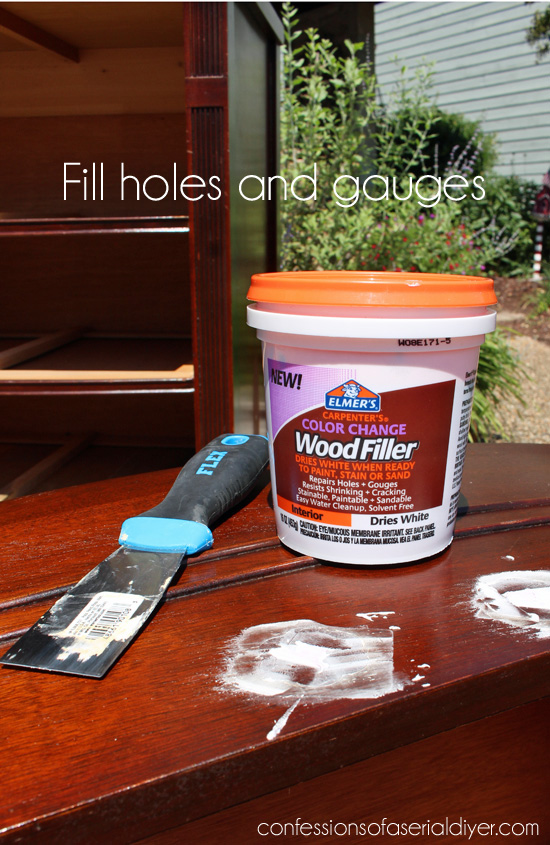
Patch Holes, Gouges, Scratches, etc
Look your furniture piece over for any gouges or deep scratches that need filling. This dresser had a pretty deep ring on top, several deep gauges, and some missing veneer. I also planned to swap a couple of the original drawer handles out for single glass knobs since one was missing, so the old holes needed to be filled.
This is what I used for this piece: Elmer’s Wood Filler and a putty knife…
This is what I use these days:
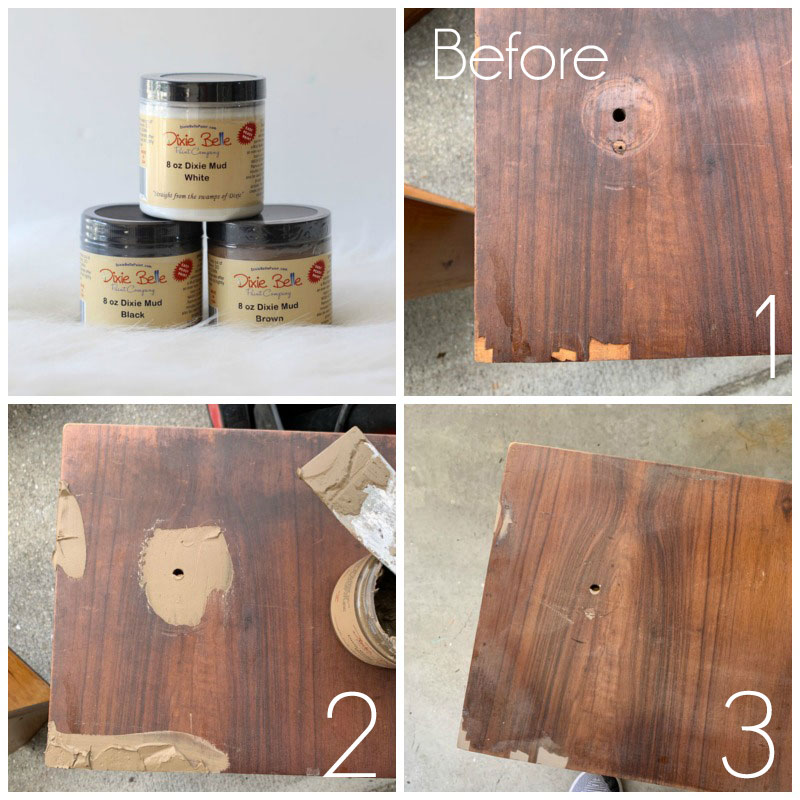
This is Dixie Mud and it is available in three colors.
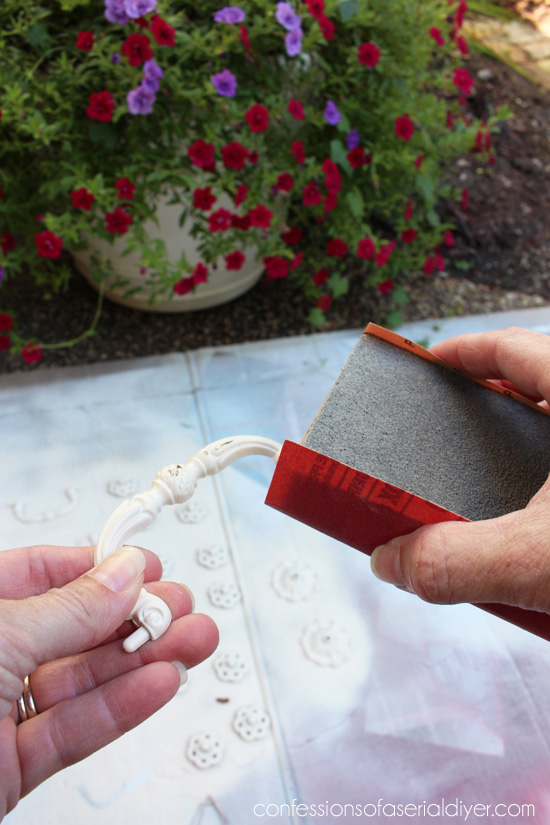
I use 220 grit sandpaper to sand the surface smooth:

I cut these sheets in four and wrap each piece around an old sanding block:
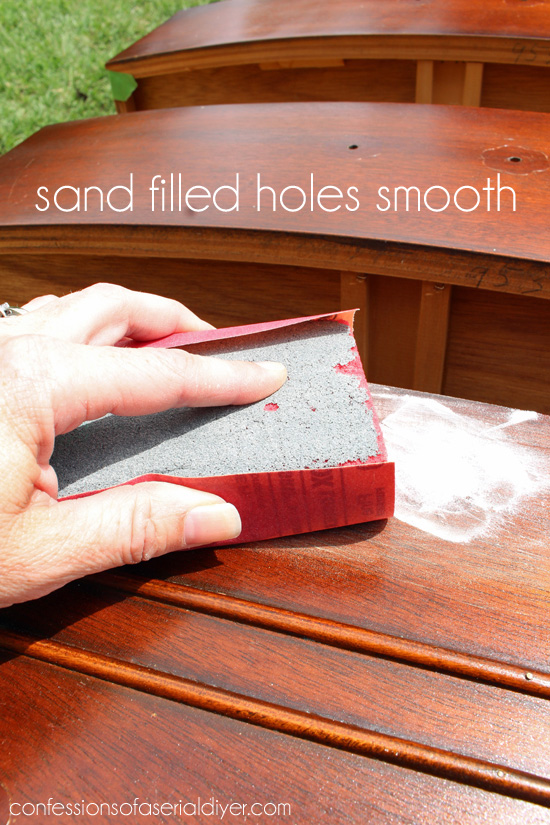
To see if it is smooth enough, run your fingers across the surface with your eyes closed. You shouldn’t be able to feel where you patched. You may need to add a little more filler a second time, but that should do it. The glass knob in the photo below has a patched hole on either side, but you would never know.
(You can skip the patching process on gouges etc if you are going for a really distressed look as they would only add to the distressed look and feel.)
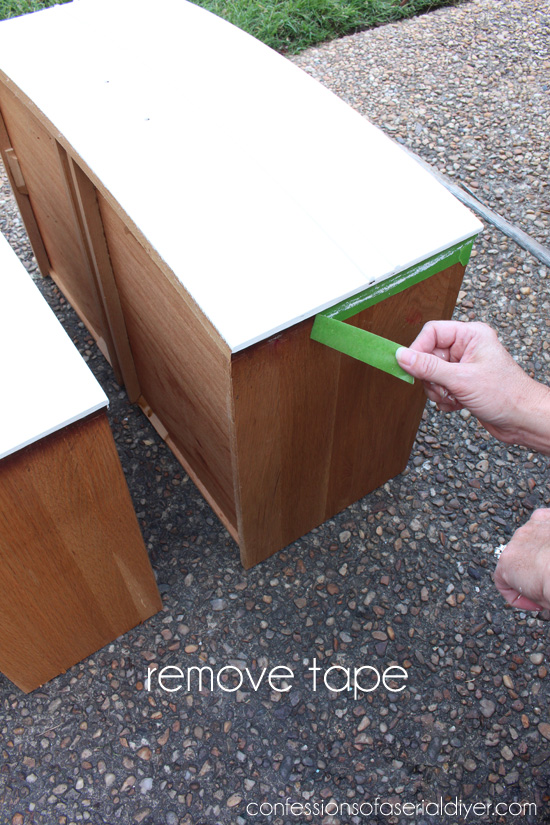
Tape where Needed
The only thing I really ever tape off is the sides of the drawers. I like FrogTape for this.
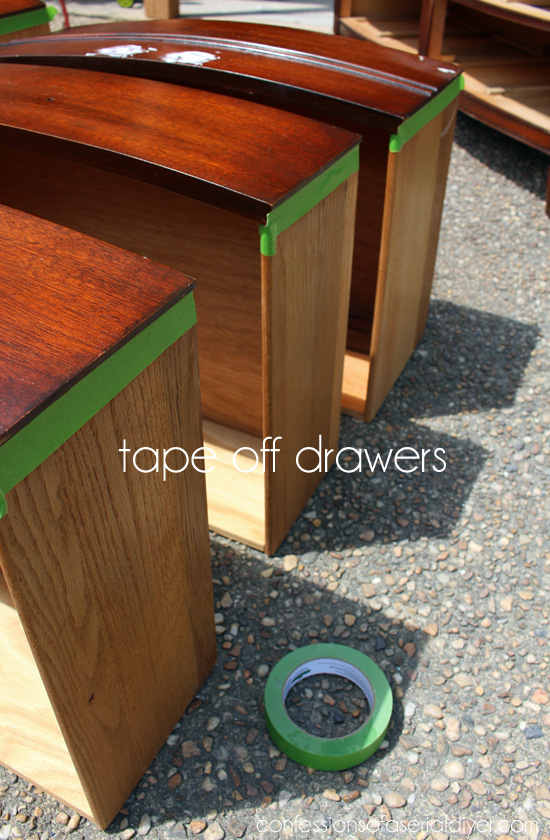
I generally do not paint the sides or the insides of the drawers on any of my furniture pieces. For one, it’s more work and why make it harder? And usually, the drawers are in great condition. (I almost always line the insides though, more on that at the end.)
Do I need to Prime or Sand?
The general answer with chalk paint is no.
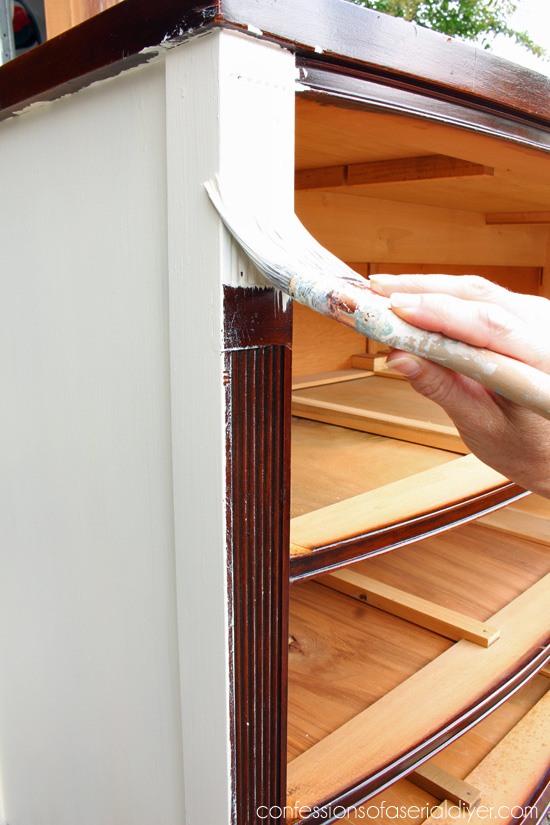
However, if you have an older piece that is cherry or mahogany, you will likely experience the dreaded bleed-through. This will happen no matter which type of paint you use. Test it in a small, inconspicuous area first. Here I started on the side, at the bottom of this dresser and as you can see, I got bleed-through:
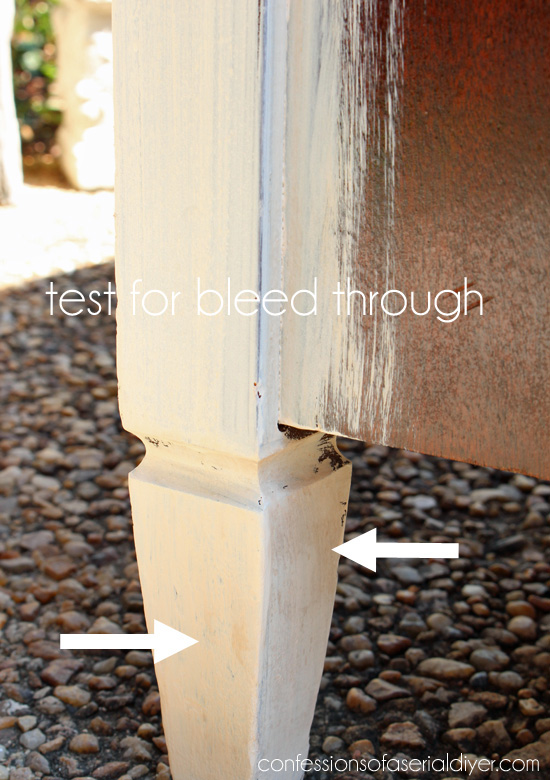
That will bleed through every layer. Don’t panic! There is a fix.
All this dresser needs is a coat of my favorite primer: BOSS by Dixie Belle. It comes in both clear and white. Allow it to dry several hours or overnight if you can. The key is allowing plenty of dry time before proceeding with paint. On rare occasions I have had to apply a second coat before painting. You can also spot-prime if you just have a couple of spots that are bleeding through:
Another option is Shellac. Shellac is stinky, so if you choose to use it, be sure to use it outside or in a very well ventilated area. The BOSS is very low-odor. Both are fantastic for sealing in super musty odors as well. (Both can be applied right over paint if you’ve already painted before you discovered bleed-through.) You can also use a traditional primer as well.
As for sanding, the general answer again is no. However, if you have a super slick surface or non-porous surface like laminate or glass, you may want to apply a coat of Slick Stick first. This will help the paint to adhere better to those surfaces. Most wood surfaces do not require this prep!
Let’s Paint!
Now we’re ready for paint!
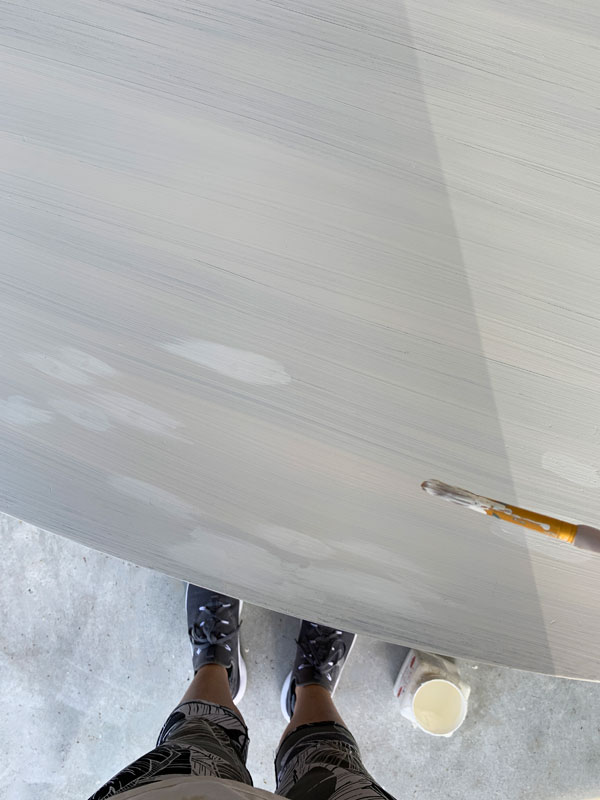
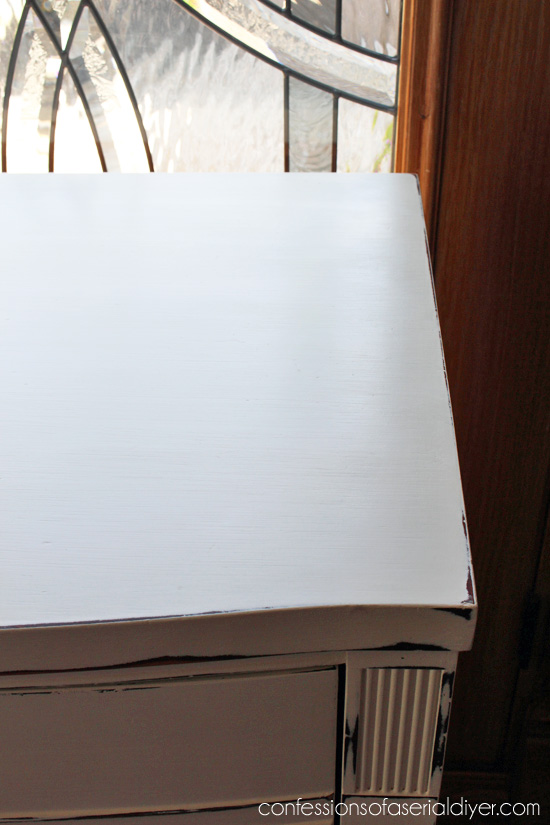
When painting a dresser or table, I like to start at the bottom. Since the top will get the most attention, you’ll want that to look perfect, so I leave that for last.
Paint in long sweeping strokes, going with the grain.
On a horizontal surface, try to go from side to side without stopping, always keeping a wet edge.
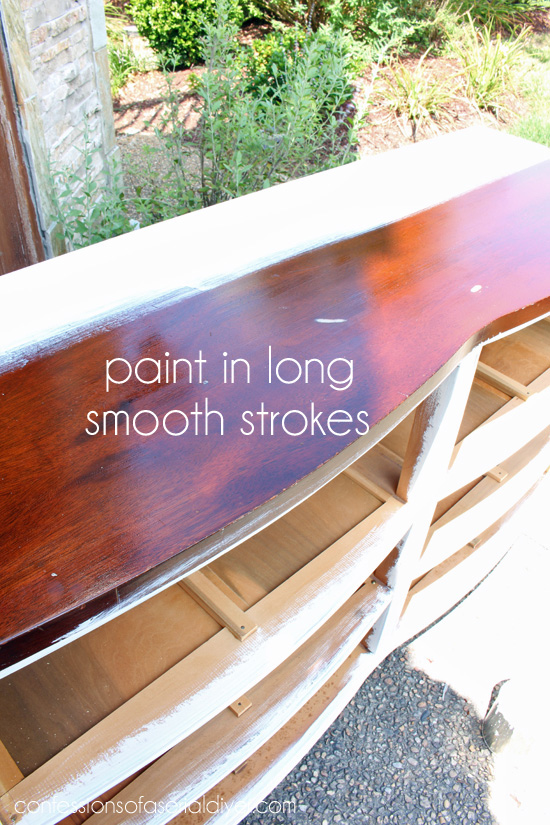
Chalk paint dries fast, really fast, so you have to work quickly.
How many coats do I need?
If you are painting something white or off white over a dark piece, you will probably need three coats for solid coverage. But because the paint dries really quickly, you don’t have a long wait in between coats. If you want your piece more distressed, you may be happy after only two coats. Darker colors have excellent coverage and rarely need more than two coats.
(One exception is Dixie Belle’s Fluff. It is more of a vintage white and because it has some pigment in it, it gives great coverage in two coats.)
*Your piece WILL look terrible after the first coat. Have faith and keep going!
The second and third coats will go on more smoothly if you add a tiny bit of water to your paint. (I usually forget.) So if you find the subsequent coats to be a bit harder to work, you can either use a continuous mister and spray it to keep it moist as you go, or you can dip your paint brush in a cup of water about every third or fourth pass before dipping it into the paint. I am a bit heavy handed with the paint, so I do not usually have any issues.
To keep your brush fresh between coats, wrap it saran wrap:
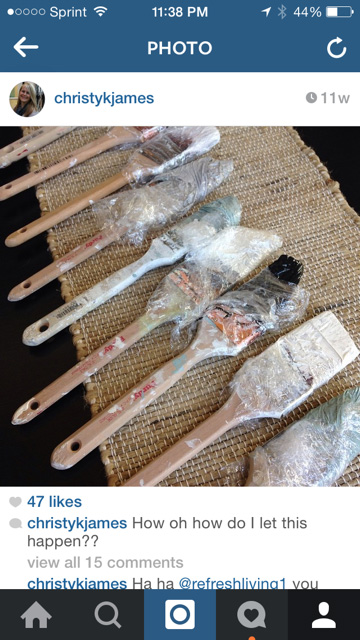
True story! (You can follow me on Instagram HERE!)
Remove Tape
Time to remove any tape.
Sand
Your surface will feel a bit rough to the touch after painting with chalk paint. You will need to lightly sand across all surfaces, applying a little more pressure on edges and details where you want a distressed look. For this I use 220 grit sandpaper. Usually, I hand sand like I did on the holes I patched earlier, but for this piece, I used my orbital sander:
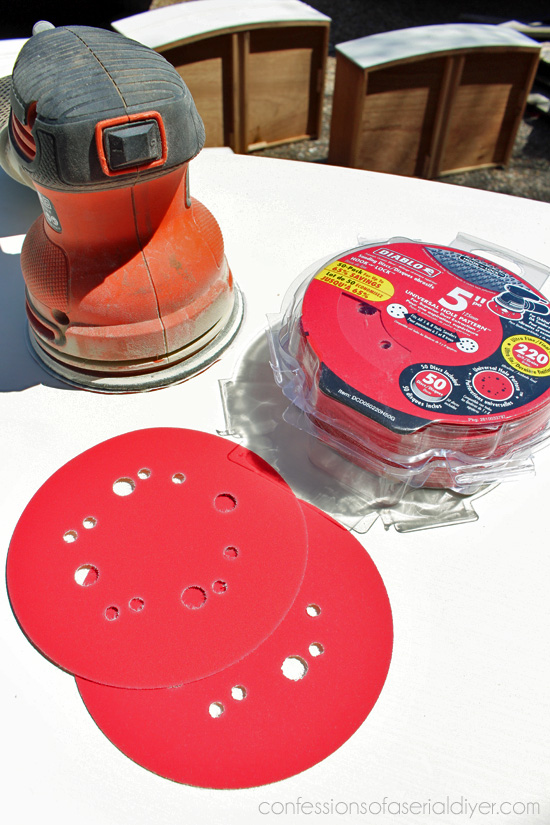
(Don’t forget to wear a mask!)
This sander does a nice even job on the top and sides. You will have less control though, so if you want very minimal distressing, I recommend sanding by hand.
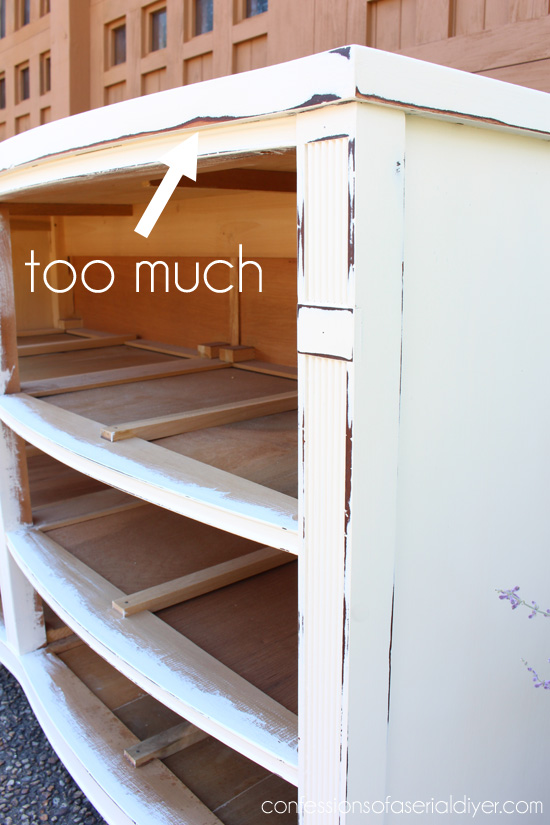
See here where I sanded a bit too much:
After all surfaces are smooth to the touch, I use a shop vac with a brush attachment to vacuum up all the chalk paint dust from the surfaces.
Choosing a Sealer
Brush-on or Wipe-on Sealer
I used to use wax for most of my furniture pieces, including this dresser, because I had a hard time finding a sealer that didn’t yellow over white paint, and I use a TON of white paint. Then I discovered one made by Dixie Belle. It was a game-changer for me! They actually have two.
The first is their Clear Coat in a satin finish. This is ideal for pieces that you want to protect but that won’t get a ton of heavy use. You can apply it with a brush made especially for sealers or with Dixie Belle’s applicator sponge.
Here is just one of the many projects I have used their Clear Coat Satin sealer and sponge applicator on:
And below is a video tutorial of how I used the sponge to apply sealer to a table:
If you have trouble viewing, find it on YouTube HERE.
The sponge is so easy to use, but be careful you don’t allow any liquid to pool in crevices of curvier areas, as those areas will yellow. If that happens, just paint over them, and reseal.
The second sealer Dixie Belle has is called Gator Hide, which is a more heavy-duty sealer that will give your pieces a waterproof finish. This option is great for high traffic pieces, and I have even used both on different parts of the same piece at times.
Wax
Wax is another option and what I used to seal this dresser long before I discovered the Satin Clear coat. The wax will bond with the paint to create a long-lasting durable finish. It will deepen and enhance the color of your paint, but it won’t change the color. Wax takes 21 days to fully cure, so use your furniture piece with care until then.
I used Annie Sloan’s clear soft wax for this dresser, but because it is oil-based, it has a very stinky smell to it. Dixie Belle’s Best Dang Wax has very low odor and works equally as well.
You will also need a wax brush and/or a couple of soft clean cloths. I buy rags in the paint section at Lowes in these big bags:
They are perfect. I usually use a a clean soft cloth, but you can also use a wax brush.
Applying the Wax
Dip your cloth or brush in the wax and apply to the surface, working in small sections. Then buff it into the surface. On this drawer, I started across the top going back and forth pushing the wax into the surface.
Just a few strokes back and forth and you will be able to feel how smooth the surface is. If it is still tacky or sticky, continue to wipe until smooth to the touch.
For a drawer like this, I actually would cover the whole surface with wax, then buff it off. For a larger surface, I would work in sections, moving back and forth across the surface. Try not to stop in the center as you will feel the wax build up there a bit. Try to go from edge to edge, working quickly. You will need to switch cloths as wax begins to build up.
After you have covered the entire surface, wait about 10-15 minutes and then go back with another clean soft cloth and buff for more sheen.
If you see streaky areas, apply a bit more wax and buff.
For horizontal surfaces that will get a lot of wear such as a table top or dresser top, I add a second coat an hour or so later.
I usually continue to use the cloths until they are no longer functional, then toss them, but they can be washed.
Dark or Colored Wax
If you want to enhance your finish or highlight details with dark or colored wax to add a bit more character, apply after the clear wax and in small amounts. Chalk paint is very porous and will really soak up the darker waxes, so this will prevent that and give you a bit more control. If you use too much, add a little clear wax to remove it. Continue to work it into the surface until it feels smooth to the touch. Use a separate cloth or brush for each kind of wax.
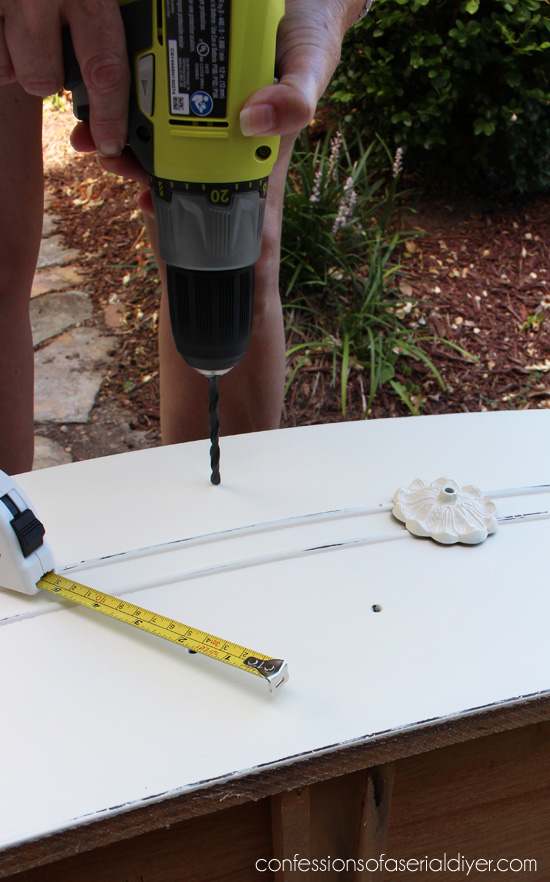
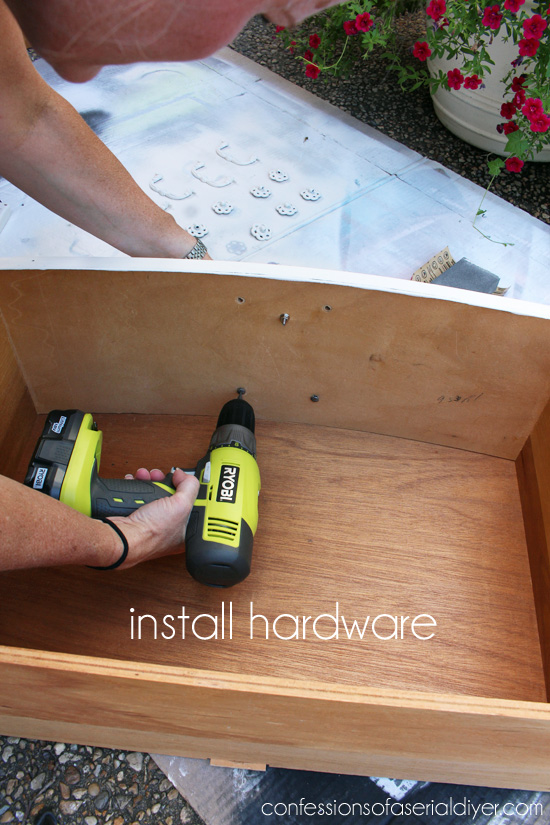
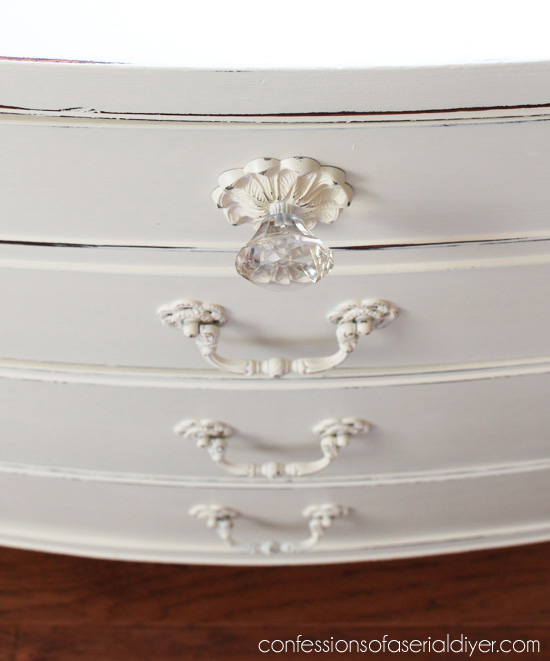
Install Hardware
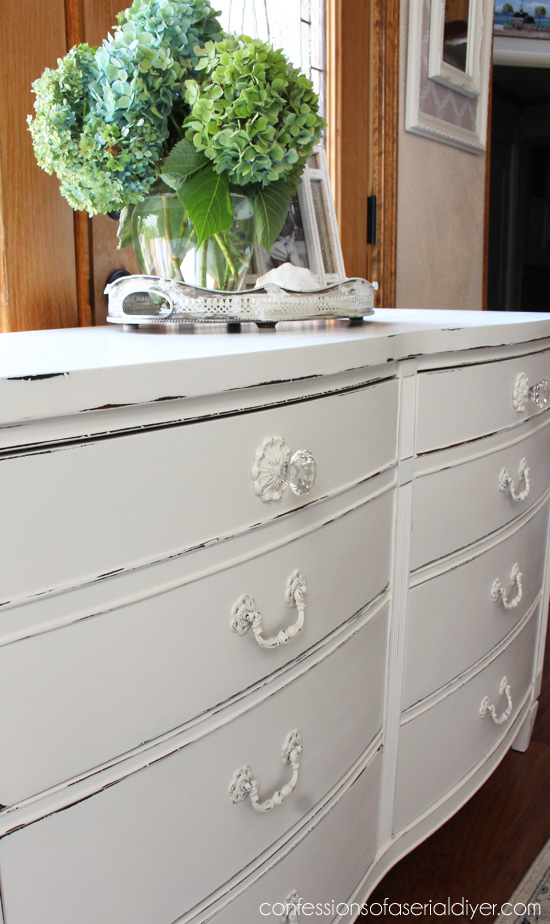
Adding the jewelry is my favorite part! I love when I can reuse the original hardware. I often use chalk paint for the hardware as well, but sometimes I use spray paint as I did for this dresser. Rustoleum is my favorite brand of spray paint. This is Rustoleum in Satin Heirloom White
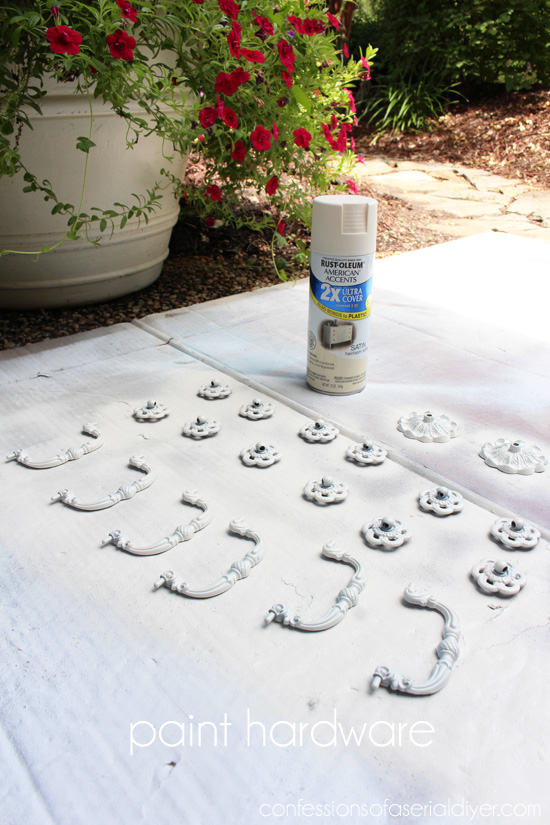
When the paint is dry, give it a quick sanding:
Or if you are using chalk paint, you can even use your fingernail to scratch a little paint off here and there to give it a distressed finish.
For this dresser, I had to drill new holes since I patched the old holes earlier…
Line Drawers
This step is optional of course, but if your project piece has drawers, lining them is the icing on the cake:
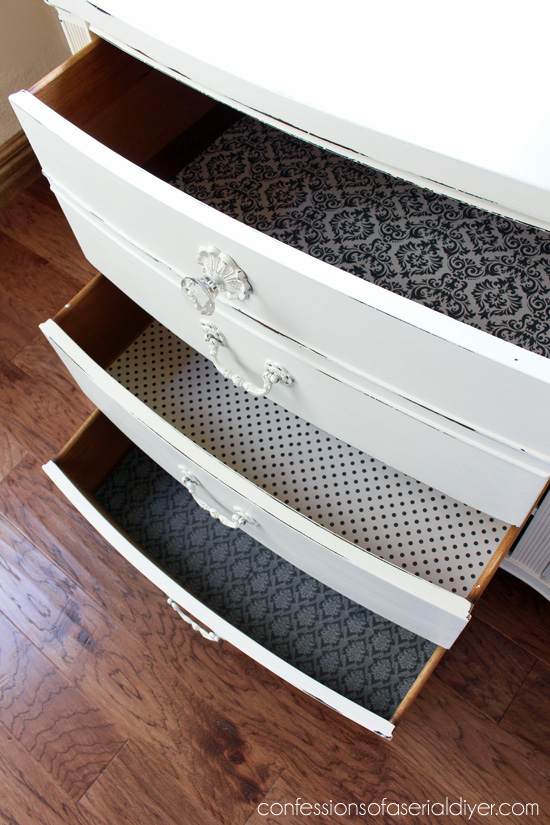
Here I used 12×12 scrapbook paper from Michaels that I already had on hand. A rotary cutter and straight edge make it super easy to cut the pieces. Try to match up the pattern for a seamless look.
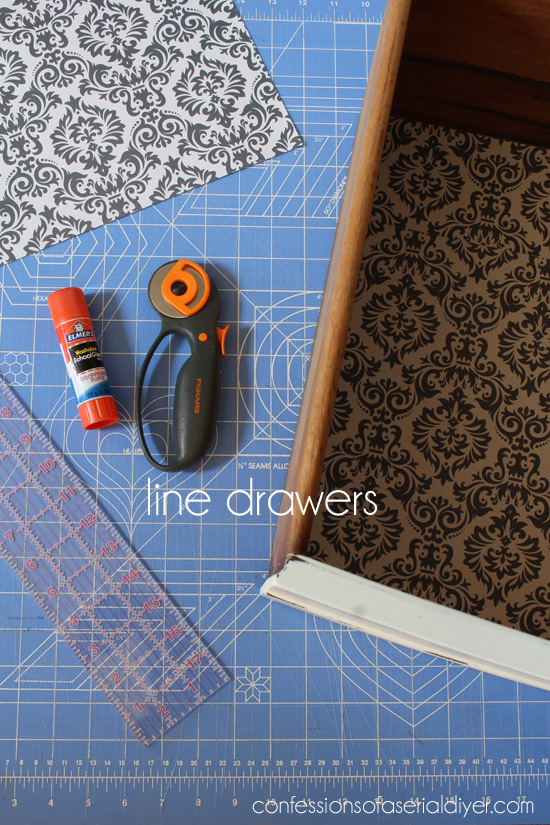
A glue stick is a simple and inexpensive way to adhere the paper to the bottom.
However, I usually prefer to use fabric as I can easily cover the whole bottom of the drawer without any seams, and you won’t have to contend with any pesky air bubbles that you get with paper. I apply that with Matte Mod Podge and a chip brush. You can see how I do that in the video below:
If you have trouble viewing, find it on YouTube HERE.
Stand back and admire!
That’s all there is to it. Not too bad, right?
If you want to see chalk painting in action, view my video tutorial below!
Visit all my Video Tutorials in one place HERE.
These are the tables shown in the video:
Feel free to browse my DIY Project Gallery to see all my projects in one place, most of which are chalk-painted projects.
Chalk paint is not just for furniture either, it works wonders on metal, plastic, laminate, glass, and fabric!
I hope this answers any questions you have about painting with chalk paint.
Want to save this for later? Pin it!
Ready to try out some products for yourself?
Visit my Etsy Shop HERE, and enjoy FREE SHIPPING on all orders over $50. The discount will automatically be applied at checkout!

Still have questions about what products to use?
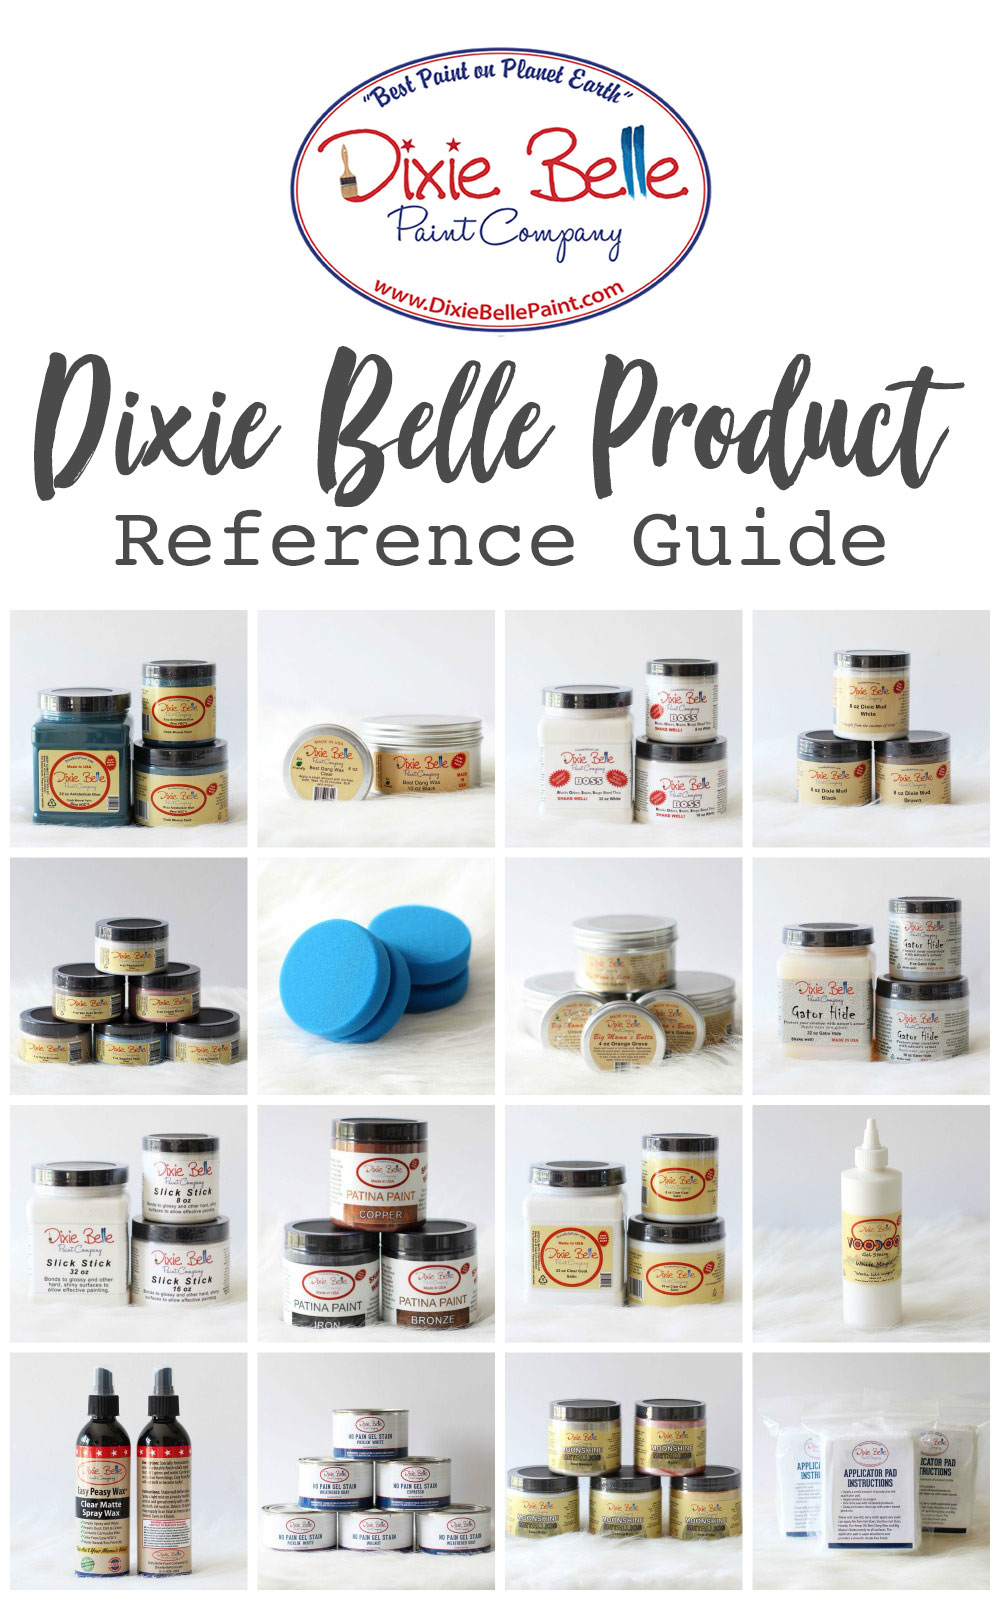
I put together a handy Dixie Belle product reference guide HERE!
Feel free to reach out to me via the Contact Me tab if you have any more questions!
Happy painting!
XOXO,
![]()
Don’t Miss a Thing!
If you like what you see, there are several ways to follow along!
EMAIL * INSTAGRAM * FACEBOOK * PINTEREST * TWITTER


Wendy says
Thank you for this! I’ll be bookmarking it and referring to it a lot. This is one of my absolute favorite blogs and you inspire me every day. This post is so timely for me because I just finished chalk painting a headboard bench that I built following your instructions. But I’m not sure how to seal it. It will be out in the elements getting sun in the summer and snow in the winter so I don’t think wax would work. The guy at Home Depot told me to use spar varnish, but the bench is painted white and I’m afraid of it yellowing. What would you suggest?
Christy K. James says
Hi Wendy! Thank you so much for your sweet words! You are correct in that wax is not recommended for outdoor use. I haven’t had any projects that I planned to use outdoors so I usually wax, but I have seen people use General Finishes High Performance Topcoat in place of wax. It’s a non-yellowing polyurethane. I’d love to hear what you think of it if you use it. Thanks so much for following along. 🙂
Shanna says
Helmsman Spar Urethane – clear satin. I just used it on a light grey stained screen door and it did not yellow the stain. Went on clear and not too glossy. The product has oils in it that allow the wood to expand/contract with changing temperatures and weather. Hence it’s for outdoor use. It’s called “marine grade” for boat use, but it’s good for any outdoor wood project.
Lei says
Thanks so much Christy for the tutorial. I have yet to try my hand at chalk painting furniture…have been jotting all info on process and you’ve created a Start to Finish guide. Super!! Your unreal transformation of thrifted finds has prompted me to try this with your recipe.
Christy K. James says
Awesome, Lei! Hearing that you are feeling inspired is the absolute best! Good luck 🙂
Beth says
Thank you for sharing this post! I i have read many ‘paint your furniture with chalk paint’ post but this one seems to have captured my attention and have given the the desire to (finally) tackle my own project! As with yourself, I am so disappointed that summer is coming to an end, my daughter goes back to school tomorrow…bye bye beach! Have a great fall!
Christy K. James says
You are so welcome, Beth! My kids have one more week left before school starts and we are trying to make the most of it! 🙂
Bev says
You did a fantabulous job and what a great tutorial. Read every bit of it and learned a lot. Thank you!
Christina says
Wow, Christy, great tips! I can make a mess when painting so I’ve really enjoyed using a canvas drop cloth. After a while, the drop cloth is fun to cut up and make things with. 🙂 I did get a cheapo Elmer’s wood filler rather than the pink to white. Lesson learned. 🙂 Thanks so much!
Christy K. James says
Thanks, Christina! Yes those drop cloths can be used for so many great projects. The wood filler I used to use was Elmers, but wasn’t pink to white, just white. This was all I could find this time around, but it works great. 🙂
Catherine McD says
Thank you so much, Christy, for putting together this video! It is an awesome reference tool! Love your straightforward down-to-earth style of writing and instruction!
Christy K. James says
You are very welcome, Catherine and thank you! 🙂
Kim says
Thank you so much for the tutorial! I love your painted pieces but have yet to try painting one of my own – perhaps now, with such wonderful instructions, I will finally try!
Christy K. James says
Yay! Yes go find something to paint! XOXO 🙂
Annette says
Thank you so much for the step by step with complete pictures. I gives me the confidence to try a project. My question is about the wax. Would you use this on every paint project even if it isn’t chalk? Does it seal and protect thru all paints? I have a office chair I am going to paint the seat with chalk paint and all the plastic parts were painted with Rustoleum. Not sure if I should wax the legs, arms etc. that are all plastic.
Christy K. James says
You are so welcome! Great question! The parts that were painted with Rustoleum shouldn’t need to be sealed at all, especially if you spray primed first. I have used wax on other painted surfaces though, so you could if you wanted to.
Christine says
Christy,
Thank you for the tutorial on chalk painting. As you can imagine, there are lots of other tutorials regarding how to chalk paint. You have listed all the steps which is a nice change of pace. I do have a question regarding using chalk paint for a table or dresser top. I have read other blogs which they had advised not to wax the table top and using a topcoat instead. Have you had any problems with using wax instead? Also, had to you clean a table top after the wax has been applied? I’m thinking of tackling my dining room set.
Jolinda lampo says
These are the best instructions ever. Even though I do use the chalk paint I love to read your instructions and learn a few tricks or remind me of what I may have overlooked.
Beautiful work.
Christy K. James says
Thanks so much, Jolinda! I know there are a lot of tutorials out there already, but thought it would be helpful to my sweet readers when they have questions. 🙂
Christine says
So sorry for the not reading before sending. What I meant to say is how do you clean a table top after it’s been waxed? Do you use something special?
Thanks again for all the wonderful tips!
Christy K. James says
Hey Christine! In response to your earlier question about the topcoat, I have heard of people using a polyurethane or a polyacrylic, but I have only used wax and have had no issues. It is recommended to be gentle with your surfaces until it has had time to fully cure which is about 21 days. The wax will harden to a very durable surface. If any imperfections arise later, it takes five minutes to buff a little wax into the surface and it’s just like new. That said, I would like to try a poly to seal to see if you get the same lustrous finish as wax provides. I clean my surfaces with Pledge. Hope this answers your questions. 🙂
Maggie M says
Excellent tutorial Christy! Many thanks:)
Christy K. James says
Thanks, Maggie! XO
Marilyn says
This is a wonderful step-by-step tutorial, Christy. I’m the one that has the mahogany set that is so similar to your project dresser. I’m so glad you mentioned the Shellac–I don’t think I would have remembered that step before I started painting. If I choose to re-stain the tops, do you just sand them, or do you use some kind of stripper? I’m not sure the best way to get the stain off all of the curves. Thanks for sharing all your wonderful projects–they are inspiring!
Christy K. James says
Thank you, Marilyn! You can sand them or remove the stain without sanding as I shared in this tutorial: https://www.confessionsofaserialdiyer.com/how-to-remove-stain-without-sanding/ Either method will work. 🙂
Marie@The Interior Frugalista says
Excellent chalk painting tutorial, Christy! You asked, so here’s my two cents. I’ve had great success with Country Chic Chalk Paint – I find it comparible to ASCP (which I also use). To remove dark wax when clear wax isn’t removing enough of it, dab Mineral Spirits onto a clean cloth and the wax will disappear effortlessly. I also use it to clean my wax brushes. I still haven’t tried your homemade recipe for chalk paint – I’m so lazy.
Christy K. James says
Well thank you! I appreciate your input too! Since I started using DIY paint, I haven’t had a need or the urge to try others lol. 🙂
Beth P says
Christy, thanks ever so much for all the hard work you put into this post. It will certainly be useful and I can’t wait to find something I’m ready to paint! 😀
Hugs…
Christy K. James says
My pleasure, Beth! 🙂
Addie says
Looks great!!! I have stripped furniture for years but….only have re-stained. Now I have an antique dresser with some lovely do-dads (draping roses) on the top drawer. I am torn on how I should refinish it. Latex or chalk paint??? I want it a green and the details in dark wax.
I also want to leave the top stained in walnut. HELP!!!!! Do you use latex? HELP!!!!
Addie…(helpless)
Christy K. James says
This sound like the perfect candidate for chalk paint. Your plan sounds dreamy!! 🙂
Terry says
Fantastic instructions! This piece turned out professional! So Pretty! You do beautiful work! Please come and share! I would love it if you would join in on my Making Broken Beautiful party! It starts 6:00pm (MST) this Thursday September 10 and I would love to have you join up each week!
Smiles for a great week!
Terry
(http://thecuratorscollection.wordpress.com)
Christy K. James says
Thanks so much, Terry! XO
Julie says
Great article, I can’t wait to get started!! I just had one question – about how long do you wait to see if it’s going to be a bleeder? How soon after painting your test area does it start to bleed through?
Christy K. James says
Thanks, Julie! Chalk paint dries super fast and almost as soon as it’s dry you will notice bleed through. Even if you don’t notice it until it’s half way painted, you can still shellac over what you’ve painted and then repaint.
Peggy says
Using instructions from your website I did a small entry table and mirror earlier this year to practice for my big project….a Duncan Phyfe set with china hutch, buffet, table and 6 chairs. Unfortunately the set is mahogany so some extra work to do but I also practiced on a mahogany silverware chest and the shellac worked great. I’m going to restain the tops of the pieces, like your table. I’ve been putting it off a bit and feeling nervous but reading this tutorial has renewed my excitement to get going on this project. Thanks so much for all your tips and tricks and making it seem so doable. Wish me luck!
Christy K. James says
I am so excited for you, Peggy! Good for you for taking the plunge, and it was so smart to test out a couple of smaller pieces first. I’m sure you will do a beautiful job and you will love your set all over again when it its completed. If you want to share pics, I’d love to see! Good luck! XO
Julie Squillante says
I just discovered your blog and love everything you do!! I have been looking for a great tutorial for chalk paint and you delivered! Can’t wait to do a buffet I have.
Christy K. James says
Yay! So glad you found me, Julie…thank you! Chalk paint is magic. Good luck with your buffet! XO
Olga says
Hi, I am wodering what are the advantages of using chalk paint over acrylic? I feel that it adds additional steps to the process and the finish won’t be as durable. I’ve purchased a dining room set with six chairs that is quiet beat up and will require sanding and prepping, and trying to decide on the treatment. I feel that adding CC to the acrylic paint plus having to seal it after the fact with wax, then polish it, adds unnessesary steps to the already laborous process. I guess I feel a bit overwhelmed… OK… ALOT overwhelmed! I want to have the set done before Thanksgiving. HELP
Christy K. James says
Hi Olga, I responded via email as soon as I saw your message. Please let me know if you did not receive my response. XO
Olga says
Hi Christy,
I have only received the automatic response but not your email
Christy K. James says
I tried to answer from my email notification of your comment in an attempt to get back to you as soon as possible, but it must not have gone through. Here is what I wrote:
Hi Olga,
I can sense the stress in your words, poor thing! I’ll try to explain as best I can. If you are looking for a distressed look, chalk paint works wonderfully. It sands beautifully and the wax gives it a long lasting durable finish. See my dining set here: https://www.confessionsofaserialdiyer.com/dining-table-makeover-take-one/ This set has held up fantastically! You will notice that I left the top stained, which in my opinion is the most durable finish for a very high traffic piece like a dining table or kitchen table. The biggest difference to me between chalk paint and latex paint is that the feel and finish of a chalk painted piece that has been waxed is completely different from a latex painted piece. It has a soft buttery feel that’s hard to explain or show in detail in photos. Also there is no need to sand prior to painting with chalk paint, as would be required if you use an acrylic paint. Having to wax afterward is a trade-off I guess. If you’re looking to give your tabletop a painted finish, I would recommend a latex with a polycrylic seal over it. You can see how I recently painted a kitchen table here: https://www.confessionsofaserialdiyer.com/how-to-paint-a-laminate-kitchen-table/
With that set, I sprayed primed and spray-painted the chairs. It was very fast and did work great, but didn’t have the soft smooth rich feel that a chalk painted piece would have after being waxed. I don’t know that I helped much, but hopefully I answered your questions. Good luck!
XO,
Christy
Olga says
Thanks for the quick reply, Christy! Your post on the remake of the dining room table and chairs is what inspired me – it looks fresh, and clean and, chic, and exactly the style I want for myself. I am planning on staining the top in the ligther shade to match a bakers rack I recently purchased. I would still have to sand the pieces to get a nice even surface but I appreciate your reply and the detailed posts on the techniques that you’ve used. Thank you very much! I love your blog!
Christy K. James says
You are so welcome! Best of luck! ?
Ellie says
Hi Christy, this is by far the best tutorial I have seen. I have painted for many years and still learned some techniques that are new to me. Your dresser is lovely. Thanks, Ellie
Christy K. James says
Thank you for the positive feedback, Ellie! This was such a pretty dresser to begin with and the perfect candidate for this makeover.:)
Joanne Willcox says
I love reading your instructional blog…..I have a few pieces that I have been wanting to chalk paint but hesitate because I have never used chalk paint (I have used latex in the past)…..I have a beautiful french dresser. You have encouraged me and I will start!
Thank you so much Christy!
Christy K. James says
Thank you, Joanne! I am so excited to for you to give chalk paint a try…it has been a real game changer for me! Don’t hesitate to write me if you have any questions along the way. Good luck! XO
Grace Turner says
All the pictures you added to show the step by step process makes it so much easier to follow along with the instruction. Your instruction is great as well. I really had no idea that dark wax wasn’t the best thing to use, I’ll be sure and use clear wax instead. I love the idea of using chalk paint on furniture I’m excited to try this out sometime! Thank You.
Christy K. James says
Thank you, Grace! Chalk paint has been a game changer for me…I just love it! Good luck! 🙂
Rose Smith says
Hi Christy,
I am about to paint my first fabric chair. I just finished painting my kitchen cabinets with Annie Sloan chalk paint. My next piece is to paint a fabric living room chair with chalk paint. Have you used your recipe on fabric? From what I have read, AS paint does not leave the fabric stiff. Painting on fabric looks like it will use a lot of paint so it would be nice to save some money making my own. Thanks for your great tutorial.
Christy K. James says
Hi Rose! I have not used my recipe on fabric just yet, but I have been keeping my eyes out for the perfect chair. 🙂 It should work the same way though, maybe test it on the back first? Also my friend Nancy recommends spraying the fabric with water first to help the paint soak in, and then finish it off with clear wax to soften the paint. You can see the beautiful chair she tackled here: http://www.artsychicksrule.com/2014/02/thrifty-french-chair-makeover-annie-sloan-chalk-paint.html Good luck! 🙂
Rose Smith says
Thanks Christy. Watched several Annie videos about painting fabric and was aware about spraying the fabric as well as cutting the paint with water to thin it. Perhaps I will experiment on a small chair first before I tackle the larger one.
Christy K. James says
Oh well you’ve already done your homework then, my kind of gal! I bet it will look amazing! 🙂
Robin Kelley says
Hi Christy.
Today’s the day! I’ll be starting my first project with your chalk paint recipe and I can’t wait to get started! Fingers crossed that all goes well. Thank you so much for the inspiration and tutorial.
Christy K. James says
Awesome!! Remember your first coat WILL look awful…just keep going and good luck! Let me know how it goes! XO
Julie Stinnett says
Hey Christy,
I have painted my first piece with homemade chalk paint using 3/1/1 ratio paint/plaster of paris/water. I painted the top with Charcoal (black) and the dresser with a red. I am sanding now and the sanding areas are coming out with a white-ish appearance. So the charcoal looks gray. Is it suppose to look like that? Will the wax change the appearance? Meaning will that make the white look go away? Help LOL
Christy K. James says
Hi Julie! Yes it will look “chalky” until you wax. 🙂
Sheri says
Hi Christy. I am thinking of trying your chalk paint recipe with some Latex paint I already have at home. Just wondering if it will work with any kind of latex paint , i.e. Eggshell, semigloss, etc. I loved your tutorial and would love to give it a try!
Christy K. James says
Hi Sheri! I am now working on my first project using chalk paint made with something other than flat latex. It’s a satin I already had that I wanted to use. I’m in the middle of it right now, so I can’t speak for how it looks in the end, but I will be posting about it. It’s a kids table and chair set that I will probably be posting week after next. 🙂
Julie B. says
I just started my first project with chalk paint. I started with a roller, but switched almost immediately to a brush. Do you find that a roller uses too much paint? Is there a way that you have found to use a roller (at least for the first coat) that does not do this?
Christy says
Hi Julie! I don’t use a roller, just a brush. I agree that the roller soaks up way too much paint and I just find it easier for me to use a brush from start to finish.
Nathan Murphy says
Hi, thank you so much in making me want to finally decorate my home how i visioned it. I just came in from doing my first project. I want to paint my daughters small bookshelf in grape purple, so i primed it first. Is it normal to finish a WHOLE can of primer on a small bookshelf or did i go overboard?
Donna Lee says
HI, I’ve done a small end table with chalk paint and did wax but now top is yellowing, why? What did I do wrong? Thanks for inspiring us all to do things
Christy says
Oh no! I haven’t had the wax yellow before…I wonder if it could be bleed-through from the stain beneath? If that’s the case, you can paint right over the wax and then wax again. The original wax will have sealed in the stain. Or you can paint over the original wax and seal with Polycrylic (blue can) in satin instead if you fear it really is the wax. Hope this helps!
Gretch says
Hi Christy! I’ve done chalk painting on several pieces before, but this is the first time that I painted a color I didn’t like. :o/ Instead of an antique white, Lowes mixed it almost pure white. I thought maybe after the second coat I would see some of the off-white come out, but no-go. Can I paint over it with a new chalk paint color, or is the furniture doomed?
Christy says
GO for it! You can paint right over chalk paint or wax!
Lisa Kraft says
Christy,
I have read many blogs and used several different recipes and yours has been the best, hands down! I just finished a cherry bedroom set; two side tables and a dresser. I used your cottage white from Home Depot-you should receive a coupon at least. It looks so fabulous! Thanks for such an informative blog.
Christy says
Oh awesome!! Thanks for the positive feedback, Lisa! I love this recipe too…no need to spend a fortune on the expensive brands. Sounds like you’ve been very productive! XO
Anod Nostaw says
I, too, love AS chalk paint! I use both the soft AS Clear Wax and the AS Dark Wax. One of the tricks I have learned using the soft clear/dark wax is to apply it with a soft cotton rag, let it set for about 15-20 minutes, and then come back and buff it out with a 000 or 0000 fine steel wool. It leaves the surface soft as a baby’s bottom.
Christy says
Thanks for the tips! I’ll have to give that a try! 🙂
Anchored in Alaska says
I am so excited i came across your tutorial! I am finally going to try my first dresser, now that I am on a time constraint and am expecting my first little girl 🙂 it will be for her room. I found this gem for free with a matching mirror. fingers crossed it comes out!
Christy says
Oh yay! I’m sure it will turn out fantastically! Good luck and congratulations on your sweet girl! 🙂
Janie says
I agree, this was an excellent step-by-step tutorial. I looked all over trying to find good instructions, and I thank you for taking the time to do it. I painted a chest black for my son and read on another site that you need to rewax every month or so. Is this the what you find? As one reader mentioned, the chest is very rough and unattractive now, but I’m in hopes that when I wax it, the sheen will be there. I was trying to decide if I should repaint with a glossier paint and be done with it, but I think you’ve convinced me that it will look nice in the end. I really didn’t want to worry about upkeep on this chest.
Christy says
I’m glad you found my tutorial helpful, Janie! I will tell you that I don’t usually go back and wax. I clean regularly with Pledge and that helps to keep my surfaces looking their best. Black is tricky though…sometimes no matter how much you buff, the wax still appears streaky in places. You can test it on a scrap piece first in small corner and see how you like it, but if I planned to use black, I would probably do it the old-fashioned way: sand, prime, paint with latex satin. Satin will still have a beautiful sheen without being too glossy. Best of luck to you!!
Celine says
Thanks a lot
For your fabulous work and recipe
I ve tried and because of you it’s perfect.
Love
Céline from France.
Christy says
I’m so happy to hear that, Celine! Thank you! 🙂
Alli says
Great tutorial! I do have one question . Since using the shellac did you have any crackling of the chalk paint ? I recently used shellac on a mahogany side table and resulted In lots of cracks. Trying to figure out if it’s the shellac or something else.. Thank you!
Christy says
Thanks, Alli! I have not had that issue using shellac. Not sure what would cause that?
karine says
me encanta todo lo que haces en restauración….y un excelente DIY… te felicito me encanta tu manera de explicar . tengo una pregunta:en que casos consideras es necesario retirar la pintura vieja ? , tengo una cama vieja pero no se si debo empezar por retirarla pintura anterior .
love everything you do on restoration …. and excellent DIY … I congratulate you I love your way to explain. I have a question: in that case consider is necessary to remove the old paint? , I have an old bed but not if I start by remove old paint.
Christy says
Thanks, Karine! If the old paint is in good shape, you can paint over it. Keep in mind that if you decide to sand a little to distress the edges, you will see the paint color underneath.
karine says
thank ….=)