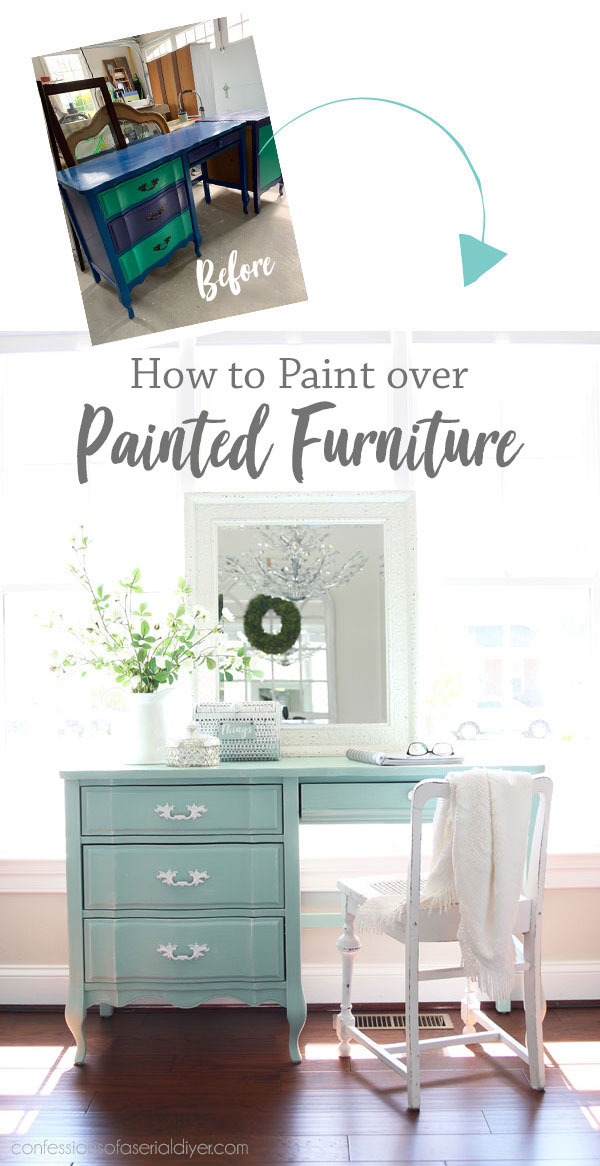
Hello amazing friends! Today’s makeovers (There’s two!) are the perfect candidates to share how to paint over painted furniture!
I’ve reshared a couple of pieces recently that I originally redid at the height of the pandemic, and I was surprised at how many people missed them on the first go round. It was a super crazy time, so I totally get it! I decided to pull another of those makeovers out today as these ones were super fun to bring back to life!
I rarely take on other people’s projects as I don’t like not having the freedom to just do whatever I want with a makeover. The stars aligned for this one though.
My neighbors had asked me for advice about painting some furniture that belonged to their daughter. I was just finishing up the haul I’d been working on at the time, so I asked them to send me photos of what they wanted to paint. When I saw those gorgeous French Provincial curves, I knew I wanted to take this project on!
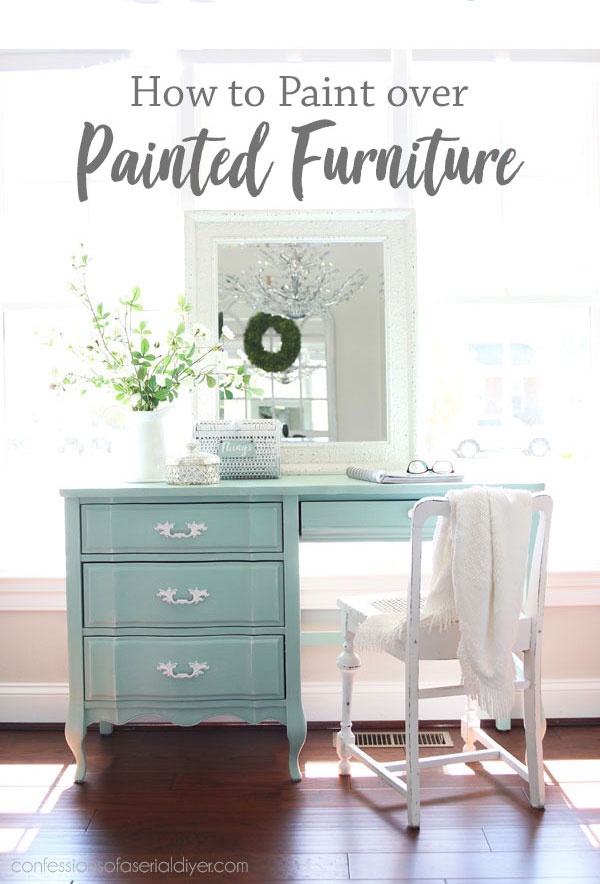
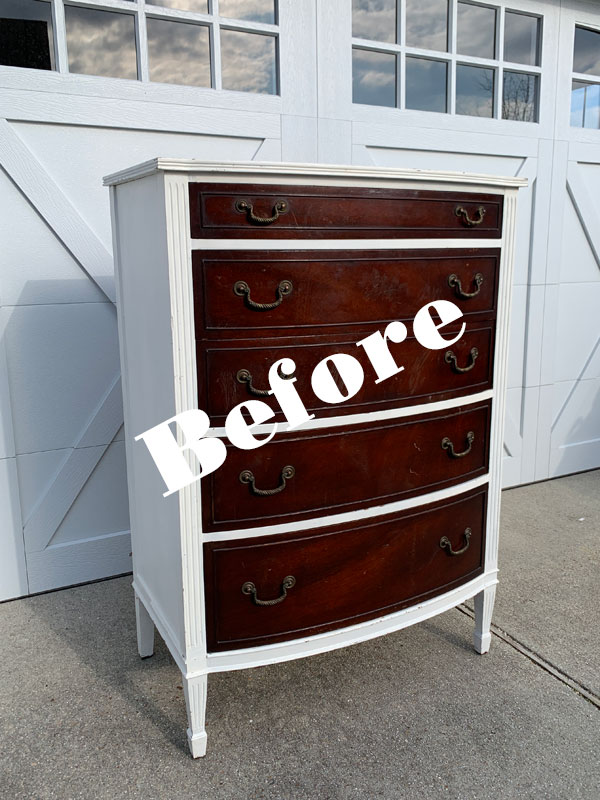
There were two pieces. First, this desk:
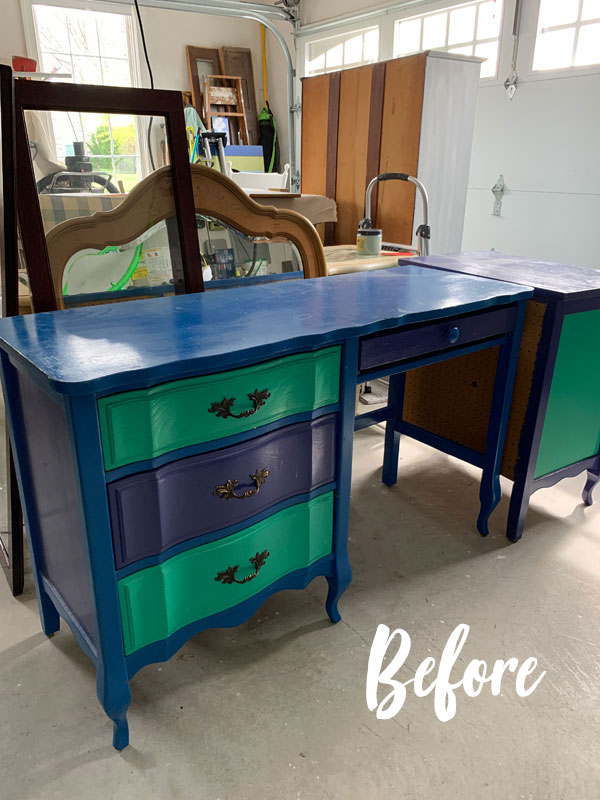
I don’t believe they were the ones responsible for the paint job. I myself may or may not have sponge painted the walls of an entire bathroom in sea foam green and peach paint back in the 90’s so I can’t really be too judgy here!
I usually pass on already-painted pieces when I’m thrifting because they can be a lot of work to redo.
Sometimes tackling an already painted piece is necessary though! I’ve included a few affiliate links so you can find the products I love.
Warning: If you suspect your painted surface has some age to it, always do a lead paint test first before any sanding!
How to Paint over painted furniture
If possible, I prefer to paint over the old paint rather than remove it, but it helps to know what kind of paint it is or what it was sealed with.
Does it have an oil-based paint on it?
Painting over oil-based paint with water-based paint will not allow your paint to adhere well, so it’s important to know ahead of time. You can test for oil-based paint by using a cotton swab or cotton ball with a little nail polish remover (with acetone) on the surface, If the paint comes off, it’s water based and you are good to go. If not, you’ve got an oil based paint. To prep an oil based surface, sand all over with 220 grit sandpaper to give it some grip.
Was it sealed with oil-based wax?
Oil-based wax used to be the main go-to for sealing chalk paint. If your piece was sealed with an oil-based wax, you will need to remove that old wax with either rubbing alcohol or odorless mineral spirits first. You can test it by running your fingernail across the surface. If you get a wax ball under your fingernail, it was likely sealed with wax. To find out if it is oil-based wax, you can try painting over it a bit in an inconspicuous area and doing a test with sandpaper. If when you sand it, it comes off way too easily, you probably have an oil- based wax on there.
Dixie Belle’s wax is water-based and can be painted right over!
Is the original paint job in good shape?
If the finish is intact and it’s a good paint job, go for it and paint away! It if it needs some smoothing out first, give it a light sanding all over to smooth first with 220 grit sandpaper.
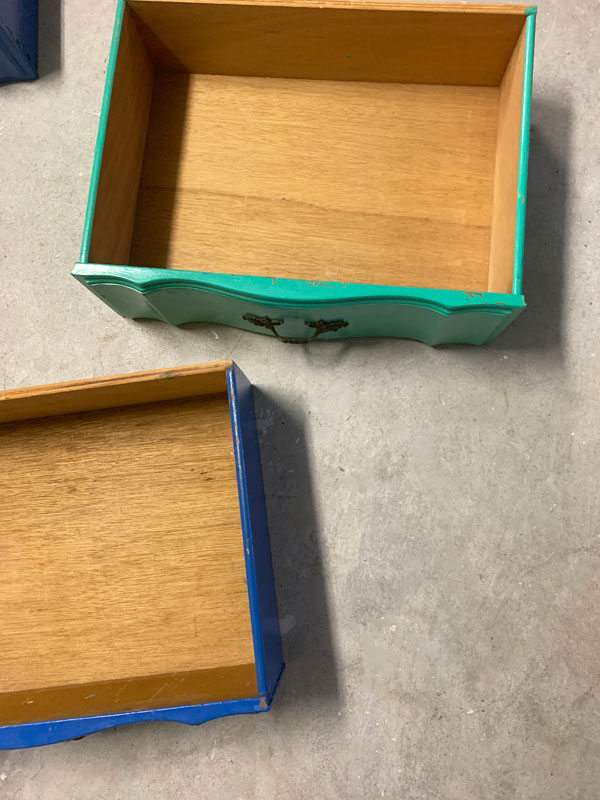
Or, as in this case with the paint peeling away from the laminate on top…

That paint needed to come off. You can use a paint remover like Citristrip, but that is messy work and sometimes I just prefer to sand.
I decided to sand down the top of both pieces to the original finish using my orbital sander and 120 grit sandpaper, followed by 220 grit sandpaper.
The paint on the body of both pieces was better adhered, so I just sanded them with with 220 grit…enough to smooth out the texture and give some grip to that very glossy paint.
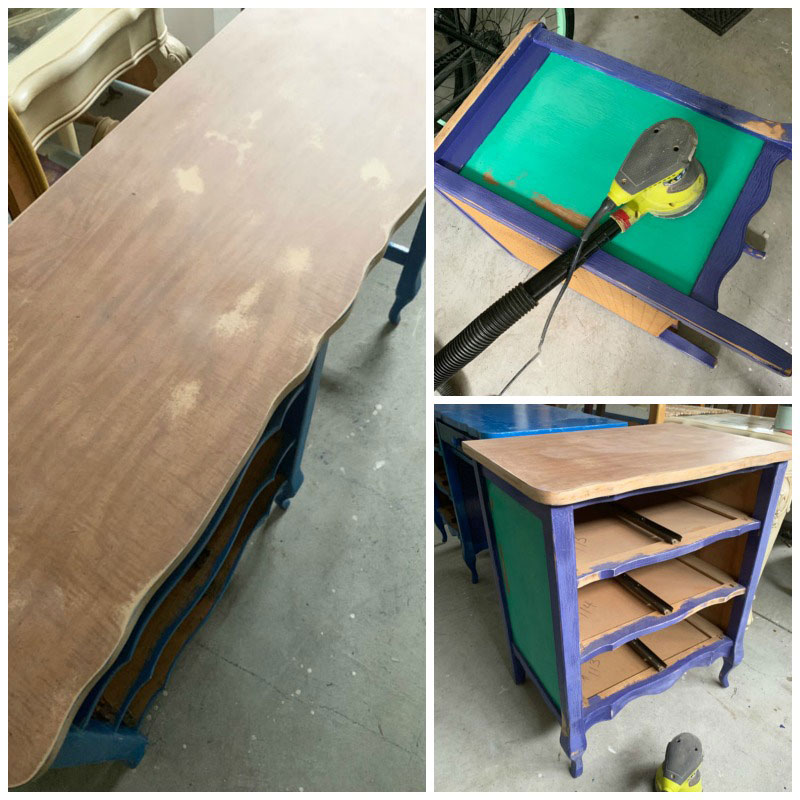
For a lamintate top, you can use a product like Slick Stick for extra adhesion with nonporous surfaces like this, but I sanded the surfaces really well to remove the paint which also works.
Paint
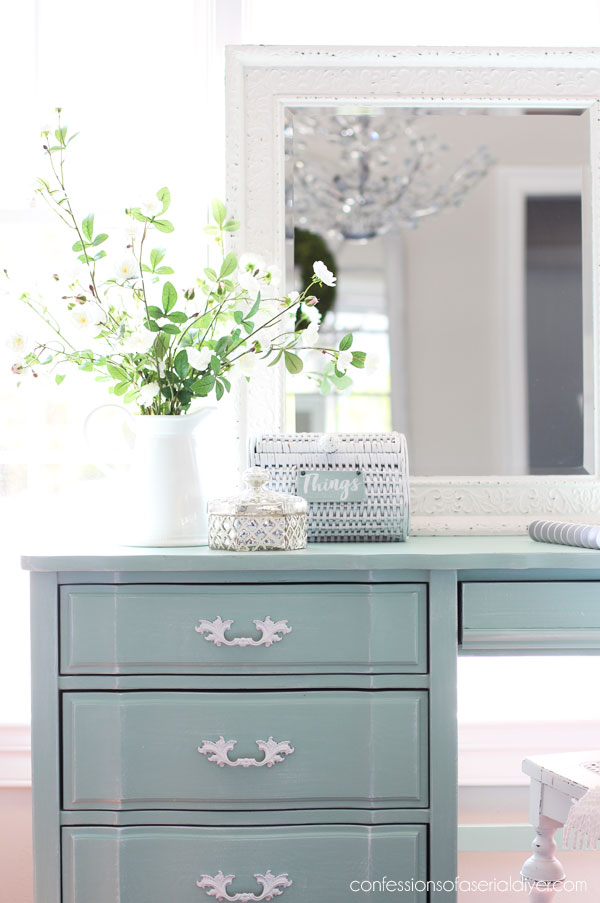
My neighbor’s daughter was looking for a “Beachy” look…a girl after my own heart! I showed her a jar of Dixie Belle’s Sea Glass that I thought would be perfect and she loved it when she saw it. It is a very beachy blue-green color.
I gave both pieces two coats:
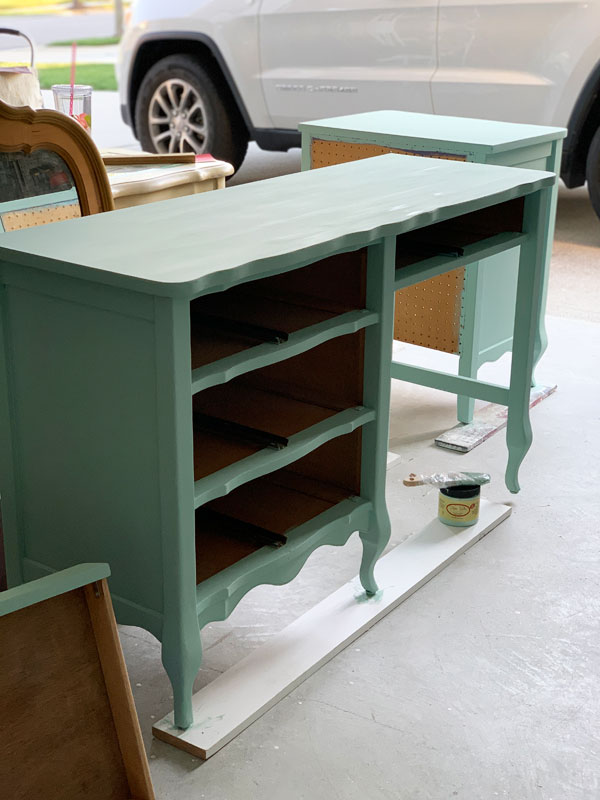
I didn’t plan to distress this set as I did not want the original vibrant colors to show through, so I just very lightly sanded all over to smooth and then cleaned up any dust with my shop-vac.
Then I gave them a light dry brushing with Cotton.
Here is the comparison of two drawers, with and without the dry brushing:
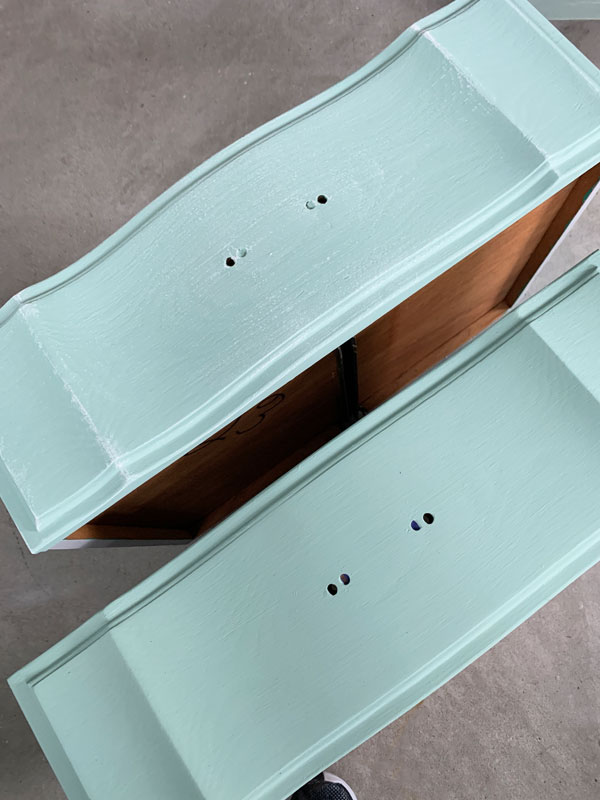
The dry-brushed version has a bit more of a relaxed coastal vibe. After Dry-brushing, I sealed with two coats of Dixie Belle’s Clear Coat in Satin, applied with a blue applicator sponge.
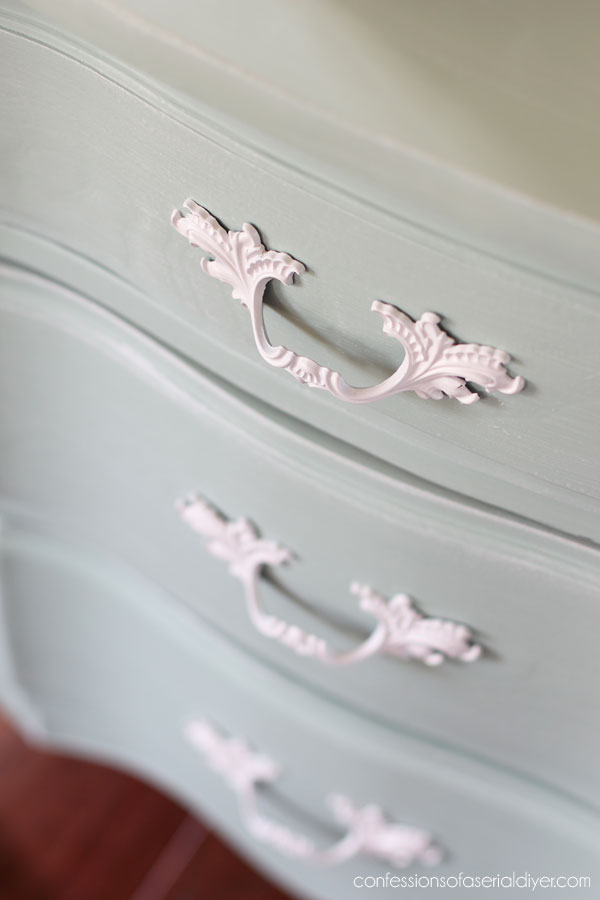
The hardware got a coat of Rustoleum primer, followed by two coats of Blossom White:
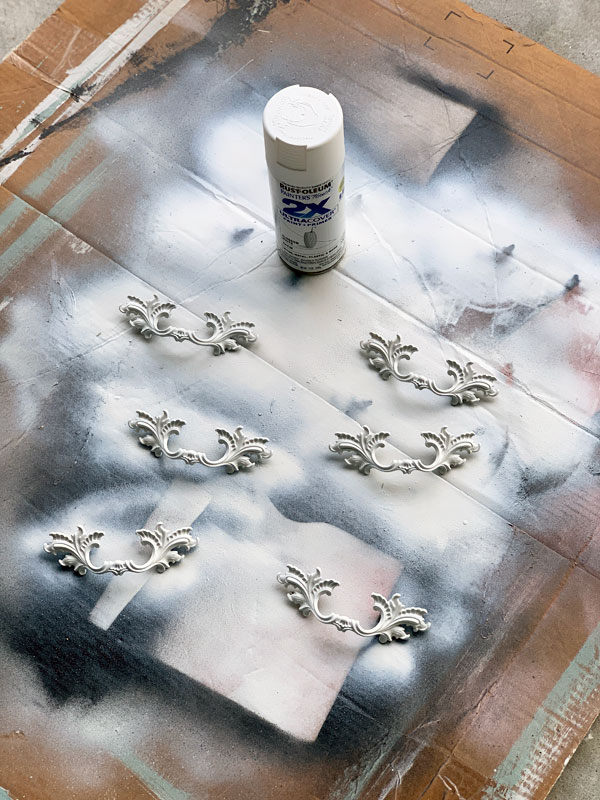
Again, no distressing this time.
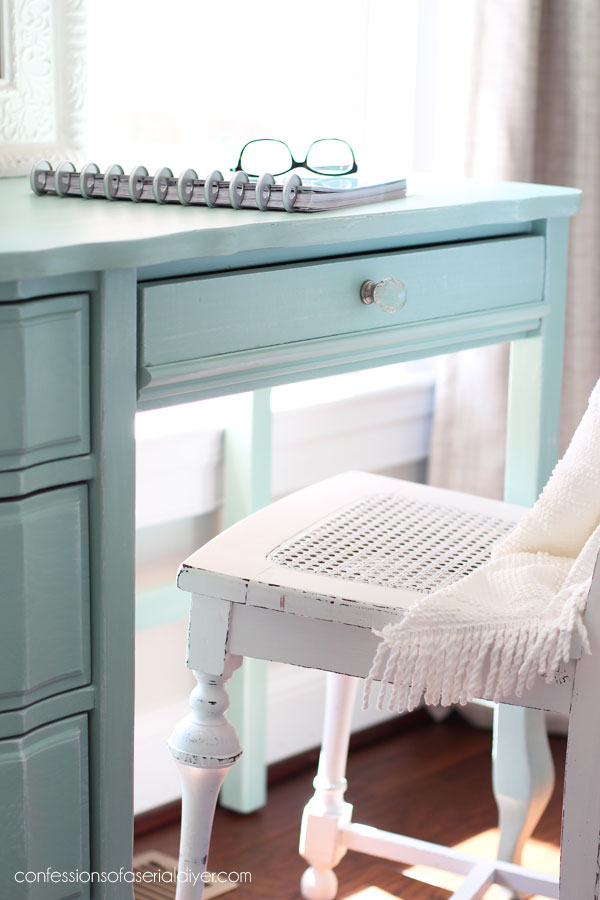
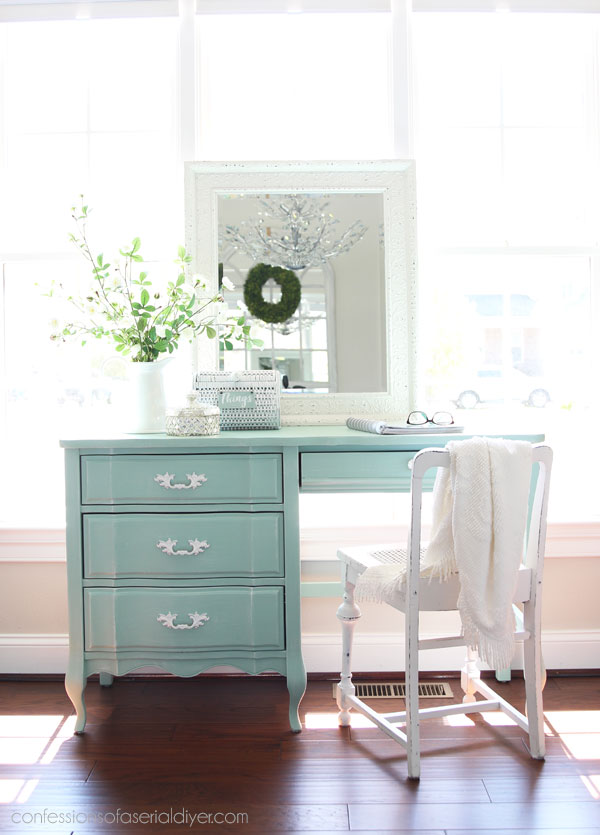
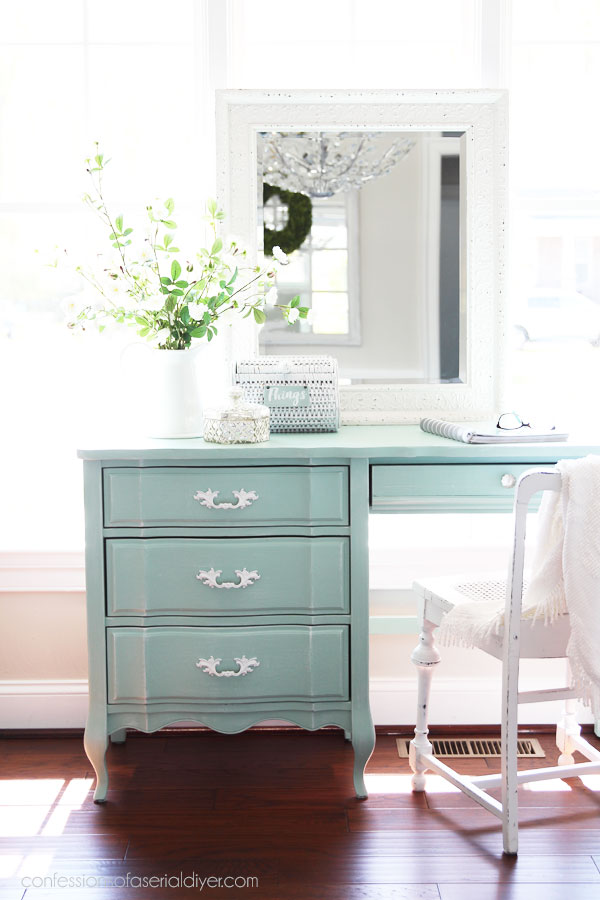
The After
And here is how this pretty piece looks with her new coastal-inspired makeover:
Yes???
What a difference a little paint makes!!
Before, the bottom inch of the single drawer on the right was missing. I searched my scraps in the garage and found this piece of trim leftover from our stairs that worked just fine to fix it:
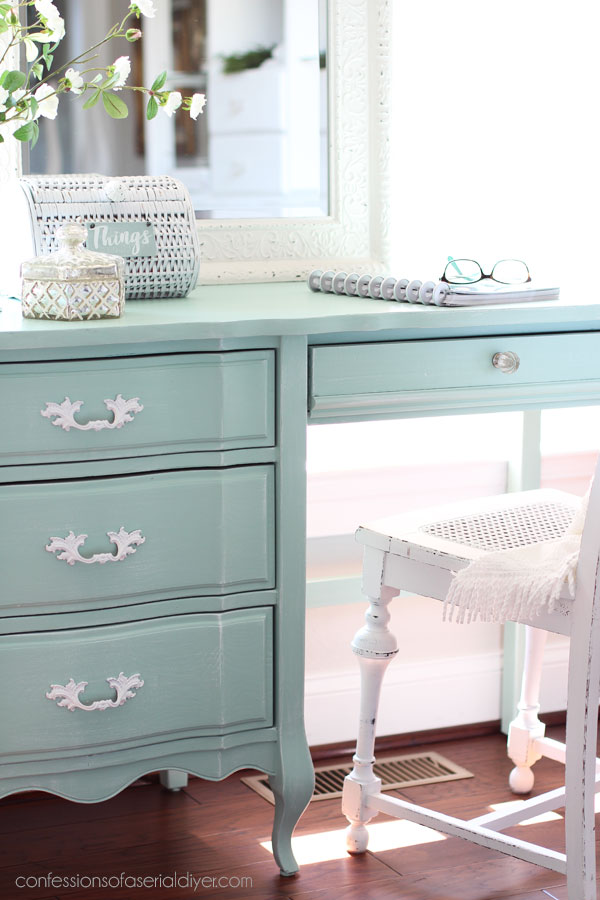
It was attached to the bottom of the drawer front with E6000 glue. I also swapped out the original wooden knob for a pretty glass one…
The drawer sides and tops had also been painted previously…
I sanded those smooth as well, but I wanted to do something different for the sides. I knew they were painting the walls in a soft gray, so I asked my neighbor if they had any leftover wall paint.
That ended up being a lovely contrast to the Sea Glass:
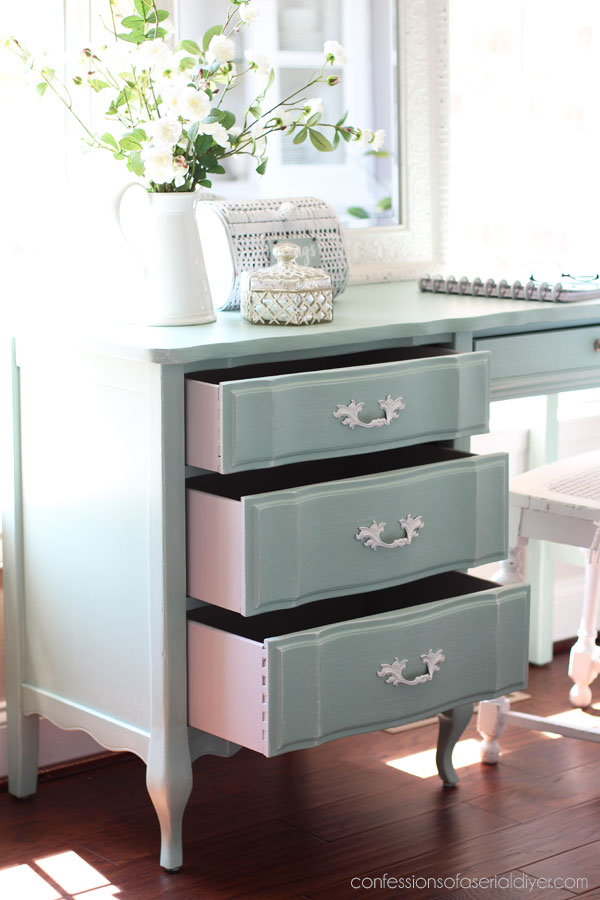
I ended up just painting the whole drawer inside and out:
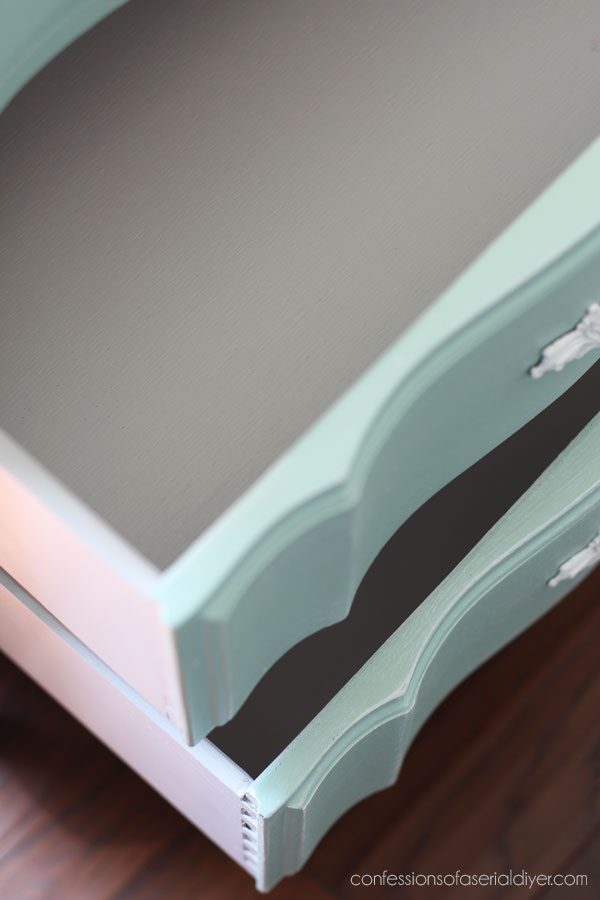
Since I was using latex enamel, I primed first, then painted with two coats.
I love how this pretty piece turned out!
Anyone remember the “Things” basket I redid?

You can see more of that makeover HERE.
I redid two baskets in that post.
And the new pulls with their fresh white paint:
Ok one more piece!
This night table looked just like the desk:
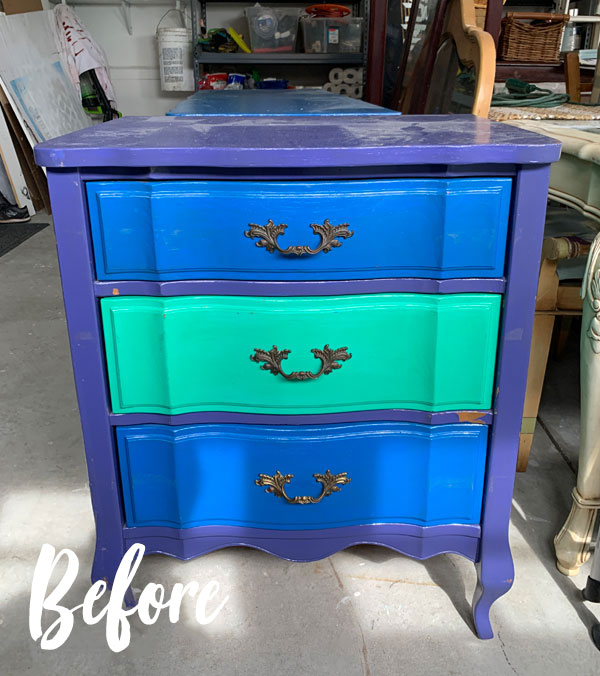
Vibrant!
And here it is now!
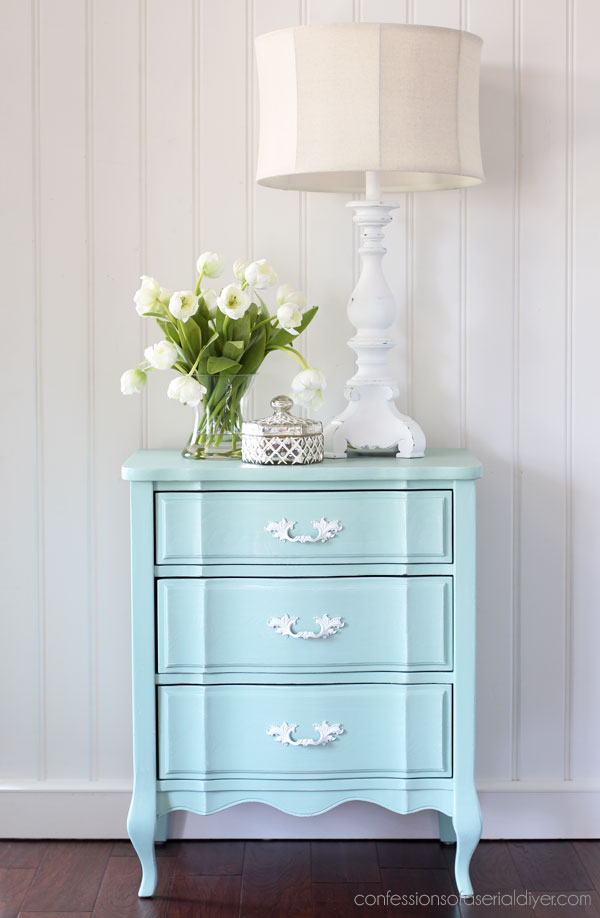
So fresh and light!
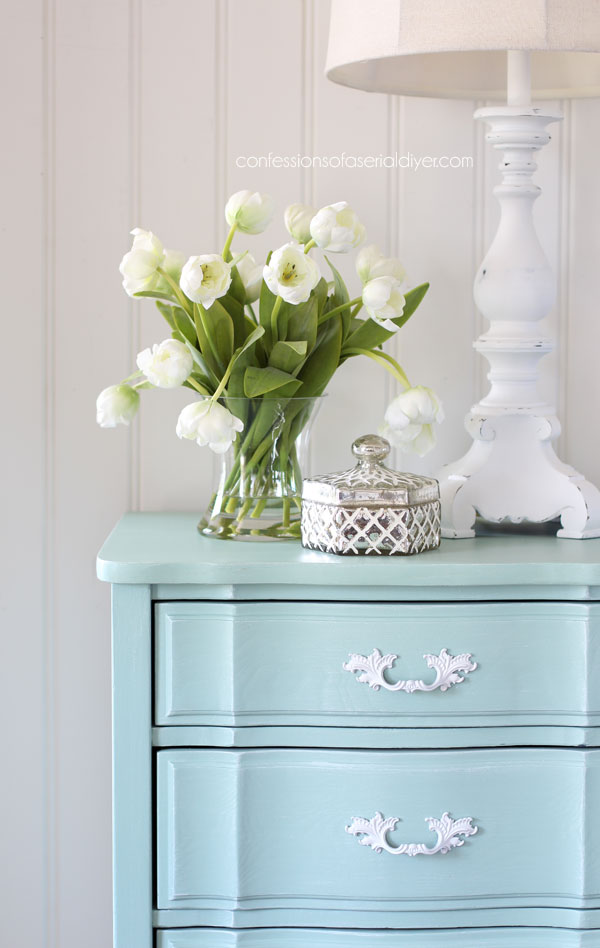
This definitely has a coastal feel now!
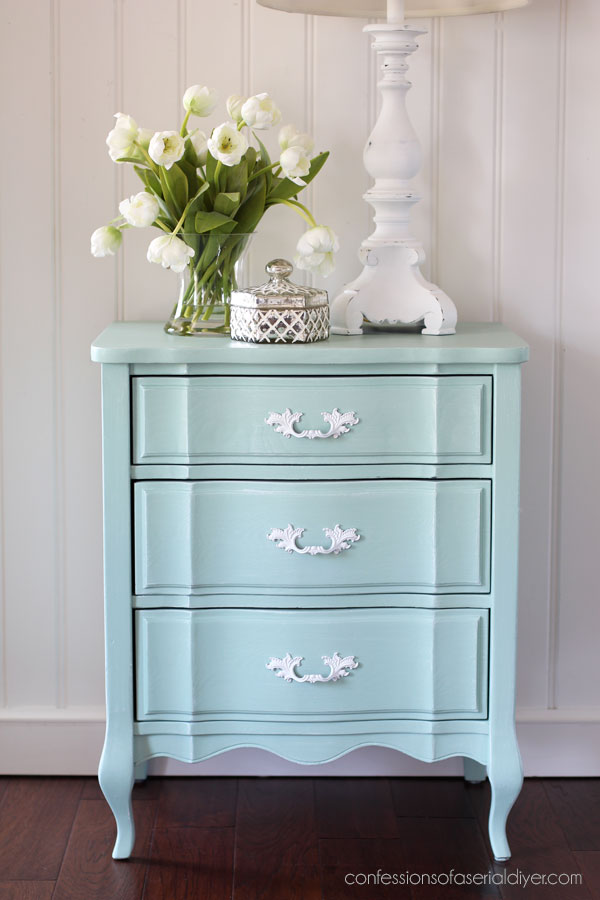
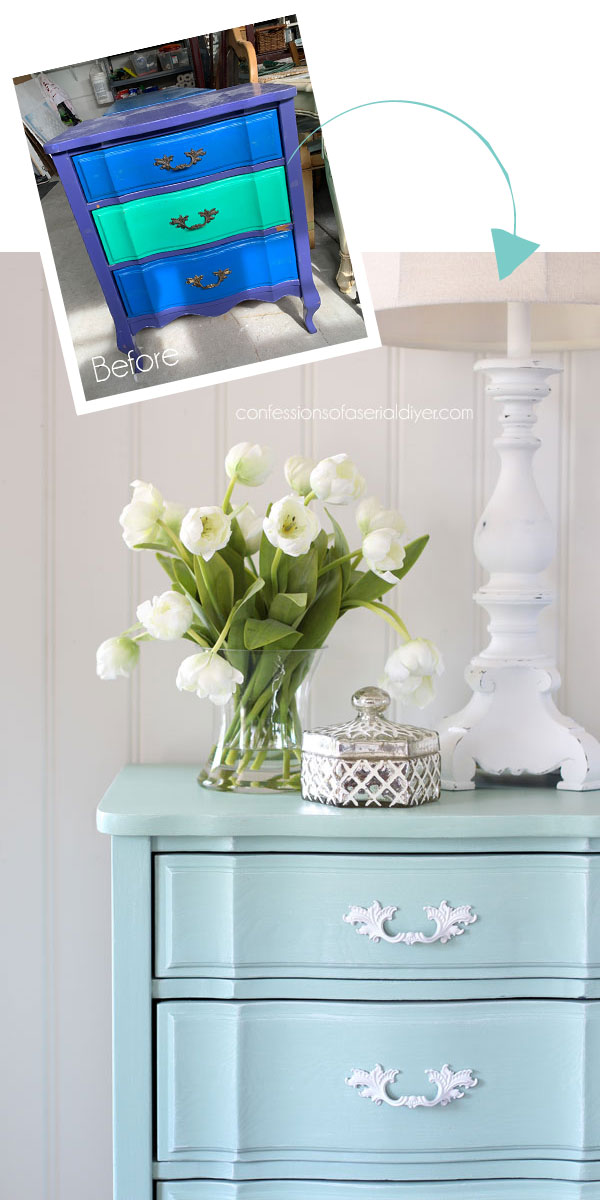
Perfect for a sweet young lady’s room!
I hope y’all enjoyed seeing these!
Here’s one of my favorite already painted pieces that I decided to take a chance on:
It was a steal so I had to!
See what I did with it HERE!
**Just a reminder that my Online Shop will reopen bright and early tomorrow morning!**
I’ll be back to my Spring Haul on Tuesday sharing what I did with this little table:
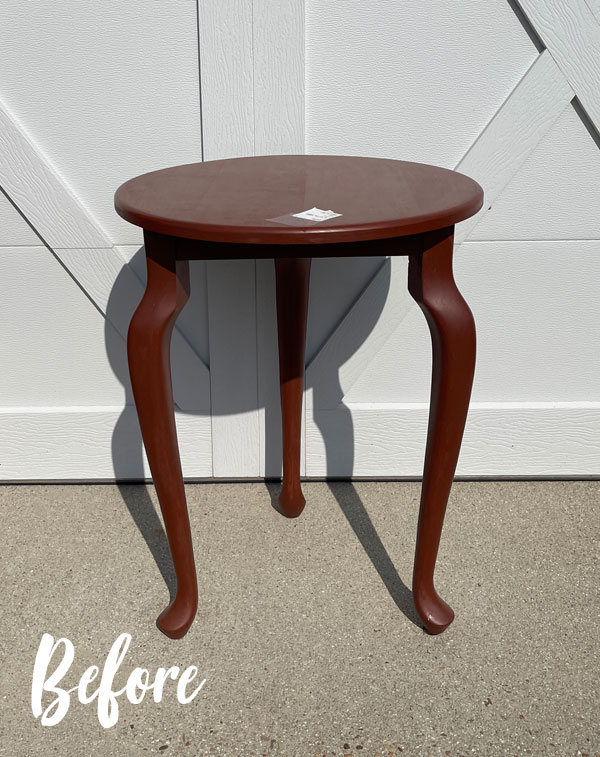
Update! This little table ended up giving me some trouble, but in the end, it turned out so pretty! Se it HERE now!
Have a blessed Easter weekend!
XOXO,

Don’t Miss a Thing!
If you like what you see, there are several ways to follow along!
EMAIL * INSTAGRAM * FACEBOOK * PINTEREST


Rose Lefebvre says
I LOVE THE AFTERS! Much improved look!!! You are genius!
Christy says
Aww thank you so much, Rose!! It had nowhere to go but up ha ha! XOXO
Janina says
You can say that again! What were they thinking? Your transformation is totally charming!
Christy says
Ha ha right?? Thank you, Janina! XOXO
Mary Kaiser says
Wow, what a transformation!! It is so beautiful now! That little girl is so lucky to have you as a neighbor. That set will look so sweet in her room! It’s amazing that paint covered that dark color that was on there! I love how it turned out!
Christy says
Thank you, Mary! She is the sweetest, so I was glad to do this for her, and I just love the style! XOXO
Denise Cox says
Ooh la la!! Love it…(no surprise there…😉). Drybrushing with the second color made the BIGGEST difference! Softened it, gave it a more authentic coastal look. Looked as though it had a textured appearance? Perhaps from the dry brushing? I appreciate how you recycle your remnants…frankly, how you remember what pieces you have that will fit where you need them. And, how you make them fit so perfectly!!
Christy says
Aww thank you, Denise! The dry brushing really added so much for sure! Glad I had something on hand to fix that drawer! XOXO
jennifer george says
Love the Sea Glass color, so refreshing. You’re so right, what a difference some paint and love can do to furniture!! Great job!!
Jenny
Christy says
Thank you, Jenny! Paint is magic for sure! XOXO
Christina says
Super sweet and beachy Christy! Love these two now!!
Christy says
Thank you, Christina! XOXO
Margie says
Hard to believe they are the same pieces. Just beautiful lucky young lady. Happy Easter.
Christy says
Thank you, Margie! Right? Paint does wonders! Happy Easter! XOXO
Cynthia says
Absolutely beautiful transformation. That sea glass is so pretty.
Cynthia
Christy says
Thank you so much, Cynthia! XOXO
Janet says
Saving this post for several reasons, thank you. The testing for paint types is particularly helpful.
I’m stealing your “haul of shame” not saying I’m have that pile:)
Christy says
Oh awesome! Steal away ha ha! XOXO
Jeannie says
I LOVE this color! And the dry brushing adds a beautiful touch! You’ve sold me on the DB wax. I got some locally. It’s so smooth! Question…since it’s water based wax, can I poly (water based) over it if I decide I want poly? TIA
Also thanks for the tips of the oil base and wax testing!
Christy says
Thank you, Jeannie! I love DB’s wax! And yes, you can poly over it if you like! XOXO
Cyndi says
Once again, beauuutiful job! I love that color (and the dry brushing). I had this same desk when I was a girl. I wish I still had it. I would try to paint it just like this! 🙂
Christy says
Thank you so much, Cyndi! I just love this style of furniture! XOXO
Marcia says
Such a HUGE improvement! I would have looked at them and figured they weren’t “save-able” but clearly that’s not the case!
Christy says
Thank you, Marcia! Paint can do wonders for sure!! XOXO
Niki says
Ufdah, that blue and green was….. something. I appreciate the coastal vibe of your redo, and that little dresser looks so similar to the one you just redid!! Fabulous Christy!!
Christy says
Ha ha right? My neighbor assured me they were not responsible for the paint job! Thanks, Niki! XOXO
Jenni says
I love frech provincial pieces! 😍 You made this one look amazing!
Christy says
Thank you, Jenni!! Me too! XOXO
Robyn Wright says
Gorgeous! And thank you for the tips! It really helps this “newbie”.
Christy says
Thanks, Robyn! You’re so welcome! XOXO
p says
That is an amazing transformation for sure. It’s now soft and sophisticated! The dry brushing gave it a nice softness. Great job – and a thorough tutorial. 🙂
Thanks, p
Christy says
Thank you so much! It really suits my sweet neighbor so much better now! XOXO
Carroll Xavier says
Yes!! What a difference; the ‘vibrant’ colours detracted from the beautiful lines of each piece. I’m definitely Team Beach, so love the transformation. The owner will love having them in her room, as the feel is now so much calmer and relaxed 🙂
Christy says
I totally agree, Carroll! The pretty lines were lost with those bold choices. My neighbor was so thrilled with the after! XOXO
Denise says
I would never have guessed those two piece could have become so beautiful! Your skills are awesome. Thank you for sharing your work and explaining what you did to achieve such a gorgeous look.
Christy says
Aww thanks so much, Denise! It’s amazing what paint can do! XOXO