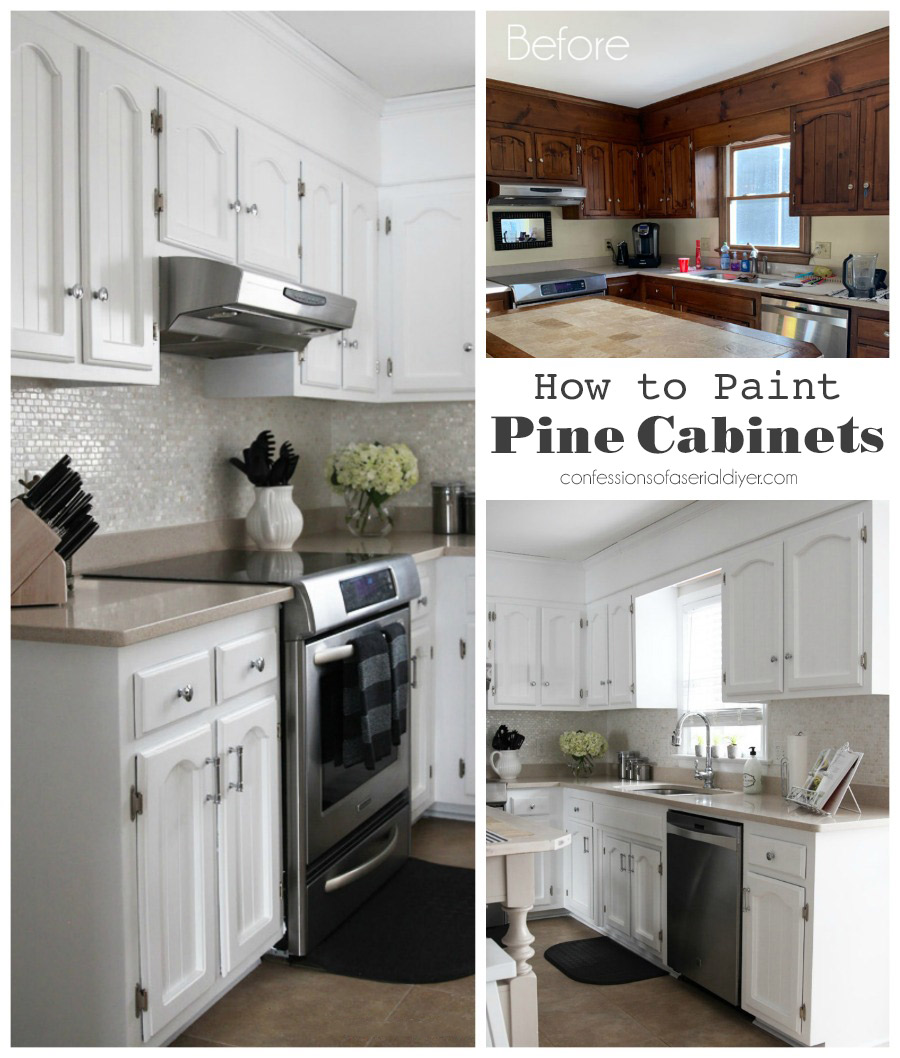
Amazing friends, today I’m sharing how we conquered my sister’s pine kitchen cabinets! I have been trying to get her to paint these cabinets for several years now. She always wanted to, but the task just always seemed so daunting. I shared a sneak peek of her kitchen back when we started on it before the holidays. There are too many photos to share to fit everything in one post, so today I’m sharing all the before photos and the steps we took to paint her pine cabinets and prevent those knots from bleeding through. Then I will be back on Thursday to share the final reveal.
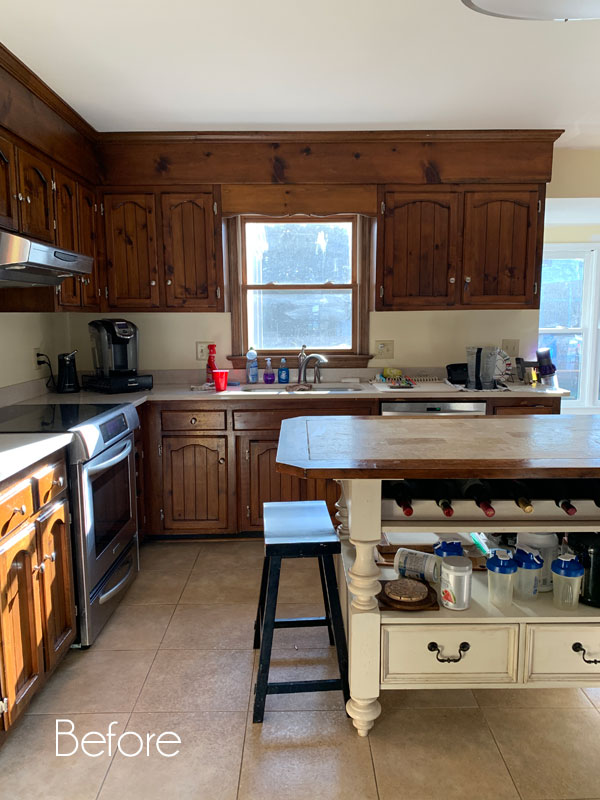
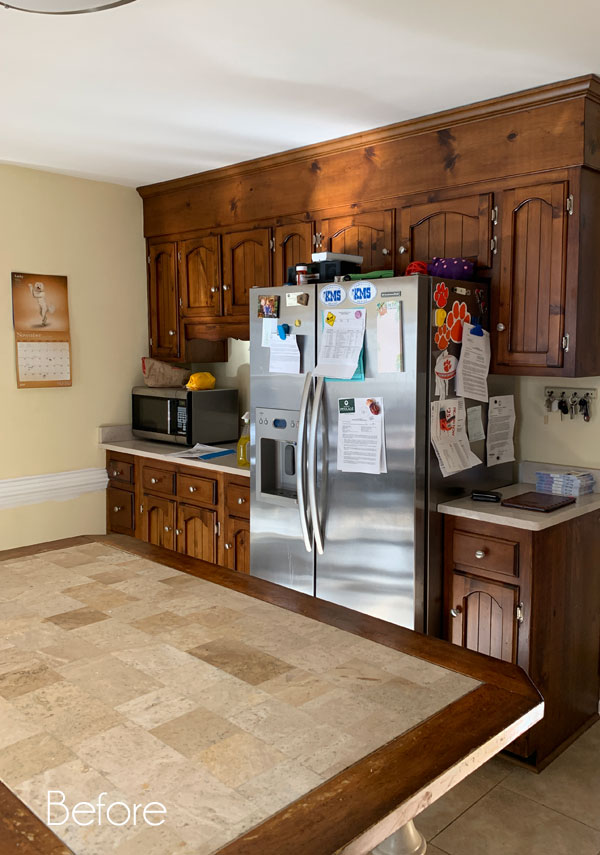
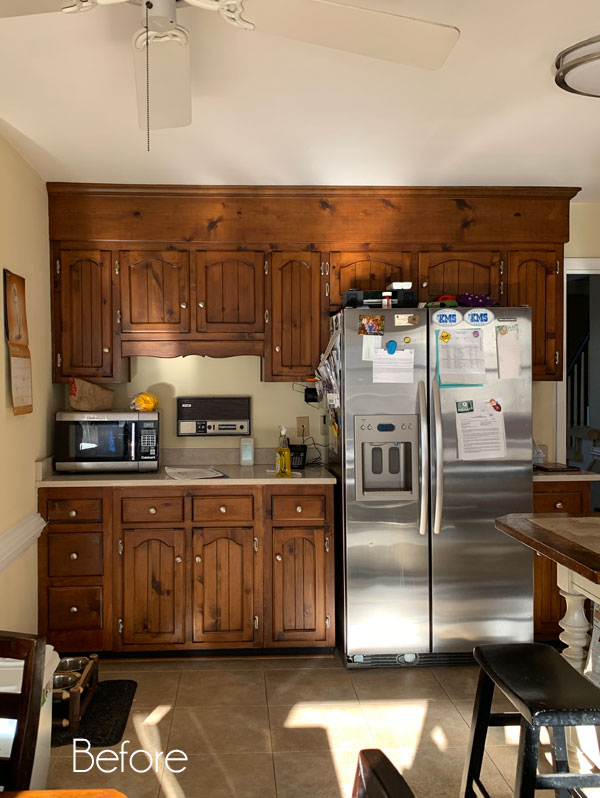
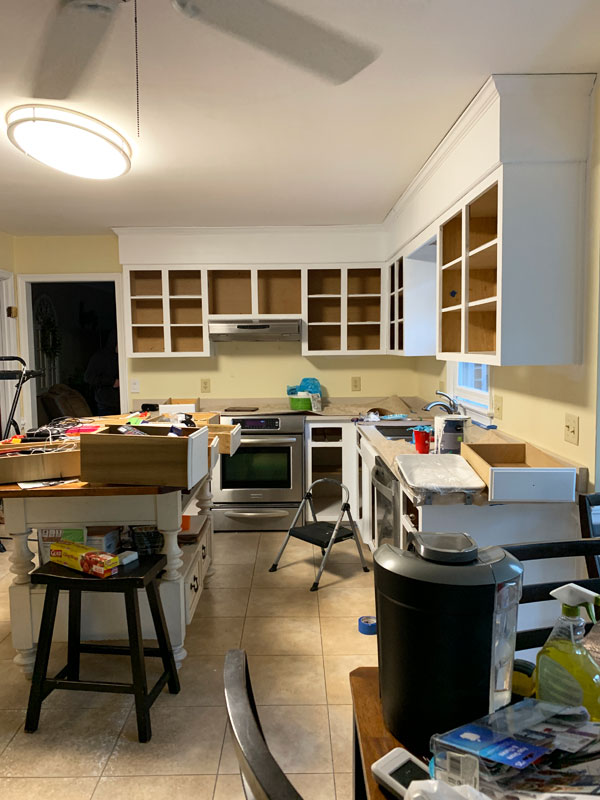
Here is how this kitchen started!
Hello, 1985:
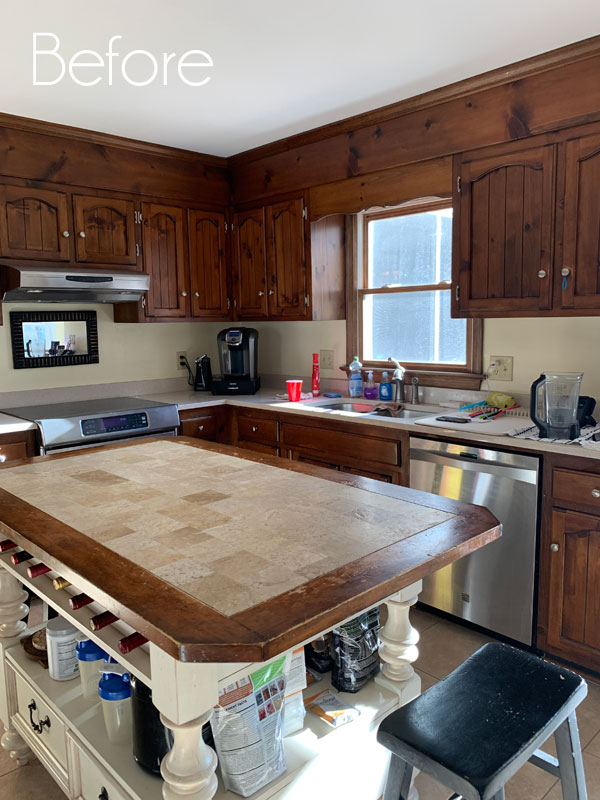
These pine cabinets were built on site when the house was built and I’m sure they were lovely at the time. I’ve included affiliate links so you can find the products we used.
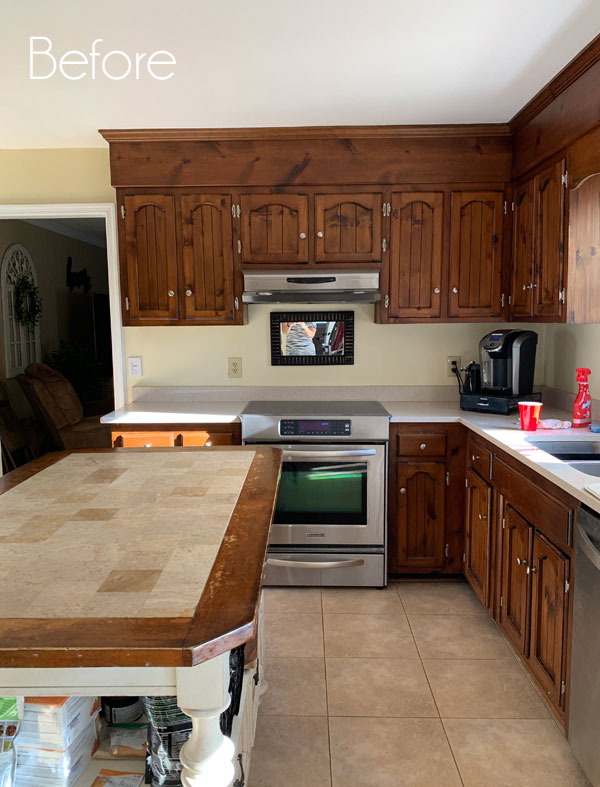
My sister talked about refacing these cabinets for years, but I honest to goodness do love the inset bead board panels on these doors, and I knew they would paint up nicely.
She wasn’t a fan of the curvy piece above the sink, so we took care of that as well.
She and her husband added the island themselves after they moved in eight years ago. They bought it at Havertys Furniture store.
They treat their fridge like a bulletin board which drives me crazy, but sister’s mantra is, “Hey! We live in our house!” So there ya go.
And here is their eat-in area and kitchen table and chairs before:
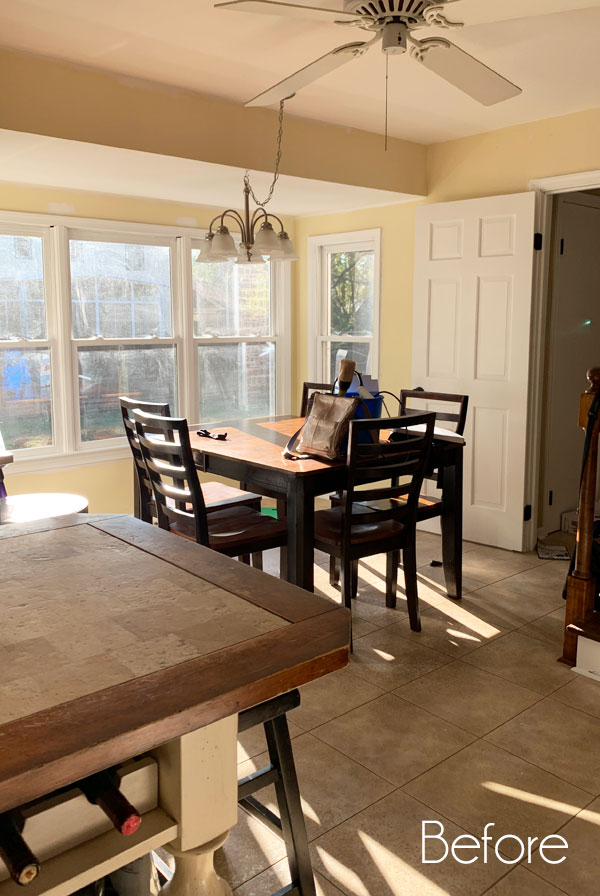
My sister isn’t fussy about style and always prioritizes functionality. I tried to convince her that her furniture can be beautiful AND functional! I’ll be back to share what we did to her kitchen table and chairs for Trash-to-Treasure Tuesday next week and you’ll see who won that battle.
Here is Everything you’ll Need to Paint your Pine Kitchen Cabinets:
- Drill to remove hardware
- Cleaner/Deglosser such as this one.
- Brown Craft Paper
- Painter’s Tape (I like FrogTape…my sister had Scotch Blue tape which worked well also.)
- Elmer’s Color Change Wood Filler/small putty knife
- Rotary sander/ 220 grit sandpaper
- Dust mask/Respirator
- Shop vac
- Clean lint-free cloths or tack cloths
- Four-inch foam roller for cabinets and doors/roller tray
- paint brushes
- Nitrile gloves to protect your hands from primer
- B-I-N Shellac-Based Primer
- Latex Enamel Paint of your choice. We used Behr Ultra Pure White in a Satin finish with the Primer built it. (This primer is more for coverage than adhesion.)
Ok let’s get to the how-to!
-
Label Cabinet Doors and Remove
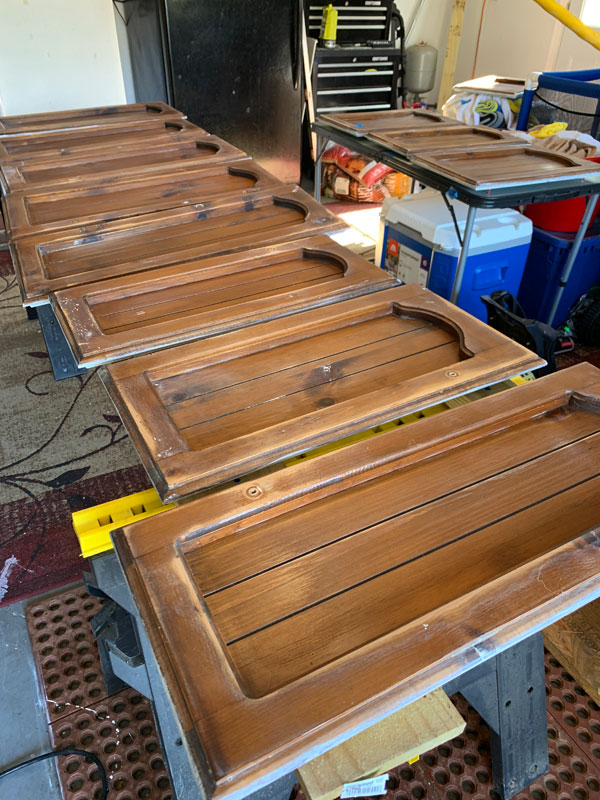
The first thing we did to start prepping my sister’s pine kitchen for paint was remove the door hardware using a drill. We collected all the knobs in a brown lunch bag since she was out of ziplocs. Then we removed the doors, labeling each one as we removed them so we would know where they went we were done. We removed all the hinges and stored them in a separate bag.
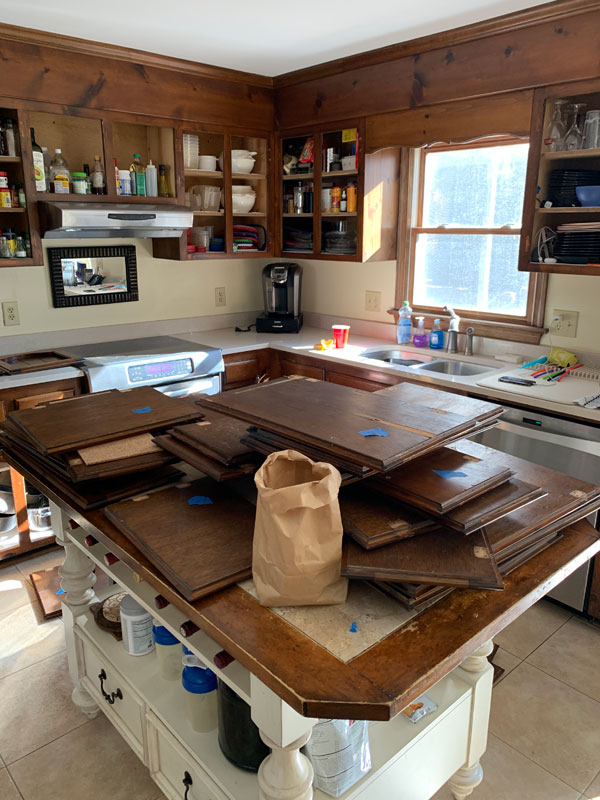
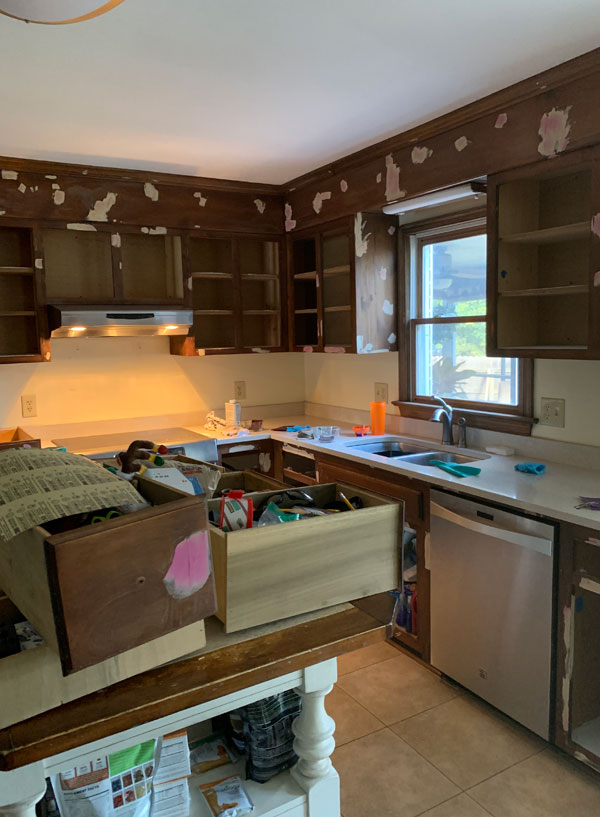
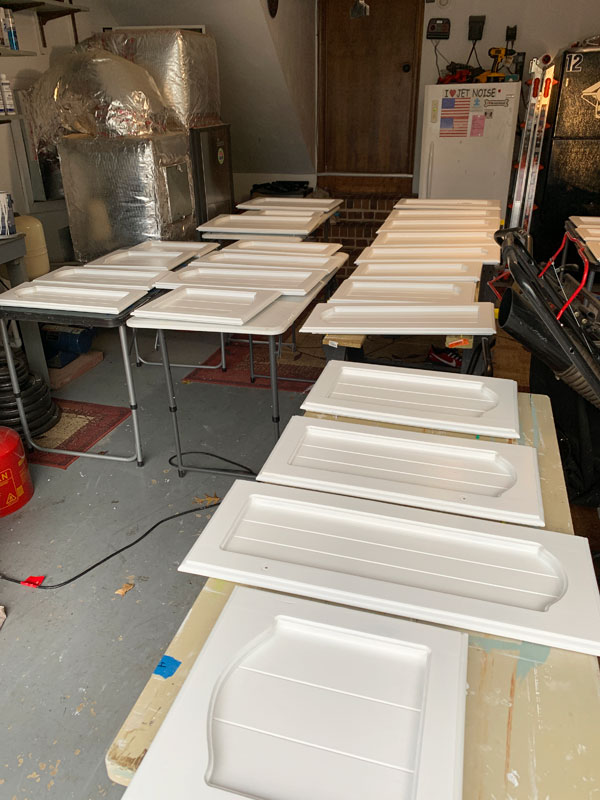
Then we moved all the doors out to tables we set up in the garage. We moved the labels to the tables where each door was placed.
-
Clean all the Surfaces to be Painted
This is one of the most important steps to a successful outcome. We used Sunnyside Gloss Remover that my sister found at Taylors Do-it Center to clean years of grease and crud off. It is a cleaner as well as a deglosser. This one is great too…as long as it says it is also a deglosser.
-
Fill in the Knots in the Pine
If you have pine cabinets, you will notice if you look closely, that there are holes and imperfections where the knots are that will be seen after painting. Those areas need to be filled with wood filler. To do that, we used Elmer’s Color Change Wood Filler and a small putty knife.
We did all the cabinet boxes, drawer fronts, and cabinet doors. The secret to getting good results with wood filler is to add a little more than you need and then let it dry long enough. Don’t be in a hurry. We let ours dry overnight.
-
Sand the Wood-Filled Areas and all Surfaces to be Painted
Before sanding, we laid out brown craft paper on all the kitchen counters to collect the dust for easier clean-up. Then I put on my dust mask and got to work using my rotary sander and 220 grit sandpaper to sand all the surfaces that were to be painted, including the areas that had been filled. I paid special attention to the areas where the handles would be.
I know using a deglosser claims to be a substitute for sanding, but we sanded anyway. We wanted this paint finish to last! Then we used a shop vac to remove all the dust from sanding, and wiped all surfaces with a clean cloth.
-
Prime Surfaces to be Painted
It was finally time to prime, but first, we taped off anything we didn’t want to get paint on like the hood vent, fridge, etc. using painter’s tape. When everything was prepped, clean, and dust-free, we started priming the surfaces. To cover those knotholes and prevent future bleed-through, you need to use a Shellac-Based primer. I asked my sister to send me a picture of the can so I could include it in the post and this is what I got:
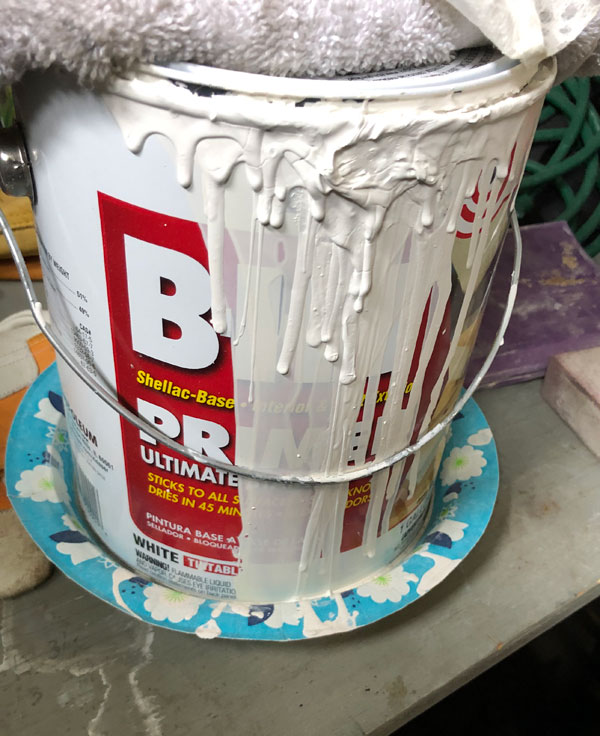
Haha! That would be B-I-N Shellac-Based Primer. This stuff is stinky! When working inside, open every window you can if possible! (Where gloves as well since this is not water based and will be more difficult to wash off.)
We used a combination of four-inch rollers and paint brushes to apply the primer.
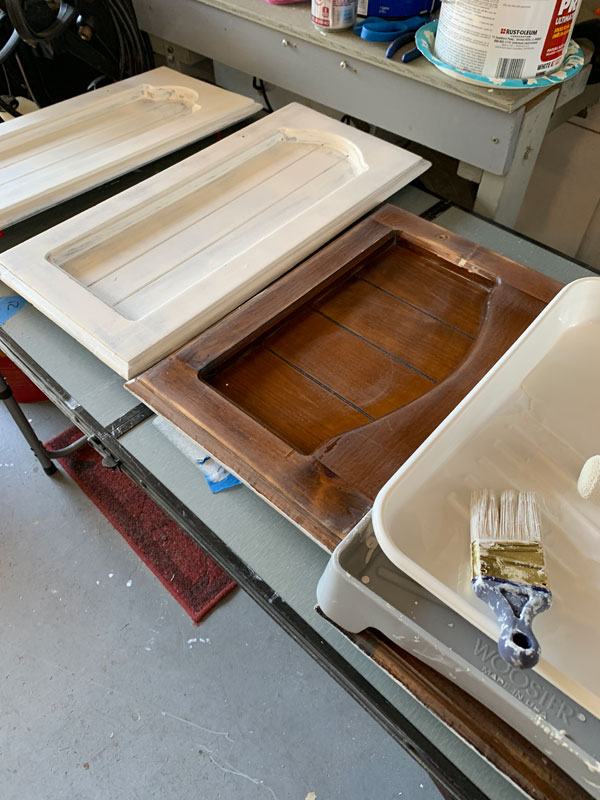
You can also see in that photo above that the doors are elevated off the table. We put push-pins in each corner of the backsides once they were barely dry, so we could flip them over and start on the fronts, while allowing the backsides to dry completely as well.
We gave everything one coat and let it dry overnight.
While we weren’t using the brushes, we wrapped them in saran wrap.
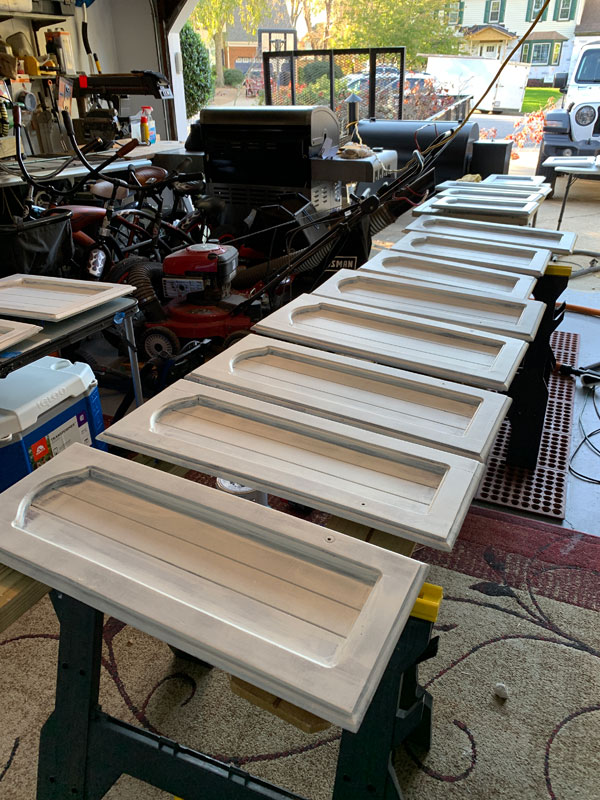
The next day, we gave everything a second coat of primer and let it dry for a full day. Instead of messing with trying to clean shellac out of our paint brushes, we just tossed them.
-
Time to Start Painting!
After all that prep, it was finally time to start painting! We used Behr’s Ultra Pure White in a satin finish, again using a mixture of four-inch rollers and paint brushes.

Wow I looked super excited to be painting!
We let it dry overnight and followed up with a second coat of paint the next day. Everything was looking amazing, especially those bead board-paneled cabinet doors!
There were a few areas that we hit with one more coat of paint just to be safe. We removed any tape immediately after the final coat went on.

When using Latex Enamel, there is no need to seal, so at this point, all the painting was done and we could now start reassembling the kitchen.
But before we got started on that, I installed a new kitchen backsplash while my sister painted the yellow walls. The yellow came with the house.
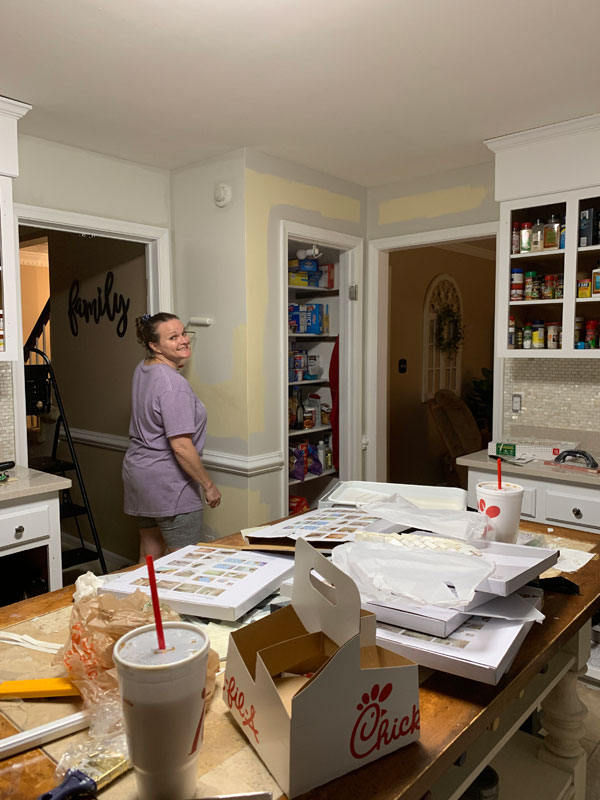
Can you spy the backsplash? Does it look familiar?? Is this whole kitchen looking familiar? And also…who doesn’t work harder when you’re being paid in Chick-fil-a sandwiches and sweet tea?
We still had to address the kitchen island:
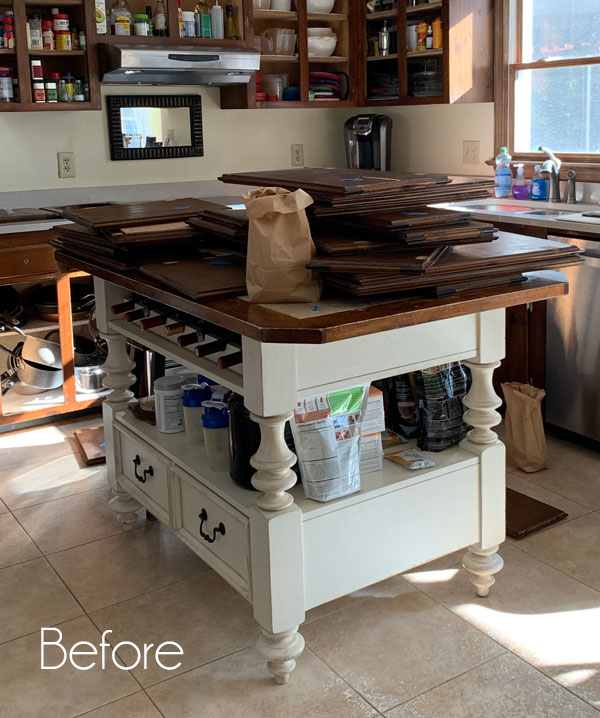
Years of use had taken its toll on the wood on top and it no longer matched the kitchen now that it was painted:
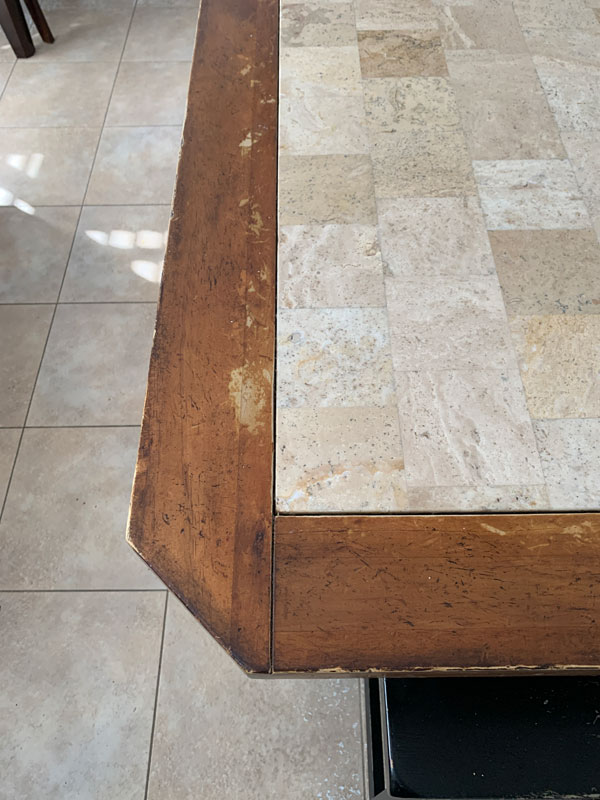
You’ll see in the final reveal how we updated this piece too!
I will also talk about why I chose NOT to use chalk paint for kitchen cabinets.
UPDATE!! See the ALL the after photos HERE now!!
Can I tell you why I loved doing this project with my sister? Because she was with me EVERY step of the way! She didn’t expect me to come do all the work for her. She worked right alongside me taking orders like a champ. She stayed up late doing “homework” I gave her to finish at night after I had left for the day. She was not afraid to roll up her sleeves and get right in there with me! And y’all know she pays me back two-fold by helping me as well! Remember when she helped me tackle our new front landscaping?

She is the best! I can’t wait for y’all to see the finished space!! I’ll share that on Thursday, and then I’ll be back next week to share how we tackled her kitchen table and chairs! I might love those even more than the kitchen!!
One last thing that I found when I was editing these photos are these pictures of Lyla:

Isn’t she so cute?? She had just been spayed, bless her heart, and her vet said we could put her collar on this way since she was so small and it would still work. It looked to me like she was wearing a cape.
How about this one:

This one makes me laugh every time I look at it. Her face says, “You better not be taking pictures of me looking ridiculous to share with your friends!” Ha ha…nobody tell her I shared this one, okay?
See ya Thursday!
XOXO,
![]()
Don’t Miss a Thing!
If you like what you see, there are several ways to follow along!
Email * Instagram * Facebook * Pinterest * Twitter


Petra says
I’m SO excited to see the “reveal” 🙂 . And I just love Lyla – she’s probably the most prettiest kitty I’ve ever seen.
Christy says
Yay! I can’t wait to share it!! And Lyla really is such a treat…we just love her to pieces too! Thank you! XOXO
Kim Thompson says
Looks better already – can’t wait to see the finished product! kim
Christy says
Thank you, Kim! We were excited just seeing the primer going on! XOXO
Christina in SW FL says
WOW!!! This is a whole lot of work and information!! SO glad your sister has a garage to set up as a painting station.
This kitchen already looks so much brighter. I know the outcome has to be positively stellar.
Is the kitchen still usable while doing all this work?
Love Lyla in her cape. 🙂
Enjoy your week and I look forward to more. 🙂
Christy says
Thank you, Christina! Yes, thank goodness we had the garage in which to set up all those doors. We are so happy with the outcome…lots of work, but big reward! Because we covered the surfaces with brown paper, they were easily able to remove it to cook, etc and then put it back. The hardest thing though was that many of her dishes etc had been moved to the dining room haha!XOXO
Mary Kaiser says
Wow, your sister’s kitchen will be beautiful when you two are done!! Can’t wait to see the finished project. I think you two are amazing together. Looking forward to reveal o Thursday!!
Christy says
Thank you, Mary!! I can’t wait to share the final reveal! XOXO
Joni says
Very cool!!! I can’t wait to see how the kitchen island looks when you are done.
Christy says
It looks so much better! See ya Thursday! XOXO
Paula@SweetPea says
It’s looking great, Christy! I can’t wait to see the final reveal. Lyla is an adorable kitty.
Paula
Christy says
Thank you, Paula! I hope your year is off to a great start! XOXO
Janice Holt says
You’ll tackle anything won’t you. Admire that in you. Painting cabinets is a huge chore but can’t wait to see the finished product. Love the way the island is built. Can’t wait until Thurs to see the end result.
Christy says
Ha ha thank you, Janice! That is where my blog name came from. I’ve always been a bit crazy that way! This was a huge chore for sure, but big reward! See ya Thursday! XOXO
Abbey Flanary Barnes says
Love this! Your kitty is so precious. We have a little grayish cat too that looks very similar. Thank you for sharing your sister’s kitchen makeover. I can’t wait to see the final reveal! I always enjoy reading about all of your projects! You are an inspiration to other painters!
Abbey
Christy says
Thank you so much, Abbey! I bet your kitty is precious too. I can’t wait to share the final reveal on Thursday…it turned out so good! See ya then! XOXO
Marni says
I enjoy reading your makeovers and transformations so much, everything is so comprehensively done, I look forward to tackling projects finally. Cottage cabinets and sleigh bed on the list! I did wonder if Dixie Bell chalk paint is so much different than chalk paint I can purchase in Canada. ie: homedepot brand or Annie Sloan.
Christy says
Thank you so much, Marni! Sounds like you have an exciting to-do list to start the new year off right! There are many paints that are similar, including Annie Sloan, but the seller on Dixie Belle for me were the sealers that do not yellow. They are so much easier to apply than wax! There are a few Etsy sellers that are in Canada that sell DB products. Here is one I found: https://www.etsy.com/shop/LifesRosie XOXO
Cindy Hathaway says
I have to wait til Thursday?????
The suspense is killing me! I love it! It’s going to be amazing! Painting my cabinets was the best choice ever!!
I’ll be here tapping my fingers til Thursday! 😊
Christy says
Ha ha! Sorry! At least I didn’t share the before and how-to on a Thursday and make ya’ll wait till Tuesday, right? I tried to be kind ha ha! They turned out so good!! See ya Thursday, my friend! XOXO
Sylvia says
Can’t wait to see the final result!!!!
Christy says
I can’t wait to share!! 🙂 XOXO
Wendy says
Your sister’s kitchen is going to look amazing Christy. You know I am not usually fond of painting wood, however, Pine or soft Spruce/conifer wood is the exception for me. One question, how are the brush strokes? One of the reasons I do not paint wood is due to seeing brush strokes. It bothers me when pieces look painted and not naturally sprayed.
Love the kitten pics. Lyla is definitely saying: I look ridiculous, do not share this photo! LOL
Have a great day Christy and will be waiting to see the final project.
Christy says
Thank you, Wendy! The secret to minimal brush strokes is using a really good quality brush. I love Purdys because they have super soft tips and applying the final strokes of paint with a very light hand really minimizes any brush strokes. And Lyla is for sure saying that lol! See ya Thursday! XOXO
Barbara says
Would love to see an ‘After’ photo. Looks like a huge project! What a difference!
Christy says
Hi Barbara! There are SO many photos, as you can imagine, so I shared all the before photos and how-to photos today, and I will be back on Thursday with all the pretty after photos! Paint really did make such a huge difference! XOXO
Ange Mills says
Excited to see the after photos.
Christy says
I can’t wait to share them, Ange!! XOXO
Stacey says
You are just awesome, in so many ways!! Love this post!
And please, please keep sharing pictures of your little Lyla, we adore her!!
Many blessings! Looking forward to the final reveal! 🙂
Christy says
Aww thank you so much, Stacey!! I’m glad you enjoyed this one, and I love that you enjoy seeing pics of my baby girl too! XOXO
Cheryl Atkinson says
Hi Christy!! Happy New Year! Lyla is about the cutest thing I have seen. 🙂 I wish i had a sister so we could do things like this together. How fun. Were there any arguments? LOL Cant wait to see the reveal!
Christy says
Thank you, Cheryl! Both my sister and I are very take-charge and she doesn’t always listen to me, but she was great since I was the expert here. She did everything I asked of her without question lol, so not one arguments! It was actually really fun working on it together! XOXO
Lilly says
It is looking so good already!! Love seeing makeovers. You ladies look so alike! <3
Christy says
Thank you, Lilly! Paint worked magic in this kitchen!! XOXO
Deb says
Looking great so far, Christy! Can’t wait to see the full reveal. Boy, I sure wish I had a wonderful sister like you, though it sounds like you both lucked out in that department. After seeing your own kitchen makeover, I had no doubt, upon seeing the “before” pic, that your sister’s kitchen would look every bit as amazing. And I totally agree – those bead board inserts look great painted! I’m so glad you’re going to be showing her table and chairs makeover, too, as that’s on my list for this year! Happy new year! Can’t wait to see all the amazing projects you share this year…
Christy says
Thank you, Deb and Happy New Year! My sister and I really are lucky to have each other for sure! And I made a believer out of her with those pretty bead board cabinet doors. They really turned out fantastic! The table and chairs might be my favorite though! Thank you for following along with me!! XOXO
Amy says
Christy!! That was a big tease!! I know it’s going to be gorgeous, the back splash is beautiful and your sister must love walking into that kitchen every day! Bright and beautiful! Can’t wait to see the final reveal! Please don’t make us wait to long? and that wee kitten ~ tooooo cute!!!!
Christy says
Ha ha I’m so sorry, but you only have to wait until Thursday! Thank you, Amy! She is thrilled with the results for sure! See ya Thursday! XOXO
Sylvia Hill says
Can’t wait to see it all finished! I have oak cabinets. Will this method work on them? Love following your blog. So many great tips, ideas.
Christy says
Hi Sylvia! For oak cabinets, you do not have to use this stinky shellac-based primer. You can use a regular primer without the stinky shellac in it, and no need to fill knotholes first! Everything else is the same though. You can see my other kitchen cabinet painting tutorial for regular cabinets here: https://www.confessionsofaserialdiyer.com/how-to-paint-kitchen-cabinets-a-step-by-step-guide/ XOXO
Denise - Salvaged Inspirations says
Can’t wait to see the after! You and your sister are super cute! XO
Christy says
Thank you, Denise! You and your sister remind me of me and mine! XOXO
sharon austin says
Looking good, can’t wait to see it finished!! And Lyla is so stinkin’ cute, even in a cape. 😉
Christy says
Thank you, Sharon! Isn’t she though?? XOXO
Carolyn Price says
LOL!!!! I laughed out loud at the second picture and the caption you wrote for it, Christy!! It just tickled me this morning. Your kitty is a cutie!
What a super sister you are! I cannot wait until Thursday. “Daunting” is an understatement. You are certainly fearless!!
Christy says
That photo makes me laugh every time I see it haha! She was so comical in her cape! I’m glad you got a chuckle out of it too! I can’t wait to share the kitchen reveal…it may have been daunting, but SO worth it! XOXO
gwen says
well, you’ve teased us enough to come back on Thursday! having lost my sister years ago, i’m envious of all the hard work you’re doing together – and you even look alike!
so far, it’s looking great and the one tip i’ll comment on is how important it is to label drawers and doors! they may look the same, but often are ‘off’ just enough to drive you crazy while reinstalling!
see you Thursday!
Christy says
I’m so sorry you lost your sister, my friend. I feel very blessed to have mine for sure. Yes…you are so right! Labeling the doors will save a lot of headaches later! See ya Thursday! XOXO
Lynda Schneider says
OMG! That Lyla is adorable!!
Oh, and I can’t wait to see the kitchen done. I bet it will look amazing!
Happy New Year!
Christy says
Ha ha thank you, Lynda! That kitchen never knew it could look so good…can’t wait for ya’ll to see it!! Happy New Year to you too! XOXO
Millie Mosley says
Sisters are the BEST and I know that your sister knows that! I cannot wait for the reveal. Christy, you always inspire!
Christy says
They certainly are! Thank you so much, Millie! XOXO
Linda says
This is a great post and hoping to tackle my kitchen cabinets at some point this year as well so this will be very helpful. Can I ask what you used for the small rollers? Did you use foam? I know when painting wood I believe foam is what is recommended. Thank you and can’t wait to see the reveal.
Christy says
Thanks, Linda! We did use foam rollers. The ones we found at Lowe’s specified they were for cabinets and doors. Good luck with yours! If you don’t have pine cabinets, you might find my other kitchen cabinet painting tutorial helpful: https://www.confessionsofaserialdiyer.com/how-to-paint-kitchen-cabinets-a-step-by-step-guide/ XOXO
Becky says
Oh wow, this is looking SO good! Sister teams are THE BEST!!!
Christy says
Thank you, Becky! Yes they are! XOXO
Mariah Beaney says
Can’t wait until Thursday to see the reveal! And your kitten is just beyond adorable!
Christy says
Thank you, Mariah!! She’s a keeper and I’ll see ya Thursday! XOXO
Addie says
Sure can tell you two are sisters. We want to see the reveal!!!! Boy! she has a LOT of cabinets!!! Seems like you got busy right after doing your bedroom set…..YOU little energizer bunny !! It will all be great…I am sure!!!
Christy says
Thanks, Addie!! She does have a lot of cabinets…ask me how I know haha! Can’t wait for ya’ll to see the reveal!! XOXO
Janina says
I can’t wait to see this all put back together! The painted beadboard will look lovely! And no doubt lovely Lyla will be featured as well. Looks like the backsplash will go purr-fectly with her colouring! No doubt you ladies chose it for just that reason…
Christy says
It turned out so good and I can’t wait to share it on Thursday!! That is the same tile I have in my own kitchen and it does match Lyla lol! XOXO
Julie Briones says
I can’t wait for the full reveal. Love the beadboard look on the cupboards, too! This is so helpful to read about the process (again)… I’m looking to repaint my bathroom vanity and overhead cupboard… Pinning!
Christy says
Thanks, Julie!! I love the beadboard too…glad I was able to convince my sister that we should just paint them! Glad you found this helpful too! XOXO
Kathy says
I can’t wait to see the reveal. Looking thru the pics is an inspiration for me to try my hand at painting my cabinets. It’s been on my mind since we bought our house two years ago.
And I just love the pics of your kitty. She really does looked perturbed at you in the 2nd photo. LOL.
Christy says
I can’t wait to share it! It is amazing what paint can do!! Hopefully this will give you the push to go for it in your own kitchen! And yes, Lyla sure did look perturbed! That’s a perfect description lol! XOXO
Laura janning says
How cute are y’all. I can’t wait to see The outcome.
Christy says
Hi Laura!! We were worker bees haha! I can’t wait for you to see it!! XOXO
Patty says
Christy, I can hardly wait until the reveal!!:) Nice to see sweet sisters working so well together! That little Lyla, how I would love to squeeze that sweet little girl! Her face tells it all – will keep it a secret that you actually posted these pics of her – LOL!
Christy says
Ha ha yes, don’t tell Lyla! She is the sweetest…I’ll give her a squeeze from you lol! I can’t wait for ya’ll to see the kitchen reveal!! XOXO
Phyllis says
Such great work. I hope to paint my 80’s oak kitchen this spring/summer. I know it will take me so much longer but I am tired of the yellow oak. Can’t wait for the reveal.
Christy says
Thanks, Phyllis! It is a big job, but take it one step at a time and you will have a brand new kitchen! XOXO
ROSE LEFEBVRE says
Looks so much better all painted! I helped my love paint his beach house cabinets and it makes such a big difference.
Christy says
It really does look so much better even without the cabinets up! I bet the beach house kitchen looks amazing! XOXO
Jewels says
Christy,
Your post couldn’t have been more timely. I plan to paint the cabinets in two bathrooms and my laundry room this year. I pinned this page, thanks for the product list. Can’t wait for the big reveal tomorrow!
Christy says
Awesome!! If you don’t have pine, you don’t have to use the stinky shellac primer, just regular primer. I linked to my other kitchen cabinet painting tutorial in the post. See ya tomorrow! XOXO
Dianne Noffke says
Boy I would love for you to be my sister! I am increasingly amazed at your talents. I would give anything to be able to paint and build and re-purpose and use all the tools that you re so comfortable with. If wanting to do it counts, I have half the battle won. Not much natural talent though. (Sad) Can’t wait for the reveal. Don’t tell my sweet Becky that I said this but Lyla is pretty sweet looking. Her coloring! My Becky is pretty sweet too. I love cats!!
Christy says
Aww you are so sweet, Dianne! There was a time not too long ago when I had my husband cut everything for me, but I got tired of waiting on him haha. If Becky is the kitty I saw at your house that day, she is stunning! If I could have snuck her out, I would have haha! XOXO
Dorothy says
I can’t wait to see the final reveal — looking good so far. This is going to be a beautiful change. Thanks again for your inspiration and your creativity.
Christy says
Thank you, Dorothy! The final reveal is up now. If you haven’t seen it yet, you can see it here: https://www.confessionsofaserialdiyer.com/pine-kitchen-before-and-after/ 🙂 XOXO
Regina says
Oh Christy you are really inspiring me to tackle my own kitchen this year. My husband and I went back and forth on what project to do, a pool or a kitchen reno and we opted for the pool a few months ago (it’s so hot here in the summer) so with that being said, I would like to at least give some updates to my kitchen so it is a bit more enjoyable to look at!
I have to say the photos of Lyla are absolutely adorable. She made me smile and laugh out loud. I am familiar with that same look on my kitties faces sometimes.
Looking forward to the kitchen table/chairs reveal!!
Christy says
Oh yay! Yes, you can still have a lovely kitchen that won’t break the bank! That picture of Lyla cracks me up too haha. XOXO