Lovely friends, welcome back! I am working my way through thrifty haul #2 and the next item on the chopping block is this tufted footstool I scored for only $12:
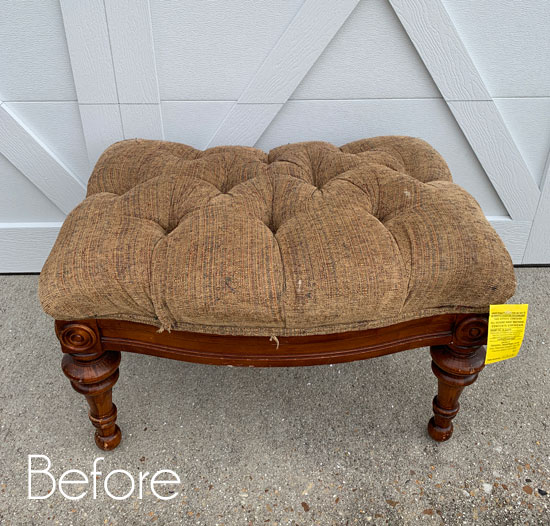
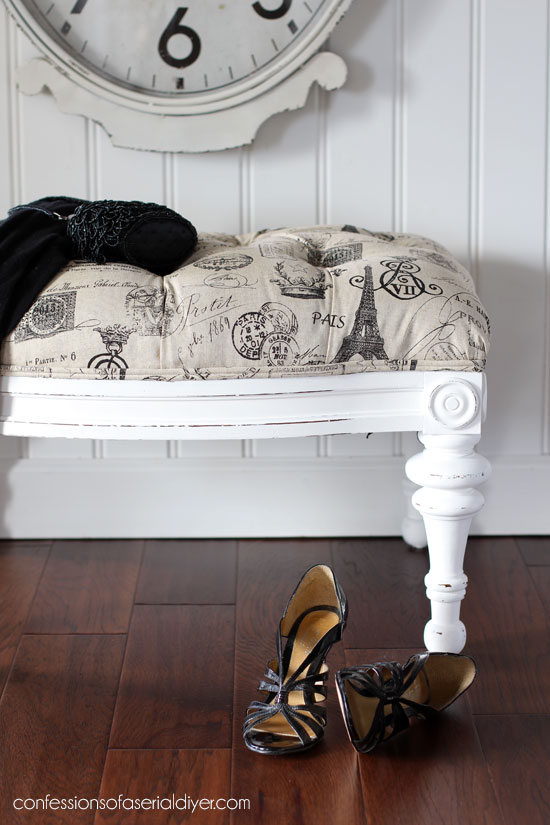
What a bargain! I fell in love with the legs and the bow front on this beauty right away, and it was so super soft and comfy. That’s where the love affair ended though because the rest was crying SOS.
When I first saw it I actually thought I might just buy it for the legs and maybe I could use them on something else. But after staring at it in my garage for a few days, I decided I would just recover it.
The title of this post suggests I may have cheated in some way in tackling this project, and that is true!
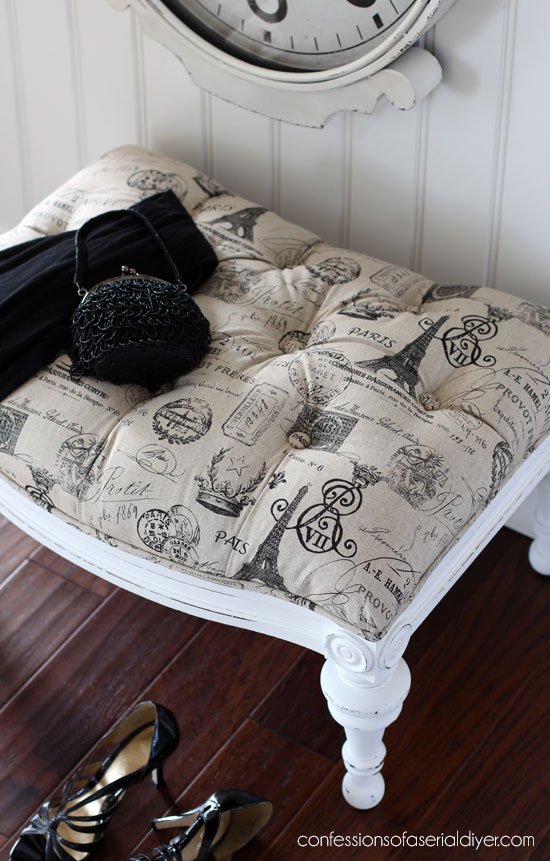
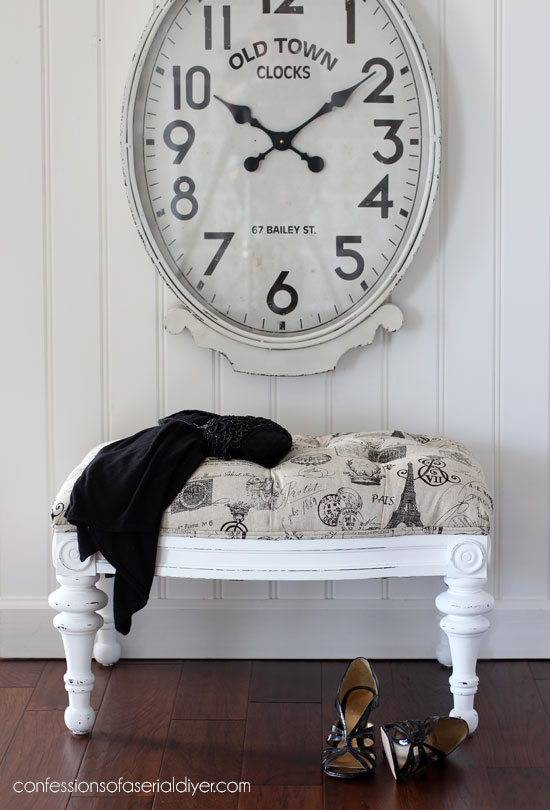
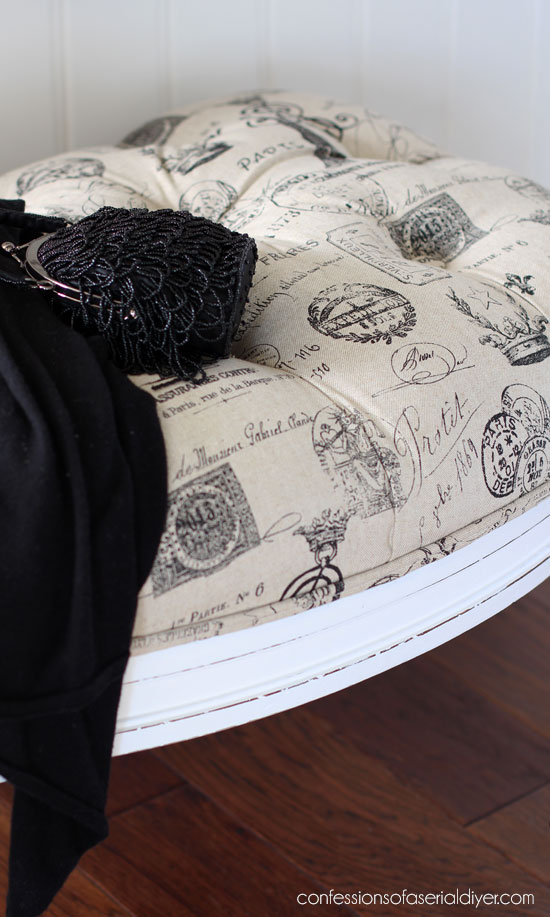
First, here is how this beauty looks now:

Hello gorgeous!
And yes I totally cheated these tufts:
And of course I am going to share my dirty secrets with all of you.
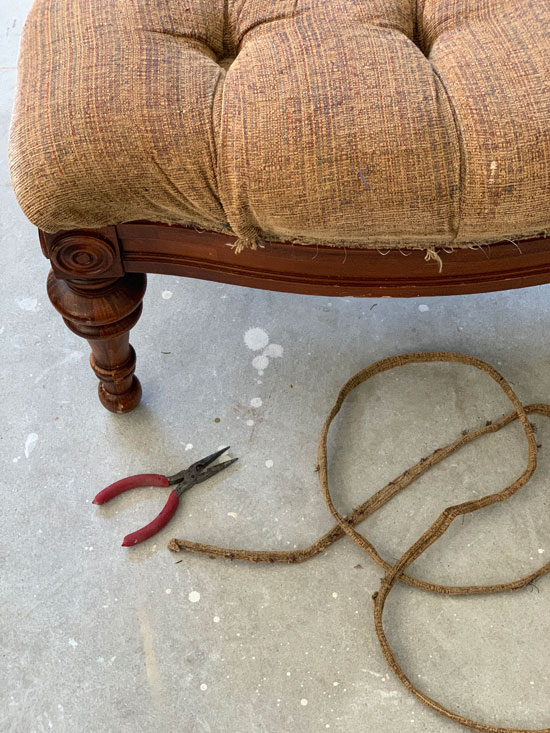
So to start this makeover, I removed the existing piping and residual staples:
Then I painted the legs in my favorite white…Bit of Sugar from Behr made into DIY chalk paint. (Find the recipe HERE.)

I sanded here and there and everywhere with 220 grit sand paper, and then sealed using my new-to-me Behr clear wax. Yep that’s a thing…I just found it last weekend at The Home Depot. So far I like that it doesn’t stink to high heaven, but the jury is still out on its durability.
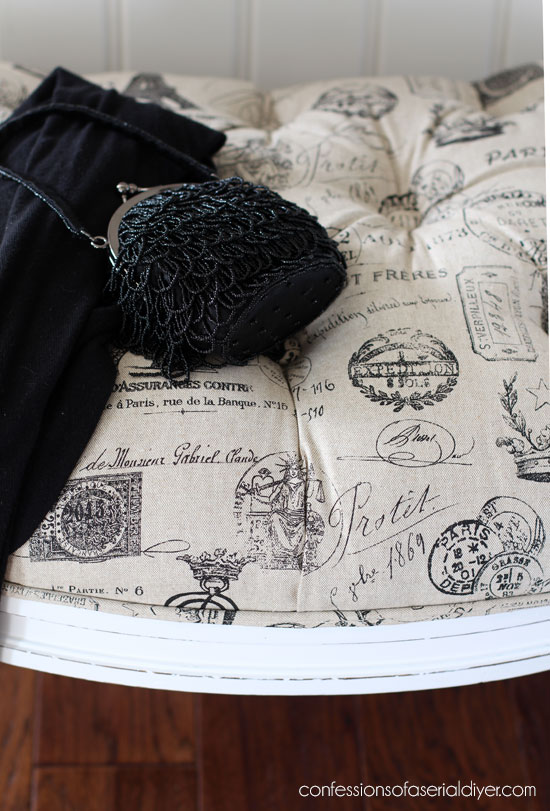
I paused here to run to Hobby Lobby to pick up a button covering kit and to my surprise, I also found this fabric that looks almost just like my favorite frenchy fabric from the past that I used to buy at Hancock Fabrics before they went out of business. I love it because while it is still considered a neutral, it also has stain-camouflaging super powers, perfect for a foot stool!
I just had to use it for this project. I’ve included a few affiliate links so you can find the products I love.
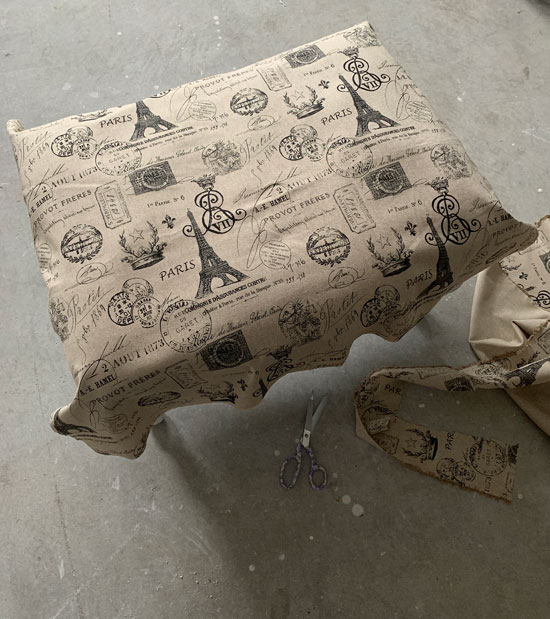
I cut the fabric about four inches longer than where it needed to be all around:
I left the original fabric and tufted areas including the buttons intact as is. All of the buttons were still securely in place.
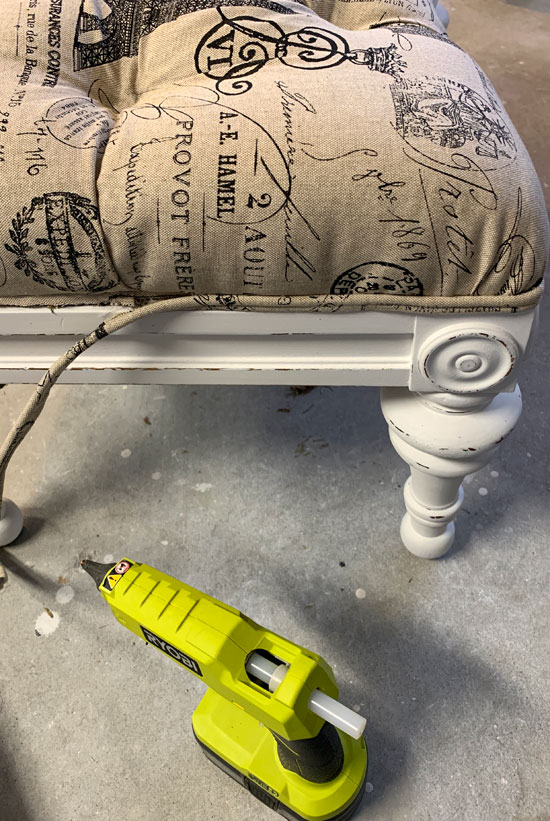
Then I pulled out my trusty glue gun and got busy. I dropped a good sized dollop of glue in the first tufted hole like so:
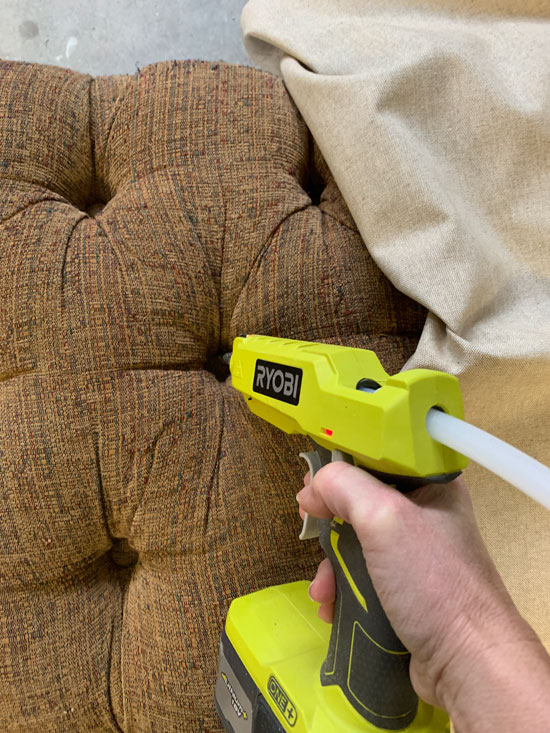
Then I used the blunt end of this saw to push the fabric down in the hole for about 10 seconds:
Me pushing blunt end in hole…
Just long enough for me to not burn my fingerprints off and then for the next 30 seconds or so, I held the fabric down in there with my fingertips.
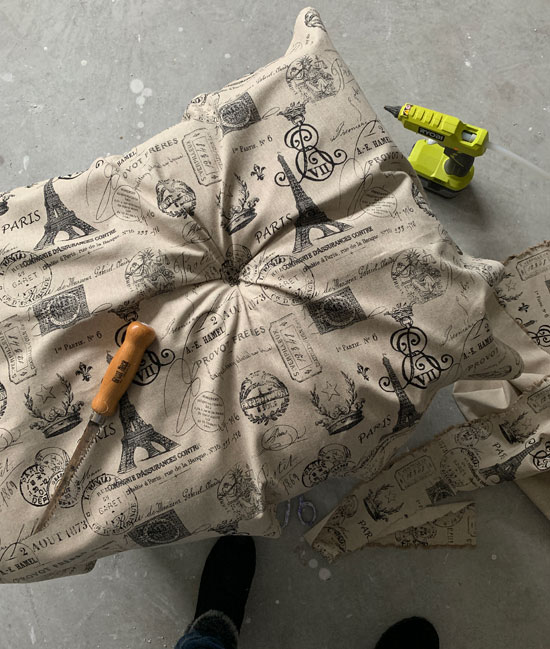
I kept going all the way across the middle:
Then I moved to the outer rows, starting with the center of each:
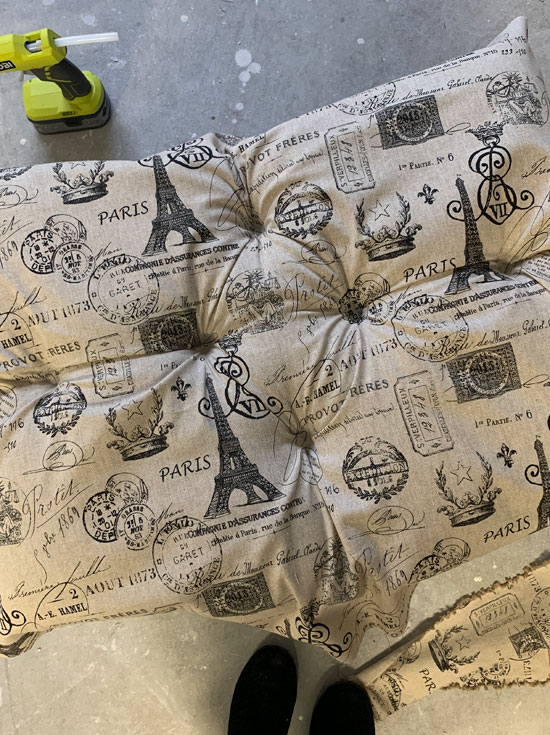
I kept going until all were done, using the tufts on the original stool of course as a guide. The glue will hold perfectly over time just as long as no one takes a hair dryer to the tufts or stores this in a very hot attic or storage unit.
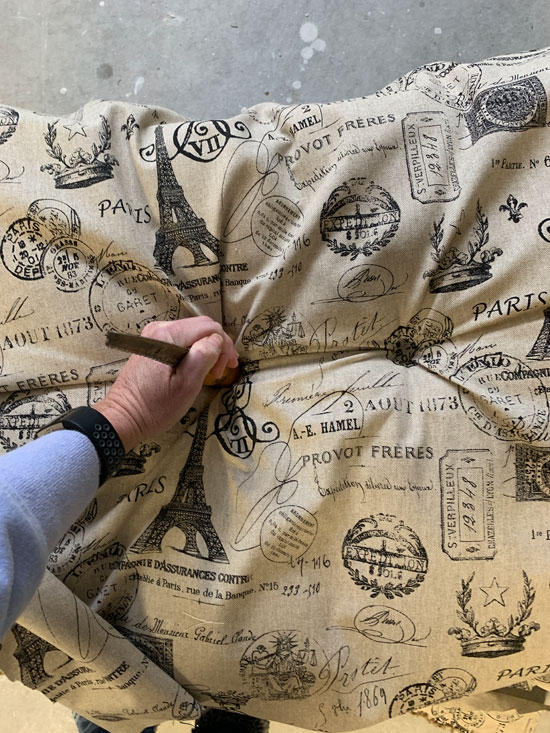
Next I pulled out my $8 el cheapo staple gun and using 3/8″ staples, secured the fabric just above where it meets the wood all the way around, pulling it taut as I went:
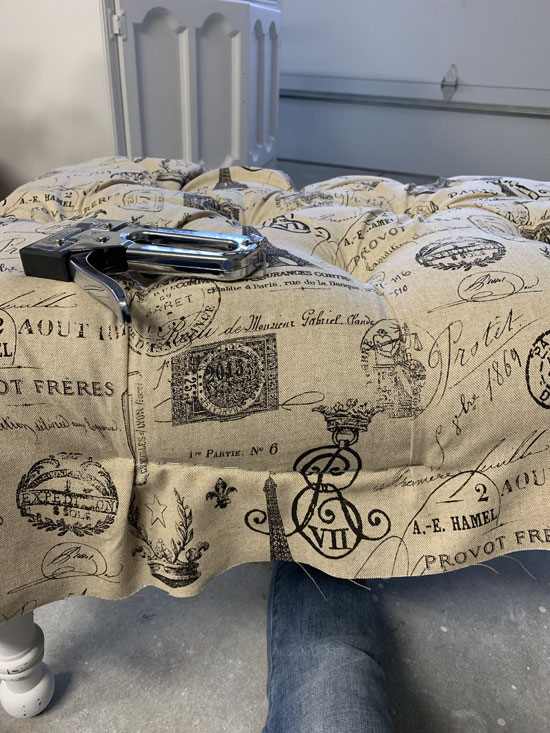
You can see above that I created pleats where the tufts were, just as in the original cover underneath.
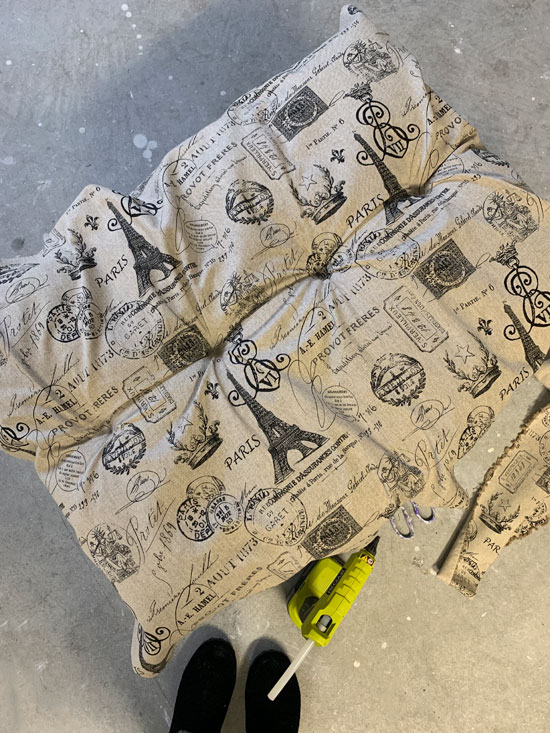
When I had stapled all the way around, I trimmed very closely to the edge using my fabric scissors. It helps to have sharp scissors for this step:
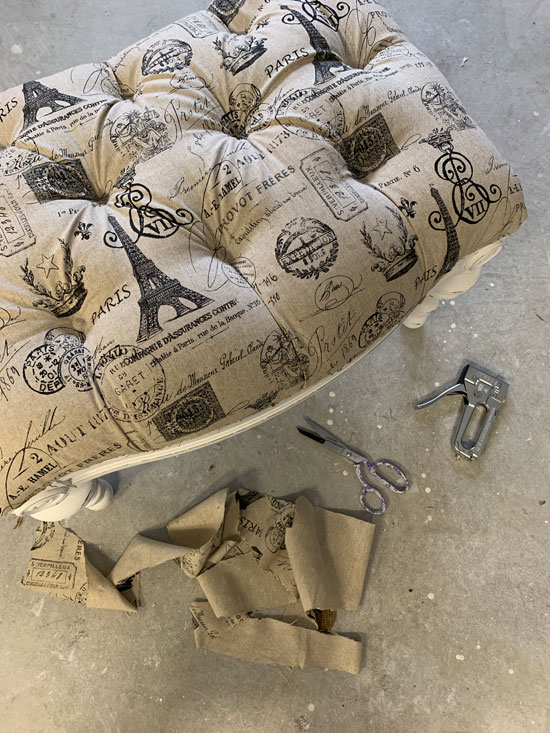
To cover the staples, I needed to make double welt trim. Don’t run yet! You will need a machine for this, but it is super easy to make! Or you can buy gimp trim to trim it out instead.
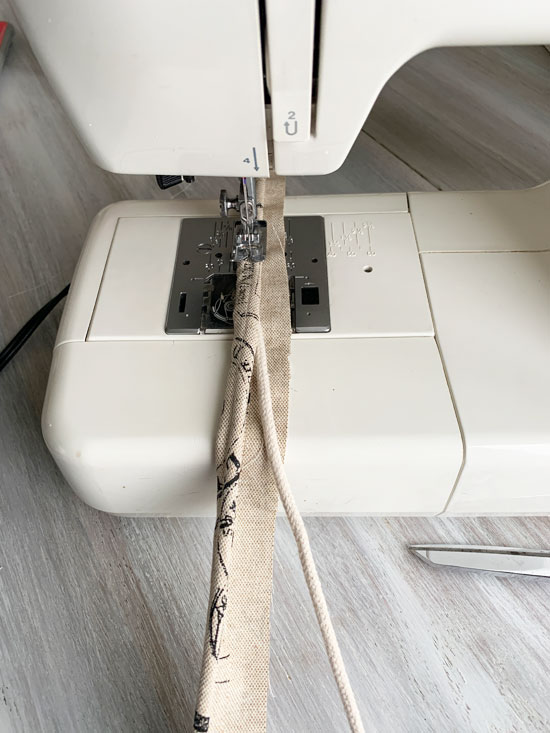
I share a complete step-by-step tutorial on how to make double welt trim HERE.
Then I just hot glued it in place:
The final step was to cover the buttons to go in the tufted areas.
I found a button covering kit at Hobby Lobby that had everything needed to do this, and I also purchased three refill packs for this project:

The instructions are easy to follow and in about 15 minutes or so I had the ten buttons I needed:
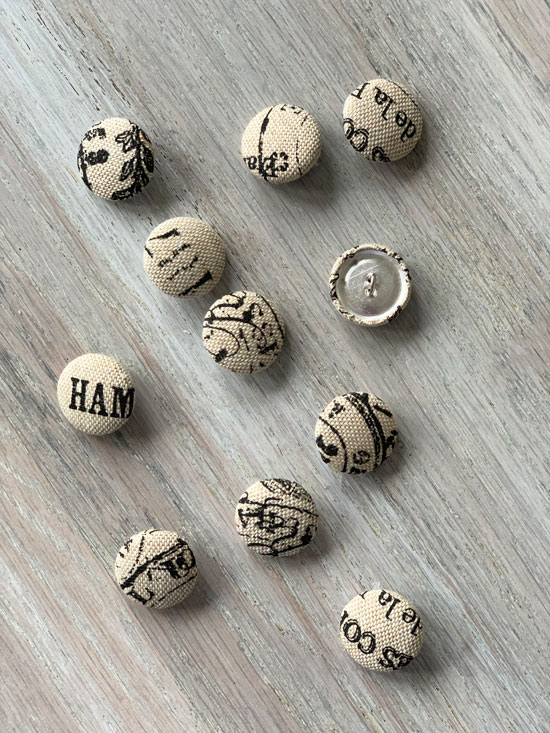
One actually says “HAM” so I decided to do an extra to replace that one.
I knew these would be held in place with hot glue as well, so I decided to add a little bit of string to the back of each one so the glue would have something to hold onto:
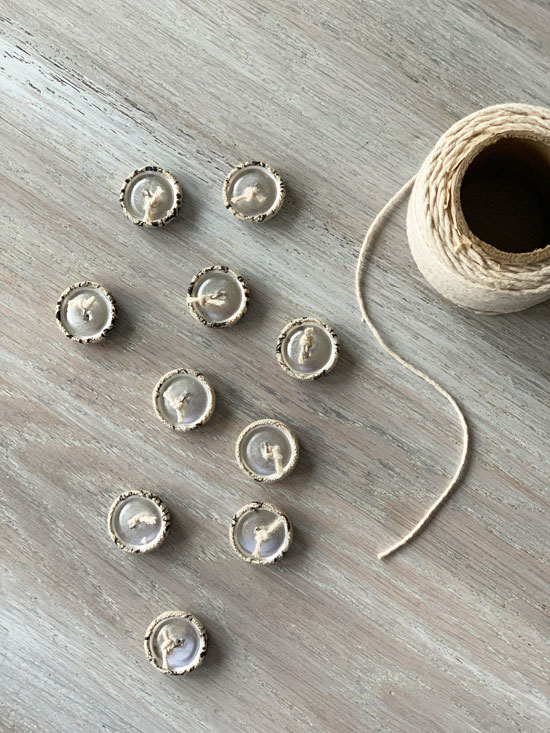
Then I just hot glued them in place! I had to hold each one down for about a minute to be sure they were stuck down in there good!

I didn’t realize what that button in the corner said until I was editing these photos…I think “HAM” would have been more appropriate ha ha!
So I totally cheated, but can you tell??
I had no clue if this would even work so I am thrilled that it did!
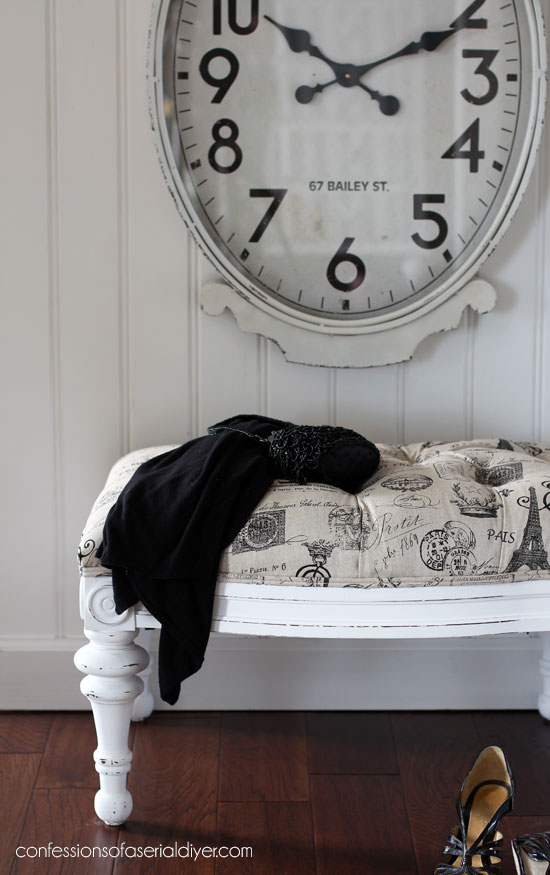
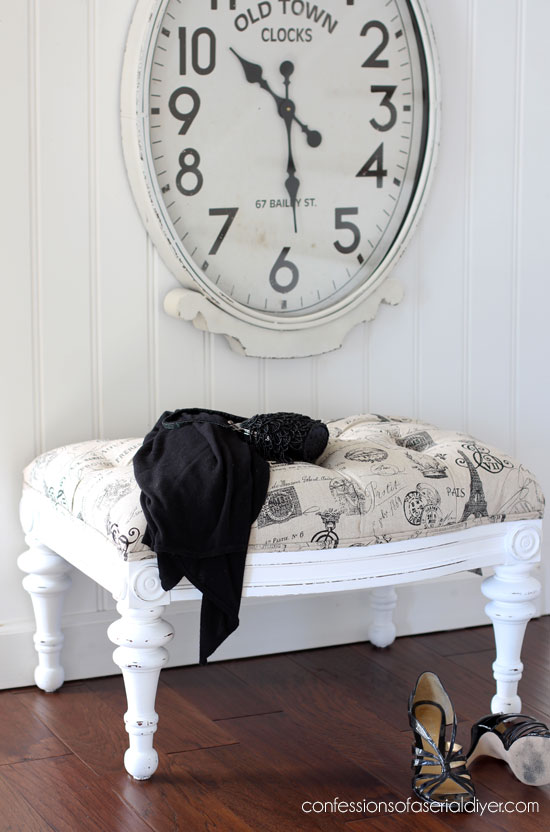

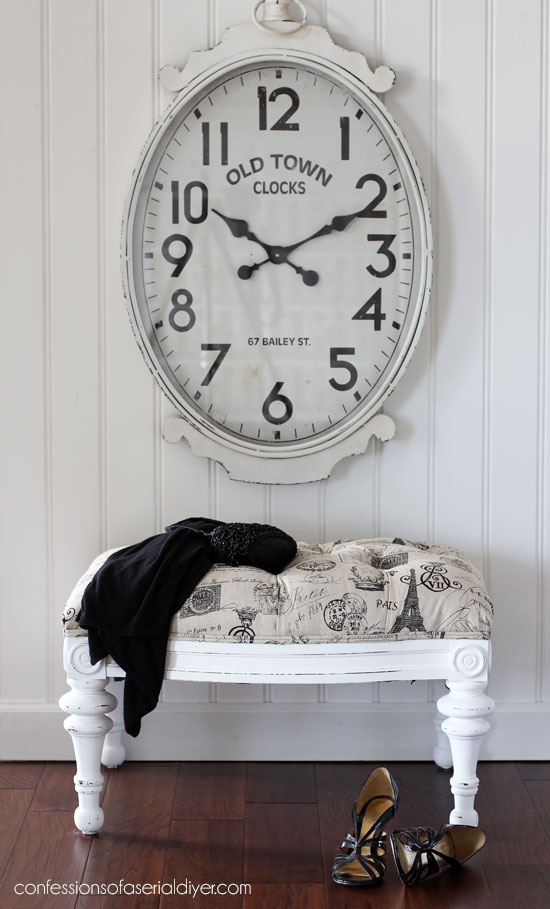
This clock came from HomeGoods and usually lives on the wall in my office. Isn’t it awesome?

Well I hope y’all enjoyed this transformation today!
I still have plenty more pieces to go…

If you missed my first two makeovers from this lot, you can catch up here:
Drop Leaf Repurposed (Corbels)
This pretty gate leg drop leaf side table is up next:
I’ll be back on Thursday sharing what I did with it!
Update: This pretty little thang gave me some trouble, but I finally got it done! See how it looks now HERE! 🙂
XO,
![]()
Don’t Miss a Thing!
If you like what you see, there are several ways to follow along!
Email * Facebook * Pinterest * Twitter *Instagram


Mary Kaiser says
Wow, you can not even tell that you didn’t really tuft it for real. I Love how it turned out. It is so beautiful. I LOVE the clock, I was looking at that and saying to my self when did she get that clock, I don’t remember seeing it. It is so cool, I thought that maybe you bought it at the thrift store and painted it to look like that, I could so see you doing that!!! I am really enjoying seeing you work through this second round of thrifted items.
Christy says
Thank you, Mary! I was so glad this little cheat worked out so well. And that clock… Isn’t it so cool? I bought that as soon as we moved into our new house and it hangs in my office! It does look like something I would paint though! XOXO
Rose Lefebvre says
Love it! You make great pieces!
Christy says
Thank you so much, Rose! XOXO
Sheila DelCharco says
You are so clever!! Love it!
Christy says
Thank you, Sheila! XOXO
d brossy says
What a beaute! Thanks for sharing clear, concise tutorials – incldg the double welt piping. And yes, indeed, what a great way to *cheat!*
Christy says
Thank you so much! It is always a pleasure to share! XO
Christina in SW FL says
Christy, I am still laughing… a total “badass” makeover! Seriously creative, love the fabric, love the white paint Love the button creativity. You rocked this and a gorgeous outcome. Oh, love your staging as well. 🙂
Christy says
You are the best, Christina! Thank you, my friend! Those buttons gave me a good chuckle! XOXO
Claudine says
This looks beautiful! I am wondering though….how good is the hold on that glue? If someone were to sit on the footstool, or use it regularly to prop up the ‘ol dogs, would the glue pop up, ruining your pretty turfting?
Christy says
Thank you, Claudine! When I realized that the one button had an inappropriate word on it, I tried to pull it off and it was stuck on there good. I think the only issue someone might have is if they stored it in a hot attic or a storage unit that is not temperature controlled. Otherwise it should do just fine! XO
Michelle says
Genius! I love the results. You are the best!
Christy says
Aww thank you so much, Michelle! XOXO
Peg says
You are such an inspiration! Even to a 70 year old do it herselfer!
Christy says
Aww I appreciate that so much, Peg, thank you! XOXO
Janice Holt says
I love love love the footstool. It could not have been any prettier. Great job.
Christy says
Aww thank you so much, Janice! I’m so glad you like it! XOXO
Patricia Wilson says
Loved what you did with the little stool. You are so talented. Refinishing, sewing, upholstering……
Christy says
I’m so glad to hear you like it, Patricia, thank you so much! XO
Susan Homeroad Stevenson says
Ok this was pure genius! I am always intimidated by anything with tufts and you just changed the game with this “cheat”. Thanks so much for sharing this Christy… I pinned it for next time. 🙂
Christy says
I was so glad that this worked out so well! I too will be looking for more tufted pieces in the future! Thanks, Friend! XOXO
Ruth Anne Buterbaugh says
Love how the tufted stool turned out! Nothing wrong with “cheating” when the results are so gorgeous! Also love that fabric!
Christy says
Thank you so much, Ruth Anne! I love this fabric too! XOXO
Robin says
So so so so cute!!!!!!
Utterly amazing!
Christy says
Aww thank you so much, Robin!! XOXO
Paula says
Looks great, Christy! I would never know that you cheated!
Christy says
Thanks so much, Paula! XOXO
Mary says
I’ll have to keep this in mind the next time I need to recover a foot stool. This looks great! Never would know you didn’t have to tear the skin off your hands pulling those buttons thread thru layers of fabric and a backing. Nicely done!! Thanks for the pictures and instructions.
Christy says
Thanks, Mary! Yes this saved a lot of work! XO
Shirley says
Brilliant!!! Thank you for sharing. Now,I’m going after that old foot stool I’ve been holding onto. I have always covered everything the “old” way, lol. But lately arthritis has slowed me down pulling on anything, this will be a piece of cake and I LOVE it!! NOW…I can;t wait to see how you covered that chair in the same fabric?? If you have already covered it, please tell me where to go to view it. I love your Blog…Keep them coming, I share with everyone!
Christy says
Thank you so much, Shirley!! Yes this was so much easier to tackle this way! Are you referring to this chair? https://www.confessionsofaserialdiyer.com/upholstered-thrift-store-chair-makeover/
XOXO
Joanne D. says
You are an absolute Crafting genius! Love that ottoman!
Christy says
Aww thank you so much, Joanne!! XOXO
Ange Mills says
That was so much easier than I thought it would be. It turned out great.
Christy says
Thanks, Ange! This really did save a lot of hassle! XOXO
Becky says
You are a GENIUS!!! Lovely! Pinned cuz I know I’ll need this one!
Christy says
Aww you are too kind, my friend! Thank you!! XOXO
Kim says
Absolutely gorgeous! I love it and will definitely be looking for a foot stool! I do have a question. I am rather new at painting furniture. What is your technique for waxing? Brush it on? Rub it on? Rub it off?
Christy says
Thank you, Kim! I sometimes use a rag and rub it in, but I also use a flat wax brush to apply at times also. Either way, I like to work in small sections, really rubbing it into the finish. After applying the wax, I remove most of it right away using a clean soft cloth, and going with the wood grain in long smooth strokes, just like when I paint. Then I go back and buff the area, again making my final pass over each area in nice ling smooth strokes. For more sheen, you can go back about 15 minutes later and buff again. Hope this helps! XOXO
Kimberly says
So pretty! And what an improvement over the original. I would have never guessed you had cheated.
Christy says
Thank you so much, Kimberly! XOXO
Wanda says
What kind of glue do you purchase that actually holds? Any experience I’ve had with glue has been disastrous!
Christy says
Hi Wanda! I just buy multi temp hot glue sticks from Michaels. The glue gun may make a difference too. Mine gets the glue burning hot.
Denise says
I’ve been waiting to see what you were going to do with this one… LOVE it Christy! I always enjoy your sewing projects… they inspire me to try. 🙂
Christy says
Aww thanks, sweet friend! I love how much faster Sewing projects are than painting projects! XOXO
Linda/ Inside Etc and Design says
Do cute
I wish our thrift stores had some of the things you seem to find
Lucky you
Thx
Christy says
Thank you, Linda! I do get lucky around here especially since we have so many thrift stores in our area. I have to go often to find good things though! XO
Sheila Moore says
WOW Christy…I have a little tufted stool that I am totally going to do this with. I wouldn’t have thought of it until this post. Thanks for being so creative!
Christy says
Thank you, Sheila! Best of luck with yours! XOXO
Jan Anderson says
Christy, this is such a great update. Recreating the tufts by using your glue gun was genius! It makes me confident that I could do the same. Thanks, Jan
Christy says
Thank you, Jan! Yes this wasn’t very difficult at all and was pretty quick to do! XOXO
Victoria Golojuch says
You are a genius! Thank you for all of the wonderful ideas! I love your blog!
Christy says
Oh thank you so much Victoria! I appreciate that! XOXO
Vanessa says
Wow! This was amazing! I am in love. QUESTION… Do you think this same technique would work with a second hand ugly tufted headboard?
Christy says
Thank you, Vanessa! I don’t see why it wouldn’t work! XO
Addie says
An AMAZING cheat!!! Love the button wording!!! That was a really good cheat idea…saved a lot of time and poss. heartache. Keep up the good work…NO slacken off!!!
It came out beautiful!!!
Addie XXOO
Christy says
Thank you, Addie!!! XOXO
Paula says
Christy, you made this look so simple. And what lovely results! Thank you for sharing your secrets with us!
Christy says
Thank you so much, Paula! I’m always glad to share! XOXO
Cecilia from Georgia says
Christy! What a clever idea!! I use my glue gun for most everything but never to attach buttons. I always avoid tufts because of the work involved but now I have to try your “short-cut” method. What about that clock? I haven’t seen that in a makeover…is it something you transformed? Love your blog! XOXO
Christy says
Thank you so much, Cecilia! I was so pleased that this worked out. That clock usually lives in my office. I found it at HomeGoods when we first bought our house! XOXO
Debra A Wise says
Looks great! Not sure I could do this even ‘cheating’. Thanks for sharing.
Christy says
Thank you, Debra! XOXO
vicki says
Awesome! Love, love, love!!! Great tips to ‘cheat’ to make it pretty 🙂
Christy says
Ha ha thank you, Vicki!! XOXO
Marilyn Gray says
Love it! You did a wonderful job and got the instructions so easy that I even believe I can do it! Whoop! I was gonna ask where you got the clock….it was like you read my mind, lol! Thanks for sharing….and taking the hard parts out of upholstery!
Christy says
Thank you so much, Marilyn! I just loved that clock when I saw it! XOXO
Bj says
I love clever people like you……making things easier for the rest of us. Even if it is cheating it makes the rest of us braver to try a project like this
Christy says
Aww you are so sweet, Bj! Glad I could share an easier alternative! XOXO
Julie Briones says
You are a TOTAL CHEATERRRR! But, I LOVE it! LOL! It looks lovely. I think that button is hilarious!!! Made me guffaw! Thank you for this tutorial, Christy… I am pinning it to my ‘how to cheat in a pinch’ board.
Christy says
Ha ha!! Thanks, Julie!! Those buttons gave me a chuckle too!! XOXO
Lynn says
Love. Love. Love. You do such beautiful work!!!
Christy says
Aww thank you so much, Lynn!! XOXO
Carole says
You are so clever. How did you even get this idea? It surely turned out lovely.
Christy says
Thank you, Carole! I just thought it could work and didn’t care much about messing the stool up in the process since it was only $12. I’m so glad it worked!! XOXO
Shelley says
I think you are incredibly talented! There are times one has to be very exact, and times cheating is just fine! 🙂 I think the random pattern in the fabric helps so much in this piece- a solid fabric would have let you see any bit “off” in your pleats, but your fabric keeps the mind from being able to make that judgment. Looks great!
The only thing I might have done differently would have been not to use white with such a cream fabric background. I would have used a cream paint or even used black for the wooden part of the stool.
I hope these didn’t sound like criticisms. If I didn’t like it, I wouldn’t have taken the time to analyze it. I love the work you do and really enjoy your posts.
Christy says
Thank you so much, Shelley! I truly welcome your feedback! Sometimes it gives me ideas I might not have thought of myself. This fabric would be gorgeous with black! XOXO
Teresa W. says
Hi Christy, What a great job you did on this footstool! It is beautiful and your technique is genius! I am wondering though, since you upholstered over the old fabric and padding, did it have an odor to it and if so, what did you do to alleviate it? Thank you for sharing your talents with us!
Christy says
Thank you, Teresa! Thankfully this piece had absolutely no odor. I am really picky when it comes to upholstered pieces, and I probably would not have purchased it if it did. XOXO
Victoria says
The stool looks beautiful. Just checking – you said you stapled the fabric just above the wood? So it’s stapled into the padding? How will that hold up over time & use?
Christy says
Thank you, Victoria! I meant the band of wood that is visible when completed. The part where the fabric is stapled is wood also. XO
Joan Clanton says
thanks so much for this tutorial. I bought a floral printed bench at a garage sale years ago then changed my décor so I painted it white. yup, despite the “wonderful” reviews about painting upholstery, it’s not pretty– it’s in my spare bedroom and guests put their luggage on it. I am going to try your technique to cover up the crunchy paint and I’m sure it will be a huge improvement. thank you!
Christy says
My pleasure, Joan! I haven’t tried painting upholstery yet. Did you wax it after? That is supposed to soften it up. Either way, kudos to you for giving it a go! I’m sure it’s better than it started, but this cheat may just be the answer. Good luck with it! XOXO
Robyn Wright says
I love anything Frenchy and those shoes are CUTE!
Christy says
Thanks, Robin! I guess since I don’t have anywhere to wear them to anymore, they may as well be useful as props ha ha! XOXO
Christy says
That should be Robyn!! Ugh…sorry, friend! XO
Sandy Nathan says
This is so clever! I’ve yet to reupholster anything, but I’m looking at some dining chairs that may need new covers–just seats. I’m not up to doing more. Now I won’t be scared. Do you have any articles on just plain recovering dining seats? What if the padding is shot? What do you do? Thanks for the inspiration!
Christy says
Thank you, Sandy! Your seats will be much easier! I share more on that in this post: https://www.confessionsofaserialdiyer.com/how-to-add-piping-to-dining-room-chairs/ My padding was still good to go here, but if you need to replace yours, you can purchase it at JoAnn Fabrics. Grab a roll of batting as well while you’re there. You’ll want to adda layer of batting over the foam before you cover. Goos luck! XO
Sandy Nathan says
Thanks so much! I’ll study your link. Is JoAnn Fabrics on line? We live out in the country will no sewing/fabric stores around. I’ve looked at fabrics on Etsy and Amazon.Ciao!
Christy says
You are so welcome! Yes, JoAnn fabrics is online. I’m not sure what is causing your comments to duplicate, but I am getting two of the same comments. Today I’m seeing two of the same comment with different email addresses. Very weird indeed. I wish I had an easy answer for you! XO
Marie says
You scared me at tufting and had me at hot glue. Now, this is my kind of tufting! Brilliant idea Christy and it looks just like the real deal. Very pretty footstool makeover too! Pinned 🙂
Christy says
Ha ha this is my kind of tufting as well!! Thanks, sweet friend!! XOXO
Donna says
The footstool is so cute! You are so clever and your tutorial is something anyone could follow. If I had room for an another stool, I would scout the thrift stores for one.
Christy says
Thank you, Donna! This is really a great option if you don’t want to do all that work! XOXO
Tina Matteson says
This is gorgeous!!!!!!!!!! LOVE, LOVE, LOVE.
Christy says
Thank you, Tina!! I was so thrilled to find this fabric! XOXO
Melitta Meneghel says
You usually make very cute furniture transformations. This one came out really good! But what makes me weary is that you left the old fabric underneath the new one. The old one has a unique texture to collect dust. In such fabrics the colonies of acari are huge, especially the dust mites, which use our dead skin cells as food. The worst part is that they can cause severe allergies.