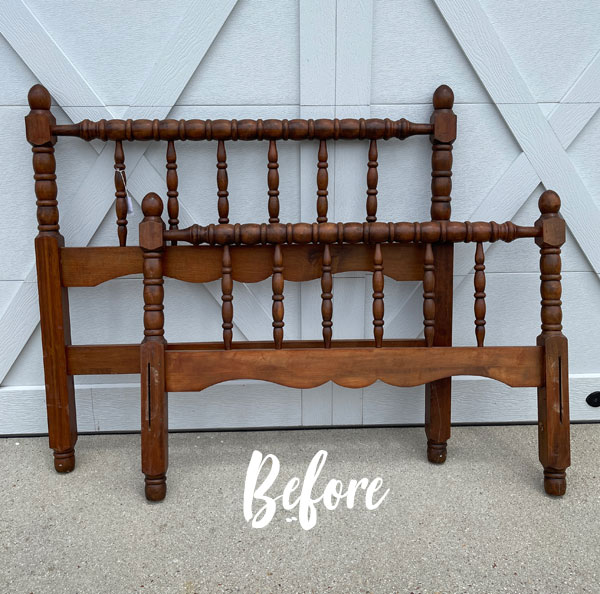
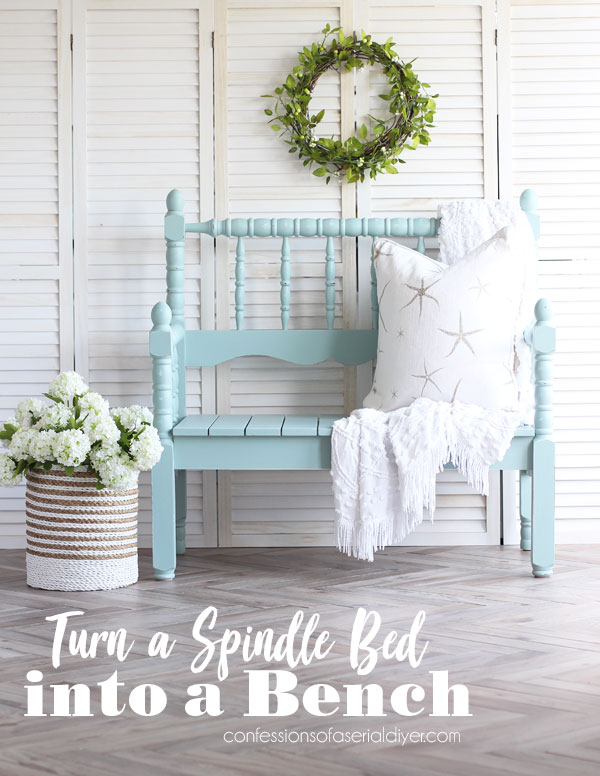
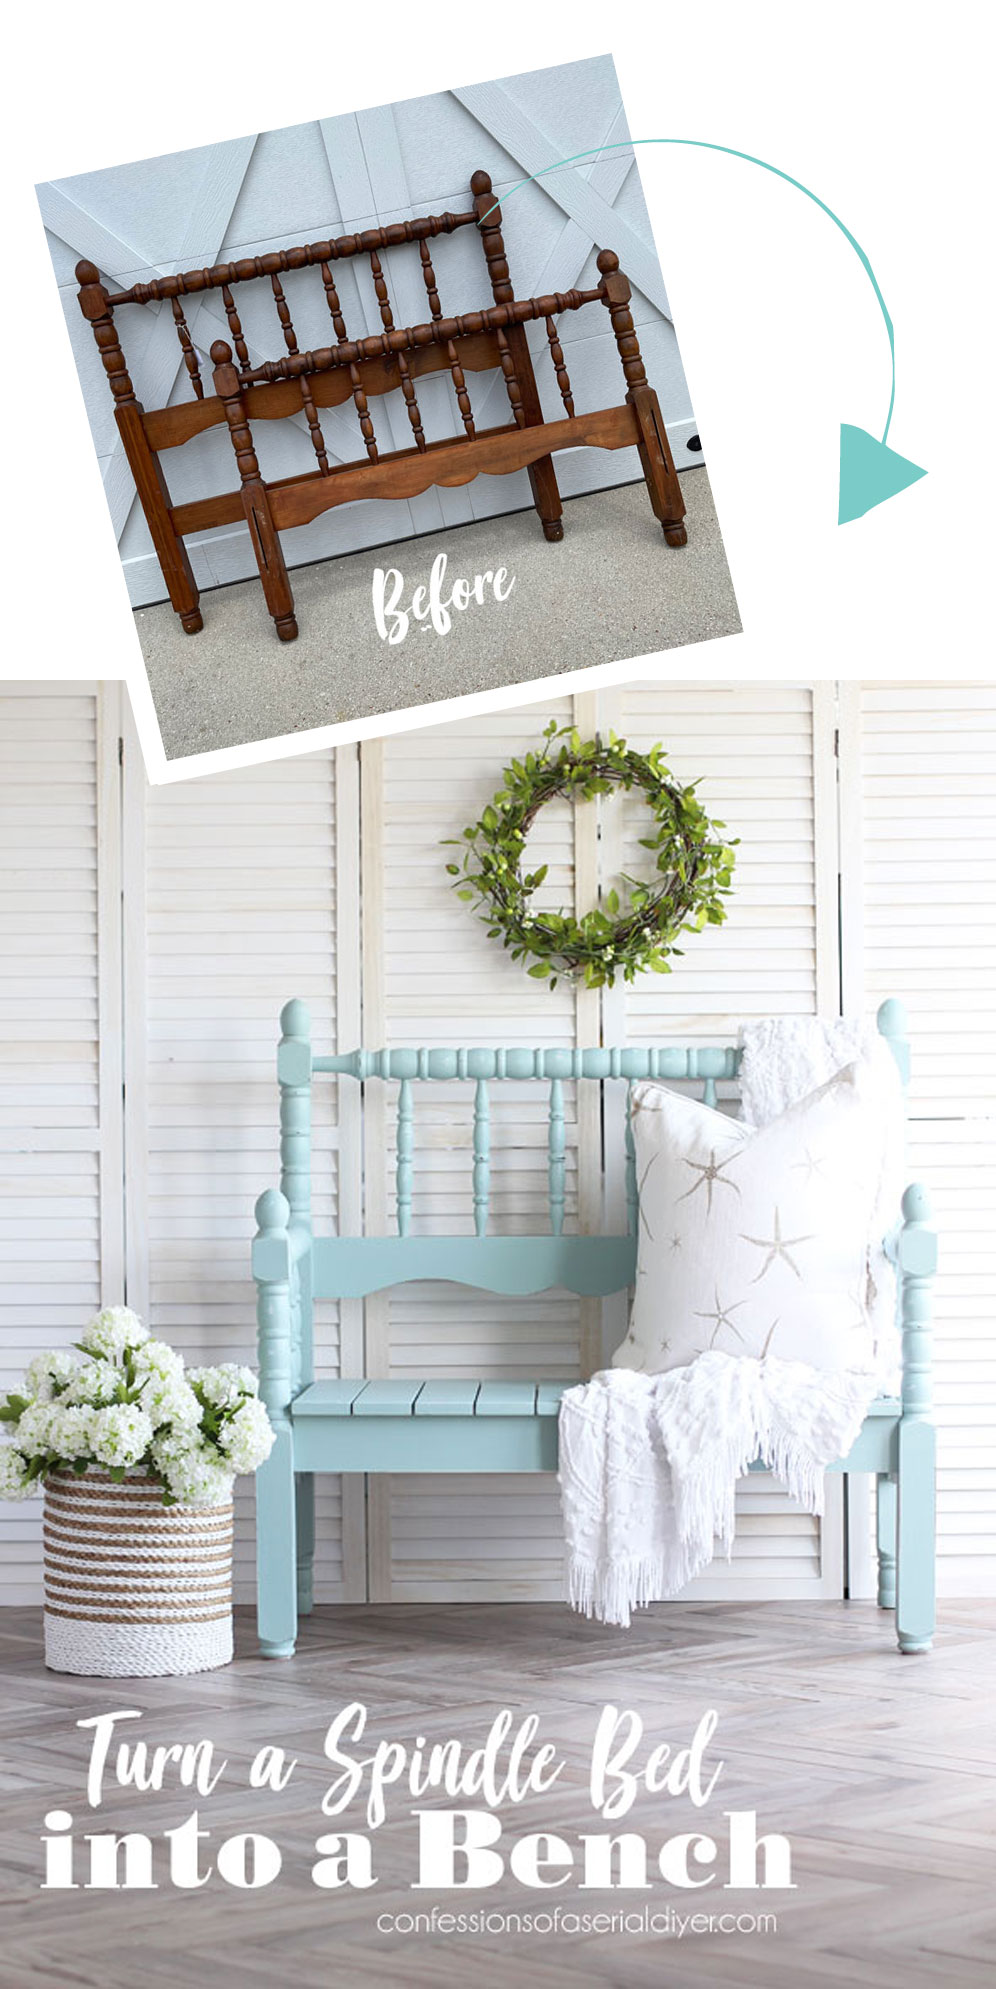
Hello beautiful friends!! I am so happy to be back to creating!! For today’s Furniture Fixer Upper makeover, I’m using this spindle headboard and footboard from my current haul to show how to turn a spindle bed into a bench:
Be sure to look for my friends’ Furniture Fixer Uppers at the bottom!
This bed was only $19.95 at one of my favorite thrift stores. I found it along with the gorgeous serpentine dresser that is also in this haul.
I’ve created many headboard benches over the years, so I’m sure it’s no surprise that this set is becoming one as well!
I just love the charm of them, especially when they have all these spindles!
However, creating one from a spindle bed is a bit trickier than with with a bed that has all straight lines, so I’m going to break it down step by step!
I’ve included a few affiliate links so you can find the products I love.
How to Turn a Spindle Bed into a Bench
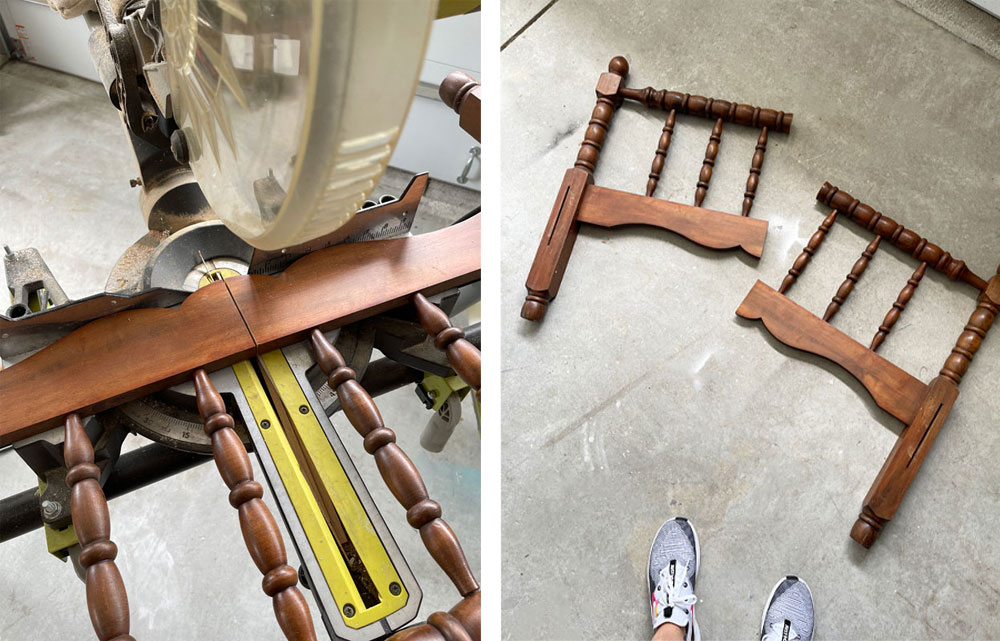
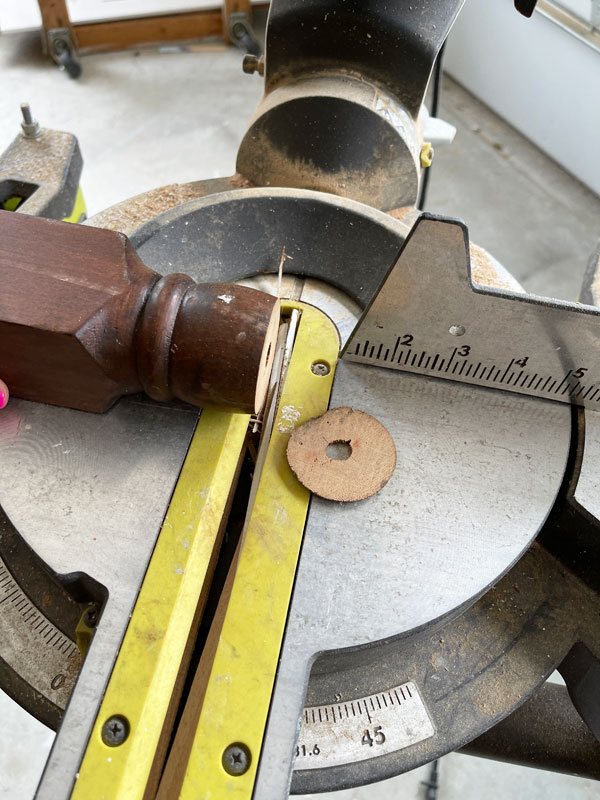
The first step is to cut the footboard in half. Those pieces will become the sides of your new bench.
I did that with my miter saw:
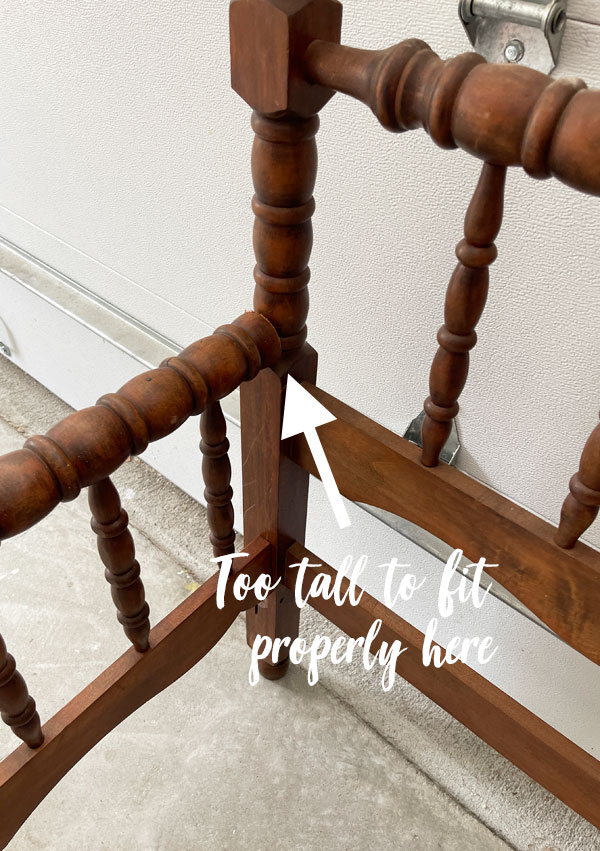
The tricky part about spindle beds
Now here’s the tricky part about spindle beds. Often, the footboard is too tall to hit the headboard in the right place where they will be joined together:
To remedy that, you can remove some of the height from the bottom as I did here with my miter saw:
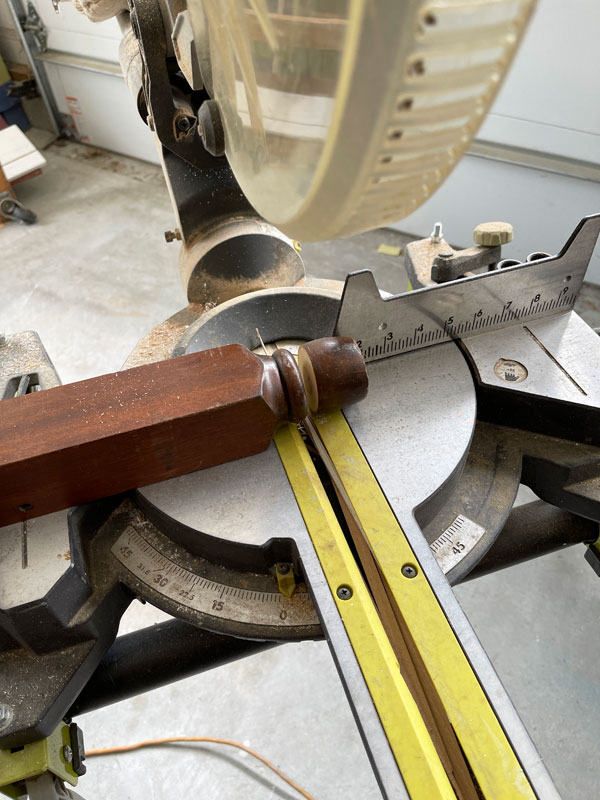
This will usually fix the issue, and you can proceed like normal. However, this one was being extra sassy and was still too tall.
So, I decided to add the piece I had removed from the footboard, to the feet of the headboard!
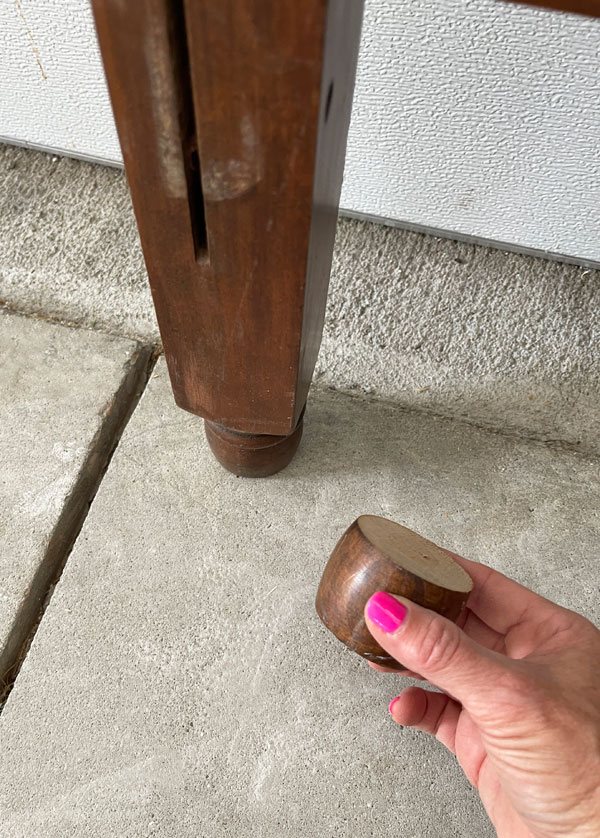
To do that, I first smoothed out the bottom of the headboard feet by barely trimming it, so the two pieces would attach nice and flush:
Next, I added a ring of wood glue to the bottom and then attached them together…
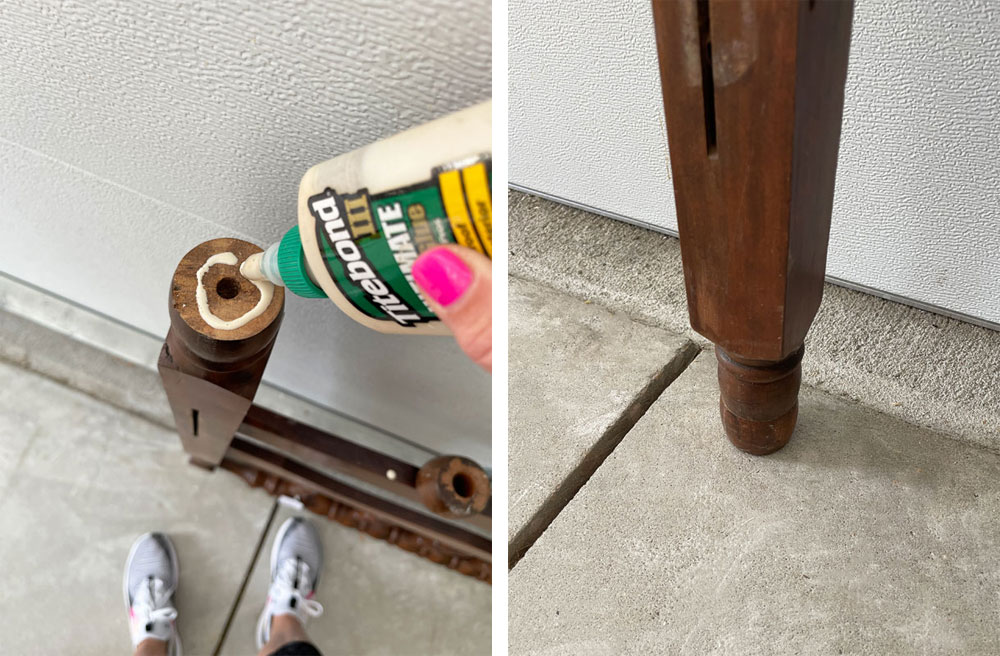
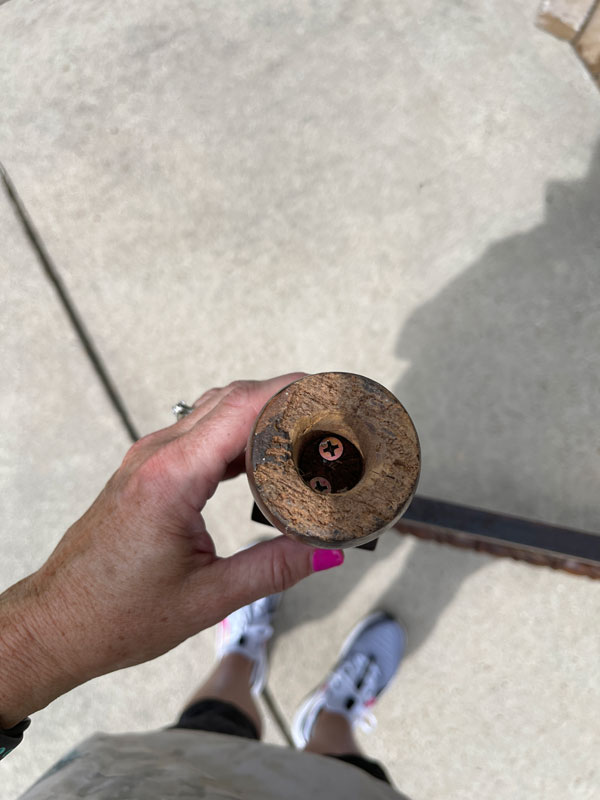
I secured them further with screws once the glue was dry. There was a hole up the middle of these legs since they were once part of a bunk bed set that stacked above one another, so I added two screws, aiming them both towards the outside of the hole:
Okay now that the height issue has been resolved, it’s time to build this bench!
Attach the new bench arms to the headboard
Now you can line up the headboard and new arm pieces made from the footboard and do a dry fit to make sure everything lines up properly. Also make sure everything is level at this point.
Next, wood glue the new arms to the headboard at the top and bottom and use clamps to hold everything in place:
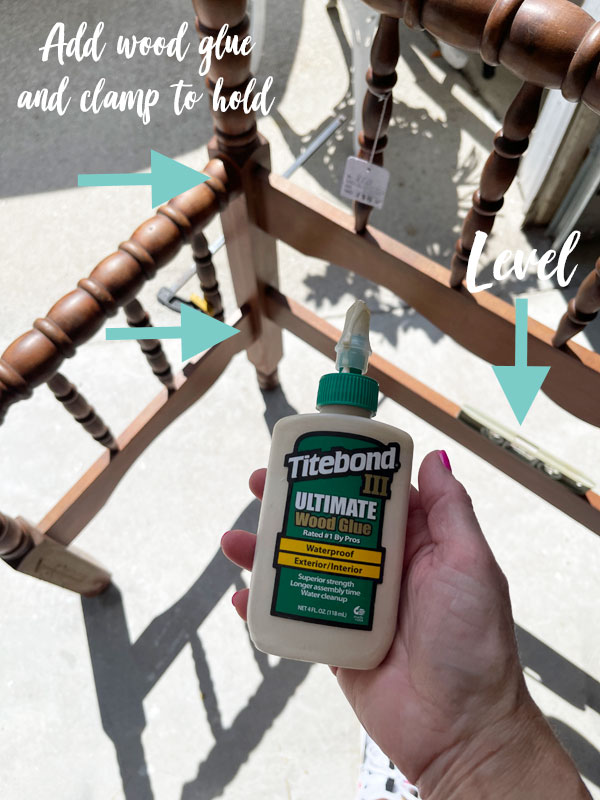
Once the glue is dry, attach the arms more permanently with screws.
To do that, use your drill to drill a pilot hole with a bit just a tad smaller than the screw:
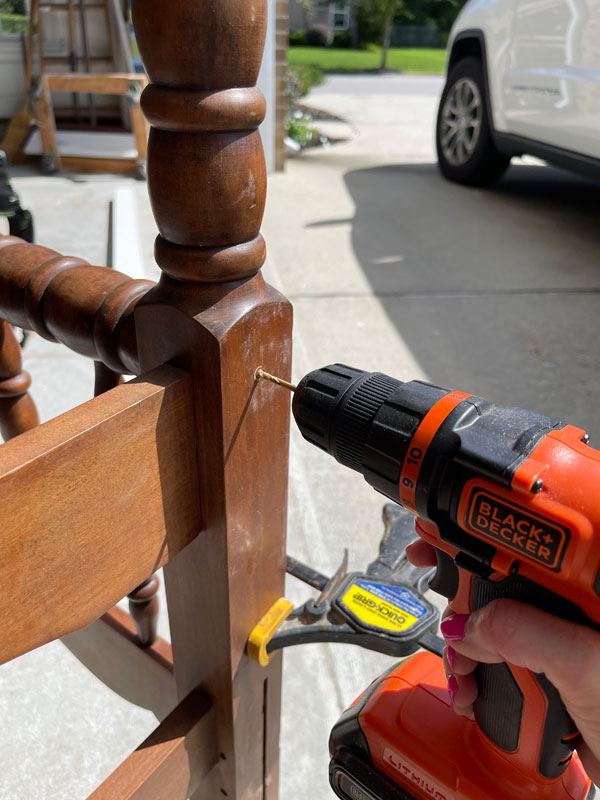
Here I drilled it as deep as it would go.
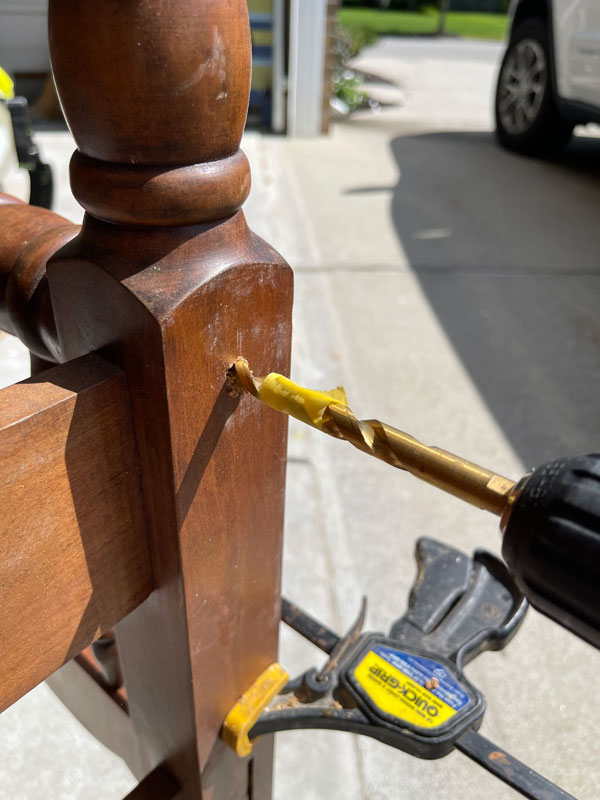
Then, use a drill bit just a bit larger than the screw head and drill deep enough so that the screw will go all the way into the new arm pieces about an inch when screwed in place.
I added a piece of tape to my bit as a guide for how deep to drill:
Screw the screws in place.
I added one on the top where the spindle was…

I usually use my Kreg Jig Jr to attach the bottom part since it has a right angle where it connects to the headboard, but I went ahead and used the same method on the bottom this time.
I added two screws on the bottom part. The screw will be countersunk, or below the surface, and you can fill the hole with filler to hide it.
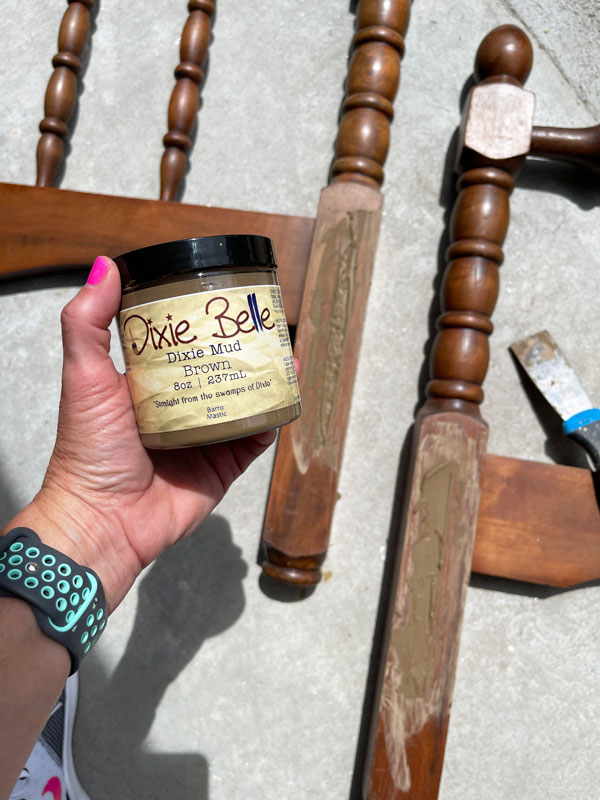
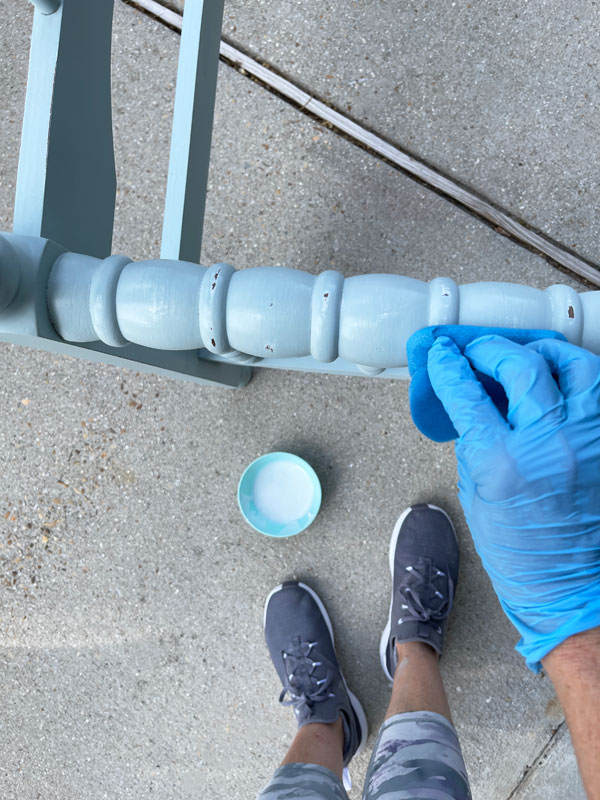
Clean
Before getting to the filler part, I cleaned everything with White Lightning. (Dixie Mud is water soluble, so you want to clean before filling the holes with Mud.)
I added one TBSP of White Lightning to my tub with a half gallon of warm water…
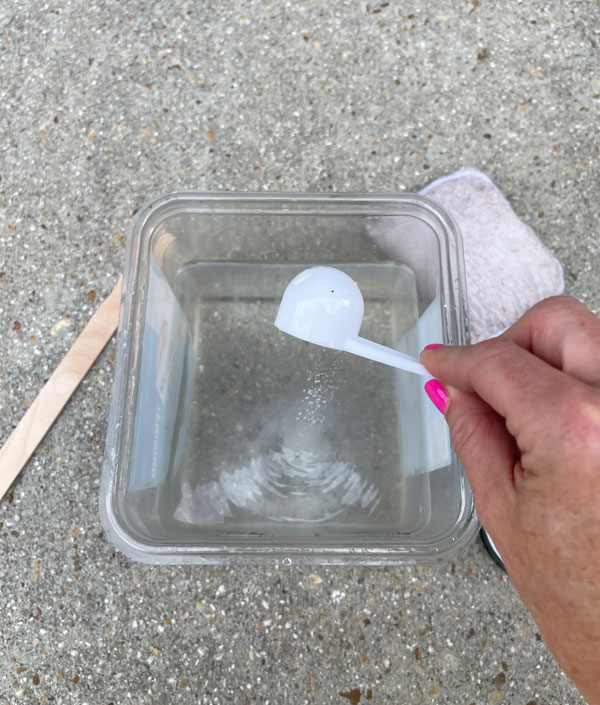
I gave everything good cleaning using a terrycloth applicator pad. Then, I swapped out the water for clean water and wiped everything down once more.
Fill the Holes
Once my bench was dry, I used Dixie Mud to fill the holes as well as the parts where the bed rails attach:
Those areas may take a bit longer to dry since they go deep. Once mine had dried, it had sunk a bit, so I went over it with a second application.
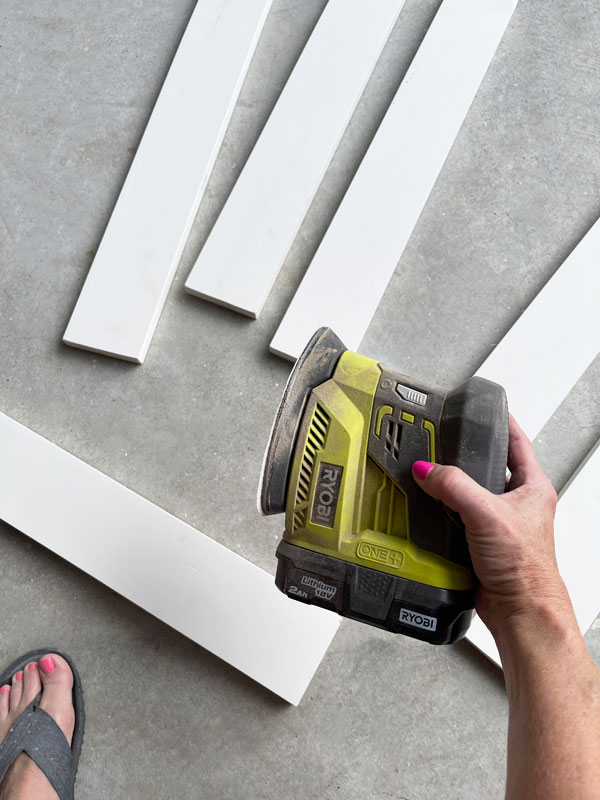
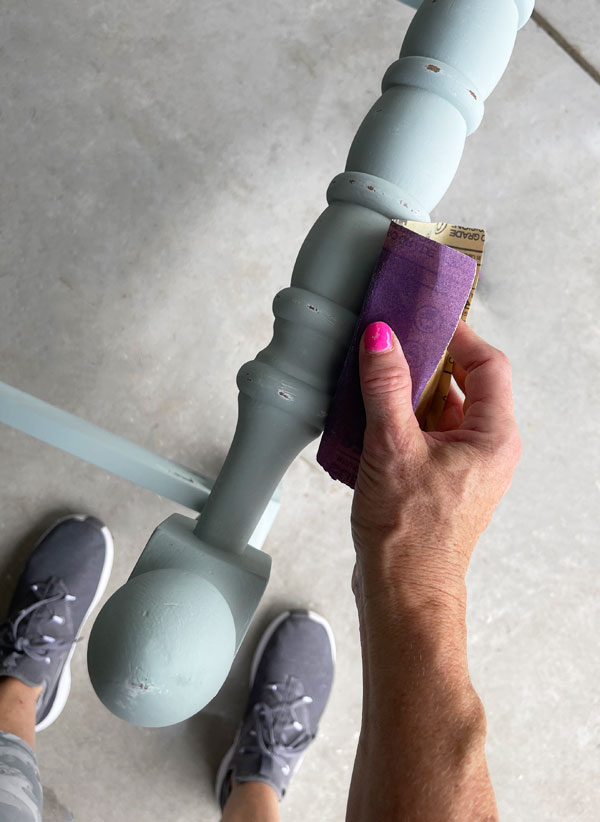
Once the Mud is completely dry, sand to smooth:
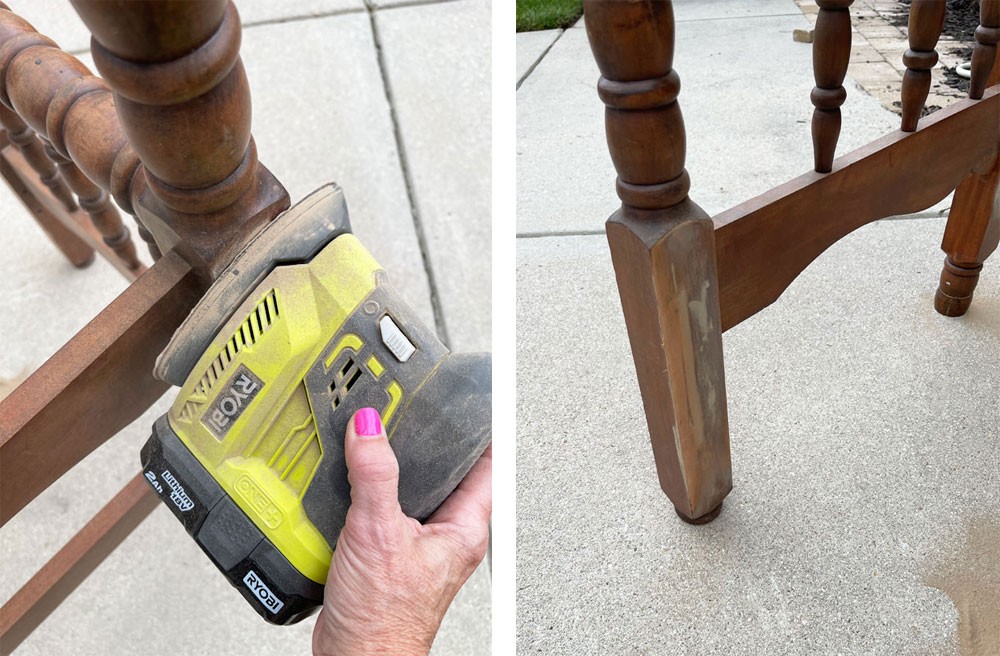
This cordless Ryobi Cat sander is great for smaller projects like this!
I just use a soft cloth to wipe away any dust from sanding.
Attach the new front support
I tried really hard to pull enough scraps from my stash to complete this build, but I just couldn’t gather enough.
So, I stopped by the Home Depot and picked up three of these primed 1X4s for $10.88 each:
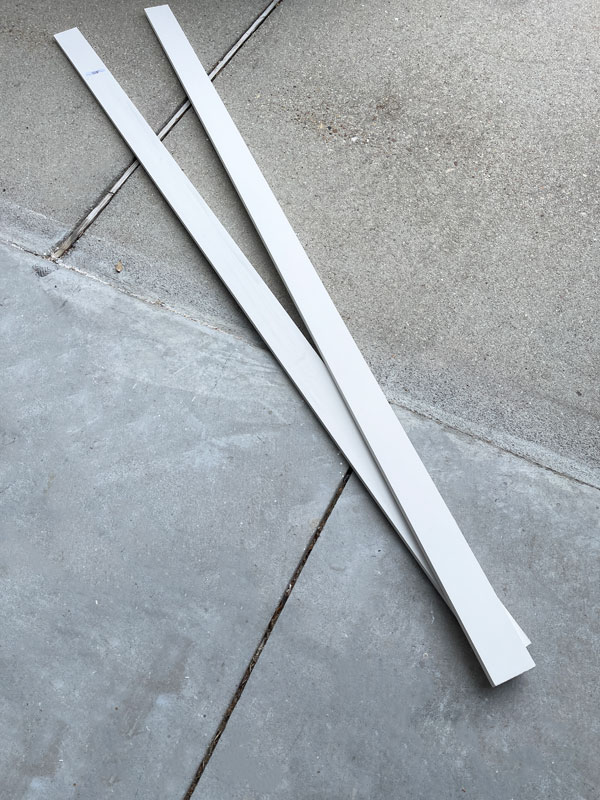
I used them to make the support piece across the front and the seat slats.
I did use my Kreg Jig Jr to attach this front support piece. The kit has easy to follow instructions, and you can use it with your drill to create pocket holes that allow you to easily connect pieces at right angles.
Screws go right into those pockets…
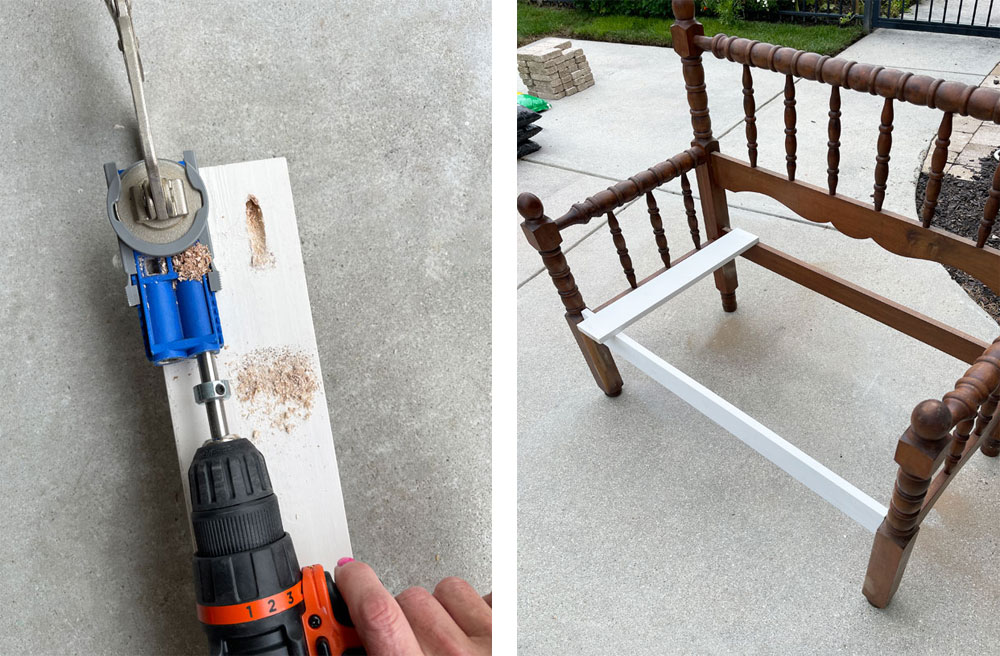
The new front support needs to be level with the back support to hold the seat slats in place. I cut those out of the primed pieces next.
Once I had them cut, I sanded the edges smooth with my Ryobi Cat sander:
Time to Paint!
I chose to paint and seal before attaching the new seat slats to make it easier.
I wasn’t planning to paint this piece white, but I wanted some white to show through when I sanded. To get a quick coat of white on, I gave this bench a coat of Rustoleum’s white spray primer:
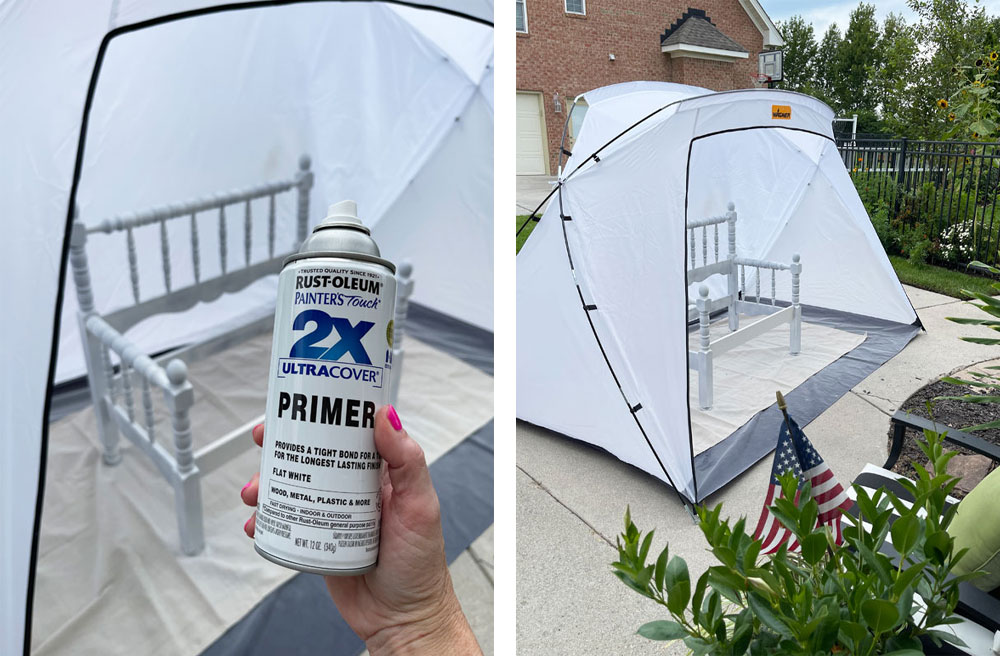
I bought a new large spray tent since my old one had become super crusty, but it’s just been sitting in my garage for at least a year. I needed it for this project since it was threatening rain. It’s pretty big and does a fantastic job at containing the spray!
I followed that up with one coat of Vintage Duck Egg Blue mixed 50/50 with Cotton:
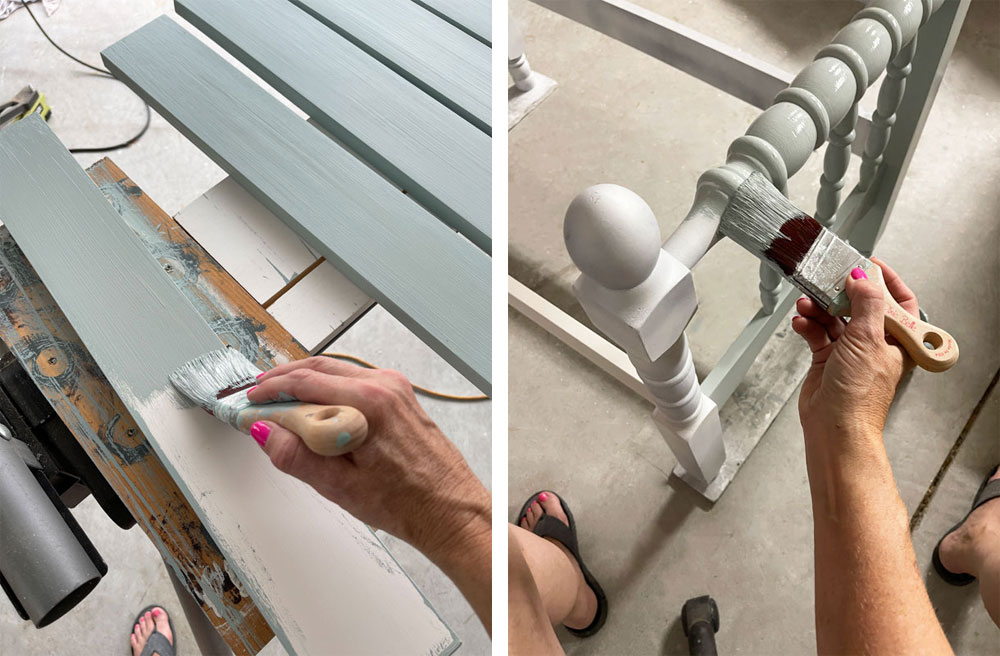
I love Vintage Duck Egg Blue, but I love it even more lightened up! (In the second photo, I was painting at night, so it looks a bit different.)
And lookie who was hanging out with his mama while she worked!
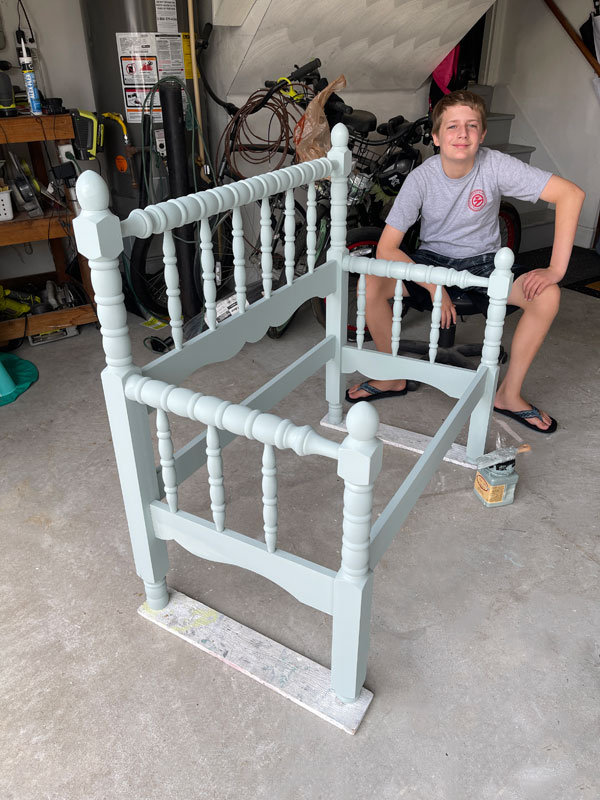
For those of you that are new here, this is my youngest, Brennan. He’s been showing up in posts since he was two, but he has grown quite a bit since he last made an appearance!
Sand
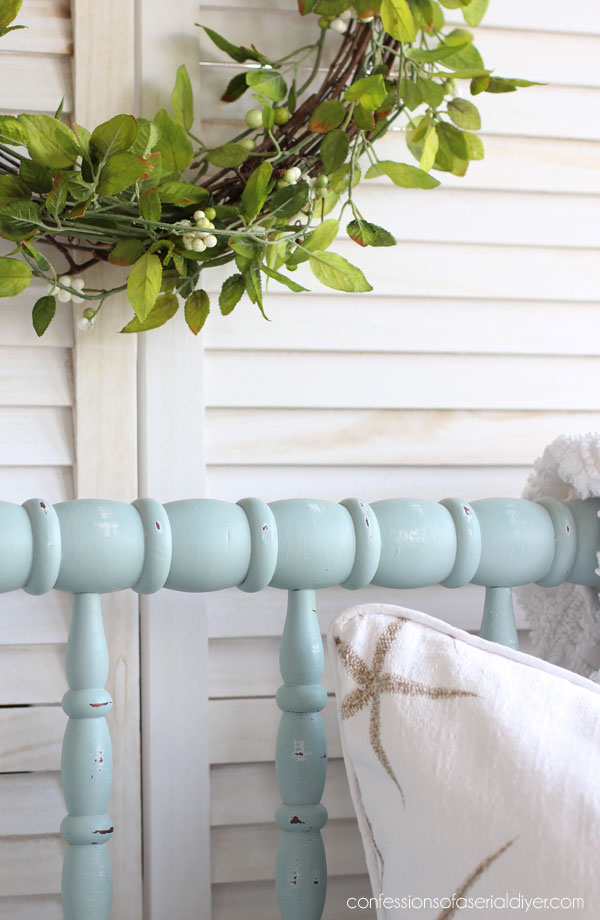
I sanded all over with 220 grit sandpaper wrapped around an old sanding sponge to smooth and distress a bit:
I hoped I would see more white come though, but you can still see it a little.
Seal
To seal my new spindle bench, I used Clear Coat in satin and applied it using the blue sponge applicator…super easy!
The satin dries to a lovely subtle sheen.
How many coats do you need of Clear Coat??
Technically, Dixie Belle chalk mineral paint does not require a topcoat. Once it has cured (about 21 days), it is good to go and super durable, but it is very flat and not as nice a finish as it is when sealed. So, keeping that in mind, if you just want to change the sheen and add a little additional protection with the Clear Coat, one coat is fine.
However, on more flat surfaces, two coats covers the surface best and yields nicer results. So on the spindle parts, I did one coat, and on the flat parts, I did two!
I attached the seat slats using my nail gun and this transformation was complete!
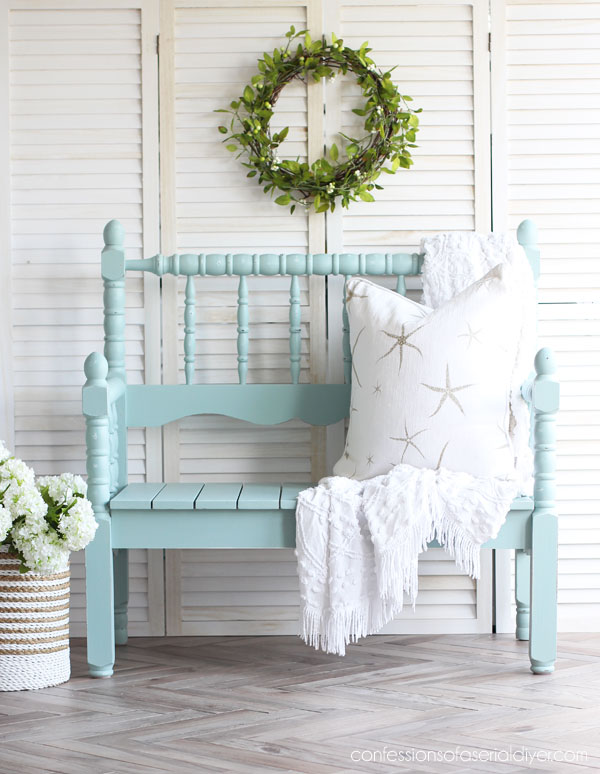
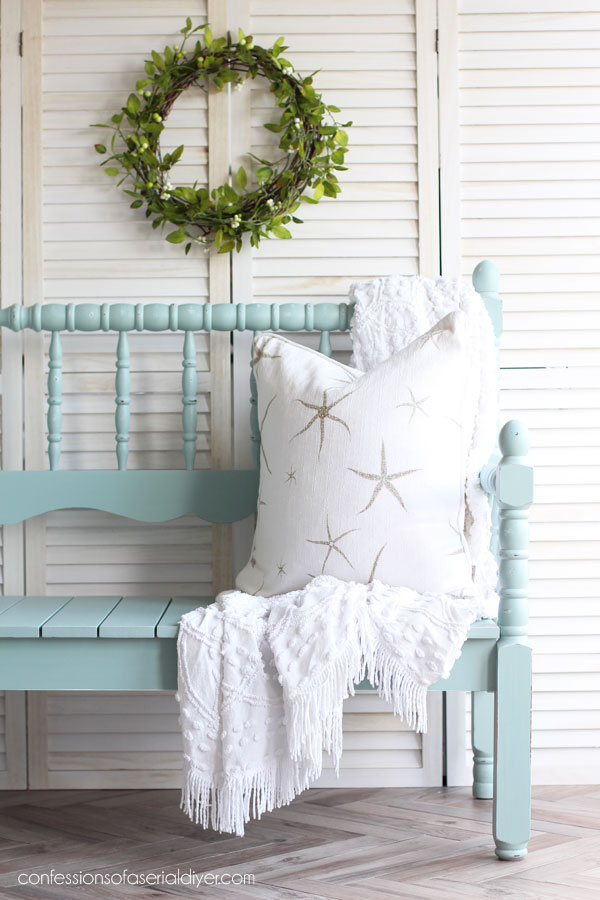
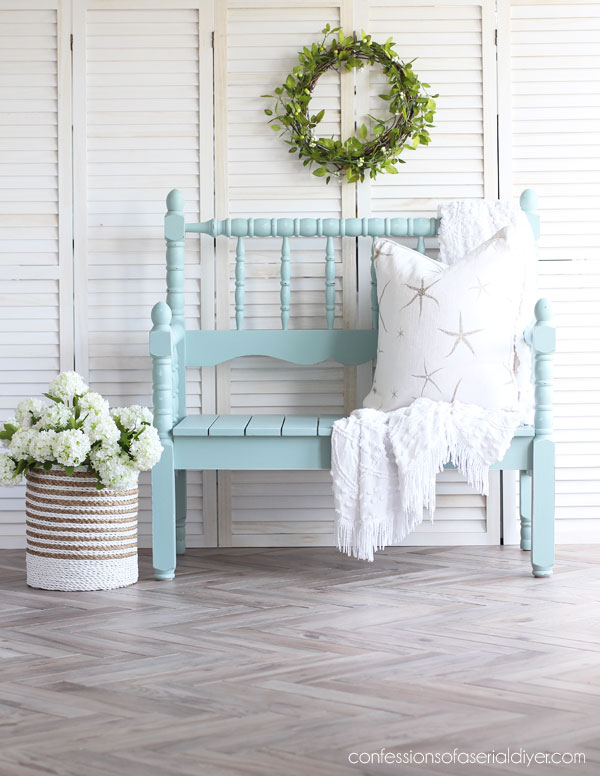
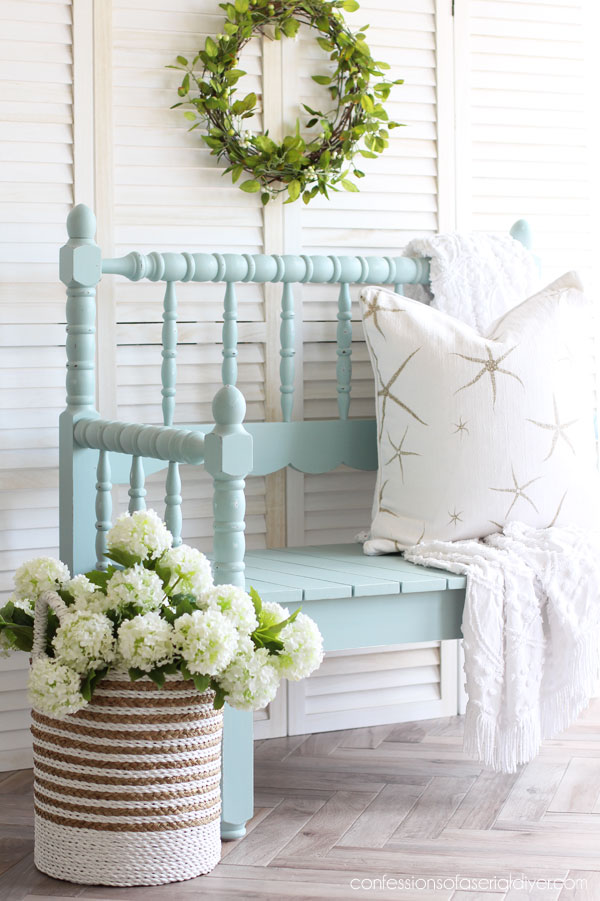
The After
There’s just something so charming about those spindles!
And this color? LOVE!
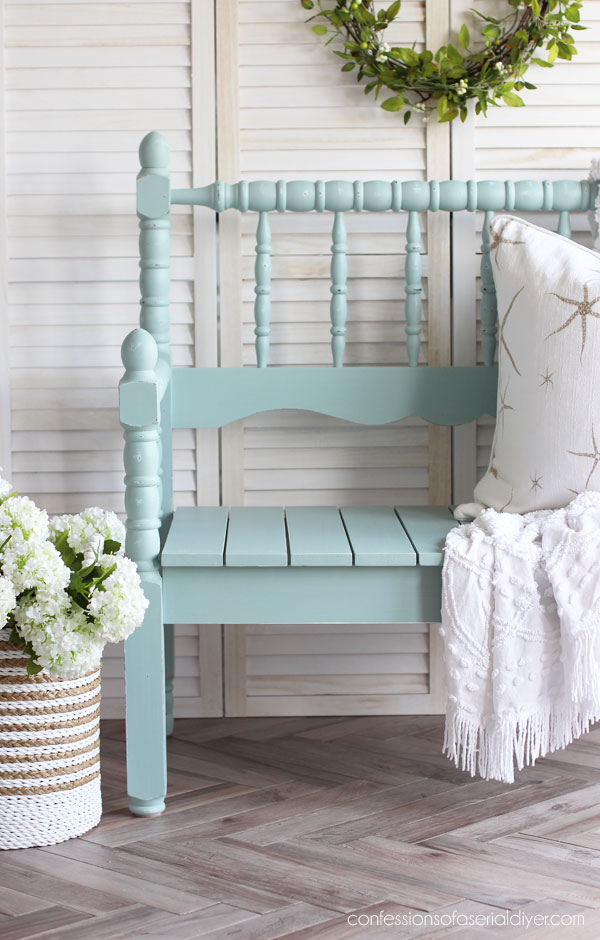
Again, it is a 50/50 mix of Vintage Duck Egg Blue and Cotton.
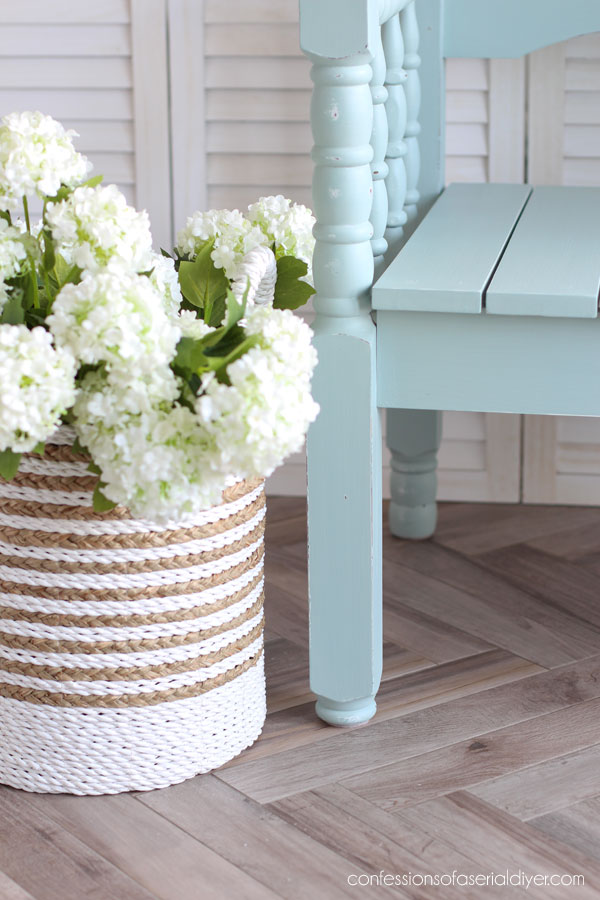
Here you can see both the front and back feet that I had to alter to make this bench work…
Look who else showed up! Lyla jumped up on here the minute I started setting it up, but then the doorbell rang.
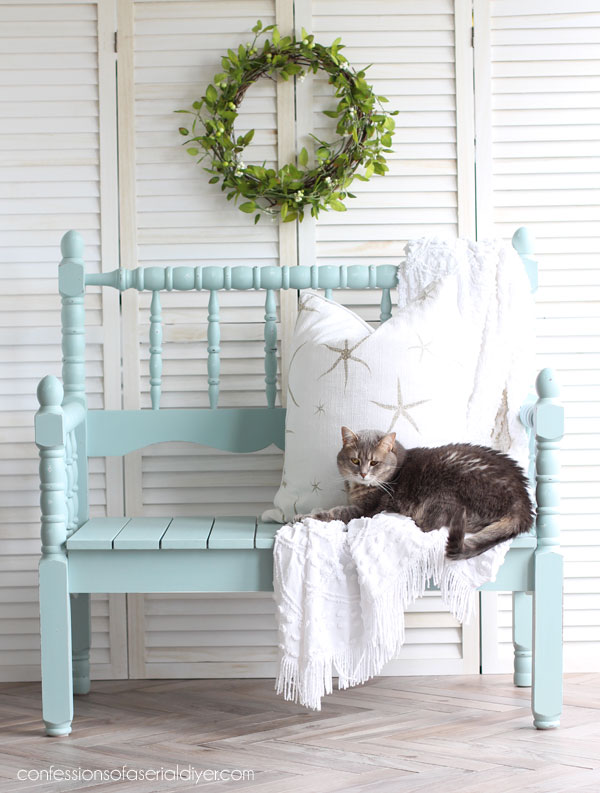
She’s like a dog that way…always has to run to the door when people show up, but instead of barking, she meows until you answer the door!

Don’t forget to check out what my friends are sharing today!

If you’ve got a more traditional bed set like this one:

They are a bit easier to convert to a bench.
See how I transformed this one HERE.
And I get to cross another project off the list!
You can revisit the pieces I’ve redone already at these links if you missed them:
Dated Shelf Makeover
80’s Clock Repurposed
Stenciled Demilune Table
DIY Fabric Lamp Shades & $5 Thrift Store Lamps
Thrift Store Dresser Makeover
I hope y’all enjoyed today’s project! For Tuesday, I’m working on this round of smalls from my haul:

UPDATE: See all the afters of this bunch HERE now!
XOXO,

Don’t Miss a Thing!
If you like what you see, there are several ways to follow along!
EMAIL * INSTAGRAM * FACEBOOK * PINTEREST


Get FREE SHIPPING on all orders over $50. No code needed at checkout! Orders under $50 always enjoy $8 flat rate shipping! Most orders ship same or next business day!


Mary Kaiser says
I LOVE how your bench came out! I think that over the years you have done ALOT of benches, but this one is my favorite. I can’t believe how big Brennan has gotten, or your super cute kitty! That is so funny that she acts just like a dog when the doorbell rings! How tall is Brennan now? He is so handsome! I can’t call him cute anymore because of his age, but we all know he is soooo cute!! LOL!
Christy says
Aww thank you so much, Mary! This might be my favorite as well! And yes, Brennan is stretching like crazy! He’s still a couple inches shorter than me, but not for long, I’m sure! Lyla really is like a dog. If someone is knocking at the door and we don’t hear them, we hear her meowing like crazy at the door and that’s how we know someone is there lol. Have a fabulous weekend, my friend! XOXO
Maryellen Webber says
I am going to save this post for my husband. I want him to transform our son’s crib into a bench. You did an amazing job on it!
I have an unrelated question, I just bought 2 milk glass lamps that need shades. How do you buy the right size shades for your lamps?
Christy says
Thank you so much, Maryellen! What a wonderful way to preserve your son’s crib…I love that idea so much! As for the lamps, I really just eyeball it. I would take one of your lamps to the store and try different sizes to see what looks best. I wish I had a more scientific method to share lol! XOXO
Janice Holt says
I believe this is the prettiest bench you’ve done although all of them are pretty. Love the spindles and you are so smart to figure out how to make it work. Another super job.
Christy says
Aww thank you so much, Janice! This is probably my favorite also! There’s just something about those spindles that do it for me every time lol! XOXO
Denise Cox says
Oh my goodness, Christy!!!! I’m in LOVE with this bench!! I love spindles and benches anyway… and you know how I am about coastal colors!! What a gem! If I was there, I’d buy in a heartbeat, ( I’d FIND a place to put ” her “🤔😊 ). I’m looking everywhere now for a new bench for my front covered porch. The one I have I bought from Craigslist and painted/varnished myself. Not the best job, but…oh well. This time around I want to buy it “ready to go” …lol! Again, LOVELY job!!
Christy says
Thank you so much, Denise! I’m so glad you like it! You know I’m right there with you when it comes to coastal colors! XOXO
jennifer says
Oh my, I’m speechless!! I’m absolutely blown away right now! Girl, you got skills!!!
💗💗💗💗💗💗💗
Christy says
Aww I love that so much, Jennifer! Thank you! XOXO
Stormee says
Wow! Great bench! Love the color.
Christy says
Thank you, Stormee! XOXO
Sandra says
I love it! Great color! Great work, Christy!
Christy says
Thanks so much, Sandra! XOXO
Niki says
So cute Christy! Spindles are very charming, and per usual the staging is perfect. I think Brennan and Lyla made this redo more special. The color bursts off of the white background and reminds us all it’s still summer as fall is knocking at the door. Can’t wait to see some smalls on Tuesday. Have a great weekend.
Christy says
Thank you, Niki! I appreciate that! Brennan hasn’t appeared since 2020, I believe, since he doesn’t hang around with me as I’m working as much, so I had to snap a quick pic! Lyla is always nearby lol! And you are so right…fall is almost here but it is still summer!! XOXO
Denise - Salvaged Inspirations says
This bench turned out amazing! I love the spindle details and the custom color you created. And I say this EVERY time, but my Kreg tool is still in the box… I haven’t tried it yet omgosh!!!😂
Christy says
Thank you so much, my beautiful friend! I was thinking about you and your Kreg Jig when I wrote this post ha ha! Too funny! Pull it out and just test it out on scraps…it is awesome! XOXO
Cory says
The spindles make it soooooo pretty and interesting! You did great with this “extra sassy” piece. Lol
I love everything about it!
Christy says
Thank you so much, Cory! This one was extra sassy ha ha! XOXO
Cheryl Atkinson says
Hi Christy! I just love this color. If I had the room and tools I would definitely make one of these benches. So pretty.
Christy says
Thank you, Cheryl! I am seriously looking around to see where I can put this one ha ha! XOXO
Lazy K says
Great idea!
Christy says
Thank you, Lazy K! XOXO
Cyndi says
A friend of mine saw a bed just like this beside a dumpster and left it there because she didn’t think anything could be done with it. 🙁 Anyway, that’s soooo cute, Christy!
Christy says
Oh no!! Better not show her this then lol! Thanks, Cyndi! XOXO
Lynda says
Wow! This turned out so nice. The spindles really give it that extra something. Great job!
Christy says
Thank you so much, Lynda! I’m always drawn to the spindly things lol! XOXO
Sharon L Austin says
Lovely! You really have to stop making things for my cottage if you’re not going to deliver them. LOL
Christy says
Bahahah! You are the best! Thank you, Sharon!! XOXO
Deanna says
Fabulous! I’m like Lyla, love the bench and just want to try it out! However, unlike her, I don’t run for the doorbell anymore 🙂
Christy says
Ha ha! I’m the same…I don’t run for the doorbell or the phone lol! XOXO
Jenni says
Oh another spindle piece, yay! I just love spindles too! I’ve been saving a spindle twin head and foot board set for when my daughter outgrows her spindle crib, lol. But now I’m tempted to make a bench instead! Love it!
Christy says
Yes! There’s just something about spindles that I love too! And ha ha…maybe you can make one from her crib?? XOXO
Marcie Lovett says
Genius idea to add the cut-off foot to the back, Christy. The color is beautiful and the construction is superb; this one definitely ranks up there with all-time favorite benches!
Christy says
Thank you so much, Marcie! I think this one is my favorite! XOXO
Sue Mellette says
Oh my goodness! I am so impressed – How you can take a spindle bed and make it into a bench is breathtaking! You are so creative and skilled. I love the result and the color is perfect. Your staging is also extraordinary. You make everything you do look effortless! It was nice to see your younger son. I know he must be proud of his mom’s talents! Enjoy your weekend.
Christy says
Aww you are the sweetest, Sue! Thank you! I’m so glad you enjoyed this one. And yes, it was so nice to be able to catch a pic of Brennan while I was working so I could share him lol! I hope you have a wonderful weekend too! XOXO
Lizzy says
It’s so pretty! The color is perfect.
Christy says
Thanks so much, Lizzy! XOXO
Constance Colvin says
Awesome result Christy and a very clear tutorial!
Christy says
Thank you so much, Connie! XOXO
Michele M. says
Oh. My. WORD! Incredible! It’s AWESOME, Christy!!!
Spindles, perfect color and size – it is absolutely amazing!
Christy says
Thank you SO much, Michele! XOXO
Patty says
Lovely bench – one of your prettiest❤️
I can hardly believe how tall Brennan looks – even tho he’s sitting! Time passes so quickly!
Sweet little Lyla – can’t get enough of seeing her! She looks so much like my Max. We always had dogs & he
thought he was one of the pack! I miss him everday.
Christy says
Thank you, Patty! Brennan has definitely hit a growth spurt and Lyla is never too far from me lol. They really do fill such a large space in our hearts! XOXO
Dalila says
Beautiful, Christy! You are quite the carpenter!
Christy says
Thank you, Dalila! It was fun to build…I don’t so that as often as I once did! XOXO
Tara C says
Love. Love. Love this transformation! The color is beautiful.
Christy says
Thank you so much, Tara! XOXO
Rose Lefebvre says
I can picture it by an entrance or even on a covered front porch. It is so lovely and the color is perfect!
Christy says
Thank you so much, Rose! That’s where I picture it as well. It would be especially perfect in an entry to sit on to put on shoes! XOXO
Petra says
Oh my goodness 🙂 this has to be one of my faves of yours. Just love everything about it – the spindles are delightful (and I know, such a pain to paint), the colour is adorable, Lyla is especially cute, the staging is so pretty (love the cushion) and I really like your little cordless sander! I really must look out for some bedheads/ends to make my own :). Have a lovely weekend xo
Christy says
Aww yay! Thank you so much, Petra! I love all the spindly things ha ha and that little sander is so handy! Enjoy your weekend too! XOXO
Connie Douglas says
Well once again you have come through for me with flying colors. I had just pulled out an old bed almost identical to the one you used in this project and have been staring at it for a month trying to figure out how to do it and then like magic you appeared with excellent step by step instructions. Thank you my Rehab Queen!!!!❤️❤️
Christy says
Oh yay!! That was good timing ha ha! Thank you, Connie…have fun transforming yours!! XOXO
Jen @ Girl in the Garage says
Beautiful upcycled bench, my friend! Love those sweet spindles!! xo
Christy says
Thank you so much, my friend! XOXO
Anita says
Love this bench! That was a lot of hard and creative work! Love the pic with Lyla especially. Our cat is very dog-like too, greeting all who enter at the front door. And those boys — they sure have a way of stretching quickly, don’t they!
Have I missed this new photo backdrop in previous posts??? I know you were installing the chevron-patterned floor tile from a long ago previous post and I kept thinking you’d circle back to a post on it with before and after photos, but I don’t actually remember seeing anything. Did I miss it? I can’t remember where you were installing all the tile. Kitchen maybe? I’d love to see some pics of this project. Thanks for all your inspiration. 😊
Christy says
Thank you, Anita! This is the first time I’ve used this backdrop. My bead board wall isn’t quite wide enough for wider projects, and I usually move my entire dining room out so I can photograph in front of the window in there when I do have wider projects. I found these shutters on Amazon as an alternative and they worked pretty great! And yes, the floors are in our kitchen and they extend to our guest bath and laundry room as well. When I was choosing them, I never even thought about them as a great addition to my photos lol! I haven’t stared new photos of the ye kitchen with them yet…I need to do that! Enjoy your weekend! XOXO
Cecilia says
Love it. The spindles make such a sweet bench!
Christy says
Thank you, Cecilia! I’m always drawn to the spindly things lol! XOXO