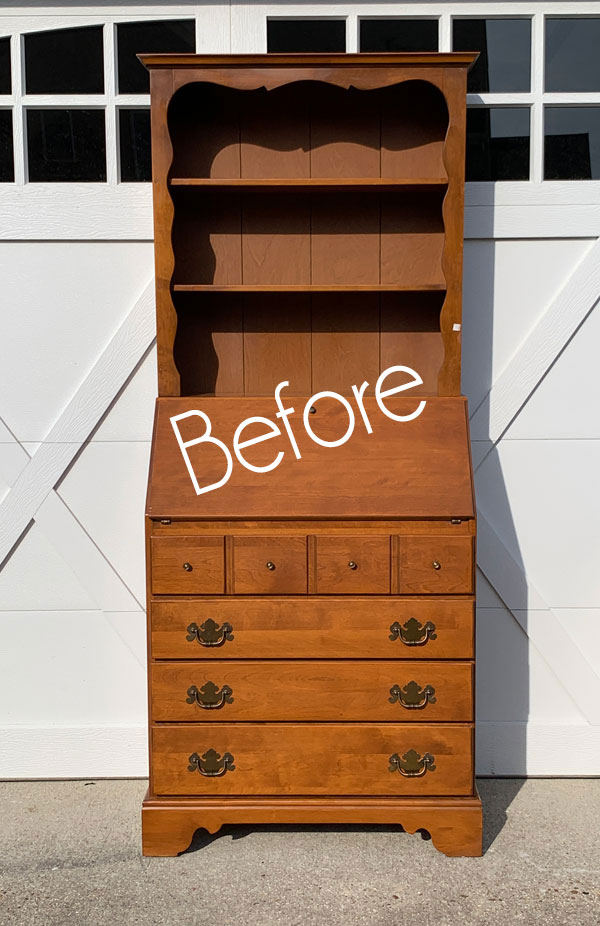
Ever wanted to know how to upcycle a secretary desk hutch? Beautiful friends, that’s what I have for today’s Trash-to-Treasure transformation! My friends have their own trashy makeovers for y’all at the bottom, so be on the lookout for those!
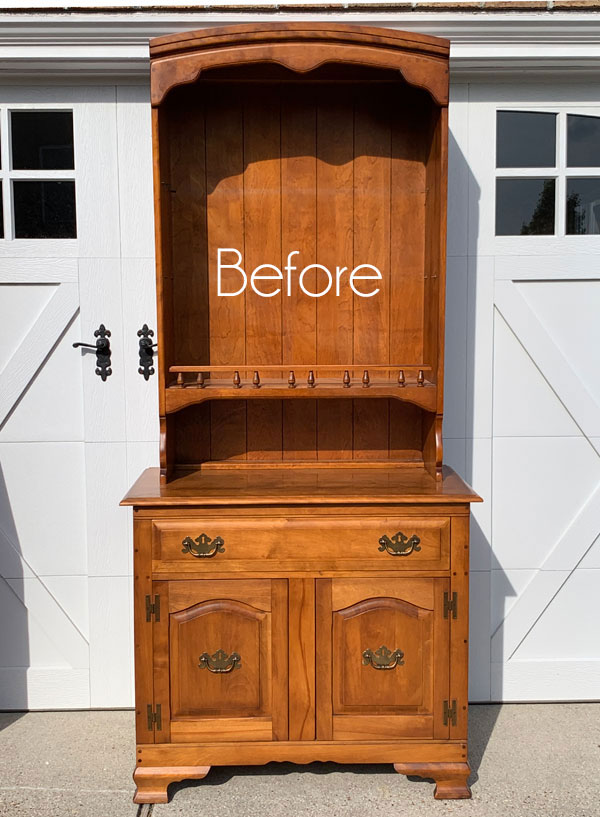
Here is how the piece I’m sharing today started:
I redid this secretary desk several months ago and ditched the hutch on top. See that makeover HERE.
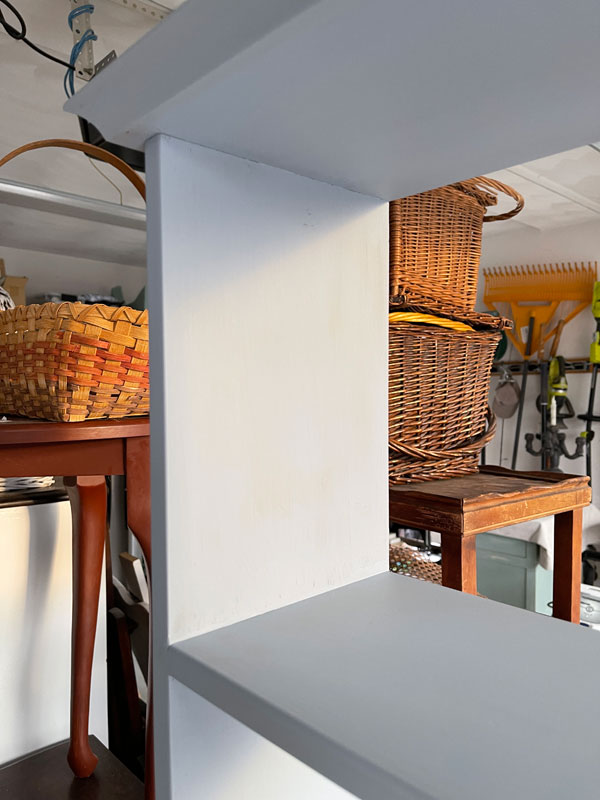
This top piece has just been hanging around the garage ever since:

I have stared at this thing so many times trying to summon some inspiration for it to no avail.
I finally threw it in my free pile, and now I have no choice but to do something with it!
How to Upcycle a Secretary Desk Hutch
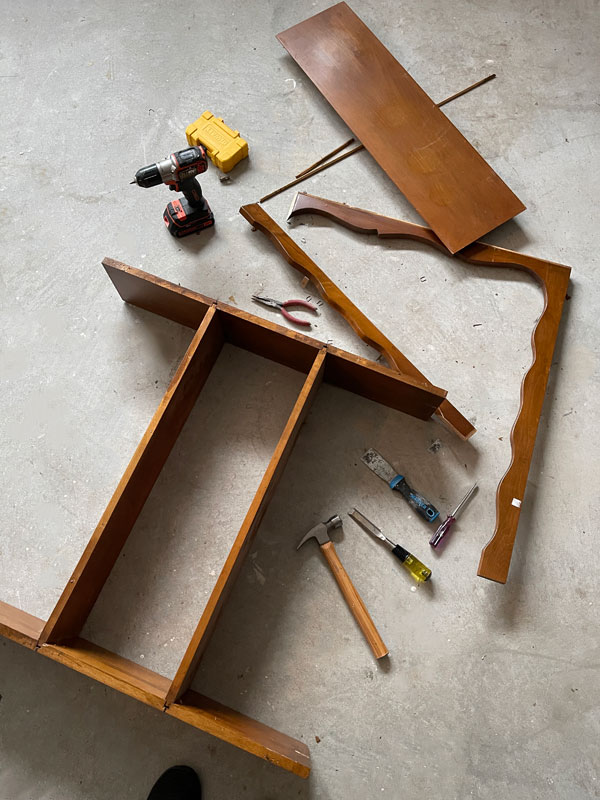
The first thing I did was take it apart so I could see what I had to work with:
I’ve included a few affiliate links so you can find the products I love.
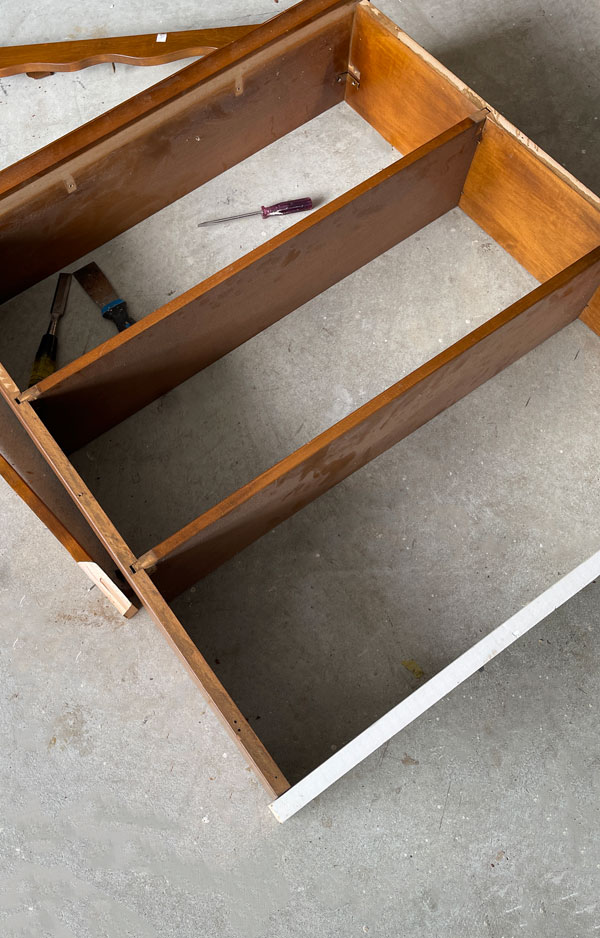
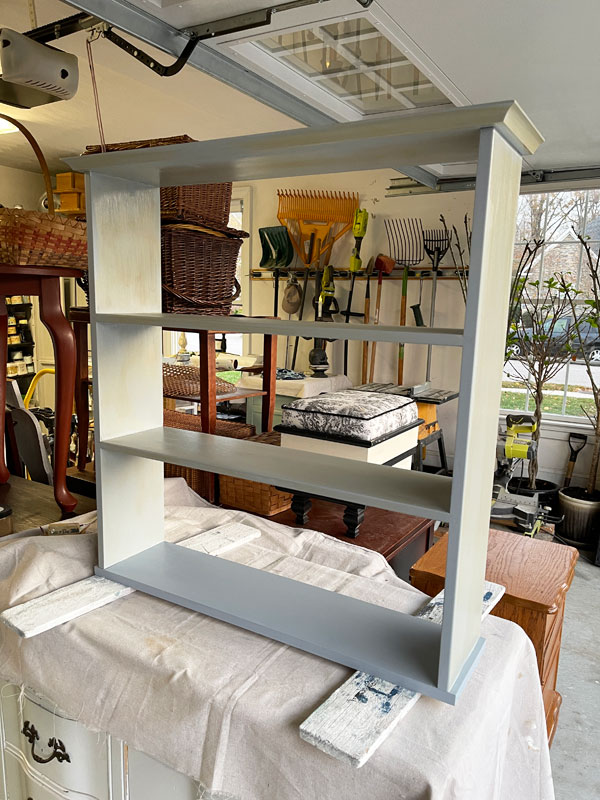
After removing the dated trim, I realized that the two shelves were actually fitted into the two side pieces, so I just decided to keep it as a mini shelf.
To do that, I had to remove about an inch from the top piece since that wavy trim piece was no longer a part of the new shelf:

To make it function on its own, I found a primed scrap of wood that I cut for the bottom:
I let it overhang just a tad on either side so that it looked more like a base.
To reattach the top and the new bottom to the sides, I used wood glue first, and then here’s what else I did to secure them:
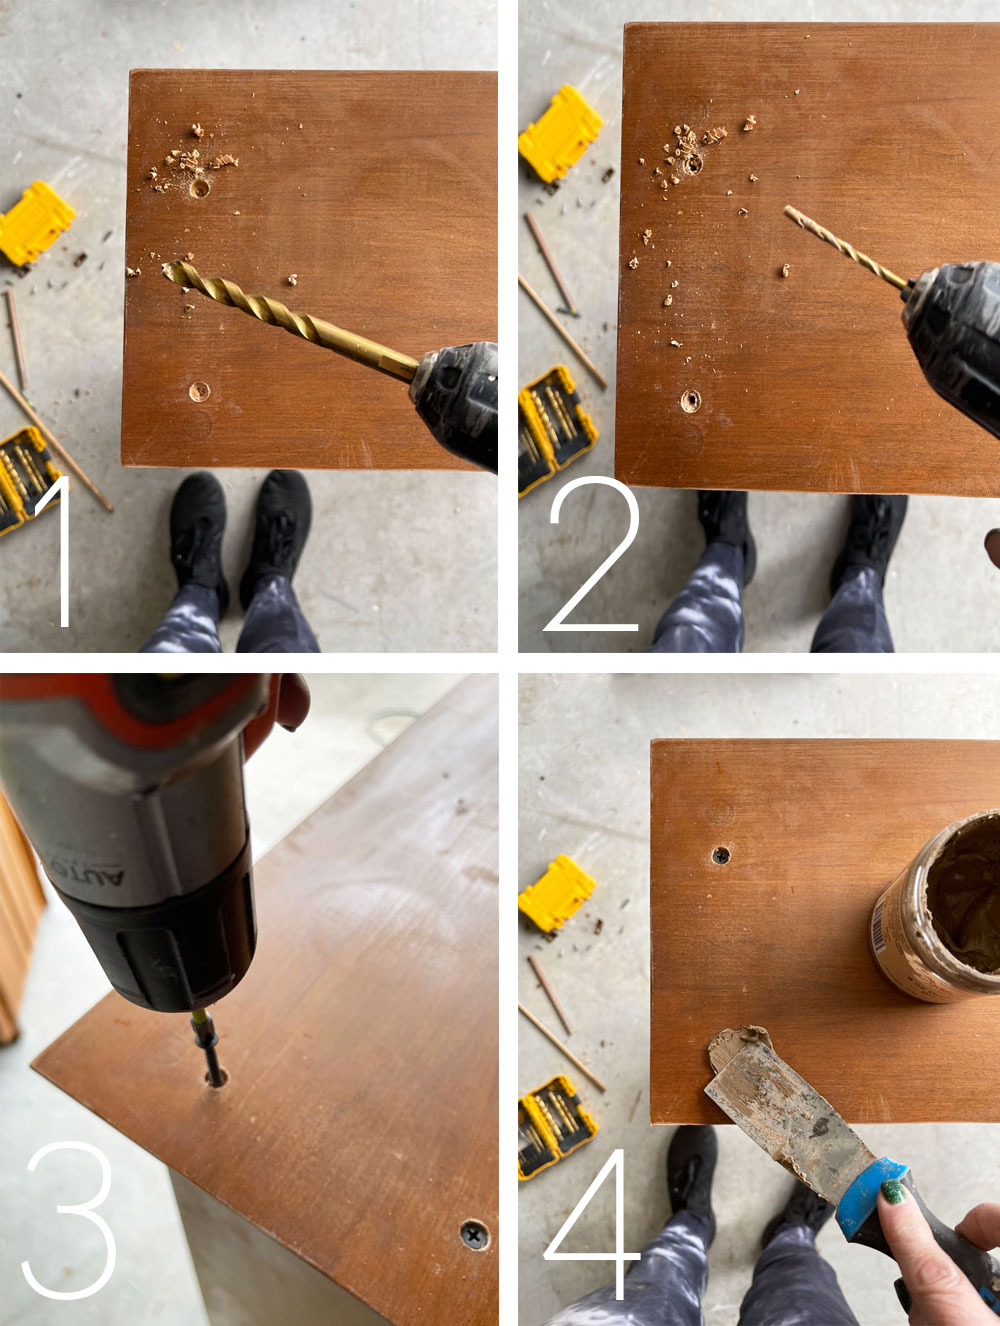
- First, I used my drill to make a shallow hole just a tad bigger and deeper than the head of the screws I planned to attach them with.
- Next, in the center of those larger holes, I predrilled for my screws.
- Then, I drilled the screws in place.
- Finally, I patched the holes with Dixie Mud and allowed it dry.
Once the mud was dry, I sanded the areas smooth using my new favorite sander for small jobs:
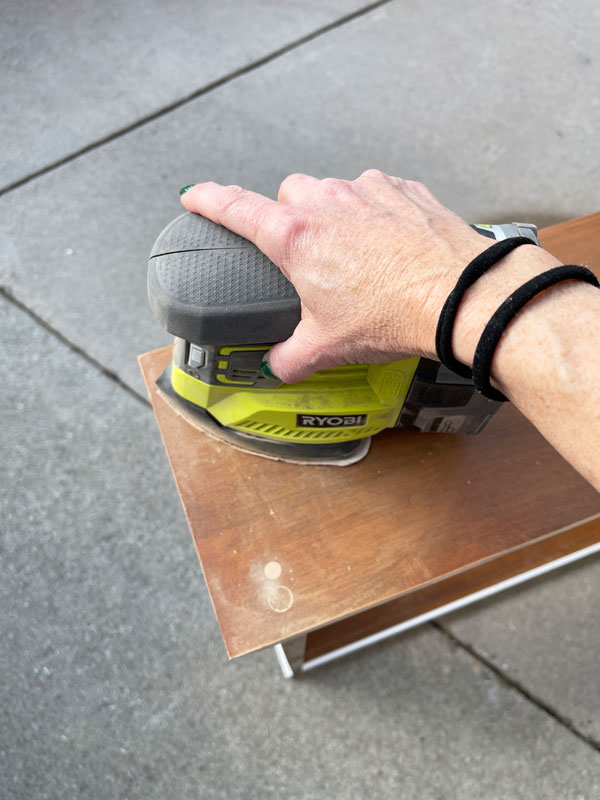
I usually do a lot of hand sanding for these smaller jobs, but this sander is so compact that it works great also and is much quicker! I have the cordless one, but it is also available in a corded option if you don’t already have the Ryobi batteries.
Finally, I had to cut a new back piece which I did out of some hardboard (like pegboard but without the holes) that I had in the garage:
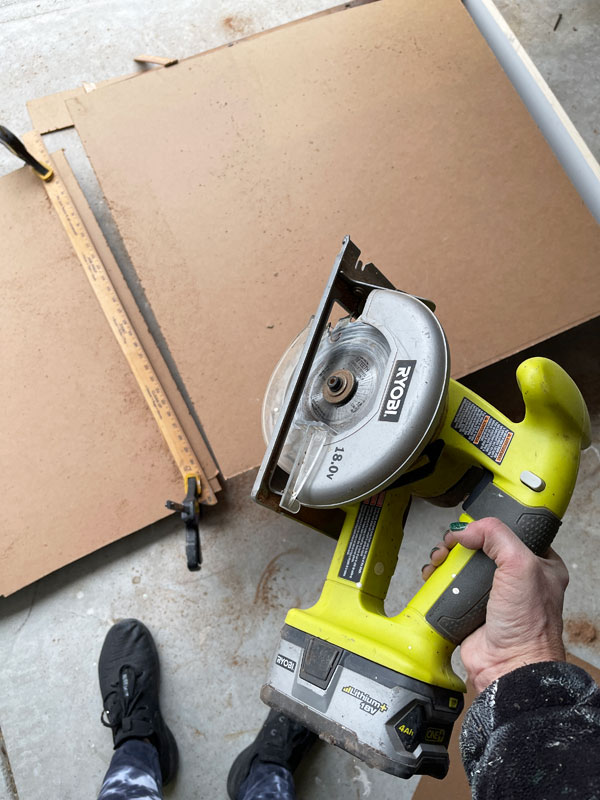
A small circular saw works great for this! As you can see, I clamped a yard stick in place to act as my guide for nice straight cuts.
Paint
Then it was time for paint!
Because I planned to use Silk Mineral paint for this hutch, after sanding where I applied the Mud, I also sanded the rest of the hutch to prep for Silk paint.
The Silk needs something to grip onto. If you want to skip the sanding prep, you can apply Slick Stick as an alternative.
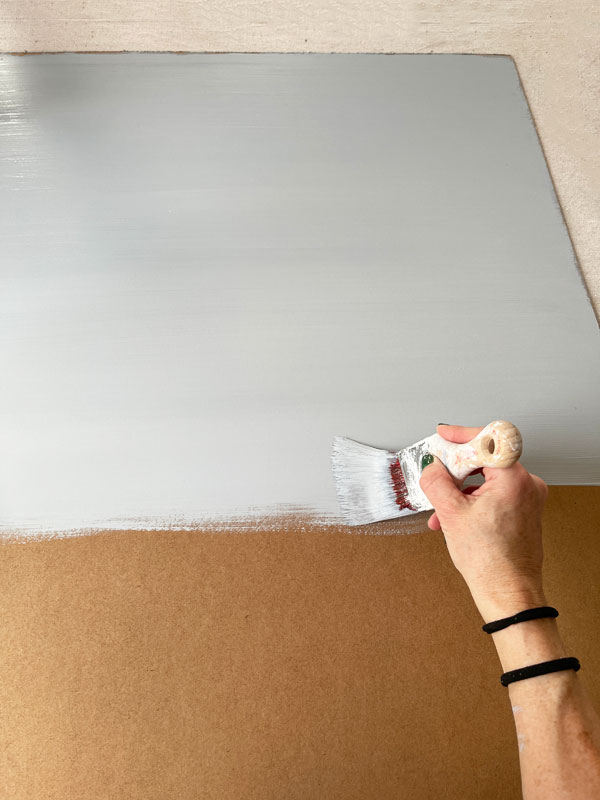
Now, I know better than to get right to painting on an older piece like this, especially one that I have sanded, since bleed-through is a real probability.
But, that’s exactly what I did:
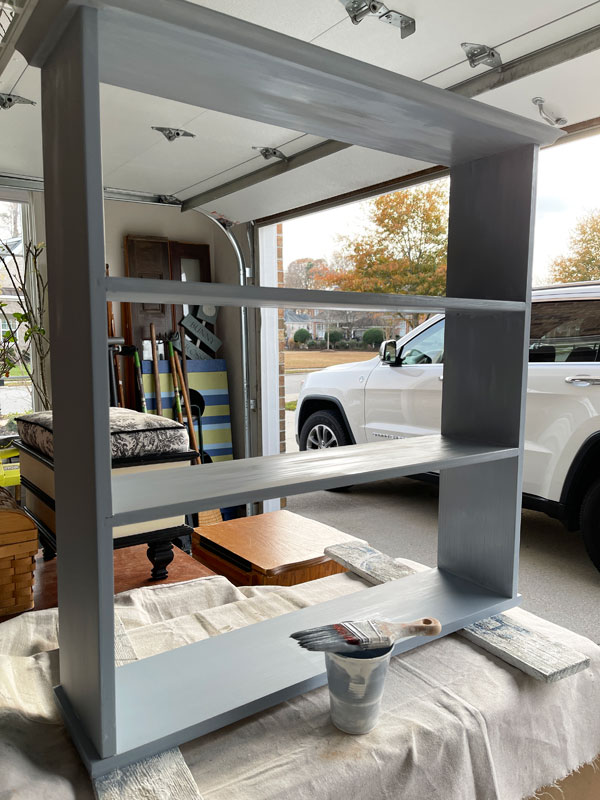
I used a custom 50/50 mix of Silk Whitecap and Quiet Cove:
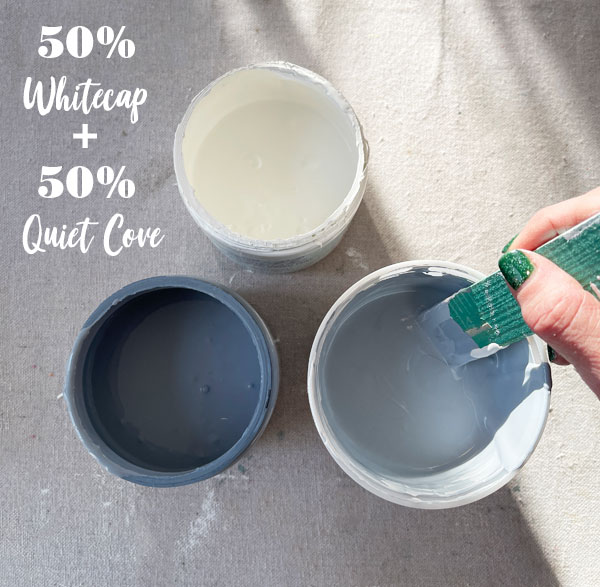
I love Quiet Cove, but I wanted to lighten it up a bit. It isn’t recommend to mix Silk Mineral Paint and Chalk Paint, but mixing two mineral paints is just fine!
As I knew would happen, I got major bleed-through!
Oh no! Not to worry though, there is a super easy fix!
How to fix bleed through
I just reached for my favorite product for bleed-though: BOSS!
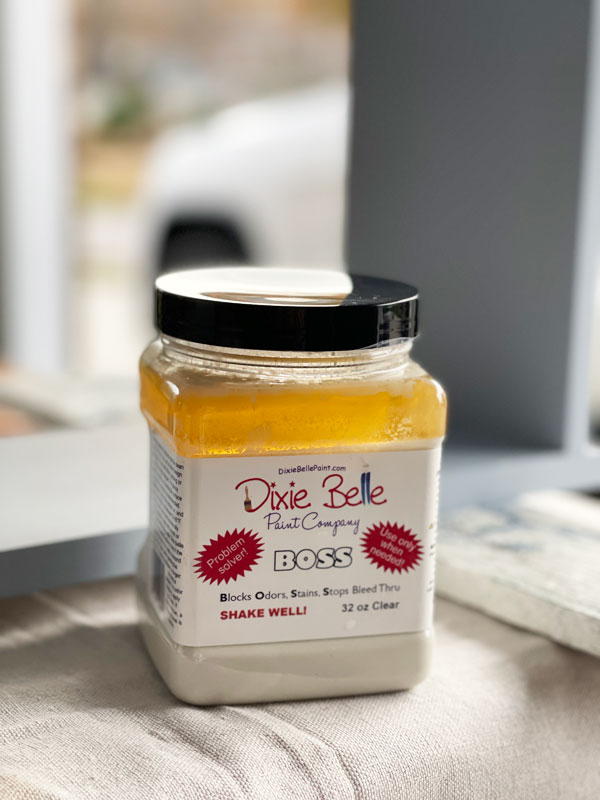
I’m sharing this photo of my jar of BOSS just in case you have one that looks like this too. It is OK! BOSS is water-based (no harsh smells!), so it’s not unusual for contents to separate. Just give it a good shake or stir and you are good to go!
Here it is after a quick shake:

I applied one coat of clear BOSS and as you can see, it really pulled those tannins out even further!
You know it’s the tannins because as you can see, the bottom shelf looks perfect since it was the piece of primed lumber I added.
I allowed this to dry overnight. Proper dry time is KEY!
I repainted the next day and it was perfect! This is by far the best product I have used for bleed-through!
There was no need to seal the shelves since Silk does not require a topcoat, so that was it for the shelves. You’ll want to use your piece with care for the first three to four weeks while your paint hardens and cures completely.
The Back board
For the backboard, I had other plans!
I started with two coats of my custom silk paint mix:
Once that was dry, I reached for one of Dixie Belle’s brand new transfers, Translucent Garden:
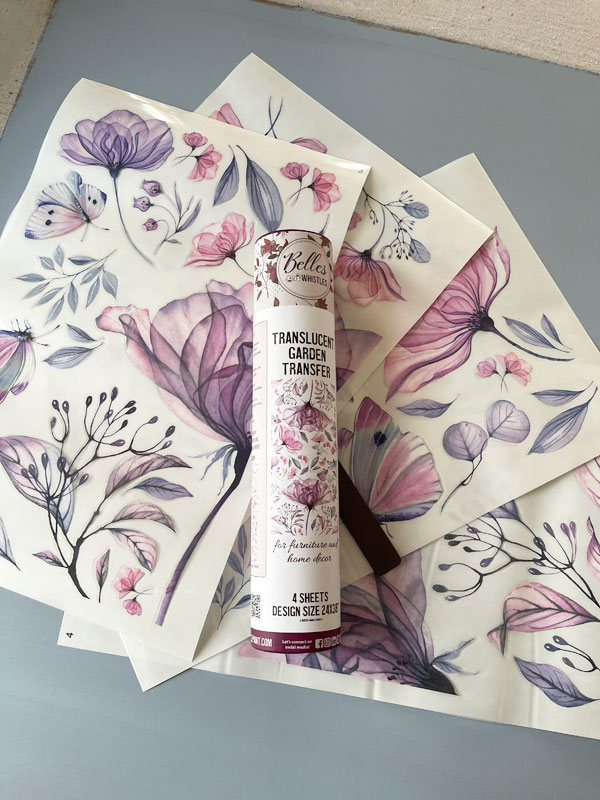
Isn’t she a beauty??
There are 12 brand new beautiful transfers in all! They are available in my shop now HERE!
They were supposed to be here in August, but as with so many things, the shipping was delayed.
There are so many beautiful ones to choose from!
You can see now that I was trying to match the paint to this pretty transfer!
Adding the transfer
This one has so many pieces you can use to create whatever look you want. I started with a couple of the larger blooms:
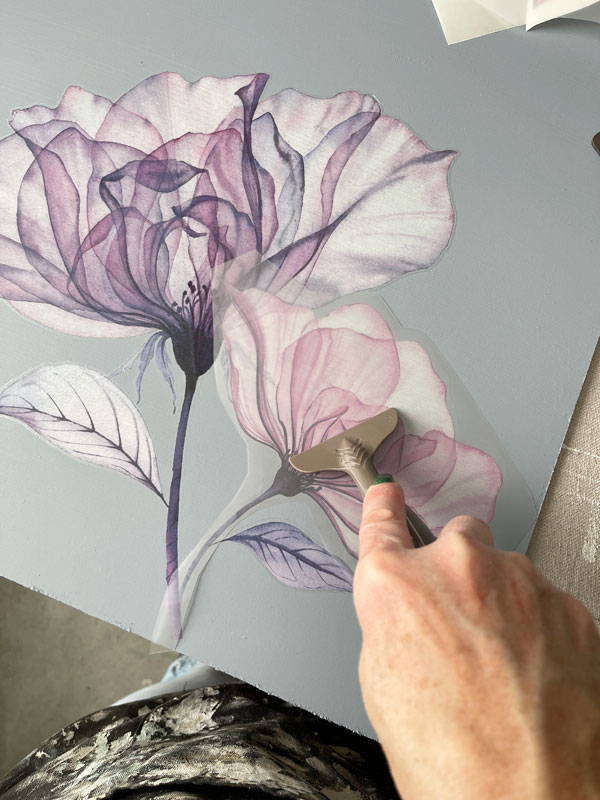
To apply a transfer, you just cut the piece out that you want to use, remove the white backing and then use the provided tool to burnish the transfer onto your piece. (I bought a transfer tool which I used here, but I didn’t find it to be any better than the wood one that comes with the transfer.)
Once the image has been transferred onto your surface, remove the clear film on top. If any of the transfer sticks to the top, just lay it back down and burnish some more.
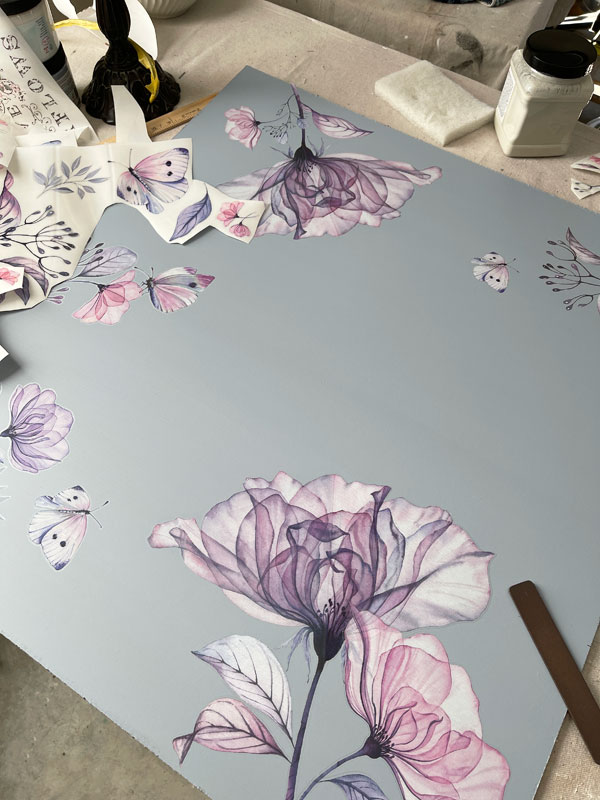
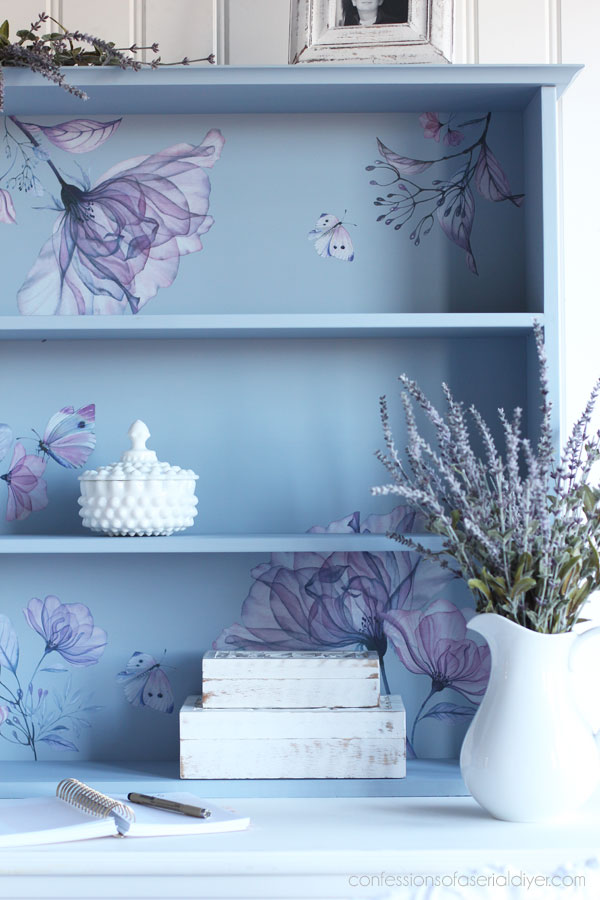
I continued to add on:
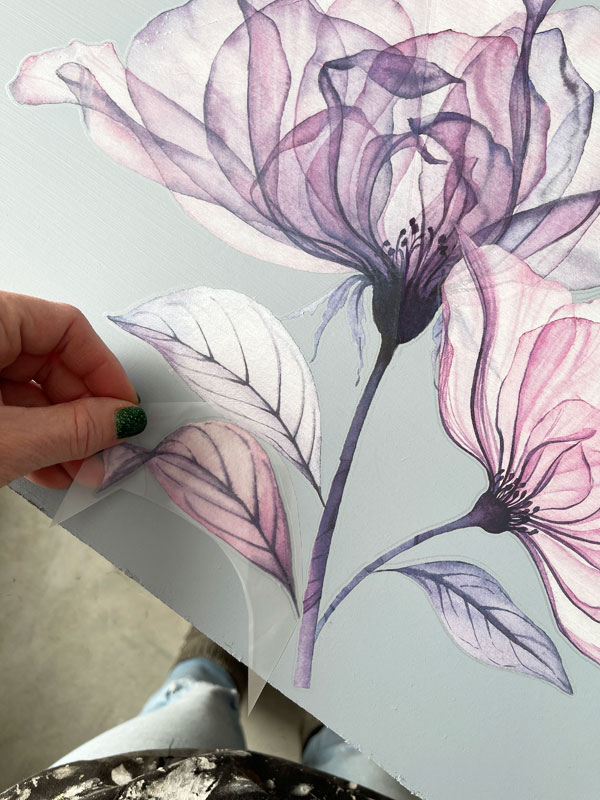
Until I had a look I liked…
Then, I sealed the transfer to protect it using Clear Coat in Satin, which I applied with my blue sponge applicator:
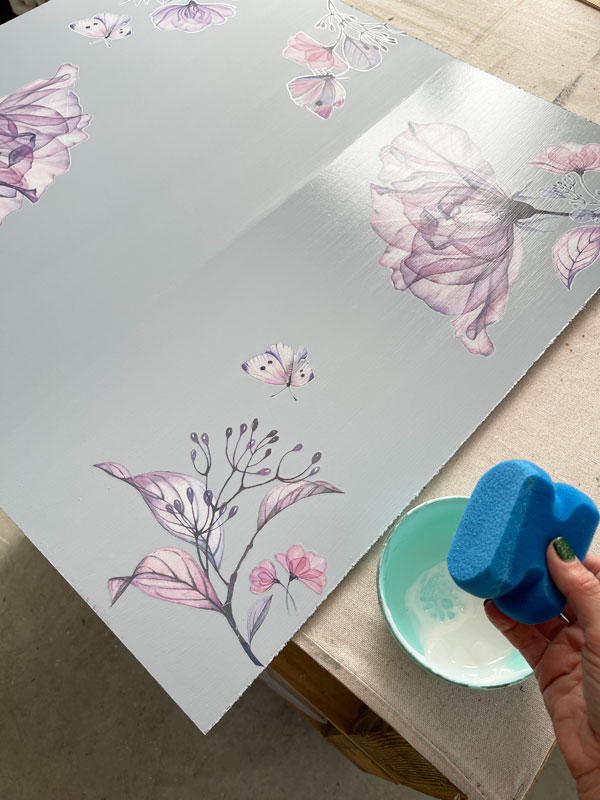
This is the same sponge I cut so I could get right up under the top edge of this dresser several weeks back. (That worked fantastically!)
You can use these over and over again! Be sure to rinse them well with water after using, and then squeeze the excess moisture out with a paper towel and allow to air dry.
I used small finishing nails to reattached the backing and this makeover was complete!
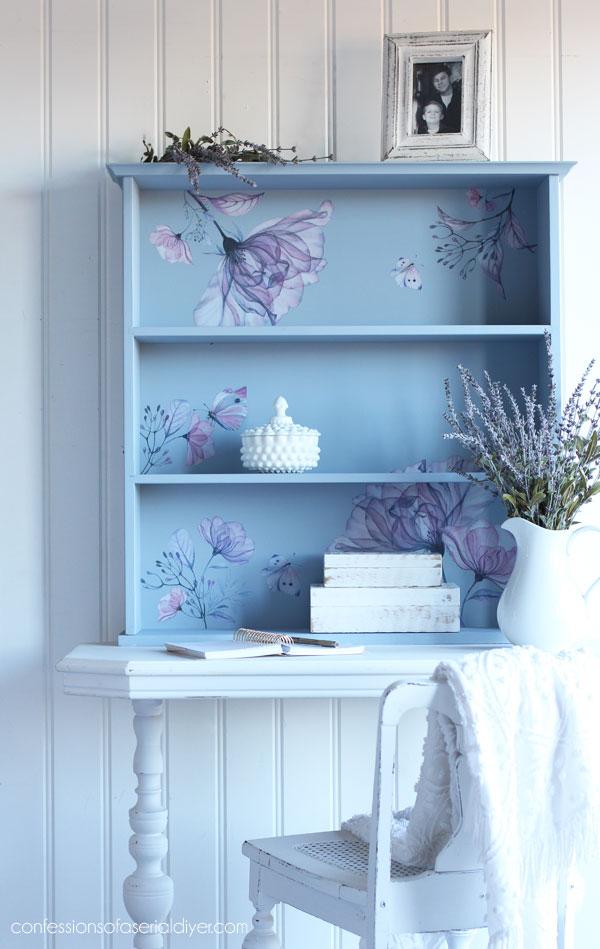
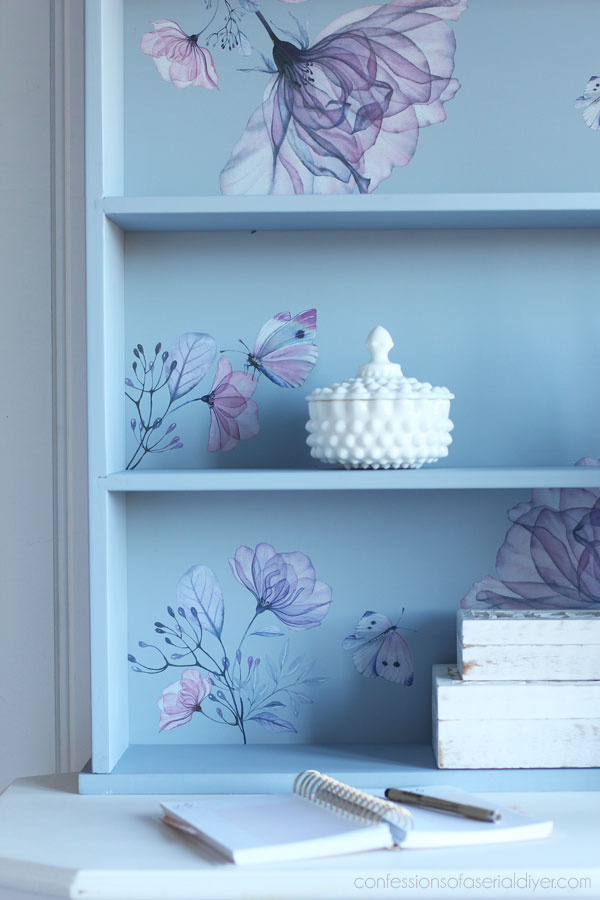
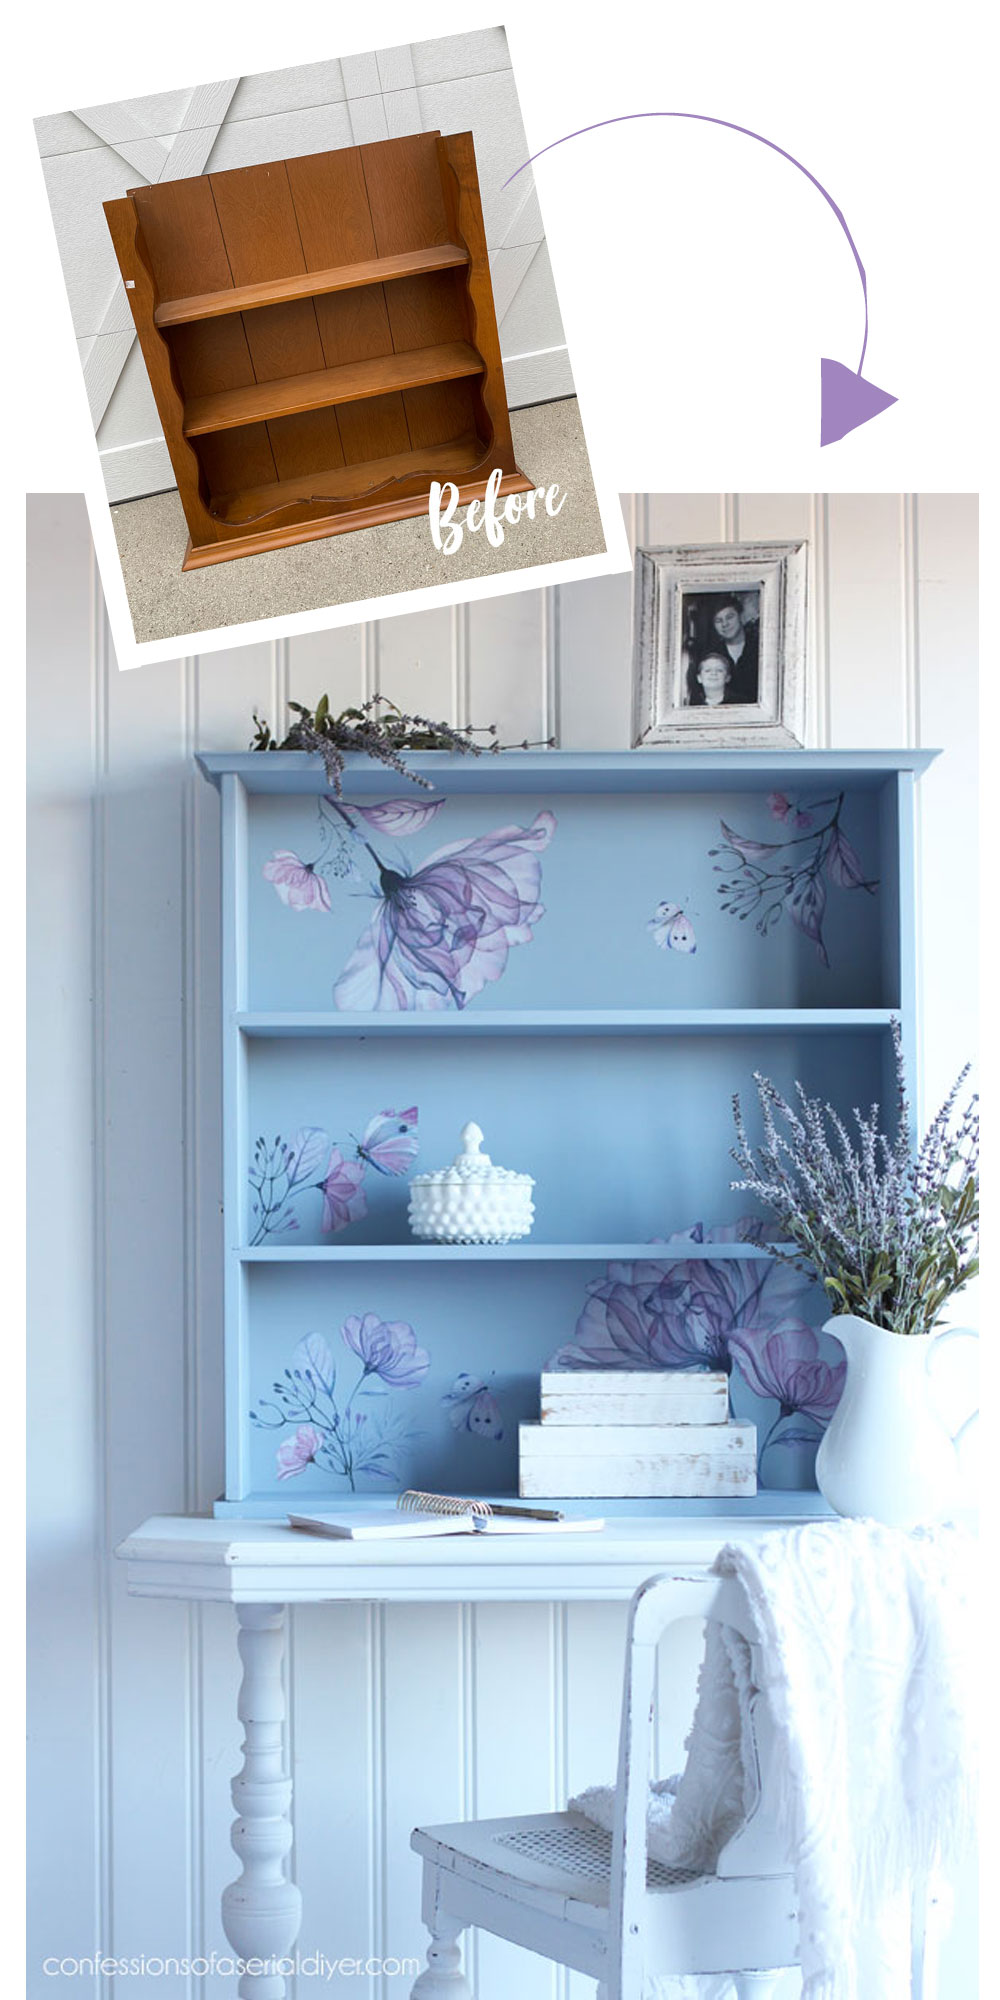
The After
Here is how this old secretary hutch looks now!
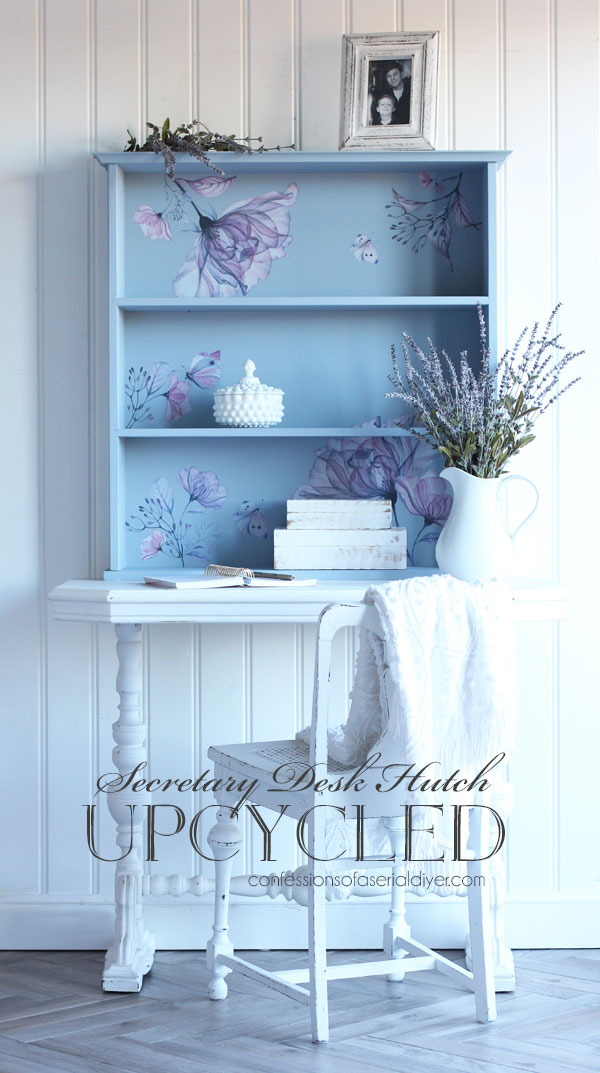
With the new base, it could definitely still work as a mini free standing bookcase, but I love it as it was intended originally…as a desk hutch!
My photos seem to have a blue hue to them, but I think it’s just the blue radiating from this piece!
I had a lot of fun layering all the different pieces to create these sweet images!
There are tons of flowers, butterflies, and even a huge dragonfly that I didn’t use.
Here are all the piece I had left over:
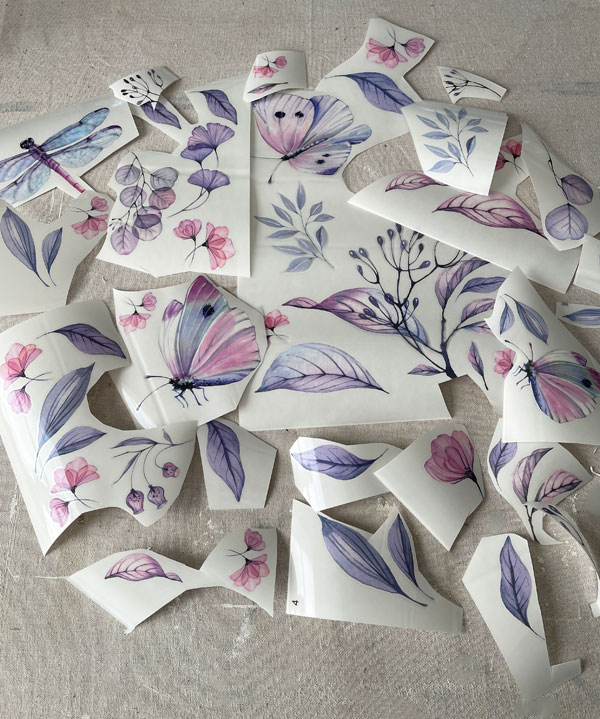
You could definitely get more than one project done with this, especially if you were using it on something small like a jewelry box!
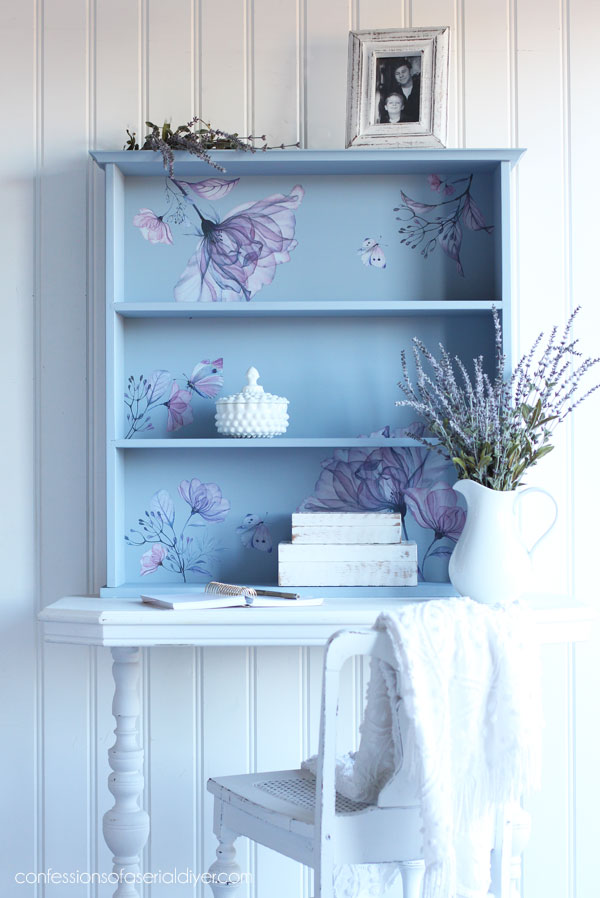
And here’s a peek without anything obstructing the design:
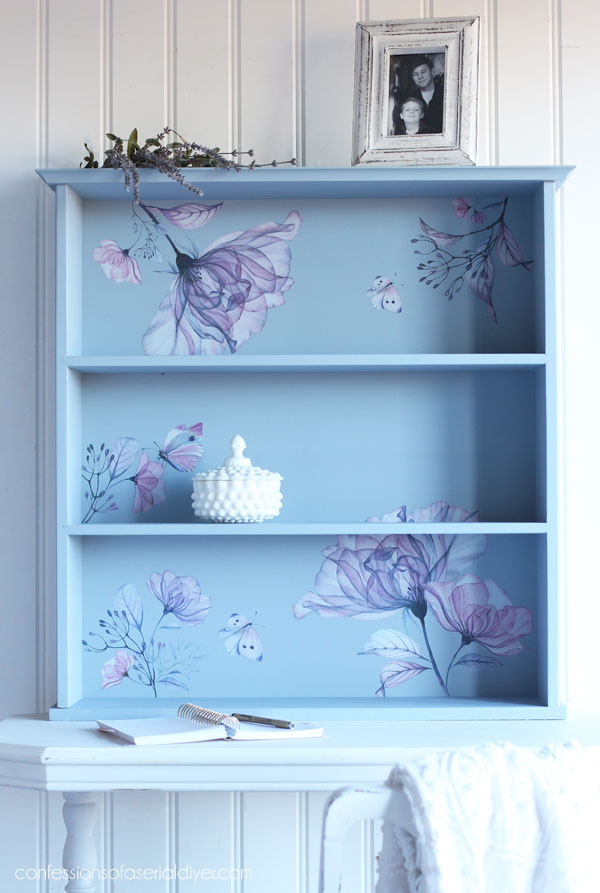
I’m so happy to have finally given this left over piece a purpose again!
Don’t forget to see what my friends are sharing today!
And that’s another piece done from my free pile woot woot!!

See any you may have missed at the links below!
Stenciled Stool Makeover
Antiqued Christmas Mirror
STENCILED BENCH MAKEOVER
STENCILED DESK MAKEOVER
CURBSIDE LAMP MAKEOVER WITH WAX
LONGABERGER BASKET MAKEOVER
HOW TO “FIX ” A BROKEN CANE CHAIR
One more note about my Etsy shop before I go, there are a few Silk Mineral paint colors that are now available in the 32 oz size: Saltwater, Black Sands, Baja Gray, Serenity, and Hampton Olive. I’m sure they will eventually add the larger sizes in other colors, and a whole line of brand new Silk colors are in the works!
I pack all orders myself, and shipping is FREE for all orders over $50!
The discount will automatically be applied at checkout. Enjoy $8 flat rate shipping on all orders under $50. If there are a few things you’d like to try, consider adding them to your Christmas list!
Have an amazing day and I’ll meet you back here with my Furniture Fixer Upper girls sharing this beauty on Thursday:
Update! See how this dated hutch looks now HERE!
XOXO,
![]()
Don’t Miss a Thing!
If you like what you see, there are several ways to follow along!
Email * Instagram * Facebook * Pinterest * Twitter


Leanne says
It looks so beautiful! Those colours are just perfect together.
Christy says
Thank you so much, Leanne! XOXO
Petra says
Now that’s turned out super nice. And your staging is perfect 🙂 Have a great weekend!
Christy says
Aww thank you so much, Petra! Enjoy your weekend too! XOXO
Mary Kaiser says
WOWZA!! It turned out so beautiful! What an imagination you have to think of the things you need to do to bring these old, discarded pieces back to life and make them so beautiful again, more beautiful than they were to start with when they were new!! You are so amazing!
Christy says
You are the best, Mary! Thank you so much! I had my doubts about this one lol! XOXO
Larissa ~ Prodigal Pieces says
I’m all like…go, Christy, go! I love it. ❤
Christy says
Ha ha thank you, my friend! XOXO
Christina says
Christy, this is absolutely beautiful! I love the color and the transfers!! I admit I kind of anticipated big ole bun feet on this one. 🙂 Have a wonderful week!!
Christy says
Thank you so much, Christina! Ha ha! Enjoy your week too! XOXO
Denise Cox says
LOVE IT!!! But once again, I REALLY love the transfers you always select!!! They are beautiful. And I’m partial to flowers anyway. Color is great too!!
Christy says
Thank you, Denise!! There is SO much you can do with transfers!! I’m a sucker for florals too! XOXO
Cheryl Atkinson says
Christy, this.is so pretty.
Christy says
Thank you, Cheryl! XOXO
Janice Holt says
Another beautiful job. The color and transfers match so well. Love it.
Christy says
Thank you so much, Janice! XOXO
Lyn Edington says
That is just beautiful! I have some Silk paint but have not tried it yet. The piece I want to use it on will definitely bleed through. Should I use the Boss first? Do I use 1 or 2 coats after the Boss?
Thanks!
Christy says
Thank you, Lyn! You can paint first or BOSS first…I have done both with the same results. You will need two coats of paint after the BOSS if you start with that, or one before and one after should do it! Allow the BOSS to dry overnight. 🙂 XOXO
Denise - Salvaged Inspirations says
Getting rid of that dated trim made ALL the difference and oh my… that transfer is GORGEOUS! Beautiful makeover my friend! XOXO
Christy says
Right?? And yes!! I am loving all the new transfers!! Thank you so much, my sweet friend!! XOXO
MrsSW says
Hi Christy – love that transfer, those are my colors. 🙂
I also love the blue color in the finished pictures which is totally different from the instruction pictures. I know it’s because light, angles, etc. but which is accurate?
Thanks,
Sheila
Christy says
Thank you, Sheila! The color in the after photos is actually more accurate than the in progress photos show. My cell phone doesn’t always capture the colors just right. XOXO
MrsSW says
Thanks, Christy.
Is your custom color mix a secret?
Sheila
Christy says
Sure thing! It is 1/2 Whitecap and 1/2 Quiet Cove…I shared a photo with the two colors and the ratios on it. 🙂
MrsSW says
So you did – I was so taken with your green nail polish I didn’t notice. 😉
Sheila
Christy says
Ha ha! 😀
Marietta Walker says
Hi Shelia,
Were you talking about the three colors at in the beginning? She mixed the two on the left to make the blue on the right.
Ignore me if you did not need to know this! 😉
MrsSW says
Thank you, Marietta. I wasn’t paying enough attention.
Sheila
Cecilia from Georgia says
Dang it! I promised myself I wouldn’t buy anything else for my projects until after the first of the year….then you surprise me with these beautiful new transfers!! I got to have them. Sorry to break my promise but myself will understand;) Love how this turned out!
Christy says
Ha ha! The new transfers are just so dang pretty!! Thank you, my friend! XOXO
Niki says
So soft and pretty! I’m usually not a girly girl type person-growing up a tom boy and God blessing me with three sons. Every once in a while though, something catches my eye and makes me long for braiding hair and tea parties. This hutch does just that!! I bet it was fun to pick the perfect transfers for this piece.
Christy says
Oh I love that! It definitely has a sweet girlie vibe, and it was actually hard to choose which transfer I wanted to use since there are so many pretty options now, but this was the winner! XOXO
Nadine says
The backboard is soooo sweet. I didn’t know why you were putting the transfers on, but when I saw your finished project…WOW! It’s beautiful.
Christy says
Thank you so much, Nadine! I love to show the step by step so y’all can see it unfold! XOXO
sharon says
Your creativity and innovation are endless. Thanks for sharing so many of your wonderful projects and tutorials.
Christy says
Aww thank you so much, Sharon!! I really appreciate that! XOXO
Cathy Bizri says
Absolutely beautiful Christy…Actually after seeing this make over I went directly to your shop and ordered the transfer and clear coat in satin..Can’t
wait to get these.
Such a beautiful job Christy and one of my favorite makeovers.
Beautiful, beautiful transfer…
Have a great week..
Cathy
Christy says
Thank you so much, Cathy!! Your transfer is packed up and already on its way! Have fun with it and have a great week also!! XOXO
Sharon L Austin says
I love those transfers and this upcycle so much; seriously, I want to be just like you when I grow up!!
Christy says
Aww ha ha I love that, Sharon! Thank you so much, my friend! XOXO
Rose Lefebvre says
You did it again! Looks so great! I would have tossed it. Bravo!
Christy says
I was seriously contemplating letting this one go ha ha! Thank you, my friend! XOXO
Marcie Lovett says
Unbelievable, Christy! There definitely was potential for that sad piece and you found it. I love how you have all the odd bits to choose from, just hanging around the garage 😂
Christy says
Aww thank you, Marcie! I was very tempted to trash it lol! And yes, I save everything just in case!! XOXO
Debbie in TX says
I figured you were going to make a bathroom shelf out of this one, but this is way better! Loving that beautiful custom paint color, and the florals definitely take it up a notch. Almost don’t want to put anything on the shelves so that you don’t hide how gorgeous it is. Simply superb!
Christy says
Thank you so much, Debbie! I’m so glad you like it! And ha ha when I was staging it, I hated to cover up the pretty pattern! XOXO
Marietta Walker says
Breathless.
Christy says
Aww thank you, Marietta! XOXO
Jen @ Girl in the Garage says
This turned out so pretty, Christy! I guess several of us were thinking of transfers for T2T day! 😄
Christy says
Thanks, Jen! Yes, that is so funny!! XOXO
Becky says
Beautiful! I love the blue, and those flowers are the best colors!
Christy says
Thank you, Becky! Now I need to see if I have a smaller piece for all the leftovers! XOXO
Michele M. says
That is an unbelievable transformation! WOW!
Christy says
Thank you, Michele!! XOXO
Marie B. says
Wow, talk about a trash to treasure transformation – it’s gorgeous!
Christy says
Aww thank you, my friend! This is another piece I had my doubts about ha ha! XOXO