Hello amazing friends!! Are y’all ready for more kitchen progress? Today I am sharing how I gave our island an update with beadboard to match our “new” kitchen!
It is also Furniture Fixer Upper day where I and a few friends share furniture flips…well an island is kind of like a piece of furniture right? If you are just tuning in to the kitchen saga, we are in the process of updating our kitchen. It started like this:
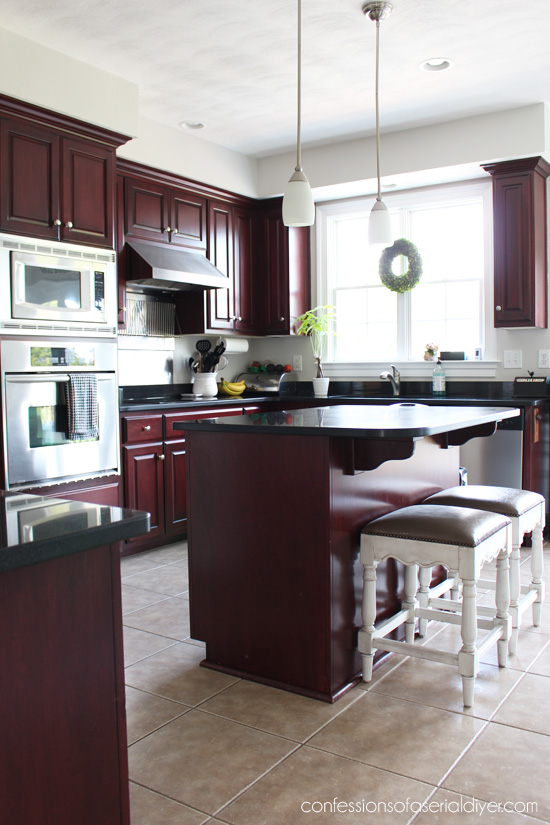
Not bad at all, just too dark for my taste. You can see more of the before, as well as what plans I had envisioned for this space HERE.
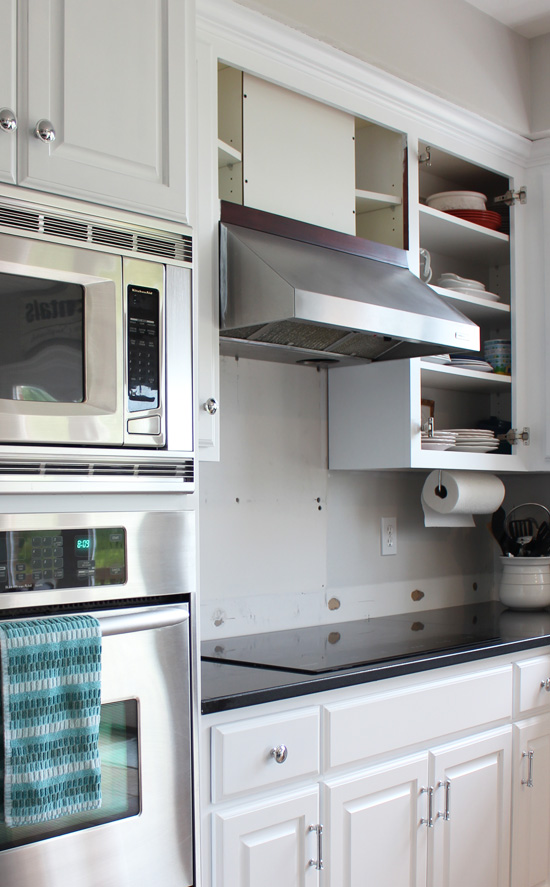
I shared a couple of updates and when you last saw it on Tuesday, I had all the cabinets painted and the doors hung:
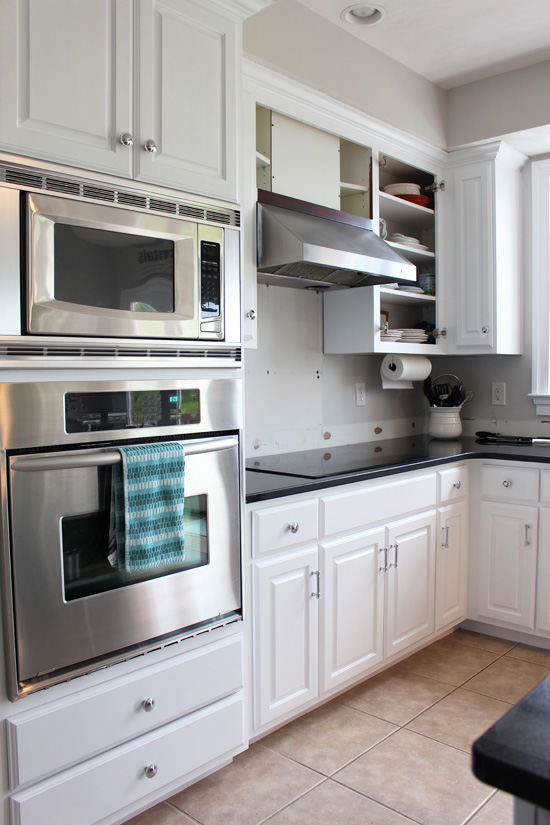
See more of those progress photos HERE.
Here was our island at the very beginning:
A humble little worker bee.
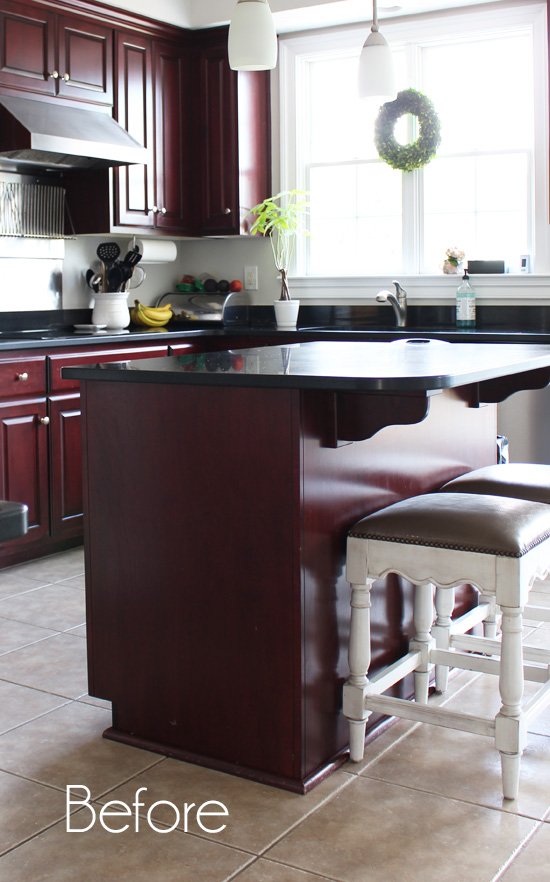
And against the pretty white cabinets after the brackets and trim had been removed:
Just sad. Plus it lacked any kind of character at all. I knew I wanted to add beadboard to it like I did to our island in our old kitchen, but this one felt small and I thought it could use a little beefing up.
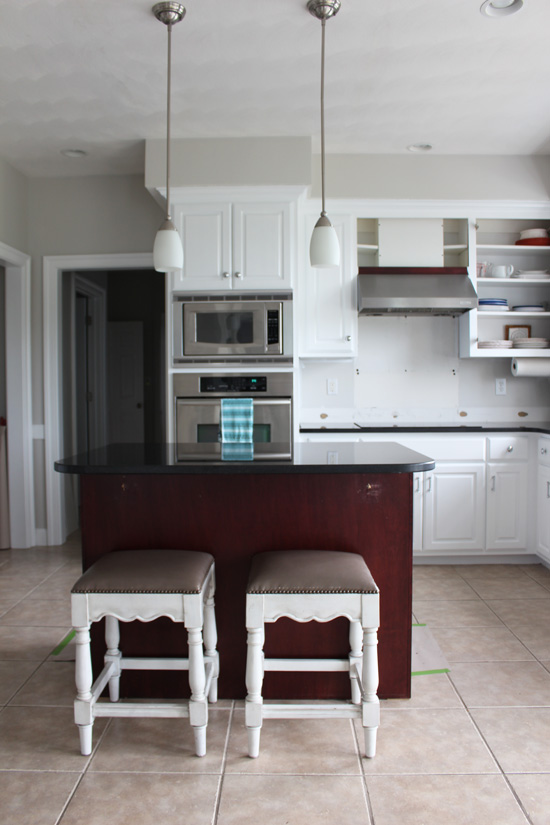
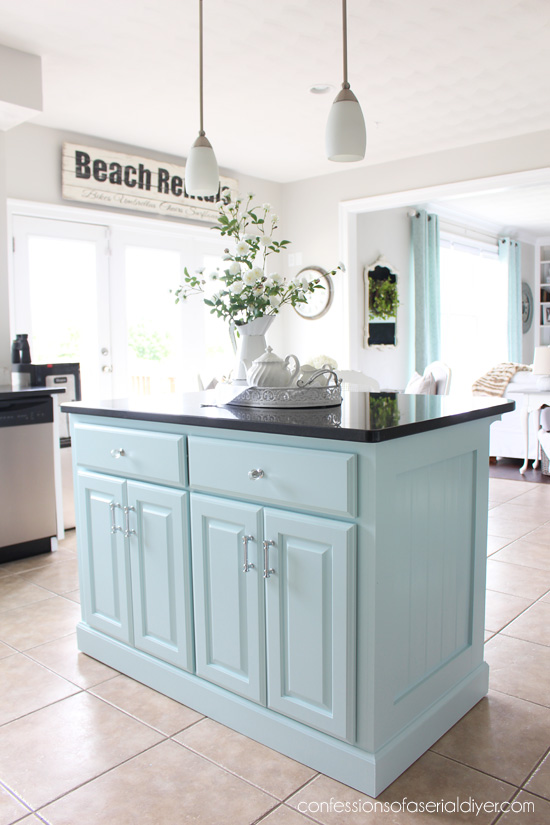
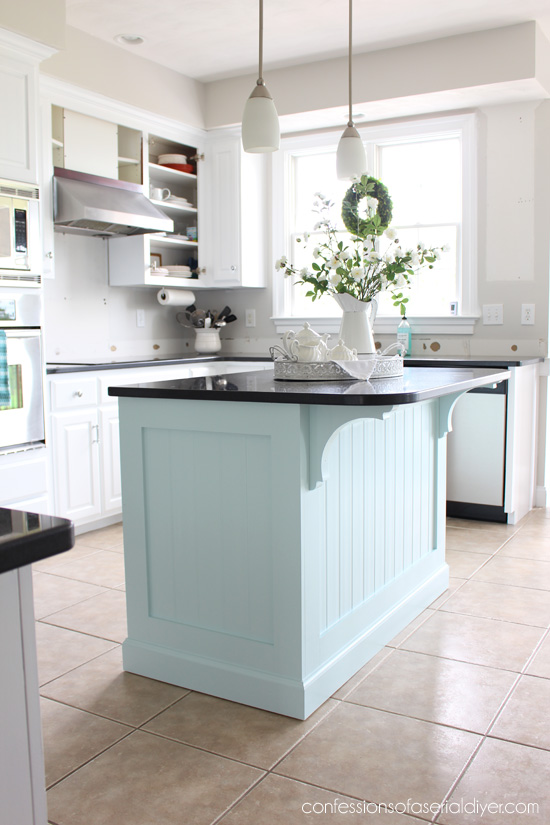
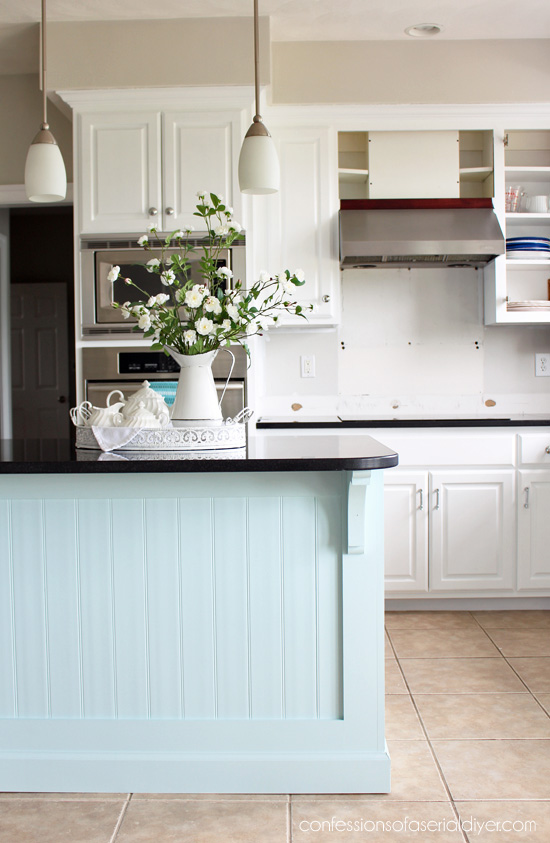
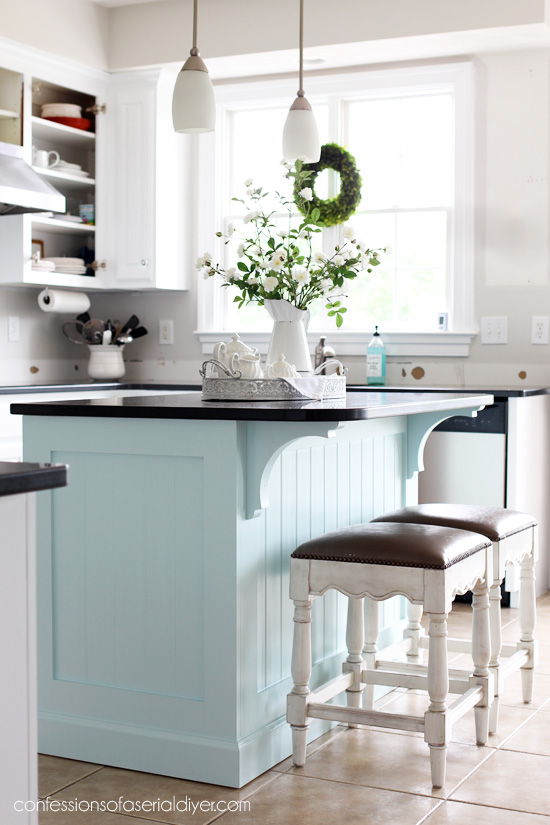
Here is how it looks now:
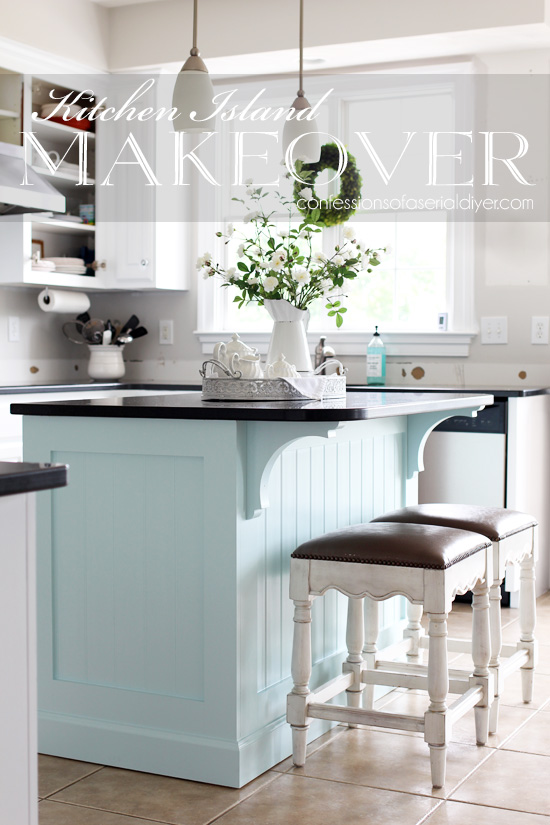
Better, no?
YES!! 😀
I love how it turned out!!
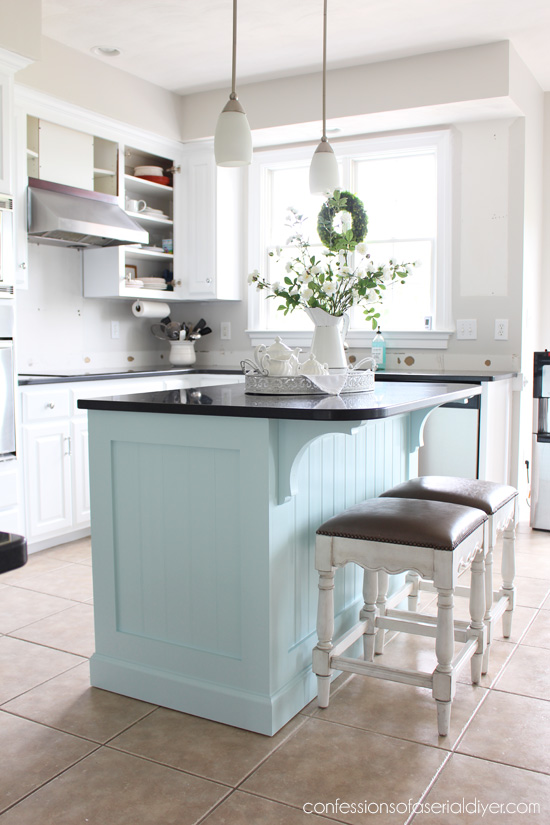
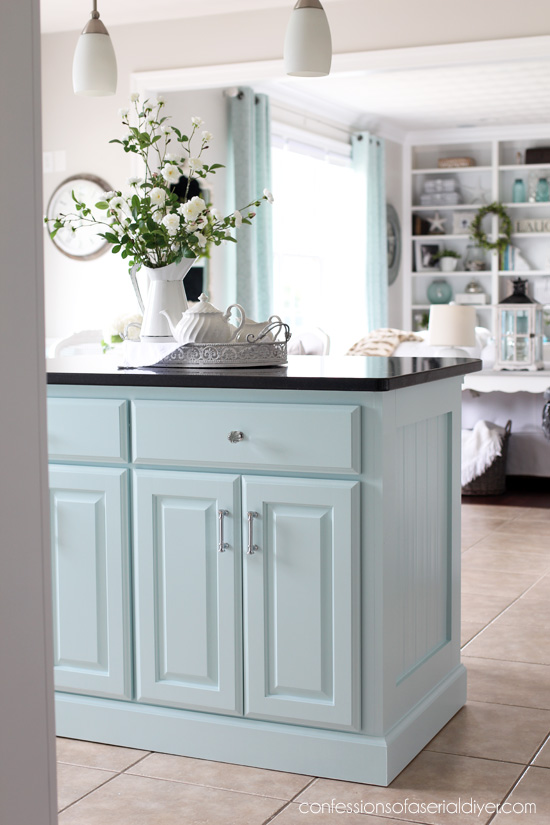
What do you think of the color? It pulls in the blues from the living room…
Here is how I achieved this look in case you have an itching to beef up your own island! (For reference, our island is 2′ x 4′.) I’ve included a few affiliate links so you can find the products I use.
Supplies:
- Select pine boards (premium pine with no knots) from Lowes: I used (5) 1 x 4 x 6 pieces and (2) 1x 6 x 6 pieces.
- This beadboard by Veranda from The Home Depot:
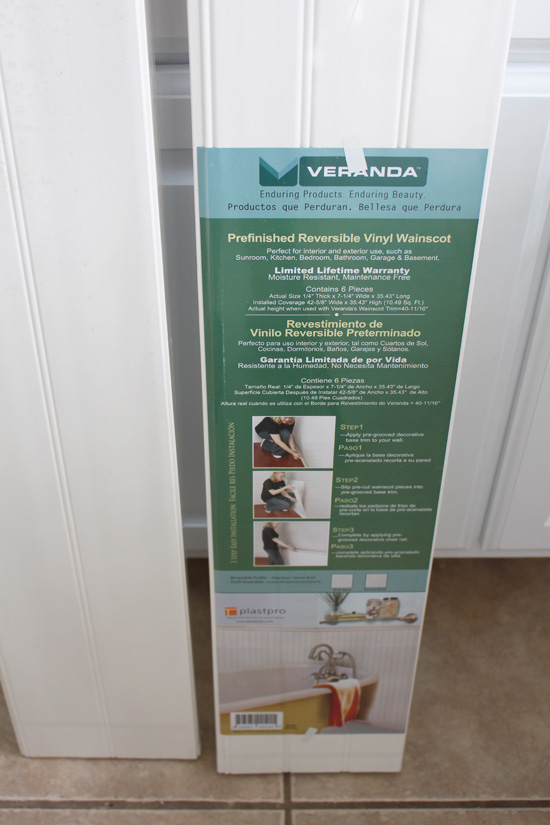
I used two packs. It’s vinyl and it is reversible, so you have two size options as you can see in the photo above.
- I used my miter saw for most cuts, but also my table saw, and my jig saw to cut around an outlet. (You can do it all with a jig saw if you only have that.)
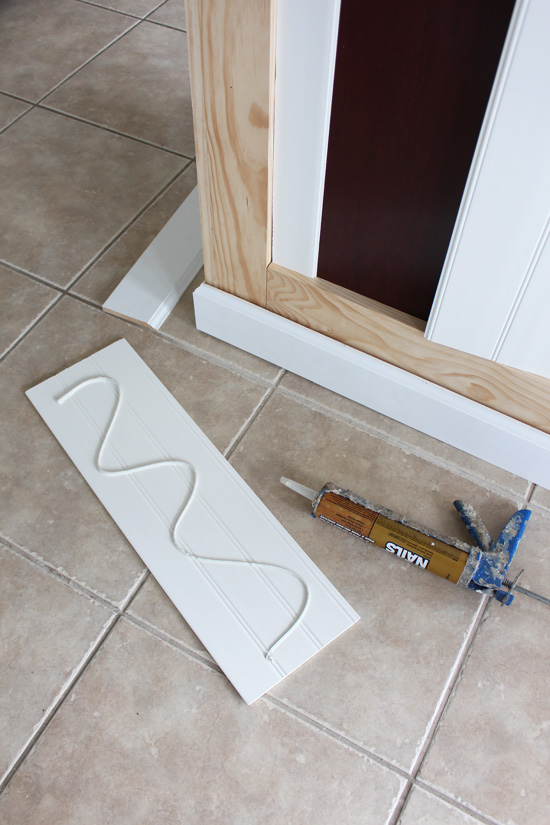
- Window and door caulk
- This caulking tool
- Wood filler
- Wood glue
- 220 grit sand paper
- Liquid nails
- Nail gun (Hammer and finishing nails will work too.)
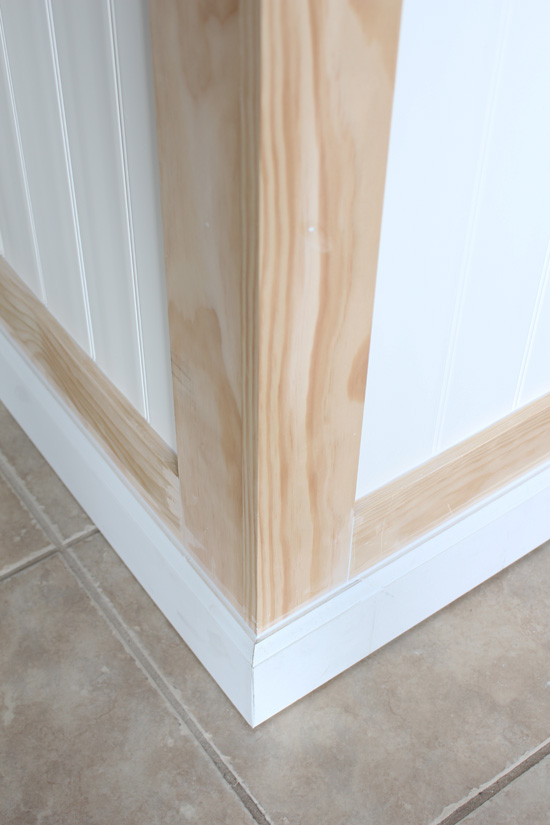
- Base molding (I used (2) 8 foot pieces.)
- Quarter round (I still need to add that…stops bars stools from hitting island when you slide them in.)
- The original island had this funky corner on the cabinet door side at either end:
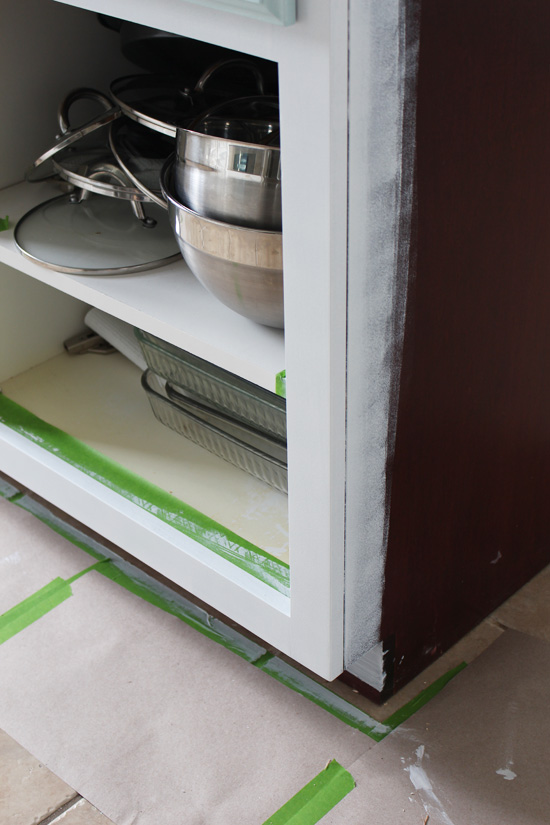
I decided I wanted to cover those corners so I started by adding a piece of 1 x 4 to that corner using wood glue and my nail gun…
WARNING: Be sure there are no electrical outlets, plumbing, etc in the way on the inside before using a nailgun.
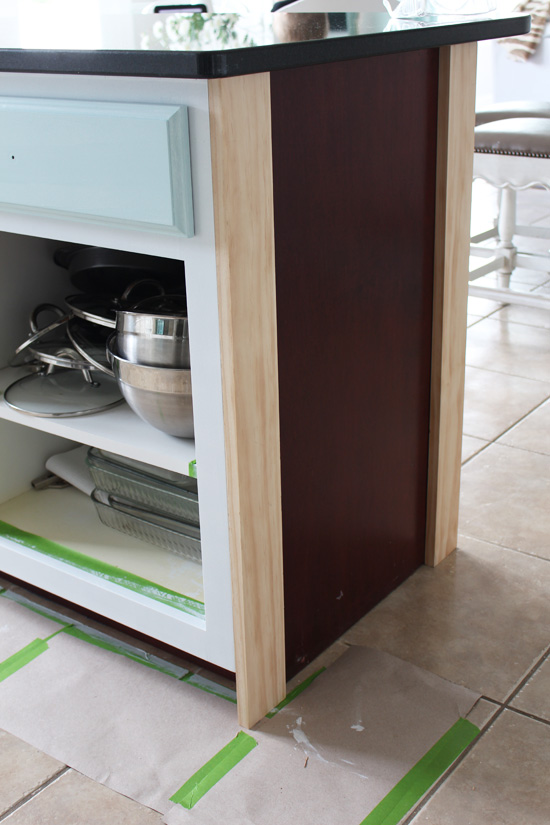
2. I liked how it sat flush against the side of the island. I continued adding a piece to each corner:
I don’t have the right tools to miter the corners on a piece of wood that long, so I just butted the pieces against one another like so:
So the back of the island has corner pieces that are 3/4″ wider than what is seen on the sides.
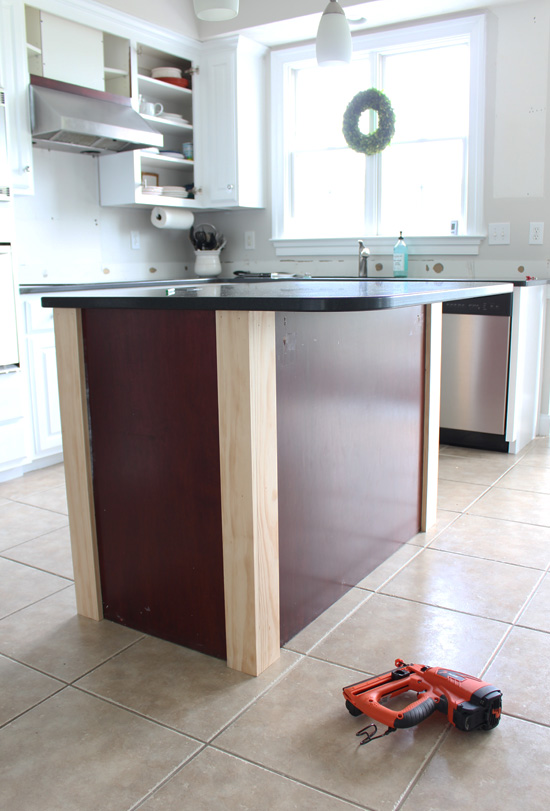
3. Next I added 1 x 6 to the bottom all the way around:
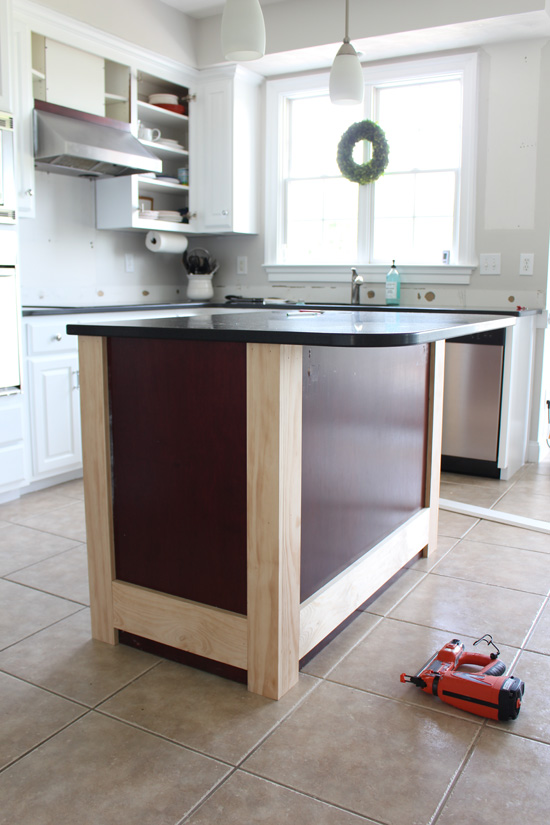
I elevated it enough so that when I add the base molding, what is still seen will match the pieces I was about to add to the top.
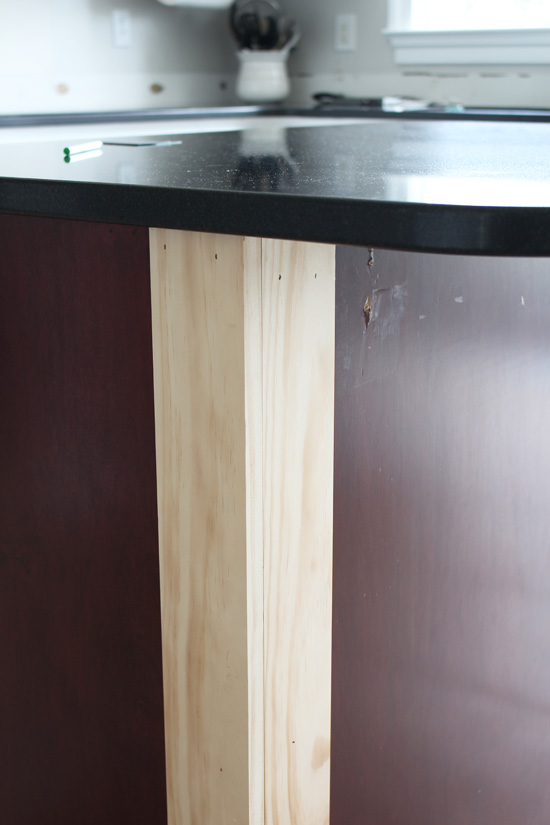
4. I added 1 X 4 pieces all around the top.
5. I cut the beadboard panels to fit the centers of each side. I used the side with the wider sized beadboard and they fit pretty evenly on the sides. I did have to cut one panel to fit. (I used my table saw, but you could use a jig saw.)
Across the back I tried to keep the panels even by cutting two even pieces for either side. After dry-fitting each side, I attached each panel using liquid nails…
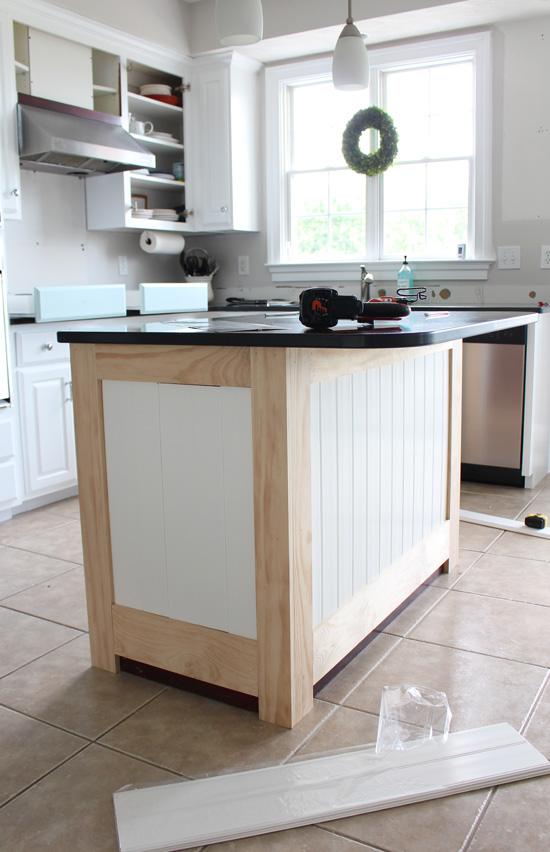
6. Finally I added the base molding using my nailgun:

I took the base molding all the way around the front of the island as well, covering up the toe kick. My hubby and I decided we didn’t need it and it looks so much more finished this way.
7. To finish it off in prep for primer, I caulked inside each panel and filled all gaps and nail holes with wood filler…
I sanded areas with wood filler lightly when it was dry.
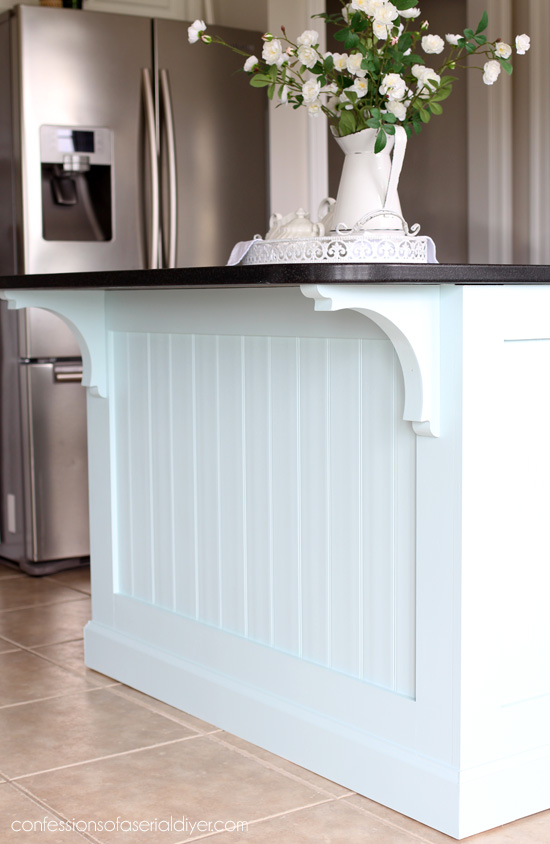
8. These are the brackets I used…I found them for around $10 each at The Home Depot:
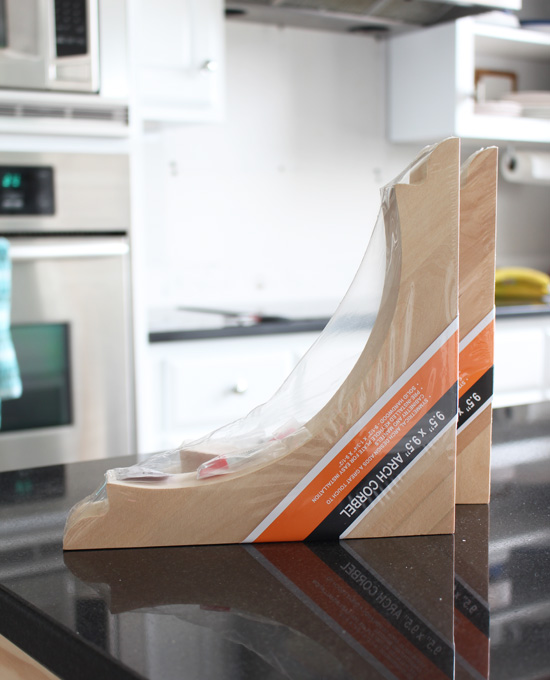
I painted those separately and screwed them in from inside the island, right into the backs of them. They were the perfect finishing touch.
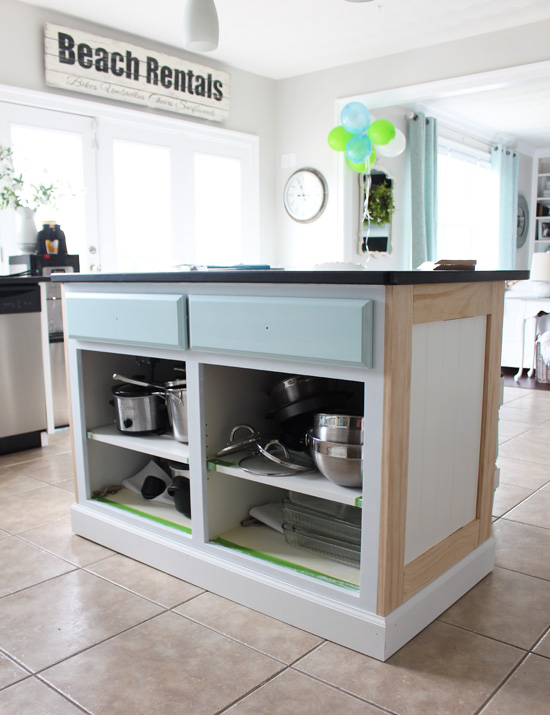
Primer and paint and voila!
This is Behr’s Sunken Pool in a satin finish. I primed first with Kilz primer in the gold and white can. I used the very same method I used to paint the cabinets, to paint this island as well. You can find my kitchen cabinet painting tutorial HERE.
I’ve had a few inquires about our paint color on the walls since we painted the cabinets. It is Campfire Ash by Behr, and I’ve used it throughout most of our home.
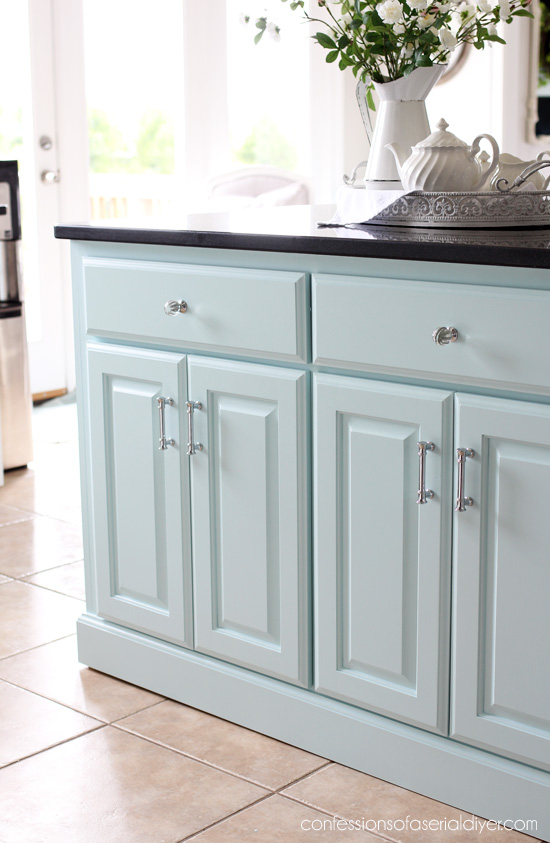
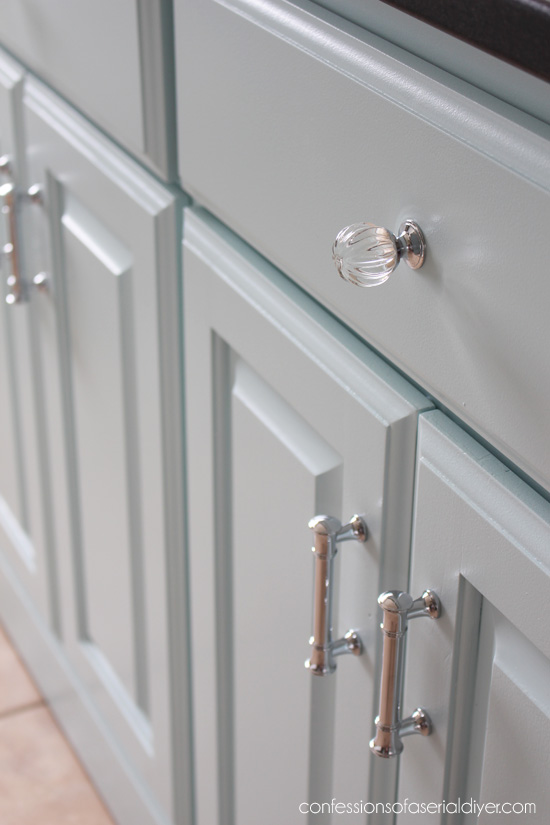
I used the same pulls I used in the rest of the kitchen for the cabinet doors and these pretty glass knobs (both from The Home Depot) that I also used in our downstairs guest bath and butler’s pantry:
I love the color that this island adds to the space…
And that’s one more thing checked off the list! Next up: custom hood vent cover for above the stove!
Don’t go anywhere just yet….check out what my furniture flipping friends have for y’all today:

I’ll see y’all Tuesday with our new DIY range hood cover! I’m ready to pretty this up!
Have a great weekend! 🙂
UPDATE: No need to wait! See how I gave our range hood a custom look HERE!
XOXO,
![]()
Don’t Miss a Thing!
If you like what you see, there are several ways to follow along!
Email * Facebook * Pinterest * Twitter * Instagram


Jody says
Ha ha ha. You snuck in the blue. Absolutely love it.
Christy says
My favorite ha ha! Thanks, Jody! XO
Addie says
Wowser!!!! Nice job!!! I like the beefing it up part…it really needed that!!! The third from the bottom pic (close-up) is PPPPERRRFECT!!! Did you spray paint it or roller and brush?
Dang good job!!! Steady hand!!!
Addie XXOO
Christy says
Thank you, Addie! I am so pleased with how it turned out! I cut in where I needed to with a brush, but then rolled out most of it with a small roller. Have a great weekend! XOXO
Bonnie Hipps says
Wow what a difference some paint can do. Love the way you did the island with the way it ties into the living room. Thanks for taking us along for the ride as you make this house into a home. Hugs!
Christy says
With the kitchen white and adding this color to the island, our downstairs flows so much better! Paint is a beautiful thing! Thanks, Bonnie…so happy to be able to share with ya’ll! XOXO
Mary Kaiser says
Totally in Love with your Island! It turned out amazing! You are amazing! I am looking forward to seeing your transformation of your vent hood, I am sure that will be amazing as well. Thanks for sharing such inspirational and beautiful projects with us, you make me believe I can do it with your great instructions!
Christy says
I’m so glad you like it, Mary! I keep going in there and just staring at it ha ha. I love being able to share the step-by-step, so people can see that these projects are not impossible to do! Have a great weekend, my friend! XOXO
Pam Walsh says
Gorgeous…… I know that you can’t wait to have it all finished. You have done so much in such a short time. Love your new kitchen! Can’t wait to see the next part !
Have a great day !
Christy says
Thank you, Pam! It has been a crazy two weeks, but we sure have accomplished a lot. And yes I am so excited to see it finished! I have really enjoyed sharing my progress with you guys! XOXO
Lilly says
YES, I LOVE IT!!!!! It looks AWESOME!! I see how the color ties in the living room. You are on a roll and doing amazing! Great job!
Christy says
Thank you so much, Lilly! I just keep going in there looking at it LOL! XO
Larissa ~ Prodigal Pieces says
What a fabulous refresh and upgrade! Your kitchen is looking amazing. Can’t wait to see what else you do!
Christy says
Thank you so much, my friend! We still have a few projects to do, but it’s getting there! XOXO
Christina in SW FL says
Christy, the island is positively beautiful. Love the new angle supports. I had to scroll back when I saw the new ones… much lighter and brighter than the oid chunky ones. The beadboard looks perfect and so is the color. 🙂
Christy says
Thank you so much, Christina! I am so pleased with how it turned out. Funny how just changing those brackets really change the look, right? Have a great weekend, my friend! XOXO
Denise says
Outstanding!! Your ideas and being able to actually do them is amazing. I love the color you selected for the island. It is you! And it is a perfect color for your beautiful home. Can’t wait to see the range hood. I know I’m going to love that too.
Christy says
Aww thank you, Denise! This color really is so me! Good thing my hubby is OK with it ha ha. See you Tuesday with the range hood! XO
Kira M Sayler says
Wow. Christy, I’m so impressed at how well you have made it all look so beautiful. I think the island is just perfect and wish I had an island to jazz up! haha!
Way to go! Doesn’t it make you want to just sit in your kitchen all the time now?? Enjoy 🙂
Christy says
Aww thank you, Kira! Ha ha yes I do! XOXO
Wendy Somerville says
How washable or scrubbable will that cupboard paint be Christy? Especially if grease hits it. As you can see, I am asking a lot of questions before I tackle mine as I know how much work this can be. Now I think you really need to redo the kitchen floor. LOL That Armstrong Prysm floor link I sent you would look fabulous!! LOLOLOl
Christy says
I used the same paint on our last kitchen, and it cleaned up beautifully, So I absolutely went right for the exact same paint for this kitchen. As for the floors, I think I spent my floor money LOL. XO
d brossy says
beautiful! makes the island stand out in your kitchen and, as you say, pull it together with the colors in the living room. thanks as always for the detailed tutorial.
Christy says
Thank you and my pleasure! XO
Michele Branham says
WOW! Your kitchen transformation is great!
Christy says
So far, so good! Thank you, Michele! XOXO
Gwen says
Oh my goodness!!! So pretty!!! You must be over the moon. 🙂 Absolutely love what you’ve done and thank you for sharing all the ideas.
Christy says
Thank you, Gwen! I’m so happy with our progress so far! And you are welcome! XOXO
Tamara Kenner says
If no one told you how amazing you are today…let me be the first!
Just wow!!! Fabulous!
Tami
🙂
Christy says
Aww you are the sweetest!! Thank you, Tami!! XOXO
Sheila DelCharco says
Wow, wow, wow! I looooove it! Thank you for the step by step tutorial! I’m filing this away or when we redo our kitchen. I loooove the way it turned out!
Christy says
Thank you, Sheila! I’m so pleased with how it turned out too! Have a great weekend! XOXO
Barbara says
Great job-love it all! and especially with your signature color on the island!
Christy says
Thank you, Barbara! I think the color is my favorite part ha ha! XOXO
Brenda Hichborn says
Beautiful job! You are very talented.
Christy says
Aww thank you, Brenda! XO
Linda says
Oooh!! I love love it!!! It really adds to your beautiful kitchen!!! Wow, girl you get projects done!!????
Christy says
Thank you, Linda! It killed me to share the last update with that island still the ugly before ha ha. Looks so much better in there now! And yep…I’m a DIY hustler lol! XOXO
Cindy says
I’m curious about painting the vinyl beadboard. Did you just prime and paint? Won’t the paint scratch off is something sharp rubs against it? I’ve tried priming and chalk-painting plastic picture frames, and even after a few weeks of “cure time”, I can easily scratch the paint off with my fingernail.
Christy says
Hi Cindy! There are actually painting instructions in the packaging, and they just suggest priming first, and then following up with paint. We’ll see how it goes! Did you seal the chalk paint with wax on your frames? XO
Shellia Ventura says
Love, love, love what you did to your kitchen! The island is gorgeous. Last year we redid our kitchen and did it in all white and the highlights were teal. I have the same drawer pulls as you and I love them. Thank you for sharing, I just love seeing what others do and you ALWAYS do a fantastic job. Hope you enjoy it.
Christy says
Thank you SO much, Sheila! Sounds like we have very similar taste! I bet the teal is gorgeous. And I love those pulls! XO
Diane says
GORGEOUS!!! Thanks for sharing how you did this! ????????????????
Christy says
Thank you, Diane, and my pleasure! XO
Cecilia says
Christy! All I can say is “WOW”! That is absolutely amazing – it really changed the whole look. Makes the white cabinets pop and love the color! It doesn’t even look like the same kitchen. I bet you smile every time you walk in there. Can’t wait to see the hood transformed!
Christy says
I know, right?? It killed me to share my cabinets on Tuesday with that ugly burgundy island in the photos ha ha. It looks so much nicer with the island done. Thank you so much, sweet friend! XOXO
Denise says
I can’t believe how fast this kitchen makeover is progressing! Everything looks amazing and I LOVE your island makeover – gorgeous! xo
Christy says
I know… It doesn’t feel like it’s been two weeks already! Thanks so much, my friend! XOXO
Lisa Johnson says
That island transformation is sooooo wonderful! Love the color you chose!
Christy says
Thank you, Lisa! I am so pleased with the color! XO
Margaret says
Gorgeous job on your island and the cabinets – the kitchen looks HUGE now!
Christy says
Thank you, Margaret! It really does look so much bigger in here now! XO
Terri says
I am speechless…. blown away… mouth hanging open !!! lolololol… What an amazing change !!! Your kitchen makeover is just incredible… Gorgeous!!!! That island brings it all together too !!!!
Christy says
Wow thank you so much, Terri! I appreciate that so much! Makes all the hard work worth it! XOXO
Diane Skubal says
How did you paint your kitchen cabinets and island? Did you use paintbrush, foam brush, paint roller or spray paint?
Christy says
Hi Diane! I cut in with a brush and rolled out the rest with a small foam roller made for cabinets. I shared a link to my full tutorial in the post if you have any questions!
Linda D. says
Wow! I love everything about the island makeover – the color which I think visually unites the rooms and gives that great beach-y vibe; the bead board and beefing up that gives it presence; the way the color draws the eye eye away from the tile floor – everything’s working for me! Can’t wait to see the stove hood you’re building!
Christy says
Thank you, Linda! I agree… The island really adds so much to the space! Can’t wait to share the vent hood! XOXO
Jennie Smith says
That looks amazeballs!!! Perfect color and it just looks solid and custom without being fussy. And your Sunken Pool and Campfire Ash compliment each other so much. I can’t wait to see the vent hood!
Christy says
Thank you so much, Jennie! I’m really pleased with how well the colors are working together too. See ya Tuesday! XOXO
Marcie Lovett says
It definitely looks like a piece of furniture now. So beautiful and so custom looking, no one would guess it started as cabinetry. Who knew beadboard came in vinyl? I know you’ve been working nonstop, and the results are amazing. You make it look so easy! Did you do anything differently this time or wish you had done differently, now that you’re a kitchen-painting veteran?
(I thought of you recently because I need to re-caulk and I keep forgetting to get that little tool. The wet finger did not do a good job last time ????)
Christy says
Thanks, Marcie! I’m so pleased with how it turned out. I did everything exactly the same way I did with my first kitchen. The only difference is because these cabinets were so dark, I needed an extra coat, so one coat of primer and three coats of paint. Or I could have done two coats of primer and two coats of paint. But everything else I did the exact same way I did my first kitchen. And yes you need that tool! 🙂 Have a great weekend, my friend! XOXO
Jewels says
I love the color on your island. My husband and I have a 40+ year old rancher and are just beginning our remodel journey. Thanks for the wonderful inspiration and ideas!
Christy says
Thank you, Jewels! I just love this color, and I’m glad my husband was on board with it. Good luck on your remodel, and you are so welcome! XO
Kellie says
Wow your kitchen looks amazing. I love love love the island. I have an island with the same beadboard from Home Depot and I love the brackets you put on it, I need to find some for mine, it is a beautiful finishing touch!
Christy says
Thank you so much, Kellie! The brackets came from Home Depot too! XO
burbmomoftwo says
I love it!! you really did a wonderful job! Congrats! I can’t wait to see the hood.
Christy says
Thank you so much, Kelly! XO
Joan Ness says
Absolutely love it all so far! Your kitchen looks so much bigger! The beef up of the island looks so good and the color is beautiful! You did such a professional looking job on the island, I can’t wait to see what you do with the vent hood! Dying to see your lights and tile too! Do you walk into the kitchen and say? “Ooo! I love it!”
My daughter and I finished painting her cabinets white this weekend and that’s what she is saying! They turned out nice but the prep work was the pitts! We just wanted to get painting! We got by with 2 coats of the Behr paint with primer in it. Her cabinets were off white though so alot lighter than yours and a lot smaller kitchen. She got new pulls too and they look so much better than the old ones. She’s looking for a new light for over the sink and she is done!
Thanks so much for sharing your progress, Christy! I look forward to seeing everything you do!
Christy says
Thank you so much, Joan! I really do… I keep walking in there just to look at it ha ha. I bet your daughter’s kitchen looks like a brand new space! She is so lucky she had you to help her with it! XOXO
Debra A Wise says
It turned out beautiful! I absolutely love it and the pop of color just makes it!
Christy says
Thank you, Debra! I’m so glad my hubby was on board with that color ha ha! XOXO
Michelle says
I love watching your process because you are such a fast worker, Christy! You will be done in no time. I love the island! It turned out beautiful and it really coordinates well with your living room. Thanks for sharing your talents!
Christy says
I’m so glad you are enjoying the process, Michelle! It has been fun to share it with you guys! Thank you! XOXO
Kimberly says
Christy. You never.cease. to amaze me. This kitchen went from functional to beautiful. Can’t wait to see the vent hood cover.
Christy says
Aww thank you, Kimberly! I almost felt a little bad because it really was a pretty nice kitchen before, but I don’t feel bad at all now. So happy with how it is coming along! See you Tuesday! XOXO
Shelby Cole says
Christy,
What color is the island ? I’ve been kicking around doing the same to our island . we have blues in adjoining great room / kitchen / dining rooms . Your island is beautiful !! How in the world did you get the cabinets done so very quickly ? I have your instructions for painting kitchen cabinets book marked and hope to get started next Tuesday .
One another note ,I love your new home . Looks like you have some open space behind you . We lived in Salem woods for 23 years before moving back home . WE MISS THE BEACH and plan to move back in spring 2020 and are checking homes for sale there . Only problem is we have almost 2 acres here and hubby doesn’t want to have neighbors so close by . Would you share the development you are in ? Looks like you have space all the way around .
Thanks ,
Shelby
Christy says
Thank you, Shelby! The island color is Sunken Pool by Behr. We started our kitchen two weeks ago, and it feels like it’s taking a long time to me ha ha. How exciting that you’re getting ready to start on your own kitchen! It will make such a huge difference!
Small world… We live in a subdivision that has only been around about 10 years, but they built these houses with a little room to breathe, which I appreciate so much. It’s called Heritage Park. 🙂
Susan Ronnfeldt says
Love the island makeover! The color is perfect! You are one handy girl! I am impressed!
Christy says
Thank you so much, Susan! XO
Ellen Shook says
Your island looks like a million bucks! We are wondering if that 4″ granite riser was hard to remove? We have it, too, and hate it!
Christy says
Thank you, Ellen! That granite backsplash came off really easily with a crowbar on all of it except for the one piece that was attached to the side of the cabinet that houses our oven. They had a ton of adhesive there, so we used a heat gun to help with that piece. But hopefully yours will come off easily like the rest of ours did. XO
kandice kullmann says
its so much lighter and brighter now! I love it!
Christy says
Thank you, girlie! XOXO
Marie-The Interior Frugalista says
Wow Christy, what a difference! Love the color and especially love how you trimmed it up. It looks fabulous in your new painted kitchen and love how it pulls the pretty blue from your living room.
Christy says
Thank you, Marie! My husband says the blue island doesn’t make sense, but he trusts my vision LOL! XOXO
Melva says
OMG,I just love it! What a change! It’s amazing what paint and some cosmetic changes can make. You did an awesome job. Thanks for sharing.
Christy says
Thank you so much, Melva! A little work can go a long way for sure! XOXO
Mary says
Oh it looks so nice, you did a wonderful job and the color is great. Good Job!
Christy says
Thank you so much, Mary! XOXO
jami P. says
I am absolutely grateful for women like you who SHARE your tips, techniques and how to’s! I thoroughly enjoy your projects and how you inspire the ” if she can do it, i can do it too” part in me!! Thank you sweet Christy!
Keep up the amazing crafty creative love!!
Thank you as always for sharing !
xo ; )
Christy says
OK that might be the best comment ever… You totally made my day, Jami! It is my goal to inspire others to tackle things they never thought they could!! Thank you!! XOXO
Marsha says
Wow! You have done an amazing job! Love the transformation! Love it!! Can’t wait for the next update!!
Christy says
Thank you so much, Marsha! I’m glad you have enjoyed it so far… It has been fun sharing the progress! XOXO
sharon says
LOVE! It’s so dreamy!! I love how your mind works!! However, it makes me second guess everything that I think looks good *LOL.
Christy says
Thank you so much, Sharon! Don’t second-guess yourself…we all have different tastes! XO
Debrashoppeno5 says
The island looks fabulous! You did a wonderful job on it.
Christy says
Thank you, Debra! Have a great weekend! XOXO
Gayle says
It looks amazing!!! What a lot of work but it was worth it!
Christy says
Thank you, Gayle! The hard work is so worth it when I walk in there! XO
Michele Ward says
what a wonderful bright transformation!!
Christy says
Thank you, Michele! XO
MaryJean says
I love it, Christy! I am definitely going to pin this because I will be soon be working on a large oak TV cabinet by making it into a kitchen island. I want to put beadboard on the front of it and you gave me some ideas of how to finish it off. The cabinet has bifold doors to hide where the TV and controls were. I want to keep the doors, but make them like mini barn doors. I can’t wait to get started, but I’m still waiting for one of my sons to take the picture tube out of the cabinet. I will probably get tired of waiting and try tackling it myself. Maybe if I put it right in the way of where they walk I’ll get a reaction, ya think? Let me tell you that cabinet is heavy and I’m not talking in 60s term! haha
Christy says
Thank you, Mary Jean! Sounds like you have a fun project ahead of you! Yes get those boys to help you! Have a great weekend, my friend! XOXO
Jennifer says
Wow! It looks beautiful, Christy! And thank you so much for sharing your tutorial. I’ve looked forward to each step and will continue to do so. Great job! 🙂
Christy says
Thank you, Jennifer! And it is my pleasure! I am really enjoying sharing my progress with y’all! XOXO
susan says
BEAUTIFUL!
Christy says
Thank you, Susan! XO
Mary Ann says
Looks great and very professional. Thank you for providing the details on how you did it as well!
Christy says
Thank you, Mary Ann! My pleasure! XO
Jen @ Girl in the Garage says
It turned out gorgeous, Christy! I love how the extra trim, beadboard, and brackets give it so much more character now. And the color is unexpected yet refreshing! xo
Christy says
Thanks, Jen! I love the pop of color this adds to our kitchen! XOXO
Julie Briones says
Absolutely perfect! Love the color, and the corbels and bead board add so much! Looks so coastal when you see the white/sunken pool/campfire ash all together! Sigh-worthy! 😉
Christy says
Aww thank you, sweet friend! That is exactly the feeling I wanted for this space!! XOXO
Cindy says
Now that you have painted the cabinets and the walls, those tile floors look really good next to them. And I love the island. It now looks like an expensive piece of furniture, rather than a cabinet.
Christy says
I think so too, Cindy! Also the backsplash I chose will pick up the tile color a bit as well. Thank you! XO
Kristina says
Oh my gosh this is amazing craftsmanship! I have just begun my kitchen update and I thank you so much for the step by step tutorial. This an amazing piece of custom furniture now! I have learned so much from your posts and have gained so much confidence on doing work around my home; knowledge truly is power!
You are amazing!
Christy says
Wow thank you so much, Kristina! I’m so thrilled you found my posts helpful!! Good luck on your kitchen! XOXO
Anna says
Hi Christy – Wonderful job!!. I loved the dark cabinets, then white with the blue & I also love these ones with color split (green bottom, white on top – see link below) https://www.blesserhouse.com/budget-kitchen-refresh-makeover-reveal/
– soooo many choices!, no wonder I can’t decide, but looove all your step-by-steps. You are so talented, I am amazed at how fast you work.
Christy says
Thank you, Anna! Lauren’s kitchen is really cute. Luckily my kitchen is done and I am on to the next project! You can see our completed kitchen if you missed it HERE. 🙂
Es says
Would I need a full gallon to do an island that is the same size you have? or would a quart be enough?
Christy says
Hi! A quart should be plenty!