Hello lovelies! Thank you again SO much for weighing in on my kitchen design! Reading your thoughts really helped me to make a few key decisions. If you missed me discussing my ideas for our kitchen makeover, you can visit that post HERE.
I snapped a few photos of our progress with my phone, and today I thought I’d share some of them and what we have decided so far.
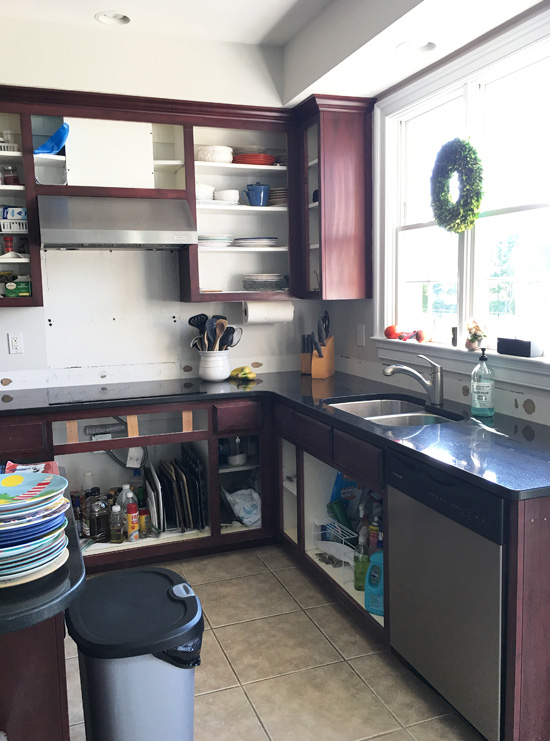
The first issue was the floor.

I asked if I should clean the tile grout and keep the floor tile or bust it out and replace it with the same wood floors we have in the rest of our downstairs? I pretty much had made up my mind that the tile was going, however after reading your suggestions, I am going to paint the cabinets first and see how it looks then. I may not mind it so much, just as in the downstairs guest bath. If I decide I still don’t love it, I can replace it at that point.
I also wanted your input on removing that skinny cabinet to the right of the sink:
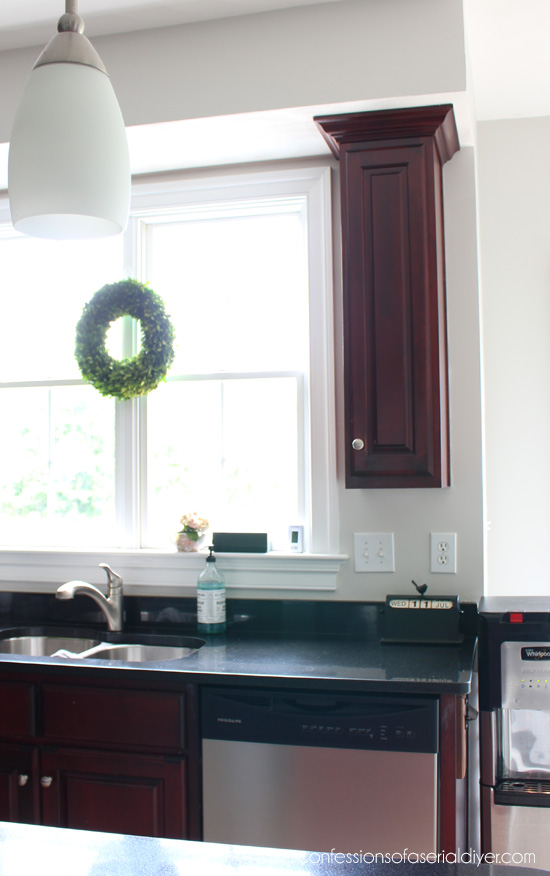
Or both on either side? It just looked like it was out of place dangling there all alone. Many of you suggested removing the door and displaying pretty things in there or replacing the door panel with glass to lighten the feel, and I liked those ideas, but here is what I ultimately decided…
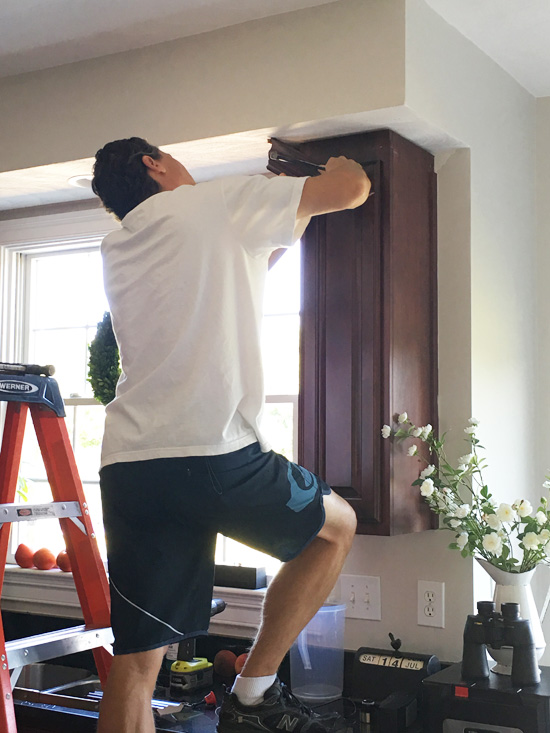
Good-bye skinny cabinet!

It looks really off balance at the moment, but I decided to only remove the one, and I am going to look for some chunky corbels and a couple of shelves for that side. Maybe something I can shabby up.
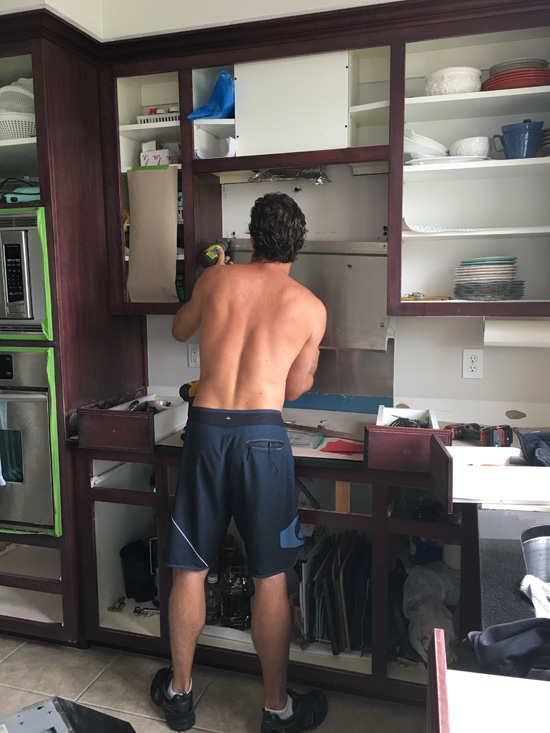
Ya’ll pretty much unanimously agreed I should remove the stainless piece behind the stove, so I put my hubby to work removing that too:
Much better! And there you go ladies, two butt shots in one post. You’re welcome. 😀
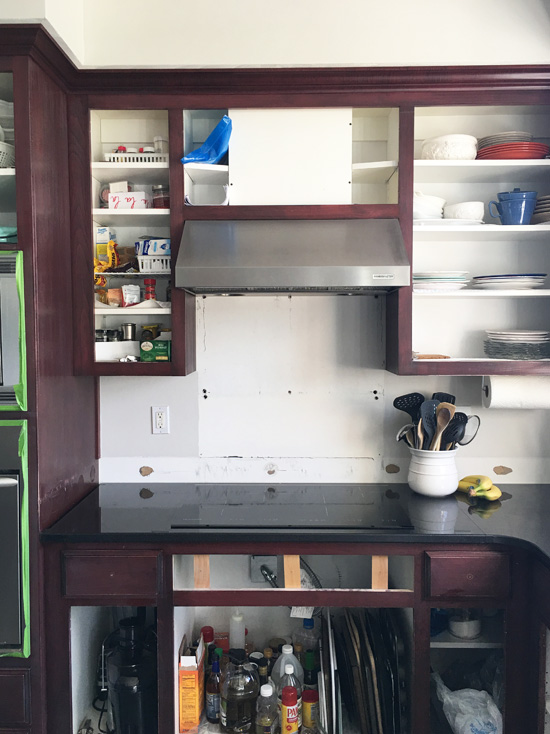
In order to remove the stainless piece, we (translation: he) first had to remove the granite backsplash which y’all also agreed should find its way to the nearest exit since we are adding a tile backsplash. It looks so much better without it already! It visually opened up that wall behind the counters so much more…
While the hubby was working on his honey-do list, I wasn’t just taking pictures of his behind, I was taking down the cabinet doors and getting them prepped in the garage:
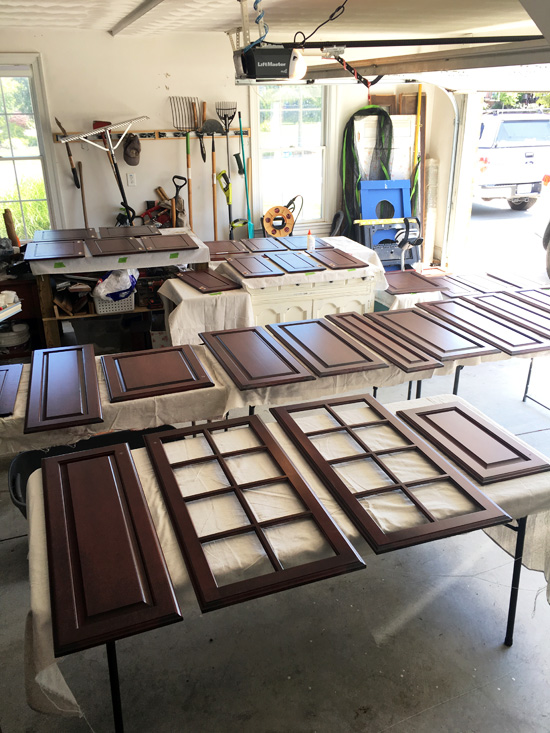
That’s a lot of cabinet doors!! There are 30 in all, including the butler’s pantry, and also three from the laundry room. I decided to tackle those while I was at it. What’s three more, right?
I gave everything a good wipe down with a TSP substitute to remove any grease, and then I sanded everything…
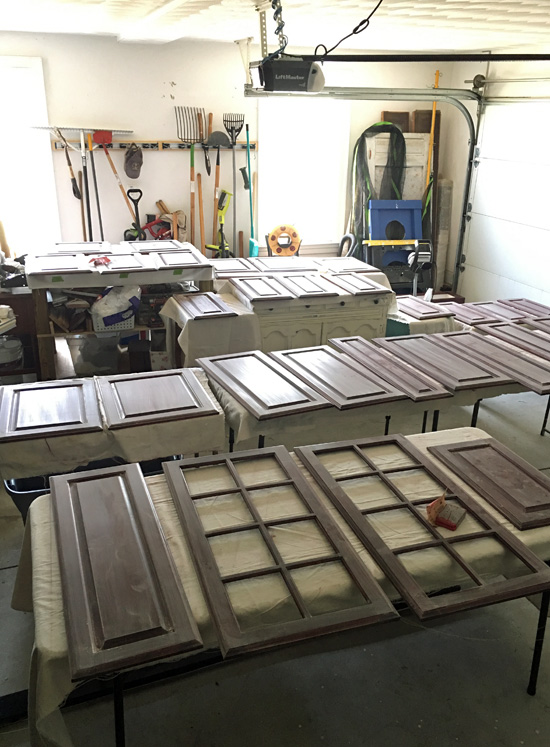
It may seem odd to clean and then sand, but you don’t want to smear any grease or grime into the cabinets with your sandpaper.
I cleaned up all the dust with my shop-vac and a gave everything another wipe down with a damp cloth. The prep is definitely the hardest part, but SO important to a proper paint job.
Yesterday I was able to start priming the backs of the cabinet doors:
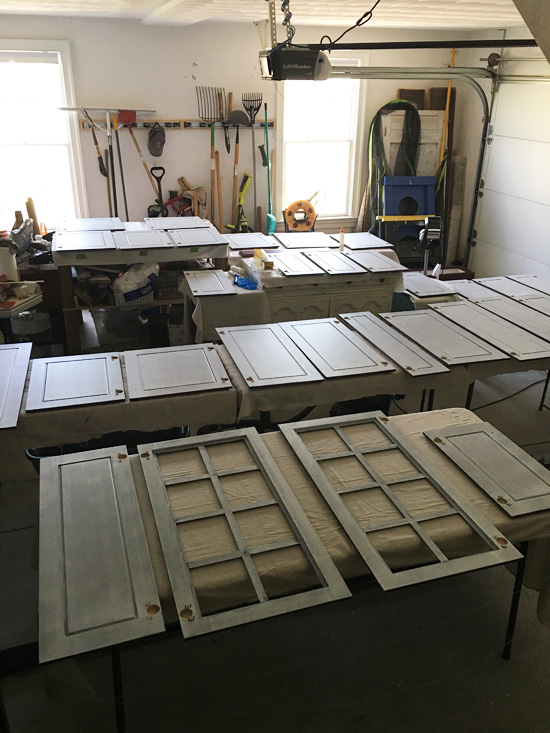
Yay! Progress! I hade some errands to run so that is as far as I got, but I am so excited to finally be at this point. My kitchen is well on its way, y’all!
I’ll stop back by on Thursday with another update, and hopefully I’ll be onto the painting by then!
UPDATE: We have primer and it looks pretty awful! See it HERE!
XOXO,
![]()
Don’t Miss a Thing!
If you like what you see, there are several ways to follow along!
Email * Facebook * Pinterest * Twitter * Instagram


Mary Kaiser says
Wow, you go girl!! It looks better already. That was so nice of your husband to remove the things that have to go. It is so nice that you don’t have to paint inside of the cabinets, you still have a functioning kitchen while your working on it. I am looking forward to seeing the end finish. I painted my cabinets this last winter and its a lot of work, but so worth it. Good luck! I will be here cheering you on!!
Christy says
Thanks, Mary! My Hubby was a huge help…I am so grateful to have him! And yes…luckily the insides are already white and everything can stay right where it is for the most part. They really need a good organizing now too. I bet your kitchen looks fantastic! XOXO
Rosie says
When Matthew MaConeghy oh I mean your husband is done tell him to come a work on my kitchen. Good job. Can’t wait to see when it is finished.
Christy says
Ha ha! I will send him right over lol! Thanks, Rosie! 😀
Sheila DelCharco says
Wow! You’ve made so much progress! 30 doors?! Wow! That’s a lot of doors! Do you mark them in some way so you know where they go back to? Or are they in order?
Christy says
Yes that is a lot of doors! I used FrogTape to label them before I removed them and then moved the tape to the spot where each is set up in the garage. Hopefully they don’t get mixed up! XO
Christina in SW FL says
Oy!! Wow, that’s a whole lot of work. I am so proud of you! okay, and your hubby. 🙂 I look forward to seeing the end result!
Christy says
I know, right?? Thanks, Christina! The sheer excitement of finally getting to this point is getting me through it! XOXO
Becky says
Could you show a small desk re-do? My son just bought his first home so furniture is in demand. He was given a small desk that needs a little love. I’d like to paint it black…he’s not so sure. Suggestions appreciated!
A faithful follower
Christy says
Hi Becky! The only desk I’ve painted that was a bit more masculine was this one: https://www.confessionsofaserialdiyer.com/childs-antique-desk-makeover/ I do like the idea of a classic black though!
Signed, Appreciative in CNY says
I admit it! I took the clickbait! Looking forward to seeing more. I meant the kitchen renovation, but hub’s butt shots are nice too. Haha! 😉
Christy says
Ha ha! My Hubby got a kick out of your comment! He didn’t even know I shared his tush with the world lol! ????
Eileen says
Hot hubby!
Christy says
Ha ha thank you, Eileen! I knew some of you ladies would enjoy that! 😀
Michelle says
Wow! You don’t waste any time!! I know you will figure out the area where you took the cabinet down. Can’t wait to see what you come up with! I like the corbel/shabby idea! What fun! Keep sending the updates and progress. Thx for sharing!
Christy says
I know…once I got all my thoughts out of my head and into the post I shared with ya’ll on Thursday, I was ready to go! I’ll keep sharing as I go! Thanks, Michelle! XOXO
Wendy Somerville says
I think your kitchen will look fabulous Christy when you and hubby are finished. It will be great to see how you make them really smooth when painting. This is my only concern when painting cupboards, that there will be brush marks. Then perhaps I can re-do mine .
Christy says
Thank you, Wendy! I will cut in with a brush and roll out with a roller made just for cabinet doors. It leaves a really smooth surface behind. 🙂
Sherrie says
oh wow really there is a roller for cupboards can you show us please in one of your posts as we are getting house built atm and i want a wood kitchen that i will be painting all white any tools that will make it easier will be fabulous to know…thanks Christy xxx
Christy says
I use this one from at Lowes..not sure if you have one of those stores there: https://www.lowes.com/pd/WHIZZ-4-in-Foam-Roller-3-Piece-Mini-Paint-Applicator-Kit/3013608 🙂
Wendy Somerville says
What type or make of roller is it Christy. I may need one. 😉
Christy says
I found it at Lowes here:https://www.lowes.com/pd/WHIZZ-4-in-Foam-Roller-3-Piece-Mini-Paint-Applicator-Kit/3013608 🙂
Deb says
Wow, Christy, I’m almost as excited watching your kitchen makeover as I would be if it was my own! It was perfectly nice before, but I have no doubt it’ll look asbolutely spectacular after! Tempts me to tackle my own. Good for you for actually doing it!
Christy says
Aww I’m so glad you are sharing in the excitement with me, Deb!! I agree it was nice before, but time to make it our own. Thank you!! XOXO
sharon says
Can’t wait to see the finished kitchen!!
Christy says
Me too!! Wish I could snap my fingers ha ha! XO
Sharon A says
Well, I’ve decided that if you do a nice job, I’ll let you come do mine! Hahahaha
Christy says
Ha ha! 😀
Cindy says
Woohoo, it’s going to look great! Just curious…what do you use as a “TSP Substitute”?
I have a great primer (Zinser shellac-based) but the directions clearly say you cannot use TSP on the wood before using this primer.
Christy says
Thank you, Cindy! TSP has been known to prevent good adhesion of primer in some areas if not rinsed off properly. I used something that is actually called “TSP substitute” and works fine with primer. Hope this helps! XO
Mari says
Wow…..you are really moving along on this. What type of paint do you use on the cabinets?
Christy says
I know…it goes pretty quickly once you get into it full force! I use Behr’s latex enamel paint in a satin finish. The one in the blue can. 🙂
Rebecca - Knoxville, TN says
Looks like progress! Glad the cabinet came down, the space looks open and has so much potential. It’s a nice kitchen but you will make it more warm, wonderful and wowza 🙂
Thanks for sharing, I enjoy watching the evolution.
Christy says
Thanks, Rebecca! Yes progress indeed! Thank you so much. I’ll continue to share my progress! XO
Donna says
You are certainly ambitious! The changes you are making will make a big difference.
Christy says
Thank you so much, Donna! XO
Marcie Lovett says
You aren’t wasting any time! Can’t wait to see how it all unfolds.
Christy says
I know…I didn’t realize I was quite so ready so soon, but getting all of my thoughts out of my head and into the post I shared on Thursday really helped kick it all into gear! Can’t wait to see the end result now! XOXO
Linda D. says
Wow. Great post! Not only did I once again get to admire your energy and vision, but I got a real whoa moment at the picture of your husband dismantling the stainless watchamacallit over the cooktop. Yeah, I might actually work more on my own kitchen if my demolition crew looked like that. Then again, I might be too distracted. 😀
Christy says
Ha ha thanks, Linda! I thought some of ya’ll might get a kick out of that! ????
Debbie in TX says
I applaud you for taking on this project because it is so much work. Can’t wait to see how it turns out!! Good luck!
Christy says
Thank you, Debbie! After sharing all my thoughts on Thursday and reading the responses, it really got me motivated! Now to get it done! XOXO
kathie says
Love this post! Happy to see you removed the skinny cabinet and the metal dust catcher. Can’t wait to see how it turns out.
Christy says
Thanks, Kathie! Yes both of those had to go! It’s easier to envision the finished project a little more now! XO
Robyn D Wright says
Excited to see the final! That’s a bit of work you have a head of you.
Christy says
I know! It is turning out to be a little more work than I imagined it to be, but I am so pumped to see it finished that I am just gonna keep chugging away ha ha! XOXO
liz says
Cute husband. I would take down the skinny cabinet too.
Christy says
Thanks, Liz! Yes, glad to see that cabinet gone! XO
Crystal says
I know you said you were just removing the one skinny cabinet but have you considered removing the other one so that the window will look centered? And do your corbels and shelves on both sides? Or neither? Just a thought. Excited to see your finished cabinets. Yay for a great paint job, prep is a pain but almost more important than the paint!
Christy says
I did consider tsking both cabinets down for sure. I thought I would take one down and paint, and then see how it looks. I can’t put shelves on the left because there’s actually a cabinet door opening behind that skinny cabinet and I wouldn’t be able to open that door. And I’d really like to add some shelves, so I’m thinking this might be the only way I can do that. Crossing my fingers it looks balanced when it is all said and done! Thank you for your suggestions! XO
Heather says
Hi Christy,
Looking good! After looking at the window photo it looks so much wider without the skinny cabinet and I believe it would look even wider without the one on the other side. Just a thought! Can’t wait to seethe progress on Thursday.
Cheers
Heather
Christy says
Thanks, Heather! It really does open it up! I think I’m going to paint and then see how it looks. We really don’t want to lose two cabinets for storage purposes, so hoping some cute shelves on the right will balance everything out! XO
MaryJean says
Woo Hoo! That’s for your husband. I had to laugh at your comment about “two butt shots in one post”. It does look better with the one cabinet down and your idea of shelves will definitely balance it out. Can’t wait to see the cabinets painted!
Christy says
Ha ha…ya’ll made him feel so good! Yes hoping the shelves will give it balance. I’ll be priming everything in site tomorrow! XOXO
claudine says
I’m so glad you took down the skinny cabinet! lol Good luck with all those cabinets! 🙂
Christy says
Me too! It feels so much more open now. Thanks, Claudine! Now that everything is prepped, let the painting marathon begin! XO
P boszko says
Lookin’ good…luv it with out the skinny upper! Tell me how easy was it to remove that backsplash? Was it only glued to wall & no adhesive on counter top? Would luv to do with mine, since it has been a stumbling block to put in a real, full backsplash! Look forward to seeing progress reports.
Christy says
Thank you! We used a $20 heat gun to soften the adhesive on the small piece that was against the cabinet that houses the stove. That was the hardest piece. The rest all along the walls came off pretty easily with a crowbar! I love how it looks already! XO
Cheryl says
You work fast, lol and love the new changes. Can’t wait to see it!!
Christy says
Thanks, Cheryl! I am so pumped to see this space done, so I’m just gonna keep on moving ha ha! XOXO
Addie says
Forget the kitchen…forget the make overs……JUST PUT UP PICS OF HUBBY!!!!!!
Christy says
Ha ha! Ya’ll have made his day lol!! XOXO
Stacey says
Please could you do a “Sanding Tips” post? I know how important sanding before (and sometimes during) a restoration is but it is the one step which I have come to dread so much! When do you use a belt-sander, when do you use an orbital-sander, when do you use a sanding-block, how do you get into nooks and crannies, what do you use to protect your hands, what is a realistic time-frame for this step of the project,etc.? I’ve probably over-inflated it in my mind but clearly I need some help (perhaps from a therapist)! Thanks in advance! I really enjoy your blog – it’s that little bit of sugar in my coffee on Tuesdays and Thursdays!
Christy says
Hi Stacey! Thank you so mcuh!! Don’t let the sanding hold you back and don’t overthink it! I almost always use chalk paint for my makeovers which requires NO sanding before painting. However for this kitchen project, I just used an old worn out sanding block, wrapped in a piece of 220 or 320 grit sandpaper. It comes in a large sheet that I cut into fours. When sanding as a prep step, you only need to sand enough to roughen up the surface and give the primer something to grab onto. You do not need to sand down to bare wood. I almost always use this hand sanding method unless I need to take something down to the bare wood, like a dresser top, and I would use my orbital sander for that. I vacuum the dust with my shop vac. Hope this helps a little! XO
Carole says
Thank you Christy for all the pics especially of your husband. haha. It looks like you guys are a good team and what a lot of work you have ahead of you. I can’t wait to see your reveal.
Christy says
You are so welcome, Carole! Ya’ll made his day with your comments ha ha! XOXO
Becky says
Wow! Even with only primer it’s looking better already! Removing the “extras” from the walls really does un-crowd the space. You don’t even realize how cluttered it looks until stuff starts to go. I think the best projects are the ones where I get to work with my husband for at least a while! : ) Fun times, haha!
Christy says
Right?? I finished the painting on all but the island last night and we are getting ready to put the doors back…can’t wait to see how it looks! And yes you are so right…you don’t even realize how cluttered it looked before. And I too love working on my projects with my Hubby! Have a great weekend! XOXO
Laura Lane says
Great job Christy!!! Looks so much better you guys are a good team. Feel free to post pictures of Hubby at work anytime as I’m sure all of us ladies will enjoy!! 😉
Christy says
Thank you so much, Laura! I do need the hubby to hang some pendant lights for me, so maybe I’ll get some lucky shots LOL! XO