Hey there awesome Friends! We have just been chugging along here and I think we are almost ready for floors!
I got all the painting and touch-ups done:
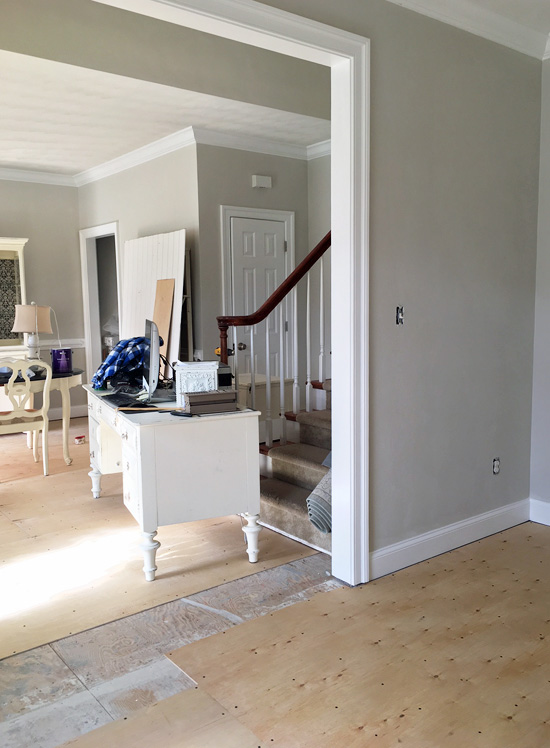
The color I used is Behr’s Campfire Ash and it’s the same color I have used throughout the rest of the downstairs so far.
And yep that’s my desk right at the bottom of the stairs. I’m actually writing this from that very spot ha ha.
We got all of the luan down except for that one strip between the rooms…

If you missed why we needed to add a layer of luan, you can catch up HERE. Unfortunately we ran out. Once we get that filled in, I can start on the floors!
And the dining room…sorry I didn’t even try to make it look presentable for y’all…
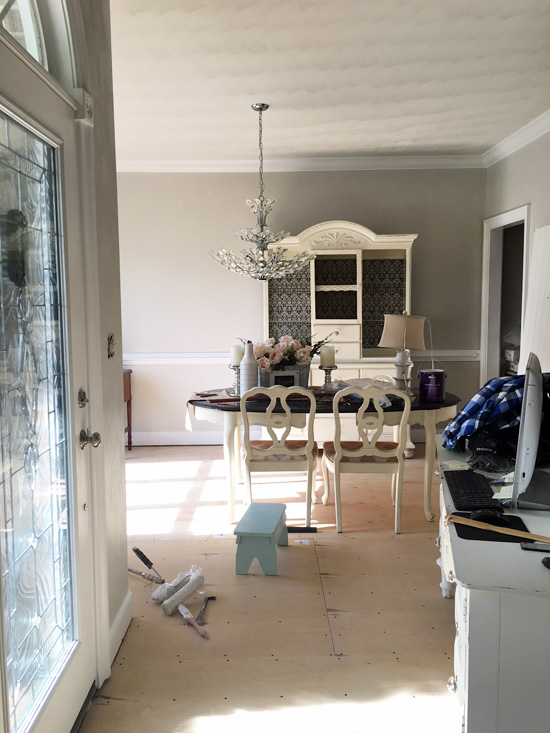
I probably should consider painting some of this furniture before installing the floors so I don’t have to move it outside. That would be the smart thing to do!
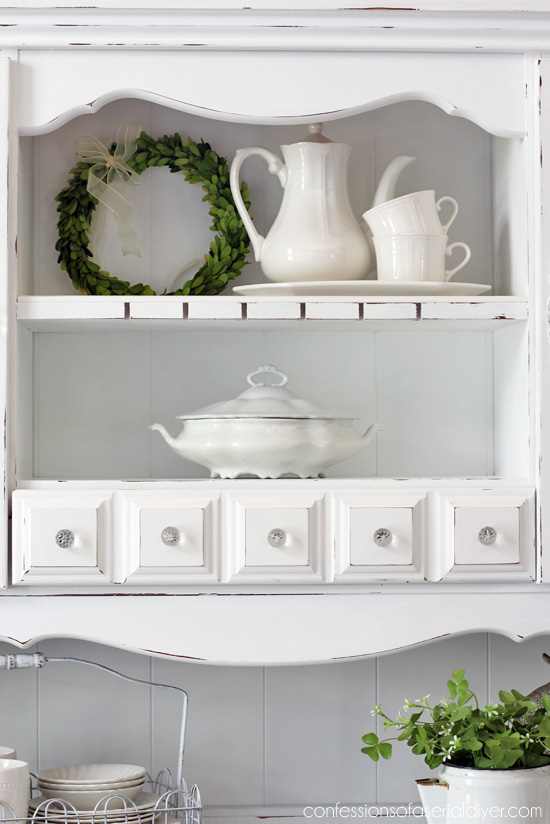
Since I don’t have much that is pretty to share today, I decided to include one of my favorite hutch makeovers!
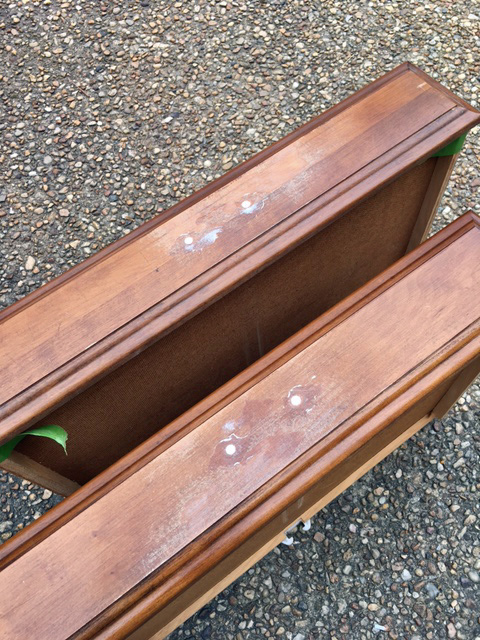
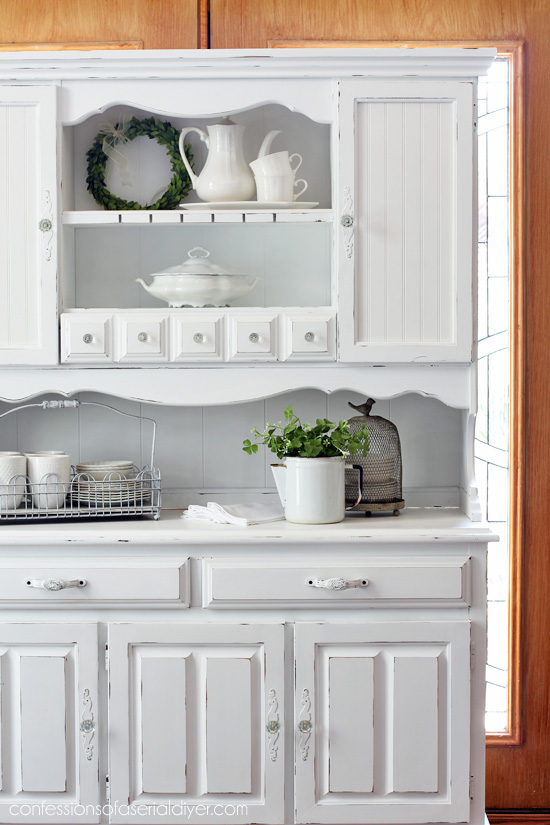
I got a great deal on this very dated hutch:
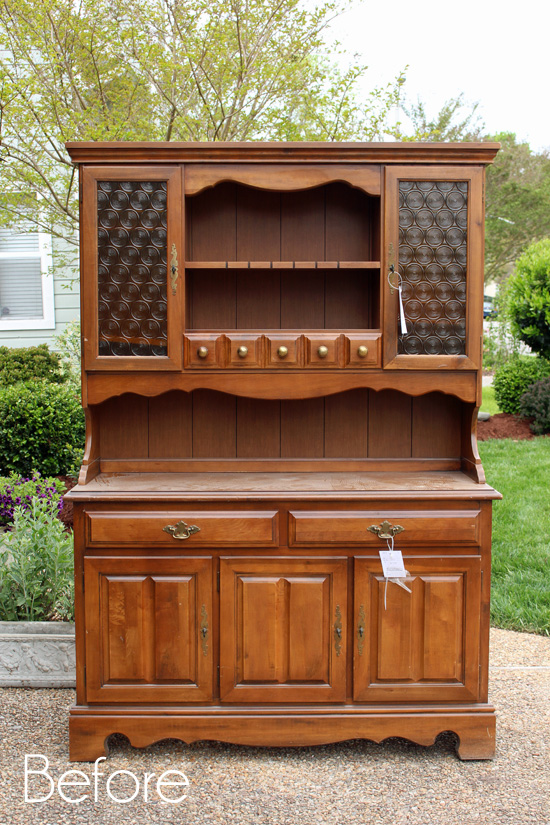
I love these older hutches because they have so much charm, but one thing I didn’t find very charming on this one were these plastic amber door panels:
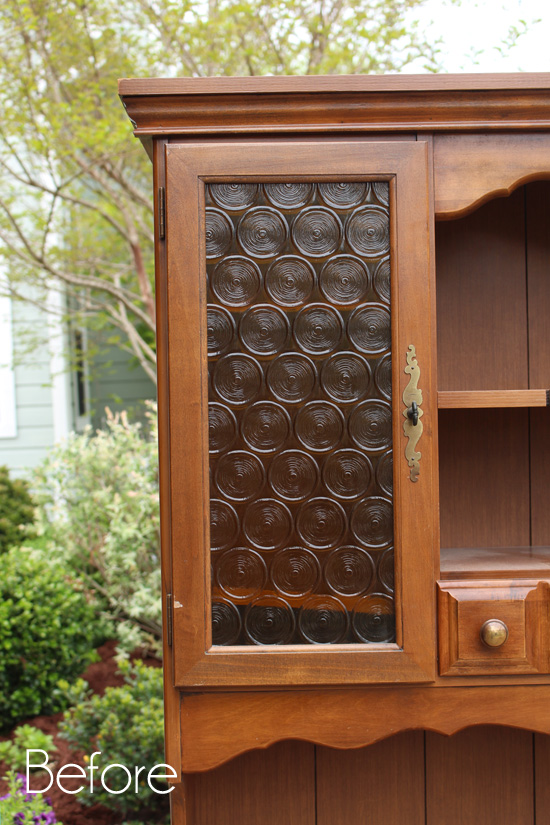
I suspected these were the reason why this piece was marked significantly lower than similar pieces at the thrift store. Not a problem for me!
I’ve included a few affiliate links so you can find the products I use. Read my full disclosure here.
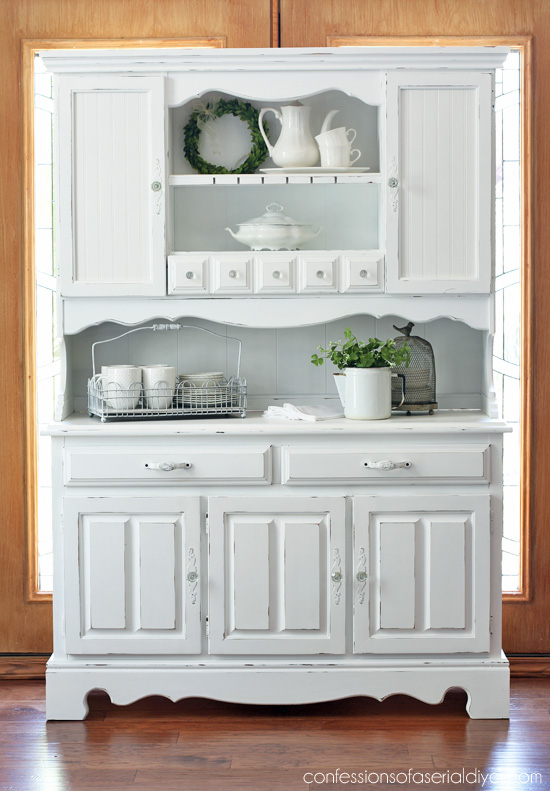
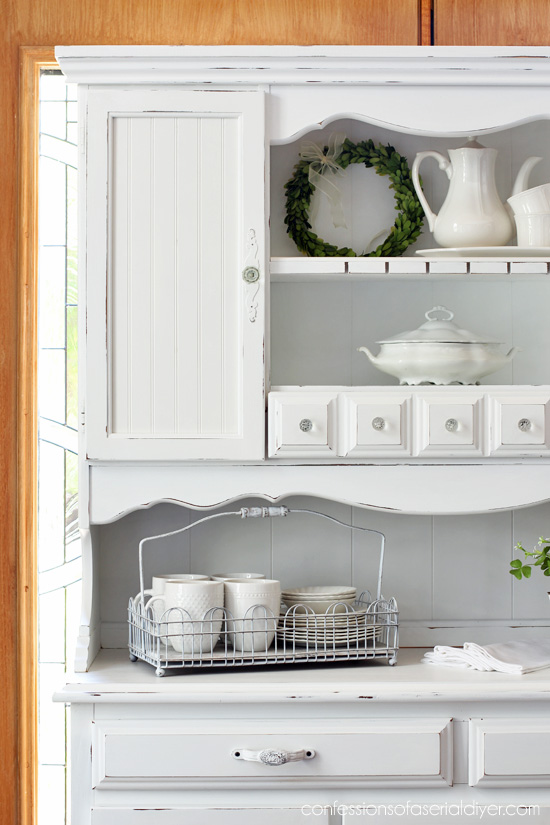
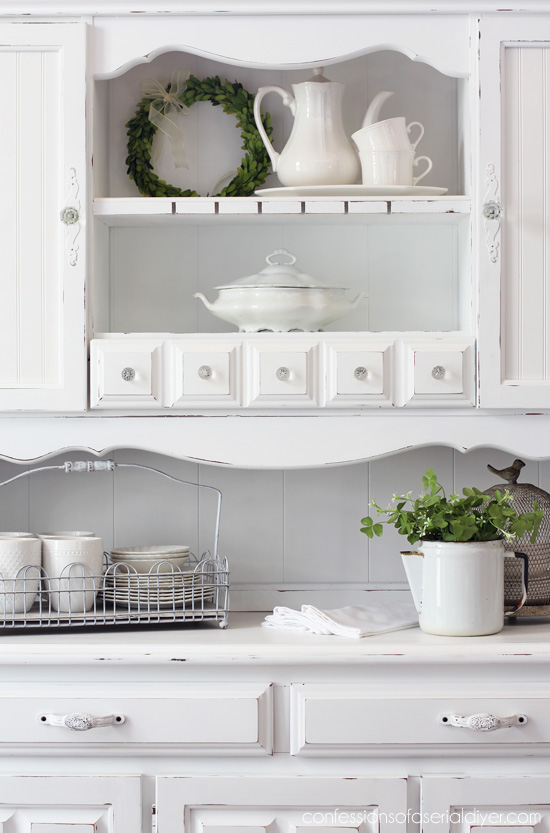
I replaced them with bead board panels:

They really gave this pretty piece a touch of cottage charm.
Another dated feature of this hutch was this area for hanging silverware (I’m guessing silverware because the slits are too narrow for wine glass stems)…
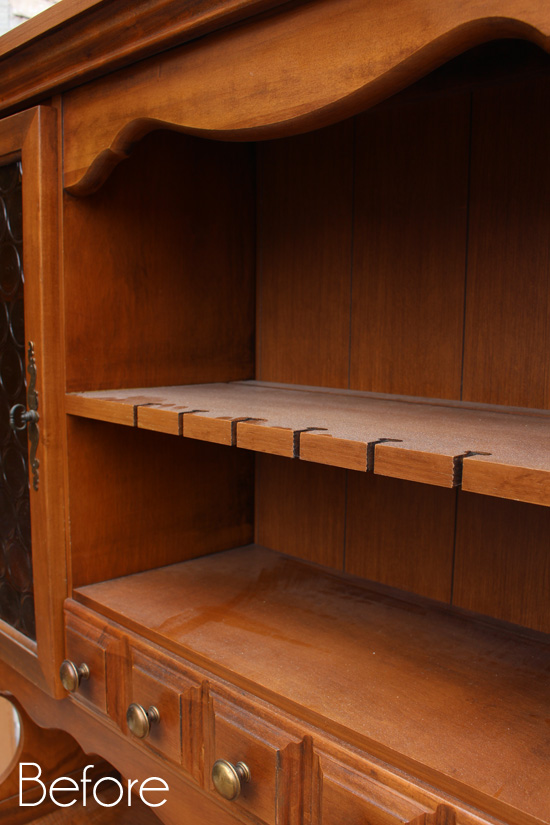
I tried my best to whack this shelf out so I could just replace it, but it wasn’t budging. I had to come up with another solution, so instead I decided to add a piece of molding across the top lip to camouflage it: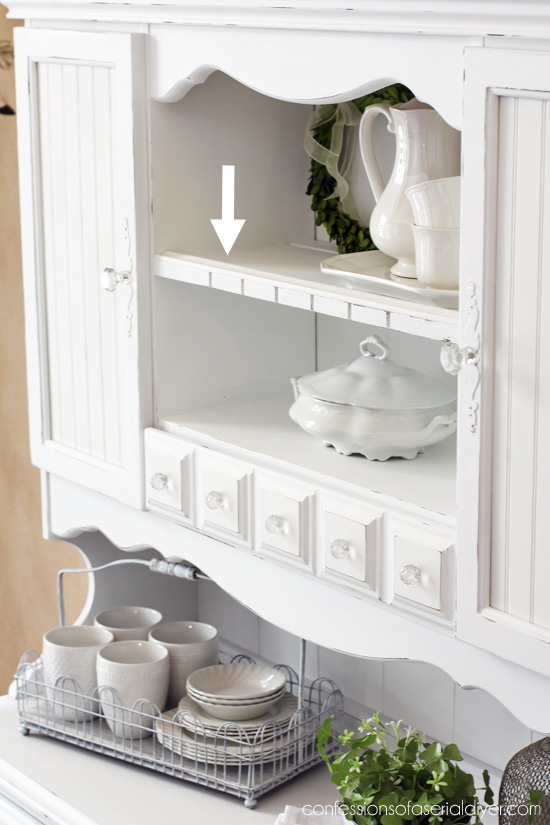
It made the slits look a bit like deep dental molding instead.
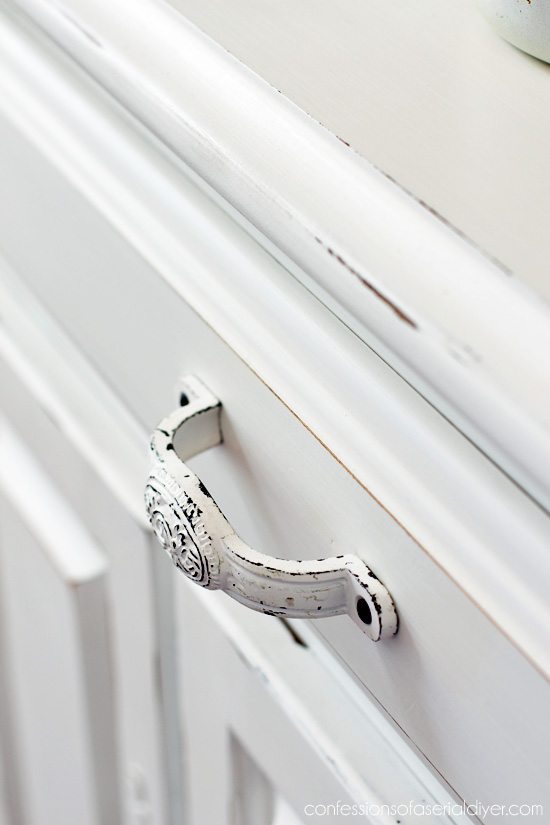
The original paneling on the back was a great base for white paint. I used Behr’s Ultra Pure White, straight off the shelf, in flat with my DIY chalk paint recipe. After sanding, everything was waxed with Annie Sloan’s Clear Soft Wax.
See my How to Paint Furniture with Chalk Paint tutorial HERE for more details on painting with chalk paint.
These pretty glass knobs from Hobby Lobby were perfect for the little drawer up top:

I filled in the holes on these bottom drawers so I could attach something prettier than what was there. I used Elmers Wood Filler for that part.
These handles were perfect:
The insides got a little fabric treatment using Mod Podge in matte as well…
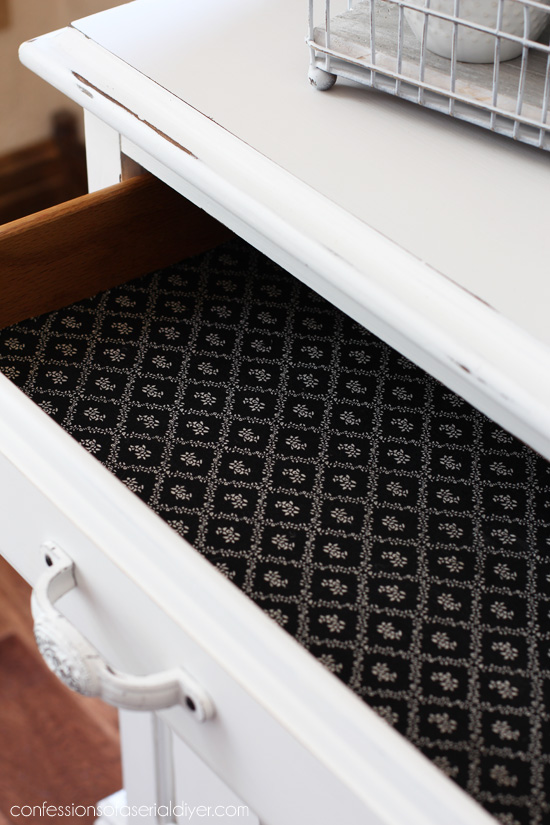
I also put this on the backs of the bead board panels in the cupboard doors but forgot to take a picture.
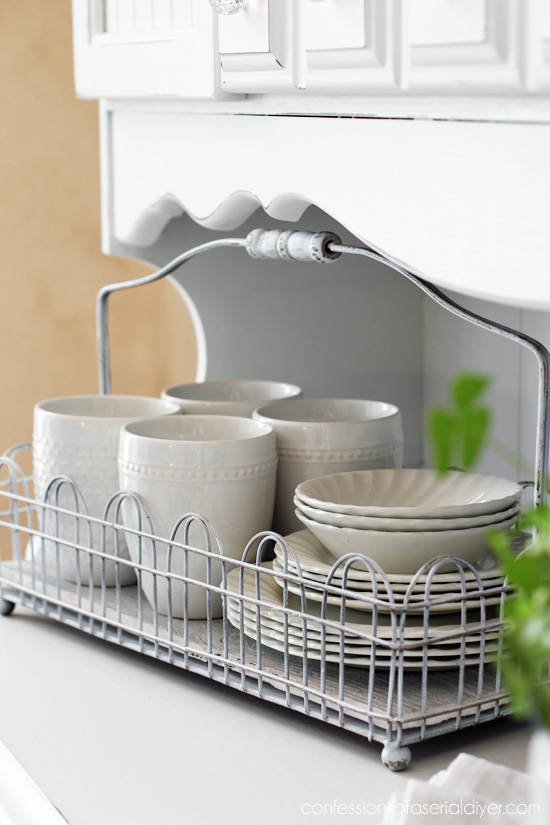
Remember this wire caddy I scored at the thrift store? It was a great addition to my Farmhouse Kitchen!
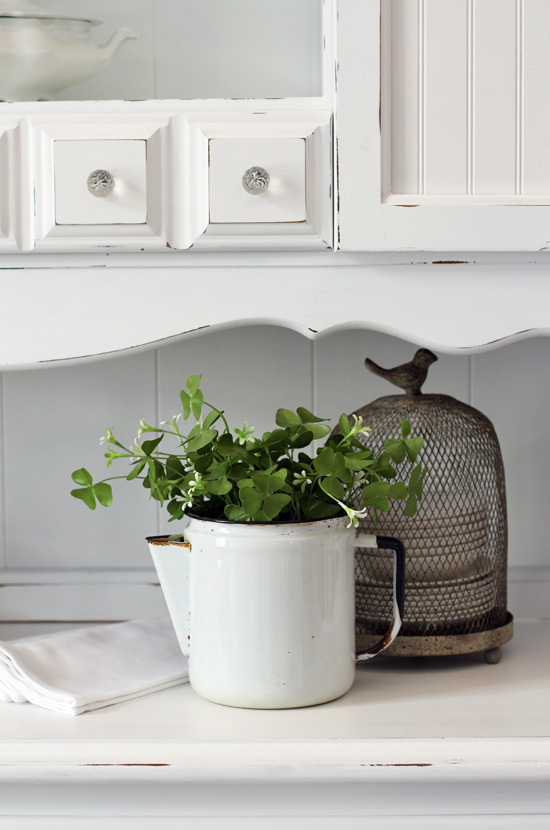
This little enamelware kettle and wire cloche were also thrift store finds, as were all of the ironstone pieces.
Sometimes those details that made a furniture piece a must-have 50 years ago, don’t do much for it today, but they can often easily be updated!
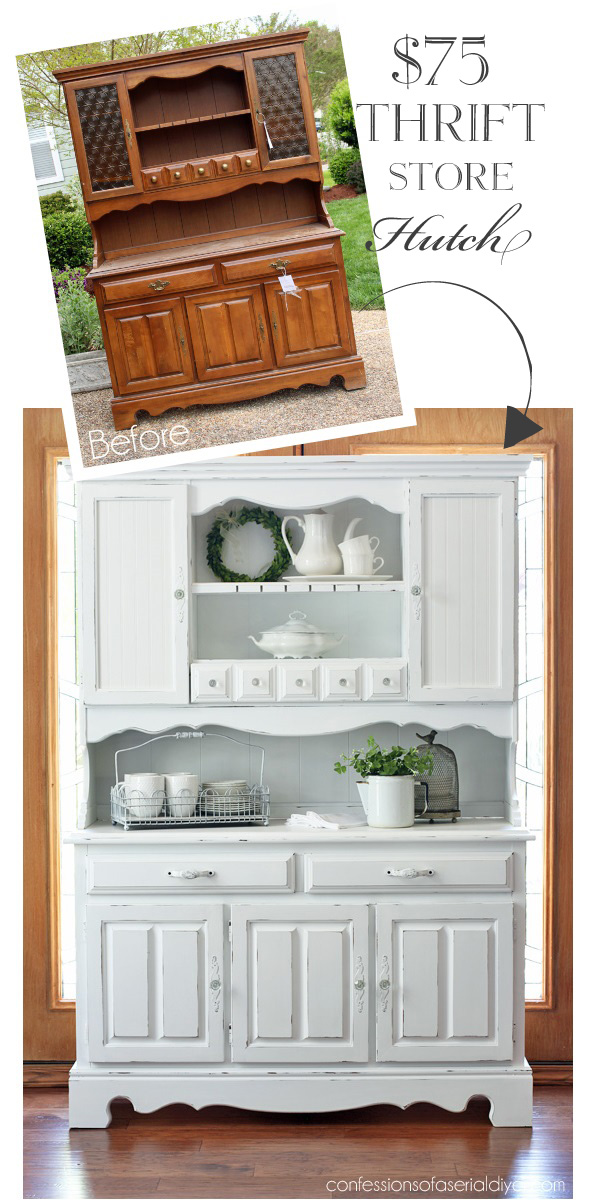
Oh and did I mention it was only $75?
If you enjoyed this makeover, you might like to see a few more thrifty furniture makeovers I’ve done: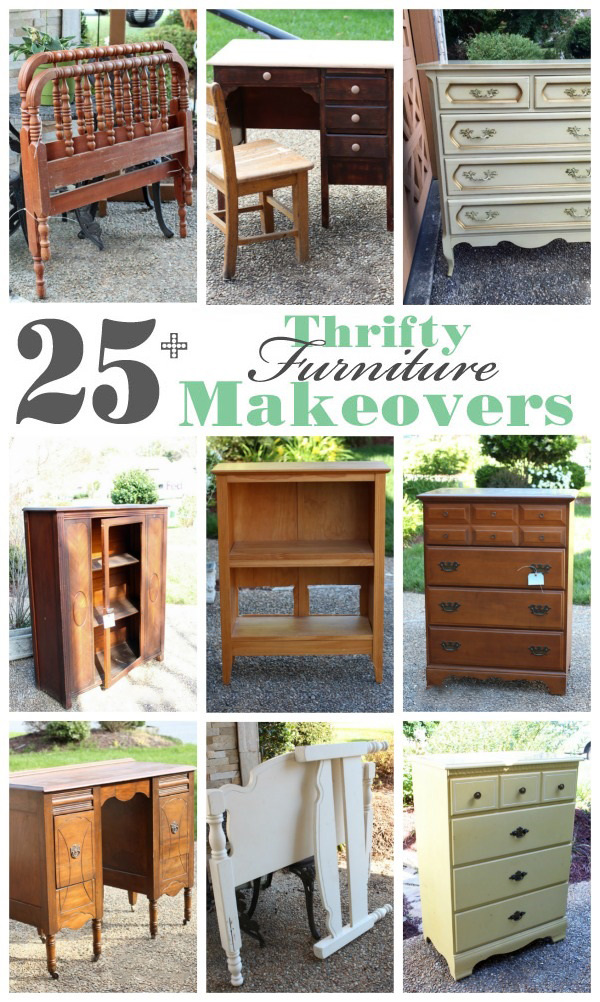
25+Thrifty Furniture Makeovers
Thanks so much for stopping by today, Friends! It’s back to work for me!
I’ll be back on Thursday sharing a super oldie but goodie:
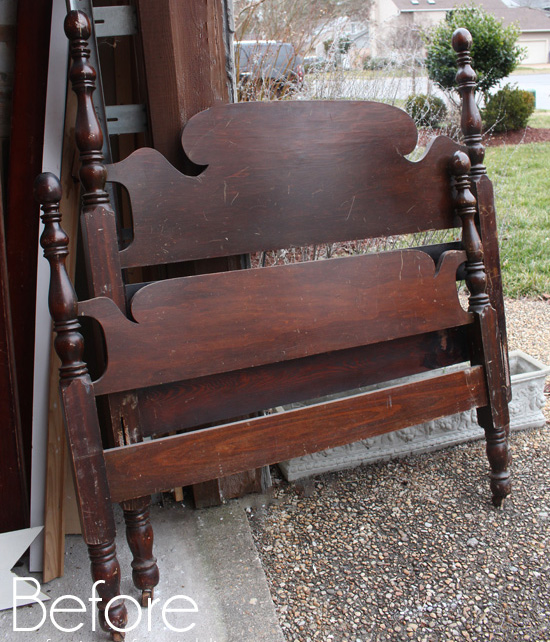
UPDATE: See what became of this headboard and footboard HERE now!
XO,
![]()
Don’t Miss a Thing!
If you like what you see, there are several ways to follow along!
Email * Facebook * Instagram * Pinterest * Twitter


Christina in FL says
Christy, this is another winner! Though I admit I am surprised you didn’t introduce your signature blue color. 🙂 Those amber panels were so popular and I love the bead board.
(Still having trouble with the page loading/freezing… nuts!)
Christy says
Thanks, Christina! I did a hutch in blue in early Spring, I believe, but unfortunately it is still sitting in my shop. 🙁 I guess people are afraid to go that big with color? Yeah girl…I don’t miss that amber glass fad one bit lol. And I am SO sorry about the page freezing on you my friend! XOXO
Norma Rolader says
Love the color on your walls and that hutch is awesome
Christy says
Thank you so much, Norma! I’m so happy to be making progress! 🙂
Michelle says
Beautiful!
Christy says
Thank you, Michelle! XO
JamieK says
Gorgeous!!! What a difference ????. Love those handles! Can hardly wait to see your floors. It’s gonna be beautiful ❤️
Christy says
Thank you, Jamie! I am so ready for my floors!! 😀
Dana says
Excellent rescue operation on a good piece of furniture. I kind of dig those weird amber panels, but not in the hutch. You did an excellent job and I love your choice on new handles and knobs, so elegant!! Thanks for sharing!
Christy says
Thank you, Dana! Had those panels been glass, I might have been tempted to save them for something down the road. 🙂
Dana says
Yes, I agree, I would’ve made them into something cool if they had been glass too! Gotta know when to hold em’ and know when to fold em’, right?
Christy says
Exactly! 🙂
Cecilia says
Beautiful! It really turned out great.
I bet you’re excited to almost have your floors in. Can’t wait to see them. I love the color of your walls too.
????Cecilia
Christy says
Thank you, Cecilia! I am so excited to get these floors in! XOXO
Patty Soriano says
Christy, I’m wondering if you had considered filling in the slits with wood filler, and if not, why ? I like your fix, but wondering if there was another way. In case I find something like this, I’d like pros and cons for what I could do. Love the makeover!
Christy says
Thank you, Patty! The slits were too deep for wood filler unfortunately. I would have had to add pieces of wood dowels where the circular cut-outs were and small slivers of wood to fill gaps in the front, then follow up with wood filler. This was a simpler fix. 🙂
Kathy E. says
What a great makeover! That hutch was waiting for you so it could live a new life in your home! I think those notches may be for holding wine glasses upside down, but silverware would work too!
Christy says
Thanks, Kathy! I thought so too at first but the slits were too skinny for wine glass stems. Luckily this hutch sold quickly so the trim piece ended up being a simple fix. 🙂
Jeri says
I love the make over hutch, the one that had the shelf where you would hang glasses and you added a little piece of molding, what color of paint did you paint this hutch with? I searched and searched and could not find the color, you mentioned you did use some straight off the shelf in pure white on the back panel but I want to know what color the rest of the hutch was?
Christy says
Thanks, Jeri! I used the same paint for the entire hutch: Behr’s Ultra Pure White made into DIY chalk paint. 🙂
Diane says
I love the color you painted your walls. I just finished painting my master bathroom a color very similar. And I’m still working on the living room suggestions you gave me! I will send photos one day I promise!
diane
Christy says
Thank you, Diane! I’d love to see your living room when you’re done! 🙂
Melinda says
Like the paint on your walls! Oh, I would be painting right there in the middle of the floor,if it were me. no one will see the effects of it when all is covered up! I say you go girl!!! Have a great week!
Christy says
Thanks, Melinda! Ha ha I am totally doing that! I am starting tomorrow on my dining set! XOXO
Jamie says
Wow! Can’t believe you only paid $75 for that. Beautiful makeover!
Christy says
I know, right?? Thanks, Jamie!!
Addie says
Hello!!! Love all you are doing to the house. You are making it a home!!! Been busy myself
cuz I just moved too!!! LOVE that make over on the hutch. Who would have thought.
Have you sold your other home…it was a beauty?
Have a great day!!!
God Bless!!
Addie
Christy says
Hi Addie!! Thank you so much! It is humming right along. I bet you have been busy…we always forget how much work it is setting up a new place! We have not sold our other home yet boo hoo…lots of lookers though! XOXO
Kim says
Hi there! Love your posts and all the fun makeovers you do. I have an issue with bleeding through on some of my chalk painted pieces. Do you have any suggestions to prevent this from happening?
Christy says
Thank you so much, Kim! Most mahogany and cherry pieces will likely be bleeders, so I seal them with shellac first. I share more details about it in my chalk painting tutorial here: https://www.confessionsofaserialdiyer.com/how-to-paint-furniture-using-chalk-paint/ Hope this helps! XO
Ellen Shook says
So pretty! I am saving your photo for inspiration. I am testing paint on one right now and we tossed the glass and wire mesh grill on the doors because it was CHEAPO. I like your idea of headboard, and make copy it. (You know = the sincerest form of flattery?)
Christy says
Thank you, Ellen! Yep beadboard saved the day on this one and added charm…I’m sure it will be perfect for your piece too! Copy away, my friend! 🙂
Holly says
This is my favorite of your hutch makeovers! I LOVE your wall color – wish I would have not been in such a rush to paint my living room – I would have preferred to try your grayer color 🙂 Good luck with the floors – they will be beautiful like everything you do!
Christy says
Thank you, Holly! It is my favorite too! As for the paint, I knew this color better be perfect because I’m not tackling all this painting for another 20 years lol! XOXO
At Rivercrest Cottage says
Wow, that cabinet turned out spectacular. Glad to see your floors are coming along.
Christy says
Thank you, Sugar! I’m so glad adding all this luan to the existing floor wasn’t as much work as I thought it would be! We’re getting there! XOXO
Sarah says
This is absolutely beautiful. Always good to see new life brought to outdated items.
Christy says
Thank you, Sarah! I popped on over to your site…love that you leave kind notes in random places!!! The world needs more people like you! XOXO
Crystal says
This is a great makeover! Those slits were for hanging stemware tho, not silverware, wine glasses and goblets and were a very popular addition back in the day. Putting the beadboard in was genius. I’ve used luan and wallpaper beadboard in the past if I didn’t have beadboard sheets lying around. Love the new hardware too!
Christy says
Thanks, Crystal! I thought those slits were for stemware as well, but they are too narrow to fit any stemware we own so the only other thing I could think of was that maybe they were for silver flatware? Who knows…they were weird anyway ha ha! Love the idea to use beadboard wallpaper!! XOXO
Mary Jean says
All I have to say is amazing and I think that word is overused but it’s the only I think fits for this. I just wish we had a place like your booth so I could sell things like this. I have tons of ideas but no place local to take things. I’m still looking for a place! Keep it coming my friend!
Christy says
You are always so sweet, Mary Jean, thank you! I have a couple of friends that sell on Facebook and Craig’s List, but I prefer to take my pieces to my shop and let them take it from there. Sounds like you would prefer that too. Good luck finding a place to sell in your area! XOXO
Denise Zdziennicki says
Removing that horribly dated glass and replacing with beadboard – brilliant! Beautiful Christy… and your home is really coming along. I can’t wait to see the floors installed! 🙂
Christy says
Thank you, Denise! It’s hard to believe that bottle glass was a popular thing at one time…makes me wonder what things we love today will be dated in 50 years! I am so ready to start installing floors. Decided to tackle the large furniture pieces in those two spaces first. Then…floors!! I might actually get these rooms done in time to decorate for Christmas woo hoo! XOXO
Annie says
I love this hutch makeover Christy 🙂 and I’m looking forward to seen the new flooring.
Christy says
Thank you, Annie! I am looking forward to seeing the new flooring too!! 🙂
Joy says
What a great piece, and love bead board on anything! Could the slits have been for collector spoons? I think that was very popular in that era
Christy says
Thanks, Joy! You might be right about that…the slits are too small for anything else, and those were a big thing back in the day! XO
Arlene Scheibner says
Hi am enjoying your site. One comment – I believe the slots on your hutch are meant for wine/ stemmed glasses to be hung. Not silver wear. So perhaps leaving them as they were would have served a ‘ fancy ‘ purpose. Such a great job on the makeover- love the transformation.
Christy says
Thank you, Arlene! I assumed that is what those slits were for when I bought it, however when I tried to put a wine glass in there the slits were way too narrow for any of the glasses we had. That would have been a better purpose for sure! Glad you enjoyed the makeover! 🙂
Eloise says
Wow you must be reading my mind. I have been thinking about painting my hutch (that looks almost the same as the one in this blog) black. But I am very nervous about ruining it and then I have no hutch. I bought black chairs to tone down the table and a black chalk paint hutch would look great in my dining room. Your tutorial gives me a bit more confidence to perhaps make this a winter project!
Christy says
Although I have a lot of light pieces in my home, I do love the look of furniture painted black! I say go for it! XOXO
Susan Pearson says
Hi Christy!
I just love everything you do/re-do! I grew up in Norfolk and was there this summer visiting family and took a little field trip to the antique mall that you sell your lovely pieces out of. It was right when you were moving though but my sister goes there regularly, so I’ll be back! I have a question, I’m getting ready to paint my first chalk paint piece of furniture, a tall, slender cabinet that was in my great grandmother’s kitchen…what are the pros and cons of the Annie Sloan clear soft wax and the Minwax? (I’m using the Bit of Sugar color) Keep that inspiration coming!!!
Christy says
Thank you so much, Susan! I’m sorry my booth was looking quite sad I’m sure when you walked through the antique mall! Unfortunately it doesn’t look much better now. Just about finished with house projects for a while, so I’ll be able to get it stocked for Christmas! Hopefully you can come back by next time you’re in town! As for the wax, the Annie Sloan is my go-to wax. The Minwax is very hard, not soft like the Annie Sloan. I have also heard that the Minwax can discolor white, although I have not experienced that myself. I think the Annie Sloan is worth the money and it a really long way. XOXO
Kate says
Amazing work! I’m so inspired! I’m looking for a bookshelf for my bedroom (and all my book-hoarding ways) and you’ve opened my mind 🙂 — From Kate, your new follower at http://www.housemixblog.com
Christy says
Thank you, Kate! There are so many more options available if you have a little vision for sure! Good luck in your search! XO