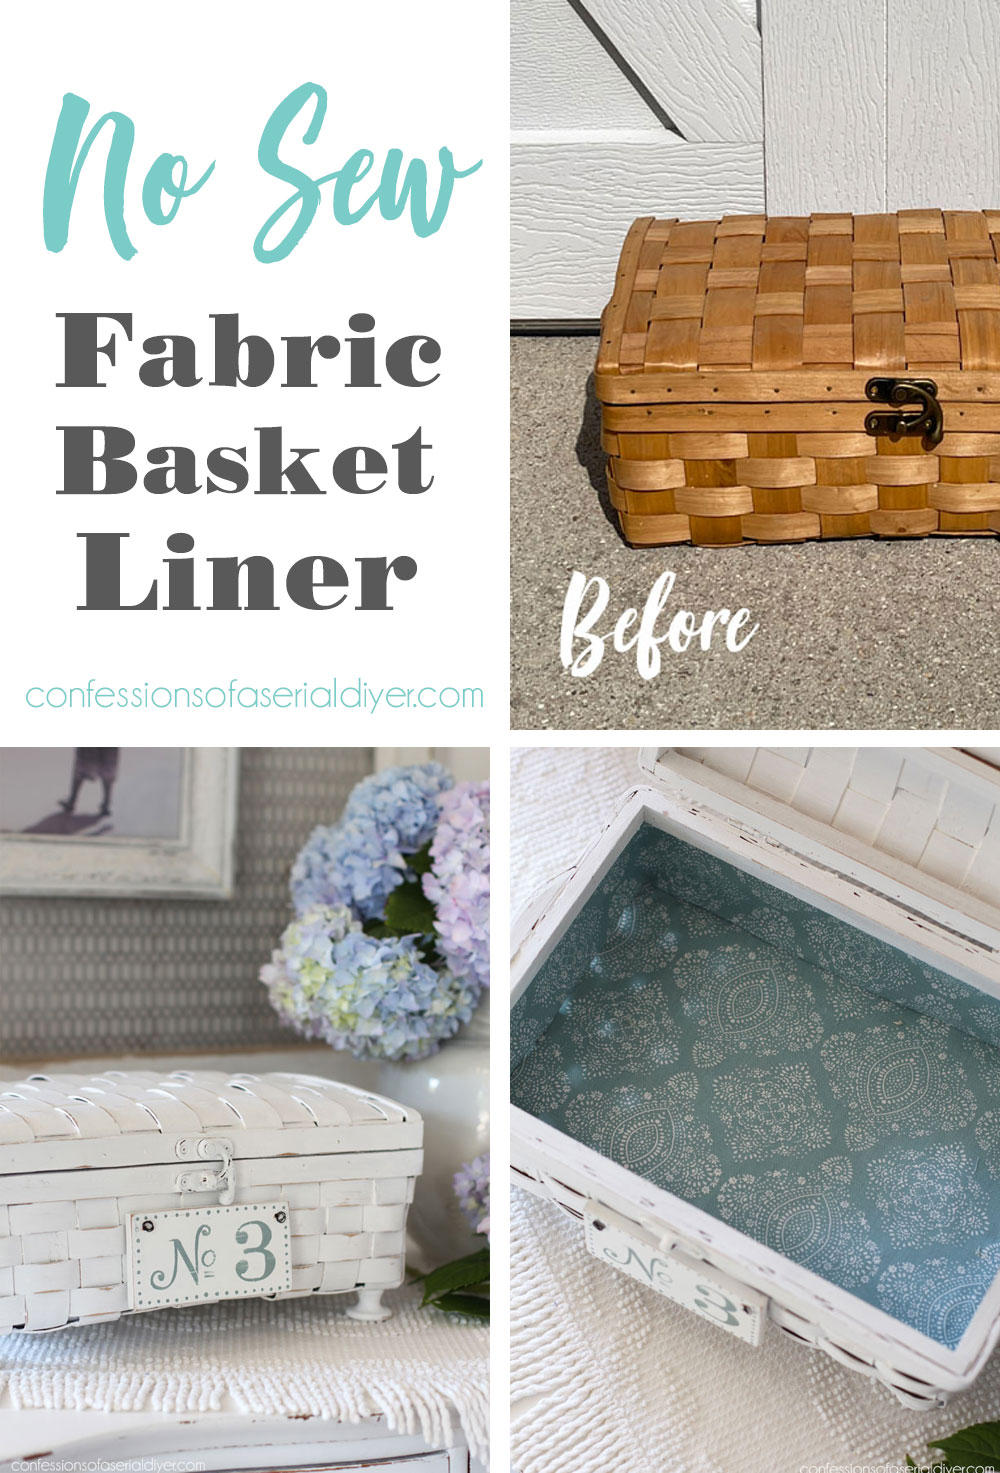
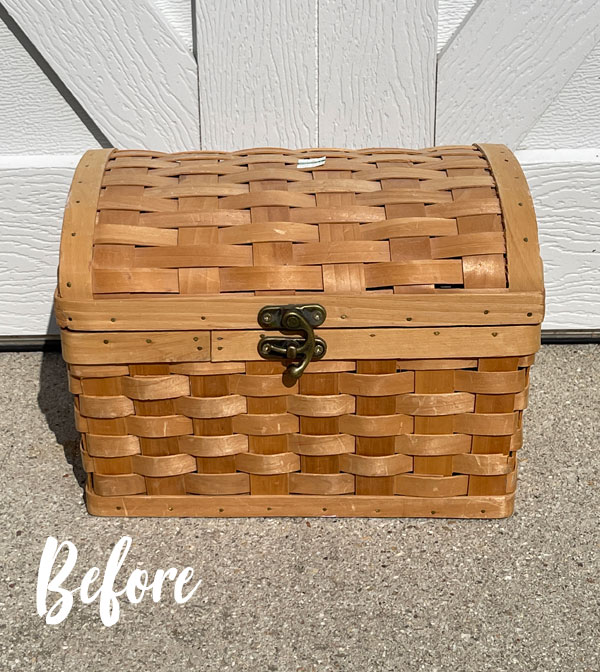
Hello dear friends and welcome back! I am still cruising through my current haul with the end in sight!! Today, I’m using one of the two baskets I have left to show how easy it is to make a NO SEW fabric basket liner!
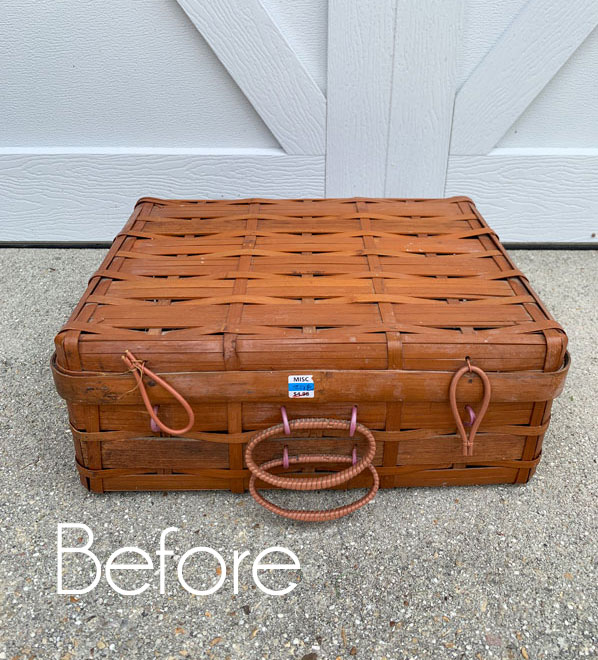
This basket was a steal at $2.95:
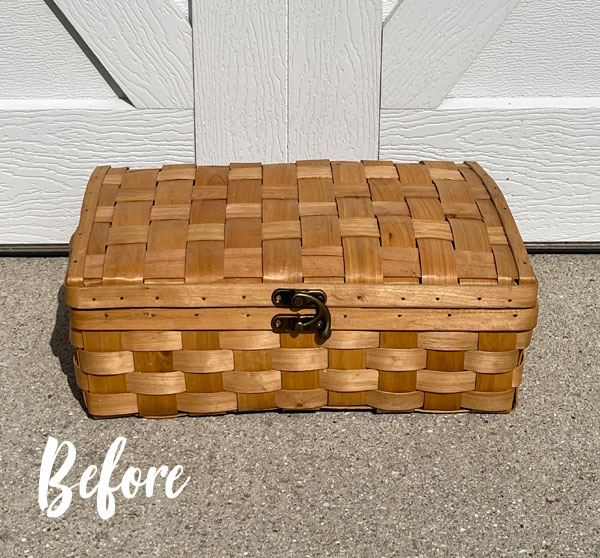
I had never seen one like this before and I just loved the shape of it.
I actually found two in a very similar style:
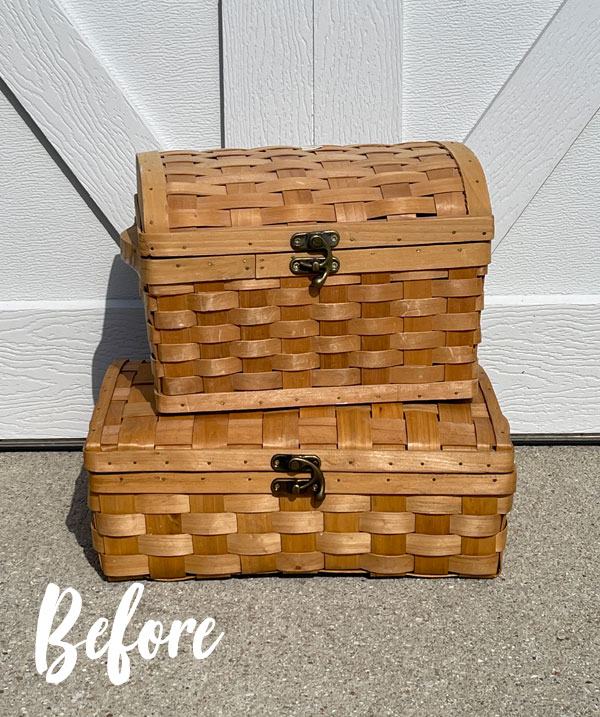
I painted them as a set. I’ll share the first one today, and then I’ll be back on Thursday with the other.
I’ve included a few affiliate links so you can find the products I love.
Clean
The only cleaning I do to baskets before painting them is give them a good vacuum with the brush attachment on my shop vac.
Then they are ready enough for paint!
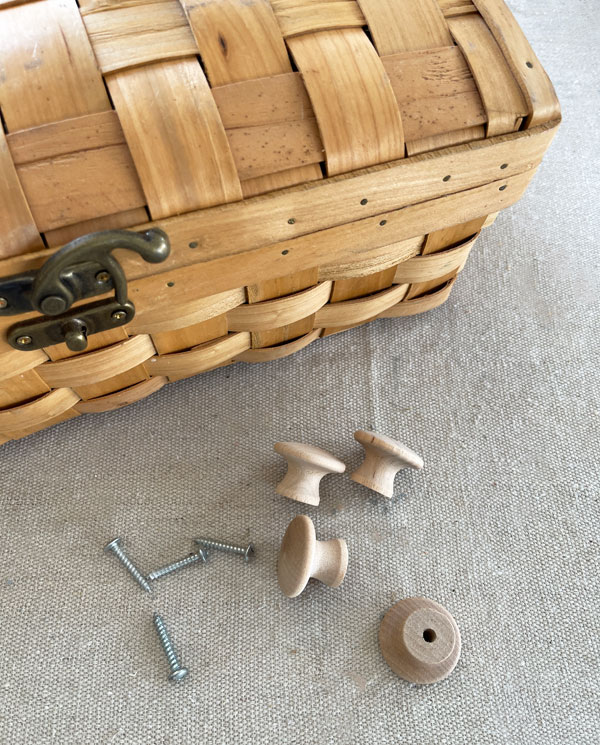
Adding Feet
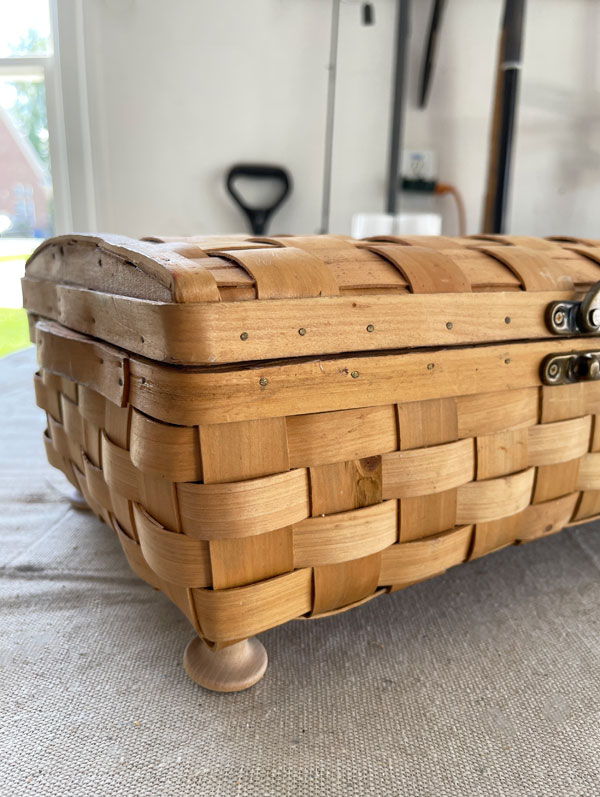
For this basket, I decided it would be so cute if I gave it feet, so I dug through my supplies and found four unfinished wooden knobs that would be perfect for the job:
To attach them to my basket, I predrilled holes in all four corners:
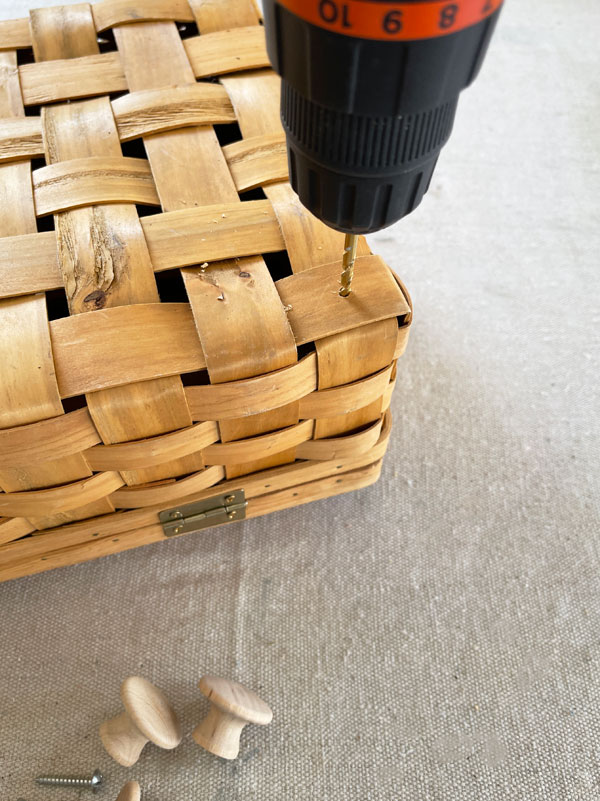
Then I screwed them right on in from the inside:
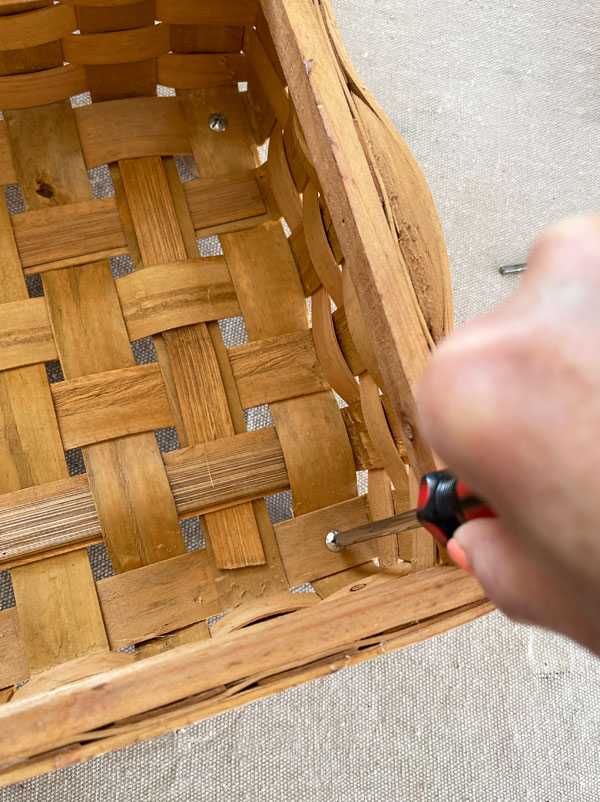
It was hard to get my drill in the corner, so I just used a screw driver and it worked great.
Voila!
Paint
I start most of my basket makeovers with a good spray of Rustoleum spray primer just to get a quick first coat on them, and I did that here too:
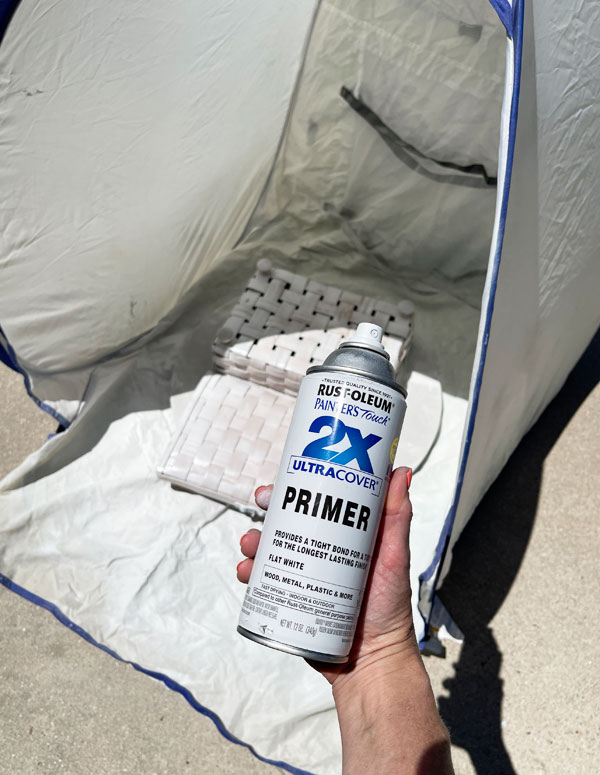
I sprayed it upside down first, and then I flipped it upright and sprayed it right side up as well as the inside. I’m using my small spray shelter here to contain the spray, which is great for the smalls! I also like to use a lazy Susan as I can keep rotating my project piece to get all sides.
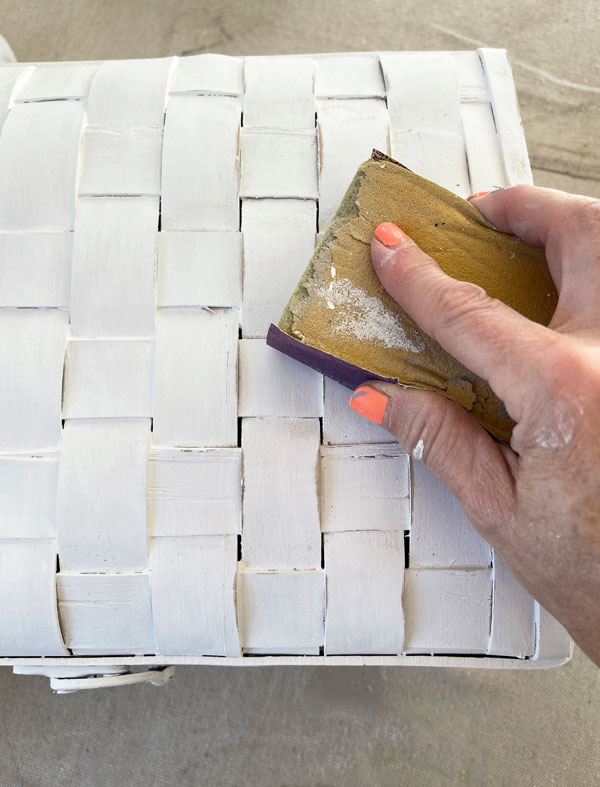
Now I could have just followed up with spray paint, but I really prefer the texture that chalk paint adds.
I chose my favorite bright white, Cotton, for this basket, and brushed it on the outside with my Best Dang Brush:

I love the large flat head for painting baskets. You’ll want to clean the natural bristles as soon as you’re done just to make it easier to clean.
YOU CAN ALSO USE A SMALL WIRE BRUSH TO CLEAN ANY STUBBORN PAINT OUT OF THE BRISTLES.
I do this with most of my brushes because I have a tendency not to wash them right away.
The large head was a bit harder to reach the insides, so I enlisted the help of my Belle Brush for that:

While the Best Dang Brush is great for larger areas, this one is great for smaller spaces.
Only one coat of paint over the primer did the trick!
Sand
I sanded all over with 220 grit sandpaper wrapped around an old sanding sponge. (That makes it so much easier to hold onto.)
If you choose to seal your basket, it is easiest with a spray sealer, which is what I used here.
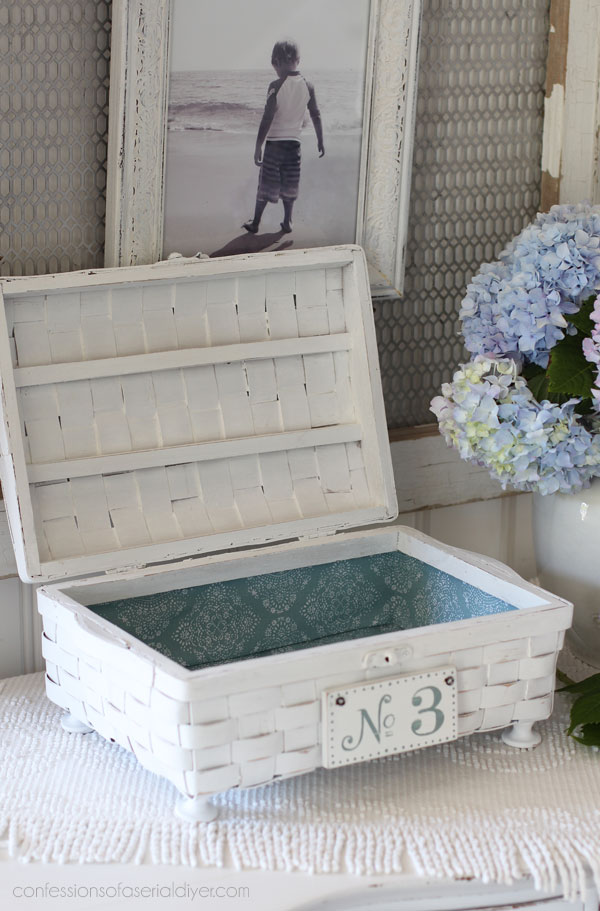
The After:
Here is how this thrift store basket looks now:
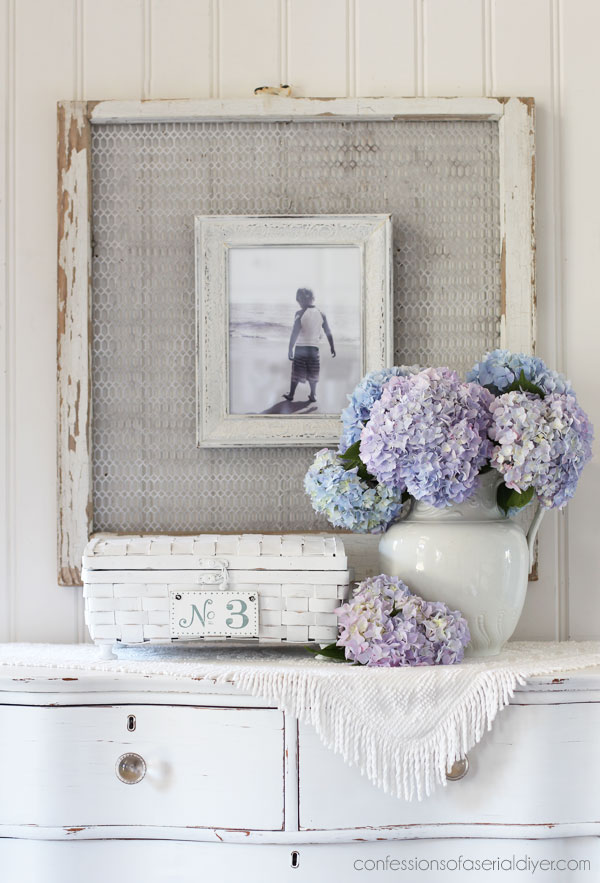
The feet make it so much cuter, don’t you think?
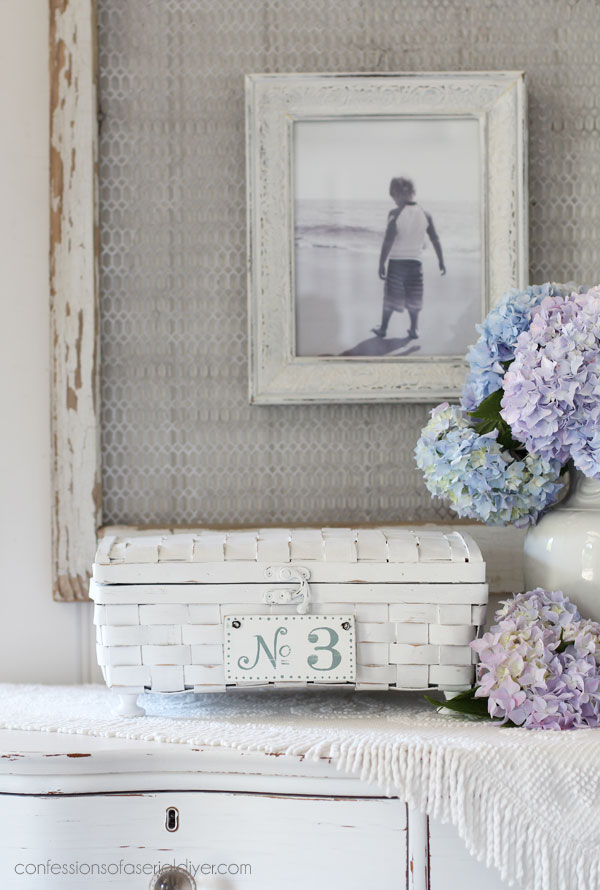
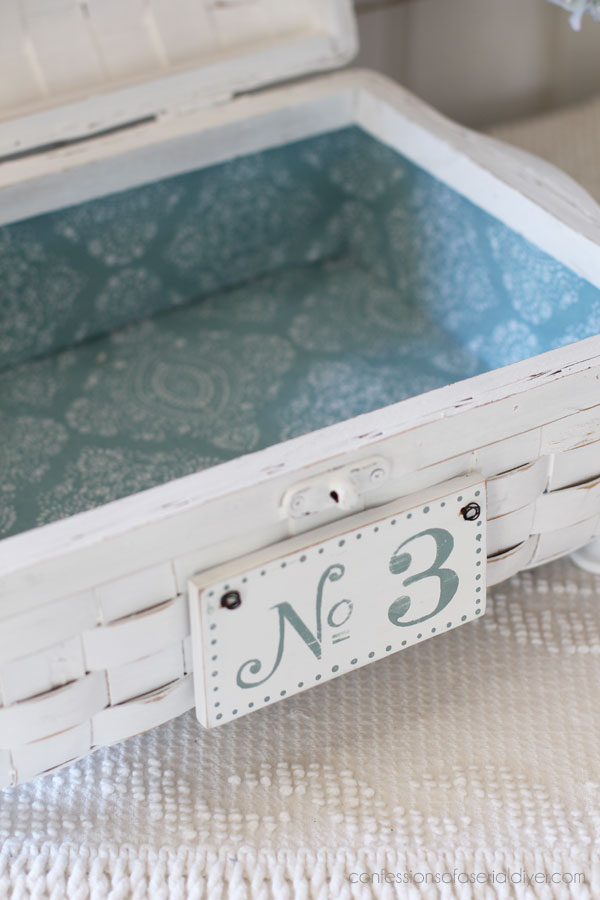
And how about that little sign?

I just made this out of scrap wood I had on hand.
I used small number stencils I purchased from a shop on Etsy, but they are no longer in business. This number stencil set on Amazon is very similar.
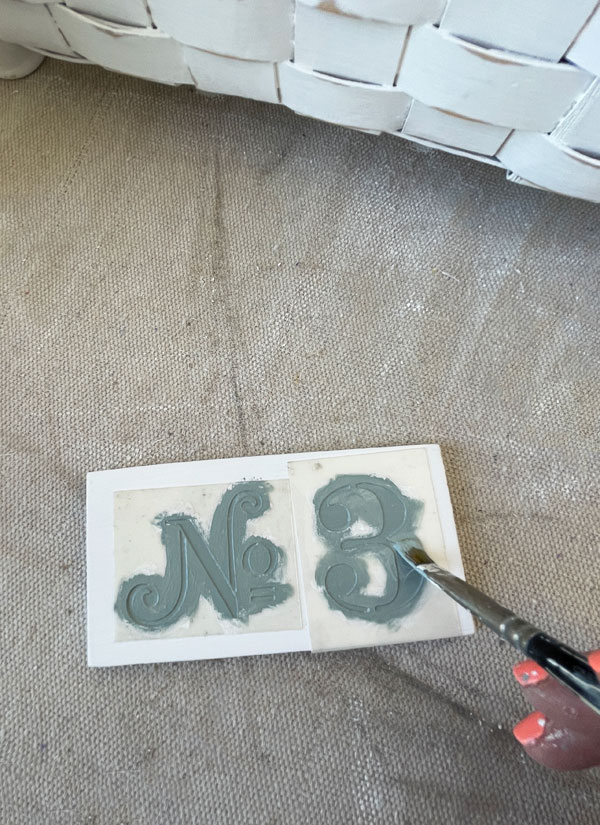
I used a little spray adhesive on the back to hold it in place and prevent bleeding, and then I filled it with Vintage Duck Egg Blue using a small brush.
I added the dots with a stylus and then sanded it to smooth it all out once it was dry.
You can see how I attach my little signs to my baskets with wire in more detail in this post.
I shared two more basket makeovers you might like in that post!
The inside
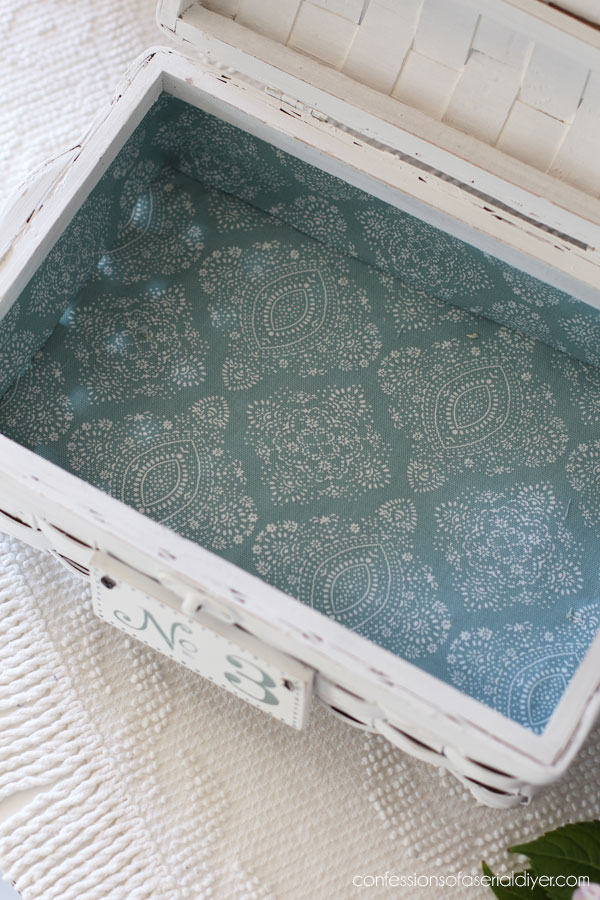
See that pretty fabric liner??
Of course, I had to do something with inside of this one too, and a fabric liner was the best option!
You don’t even need sewing skills for this liner!
How to Make a No Sew Fabric Basket Liner
To make a no sew fabric basket liner, you’ll need fabric, something to cut your fabric, something to measure, an iron, and hot glue.
- First, I measured the circumference of the inside of the basket.
- Next, measured the how deep the basket is. I added about a half an inch to both measurements.
- I then used my rotary cutter and cutting mat set to cut my fabric for the sides of the interior:
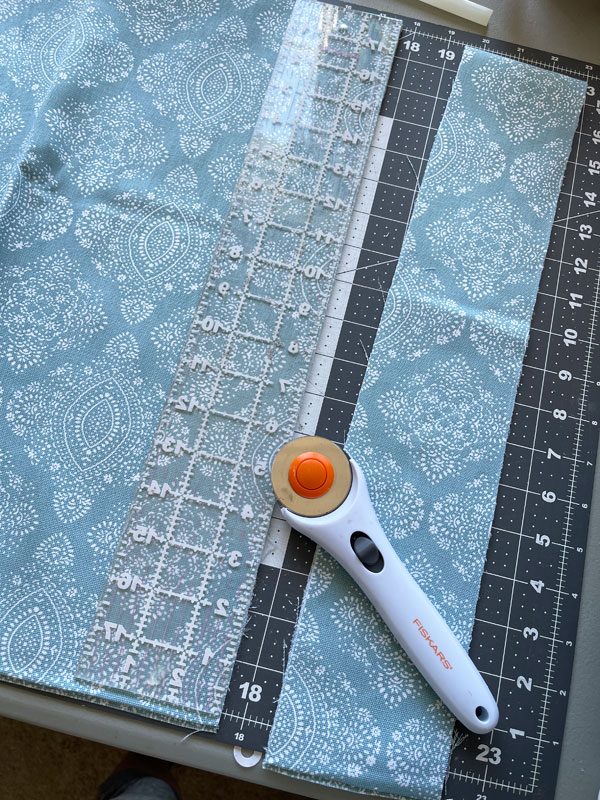
I was able to cut one long band to go all the way around, but you can always hot glue the ends of multiple pieces together if need-be.
- I then measured the dimensions of the bottom, and again, added about a half an inch to both the length and width.
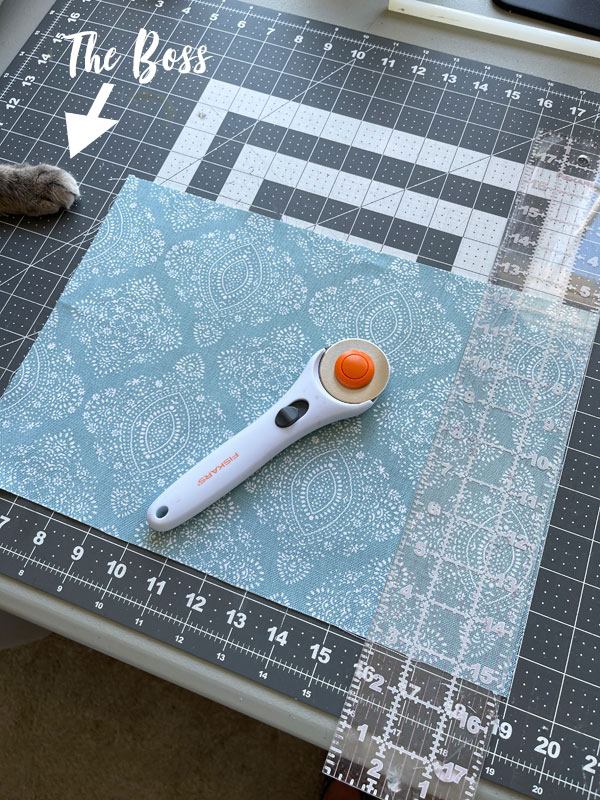
You can see my boss there making sure I do things right!
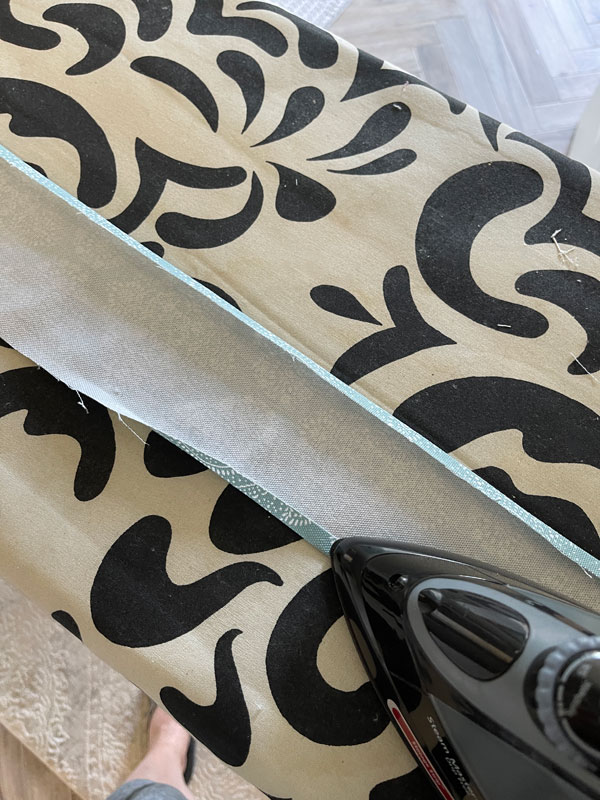
- I ironed both pieces, turning both the top and bottom edges of the side band over about 1/4″:
- Then, I attached the bottom piece first with hot glue:

You can see that it comes up about a 1/4 ” or so up the sides.
- Lastly, I attached the side piece that had been ironed, with hot glue also, starting in the front left corner. I just put hot glue on the top and bottom edges that were folded over.
Tipping it up on the side like this was the easiest way to tackle this step:
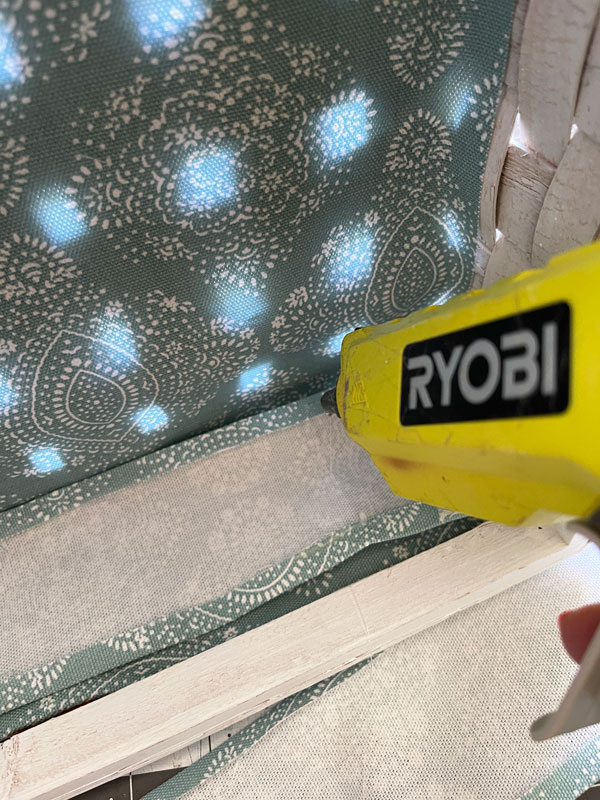
- I added the glue, and then rotated the basket clockwise and pressed the side piece in place.
And that is pretty much it!
As you can see above, where the light was coming through the bottom, there were large gaps in the weave, and small things would have fallen right through.
Not only is the fabric pretty to look at when you open the basket but functional too!
There was a lip on this basket, which made this pretty easy, but if you don’t have that, you would just bring the folded fabric flush with the top edge.
If you do sew, you can see how I line a basket that way also HERE.
It’s always nice to have a NO SEW option though!
If you enjoyed this makeover, you’ll enjoy this one too!
See the after of this ugly duckling HERE!
I’ll be back with the second basket of this set on Thursday:
UPDATE: No need to wait, check out how this basket turned out HERE now!
I hope you have a fantastic week, friends!
XOXO,


Get FREE SHIPPING on all orders over $50. No code needed at checkout! Orders under $50 always enjoy $8 flat rate shipping! Most orders ship same or next business day!
Don’t Miss a Thing!
If you like what you see, there are several ways to follow along!
EMAIL * INSTAGRAM * FACEBOOK * PINTEREST


Mary Kaiser says
Love the feet, it brought it up a notch! It turned out so beautiful, I love how fresh and clean it looks now with the white. White is so great because you can use it in any room and it will fit in so well!
Christy says
Thank you, my friend! I thought the feet would be fun! And yes, white can fit in anywhere! XOXO
Jenny says
Adorable!! Feet are too cute & fabric (no sew) is such a pretty choice. 🙌❤️
Christy says
Thank you, Jenny! XOXO
Janice Holt says
What a great job on the basket. Love the inside also and the little sign on the outside. Another great job as usual.
Christy says
Thank you so much, my friend! XOXO
Christina says
Oh this is super cute! I get it sells very quickly in your booth.
Christy says
Thanks, Christina! Fingers crossed! XOXO
Ei Con says
A tip for your readers. Keep an eye out for TV swivel stands while out thrifting. They’re much bigger and sturdier than a kitchen lazy Susan and since they’re built to hold an old tube tv, can even support heavy items like an end table. I got mine for $4.99. Best find ever.
Christy says
Ooh genius! Great tip, thanks! XOXO
susan says
Love the little feet on the basket! Too cute! I’ll hav3 to remember that one!
Christy says
Thank you, Susan! I’m glad they worked out as well as they did! XOXO
Niki says
This little basket is cute Christy. I like the blue fabric inside, and think this would be perfect for the nursery of the 3rd little boy in a family. Too bad mine is 13. I also think it needed the added hight of the legs.
Christy says
Thank you, Niki! It sure would! And aww…your baby isn’t a baby anymore…my youngest will be 12 this summer. It’s bittersweet for sure! XOXO
Denise Cox says
Sooo pretty and the feet and liner add personality!!!
Christy says
Thank you, Denise! XOXO
Kddomingue says
Cute as the very dickens!
Christy says
Thank you so much, Kd! XOXO
Elonda Power says
Hello Christy,
Just wanted to say what a pleasure it is to watch you do your make overs on so many different furniture items. The 30 make overs in 30 days I learned so much now I’m so ready to do some of my own. (including my kitchen cabinets.)
Thank You, Elonda
Christy says
I love hearing that, Elonda! Thank you! And I’m so glad you enjoyed the 30 day series! Happy creating! XOXO
Cyndi says
That is so darned cute! You make doing the fabric liner look easy. I might have to actually try it. 😉
Christy says
Thank you, Cyndi! It is! And with hot glue, if you don’t like how it looks, you can easily pull it out and redo it! XOXO
Rebecca Payne says
GORGEOUS!
Christy says
Aww thank you, Rebecca! XOXO
Debra Hubbs says
This came out so cute. Love the feet and the fabric.
Christy says
Thank you, Debra! It just seemed like it could really use some feet lol! XOXO
Kat says
Where do you do your thrift store shopping?
Christy says
Hi Kat! Are you local to the Virginia Beach area? I shop mostly at Goodwill and the DAV. I have the best luck early in the week…usually I stop in on Tuesdays. XOXO
Michele M. says
Oh, Christy – she is a total cutie! I love the fabric you choose, too.
Christy says
Thanks so much, Michele! I had forgotten I bought that fabric a while back for another project, so I was tickled to find it again! XOXO
Marietta-again says
How I love thee…baskets. Your fabric liners-THEEEEEEERRRRRY’RE GREAT!!!
Christy says
Thank you, my friend! Ha ha! XOXO
Michelle Leslie says
Beautiful, Christy. The fabric liner takes the basket to a whole new level and that little sign finishes her off perfectly.
Christy says
Thank you so much, Michelle! XOXO
Bonnie says
I am a sucker for baskets. Have them everywhere. This one took on a whole new attitude. Great job
Christy says
Me tooooooo! I have such a hard time passing them up! Thanks, my friend!! XOXO