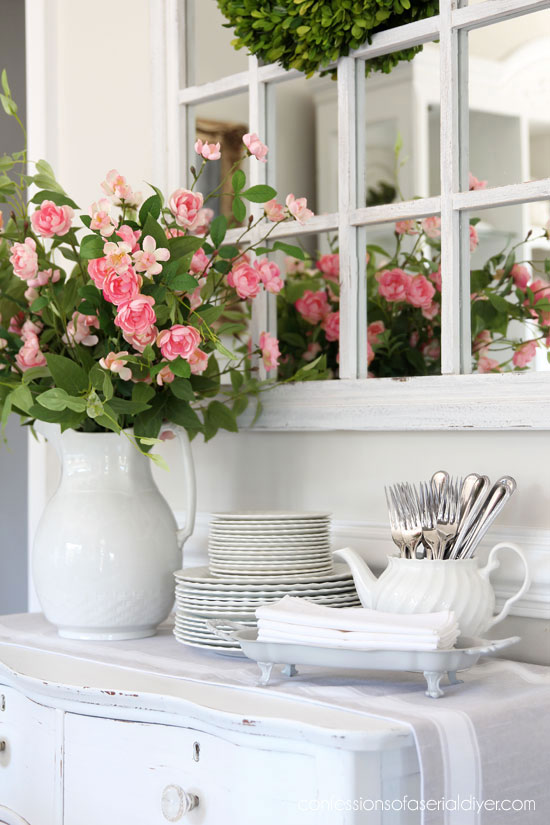
Hello awesome friends!! Welcome back! Today I’m sharing another round of smalls!
These are all projects from the past that I have shared before, but they are super simple makeovers anyone can do:
Enjoy!
Mini Makeover #1
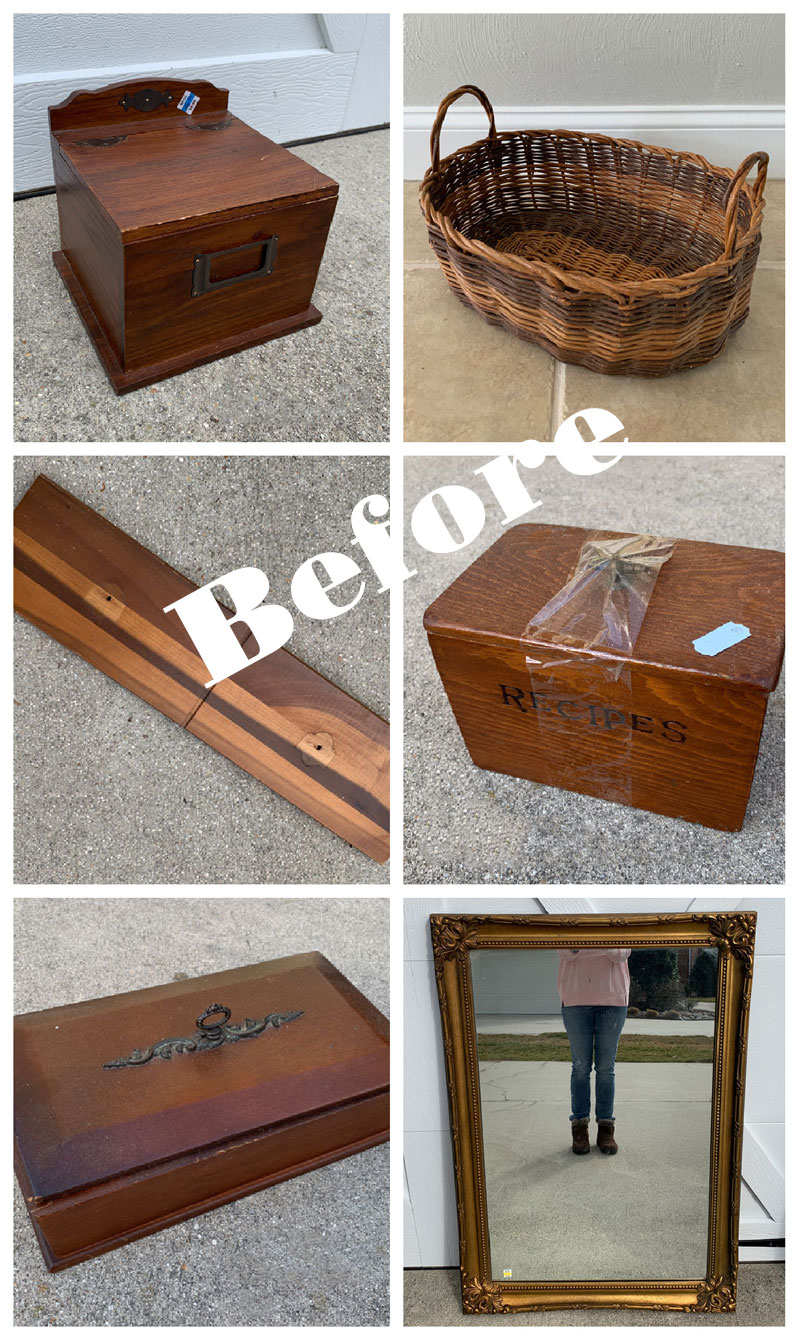
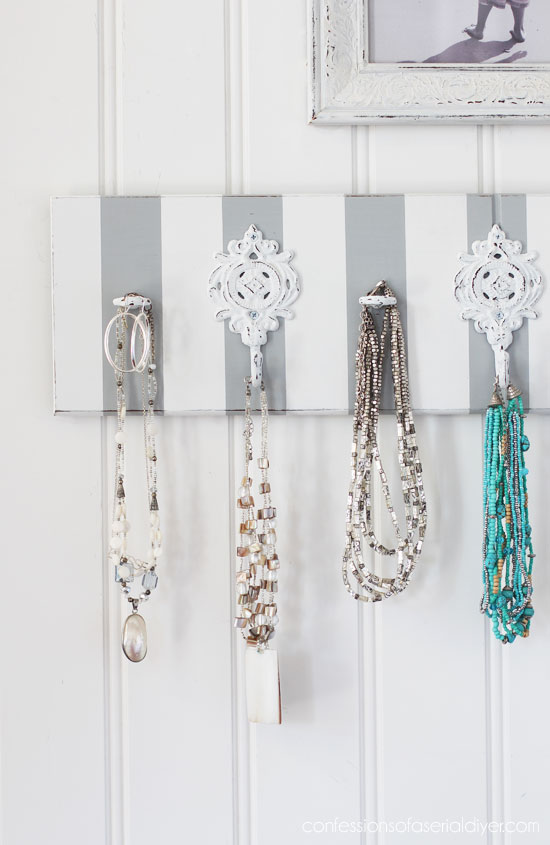
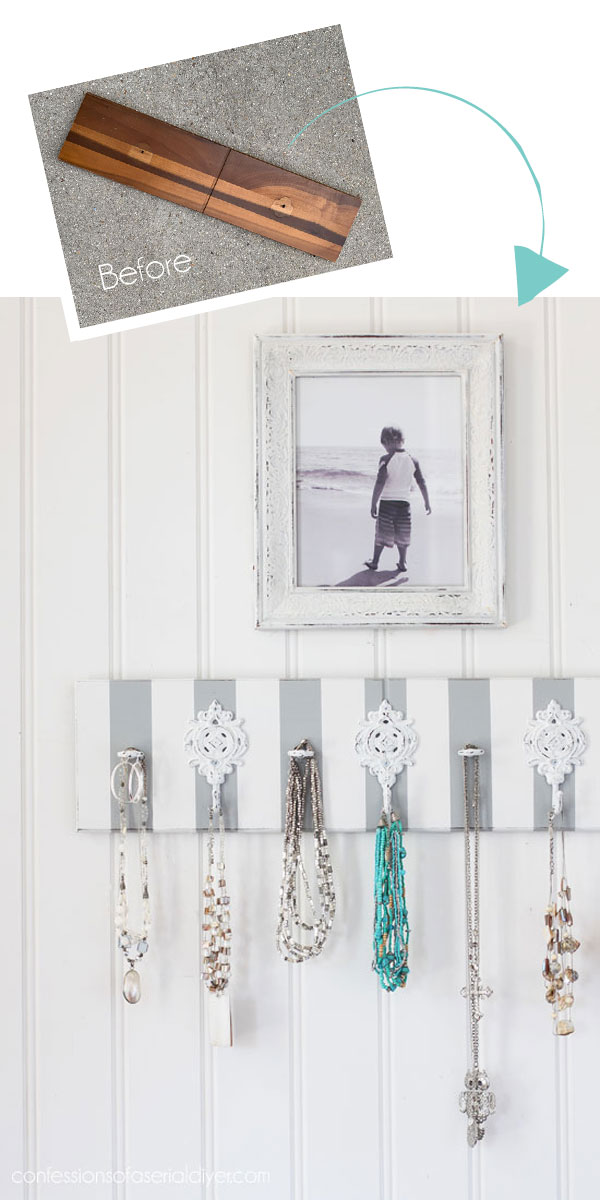
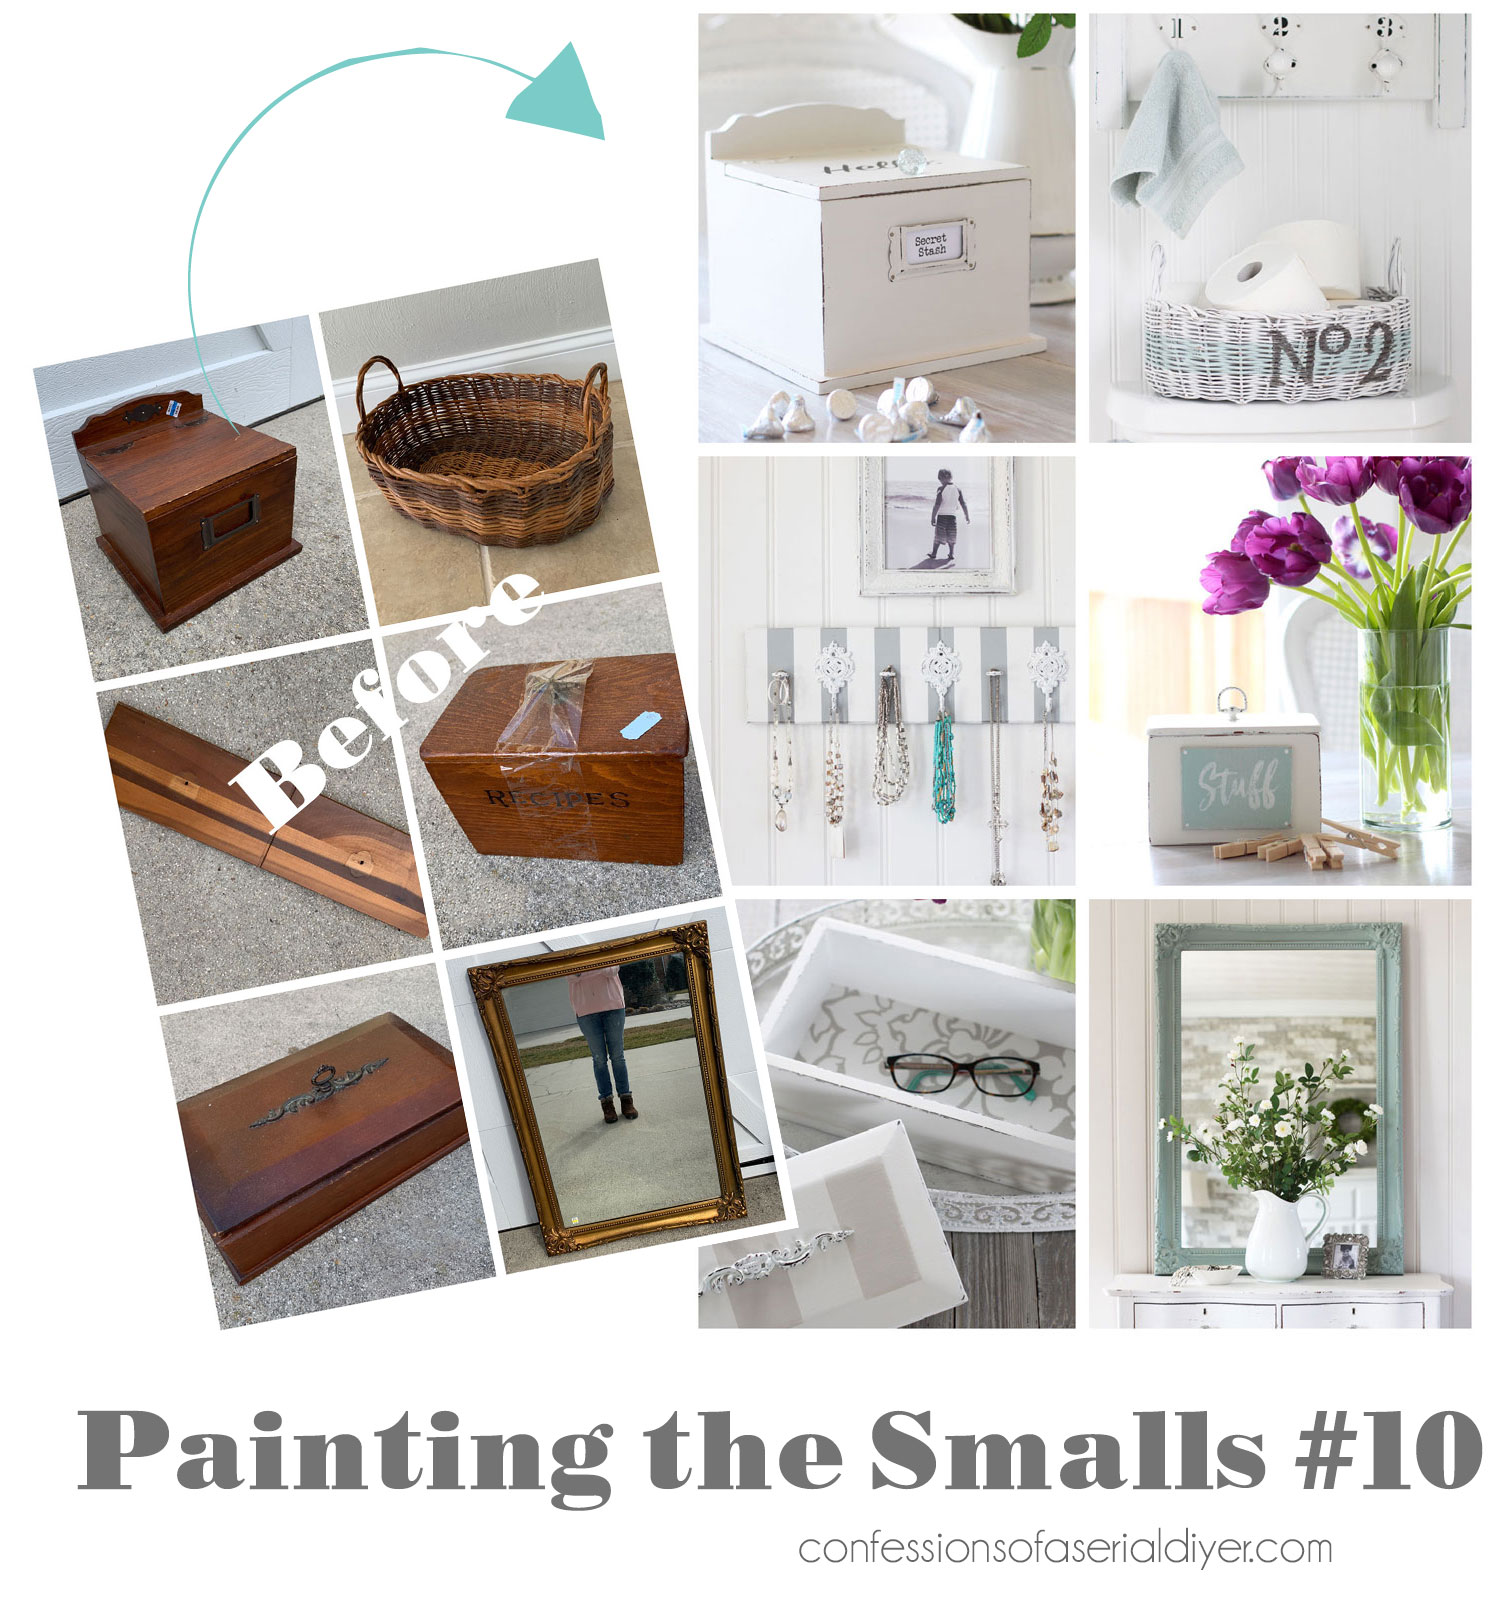
I’m starting today’s smalls off with this drawer front that came off of a dresser we got from Hubby’s Grandma:
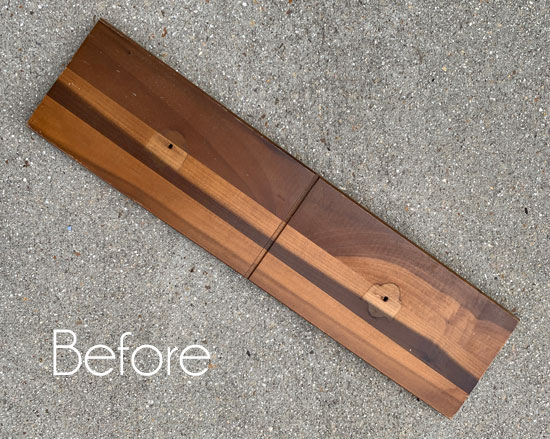
The dresser wasn’t in the best shape when we got it and had quite a bit of mold growth on it that we didn’t realize it had, so I ended up just keeping this drawer front and the hardware.
I’ve included a few affiliate links so you can find the products I love.
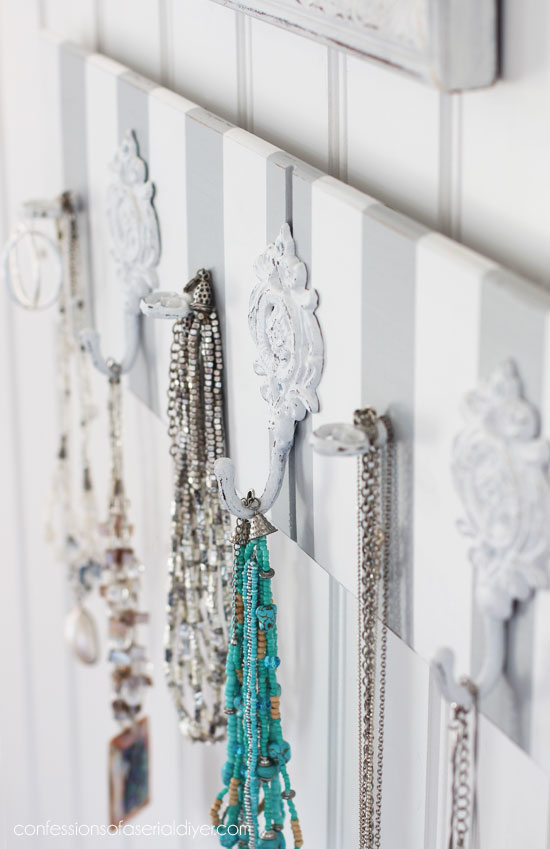
I went gray on this one using a 50/50 mix of Dixie Belle Manatee and Cotton:
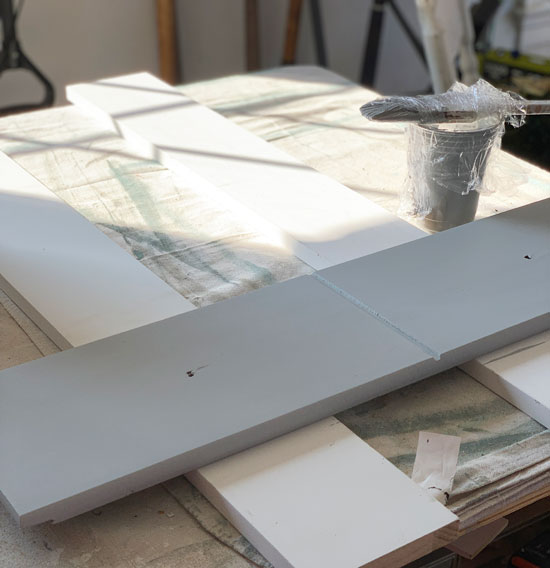
I grabbed my favorite tape for adding stripes, FrogTape for delicate surfaces, and striped this one in vertical stripes:

See HERE how I measure out my stripes…it uses zero math! I gave each stripe two coats of Dixie Belle Cotton and then pulled the tape off while the paint was still wet.
I lightly sanded with 220 grit sandpaper and sealed with Dixie Belle’s Clear Coat in Satin using their sponge applicator. (See how I apply it HERE.)
I found these hooks that I had painted in Cotton, but I also found a few more pieces of hardware that I had removed from another project (free!) and gave them a couple of coats of Cotton as well. I used the end of my putty knife to add some distressing…
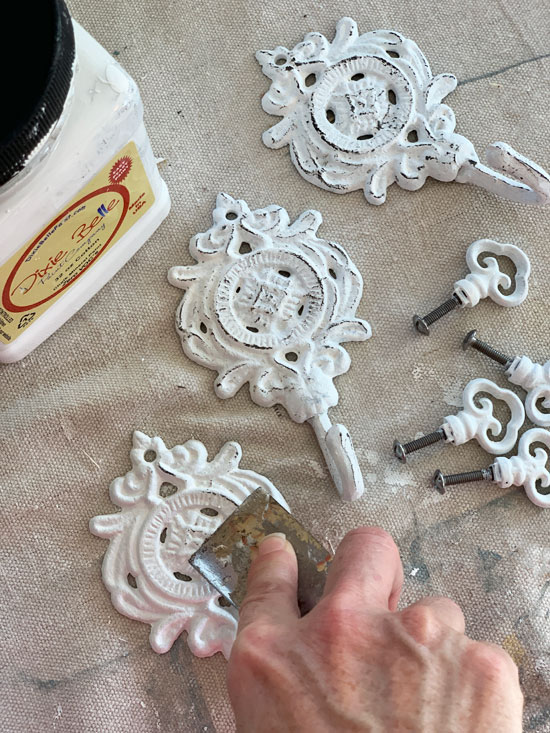
You could totally use spray paint here, but I like the texture of the chalk paint and it distresses easily.
Then I added them to my drawer front to make a one-of-a-kind necklace organizer:
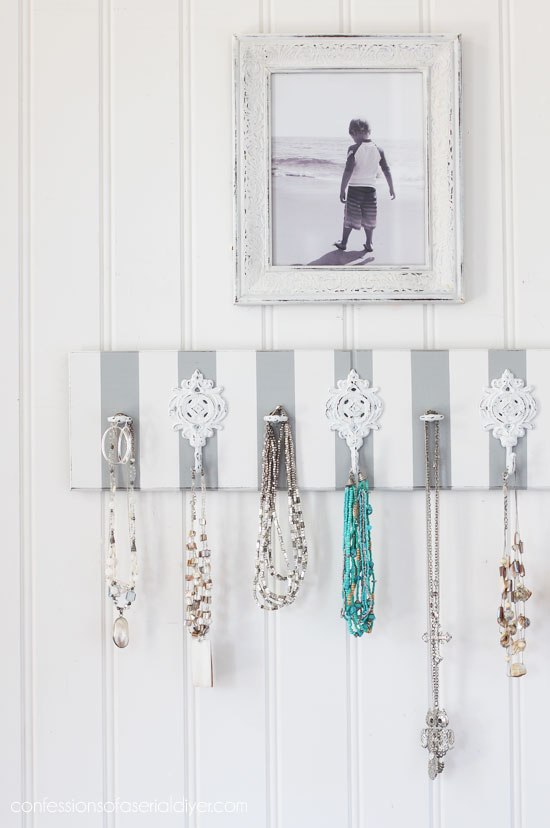
These hooks that I used came from Hobby Lobby and are super affordable:
They started out dark before I painted them.
The other small hardware pieces are quite pretty, but it’s hard to see any of that detail head-on:
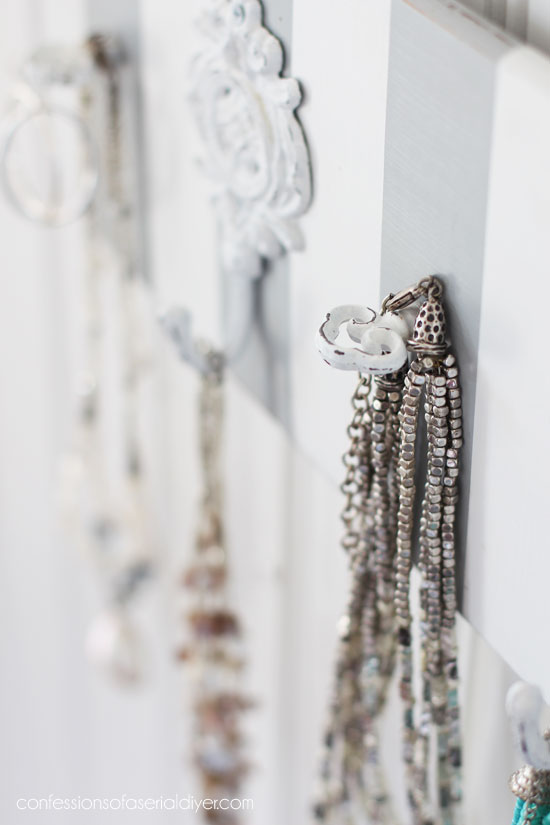
These were a lucky find in my stash and didn’t cost me anything!
This is a great way to keep all those necklaces from getting tangled and can easily be hung in a bedroom, closet, or even on a door using heavy duty command hooks to hang it.
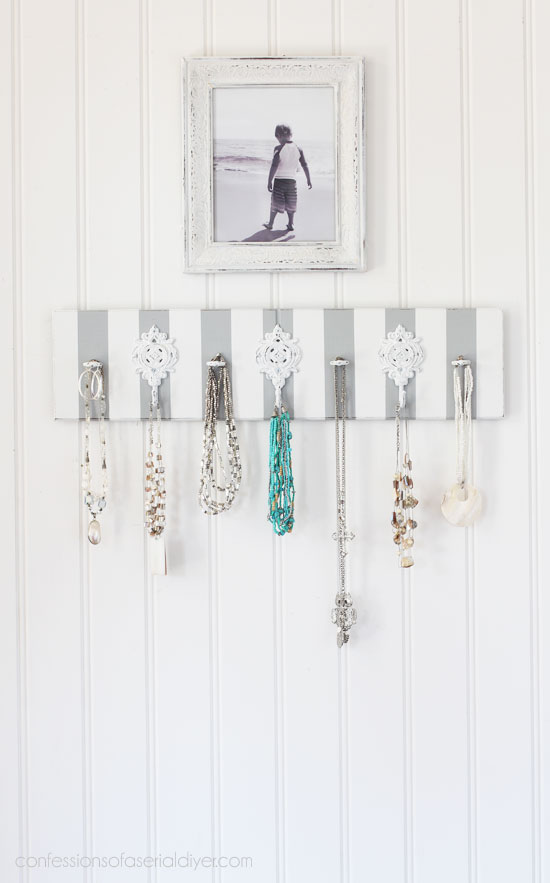
This was a super simple project you could do even just using a piece of 1X6, or you could use an old cabinet door as well.
Mini Makeover #2
The next two pieces aren’t in the graphic above, but they are super simple and quick and so I included them as well.
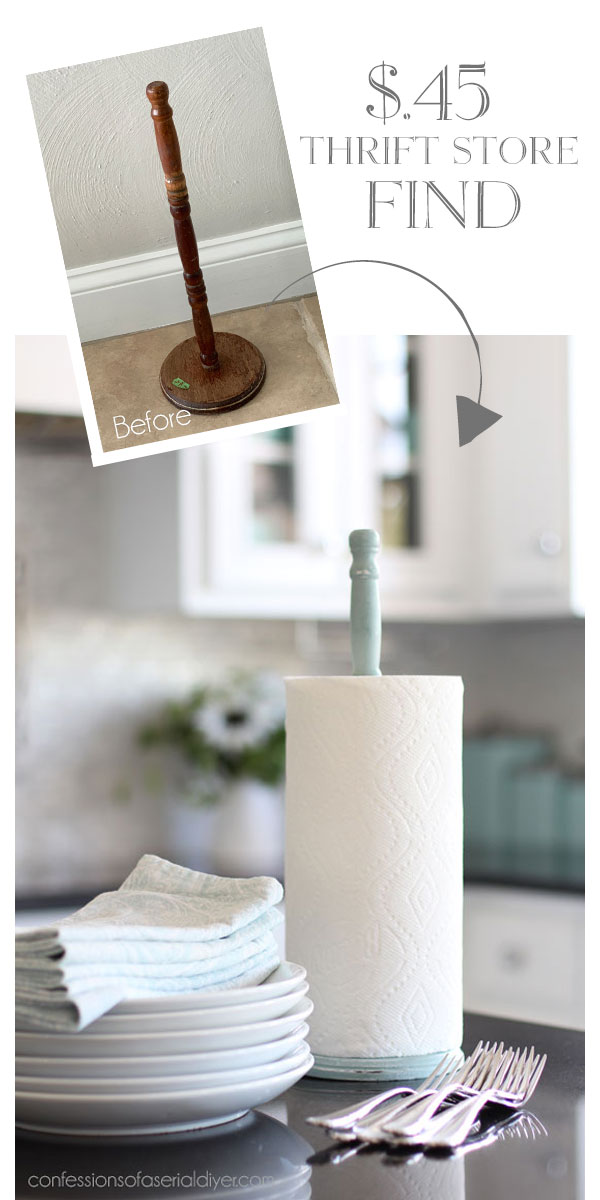
I picked up this paper towel holder forever ago, and it had been hanging around for way too long. So, I finally decided to throw it in with one of my hauls to get it done!
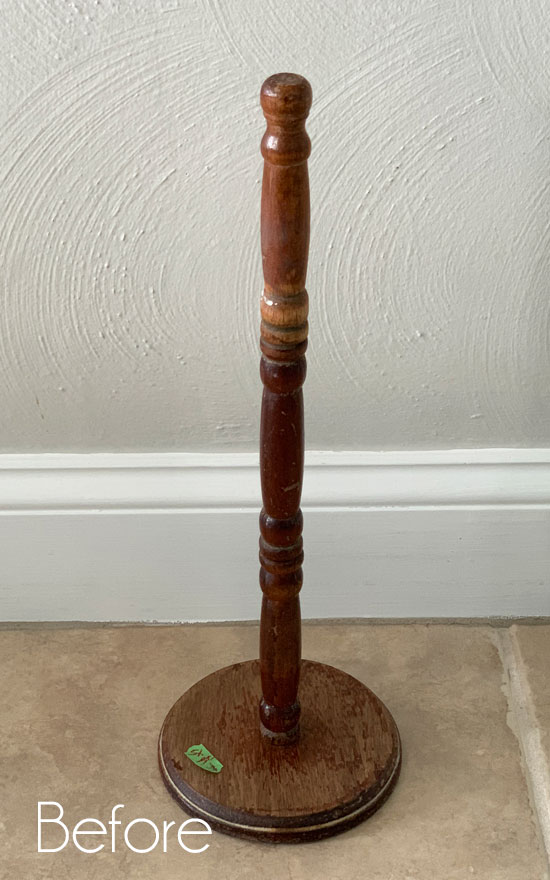
Pretty sad looking, huh? I paid 45 whole cents for it and figured paint might do something for it.
And it sure did!
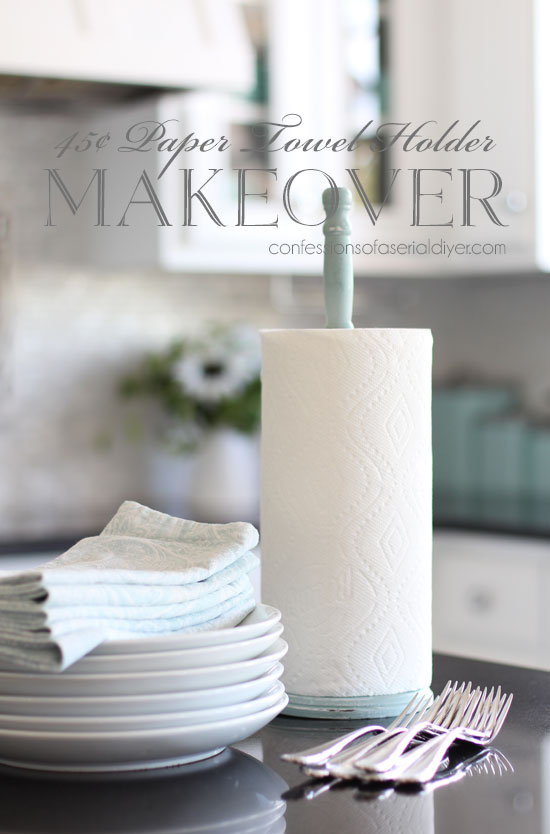
I guess the napkins in that photo are a little redundant, huh? I mean if you have a giant roll of paper towels right there…It would be perfect to put on the table at a cook out though, right?
I sanded the base that was flaking first, and then I spray primed it white. I wanted a little white to show through. Then, I gave it a coat of Dixie Belle’s Vintage Duck Egg Blue.
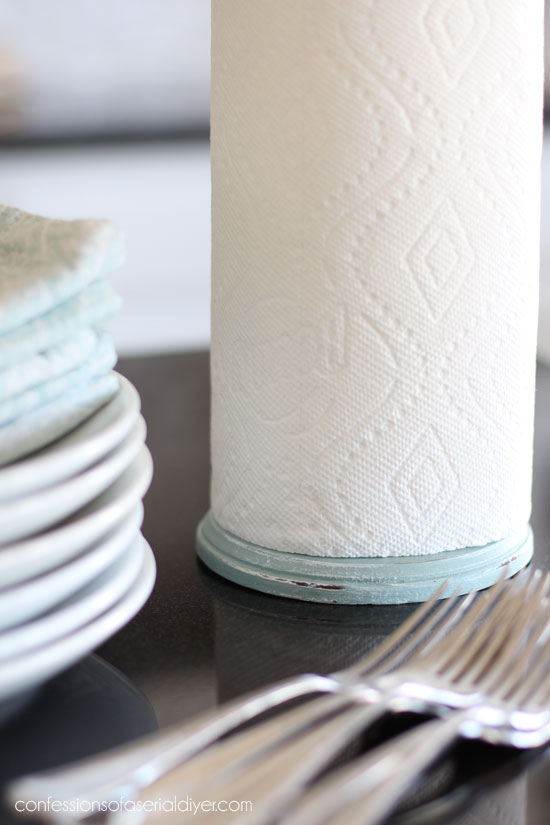
This also got a light sanding and a coat of Dixie Belle’s Clear Coat in satin to seal.
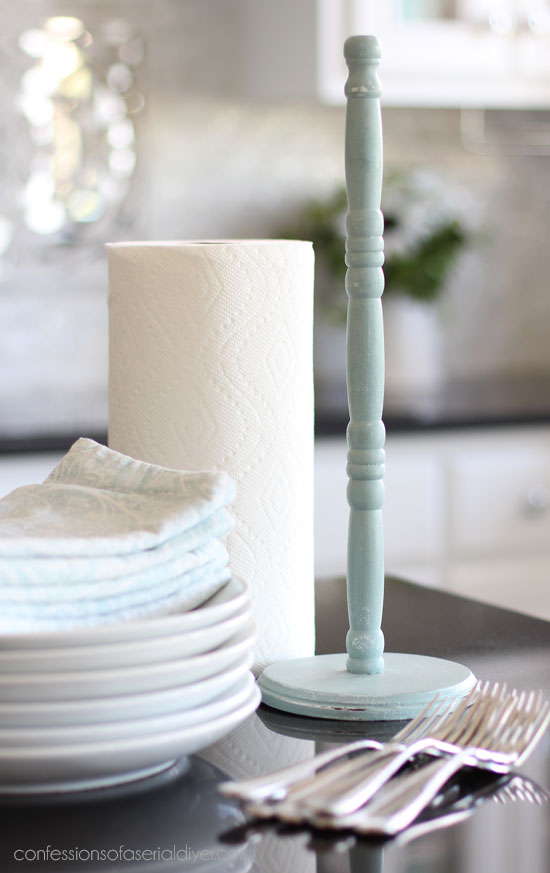
I’d say that’s 45¢ well spent!
Mini Makeover#3
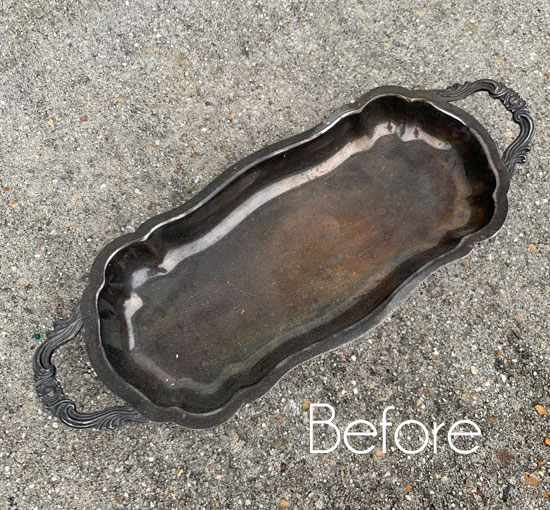
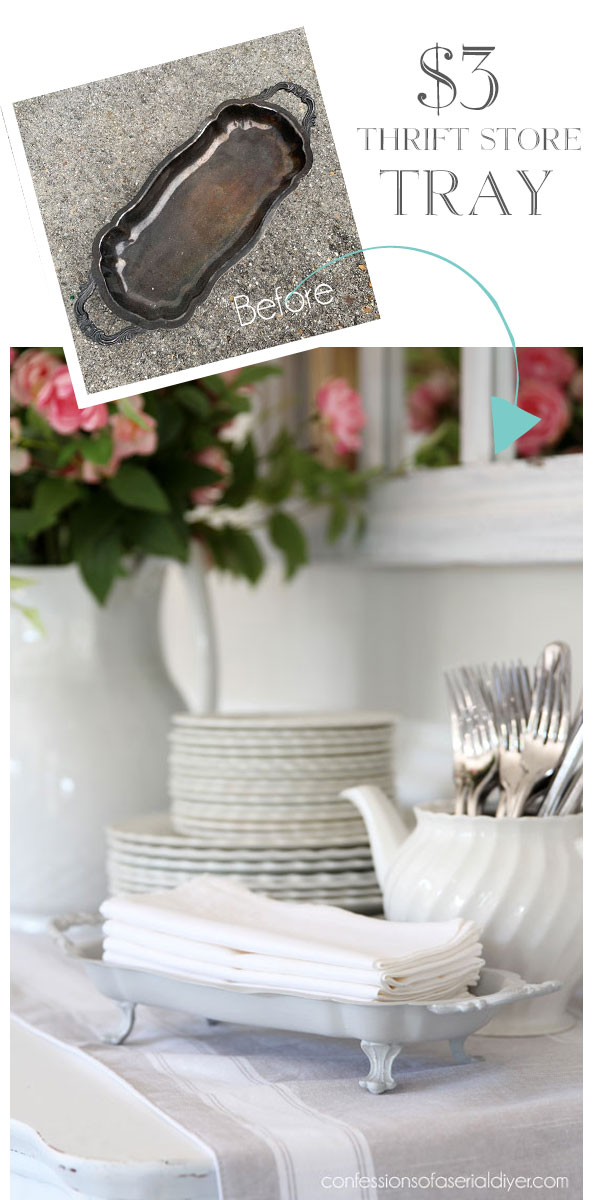
This petite tray is another simple one that I found while thrifting with Nancy:
You can see me finding it here in this video if you like:
(See how I redid that chair I found HERE!)
I chose to give this tray a simple paint job:
I started with a good cleaning. Then I primed with Rustoleum’s spray primer using my small spray shelter to keep the spray contained.
I gave my tray plenty of time to dry and then painted it in two coats of Driftwood mixed with 30% Cotton.
I love this color combo…it’s like the perfect neutral!
I lightly sanded it and sealed it with Dixie Belle’s White Wax so I could leave some in the crevices of the handles and feet:
A little tray like this could be used for so many things!
Mini Makeover #4
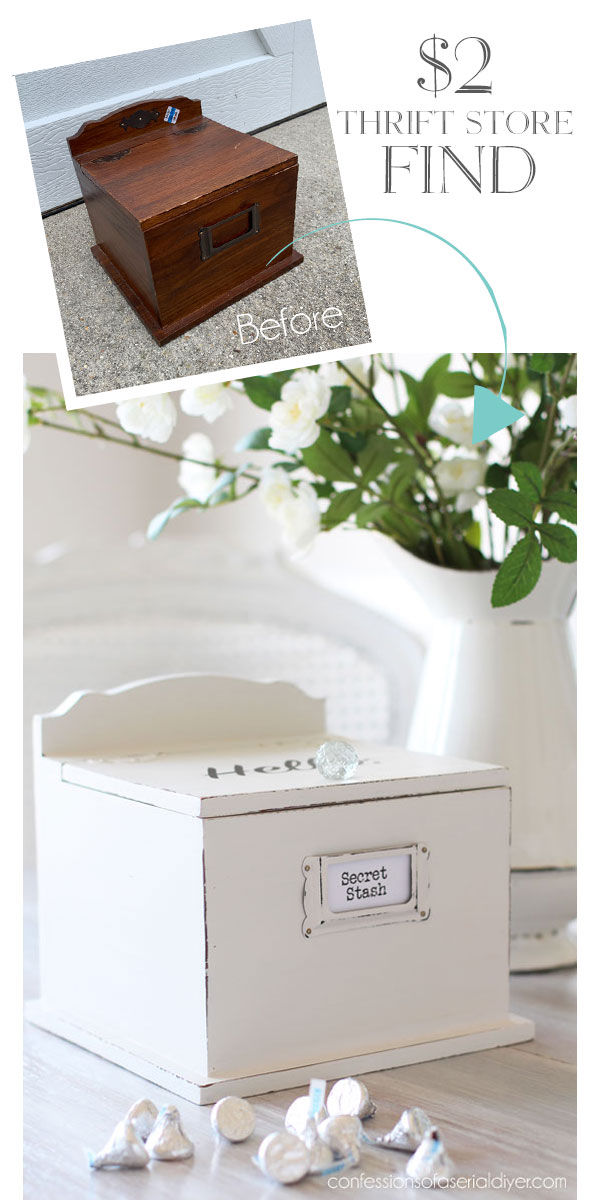
I knew this next piece had potential as soon as I spied it at the thrift store on another one of my trips with Nancy:

It was marked down twice to $1.98…what a deal!
It got a simple makeover…

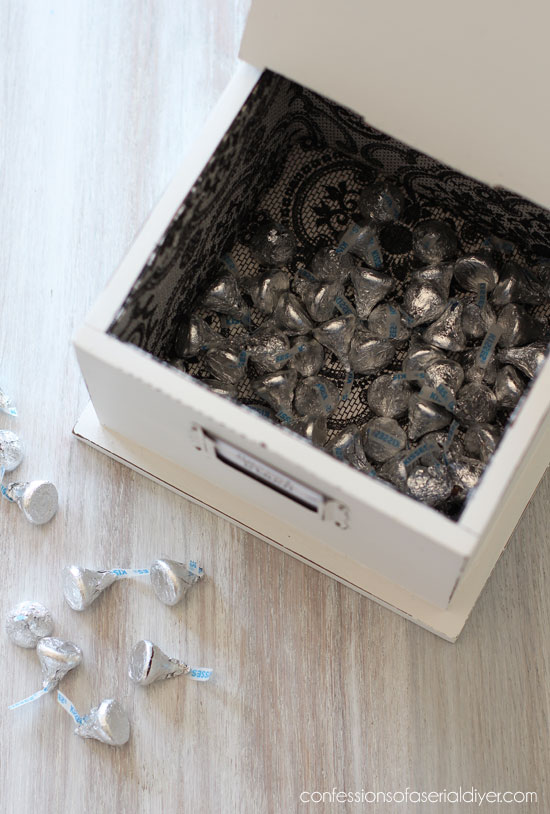
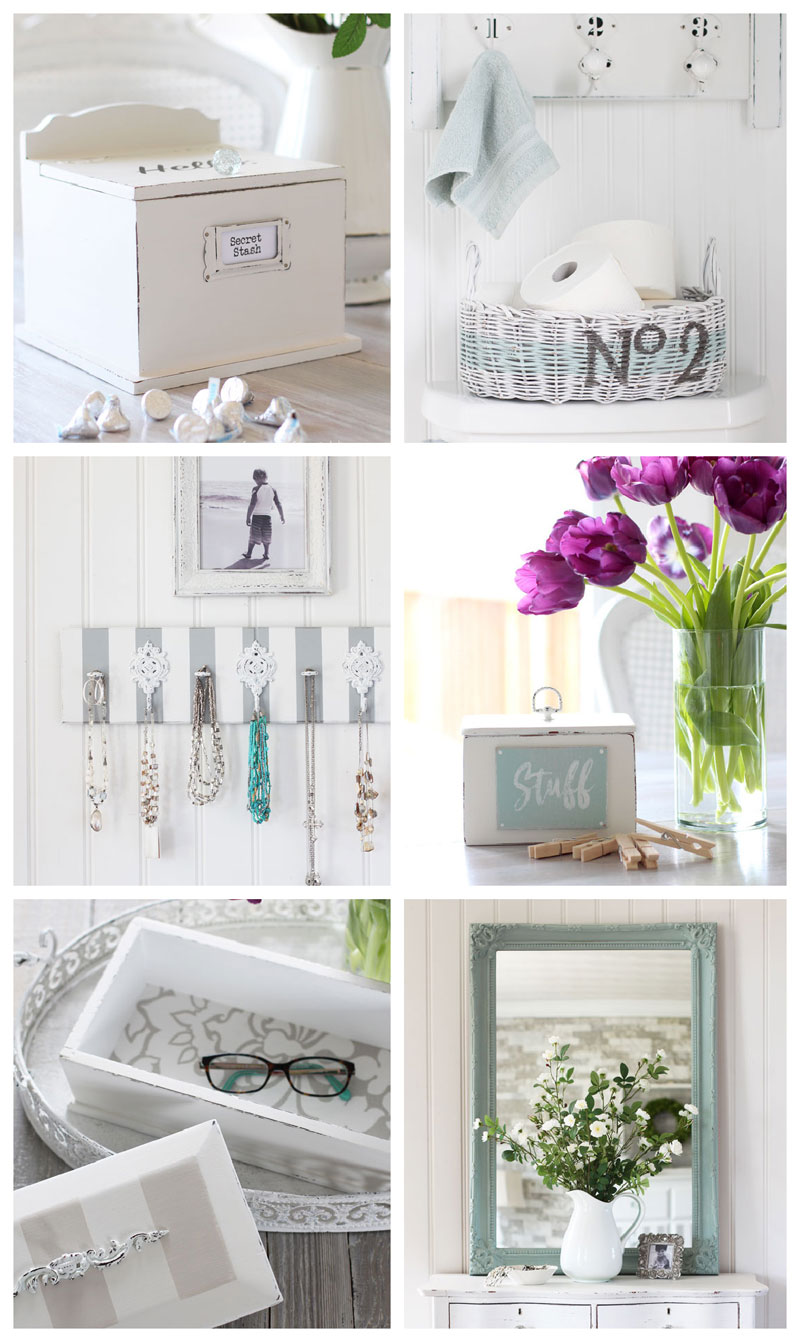
Who couldn’t use a box to hide their secret stash?
For this one, I used Fluff by Dixie Belle. Then I used my Silhouette to cut out the word Hello on contact paper…

I used a small brush and black craft paint to fill it in.
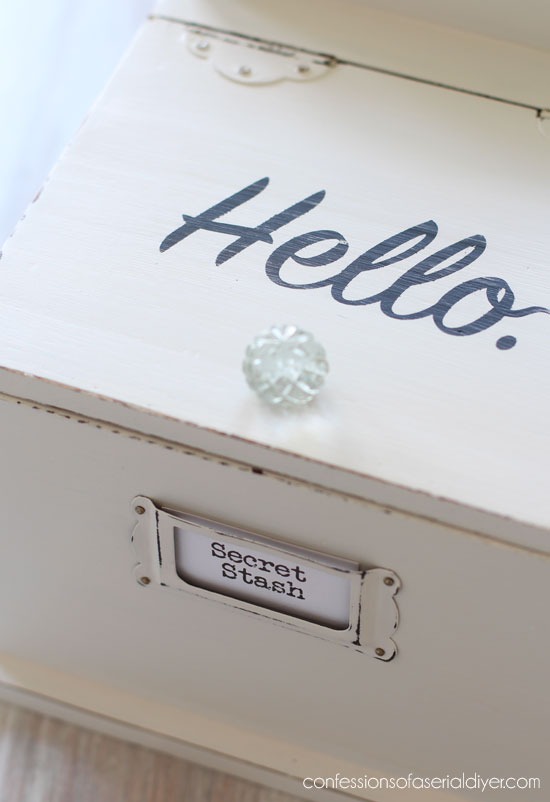
Well hello to you too!
When it was dry, I sanded it all over with 220 grit sandpaper and sealed with Satin Clear Coat using DB’s blue sponge to apply it.
Then I added a little glass knob from Hobby Lobby, and printed out a tag for the front using the Veteran Typewriter Regular font.
I guess it’s not so secret though if I put that right on the front, eh?
Simple, but definitely better than the original, don’t you think?
Mini Makeover #5
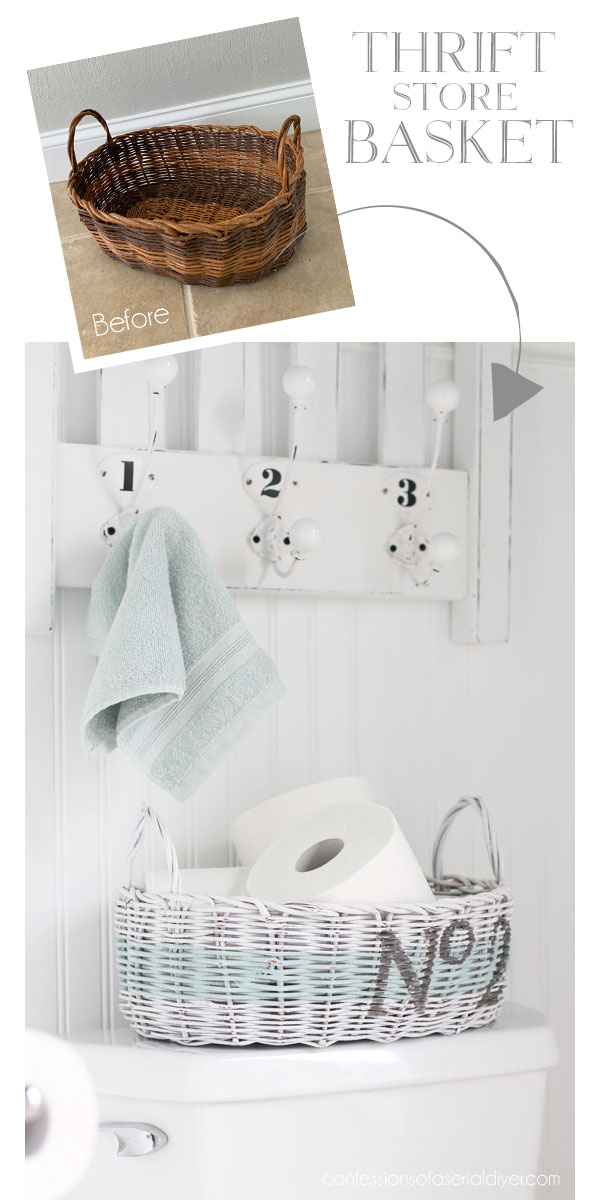
What would a smalls round up be without a basket? I picked up and stored this one so long that I forgot where it came from or how much I paid for it:
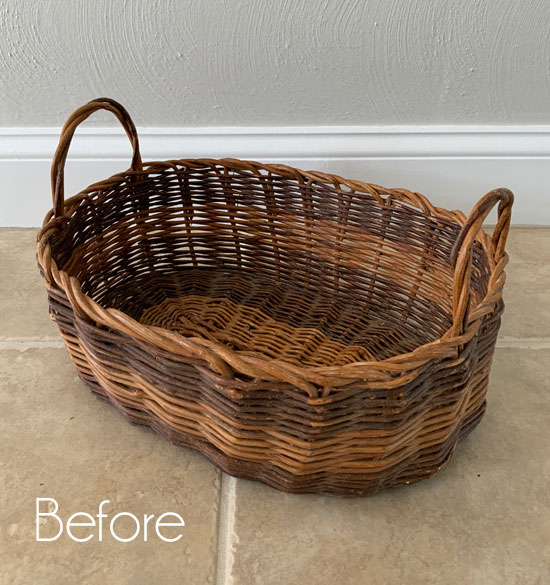
I’m sure it wasn’t much because I’m cheap like that. I tried to flog it at our annual yard sale last year for a dollar just to get it out of the house…
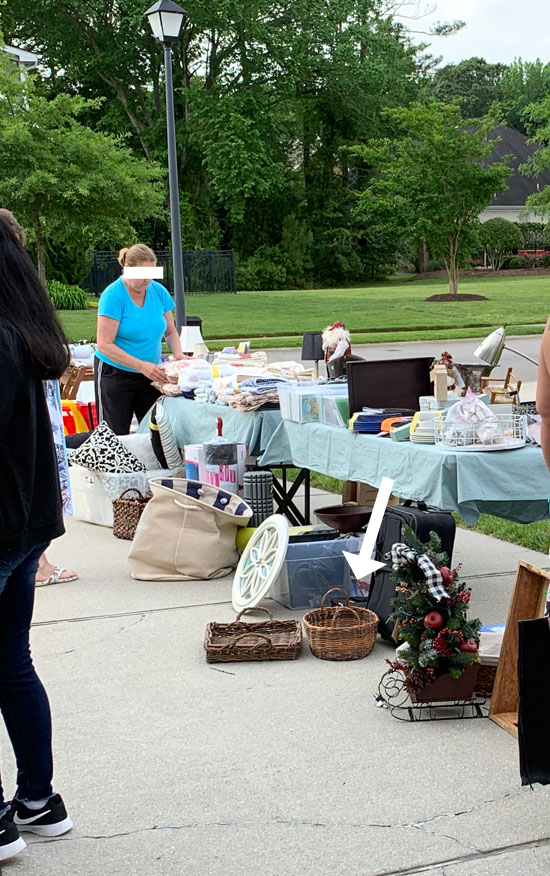
But no takers! (See more pics from our yard sale at the bottom of THIS POST.)
So, I decided to keep it and finally redo it.
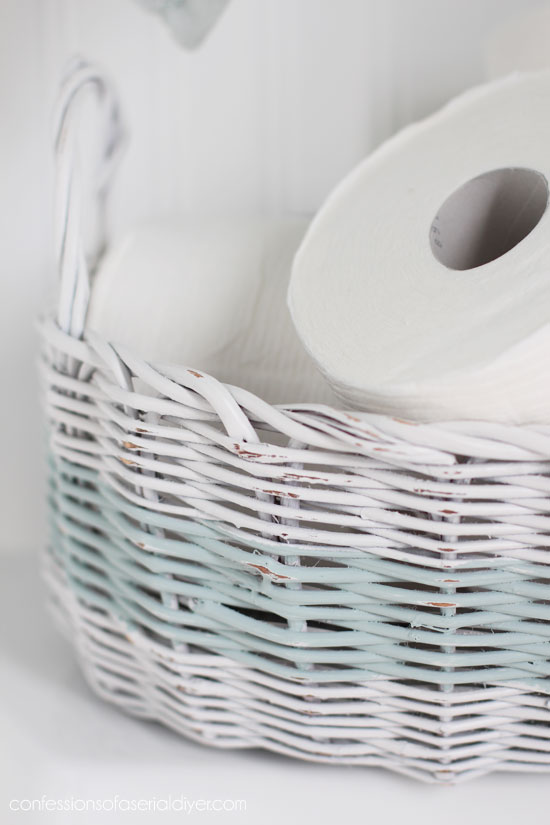
And here’s how it looks after a little love:
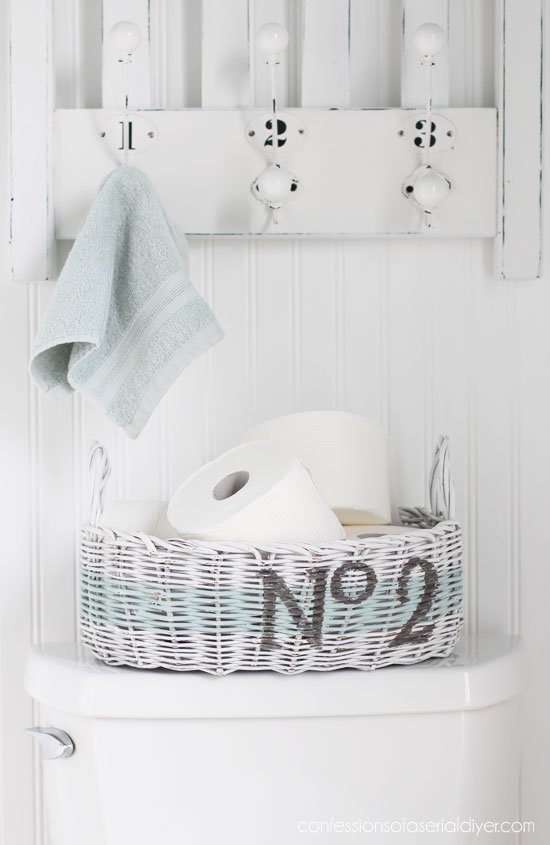
It’s perfect for holding a few spare rolls of TP!
Heh heh…No 2…on a basket holding toilet paper.
To redo this one, I brought out my small spray shelter and spray primed it first using Rustoleum primer:
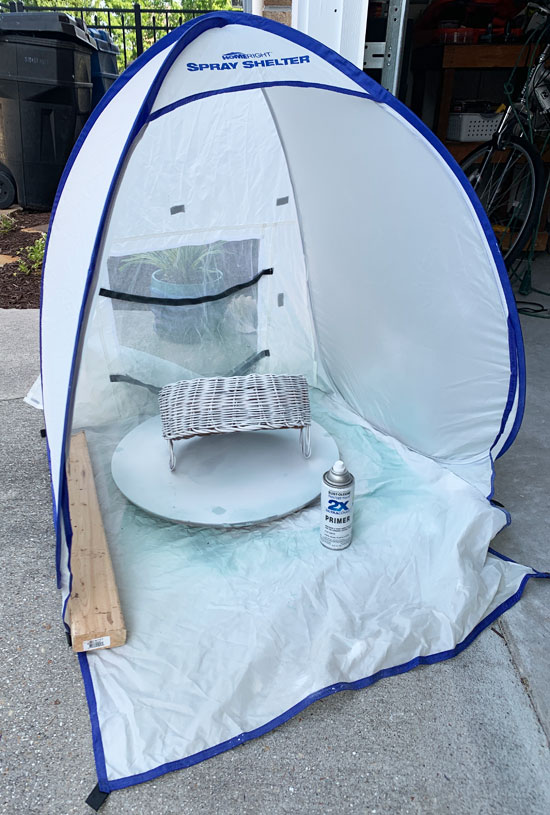
I sprayed it upside down first, then right-side-up.
You could just spray prime and be done with it as I often do with baskets, but I decided to go ahead and spray paint over the primer for a little sheen using Rustoleum’s Satin White spray paint. Always prime first so your finish doesn’t flake off over time.
I used FrogTape and a brush to add the stripe:
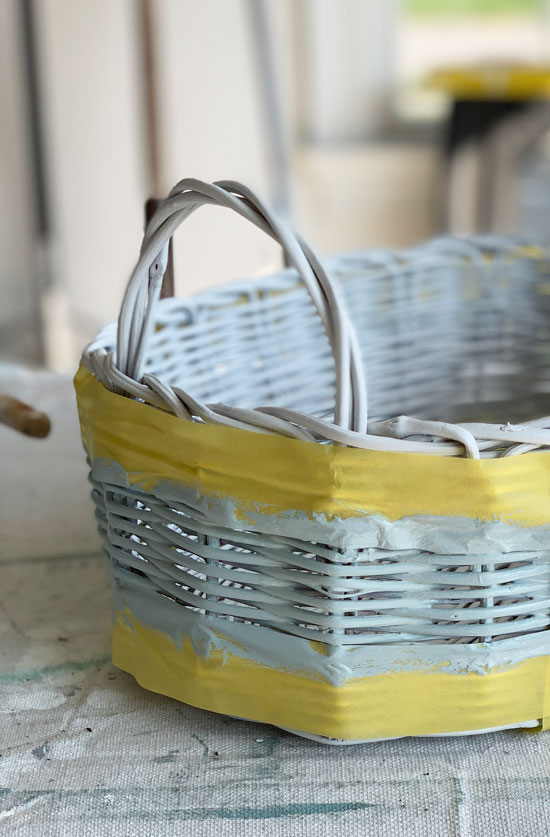
The color I used is Vintage Duck Egg blue that I had mixed 50/50 with Cotton.

Then I used this stencil, Hurricane Gray by Dixie Belle, and a small brush to add the “No 2”.
I gave the surface a quick sanding with 220 grit sandpaper and called it a day.
Mini Makeover #6
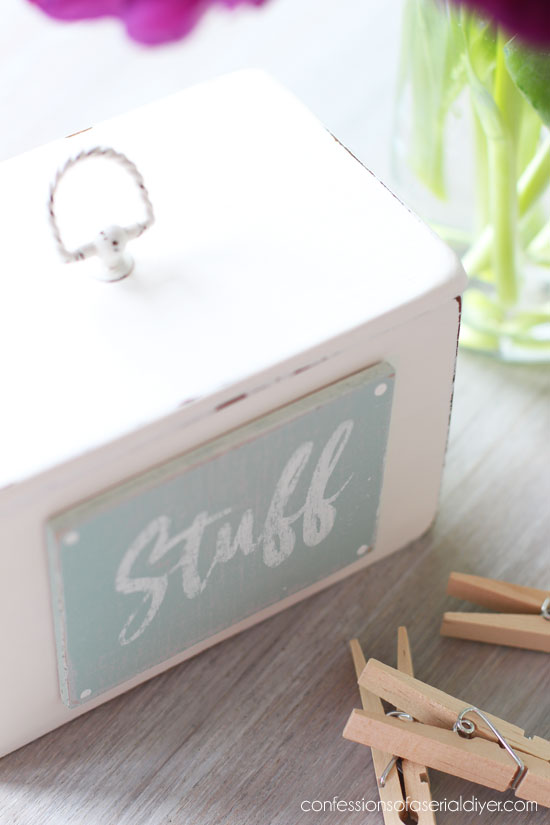
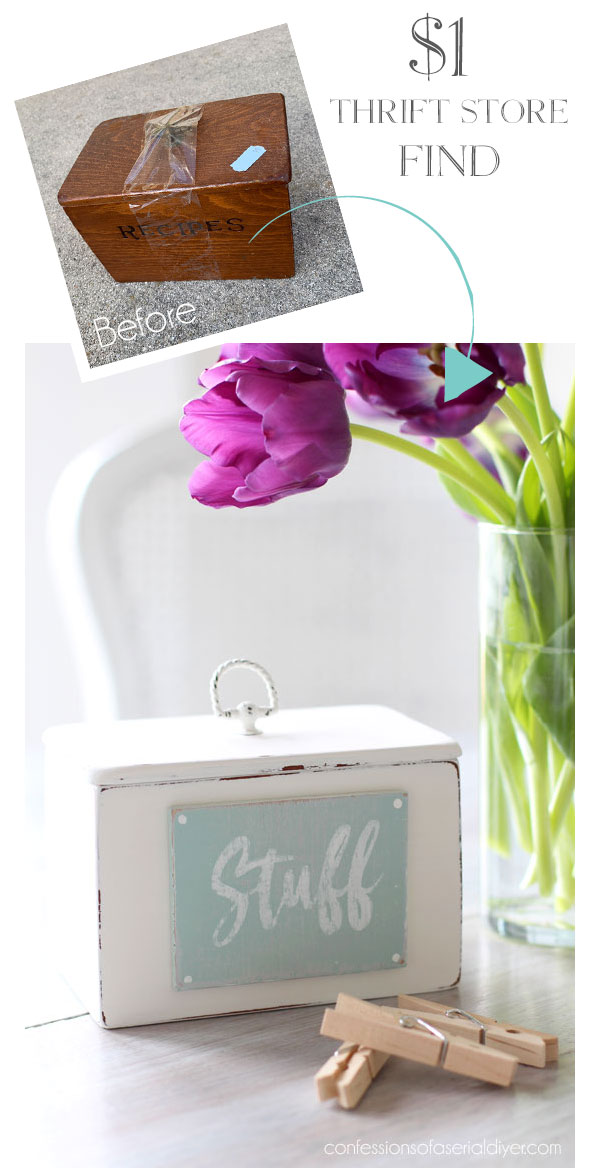
Every so often, I come across these little recipe boxes, but with the word recipes carved into the front, I usually pass on them. However, this one was only a dollar, so I picked it up:

Personally I prefer hand-written recipes or recipes that I have printed out rather than trying to follow them on my phone or iPad, but sadly these little boxes just aren’t the kitchen staple they once were.
I decided to change it up so it could be used anywhere:
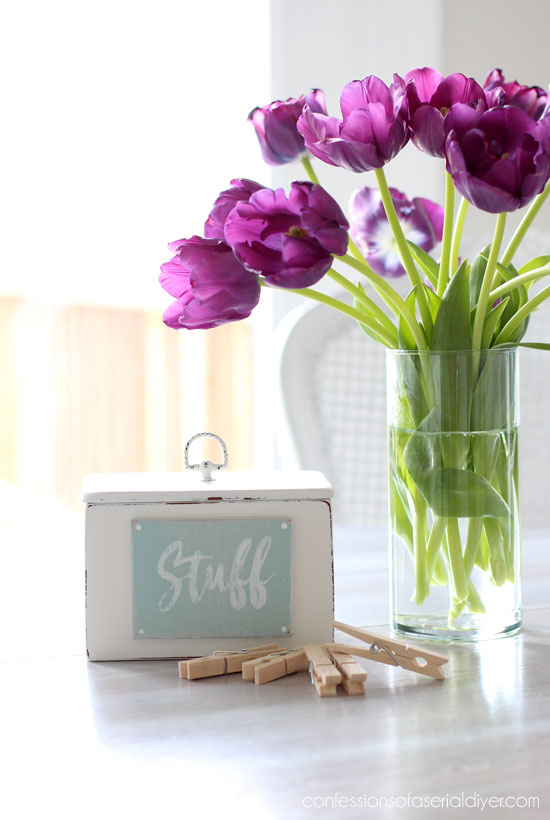
I cut out a piece of luan with my miter saw and covered right over the word Recipes. Now it can hold just about anything that can fit inside!
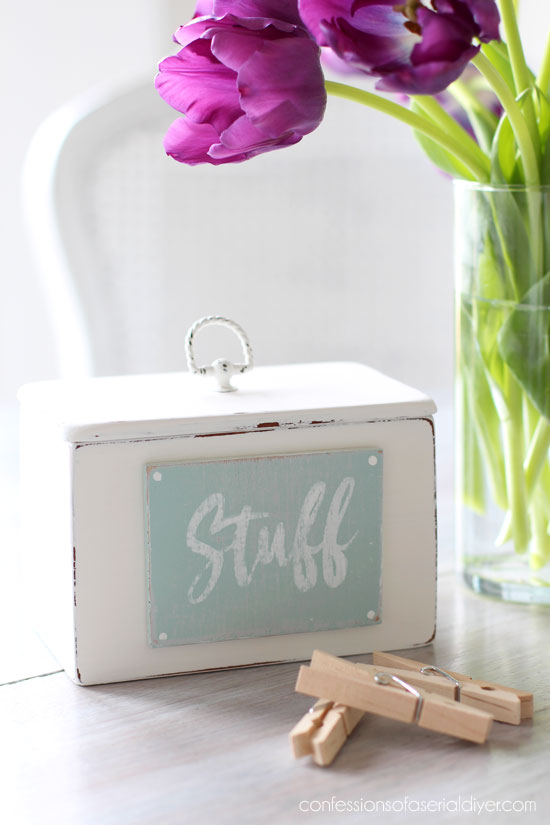
I used my Silhouette machine and dollar store contact paper to add the word Stuff. I figured that could cover a lot of bases.
I glued the sign onto the front using wood glue and that was that!
It’s perfect for clothespins…
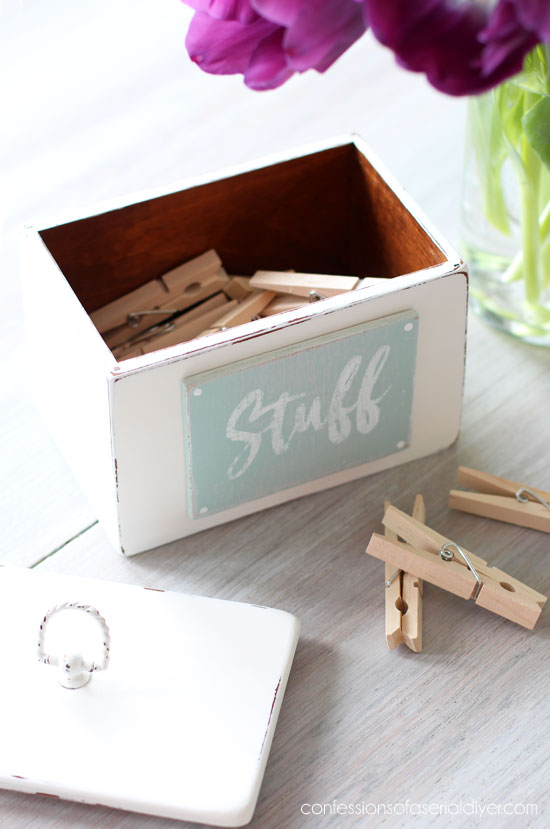
Not that I’ll be hanging our laundry out to dry anytime soon or ever, but they were perfect for the photo lol!
You could use this to store medication bottles, hair accessories, whatever you can think of that would fit inside!
Not bad for only a dollar, right?
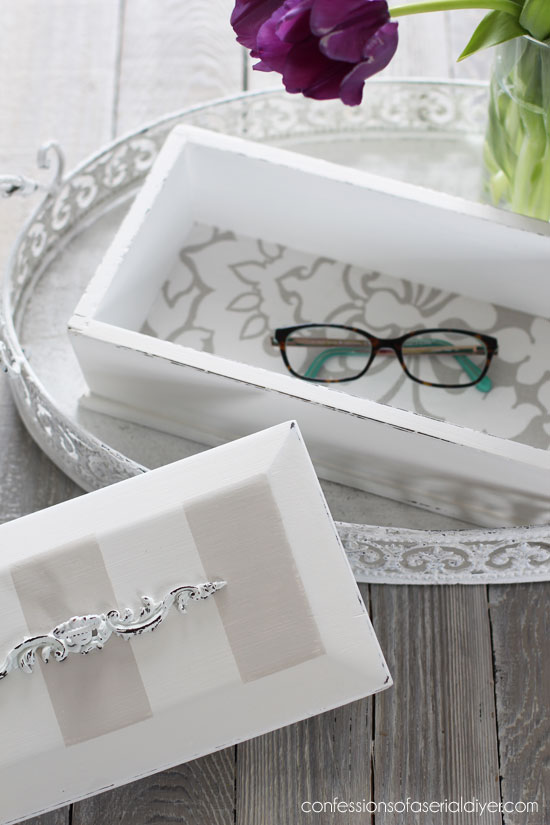
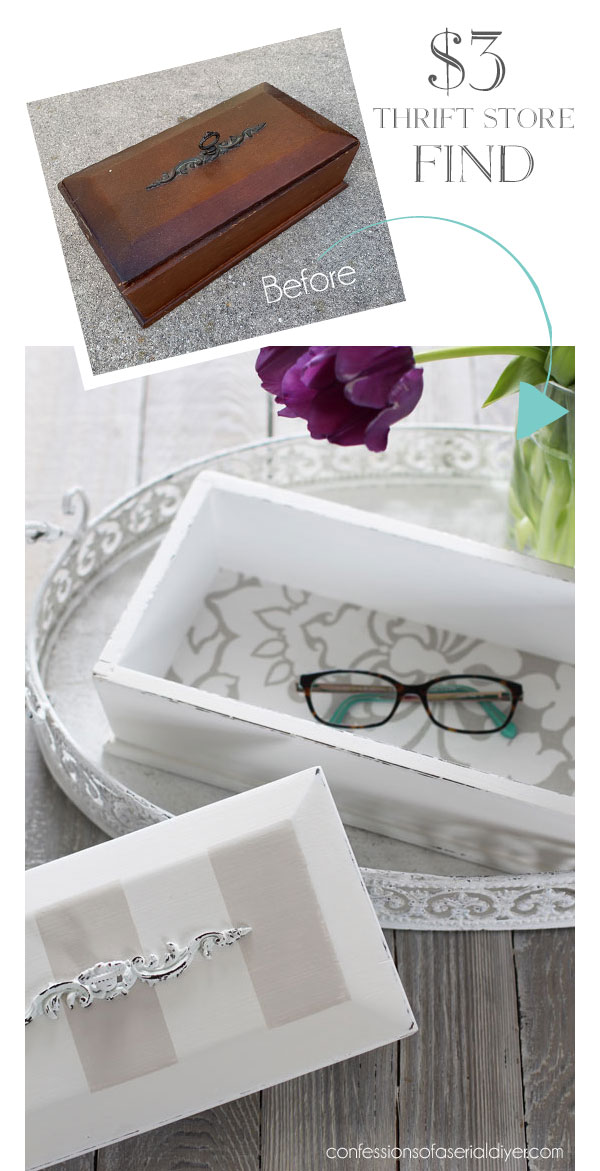
Mini Makeover #7
In the same post I shared this beauty:
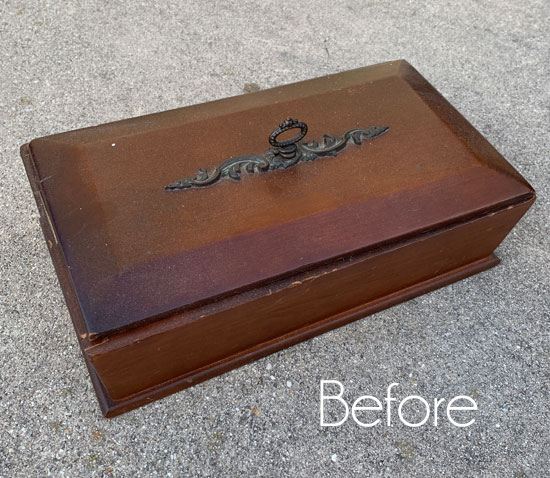
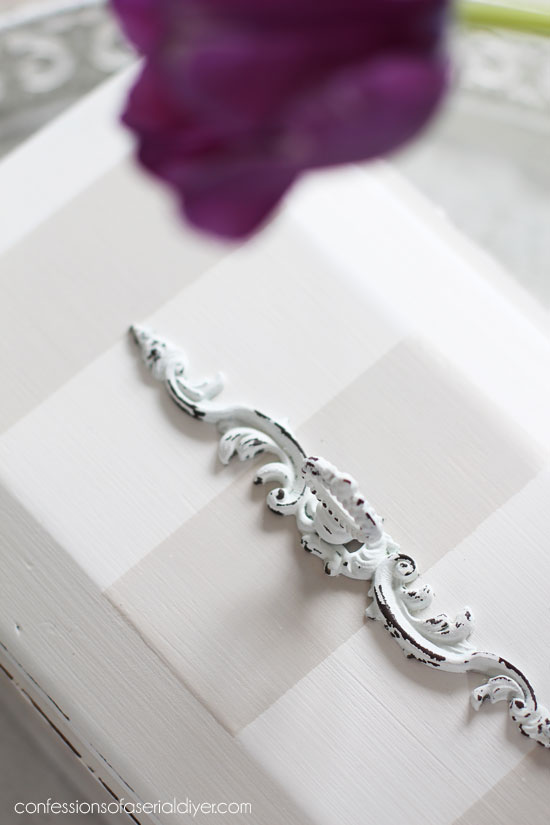
I loved the ornate handle on the top and for $2.98, I knew I could make it feel loved again!
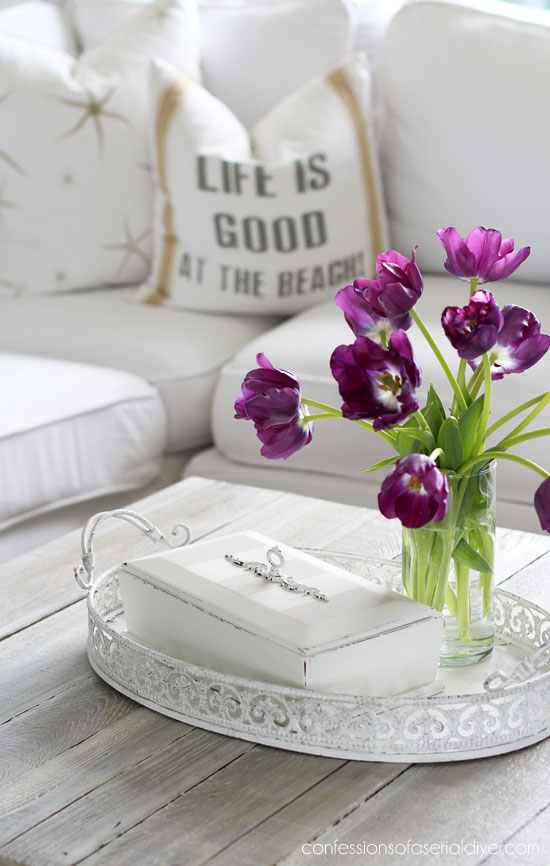
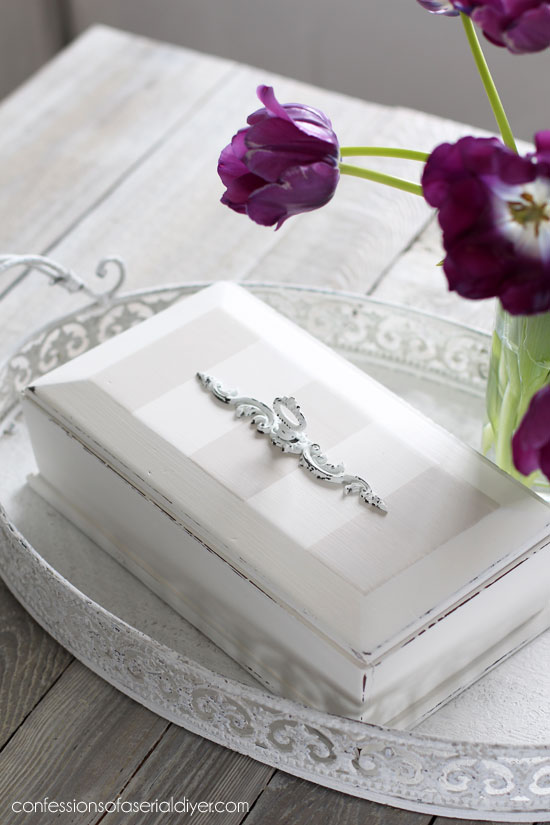
I love the softness the stripes add to this box.
I removed the handles from both boxes prior to painting.
When they were barely dry, I used my nail to scratch the paint off…
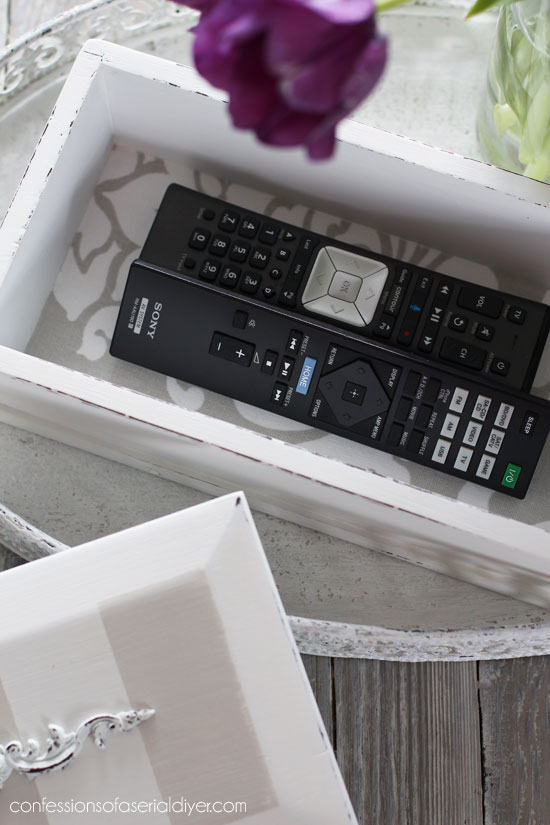
I lined the bottom of this one with fabric left over from my desk…
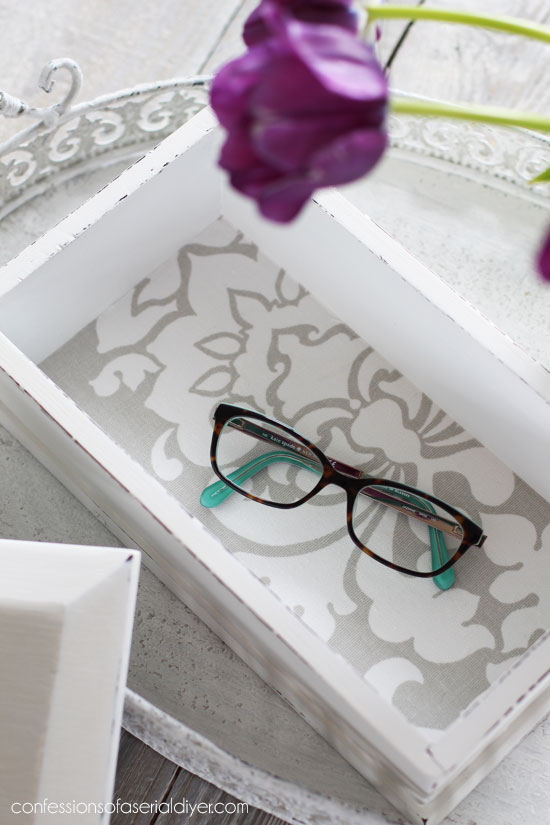
I attached it the same way I add fabric to drawers which you can see a video of in this post.
This one is actually the perfect size for hiding the remotes!
Mini Makeover #8
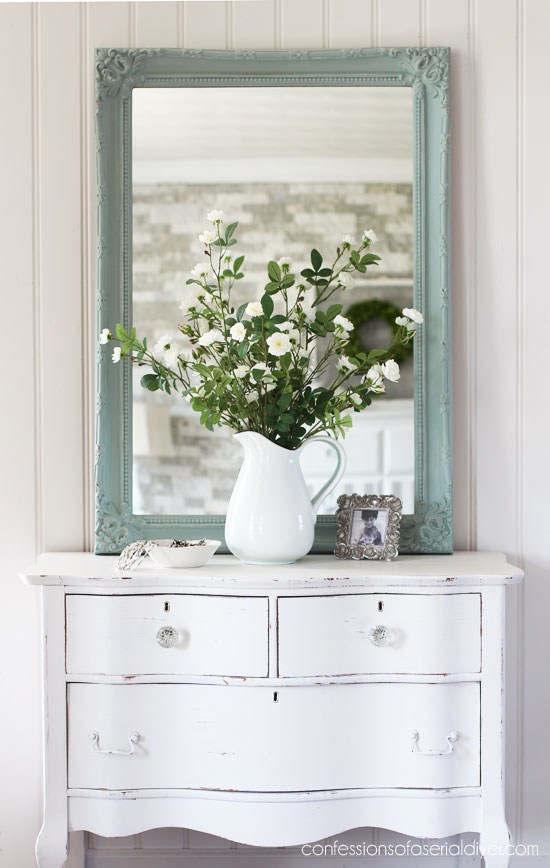
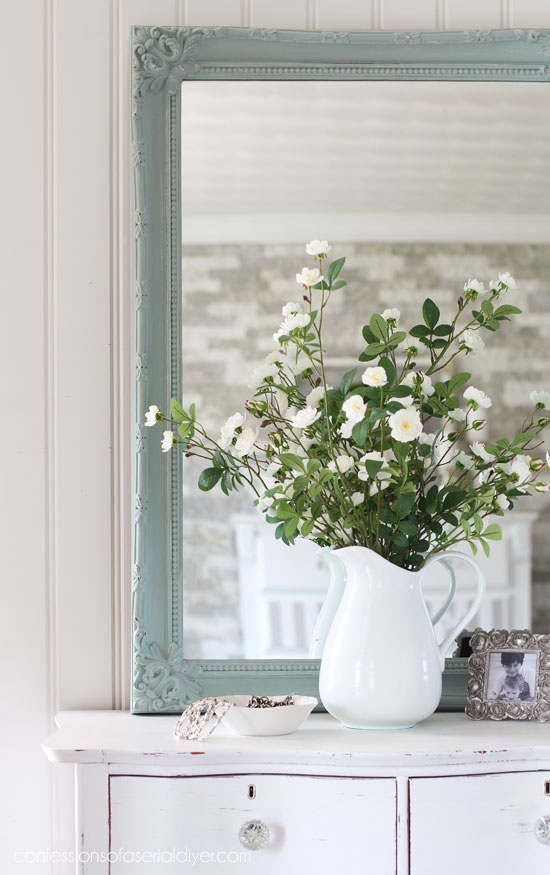
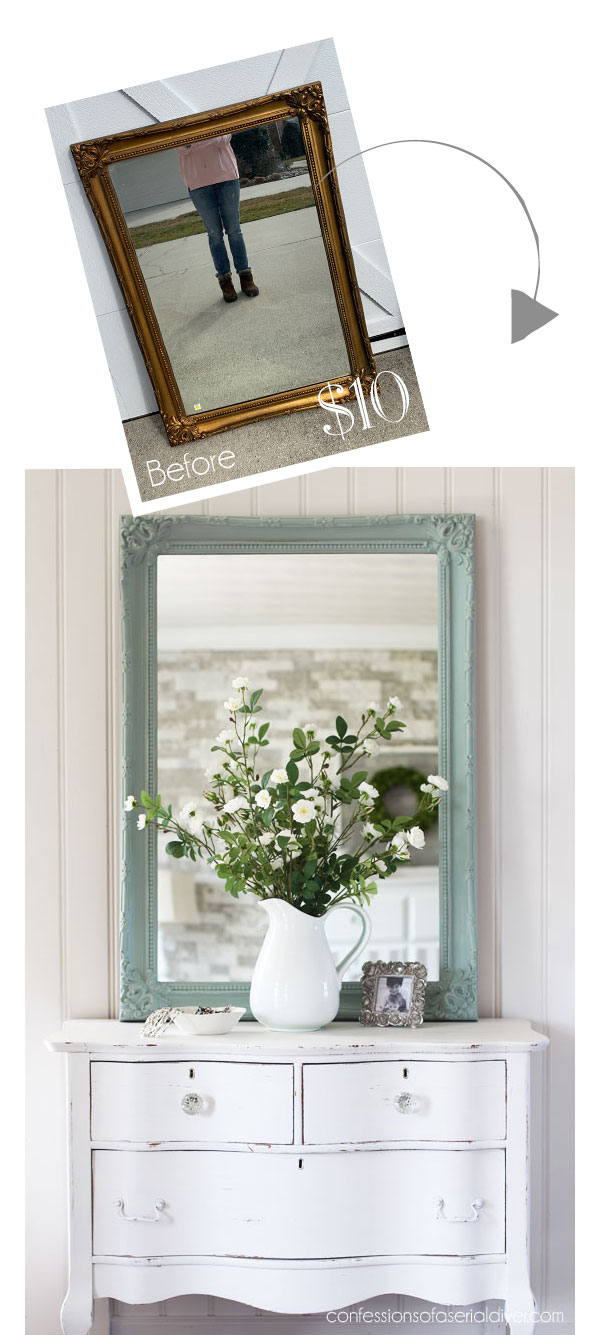
And finally, how about this plastic gold mirror:

This was a steal at $9.98. If you’re ever in need of a mirror, definitely hit up the thrift stores first. This one was from 1977 according the stamp on the back.
I painted one coat of white as a base first.
Then I used my favorite brush for painting those details to add one coat of the blue:
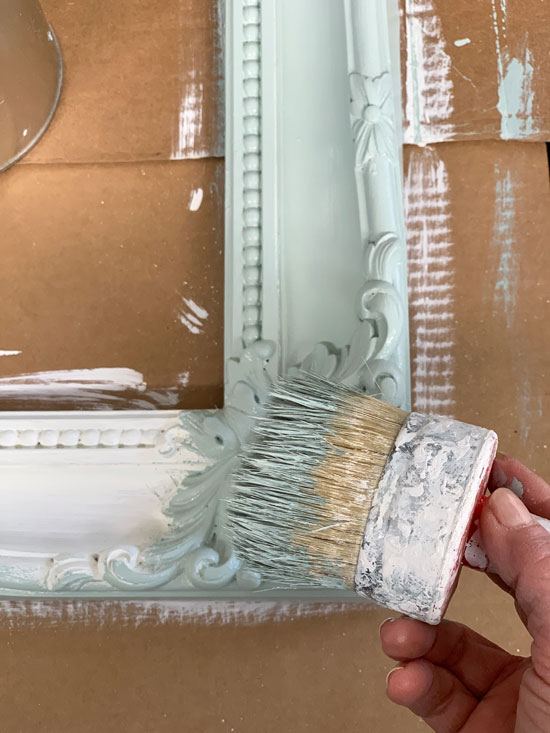
This is Amy Howard’s 2″ Round Wax Brush Paint Brush. I believe it is intended for wax, but it says “paint brush” on it so I’m not sure. I was lucky to get one in my goodie bag from one of the blogging conferences I attended years ago. HERE is one very similar to it on Amazon, and Dixie Belle is releasing a similar one soon! This type of brush works amazingly well on all those details!
I also painted the back, inside edge all the way around so the mirror would reflect the blue.
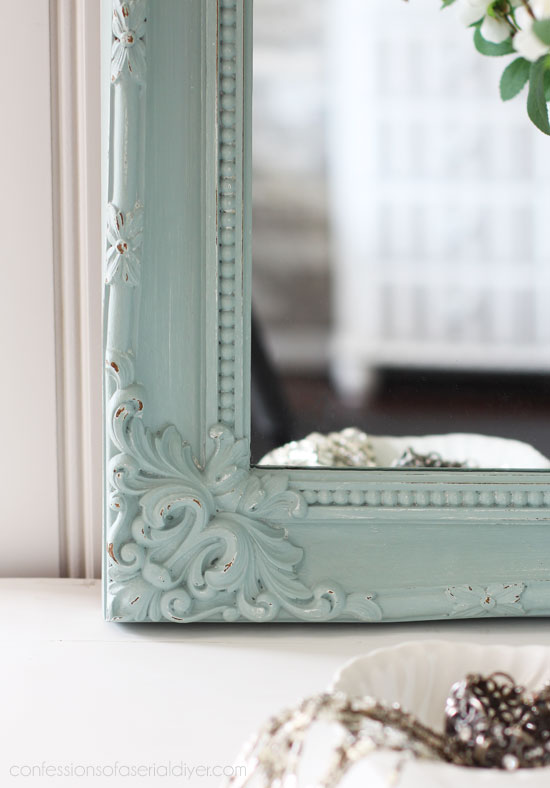
I decided to go from old gold to more coastal on this one:
This is very similar to Vintage Duck Egg Blue.
I sanded lightly all over with 220 grit sandpaper which highlighted the details a bit more…
I used spray clear sealer to seal the frame. Easy!
And that is another batch of smalls…from the past!
Were any of them new to you?
I will be back on SUNDAY however, and every day next week as I bring you the Posts of Christmas Past!
I have several cute repurposed holiday projects that I am dusting off and sharing all next week while I deck the halls around here! I thought that might be a fun way to officially welcome the holiday season!
I hope you’ll join me each day! This will be the first one:

UPDATE: See how this cutie looks now dressed up for the holidays HERE!
And if you’re not into holiday makeovers at the moment, skip to my next non-holiday makeover HERE! You WILL NOT be disappointed! 🙂
XOXO,
![]()
Don’t Miss a Thing!
If you like what you see, there are several ways to follow along!
EMAIL * INSTAGRAM * FACEBOOK * PINTEREST * TWITTER


Mary Kaiser says
I remember every one of them when you posted them. I love seeing them again, and the No. 2 basket for toilet paper had me laughing all over again! I am glad Jack is home and hope you have a very Happy Thanksgiving with your family! I am thankful for so many things and you and your blog are right near the top on my blessings list! I love what you do to all your projects and love that you share them with me! I am excited to have my coffee every day with you next week her on your blog, WOO HOO!!
Christy says
Thank you so much, my friend! I’m glad you enjoyed this bunch again! And I too am so happy to have my little family back together again. Happy Thanksgiving, and I’ll see you Sunday!! XOXO
Cheryl Atkinson says
Hi Christy! It’s always good to go back and visit the smalls from the past. Thank you. I hope you have a wonderful Thanksgiving with loved ones. This will be my first one alone. Family are going to the in laws and I chose to stay home. I will be painting and creating. I am thankful for you and your blog. More than you know.
Christy says
I’m glad you enjoyed this bunch, Cheryl! I imagine Thanksgiving will look much different for many this year. We will be staying home also. Enjoy your quiet, creative time! XOXO
Becky Fischer says
I love what you did with everything. My favorite is the “stuff” box.
Christy says
Thank you, Becky! That’s a favorite of mine too! XOXO
Christina says
Happy Thanksgiving Christy and family!! Enjoy!!
Congratulations to the winners of the giveaway!!
Love these smalls which I don’t recall so it was so fun. Love what you do to make all these littles so pretty. 🙂
I, too, feel Blessed to have you share your joy with me and everyone else who reads your blog.
Be well and enjoy!!
Christy says
Aww thank you, Christina! Happy Thanksgiving to you and yours! XOXO
Janice Holt says
Enjoyed looking back on these smalls. Mostly glad to see the secretary you did last week because for some reason I couldn’t see it. Hope you have a wonderful Thanksgiving and glad Jack is home. We do miss our kids don’t we.
Christy says
Thank you, Janice! Yes, I missed him more than I let on! I hope you have a wonderful Thanksgiving too! XOXO
Deanna Casto says
I literally have over 500 yards of fabric, most of it not suitable (in style) for my upholstery projects. I believe I’ll be using it to line drawers. I knew I kept it for a reason! Enjoy your Thanksgiving and stay well.
Christy says
Oh fantastic! I bought some fabric online years ago that I thought might work on our dining room chairs, but when I received it, the pattern was huge and I hated it! However, it ended up working out marvelously to line the drawers of this dresser and it’s taller mate: https://www.confessionsofaserialdiyer.com/grandmas-vintage-dresser-makeover/ I don’t think I could have found one I liked better for that makeover lol! Happy Thanksgiving! XOXO
Maryellen Webber says
Loved seeing all the smalls today! Wishing you and your family a Happy Thanksgiving! Looking forward to seeing all your posts next week!
Christy says
I’m glad you enjoyed them, Maryellen! Thank you and Happy Thanksgiving to you and yours also! See ya Sunday! XOXO
Becky says
Ahhh… a great collection! Now I have serious little-wood-box cravings. Again. 😊 The “#2” basket never fails to bring a little joy!
Thank you for all you share with us, Christy! You’re my #1 refinishing hero!
Christy says
Aww thank you, Becky! Glad I could give you a chuckle this morning lol! XOXO
Rebecca Payne says
Great job on all. Thank you for sharing.
Christy says
Thank you, Rebecca! XOXO
Sue H Mellette says
Enjoyed seeing your smalls again. I think my favorite is the drawer front you turned into a jewelry holder! How clever! I do like the smalls as it gives me a great deal of inspiration. Glad Jack is home for the holidays. Enjoy your family this Thanksgiving. We all have a great deal to be thankful for, especially this year!
Christy says
Thank you, Sue! I enjoy the smalls too! It is so nice to have my family whole again for sure. I hope you have a lovely Thanksgiving too!! XOXO
Deanna says
Happy Thanksgiving season! Enjoyable to revisit past smalls. You are so creative, and it’s a blessing to read your posts each week. Take care, and enjoy the time with Jack!
Christy says
Thank you so much, Deanna! Happy Thanksgiving!! XOXO
Kathy M says
Somehow I missed these the first time around, so I’m so glad you showed them again. (Although, I can look at your makeovers over and over again.) I love every single one! Every time I see what you have done, I’m ready to go thrifting, and I definitely need something cute to hide my chocolate kisses in!
Christy says
Oh good! I’m glad you enjoyed them! These smaller projects get shared and then forgotten, so I was happy to be able to share them again! Thank you and yes, we all need a secret stash, right?? XOXO
Marcia Stansberry says
I absolutely love all of your projects! I am going to take apart my wedding dress (from 1973) use the beige lace bodice and sleeves to cover some small wood boxes, then use the silk lining to line the inside. I am going to make two, one for each of my daughters. I thought it would be a unique gift for them. Wish me luck!
Christy says
Thank you, Marcia! I absolutely LOVE that idea!! They would make lovely and thoughtful Christmas presents…good luck! XOXO
My Crappy House says
Hi,
What do you suppose that “secret stash” box was originally intended for? That would make a great card box for my wedding next year, but I don’t know what to search for. Did it have a specific purpose, you think?
Christy says
That is a really good question! Maybe giant recipe cards lol? I just visited your site and spent the last 30 minutes there…I love your quick wit and your crappy house!! XOXO
My Crappy House says
Aww, thank you! My mom turned me on to your site. She talks about you all the time. “Christy says… Christy does…” like she knows you personally. She’s refinished some really cute pieces in your style and now I enjoy getting to see your transformations too 🙂
Christy says
You’re welcome! And I LOVE that!! 😀
Kathy W F says
I love seeing the smalls. Keep posting those oldies but goodies. We love revisting them. I’ve probably asked before but I’ll ask again. When you use your spray shelter do you use a drop cloth inside? And…the screws in Hobby Lobby pulls and handles are so long. Do you replace them or cut them off? Have a wonderful Thanksgiving with your family. I’m holding my new blog friends in my thanks this year.
Christy says
Thank you, Kathy! I’m glad you enjoy the smalls! I do not use a drop cloth in my small and medium shelters. I do for the large because it doesn’t have a bottom. And I think I have answered this a couple of times, but it may have been someone else lol. I use a dremel-like tool made by Black and Decker to cut the extra length off of the screws. I used to use a small hand saw and that works fine also. Happy Thanksgiving to you too! XOXO
Deborah Garrison says
I love it all, going to copy your N0 2 basket, love it. I hope you have a wonderful Thanksgiving cant wait to see your Christmas Posts.
Christy says
Thank you, Deborah! Copy away ha ha! I hope you and yours enjoy a wonderful Thanksgiving too! XOXO
Lizzy says
I love them all! So good!
Christy says
Thank you, Lizzy! XOXO
Michele M / Finch Rest says
Oh these “smalls” were excellent! They were all new to me ‘cuz I just found you recently. (Tuesday is now my favorite blog day.)
I love every single one of your projects.
BIG congrats to the 3 winners. They are so lucky!
Have a Happy Thanksgiving!
ps – I have an artisan soap giveaway going on if you’d like to enter.
Thanks!
Christy says
Thank you, Michele! I’m glad to hear these were new to you! Happy Thanksgiving and what a wonderful giveaway…I love handmade soaps! XOXO
Addie says
Yep!!!…I AM one to hang the clothes on the line. Not everything….but sheets, t-shirts, jeans, socks and rugs. I cannot let all this glorious Arizona sunshine go to waste!!! If you do the sheets you will never go back!!!
Nice work on the haul and love the “No. 2″…I got it right away!!!
May you and yours have a wonderful peaceful Thanksgiving…where ever you eat it!!!
addie xoxo
Christy says
My Mom always hung her sheets on the line too and swore by it! The No 2 basket makes me chuckle whenever I see it…I guess I’m not above potty humor eh? Ha ha! Thank you, and a blessed Thanksgiving to you and yours as well, my friend! XOXO
Ivory says
I am so in love with your fab diyers. You did an amazing transformation of each.
Thanks for sharing
Christy says
I appreciate that so much, Ivory! Thank you!! XOXO