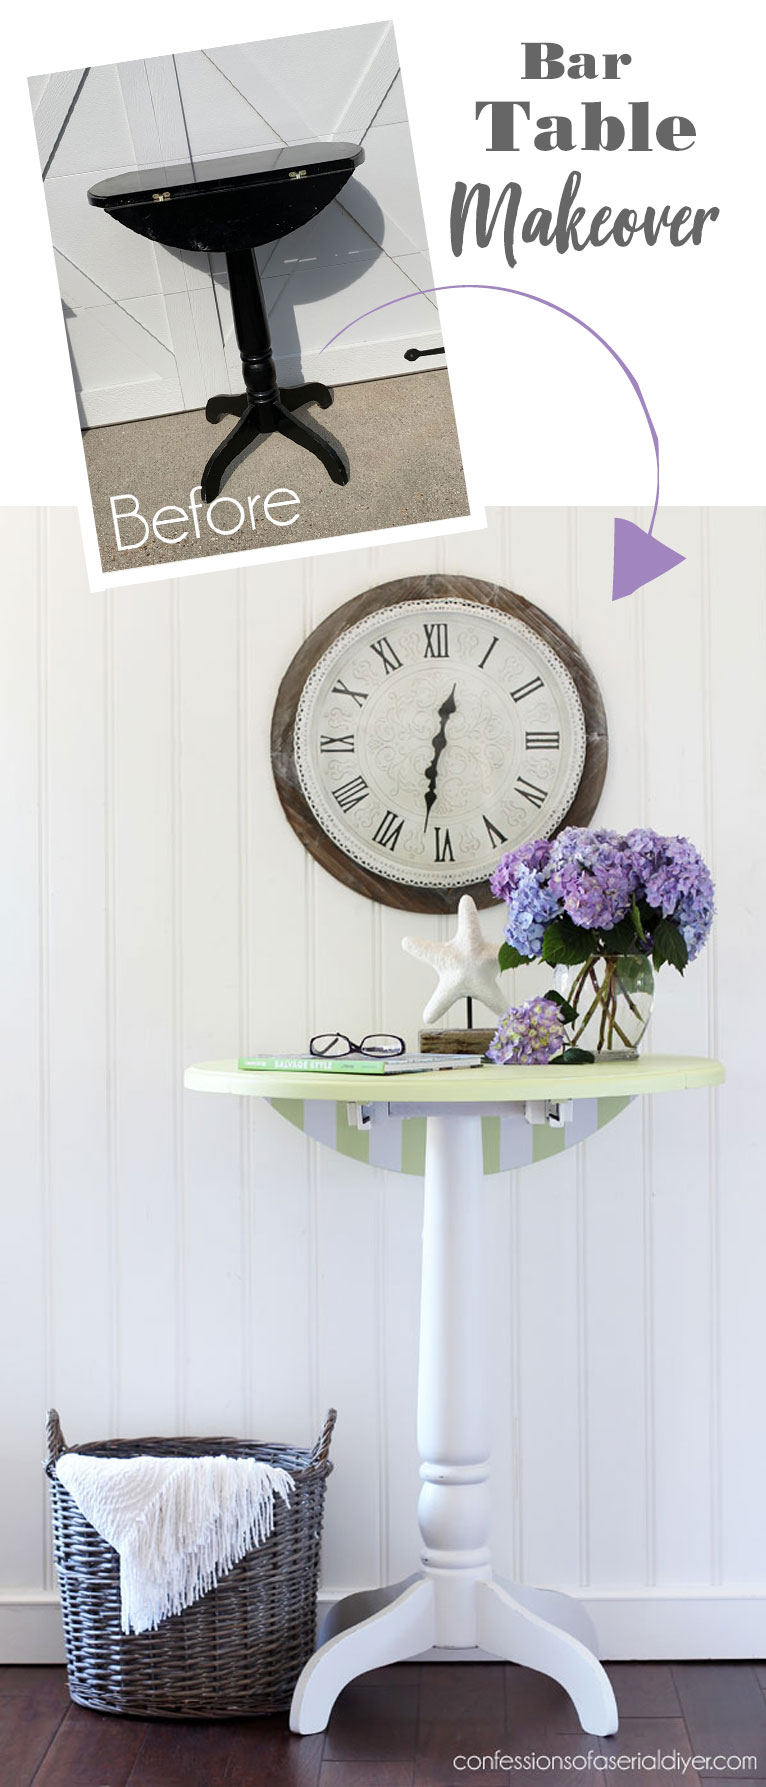
Hello awesome friends, and welcome to June! Can you even believe it’s June already?? Today’s pub table makeover started out as my very favorite kind of project…a freebie!
One of our sweet neighbors reached out a couple of months ago to ask if I would be interested in this pub height table:

I rarely turn down free, so of course, I gladly accepted the donation!
At first, I tossed around the idea of cutting the base down to bring it from a pub-height table to a regular side table height, but in the end I kept it as is.
Prep
To prep this table, I first gave it a good cleaning with White Lightning:

Once I had it all clean, I swapped out the water and gave it another wipe-down to rinse.
Because this table had a very slick, glossy factory finish, I gave it a light sanding all over with 220 grit sandpaper:
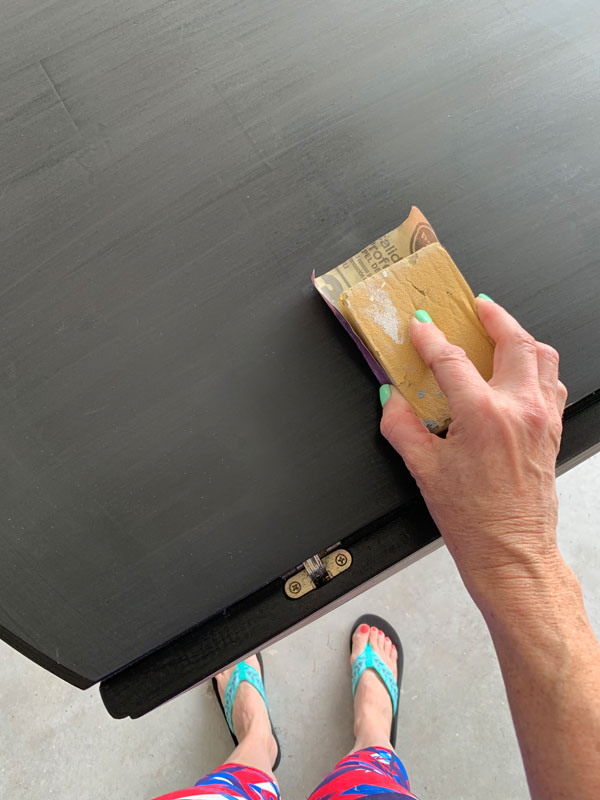
I almost always skip the sanding when using chalk paint, but I decided to play it safe with this particular finish, so just a quick sanding is all I did. I vacuumed up the dust with my shop vac and I was ready for paint!
Paint
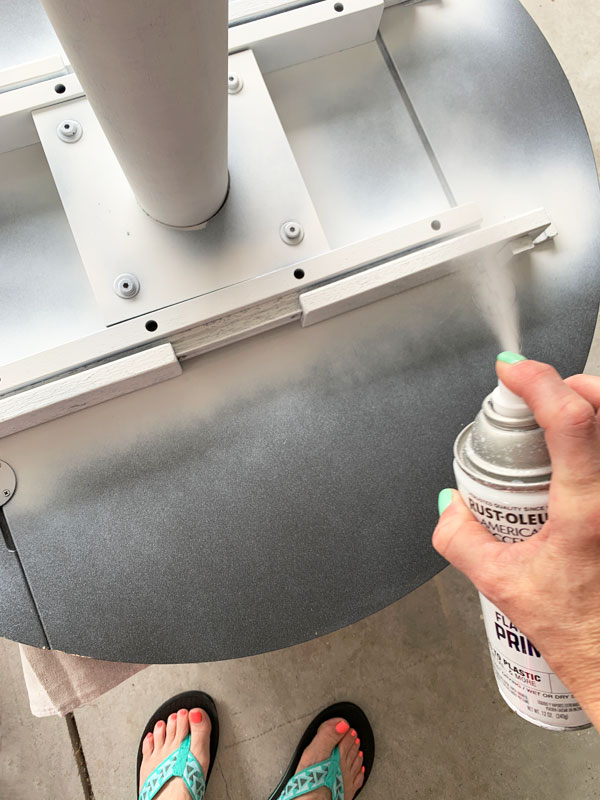
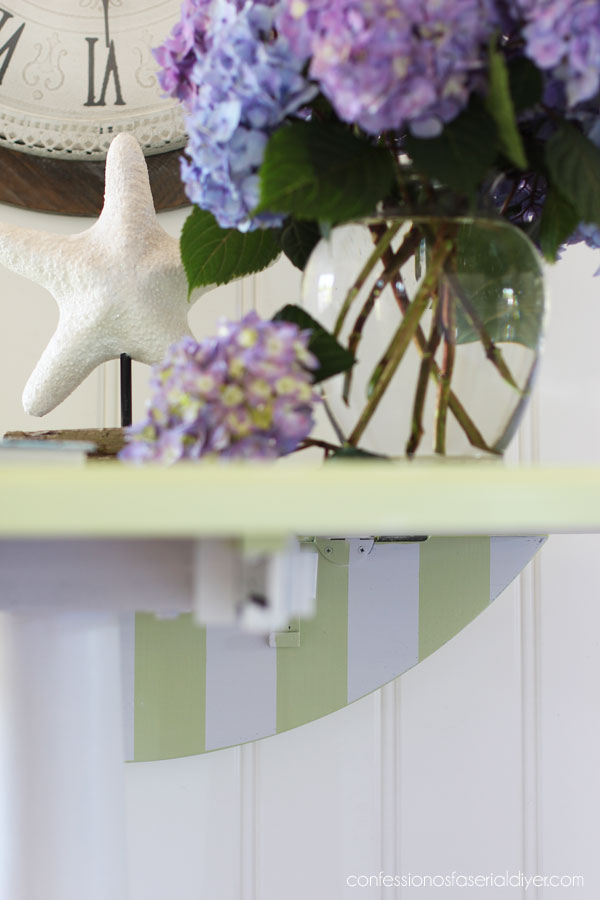
This table had a two drop down pieces and I always like to start these by positioning them upside down. I painted the legs first with Fluff, and then for the sliders that held the sides up, I didn’t want my paint in those areas to be too thick, so I chose to use a spray primer just for those parts:
I painted the rest of the underside in Fluff, and then came back and added a fun stripe to the drop down pieces in Farmhouse Green!
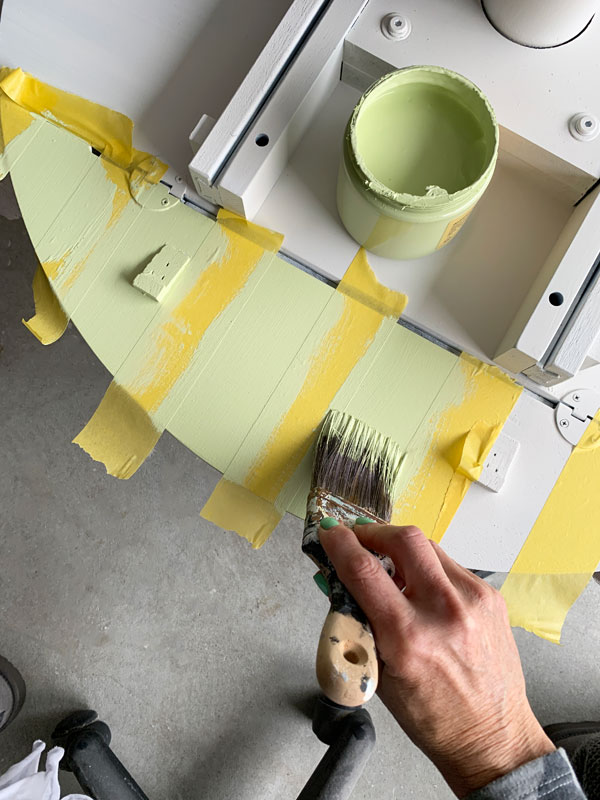
Only one coat over the Fluff was needed, and I immediately removed the tape after painting the green.
Once everything was dry, I flipped it over and painted the top solid Farmhouse Green.
Sand & Seal
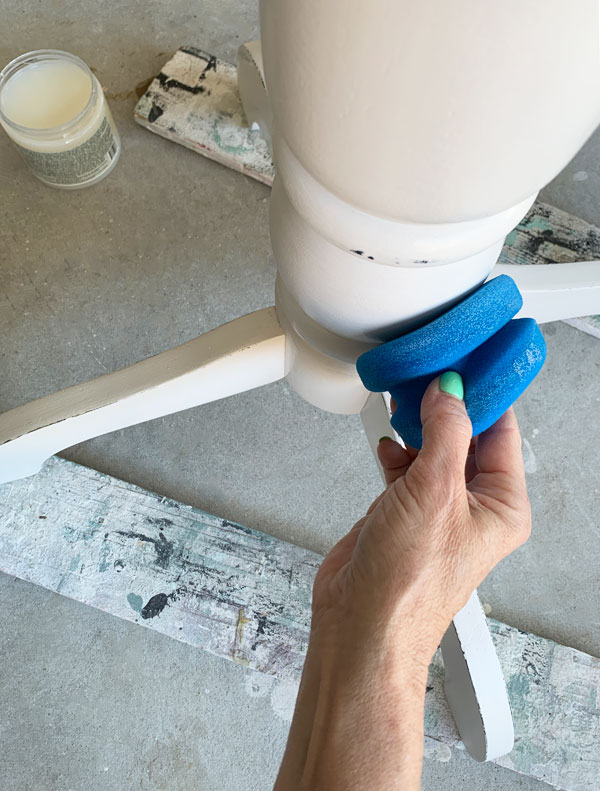
I sanded lightly all over with 220 grit sandpaper wrapped around an on old foam sanding block, and then sealed with Gator Hide using the blue sponge applicator:
That was it…quick and easy!’
You can see how I apply sealer with a sponge in this video:
If you have trouble viewing, find it on YouTube HERE.
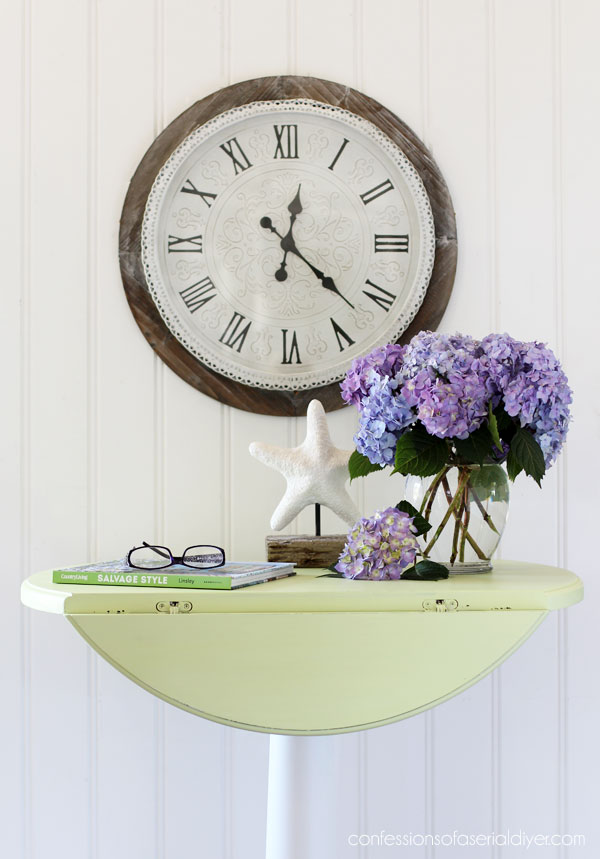
The Result
Here is how this fun free-to-me table looks now!
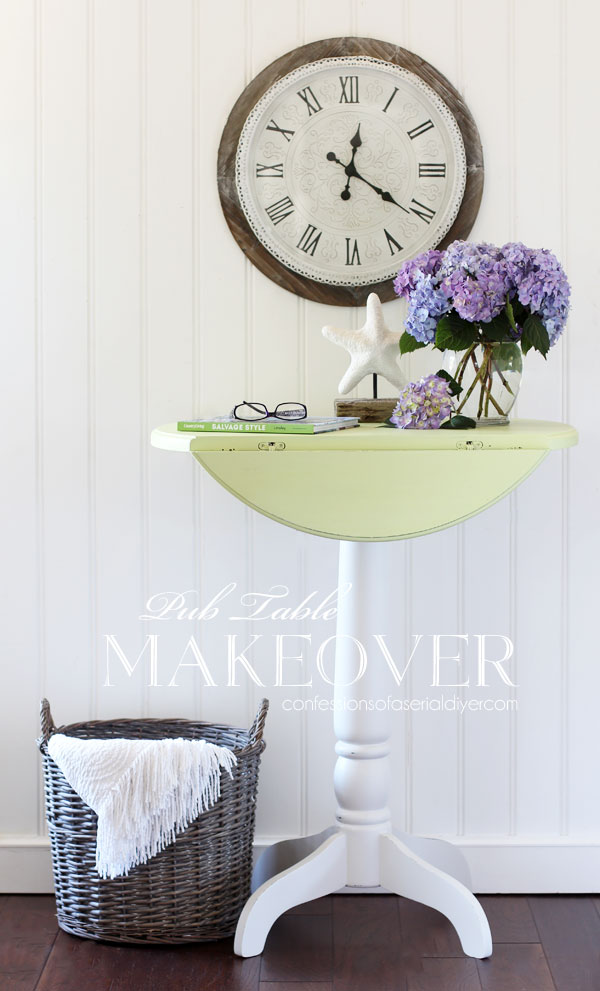
I’ve used this color combination on two other tables in the past, and I just love the Summery feel it gives these pieces!
And here are the peek-a-boo stripes!
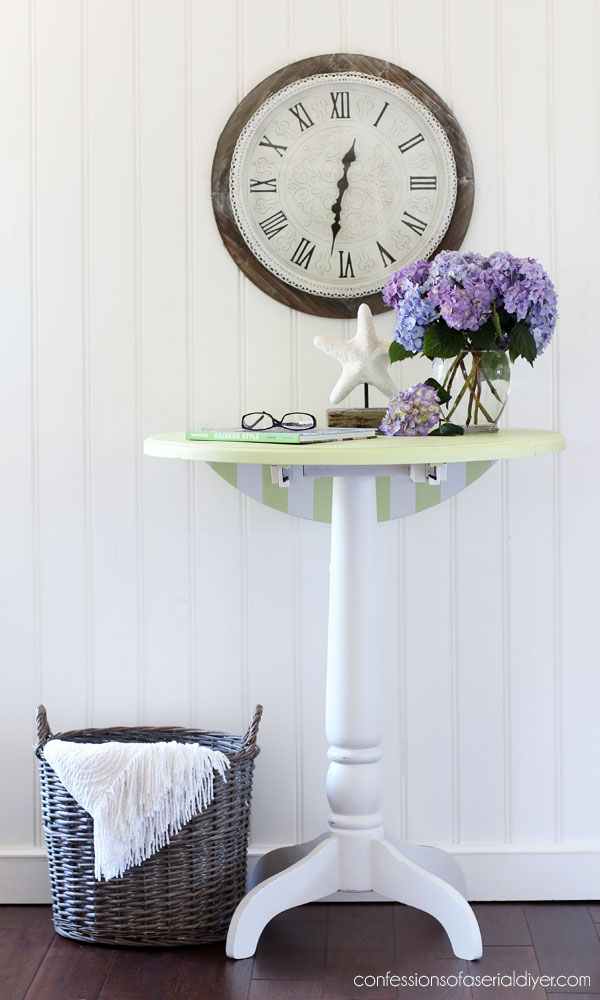
This table would be a great addition to a sun room or covered porch. That’s what I imagine for it for some reason, and that’s also why I chose to seal it in Gator Hide. I wish I had two bar stools to redo to make a set, but it would be cute in a corner solo holding a large plant also.
I used FrogTape for delicate surfaces to apply the stripes…
See how easy it is to space out stripes HERE! No math required, I promise!

Aren’t these hydrangeas so pretty??

They are from the one I potted on my front porch! I just love the purple!
Hydrangeas are my favorite, and I’ve really missed them all at our old house. We had tons of blooms all Summer!
I actually have a nice-sized hydrangea bush that is full of blooms in the back yard:
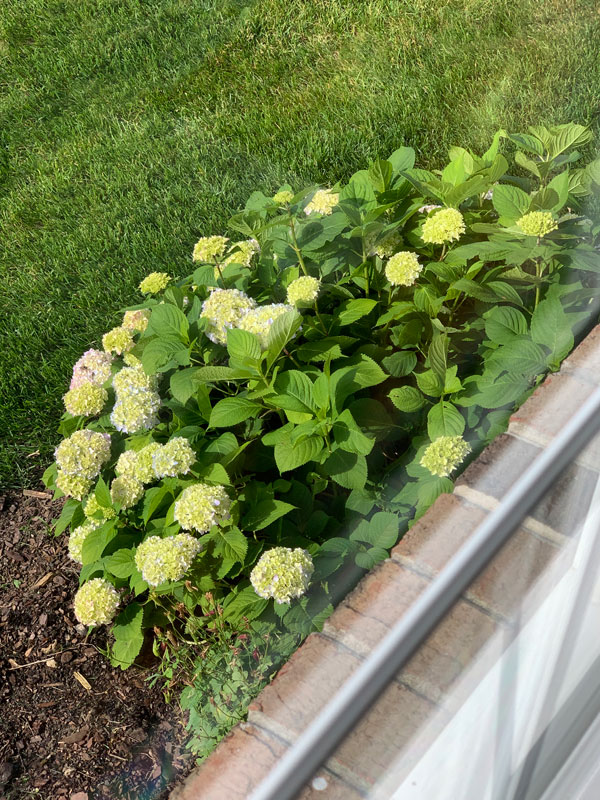
This is from our living room window. It started from a small piece of one that had belonged to my hubby’s grandmother that his mom had given us when we lived at our old house. We dug it up and brought it with us when we moved in 2017. It’s finally blooming this year, and they are almost ready to cut!
Thank you to my amazing neighbor for thinking of me when looking to purge this piece!

Quick, easy, and FREE! My favorite!
And I get to cross another piece off the to-do list:

Five down, thirty-something to go!!
See the first four here if you missed them:
Becky’s Secretary Desk Makeover
Update a Thrift Store Box with Fabric
$5 Buffet Lamps Updated with Decoupage Paper
Here’ s another small drop leaf table I redid in a fun color that you might have missed:
See how it looks after HERE!
I’ll be back on Thursday with this hanging shelf:
UPDATE: The makeover of this shelf is night and day!! See the beautiful after HERE now!
See y’all then!
XOXO,
![]()
Don’t Miss a Thing!
If you like what you see, there are several ways to follow along!
Email * Instagram * Facebook * Pinterest * Twitter


Mary Kaiser says
Love the green and white, especially with the stripes, so fun! The best things in life are free! I love your beautiful hydrangea bush, it is loaded with blooms! Be sure to take a picture of it when it blooms the rest of the way. What color will the blooms be? It is so special that it was from your husbands grandma, I love that!
Christy says
Thank you, Mary! Yes…gotta love free! I am so thrilled that our hydrangea bush is doing so well this year…it didn’t bloom at all last year. They bloomed beautiful vibrant blue at our last house, but they look much lighter here. It will be fun to see what they become! And absolutely, his Grandma passed several years ago, so it is especially loved! XOXO
Janice Holt says
Sweet sweet sweet table. The stripes look so cute. I do have a question, in the photo the top of the table where the book is laying looks white; is that the light making it look that way? Not being critical and never would of anything you do but just curious. Hope you had a great Memorial Day week-end.
Christy says
Thank you, Janice! Yep…that is just the light as there is a large window to the left. It is painted green like the rest! 🙂 XOXO
Christina says
Christy this table is so fresh and happy looking now. Love the peek-a-boo stripes. 🙂 Great tip about painting the sliders. I wonder if the neighbor will want to buy it back now that it is so pretty!
Have a wonderful week!
Christy says
Thank you, Christina! It’s kind of a repeat since I’ve done this look a couple of times before, but they both sold quickly, so hoping for the same with this one! And ha ha…maybe! Enjoy your week too! XOXO
Robin Simonds says
Christy, I am doing a side table in coffee bean and I have used gator hide to seal it. It looks streaked and I don’t like how it turned out. What can I do to correct this and what did I do wrong.? Please help. Thanx in advance ♥️
Christy says
Hi Robin! Did you give it just one coat? If so, give it one more and then if you still get streaking, you can go back with 0000 steel wool and buff it, and that should take care of any streaking you’re seeing. Aj from AJ’s Vintage has a great video on that here: https://youtu.be/50oCjouNe08 I hope this helps! XOXO
Robin Simonds says
Thank you. I did watch the video. It was informative. Thanks for all your help. You’re the best.
Christy says
Oh great! You are so welcome! XO
Cheryl Atkinson says
Hi Christy! What a cute table!!
Christy says
Thank you, Cheryl! XOXO
Cate Cooper says
Oh that table is just DARLING!! I’m not usually a fan of stripes, but this I really like. Great job!!
Christy says
Thank you so much, Cate! XOXO
Denise says
Love Free! This turned out adorable and I love the surprise stripes! 😊💙 XOXO
Christy says
Yes!! Free is the best! Thanks, my sweet friend!! XOXO
Ashley says
“Peek-a-boo” stripes! Who would’ve thought? ❤️👍🏻
Christy says
I thought they would be a fun addition! XOXO
Vicki says
So fresh and pretty! Maybe you will find a set of stools soon, you find the best stuff! I’m wanting to try Dixie Belle clear coat/gator hide, as I’m intrigued by the sponge applicator. I get so frustrated using brushes, as it seems like no matter how careful I am about checking, I end up with drips that dry into whitish blobs in crevices that are hard if not impossible to sand out. It seems like the sponge applicator would help with that. Thanks for sharing!
Christy says
Thank you, Vicki! I love the sponge! You do still have to watch for drips a bit, but it’s much easier than applying with a brush! XOXO
Rose Lefebvre says
Cute idea! I am looking forward to the upcoming makeovers.
Christy says
Thank you, Rose! I’ve got enough to keep me busy for a while! XOXO
Carolyn says
Hi Christy,
I love what you did with the table!
I always think of you as changing the world one piece at a time and with so much inspiration for the rest of us! I really like how you photograph everything and then check it off! Such an easy way to stay organized and on top of things🙂
Thank you ♥️
Christy says
Thank you so much, Carolyn! I love that! Checking each item off as I go really helps keep me on track. It also stops me from hoarding since I rarely stop at the thrift store knowing I already have a pile to work on at home! It works out so well! XOXO
Becky says
How creative with the peek-a-boo stripes!
Christy says
Thanks, Becky! I thought that was a fun addition! XOXO
Cecilia from Georgia says
Such a cute idea painting the stripes on the bottom of the drop leaf! Great color of green! I found myself in Goodwill looking at what other shoppers had in their carts wondering what makeover they had in mind! One lady had selfishly snagged all 3 of the round cheese boxes and I so wanted to ask her if I could get one from her! Now, that’s pretty sad of me😢.
Christy says
Thank you, Cecilia! I am always bummed when I see some thing I want in someone else’s cart. If only I were there sooner lol! Have a great week! XOXO
Michele M. says
What a fun sweet do-over! That is going to make some lucky person very happy. Love the “surprise” stripes. Well done, Christy!!!
Christy says
Thank you so much, Michele! I hope so! XOXO
Marcie Lovett says
Stripes on the underside? Why would she do that? Because she has a plan! Fun to see that little “extra” when the top is down. You’re so smart, Christy!
Christy says
Ha ha thank you so much, Marcie! Yes, a fun surprise! XOXO
Candy says
Great job! what a big difference! Thanks for sharing.
Love the clock in the picture too may I ask where you found it?
Christy says
Thank you, Candy! I found that at Hobby Lobby! XOXO
Sue Mellette says
What a clever makeover! I would never have thought about the green and white stripes underneath the top! I am glad you left it the height alone. It would be perfect for a nice plant on the top, but also with the leaves open, what a nice place to have a twosome at the table enjoying an adult beverage or tea or whatever! Perhaps you can find some stools that would accommodate the table! Great makeover! Thanks so much for sharing!
Have a great week.
Christy says
Thank you, Sue! I think it would be great in the corner with a plant on it also. I am keeping a lookout for a couple of stools though! XOXO
Claire Whitley says
Lovely. Is it a requirement to sand before the clear coat. Would it adhere to chalk paint without sanding?
Christy says
Hi Claire! I just answered you over on YouTube LOL. It is not a requirement to sand before sealing. I mentioned over there that chalk paint does have a bit of a texture to it and lightly sanding just smooths everything out so beautifully. You don’t have to sand so much that it distresses, but just enough to smooth it out. I hope this helps! XOXO
Marietta Walker says
I Love this little table! What a fun choice you made. I continued to be inspired by you and your DIY friends. You are amazing!
Christy says
Thank you, Marietta! I appreciate that so much!! XOXO