I am a picnic basket hoarder. There, I said it. I cannot pass up a deal on a picnic basket. I just love them! Amazing friends, it is Trash-to-Treasure Tuesday and I am thrilled to announce that I tackled not just one of the picnic baskets I recently picked up, but both picnic baskets I recently picked up!
Before I forget…don’t forget to look for my talented friends’ makeovers at the bottom!
I really had no business buying more picnic baskets because look what I still have in my storage room:
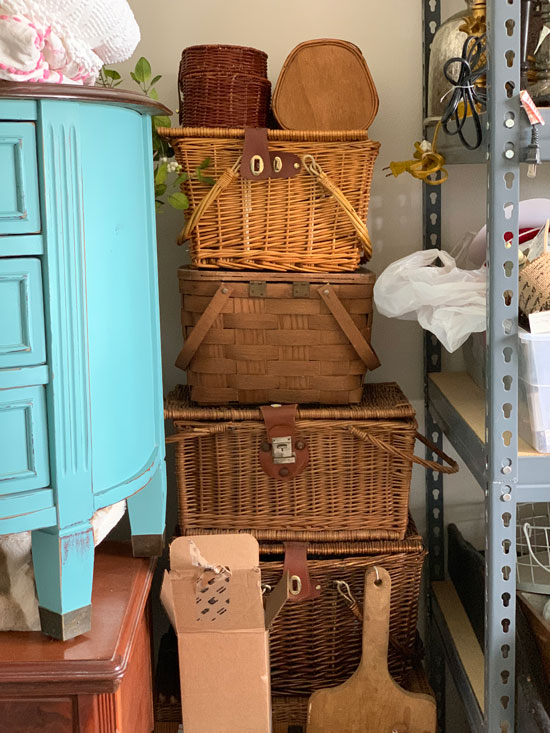
Shame I know. I told you I had a problem.
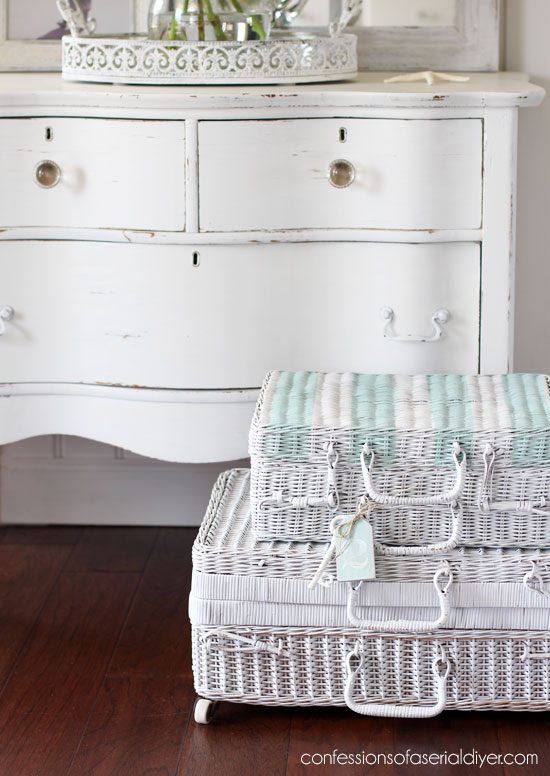
Today I’m sharing these two baskets I picked up on my last thrifting day out:
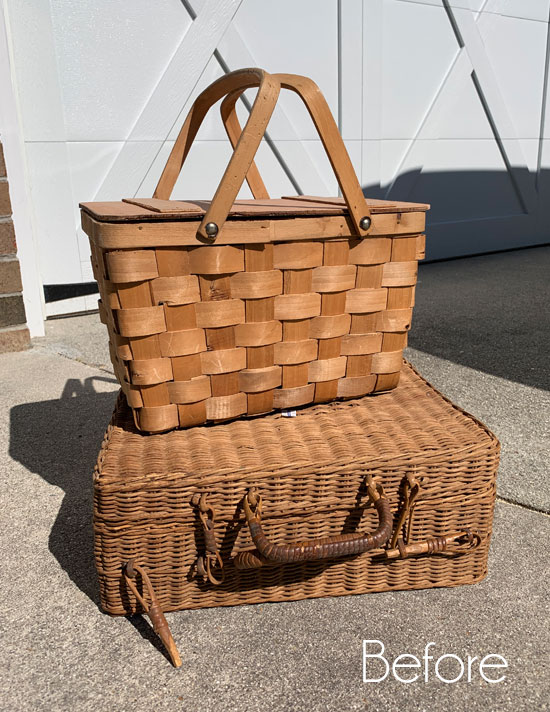
These are everywhere in thrift stores! You might remember seeing the one on the bottom in the cart with the table I shared on Thursday:
It was $5.25 but all blue tags were half off, so I paid less than $3 for that one. The other one was marked down not once, but twice to $1.98 at another thrift store. I guess it’s just me who has an affinity for these poor things. I will save them all!
I’ve included a few affiliate links so you can find the products I love.
Here is how the first one turned out:
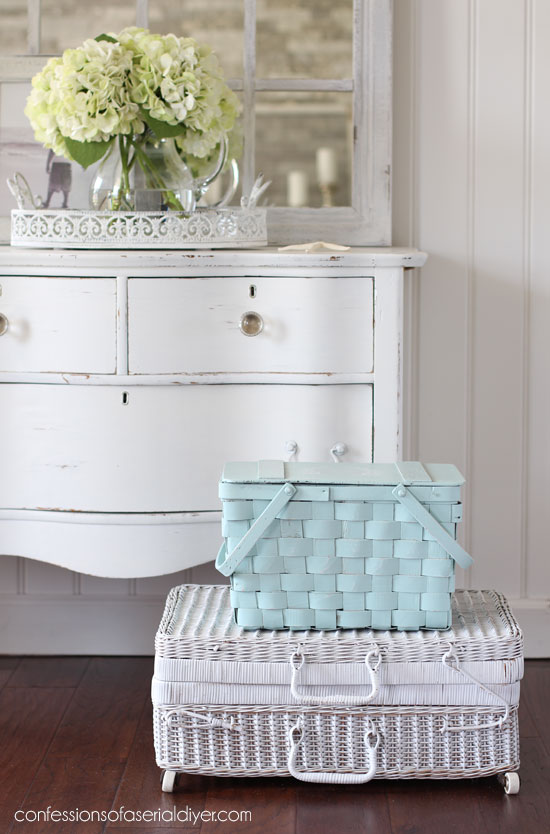
This blue is Robin’s Egg by Rustoleum. Spray paint is the best way to paint baskets.
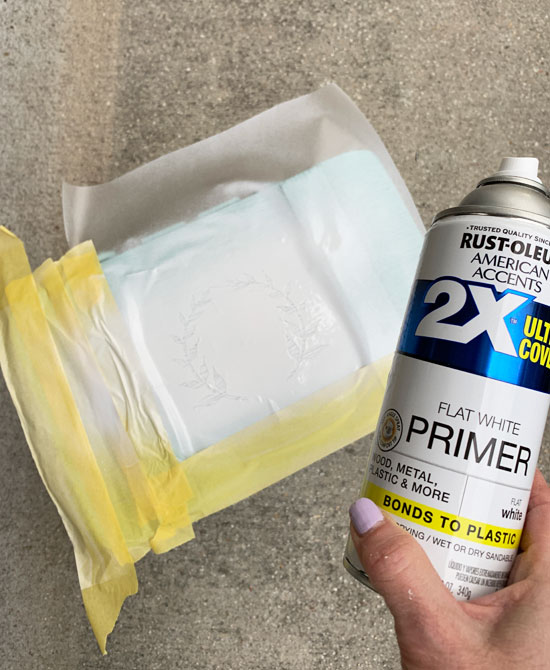
I pulled out my handy spray shelter to tackle these. I started priming first with the basket upside down using Rustoleum’s spray primer:
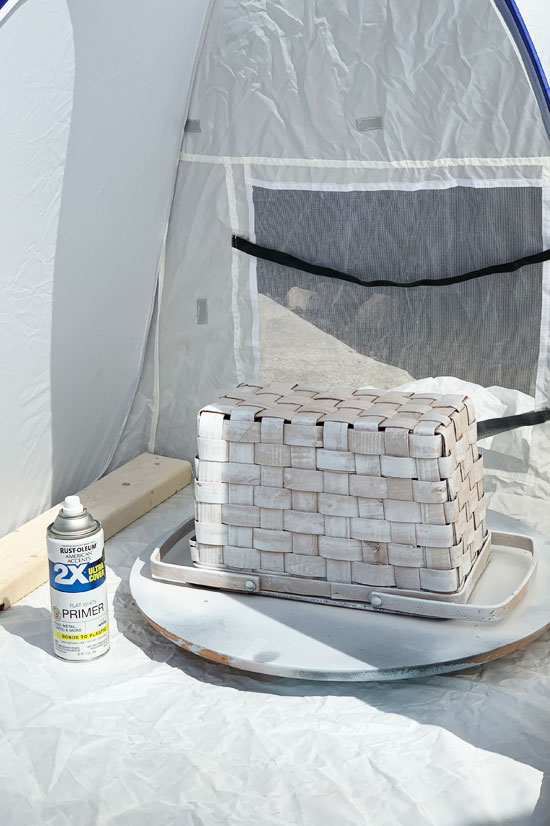
(Always prime first or you will end up having paint flake off every time you move your basket.)
You won’t get complete coverage here and that is okay.
Then I flipped it right-side-up and gave it another good spray…

This also ensures you get the woven parts from all angles.
If you want to paint the inside, prime that also. I just primed the lid and around the lip of the opening since I had other plans for the inside of mine:
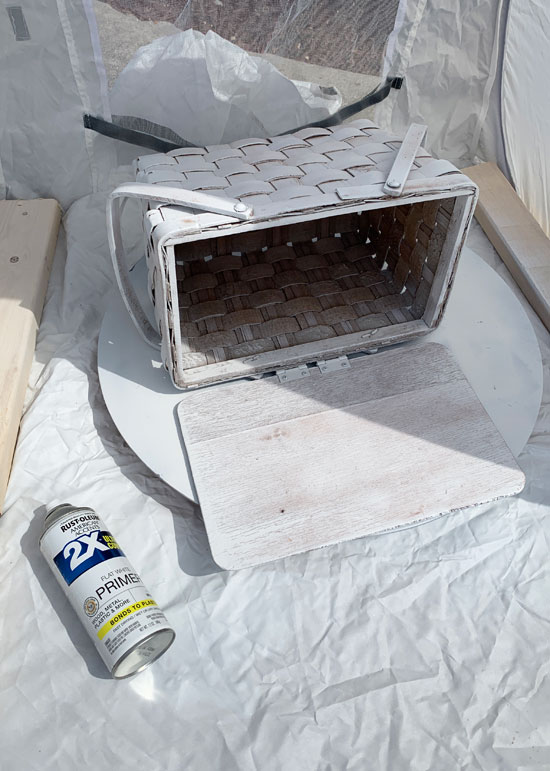
I followed up with Rustoleum’s Robin’s Egg in Matte in the same order.
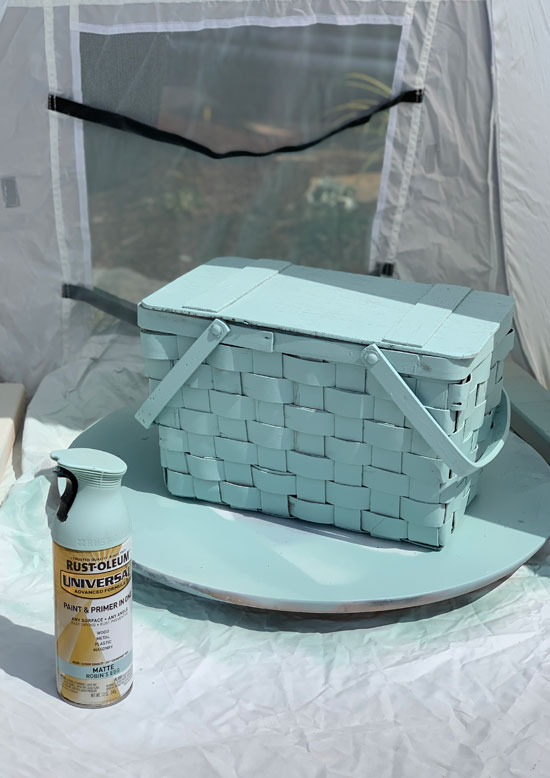
This covered much better, thanks to the primer. (Oh and if you happen to find a large lazy susan while you’re out junkin, grab it…it works amazingly well for projects like this one. I picked that tip up from my fellow T2T pal, Larissa from Prodigal Pieces!)
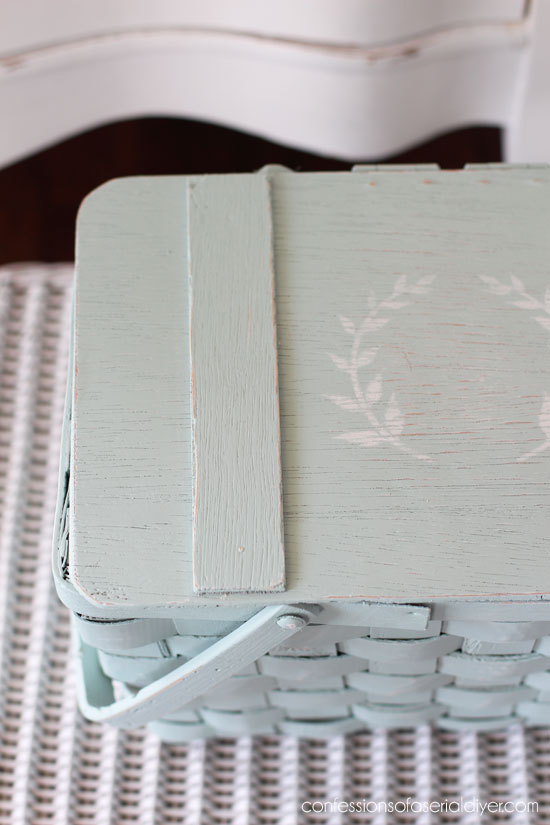
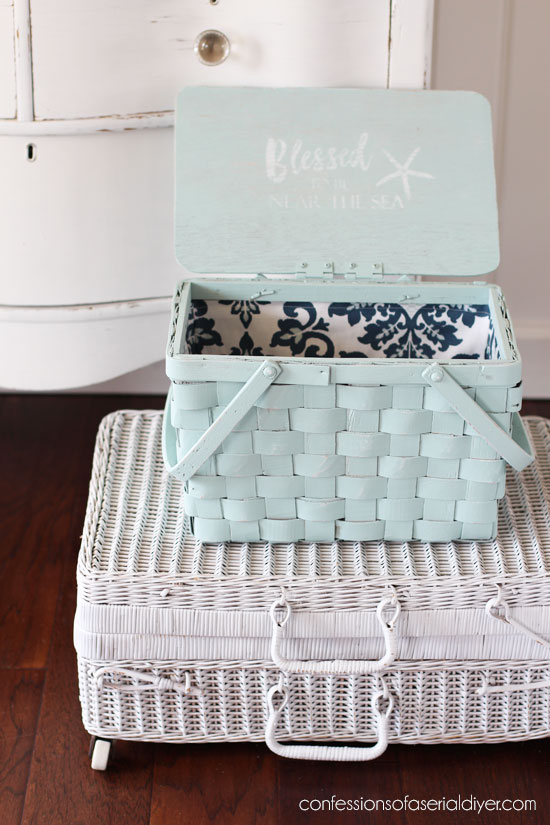
I wasn’t finished there though. I decided to add a little whimsy to the top:
I have this wreath stencil, but it was too large, so I ended up finding one just like it online by googling wreath silhouette. I uploaded it to my Silhouette Cameo and was able to make it just the size I needed.
I cut it out on contact paper and after centering it on the top of my basket, I gave it a couple quick sprays of the primer I still had handy. A little sanding and a coat of wax (just on the lid) and voila:
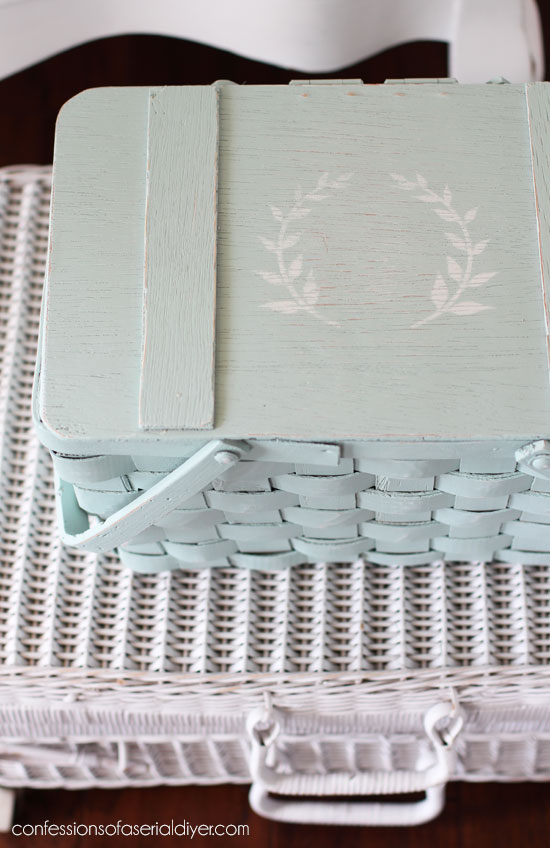
Instant whimsy!
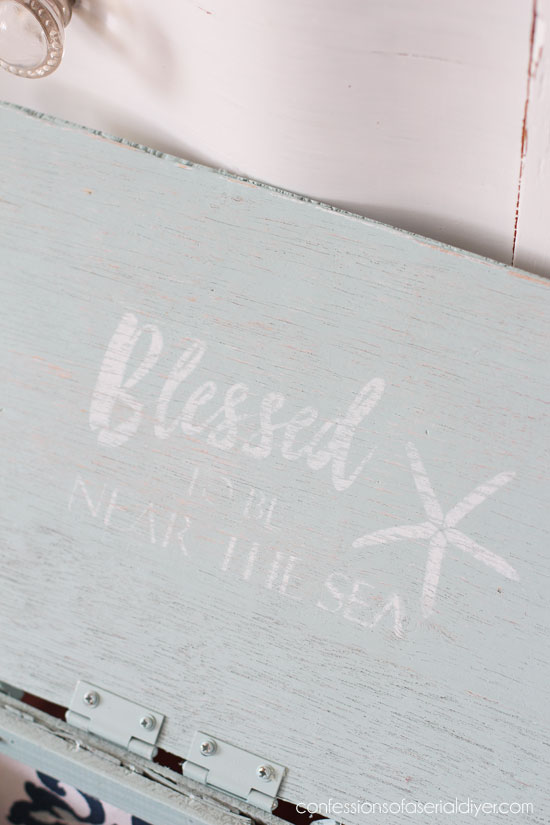
But I still wasn’t finished. I decided to add something sweet and coastal to the inside of the lid as well. Just something subtle I created in Photoshop Elements that looks faded and worn like it’s been there for years…
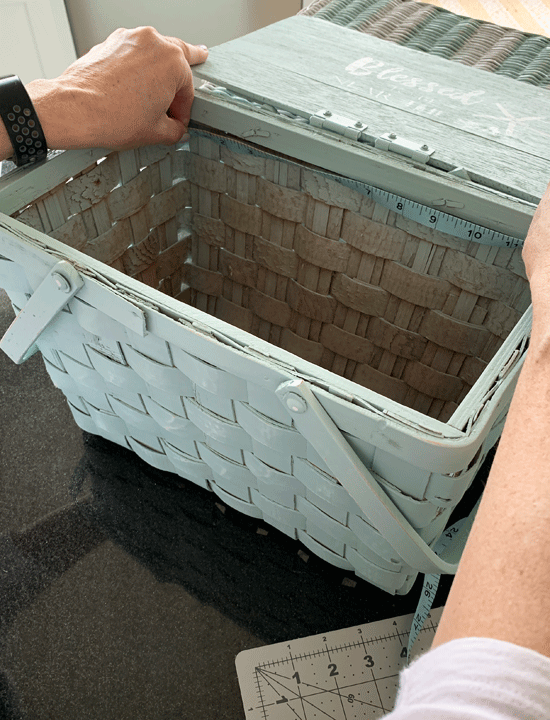
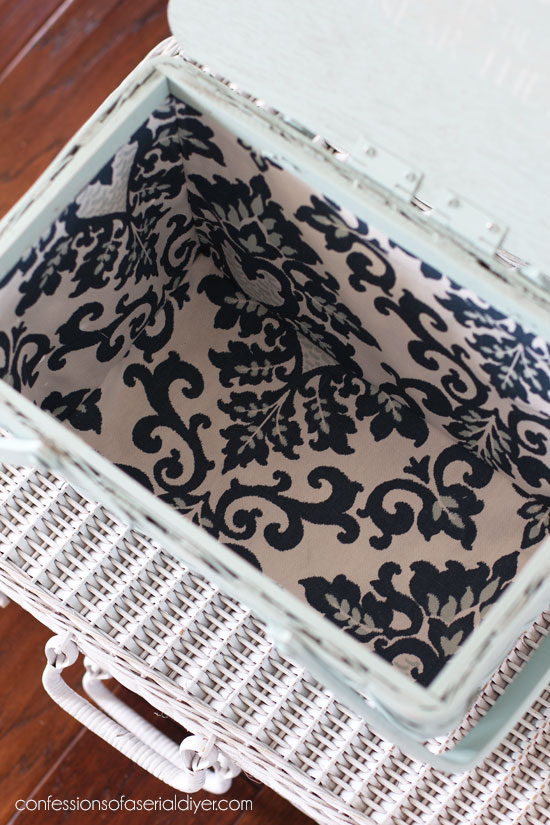
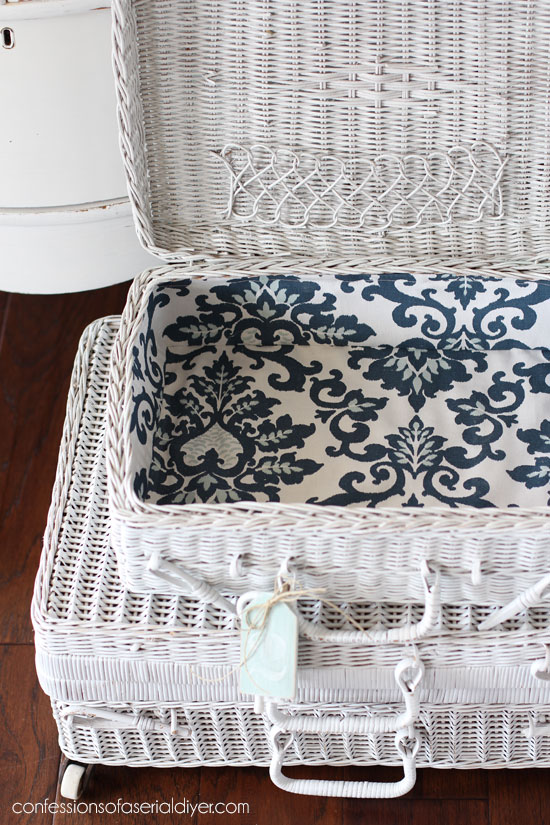
And you can also see that I lined the inside with this super cute fabric I found at Hobby Lobby:

This is not very difficult to do, but it does require some sewing. Beginner skills needed only, I promise! (Actually, you could probably get away with hand sewing or hot gluing your seams for this since they don’t have to look perfect!)
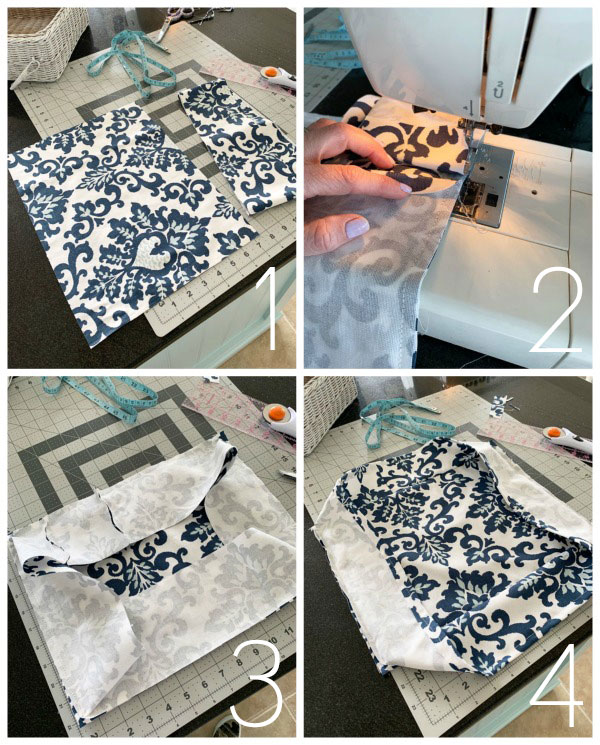
How to line a Basket with Fabric
This basket is a bit smaller at the bottom, so in order to make a liner for it, I started by measuring the width at the top and the bottom on all sides:
I also measured the height/depth of the sides as well as the length and width of the bottom of the basket.
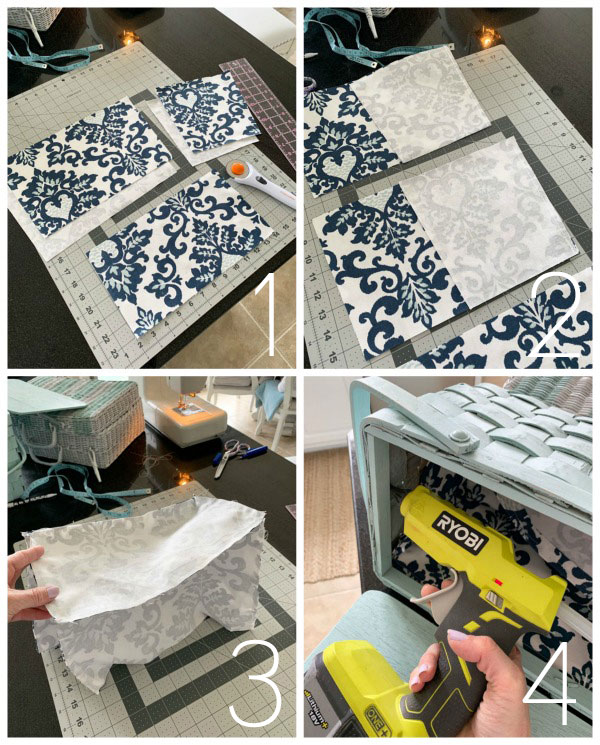
1. Using my rotary cutting set, I cut a panel for each side that was 1/2″ wider than I measured, and 3/4″ taller than I measured. (You can also see they are slightly larger at the top than at the bottom.) Then I cut a piece for the bottom, adding a 1/2″ to the width and length. (This allows for 1/4″ seam.)
2. Next, I sewed a side panel to both the front and back panels, right sides of the fabric together.
3. Then I sewed those two pieces together to create one long panel that will cover the sides of my basket. I lined one of the seams up with one of the corners of the bottom piece and sewed the side panel strip to the bottom panel all the way around. Then I sewed up the side panel strip where the two ends met. (The photo shows the bottom panel facing up.)
4. I folded the top of the sides over 1/2″ all the way around and sewed in place. Then I gave it a quick press with my iron and hot glued it in place with my glue gun beneath the lip of the opening of the basket.
Not bad for a $2 thrift store clearance basket, huh?
This could be cute storage for so many things!
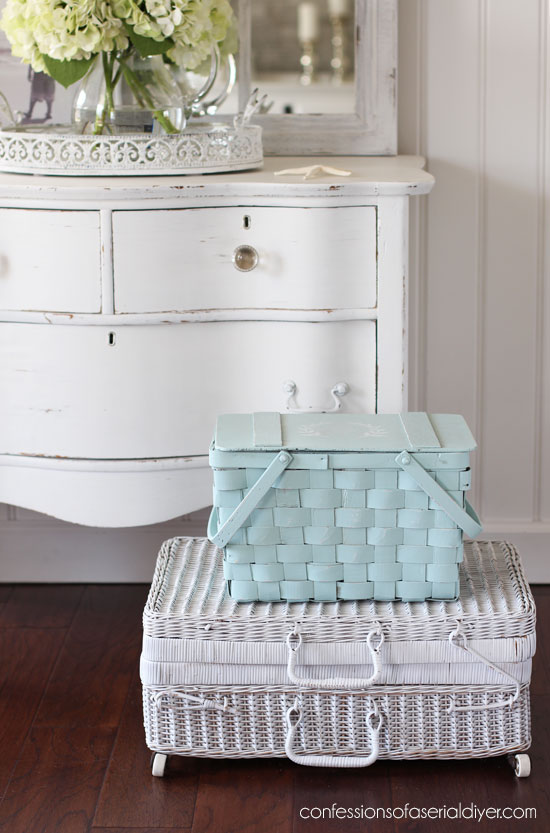
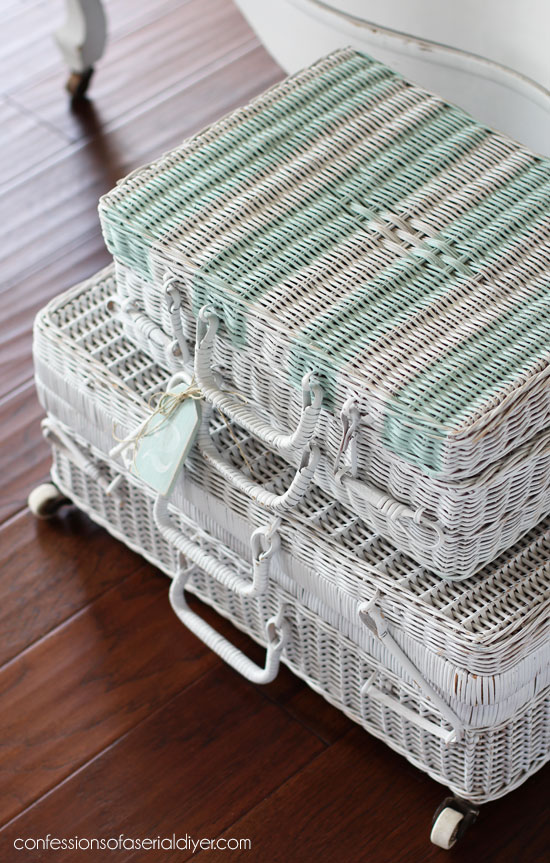
And for thrift store picnic basket #2…
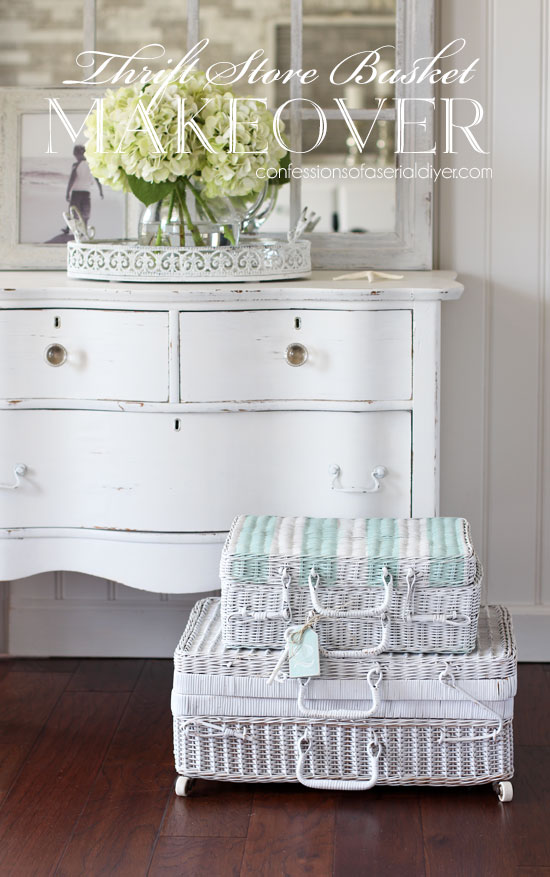
This is like a mini version of that one on the bottom! (I painted that one and added wheels to it in this post a couple of years ago.)
I decided to add stripes to this one while I still had the Robin’s Egg spray paint out.
I painted this one in the same order as the first one. I primed first, then followed up with Rustoleum satin white. Sometimes I only use primer, but give it a few coats for complete coverage since I like the matte finish, however I was running low on the primer.
To add the stripes, I used my favorite FrogTape:
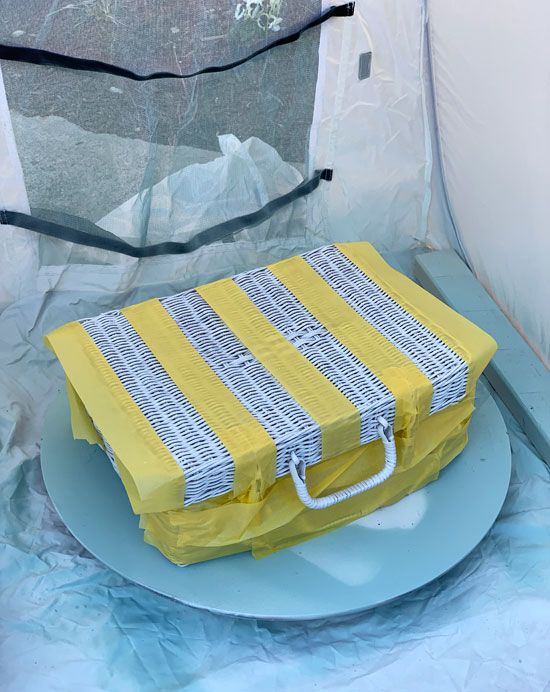
Then a couple quick coats and I was able to remove the tape…
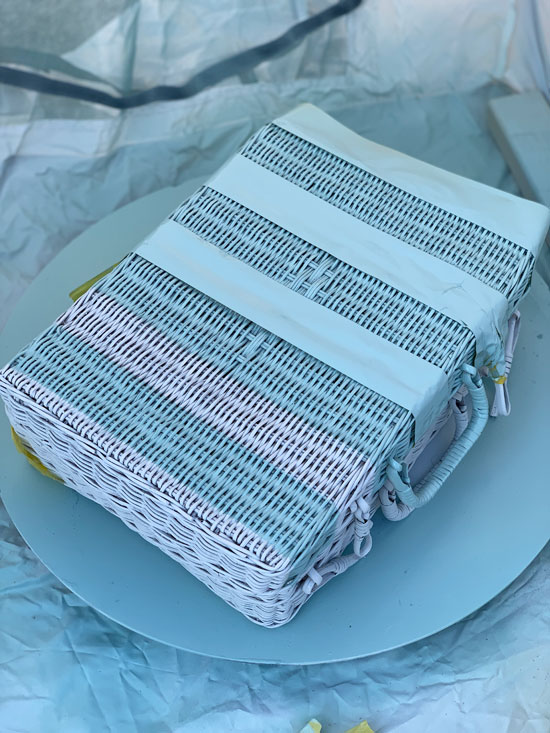
Even on a woven surface like this basket, the FrogTape gives nice crisp lines.
I had painted the top handle blue but wasn’t crazy about how it turned out, so I painted it white again.
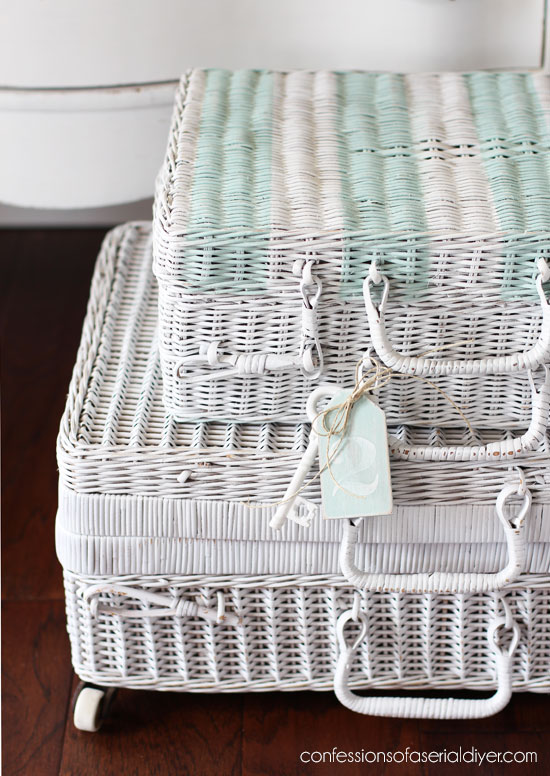
I felt like it still needed something so I cut a little tag with some scraps from the quilt tray I shared last week, using my miter saw.
I am always printing out numbers with my silhouette to add to things, but it’s a lot sometimes to drag everything out for such a small thing. So I bought some small number stencils that are just perfect for projects like this:

I used spray adhesive to hold the stencil in place (Spray the back of the stencil.) and filled it in with a small brush and my DIY chalk paint. I filled in the separated areas left by the stencil with a liner brush, then sanded a bit and sealed with wax.
I found this key that I had in my stash, from Michaels on the clearance originally I believe, to go with it and attached it with some twine:
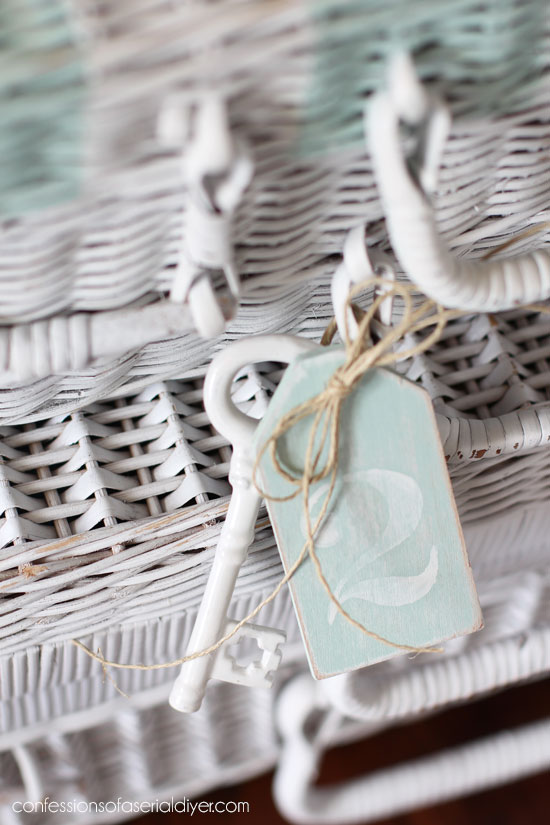
These small details are my favorite and they are what make each finished piece unique.
And I lined this one too!
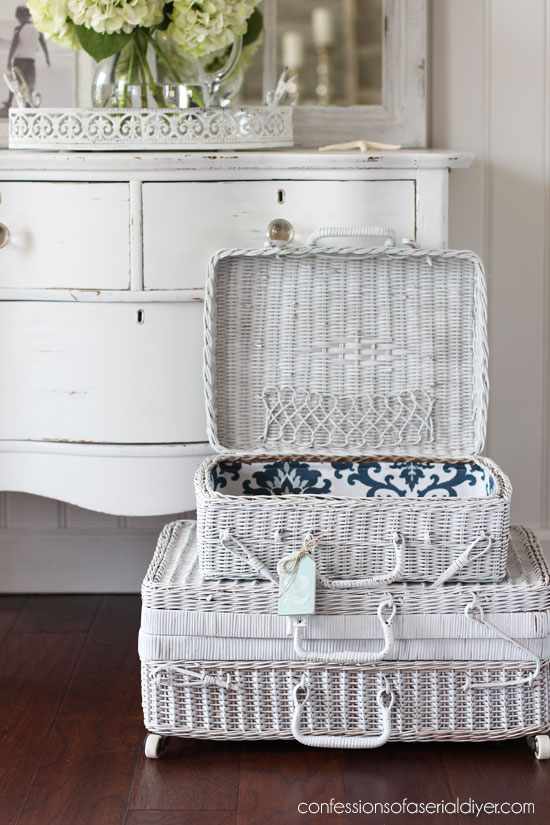
I used the same pretty fabric from Hobby Lobby.
Lining this one was a bit easier since it the top of the basket and the bottom of the basket are the same width.
Here’s how I tackled this one…
1. First I cut a piece of fabric for the sides. I was able to cut one long piece for this one that would wrap around the entire inside of the basket. To do that, I measured the circumference of the inside and added 1/2″. Then I measured the height/depth of the inside and added 3/4″. My fabric wasn’t quite long enough to do one continuous strip, so I had to attach another small piece to get the length I needed. For the bottom, I cut a piece that was 1/4″ longer and wider than the actual measurement of the inside bottom.
2. I started attaching the side panel at the center, leaving about 1/2″ unsewn. I sewed it all the way around, and then I sewed up the seams where they met.
3. Here is the side piece connected to the bottom, and you can see where I had to add a bit of length to my side panel as mentioned in step #1.
4. I folded the top edge over all the way around about 1/2″ and sewed it in place. Then I attached it just under the top lip using my hot glue gun.


I hope you enjoyed these basket makeovers! They will both be heading to my booth!
My friends have fun thrifty makeovers to share with you today as well:

{Lauren is knee deep in a bathroom reno at the moment and will rejoin us next month!}
I hope you got your makeover fix for the day with all these makeovers!
I know I’m happy because I can cross off TWO more pieces from my latest haul!!

If you missed any of these makeovers so far, you can catch up below:
Estate Sale Shelving Unit Makeover
$6 Thrift Store End Table Makeover
I’m working on the tall blue cabinet at the moment, but it’s kicking my behind so it doesn’t look like it will be ready to share by Thursday. Instead, I’m going to take y’all on a field trip to my booth! It’s been a while!
See y’all then!
UPDATE: See what’s new with my booth HERE!
XO,
![]()
Don’t Miss a Thing!
If you like what you see, there are several ways to follow along!
Email * Facebook * Pinterest * Twitter *Instagram


Mary Kaiser says
How adorable are those baskets now!! You are my hero rescuing all those baskets, and at such a good price I might add!!! I love how they turned out. I am excited to see your booth on Thursday and looking forward to what you do with the blue cabinet, how fun!
Christy says
Thank you, Mary! I will save ALL the baskets ha ha! See ya Thursday! XOXO
Larissa ~ Prodigal Pieces says
Baskets cases…er…I mean basket lovers unite!! ✋???????? Those were too pretty to pass up. You gave them such charm, Christy!
Christy says
Ha ha! I feel like a real basket case sometimes! Yes, I do love a basket! Thanks, my friend! XOXO
Christina in SW FL says
Super cute baskets! Wow! I bet they go fast in your booth. Thanks for the tips on lining baskets. Truly charming.
Christy says
Thanks, Christina! I hope so! XOXO
Cheryl Atkinson says
Christy, these are so adorable. I also love picnic baskets. i don’t know how to sew but i will sure give it a try. You make everything look so sweet. What was that piece of furniture in the first picture? Hmmm?
Christy says
Thank you, Cheryl! Are you referring to the blue night table? That’s a really old project that I brought from our old house but have yet to find a place for! I need to take it to my booth! 🙂 XOXO
Debra says
Cute baskets! Good save from the thrift stores. Thanks for sharing.
Christy says
Thanks, Debra! I will save them all! lol XOXO
Erin Kaven says
I just love getting your emails for fresh pretty ideas!
Christy says
Aww thank you so much, Erin!! XOXO
Doreen says
Adorable basket makeovers! I’ve done a few and they make fun home decor. Thanks for the 411 on lining the baskets.
Christy says
Thanks, Doreen! They are fun to redo, and you are welcome! XOXO
Robyn Wright says
I’ve caught your addiction to baskets and silverware boxes. My problem is I have plenty waiting to be refinished and I buy more. Erg…
Christy says
Oh no ha ha! I’m the same way!! XOXO
Julie Briones says
These look lovely, Christy! Can’t wait to see your booth tour. 🙂 Feel free to link-up at Homestyle Gathering, if you have a moment. (As always, no pressure, my friend!)
Christy says
Thanks so much, Julie! XOXO
LeAnn Hileman says
Holy cow girl! You are amazing, to take these baskets which look like junk and make them into something so beautiful!
Christy says
Aww thank you so much, LeAnn! XO
Cecilia from Georgia says
Baskets are so useful for hiding stuff when unexpected company arrives! I am going to find a cute basket and copy you so I can throw my mail that gathers on the counter in it and maybe I won’t forget where I tossed it in the frenzy of straightening up!! Love the stripes….of course, I do!! XOXO
Christy says
Oh yes absolutely! You can stash all kinds of junk in them ha ha! Thanks, Cecilia! XOXO
Jen @ Girl in the Garage says
Giiiiiirrrllll. I love your stack of unpainted baskets, it looks gorgeous like that! These turned out super cute though- way more effort than I probably would’ve put into them. LOL. I can’t wait to see the tall cabinet when it’s finished! xo
Christy says
Thanks, Jen! If I weren’t blogging about these, I surely would not have put as much effort into them ha ha! XOXO
Paula Pentoney says
Christy,
I always look forward to your posts! You have great ideas and results. It’s so easy to follow along. Love these picnic baskets! Thanks for sharing with us
Best,
Paula
Christy says
Thank you, Paula! I appreciate that so much! XOXO
Sandra says
I love the stripes! Thank you for sharing your tips ????????
Christy says
Thank you, Sandra! It’s always a pleasure! XO
Kate Speirs says
Hi Christy!
I just love your posts and projects each week, and you’ve inspired me to start doing some of my own! I bought a spray shelter (which you introduced me to and is basically the greatest invention ever!), and I wondered if you placed something on the bottom of it before spraying? I have found that I am getting some transfer of colours from previous projects, so I should have put something removable down first, and wondered what your process was.
Thanks for the continued inspiration!
Kate
Christy says
Hi Kate! I LOVE that you’ve been inspired to create!! Yes that tent is awesome! I haven’t noticed paint transferring from the bottom, probably because I’ve been using my big lazy Susan in the bottom of mine. If that is an issue for you, try laying a drop cloth in the bottom. That should help! XO
Ange Mills says
Great tutorial! I wouldn’t have thought to use a primer first. Love the inside as much as the outside. Another great job.
Christy says
Thank you, Ange!! I learned the hard way not using primer first! XOXO
Marcie Lovett says
They’re both wonderful, Christy! The fabric lining is such a fun surprise when you open the lid. After you work your way through the latest haul, you’ll need to get to the other baskets in your stash because these won’t last long in the booth!
Christy says
Thank you, Marcie! I’m so glad I found that pretty fabric… I almost like the insides better ha ha! XOXO
Rose Lefebvre says
Nice!!! You sure do have a designers eye!!
Christy says
Aww thank you, Rose! XOXO
Nancy @ Artsy Chicks Rule says
Those turned out so cute Christy! I LOVE the fabric you used inside! xoxo
Christy says
Thanks, Nancy! I love it too…almost like the insides better lol! XOXO
sharon austin says
Super cute! Great for storage 🙂 And here I thought you only hoarded wood trays LOL
Christy says
Thanks, Sharon! Yes! And admittedly, I hoard a few things lol! XOXO
Becky says
These are lovely! The info on lining is very timely, I MUST finish some baskets and get them into permanent homes (AKA out of my storage room, haha!)! How can anyone resist a good basket?!
Christy says
Thank you, Becky!! I am such a sucker for baskets!! Have a great weekend! XOXO
Jo Ann says
Several years ago, I found a huge, sturdy picnic basket at a garage sale at a great price! The only downside was instead of having two handles that folded down and a lid that lifted up, the lid was split in two hinged pieces with the handle in the middle and it was not convenient to use. This post inspired me to think outside of the box and I did! I removed the lid and lined it with some blue gingham fabric and voila! I love it! Thank you for the inspiration
Christy says
Oh I am so happy to hear that, JoAnn! Isn’t it the best when you can turn something ho-hum that is just taking up space into something you love again?! Thanks for sharing with me! XOXO