Hello friends and welcome to my big ceiling reveal!! I really love to make over all kinds of junk I drag home, but ceilings? Not so much. I mean how much more boring can a ceiling makeover be, right? Yawn. Snore. But it had to be done, y’all. I had to put all my fun makeovers on hold to work on this:
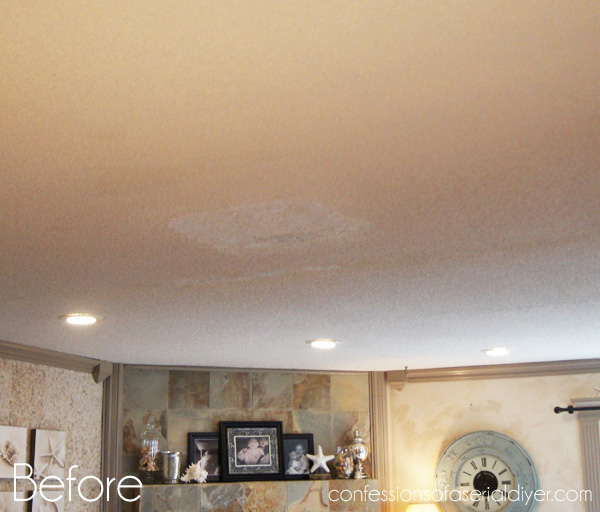
Popcorn central woot woot! This was taken a couple of years ago actually when I was writing up my wish list of projects to be accomplished that year. As you can clearly see, this didn’t get crossed off the list that year.
The patch job in the center was to repair a waterFall from our Master Bath. I had just had Brennan and we were in full swing on our Master Bath Remodel. My husband was working on the plumbing when the ceiling gave way and water came gushing out of our ceiling. I was feeding Brennan at the time right about where I took this picture from. You can barely see how the water ran to every seam in the drywall on the ceiling and turned it a lovely shade of yellow. Then last year we had a water heater leak from upstairs above the TV.
I have been wanting hardwood floors for years now and my hubby finally gave me the go ahead at Christmas. I was beyond excited! BUT, the ceiling had to be dealt with first.
Here’s how we dealt with it:

I love how it turned out!

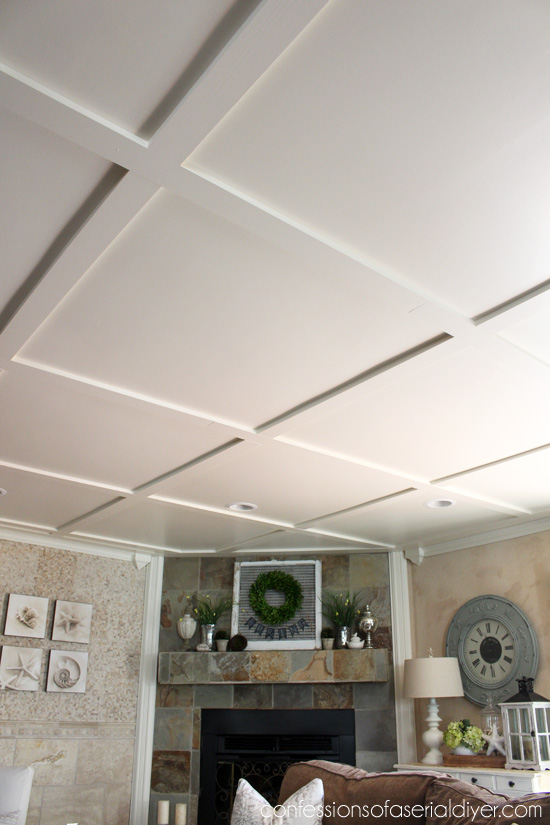
It adds a ton of character! We love coffered ceilings, but our ceiling in our living room is only eight feet high, so we knew that was a no-go for us. Then a couple of New Year’s Eves ago, my SIL sent us a hilarious video of my brother dancing to Just Dance on the wii at their neighbor’s house, and I spotted their ceiling. Immediately I knew that’s what I wanted.
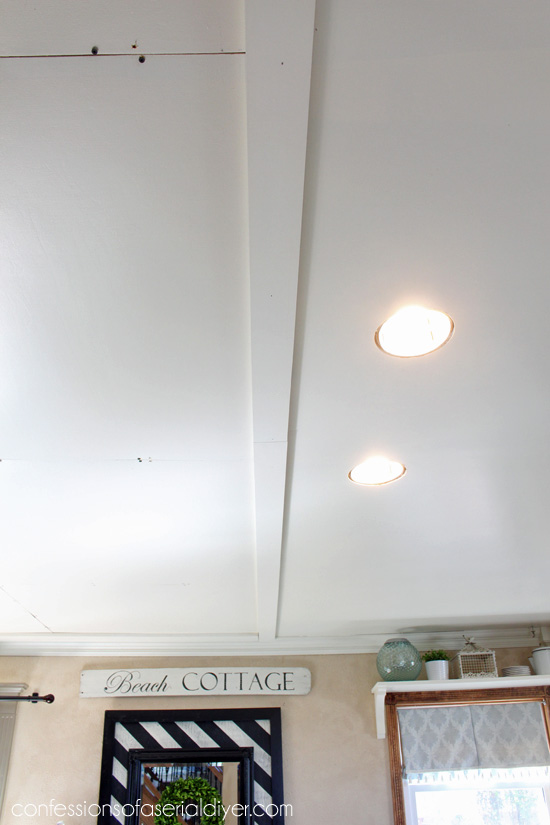
We started by covering the nasty popcorn and patchwork ceiling with 4X4 luan panels (started as 4X8’s), that we painted before hanging. The fact that the master bath flood of 2010 left a dingy yellow line at almost every joist was a fantastic help! That helped us to line the new panels up so we could screw them right into the joists.
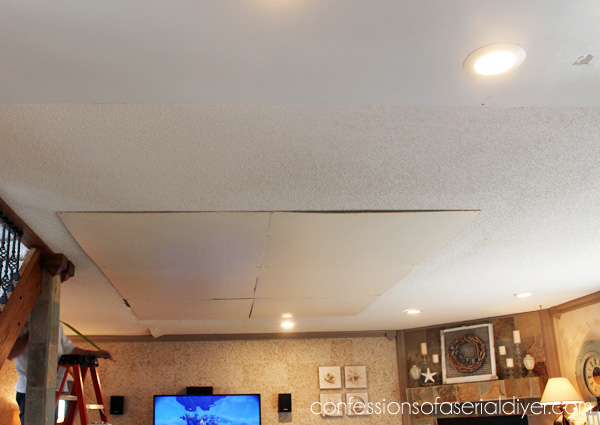
You can see at the far end to left above the TV where the water heater leak left sagging popcorn.
We continued to hang right up to the seam you see in the foreground of the last photo where the popcorn ends. That marks where the kitchen begins.
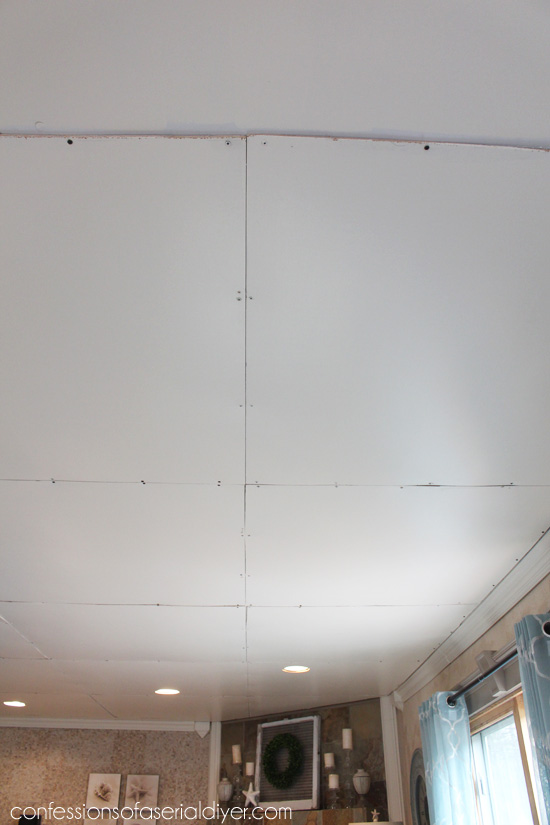
I think our family and friends, and even my hubby were a bit skeptical of my vision at this point. Here the molding got a fresh coat of paint to match the ceiling, and as you can see, we did not take down the crown molding to complete this project. Lazy DIYers. We ran the perimeter boards right up to the molding.
We used the same paint used on our kitchen cabinets (I share a complete how to paint kitchen cabinets here.), in my favorite off-white, Behr’s Cottage White. This is a satin finish.
It took us nearly two months to get to this point. As soon as March Madness was over, I went to town and got all the boards painted and ready to go.
I used primed 1X6X8s from The Home Depot for either side (to hide a gap on the left side of the room, made them even by doing it on both sides.), and 1X4X8s for the rest…
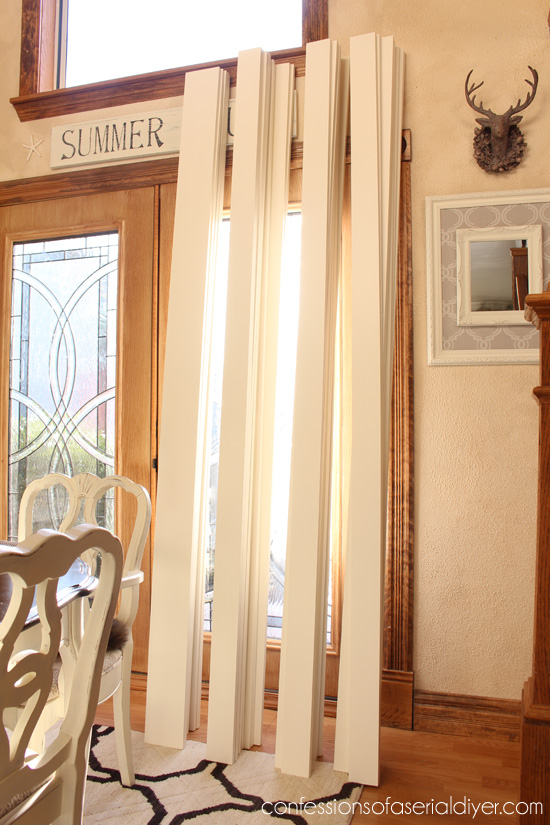
I used 31 in all to complete my space. Then I started hanging them using my cordless nail gun. I started with the perimeter first.
Then I added the pieces going across.
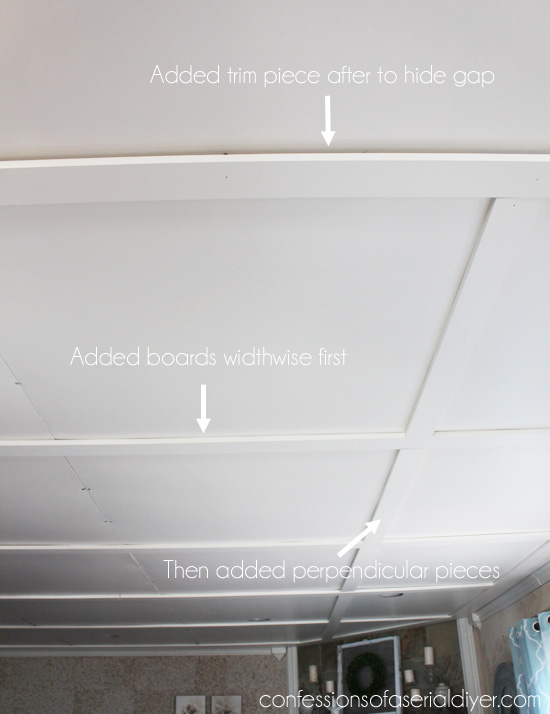
And then in between going perpendicular. Those were the toughest pieces. It was hard to line them up perfectly even to look like one long board.
I am not a professional faux coffered ceiling hanger, I totally eye-balled every piece I hung. Our room is not perfectly square anyway, so it was probably for the best.
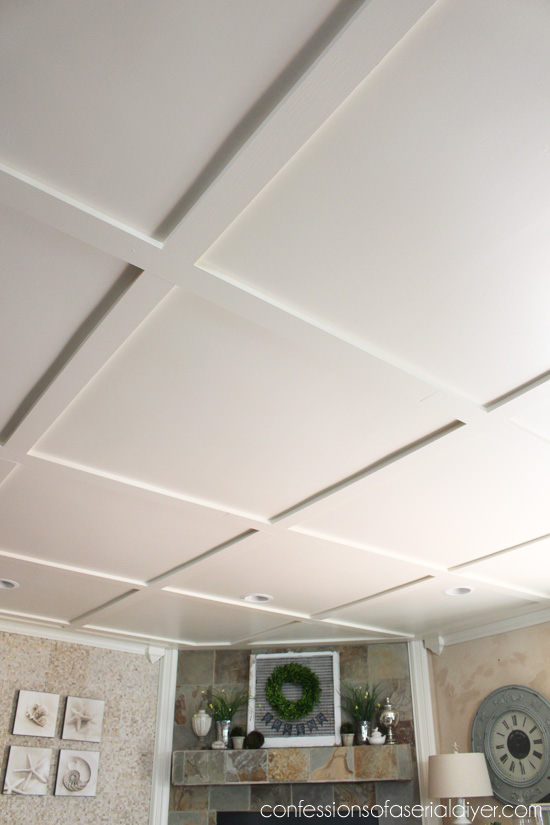
After everything was up, I filled in the nail holes and caulked the gaps. Then touched up with paint.
I am really loving the results. These pictures really show how open my floor plan is…
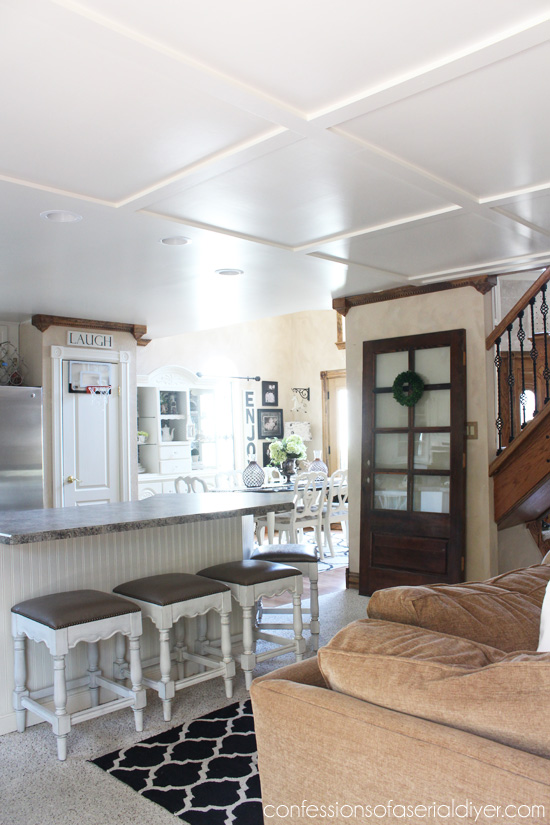
Just imagine with beautiful new hardwood floors!
UPDATE: No need to imagine…see our hardwood floors HERE now yippee!
We ended the ceiling treatment just before the kitchen because for one, that was where the original popcorn ended, but also because some of the existing lights in the kitchen would not have cleared the wood pieces had we kept going.

I want to slip cover my sectional eventually too. Maybe when my four-year old outgrows his sticky finger syndrome.
UPDATE: I did it! I slipcovered my sectional…see it HERE now!
This space looks so much different from when it was my husband’s bachelor pad. I’ll have to see if I can dig up any photos.


I recreated my Spring mantel from last year before our Easter dinner guests arrived. It’s awesome to have those old posts for reference to decorate quickly.
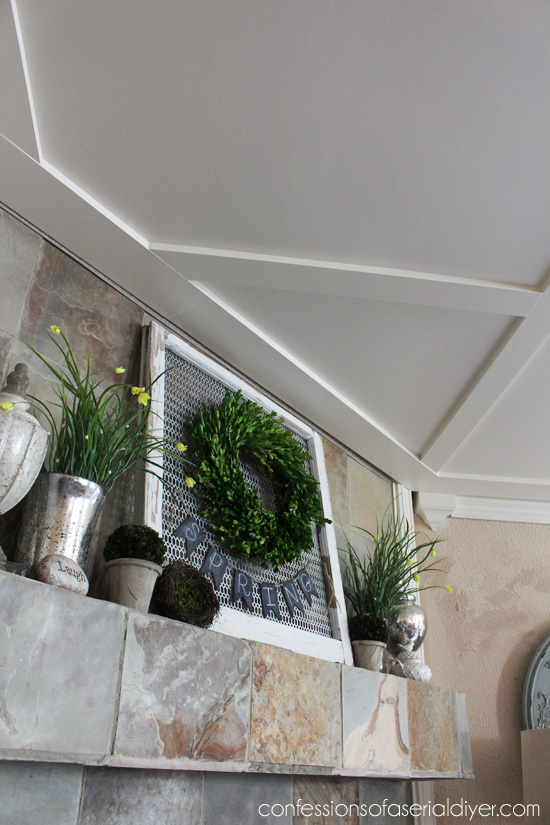

I’ve been working outside too!

Too bad I didn’t clean the glass door while I was at it. 🙂
I guess I’ve goofed off enough. A few thrifty makeovers are on the way, I promise!
XO,
![]()
If you like what you see, there are several ways to follow along! 
Email * Facebook * Pinterest * Hometalk * Twitter * Instagram
I love to share at some of these great parties:
Home Stories A to Z Not Just a Housewife Kammy’s Korner The Happy Housie Design Dining and Diapers Liz Marie Blog Funky Junk Interiors Savvy Southern Style Tatertots and Jello DIY Show Off Redoux Interiors Between Naps on the Porch The DIY Dreamer Oh My Creative Little Miss Celebration Just a Girl and Her Blog Sand and Sisal Interior Frugalista House on the Way Addicted 2 DIY I should be Mopping the Floor Miss Mustard Seed

Marcia Stansberry says
I LOVE it all! I wish you could come live with my family for a while and help me
Christy K. James says
Thanks so much, Martha! Let me see…do you live somewhere tropical? Maybe right on the beach, and would my room have a view? 🙂
Kristen says
what a wonderful job, Christy! I always tell myself ‘if I can dream it I can do it…sort of’ 🙂
Christy K. James says
Thanks, Kristen! Yes you can!! 😉
Sue Farmer says
Love, love, love your coffered ceiling!!! I have always loved coffered ceilings and yours looks great. I am sure it was a LOT of hard work. You amaze me!!
Christy K. James says
Thanks so much for your sweet words as always, Sue! The hardest part was looking up so much…put my neck in a pinch several times ha ha. 🙂
Marilyn says
Such a transformation! You are amazing. I love how you turned the mishap of the water staining the ceiling into a helpful guide for where to attach your boards to the joists. Atta girl!
Christy K. James says
Thanks, Marilyn! Those water stains came in very handy! 😉
Celia says
wow, wow, wow Christy ! Nice job! We had water leak from the 3rd floor of a Dutch Colonial heating pipe that ran for 3 days. So I understand seeing your ceiling rain! Water went all 4 floors & accumulated in the basement (foot of water). House was on the market. A joy…It’s all water under the bridge now. LOL Our hardwood floors(honey oak) were refinished & came out very light. They looked awesome. I can’t wait to refinish our floors here to as light as they can go. What color will you do? ….The kitchen here? Worse than popcorn. Drywall compound swirled on ceiling & the walls! The swirls looked like ears! Additionally he used backer board. The weight of the ceiling & walls was crazy. Took days to gut! We have cement ceilings (yes cement) in our bedroom- previous owner was builder/mason/70’s. You have just solved a huge dilemma for me! Thank you! !
Christy K. James says
Thanks, Celia! Wow, sounds like you had your hands full! Sounds like our water mishap was nothing compared to yours. For the floors I am going with a medium tone to match the existing stain on the staircase. I can’t wait to get that project started! 🙂
Nancy @ Artsy Chicks Rule says
Yay! Looks SO great! So glad I got a sneak peek in person!! 🙂 Can’t wait to come over and see the floors once they are done!
xo
Nancy
Christy K. James says
Thanks, Nancy! I am SO happy they are done! I’ll have to have another lunch when my floors are done. 🙂
Heather @ Viral Upcycle says
Christy that is amazing and look so professional! Your hard work played off. Inspiration for my ugly ceilings.
Christy K. James says
Thanks, Heather! I can’t tell you how tired I was of looking at that old ugly ceiling. I tried the best I could to keep it out of pictures! XO
Heather J says
You are truly a jill of all trades:) It looks wonderful! Great job! I can’t let my husband know about you or I’ll never be able to live up to his expectations;) You’re awesome!
Christy K. James says
Thanks, Heather! Ha ha you are funny! My husband thinks I try to tackle too much. I just want things done, so one day we can sit back and enjoy it. Of course there is always something else that comes up, right? Hope you’re having a great week so far!
Brigitte says
Even if you’re not a “pro”, your work looks great! Your home is lovely and I’m sure the hardwood floor will only add to its charm.
Christy K. James says
Sometimes you just never know how a project will turn out, but it turned out better than I envisioned, which makes this little DIYer pretty darned happy! Thanks so much for your sweet words…now I can’t wait to start on the floors. 🙂
Marie@The Interior Frugalista says
I LOVE IT Christy! Kudos to you for doing such a fabulous job. Such a great way to remove those popcorn ceilings without the nasty task of scraping them off…and with way more impact too. Hmmmm, need to show Mr. Frugalista this. I can’t stand our popcorn ceilings.
Christy K. James says
Thanks, Marie! The person who invented popcorn ceilings was probably considered a genius at the time lol. Now we can’t get rid of it fast enough! XOXO
Sally says
Wow!! You did good! That looks wonderful, very rich looking, I was thinking how it’s going to look with wood floors and its going to be beautiful. I mean it is lovely now, but wood floors……you never cease to amaze me. Great job!!
Christy K. James says
Thanks so much, Sally!! 🙂 Now I can’t wait to get started on the floors! XO
Becky says
Amazing! I can only imagine the work involved in keeping all those straight lines! Fantastic job.
Christy K. James says
Thanks, Becky! There may have been a few choice words involved ha ha, but it came out pretty well in the end. 🙂
Shirley Perez says
You are amazing. The ceiling is beautiful, like pretty much everything you do! Congratulations on another great project.
Christy K. James says
Thank you…you are too sweet, Shirley! (That’s my little sister’s name too!) I’m so glad you like it! XO
Maggie M says
What a great job. Love the new ceiling:)
Christy K. James says
Thanks so much, Maggie! I’m pretty much in love with it. 🙂
Tania says
Wow, that looks so great! I’m sitting here looking up at my ceiling now! lol!
Tania
Christy K. James says
Thanks, Tania! My Mom has been eyeballing hers too lol. 🙂
Betty says
Thank you, thank you, thank you!!! I’ve been trying to explain to my husband what I wanted and how I wanted it done – and you did it perfectly! Your ceiling is gorgeous. I only hope ours turns out as well.
Christy K. James says
Oh great! Glad I could help! Good luck. 🙂
andi says
Holy Freakin’ Smokes WOW!!!! Absolutely love!
xoxo
-andi
Christy K. James says
Thanks, Andi! Next on the list is hardwood floors so mine can pretty like yours. 🙂
Addie says
I love your: “I can tackle ANYTHING!!!! attitude!!!!
Addie
Christy K. James says
Thank you so much, Addie! That gets me in trouble sometimes, but sometimes it gets me a pretty new ceiling. 🙂 🙂 🙂
Carole says
I am always amazed at what you are able to do. I guess when I was your age I accomplished quite a bit too, however, I didn’t have your skills (does determination count?)
What a beautiful ceiling. I would love to have something similar because I have very high ceilings so it would be pretty dramatic. Let me know if you ever have any free time; just kidding. I love your style, ideas, work ethic, everything. I wish you were my next door neighbor. Thanks for all your hard work and documenting it for us.
Christy K. James says
Thank you so much for the very kind comment, Carole! I do love a project that’s for sure! Thanks so much for following along. 🙂
TwoPlusCute says
Well done! Wow what a feat and how nice it turned out.
Christy K. James says
Thanks so much, TwoPlusCute! 🙂
Paula@SweetPea says
I can only imagine the hours and hours of hard work that you and your hubby put into this project. Wow! The end result is so worth it. I love your new ceiling!!
Christy K. James says
Thanks so much, Paula! We are so thrilled with the results. 🙂
Wendi @ H2OBungalow says
Love this! We have the crummiest ceilings and you’ve inspired me to look up & be creative! Awesome project!
Christy K. James says
Thanks so much Wendi! SO glad to cross that project off the list! 🙂