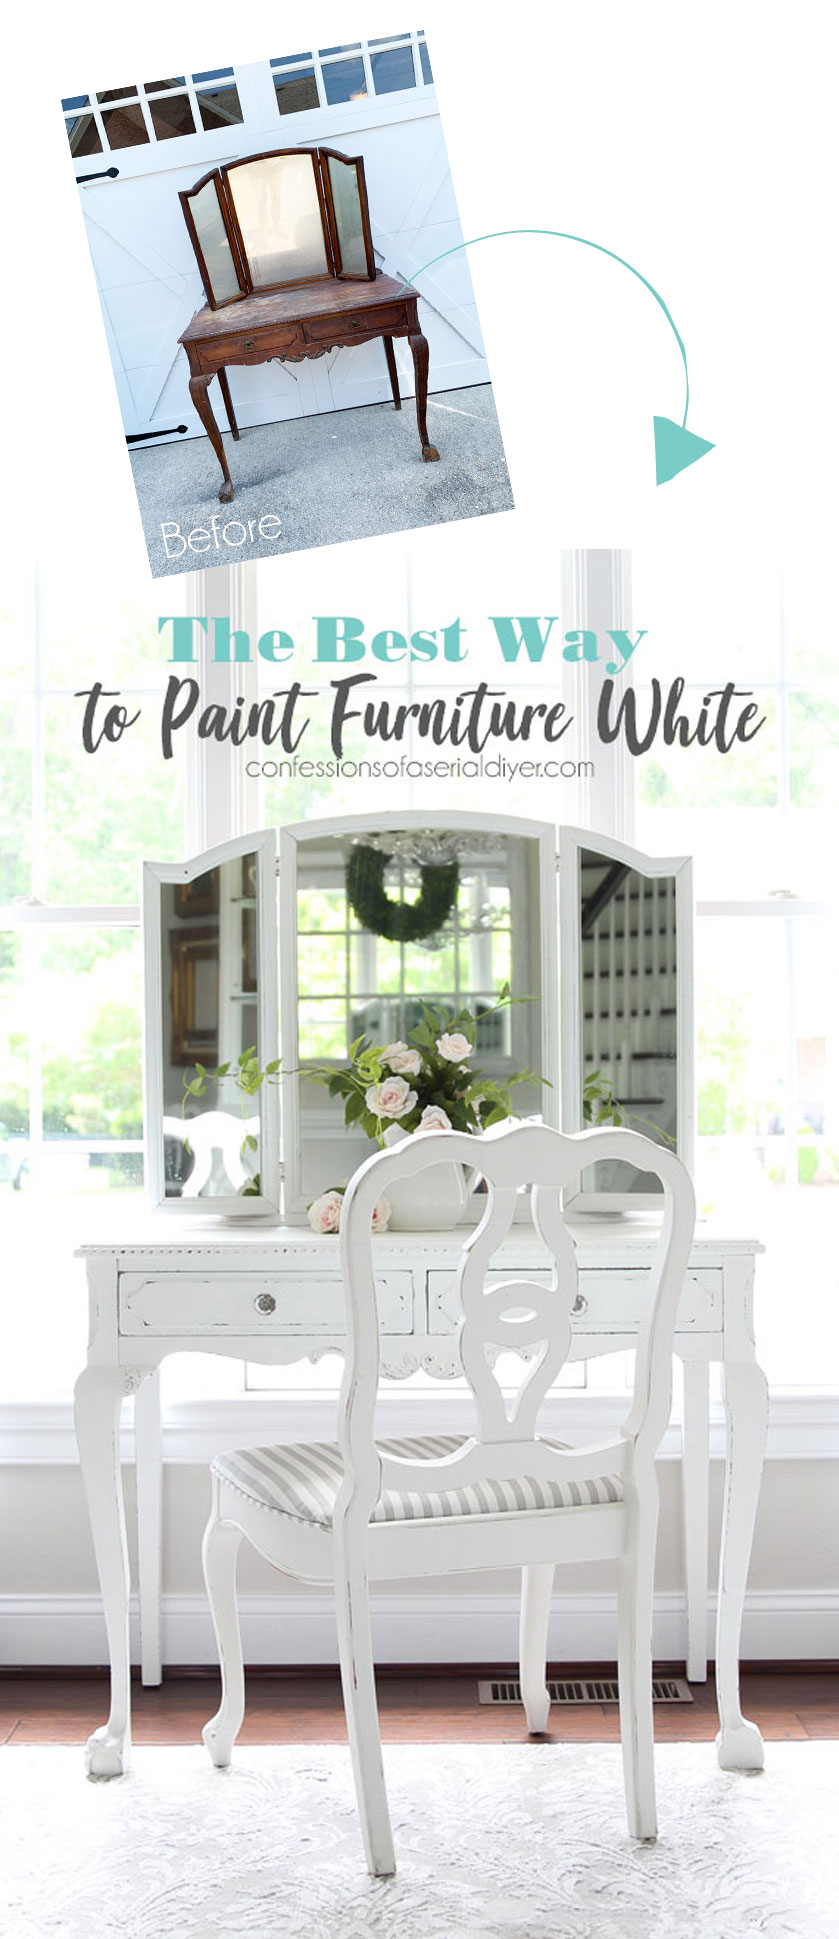
Hello amazing friends! Today, I’m back sharing THE BEST way to paint furniture WHITE using this gorgeous dressing table I shared back in 2020:
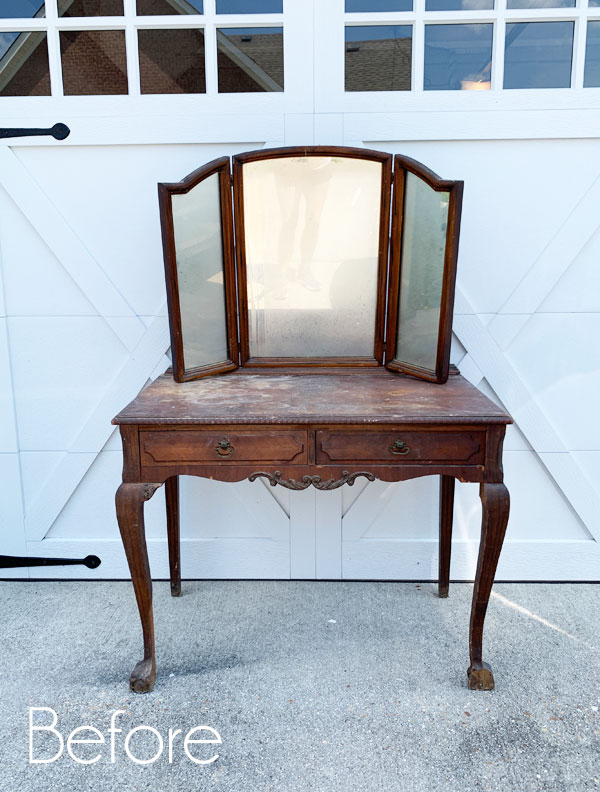
This dressing table belonged to a lovely local reader who blessed me with my Mother’s Day haul that you may remember if you’ve been hanging out with me for awhile.
I’ve included a few affiliate links so you can find the products I love.
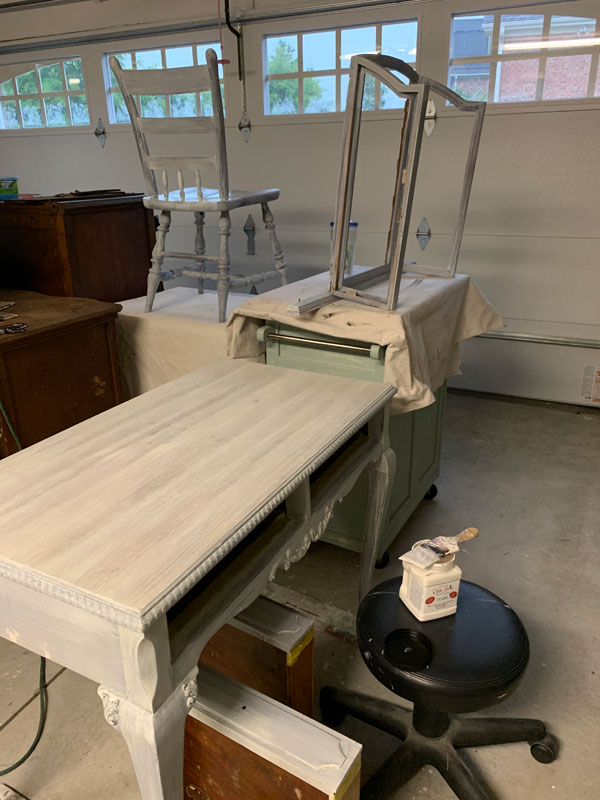
The before
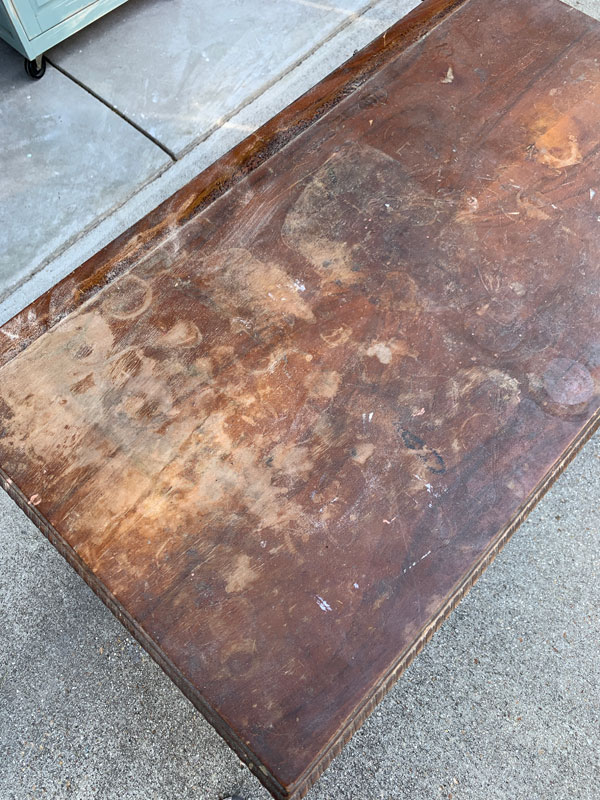
This piece needed some serious TLC. Before I could get started on this makeover, I needed to address the top:
Prep
If your surfaces are in good condition, you can skip the sanding step and go straight to cleaning!
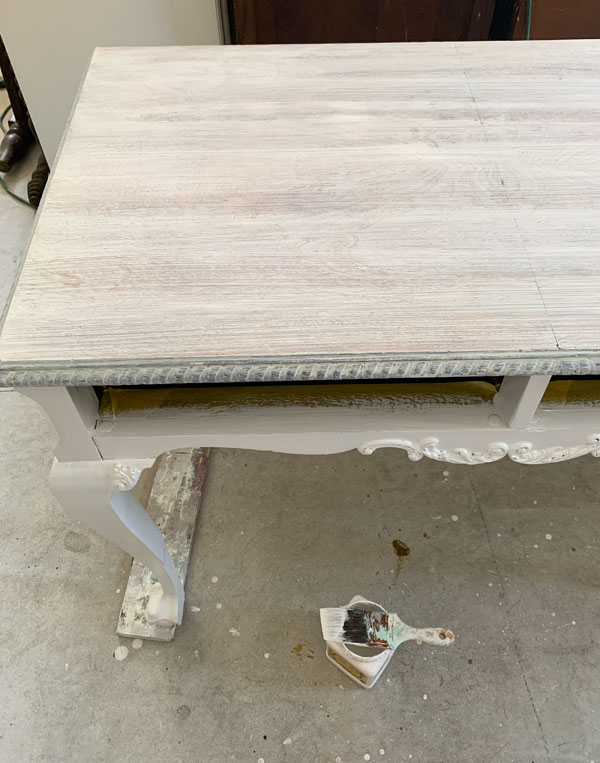
Mary just wanted a simple paint job, but if I painted over this top in its current condition, you would be able to see all those imperfections in the final finish.
So, I sanded the top using my orbital sander and 120 grit sandpaper, followed by 220 grit sandpaper.
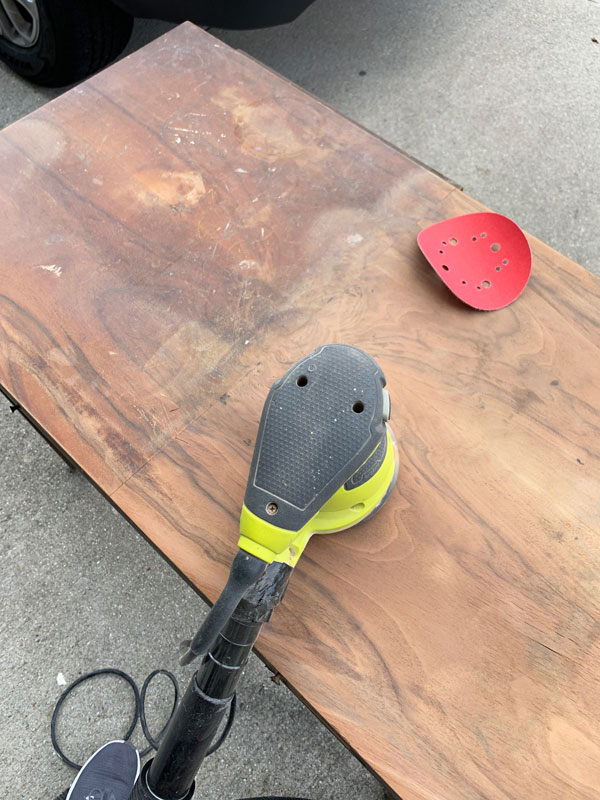
Once I had all the sanding done, I gave it a good vacuum with my shop vac using the brush attachment. Again, if your surface is in good condition, you can skip the sanding!
Clean
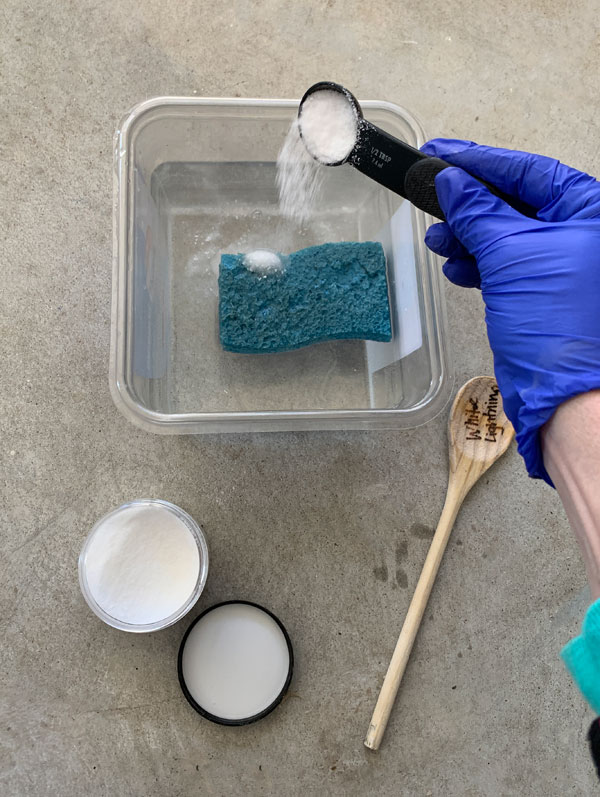
Next, you’ll want to clean your piece well or, if your surfaces are already in good condition, you can start here!
I like to use White Lightning to clean. It is a degreaser and a deglosser, so be sure to wear gloves.
I just mix one TBSP with a half gallon of warm water:
After cleaning, rinse away any residue by swapping out your dirty water for clean water and giving it another wipe down.
The Best Way to paint furniture white
I paint a TON of white furniture, and I’m sharing everything you need to know to get the best results!
Prep for Possible Bleed-through
If your piece is newer than the 80’s, and the finish is intact, it’s likely that the tannins in your stained surfaces will not bleed through, and you can skip right to painting! (We’re using chalk paint, so no sanding needed!)
Any older cherry or mahogany pieces or pieces that have a sanded finish or areas where the finish has worn away, have a chance of the tannins bleeding through your paint finish, no matter what kind of paint you use.
If you are unsure if your piece will have bleed through, you can start painting in an inconspicuous area first to test. Bleed through looks like pink splotches or streaks.
The magic of BOSS
To combat and prevent bleed through, I reach for my favorite product: Dixie Belle’s BOSS in white:
The wonderful thing about BOSS (also available in clear and gray) is that not only does it seal in those tannins, it has no harsh odors, and if you use the white formula, it saves you a coat of paint when painting white! You can even use it right over your paint if you realize later that you have some bleeding.
The key to using BOSS is to allow plenty of dry time!
I allowed this to sit overnight.
In most cases, one coat will do it, and even if you see bleed through the BOSS, if you wait the necessary among of time, the tannins should not bleed through your paint. If you get a stubborn piece, you may need to give it one more coat and allow it to dry overnight again, but that is rare!
As I mentioned above, if your project piece is newer, you can likely skip this step altogether and get straight to painting!
Paint
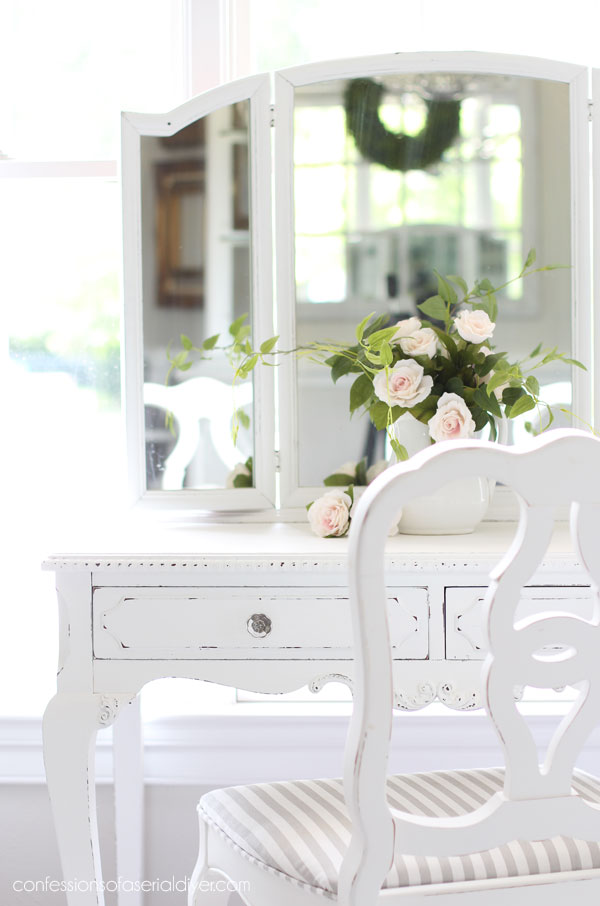
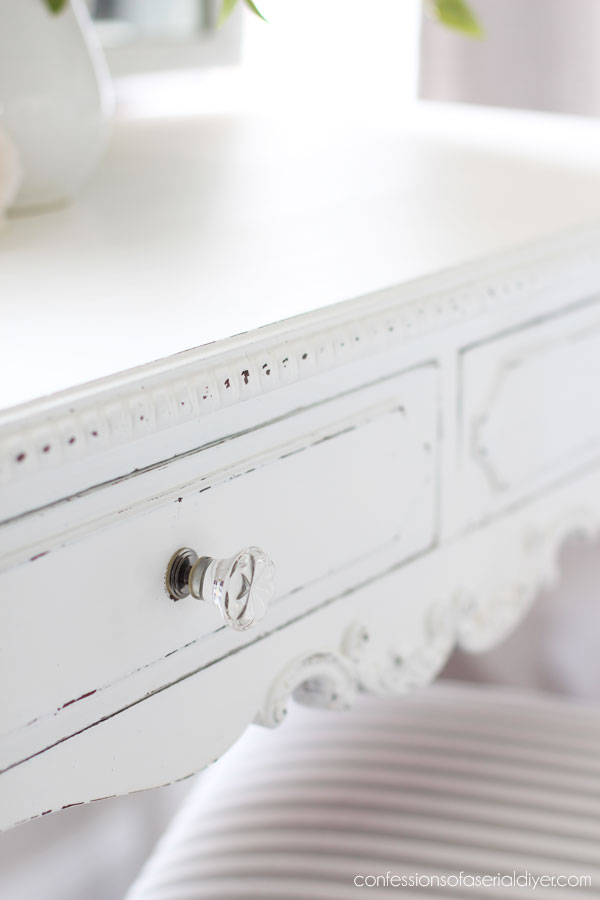
You are now ready for paint! I painted this piece in two coats of Dixie Belle’s Cotton.
You can see below that I taped off just inside the drawer area so I would have a nice crisp line, using FrogTape:
I hadn’t yet made it to the top with paint yet, but I kind of like how it looked as-is!
You can see more on how I paint my pieces in this video tutorial:
If you have trouble viewing, find it on YouTube HERE.
The mirror
You can see in the background of one of the above photos that I removed the mirrors to paint the frame.
I almost always do this so that I can paint the back side of the frame. That way the mirror will reflect white instead of the brown wood.
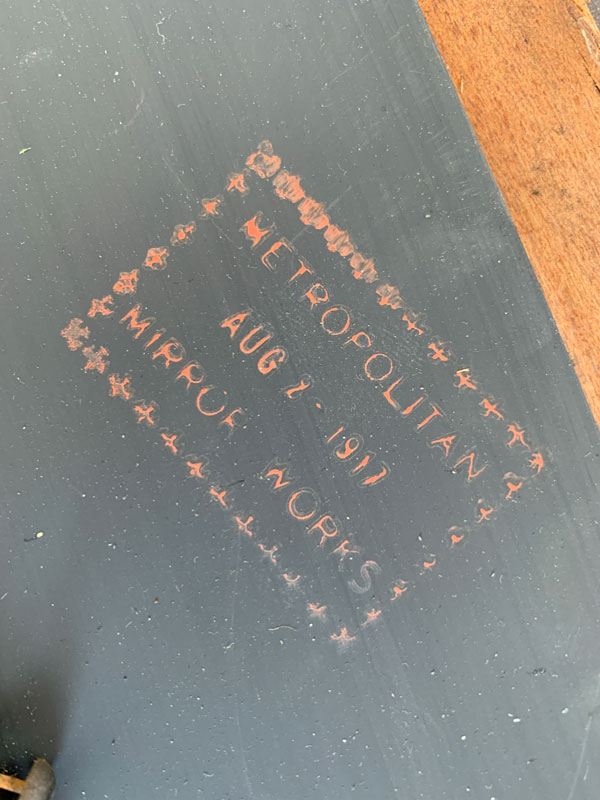
Here is what was holding the mirror in place:

I removed those wood pieces with a flathead screwdriver and saved them so I could secure the mirror back in place with them when I was done.
And can you see the layer of dust along that one edge? That was reflecting in the mirror and I knew I needed to clean that out…another good reason for removing the mirror!
I knew this set was old, but it is actually over one hundred years old!
By the stamp on the mirror, it looks like it was made in 1917!
I love that so much!
Sand
With chalk paint, you want to lightly sand the surface to make it buttery smooth. If you like a distressed finish, sand a bit more heavily over all the edges and details…anywhere normal wear might occur. I do this with 220 grit sandpaper wrapped around an old sanding sponge. Vacuum up any sanding dust with a shop vac and wipe down with a clean soft cloth.
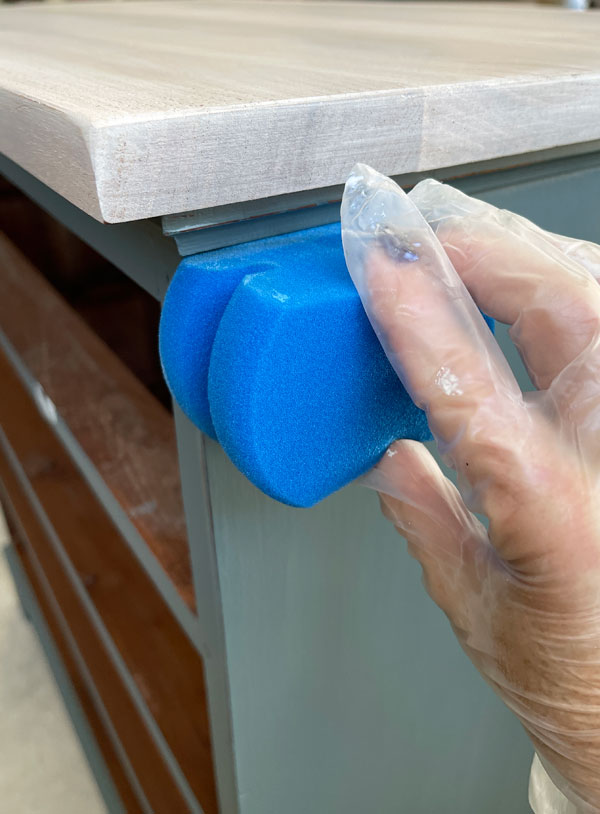
Seal and Protect
I like to seal my most of my furniture pieces with Dixie Belle’s Clear Coat in satin, using their blue sponge applicator, and I used it on this dressing table also, giving the top two coats.
You can see how I apply the Clear Coat to a table using the sponge applicator in this video:
If you have trouble viewing, find it on YouTube HERE.
If you cut one of the edges of the sponge straight ( I just used scissors.), you can get right up under edges easily like I did with this dresser:
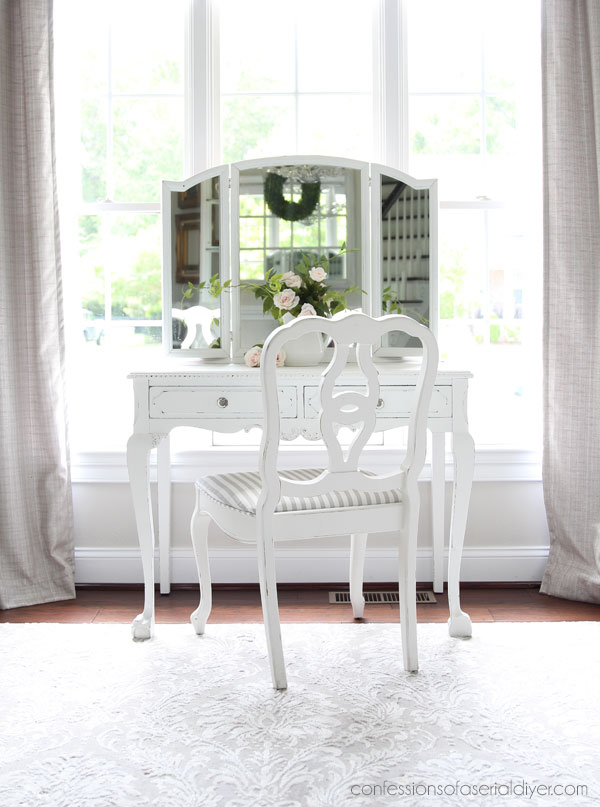
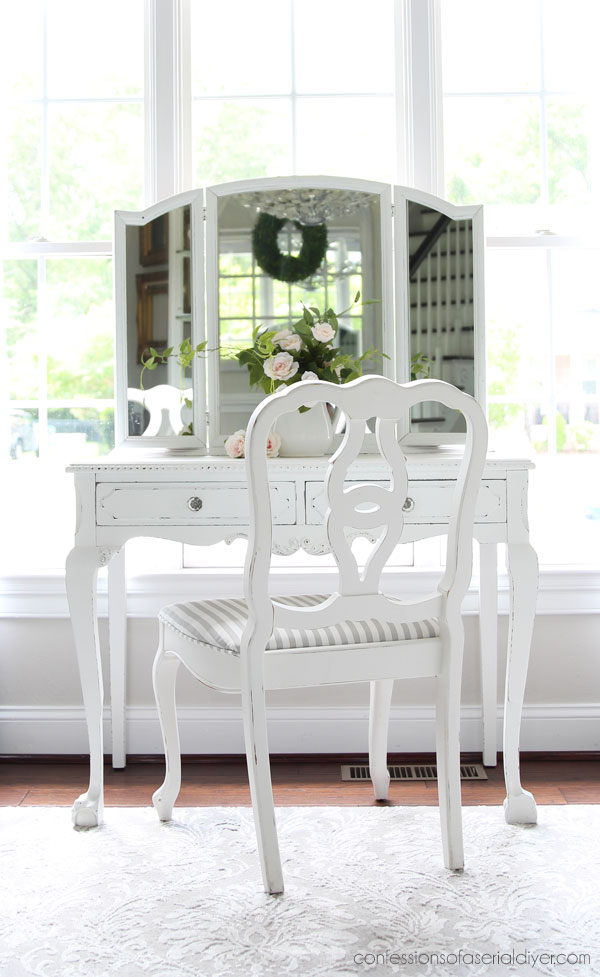
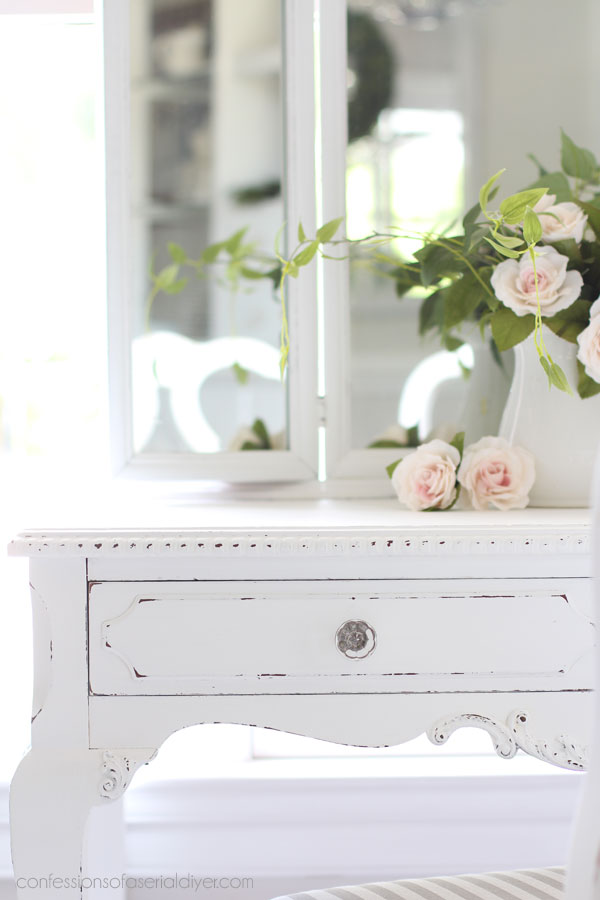
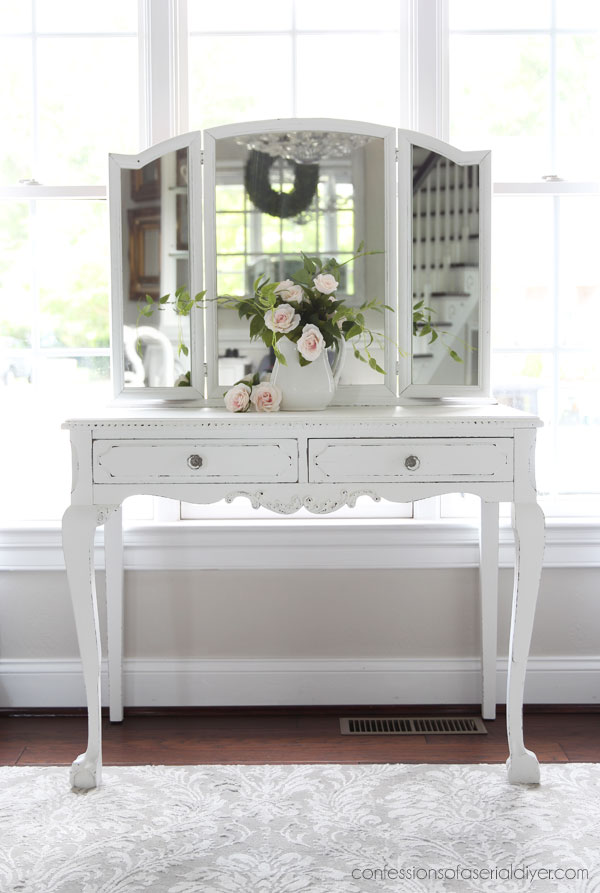
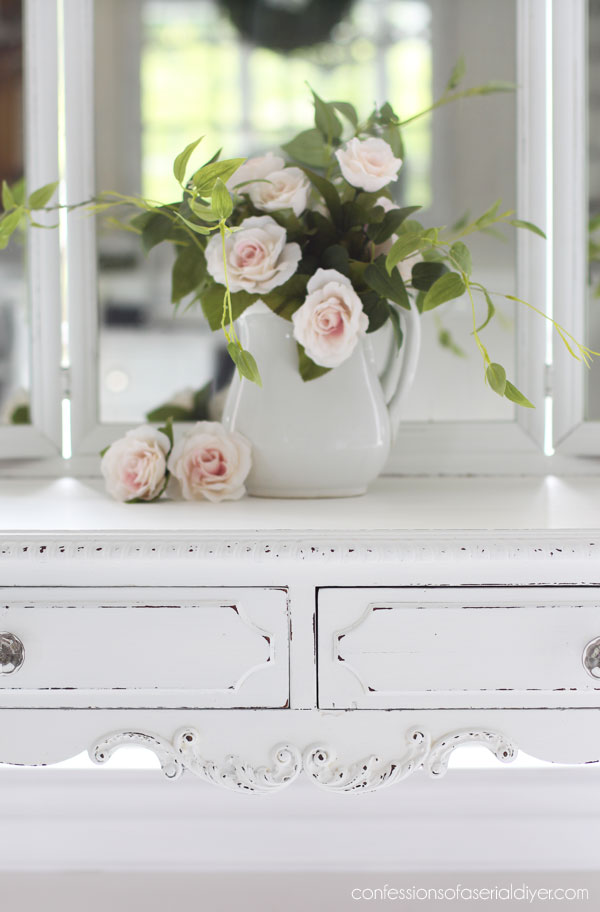
The After
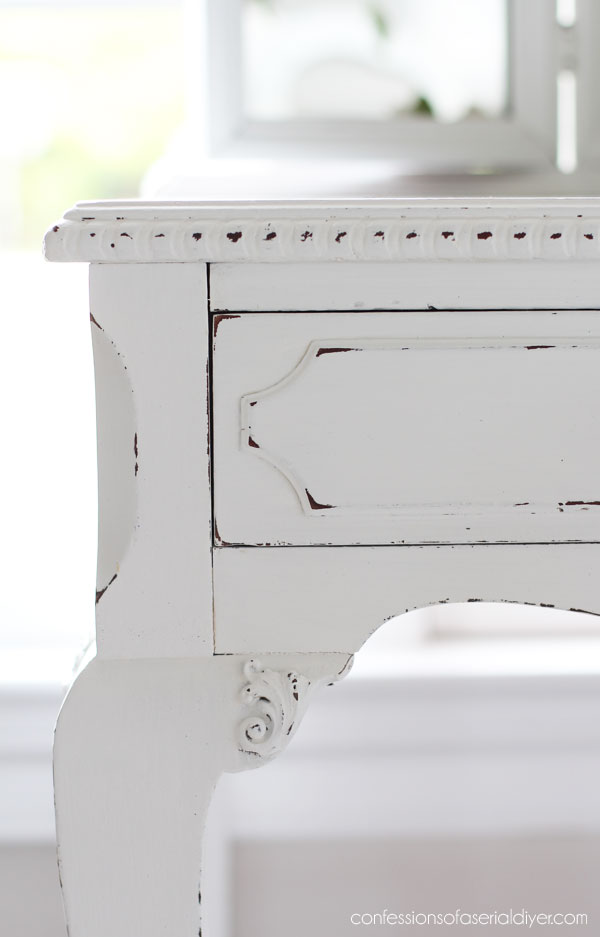
I love a simple white makeover so much, and it really suits this beautiful piece!
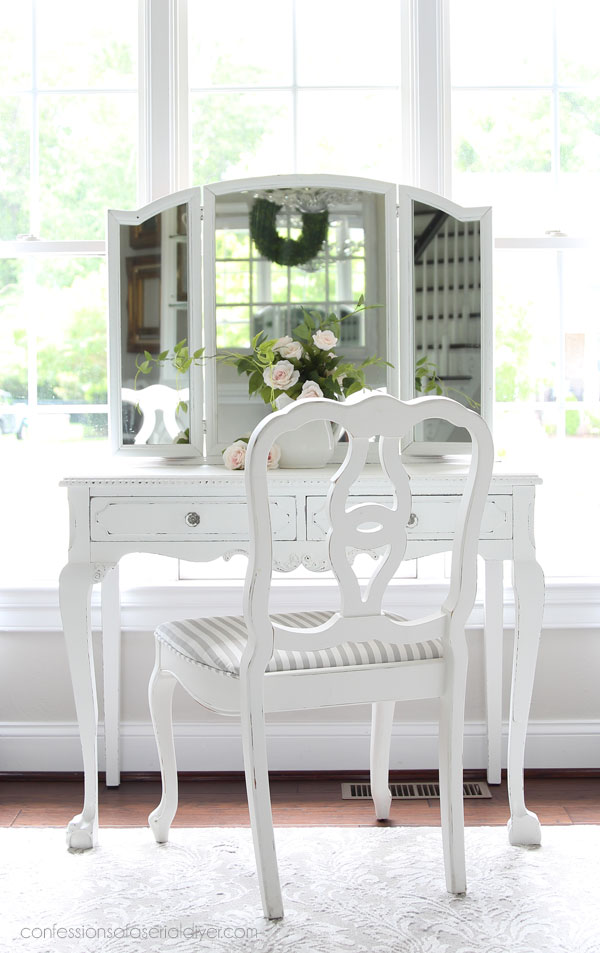
It highlights all those gorgeous details so well!
I just love how this piece turned out!

I grabbed one of our dining room chairs to pair with it here…
One of the original drawer pulls was bent, so I opted for these simple glass pulls instead:
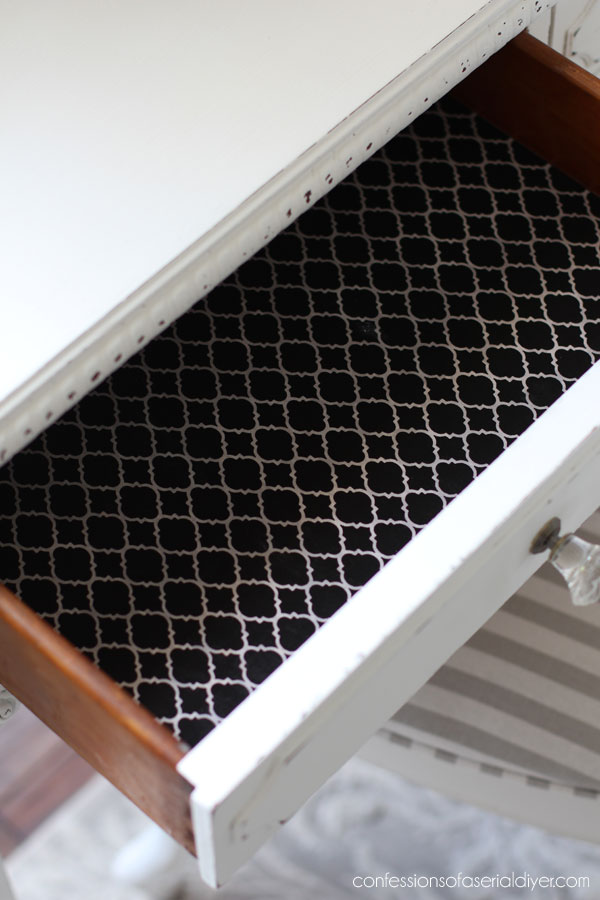
The drawers also had some wear on the insides:
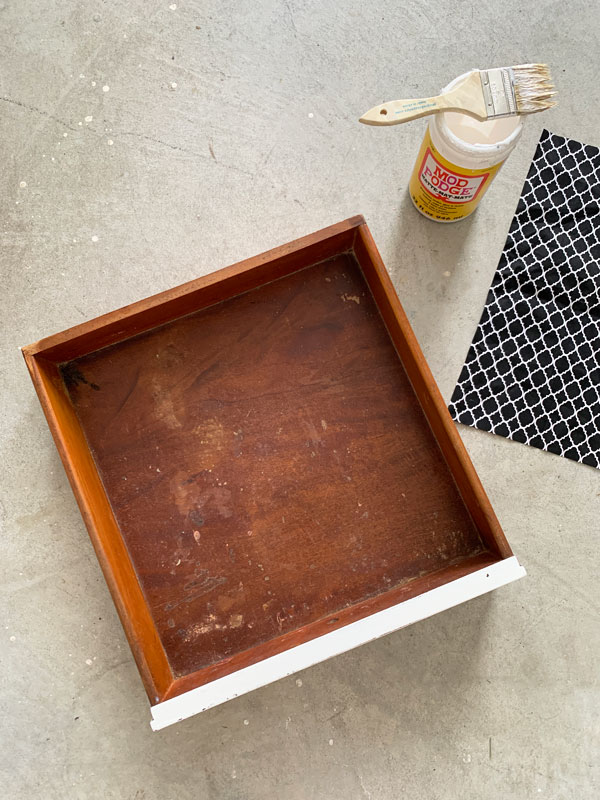
I knew I was going to line them, and I chose a dark fabric so I would not have to BOSS and paint them first.
Here’s a video on how I cut my fabric and add it to the drawers if you’re interested:
If you have trouble viewing, find it on YouTube HERE.
I just brushed matte Mod Podge on like a glue with a cheap chip brush:
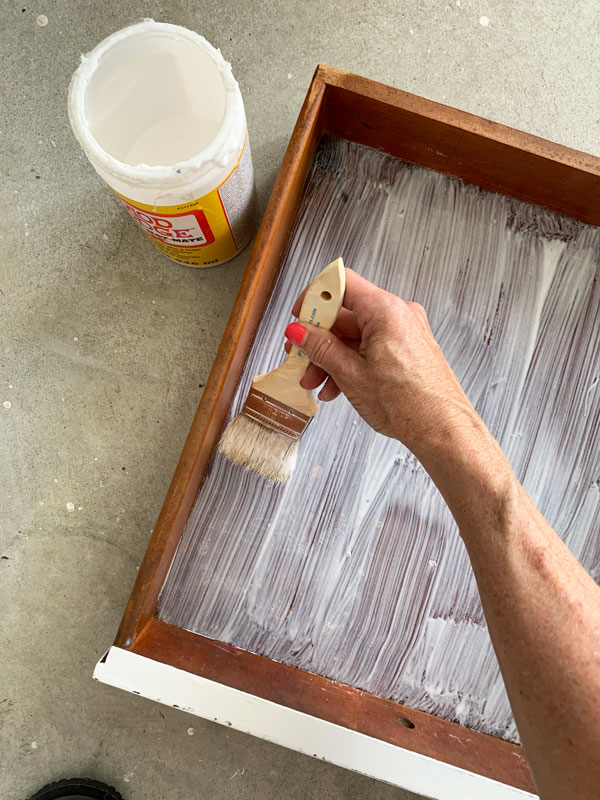
Much better!
This table has been through a lot. It is actually missing the front of one of its legs on the right side…
Part of the ball claw foot is missing:
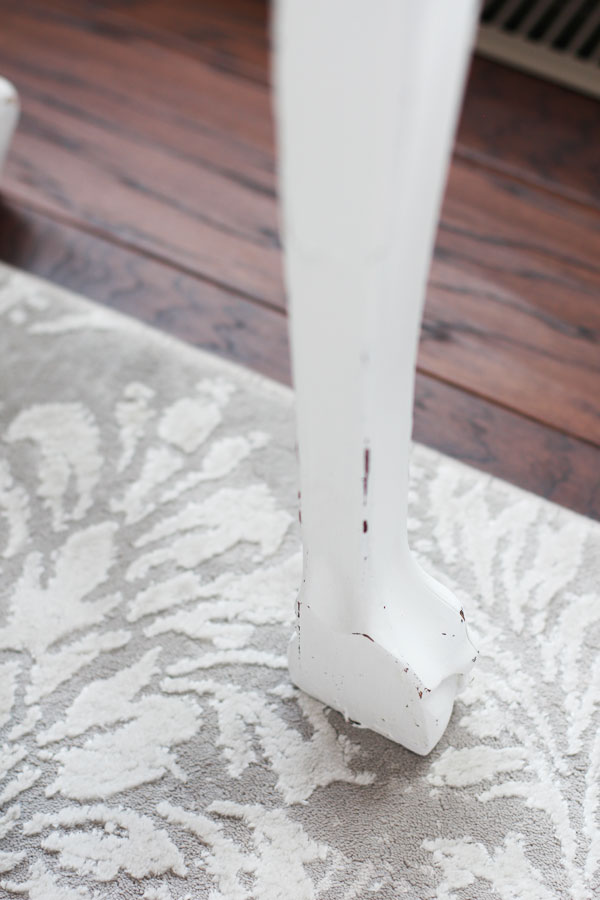
On the right side, it is also missing the pretty detail on the inside corner that you see here:
You might never know if wasn’t pointed out, but I love that it has a story to tell!
The center area might be my favorite:
I feel so fortunate to have been able to redo this special piece for Mary!
I really enjoyed working on this gorgeous piece, flaws and all!
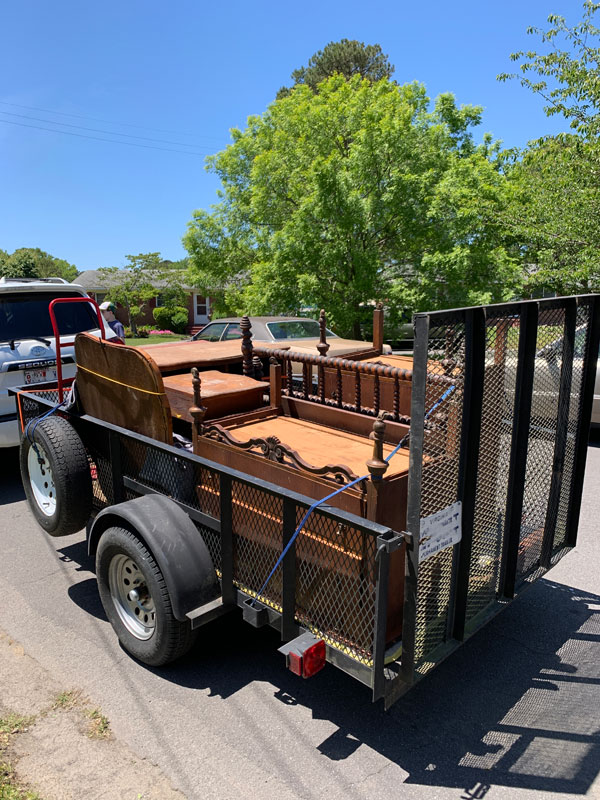
Here are all the pieces that Mary gave me:
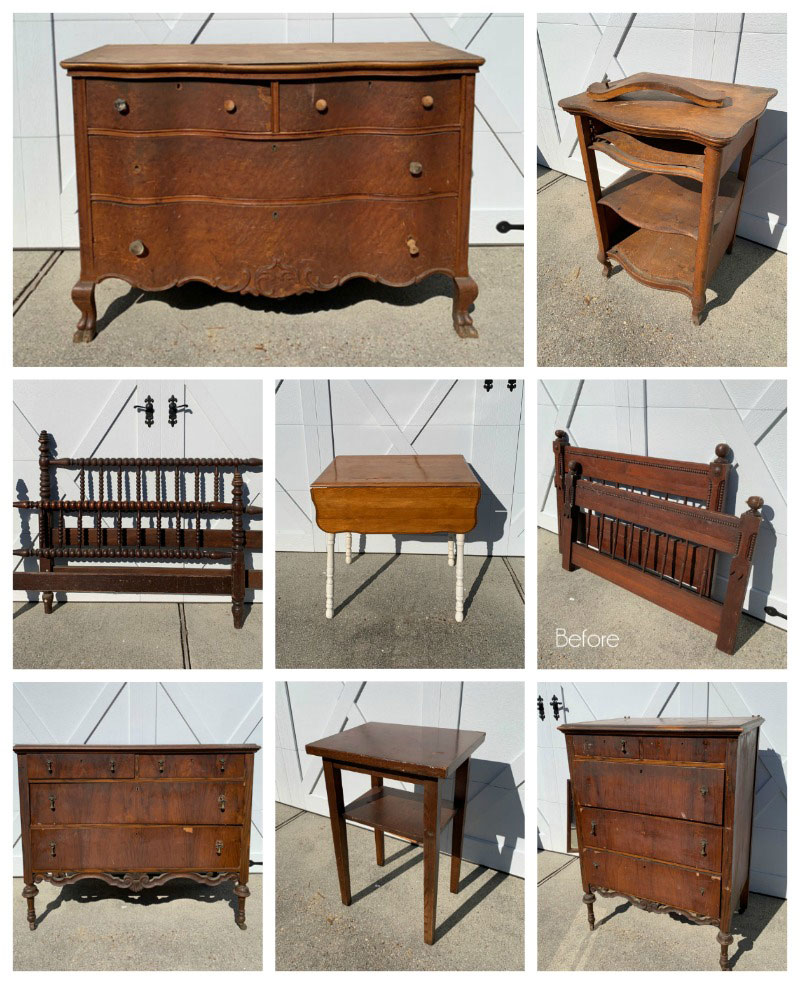
Visit any of the afters of these pieces at the links below:
Antique Serpentine Dresser Makeover with Transfer
Antique Night Table Makeover
Drop Leaf Kitchen Table
Antique Twin Bed Makeover
How to Paint an Antique Dresser
Painted Side Table
Painted Antique Dresser
She ended up being reunited with two of them after their big makeovers!
I love a happy ending!!
I love the bright white of Cotton, but if you want a bit of a vintage white, you may like Fluff. You can see how that looks on our bedroom set HERE!
I know y’all are super busy this week, so thank you so much for taking a minute to stop by! I’ll see ya Thursday with this piece that I have found and redone three times:

Update: See all three makeovers hERE now!
XOXO,
![]()
Don’t Miss a Thing!
If you like what you see, there are several ways to follow along!
Email * Instagram * Facebook * Pinterest * Twitter


Mary says
Thank you again, I never tire of seeing this online even though I see it in person every day! It reminds me of just how talented you are!! Hope you and your family have a wonderful Christmas and a blessed New Year!!
Christy says
Aww it was such a treat to be able to do this for you! Thank you so much! I’m so happy you get to enjoy it now! Merry Christmas to you and yours as well, my friend! XOXO
Rose Lefebvre says
I bet Mary was so pleased with the makeover. It is beautiful! You made Mary merry!!
Christy says
She was for sure! Thank you, Rose! XOXO
Lilly Thomas says
Absolutely gorgeous makeover. You can still see the beauty of this piece. How special for you and her!!!
Thanks for sharing with us! <3
Christy says
Thank you so much, Lilly! It was a treat to bring this one back to life for her! XOXO
Christina says
Oh Christy, this antique piece went from sad to fab! I know Mary is thrilled!!! I love how you treated the inside of the drawers and those glass knobs are marvelous! I’m with you, I love me some white furniture!!!
Have a marvelous Christmas week!! I hope all of your family is home with you also.
Christy says
Thank you, Christina!! She really loved the outcome for sure! And yes, I love a good white painted makeover! Enjoy your holiday week too!! XOXO
Janice Holt says
I love this dresser. I’m sure Ms. Mary was so proud of it. Hope you’ve gotten almost everything done for Christmas. Just enjoy the holidays.
Christy says
Thank you, Janice! She was very happy with the outcome and now she can enjoy it once again! I am doing well with my Christmas preparedness for once lol! Enjoy this week, my friend! XOXO
Cecilia says
Oh my goodness! I knew it was a pretty piece but painting it really brought out those gorgeous details! I bet she is super thrilled. It’s just stunning!
-Cecilia
Christy says
Thank you so much, Cecilia! The paint really did show off those gorgeous details so much better, and she loved it! XOXO
Celia says
I was expecting you to say you made the missing pieces so I loved that you left it as is with all its history! It’s a beautiful piece, you did a great job, lucky Mary!
Christy says
Thank you, Celia! I love that the imperfections tell its story too! This was a special one! XOXO
Ashley says
Another stunning piece, Christy. ❤️❤️❤️
Christy says
Thank you so much, Ashley! Merry Christmas! XOXO
Tracy says
Love how this turned out. Merry Christmas!
Christy says
Thank you, Tracy! Merry Christmas to you also! XOXO
Cecilia from Georgia says
Beautiful! The missing pieces give such character! I’d love to hear how it got damaged 😜. Mary sounds like a lovely person and she’s fortunate to have you as a friend. Happy Holidays!
Christy says
Thank you, Cecilia! I couldn’t agree more about the missing pieces! They really tell the story…and I’m curious what that story is too ha ha! Mary is just lovely! Happy holidays to you as well! XOXO
Niki says
So crisp, I like the black Moroccan stencil fabric in the drawers. I’m sure Mary is enjoying the new life you breathed into this cute little dressing table. Merry Christmas Christy and blessings for a wonderful New Year!
Christy says
Thank you, Niki! She loves it for sure! I hope you have a wonderful Christmas and New Year too! XOXO
Lori says
This is absolutely beautiful. You did a fantastic job. Have a blessed and Merry Christmas and wishes for a blessed 2022!
Christy says
Thanks so much, Lori! I hope you have a wonderful Christmas also!! XOXO
Mary says
Absolutely stunning Christy! Took my breath away to see the transformation. Wow! And your fine attention to detail? lining the drawers too, its just speaks to the class you have restored to this beautiful piece! Wishing you a very Merry Christmas and many blessings wished for your New Year! Keep letting your light shine 🙂 (and thank you last week for all the tips you gave me about painting hinges – I really appreciate it so much!)
Christy says
Aww thank you, Mary! You are the sweetest! I hope you have a wonderful Christmas and New Year also…and you are most welcome, my friend! XOXO
Sharon L Austin says
That turned out so elegant, I love it. And it was “born” the same year as my mom! Merry Christmas to you and yours. 🙂
Christy says
Thank you, Sharon! And awww…I love that! Merry Christmas!! XOXO
Jenni says
One of my favorite makeovers! But I loved all of the mother’s day haul 😍 but is it just me, or was the spindle bed never done? I am seriously a sucker for spindle furniture. My baby’s room has 3 pieces 😁😅
Christy says
Aww yay! Ha ha you are correct…I have not done anything with the spindle bed yet. It is completely busted where the rails would attach to the headboard and it’s a bit too big to become a bench, so I’m still waiting for inspiration to strike on that one! I do love those spindles though too! XOXO
Robin says
I was thinking…maybe it Could be a bench but for the side of a rectangular dining table? Or for a patio (picnic) table? Or a porch swing?
Christy says
Ooh!! It would be a gorgeous swing!! I keep saying I’m going to turn it into a bench, but it would just take up a lot of space in my booth as large as it is but I love all those ideas, especially the swing idea! XOXO
Constance Colvin says
This table is just beautiful and showcases just SOME of your many skills! I have a technical question! How did you remove the finish from that top edge molding without damaging it? Did you sand the surface and then in the divots in between? Hope this question makes sense and…….Merry Christmas!
Christy says
Aww you are so kind, Connie, thank you! I only sanded the very top flat surface and only because it was in such sad condition. Otherwise, I could have skipped the sanding part and gone right to priming! I hope that makes sense! Merry Christmas! XOXO
Addie says
Nice break from Christmas “decor” overload…..of course never enough Jesus for the season!!!!…Amen!!!
Nice redo!!! Clean and fresh. I loved the stamp on the mirror. It makes you wonder if the piece could talk what would it say about the last hundred years!!!…..probably something to the effect of, “I remember when gas was 10 cents a gallon!!!”….lolololol
Question: When you put the fabric in the drawers…do you edge stitch it?
Does the fabric unravel? How? you do????
Have yourself a very Merry Christmas!!! and a better 2022!!!!
Christy says
Amen!! Thank you, my friend! I always imagine all the faces that have been reflected in these old mirrors…kinda creepy, but fascinating too! For the fabric in the drawers, I use a rotary cutter and straight edge with my cutting mat. It’s basically a pizza cutter that is razor sharp. It cuts in perfectly straight lines and I just try not too handle it too much while I’m adding to the drawers! Merriest of Christmases to you!! XOXO
alice reinhardt says
I just finished my kitchen cabinets, I painted them grey with a white stripe like you paint many on your projects. You inspired me to try the stripe thanks. I wish I could send you pics but I don’t see a way to send them.
Christy says
Oh I love that so much and I would love to see pictures if you’d like to share! You can email them to christykjames@cox.net if you like. XOXO
Petra says
This dressing table has lots of really cute intricate features – it’s really very pretty 🙂 And of course, perfect in white :D. Happy Christmas to you and yours from sunny NSW, Australia 🙂
Christy says
Thank you, Petra! This one really works well with the simple shabby chic look with all those pretty curves and details for sure! Merry Christmas to you too from cold as you know what Virginia ha ha! XOXO
Stacey says
Hi Christy
I love your blog and don’t comment often but I’d love your opinion on the following;
I have inherited most of my furniture from my Gran and my Mom. My Mom is an antiques lover, and my husband is a wood lover! I like a combination of high-gloss wood finishes for easy cleaning (dirt roads on a farm = so.much.dust!) and white satin paint finishes for a light/bright room. Given my husband’s preferences, I only paint ugly laminate, cheap pine and very damaged oak woods but my Mom has asked me not to restore other woods (teak, mahogany, etc.) with high-gloss varnishes in favour of the more appropriate satin finish for antiques. I am not opposed to a satin finish but also feel that I am restoring these pieces for me – I am not concerned about the long-term value but my enjoyment of them in my home.
I have given both my Mom’s and husband’s opinions open consideration and was just wondering what the opinion of a Pro would be?
All the best to you and your family over the festive season!
Christy says
Thank you, Stacey! Satin is my preferred finish also as it still has some sheen for easy cleaning, but just not as high of a sheen. Some older pieces do look better with more sheen though and I believe you should do what YOU want since these pieces will ultimately live in your home. And, they will be off than they are now if they are in need of refinishing no matter what you do! Have a wonderful holiday! XOXO
Stacey says
Thank you for such a considered response – you are a darling! I love getting as many opinions as possible before drawing my own conclusion so appreciate yours very much! x
Christy says
You’re welcome! My response should have read, ” They will be better off…” I forgot the “better” ha ha. Have fun with them…I know you will make them beautiful! XOXO
Betty Bilnoski says
Christy, it’s so pretty in white. You really brought that sweet dresser back to life.
I have so many vintage pieces that I want to make over, and I even have the paint thanks to your Etsy shop, but I just can’t seem to take the first step. I am so grateful that you share your projects and, more importantly, step-by-step how to do them. You’ve given a novice like me hope. My goal in 2022 – take that first step finally and get started on my makeovers.
Happy Holidays!
Christy says
Thank you, Betty! Start with something smaller that you don’t care as much about to practice! You can do this!! Happy holidays!! XOXO
Karen says
Hi Betty, I hope you don’t mind me putting my 2 cents in, but I am 72 years young and love to remake furniture. I so agree with Christy. Start with something small. If you’re not ready for furniture, even a tray or something small from the thrift store, that you have no sentimental attachment to, is a great confidence builder. Remember to take your time and not be too hard on yourself if it doesn’t turn out the way you pictured. It is all just practice and can be redone again.
Good luck with your 2022 redos! Soon I’ll be following your blog too!