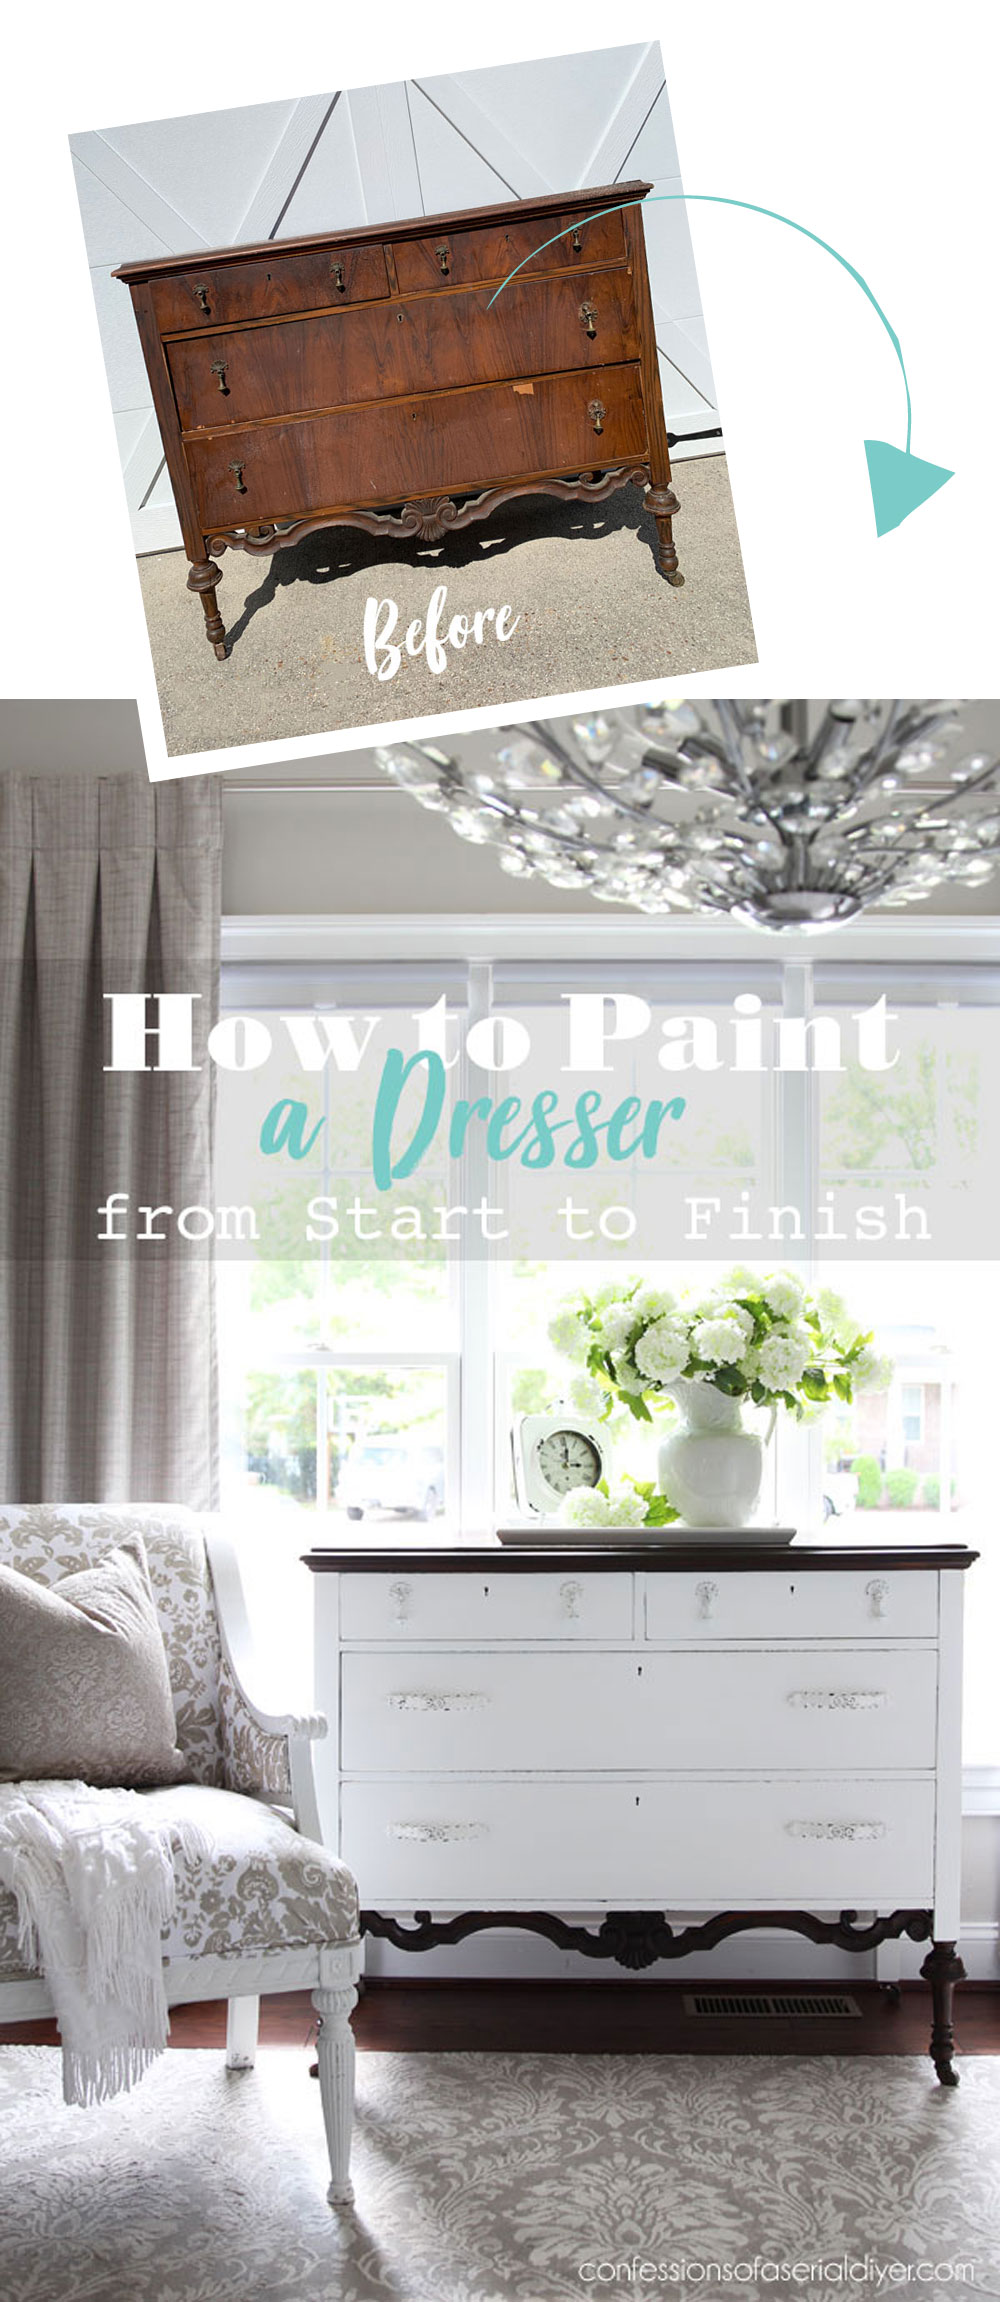
Hello my creative friends! With the start of a brand new year in just a couple of days, I thought it was the perfect time to share how to paint a dresser! A dresser is a great place to start if you’ve been wanting to get into the furniture painting game or just want to make a few updates in your own home. This project will show you how to tackle practically any issue you may come across along the way!
Bringing older pieces back to life can be especially intimidating, but just go through the steps one by one, and don’t feel like you have to tackle everything in one day!
**If you’re dealing with a newer piece in decent shape, you can skip some of these steps!!**
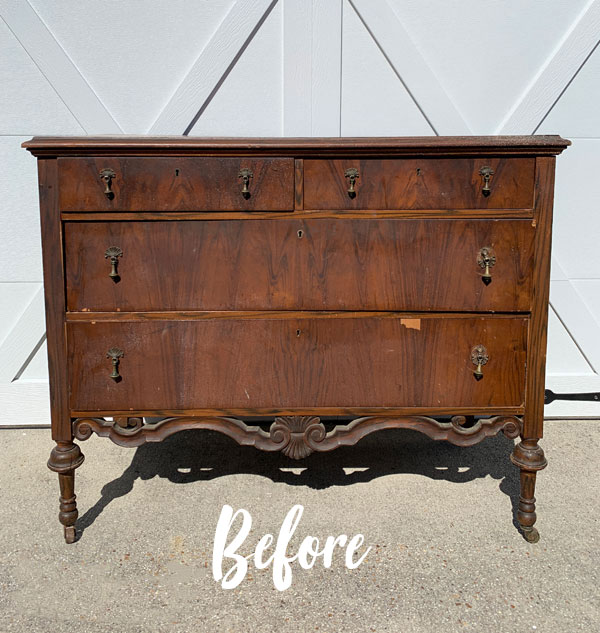
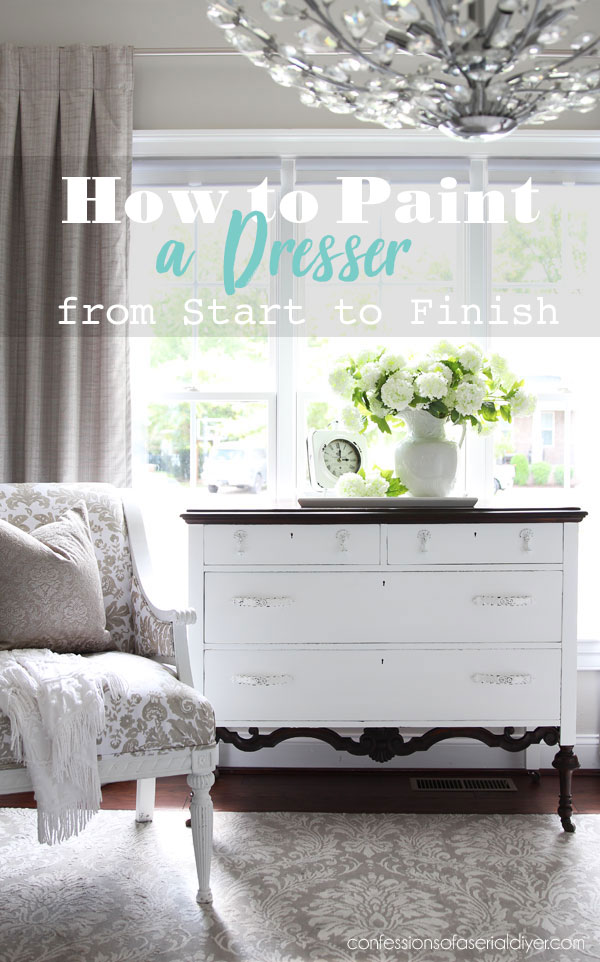
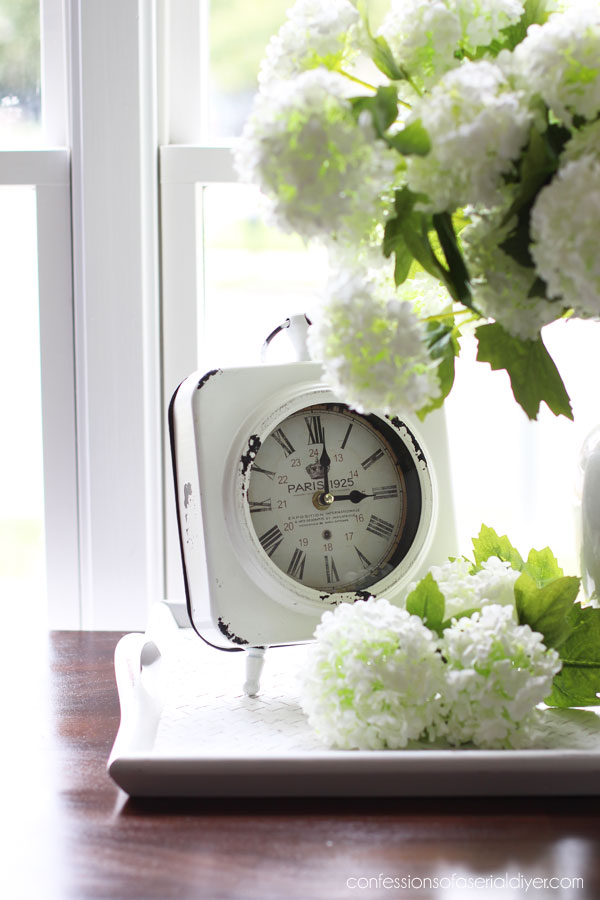
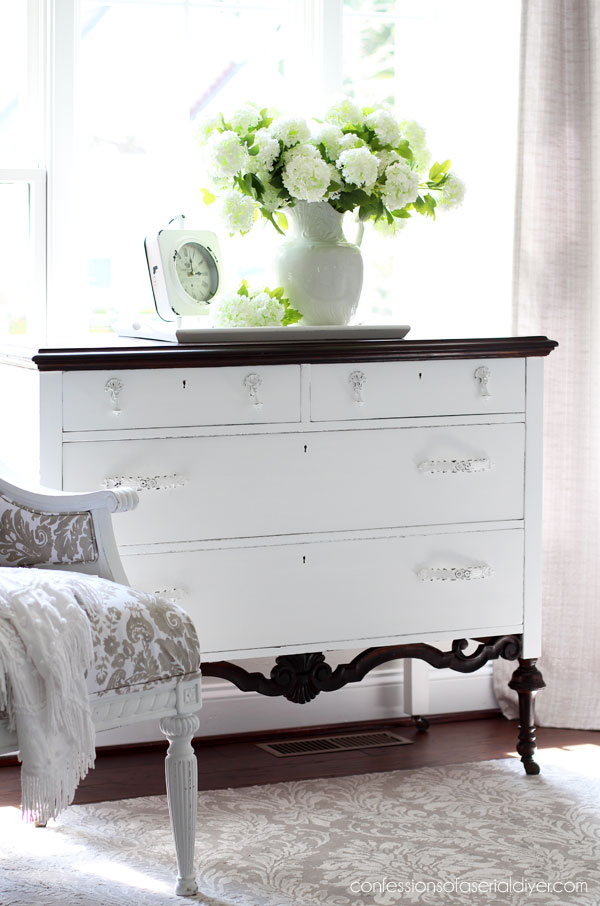
Today’s project piece is this gorgeous dresser that I redid in 2020:
I also shared the taller mate to this dresser HERE.
At the time, I asked y’all if you thought I should paint this one to match or give it its own look, and the responses leaned more toward making it match.
Funny thing, because when the lovely lady who blessed me with this set saw the first dresser made over here on the blog, she asked if she could buy them back!
She had held onto them as long as she could in their current state but was in the process of downsizing and just did not have the space to store them any longer. I knew she was heartbroken to have to let them go.
This dresser had belonged to her father and his parents before then.
How to Paint a Dresser from Start to Finish
I’ve included a few affiliate links so you can find the products I love.
-
The first step step is a proper cleaning!
When I originally redid this dresser, I waited to clean until after I had sanded and filled any holes, but nowadays I prefer to clean first as not to disturb the wood filler. I use White Lightning by Dixie Belle. It is a cleaner AND a deglosser that comes in powder form.
I like to mix a small amount into a small tub for each project, adding one TBSP to a half gallon of warm water:
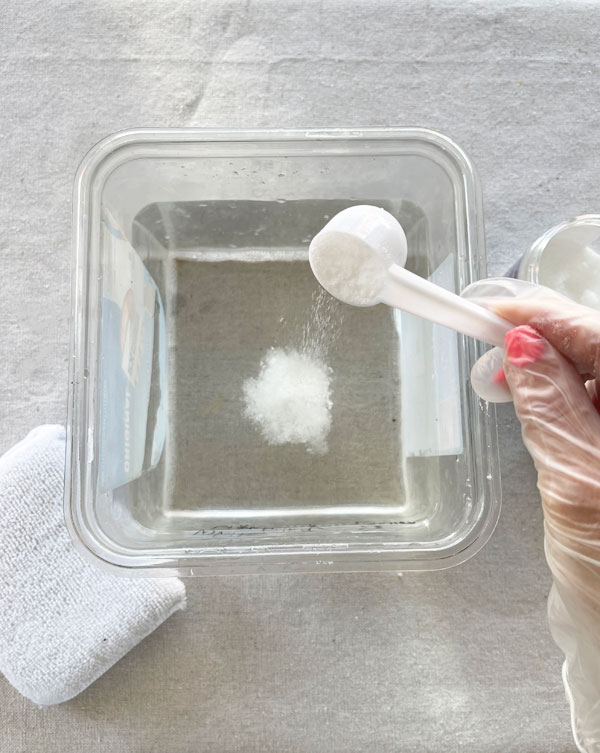
Be sure to change out your water for clean water and wipe down once more to remove any residue after cleaning. These terry cloth pads are perfect for cleaning…like a washcloth sponge!
-
Next, fill any gouges, holes, or deep scratches.
For this, I like Dixie Belle’s Mud in brown. You could use any color really if you plan to paint over it, but it comes in brown, white, and black.
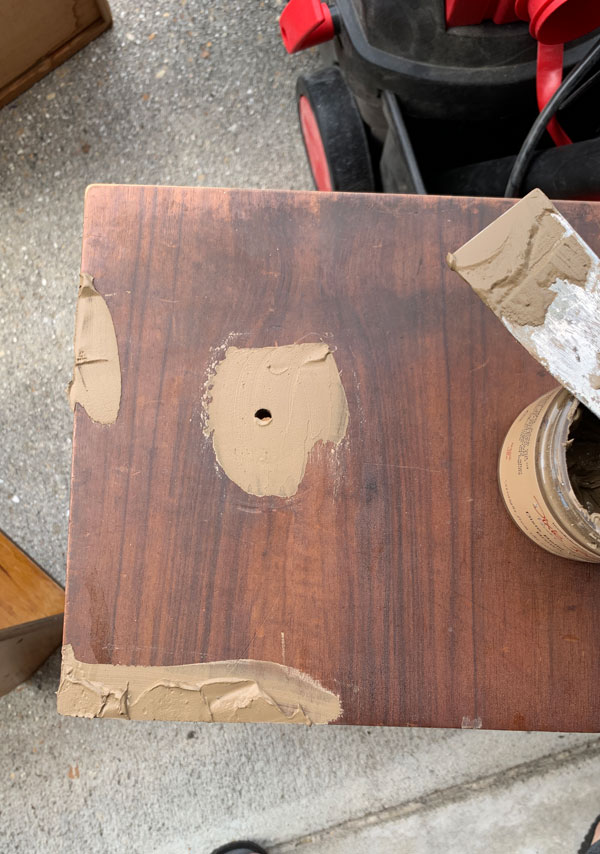
Allow plenty of dry time, overnight if possible, to be sure it is completely dry all the way through. Leaving it out in the sun will speed up the process.
Then, sand with 220 grit sandpaper. If I can run my fingers over the area with my eyes closed and still feel what I was trying to fill. I apply another coat and repeat.
-
Tackle Missing or Damaged Veneer
If you have missing veneer, sometimes it can be filled in as in this instance:

If the veneer is loose, it can sometimes be secured with wood glue and clamps. However, if it needs to be removed, there is a great solution for tackling that as well. You can see that HERE.
-
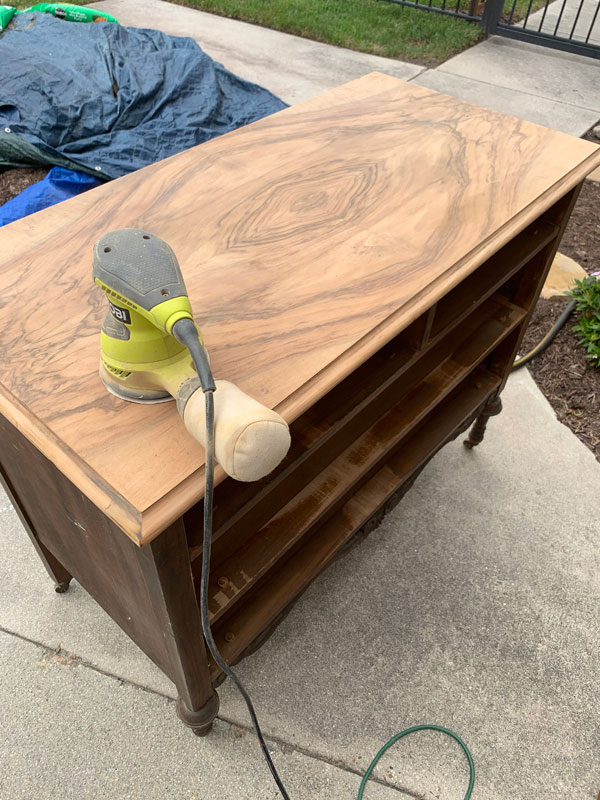
Sand any areas to be stained
I decided to stain the top of the dresser. I first needed to sand the top using my rotary sander. I used 120 grit sandpaper first, followed by 220 grit.
-
Vacuum and clean
Once you’re finished with all the sanding, vacuum using a shop vac and brush attachment. Then, give it another wipe down with a soft, clean cloth.
-
Get rid of musty odors
If you’re lucky enough to have a fresh, clean dresser to work on, then skip ahead. If not, I’ve got you covered!
The magic sauce for ridding furniture of musty or smoky smells is BOSS by Dixie Belle. (UPDATE: This product has been replaced by Bonding BOSS, which is an adhesion and stain/odor blocking primer in one convenient product!)
I used the clear formula to completely coat the inside of this dresser. I find it easiest to tackle the inside of dressers while they are lying flat on their backs:
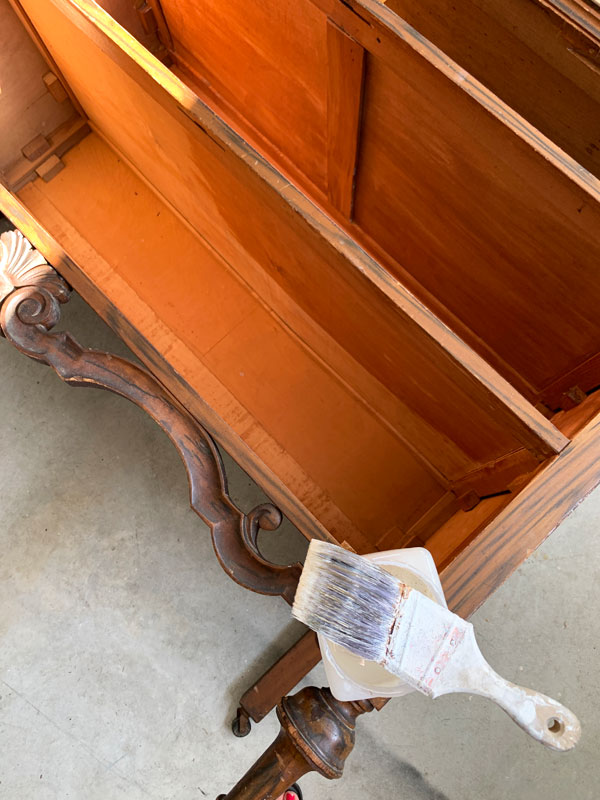
As you can see, I covered every surface inside. Not all dressers have the drawer areas divided like this one, so those should be easier to tackle.
I only used one coat and the musty smell that was quite strong before was eliminated completely.
-
Tape off drawer fronts
I use FrogTape for delicate surfaces to tape off drawers, so paint does not end up on the sides. You want the inside to look as beautiful as the outside when the drawers are opened! (Be sure to remove the tape as soon as the final coat of paint goes on while the paint is still wet.)
-
Prime for possible bleed-through
Bleed through usually occurs in older cherry and mahogany pieces…sometimes older oak as well. What’s coming through your paint are the tannins in the wood, and that will bleed through every layer no matter the kind of paint you use. It looks like pink or brown splotches.
If you have a newer piece (post 1980’s), you can likely skip this step.
Just about anything considered antique, however, usually gets a coat of BOSS from me if I plan to paint it a lighter color, especially white. (UPDATE: This product has been replaced by Bonding BOSS, which is an adhesion and stain/odor blocking primer in one convenient product!)
Although newer dressers will likely NOT need BOSS, if you start painting and realize you are getting bleed-though, you can always apply BOSS right over the paint.
I chose the white formula since not only will it seal in any tannins that may possibly bleed-through, it will also save me a coat of paint! (It comes in clear, white, and a gray formula.)
Allow the BOSS plenty of dry time before painting, at least overnight. I rarely need more than one coat when I give it the needed dry time. If you see any stubborn areas that do still bleed through, give it another coat. You should not need more than two coats. If you just see a couple of spots, you can spot prime those with the BOSS. Allow plenty of dry time once again before painting.
-
Painting time
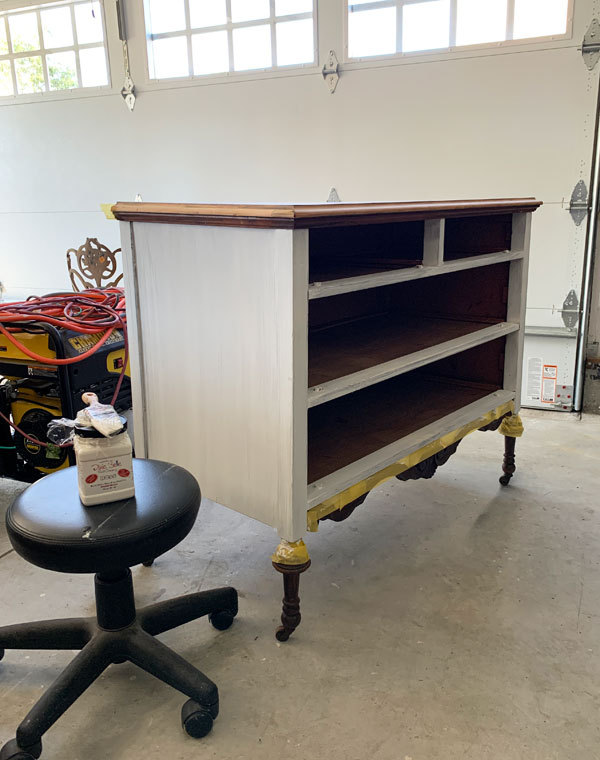
Finally, it is time to paint! Chalk paint is super user friendly and you do NOT need to sand your surfaces before applying unless you have a super glossy finish like lacquer or a non-porous surface like laminate. (See how to tackle those surfaces HERE.)
I ended up giving this dresser three coats of Cotton, Dixie Belle’s brightest white chalk mineral paint, but I probably could have gotten away with two since I used white BOSS first. There is no need to sand in between coats.
I applied that, as well as the BOSS, with my favorite Mini Angle Brush.
You can see how I paint a piece of furniture in action in this video if you like:
If you have trouble viewing, find it on YouTube HERE.
-
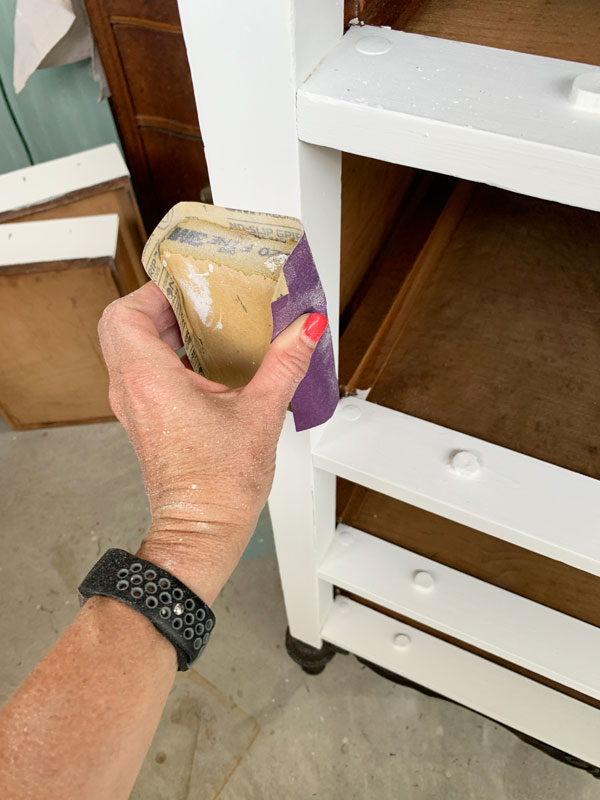
Sand to smooth
Chalk paint does have a slight texture to it, but giving it just the lightest sanding with 220 grit sandpaper after your final coat will make it smooth as butter!
I like to wrap mine around an old foam sanding sponge to make it easier to handle. (I show that at the end of the painting video I included above… and I buy my sandpaper in sheets and cut them into four.)
If you prefer a distressed look, hit the edges a bit harder. If you like a really distressed look, break out the electric sander.
If you prefer hardly any to no distressing, opt for these fine grit sanding sponges instead.
After sanding, clean up all the dust once again using a shop vac, followed by a good wipe down with a clean, soft cloth.
-
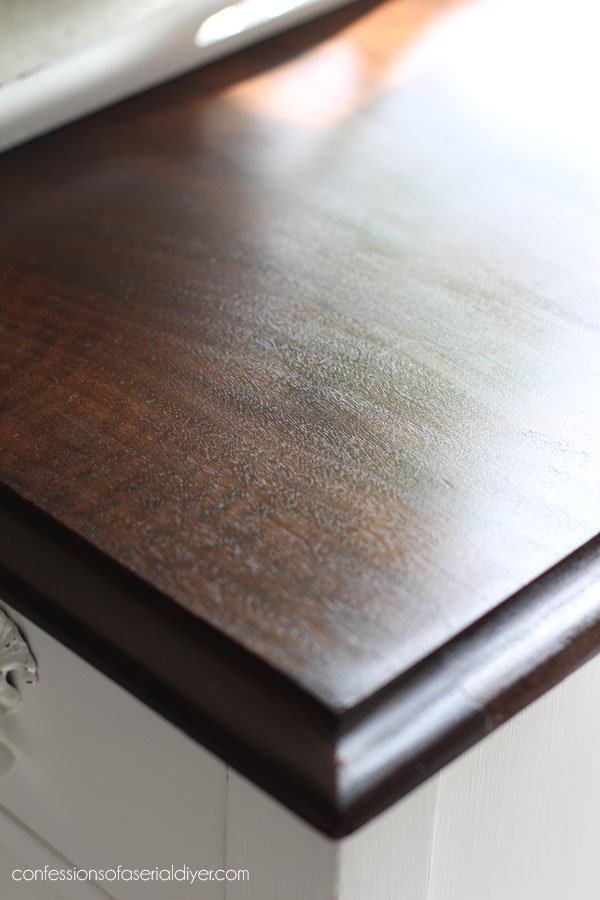
Stain the top
If you plan to stain the top, I like to do that last. I start by conditioning the top with wood conditioner. This allows the wood to absorb the stain more evenly:
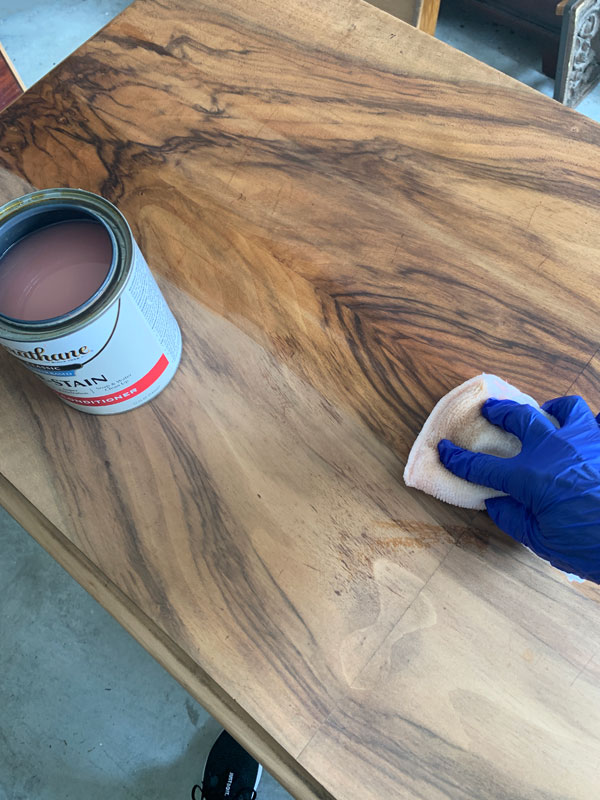
I applied it with the terrycloth applicator pad, or you can use a Foam n Dandy brush or just clean soft cloth.
I immediately followed up with No Pain Gel Stain in Espresso:
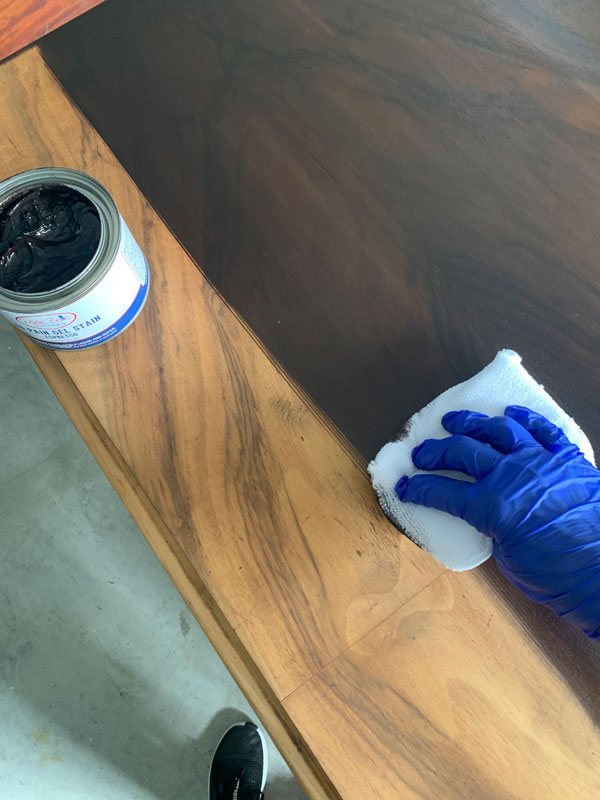
I love the gel stain as it is so easy to work with! The applicator pads are a one-time use if you use them with the oil-based stains, but can be used multiple times when using them with water based stains like the VooDoo gel stains.
I kept wiping with the grain until I had pulled any excess stain from the surface.
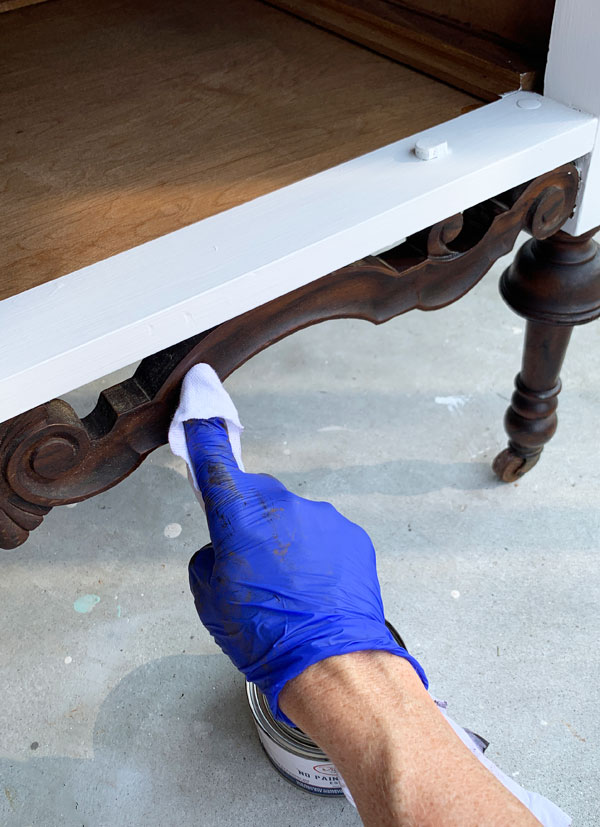
I also applied another coat of stain right over the existing stain on the gorgeous detail work at the bottom using a soft cloth:
-
Seal the surface
Finally, seal and protect your piece! When working with the oil-based No Pain Gel Stain, wait about 72 hours to seal with a water-based stain. It should be good and dry. If you can leave your piece in the sun, it helps speed up the dry time.
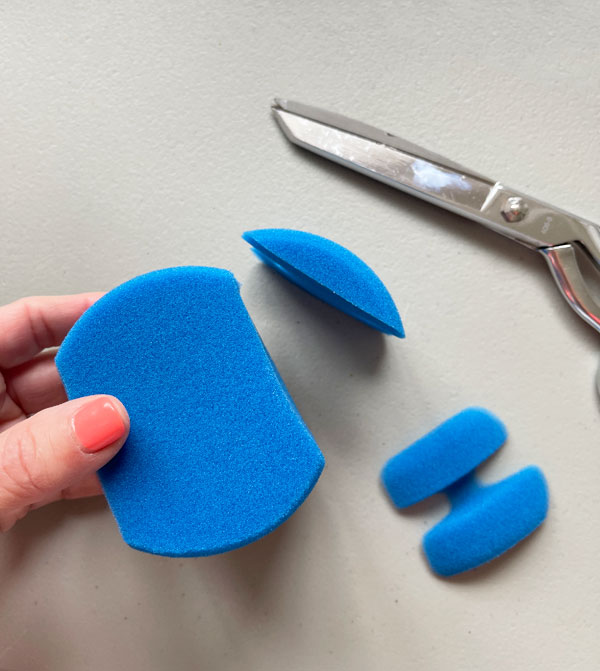
I sealed the body using Dixie Belle’s Clear Coat in Satin, applying it with the blue applicator sponge.
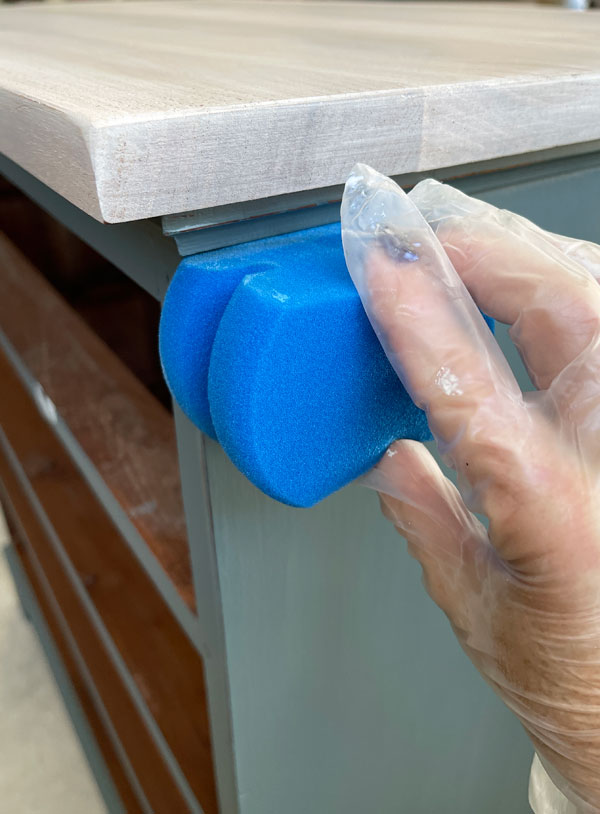
Barely cutting the rounded edge off of the sponge makes it easier to get right up against straight edges:
Like I did here on another dresser:
When I sealed the stained top, I used the same thing, but I felt this fancy of a dresser needed a little more sheen on top, so opted for the Gloss sheen instead.
-
Add the jewelry
Time to add the pulls! I like to think of it as jewelry. Luckily we had four good original pulls that I could use. They got a good cleaning and two coats of Cotton. The other four came from Hobby Lobby.
-
Give the drawers some love
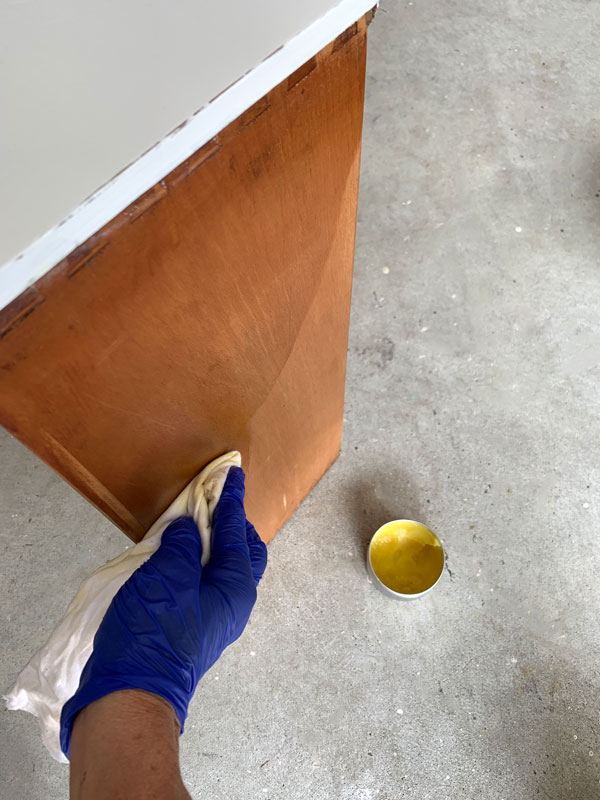
After painting and sealing the fronts of the drawers, the sides were still looking tired and worn, so I applied Big Mama’s Butta in Orange Grove. (Available in four scents!)
It smells so lovely and hydrates the wood while adding a layer of protection:
-
Having trouble with the drawers sticking?
If you have trouble with the drawers sticking, which is quite common in antique dressers, try rubbing a candle along the bottoms of the drawers on the edges on either side and on the insides of the opening, or anywhere the drawer is sticking. If you have Big Mama’s Butta on hand, it works marvelously to help drawers glide also. Just apply it anywhere you are having sticking issues.
Ready to see the final product??
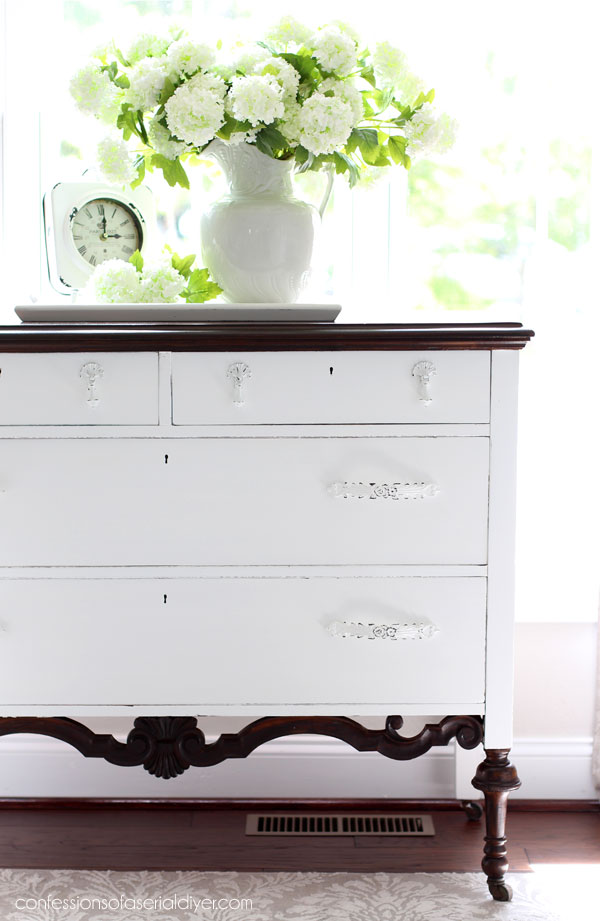
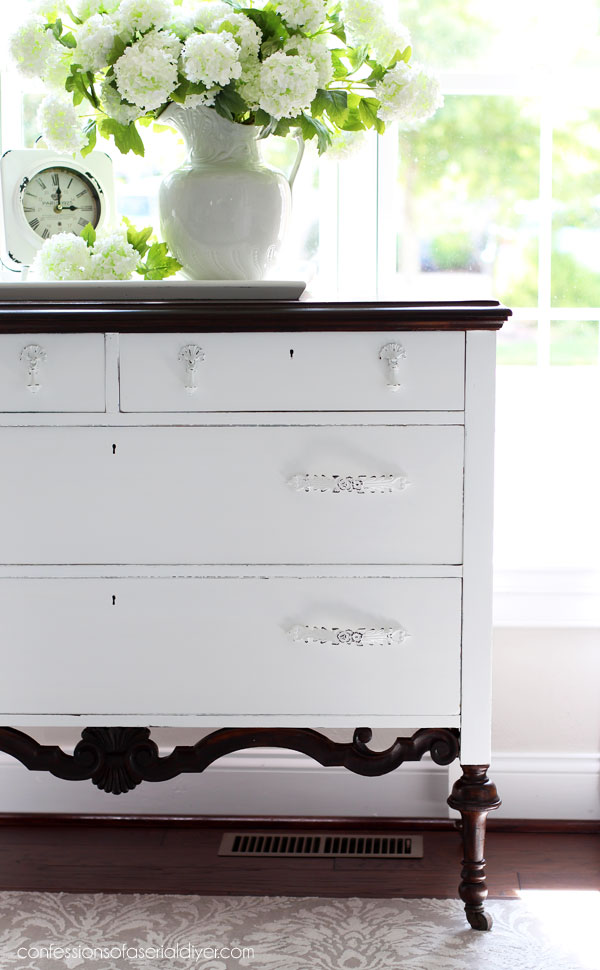
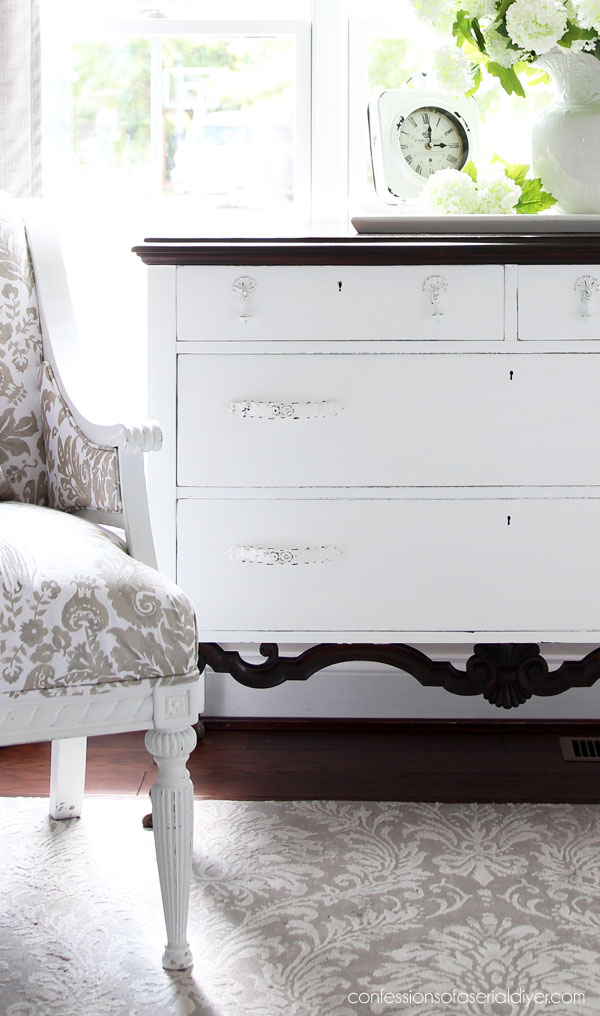
Leaving those amazing details on the bottom stained really made them stand out:
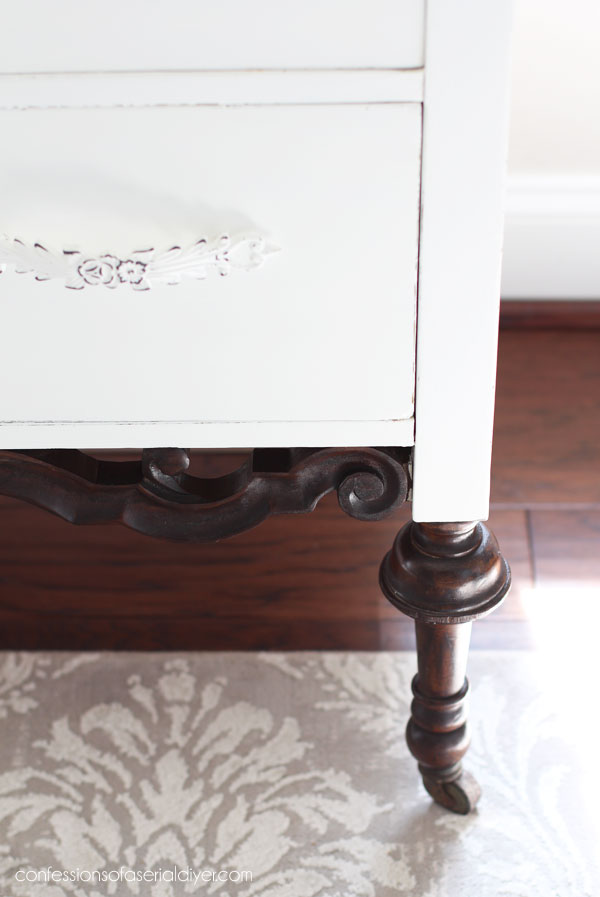
I think the combination of Espresso and white adds sophistication to these already beautiful lines.

The stained wood on top is so rich in color now…
I used the same combination of pulls from the first dresser I did like this.
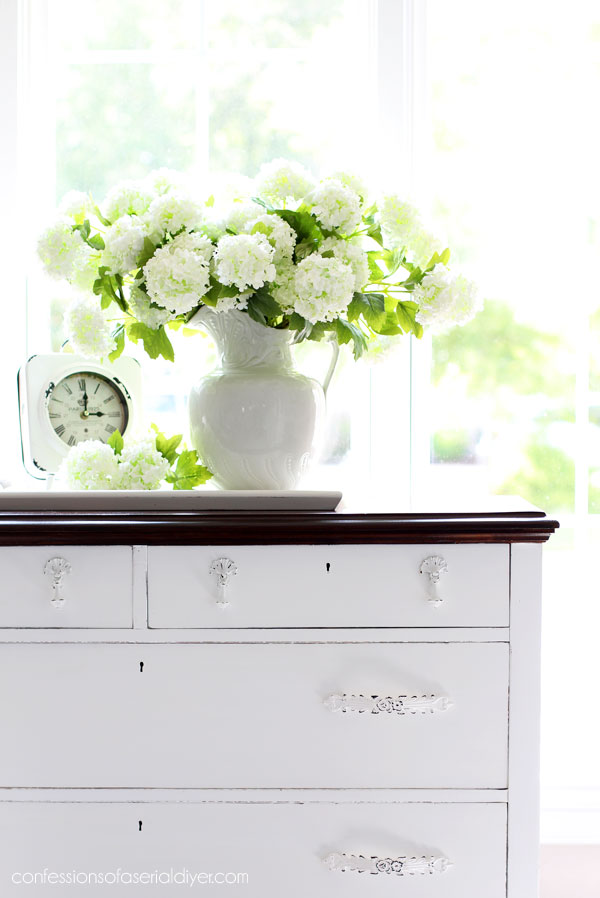
The top ones are original and the others are from Hobby Lobby:

And I had enough of this paper left to add some pretty to the insides too:
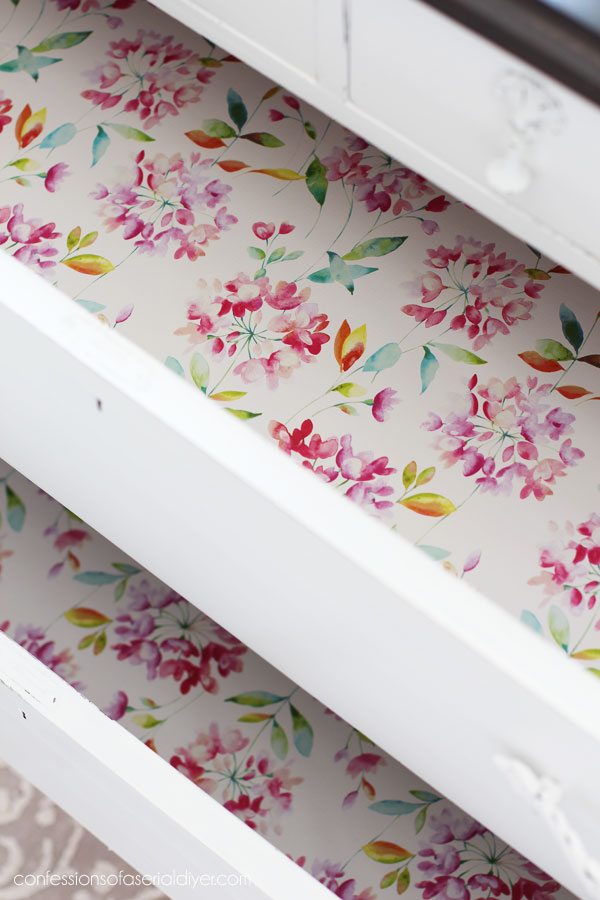
I cut it using my rotary cutting set and adhered it the bottom with a glue slick.
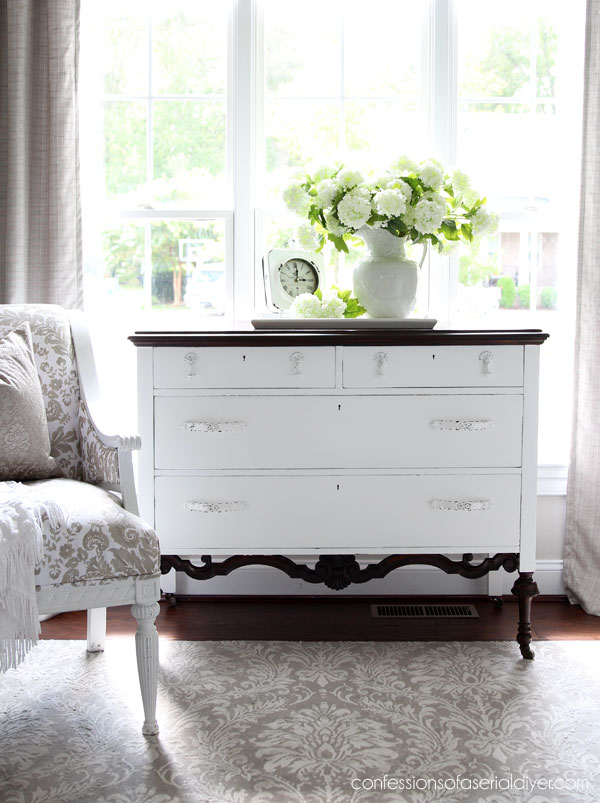
I loved bringing this gorgeous dresser back to life!
Thanks again to Mary for giving me the opportunity to love on these pieces! It makes my heart so happy to know that she has been reunited with them!
If you missed the dressing table I painted for her:
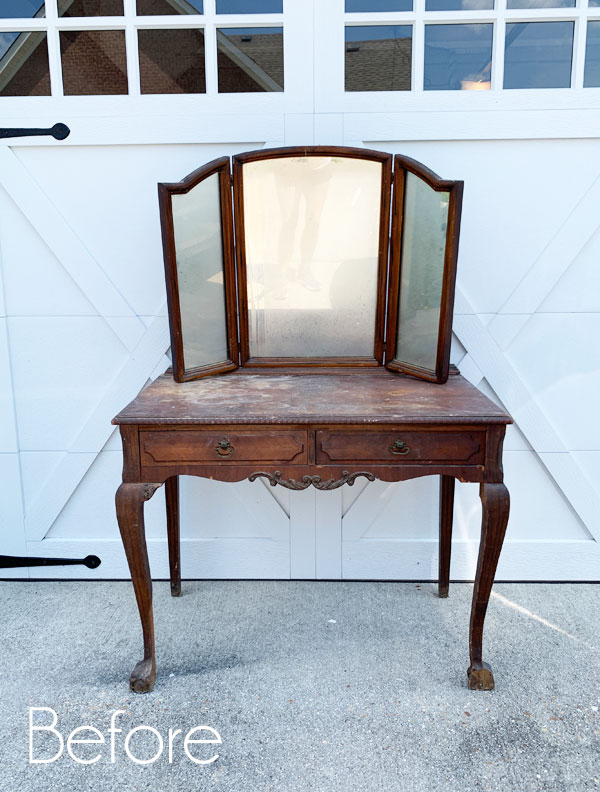
You can see that HERE!
Here is my Dixie Belle Product Reference Guide that will take the mystery out of all those products:

I’ll be back next week with all your favorites from this year, and then I’ll be back to finishing up my biggest haul ever! I already have a new haul to start on once that’s done!
Update: Visit your favorite furniture makeovers of the past year HERE now!
Happiest of New Years to you all!
XOXO,

Don’t Miss a Thing!
If you like what you see, there are several ways to follow along!
EMAIL * INSTAGRAM * FACEBOOK * PINTEREST


Get FREE SHIPPING on all orders over $50. No code needed at checkout! Orders under $50 always enjoy $8 flat rate shipping! Most orders ship same or next business day!


Mary Kaiser says
This one I remember also because it was stunning when you were finished with it. I hope you and your family have a Happy New Year and I am looking forward to 2023 and seeing what your imagination brings us!!
Christy says
Thank you, Mary! It’s one of my favorites! I hope you have a wonderful New Year too! I spent all day cleaning and organizing the garage, aka my workshop. I’m ready for a brand new year yay!! XOXO
Anne Mathews says
I love all your work! But… this dresser has the most beautiful grain on the top. The dark stain hides that beauty. I do like the dark accent with the white though. You do awesome work and are inspiring.
Christy says
Thank you so much, Anne! XOXO
Cecilia says
Gorgeous! Thanks for all the handy tips. A friend has been asking me how to paint different things – now I can point her to this excellent tutorial. (I bet she just relies on me though lol so I’m glad I have this to refer to). Have a great weekend!
Cecilia
Christy says
Thank you, Cecilia! Absolutely…send her my way!! 🙂 XOXO
Mary King says
Downsizing was so very difficult, but it turned out that these two smaller dressers fit perfectly and with your beautiful touch they will live on in my family for many years to come! Of course their sentimental value was enormous. My mother and father used these dressers and dressing table in their bedroom and yes they had belonged to my father’s parent’s. I am so blessed to have these lovely pieces back with me in my own bedroom where I see them daily. And once again it brings me great pleasure to see them here on your blog.
Christy says
I know that was a difficult move for you, Mary, but your new place is so bright and refreshing! I am so grateful that you thought to reach out to me when you were looking for a home for these pieces, and I truly enjoyed bringing them back to life. It brings me great pleasure to know that you have them back and also to get to visit them here on my blog as well, and I always think fondly of you when I do! I hope you are healing nicely, my friend! Take care! XOXO
Sue Mellette says
Beautiful transformation! I particularly love the contrasting dark stain and white. The drawers are a wonderful surprise. Thanks, too, for the detailed instructions! This piece would be lovely in any setting. Thanks for sharing. Have a wonderful New Year!
Christy says
Thank you so much, Sue! I’m glad you enjoyed this one! Happy New Year to you as well! XOXO
Sharon L Austin says
That’s so cool the lady wanted to buy them back. To keep these pieces in the family is wonderful. I have to save this post as it literally tells me everything I need to know about the family pieces I want to redo. Thank you for sharing your knowledge, yet again!
Christy says
I know, right? It makes me so happy that she has them back! And I’m glad this post was helpful, my friend! XOXO
Phyllis says
Absolutely gorgeous!
Christy says
Thank you so much, Phyllis! XOXO
Niki says
So gorgeous! I really like this set, and it makes my heart happy to know she has them back as well. I’ll be spending some time in your Etsy store today to see what I can find!! Have a great weekend Christy!
Christy says
Thank you, Niki! Yes, it was a lovely reunion for sure! Happy shopping and feel free to message me on there if you have any questions! XOXO
Michele M. says
What a wonderful and helpful tutorial, Christy!
It ended up just gorgeous – and I love love love that Mary was reunited with such a precious family heirloom. Yay. Loved that dressing table too.
Can’t wait to see your new haul and the magic you bring to every item you create. Whoo hoo! Thanks for always inspiring us!
Happy New Year!
Christy says
Thanks so much, Michele! I was so thrilled to see her getting them back. It was a lovely reunion! I can’t wait to get through the rest of this haul and share all my new goodies! Happy New Year!! XOXO
Marian says
Christy,
Your work is absolutely beautiful! I love the color combination.
Christy says
Thank you so much, Marian! XOXO
Cheryl Borns says
Beautiful!!
Christy says
Thank you, Cheryl! Happy New Year! XOXO
Cecilia from Georgia says
I am always second guessing myself when I want to stain the legs of a painted piece; this is lovely! I am saving this for future inspiration to show how attractive this look can be. Have a wonderful and productive 2023! XOXO
Christy says
Thank you, Cecilia! I love the look of stained legs. Unfortunately, the stain takes time to dry and I am usually hustling to get pieces finished so I don’t do it often enough lol! Here’s to a beautiful new year, my friend! XOXO
Sam says
Step 1: be able to afford place –house– where you live where you can just do this outside.
Christy says
Great first step, Sam! Before I had a garage, I actually did it all in my house! 😀 XO
Marietta says
SAM: Me too. I have a great-room area and I pushed the dining room table over, set up a tight but doable little area, and just painted anyway! Granted I could not do big pieces in the house but I did do chairs, night stands, and the like. I sanded on the deck, and used a lot of drop cloths. When my Mom passed she left me enogh to build my she shed which I am moving into 18 months later. (could not bring myself to spend Moms’ money for a long while). I am already missing painting and restoring, but now I have a 16 x 32 shed to finish setting up and lot of furniture to do for self and to sell, so here we go. My advice, hang in there and a way to do what you want will find you!
Marietta Walker says
Cristy,
THIS. IS. BEAUTIFUL!
BUT…
You know me, the one with the nosy questions. I would like to see a picture or too more of the top. When you showed it sanded it looked like it could come out beautiful re-stained and then I saw you staining and I got excited to see it. I realize you showed the end of it but I really wanted to see more.
Is it as nice as I hoped it would be for you?
Christy says
Thank you, Marietta! The top turned out just beautifully! I now have a new shutter backdrop that I use for photographing larger pieces, but I used to have to take photos of those larger pieces in front of our dining room window which really blows out the tops of pieces due to all the light, so I did share the best photos I got of the top, but yes, it was gorgeous! Hope you are enjoying your weekend! XOXO