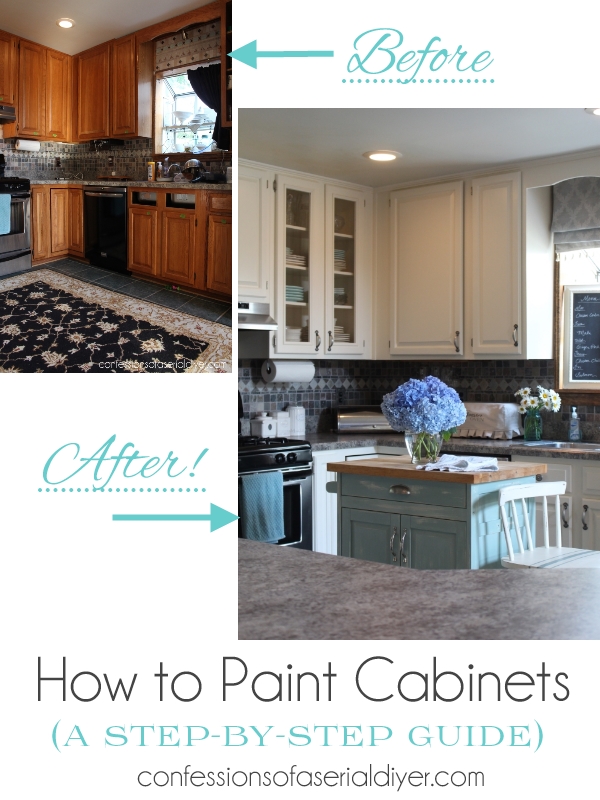
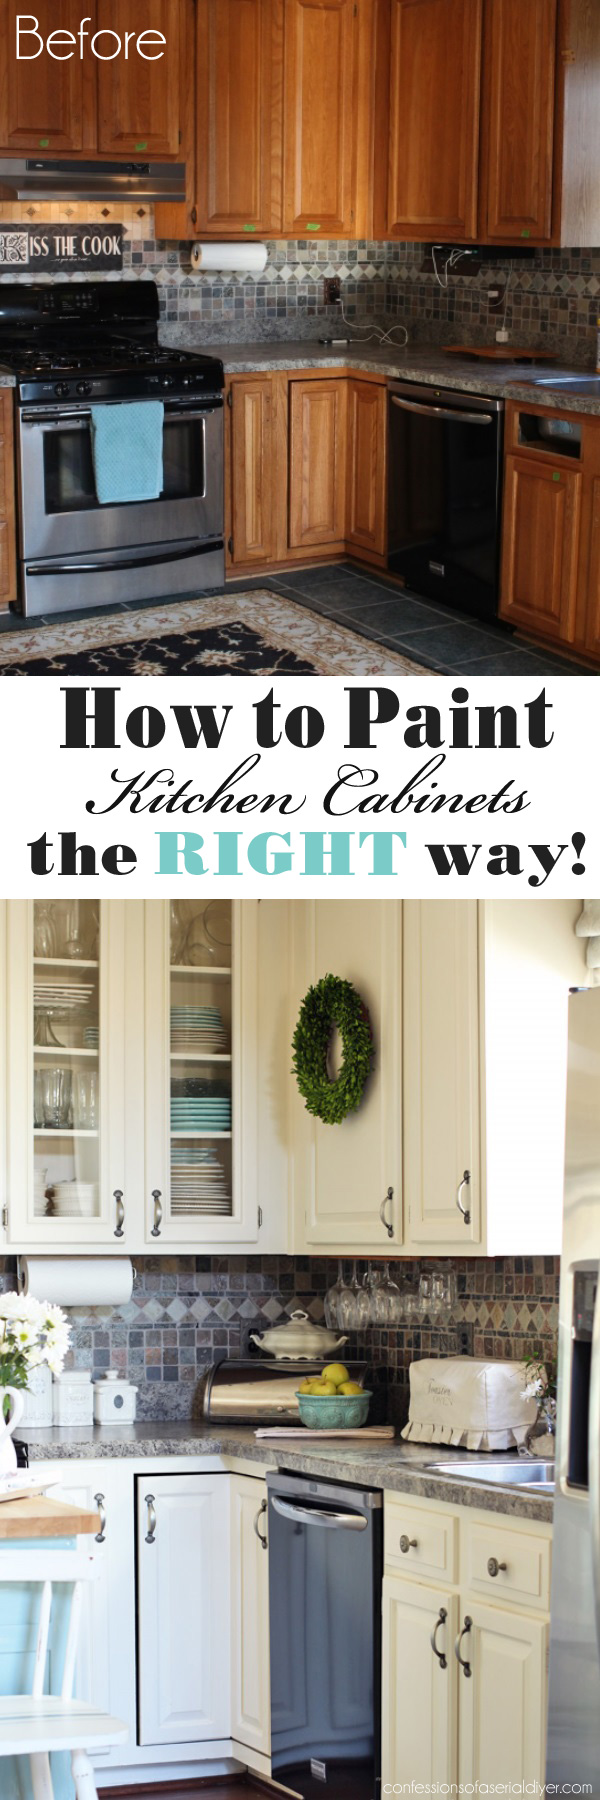
If you’re in the market to paint your kitchen cabinets, you have come to the right place! I am sharing every single solitary step to a brand new space!
While the actual priming and painting only took three days (can you say marathon painting?), reviving your kitchen cabinets will also require at least one solid day for prep, and at least one additional day to put everything back together. I took all day Friday to prep, primed and painted Saturday, Sunday, and Monday, and put everything back together all day Tuesday for a total of five days.
I am sharing my experience step-by-step. Feel free to skim over if you don’t need that much nitty gritty. I included affiliate links so you can find the products I used. Click here to read my full disclosure policy.
If you missed the before of this makeover, you can see all the not so pretty pictures HERE.
Let’s get started!
Day 1: Prep Cabinets
- Remove all handles and knobs, and store them in a Ziploc bag if you plan to reuse them.
- Label doors according to what is inside. I used FrogTape
which was perfect since I was moving the tape often.
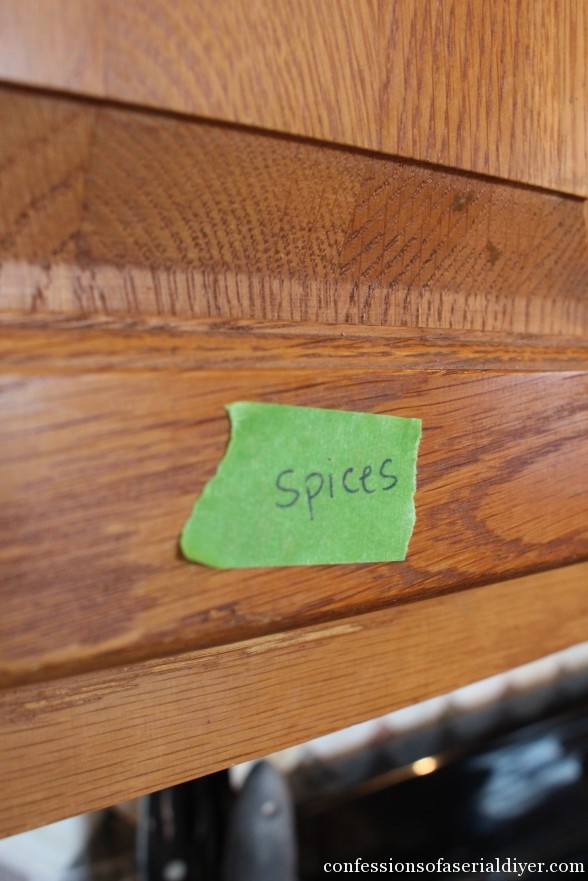
- Remove cabinet doors and cabinet door hardware (hinges). If you plan to reuse them, save them in a Ziploc bag also. (I have reused my hinges in the past to save on costs. I just spray painted the old hinges. However, if it is in your budget to do so, I recommend purchasing new ones. Be sure to take a sample of what you already have to the store with you!)
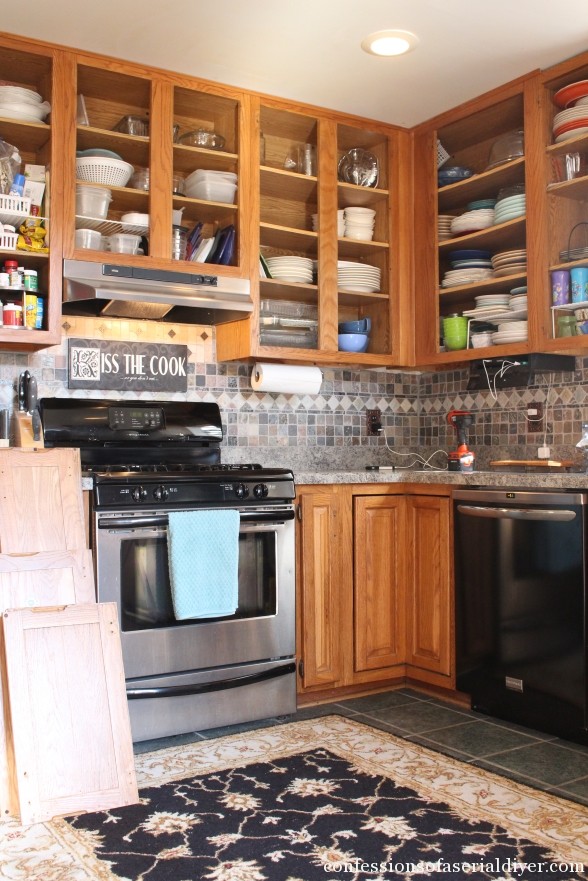
- Remove everything from the counters if possible. I emptied a couple of my cabinets, but not all. I pushed as much back as I could and removed anything that was unable to be pushed back.
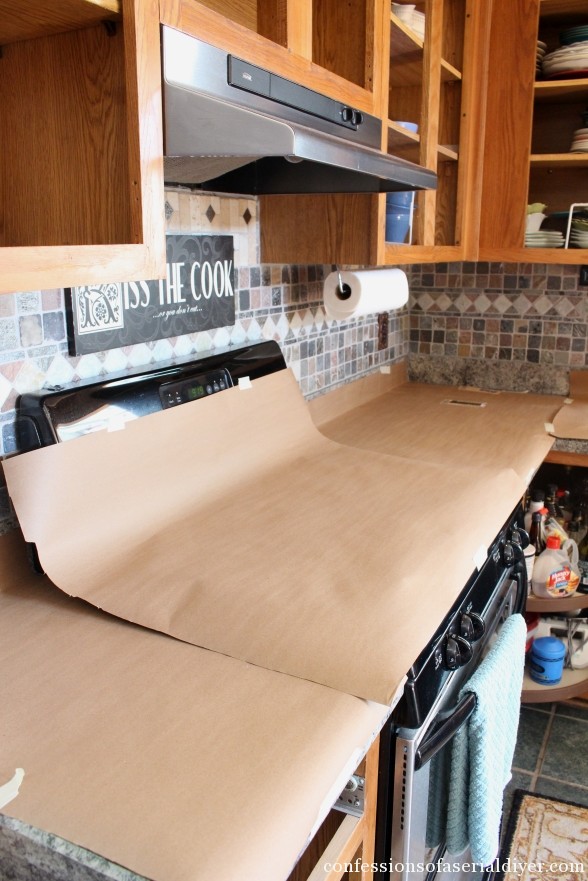
- I found it very helpful to cover my surfaces with brown paper. A roll of it can be found near the drop cloths at Lowes for around $8. It will catch any paint splatter and any dust from sanding, saving a ton of clean up later.
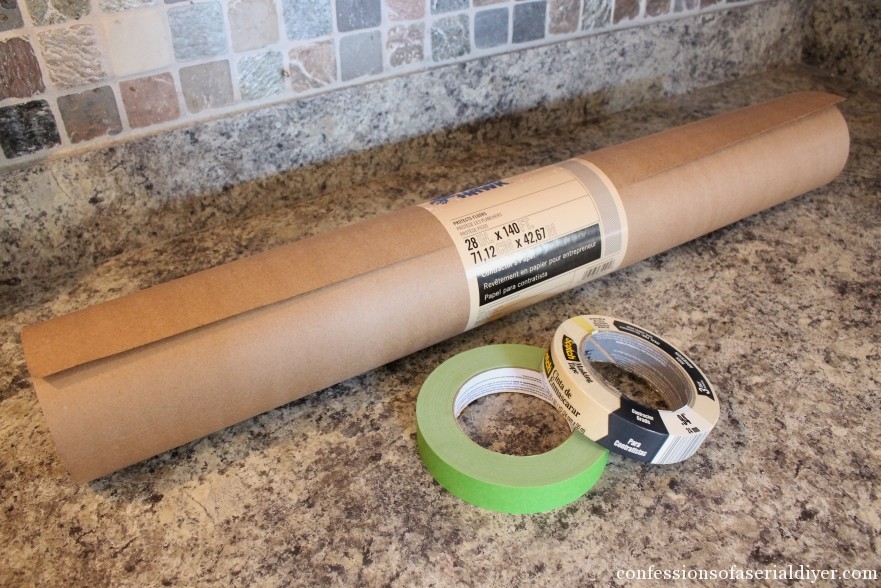
I used masking tape to hold it in place. I covered the stove and sink also, but I was able to remove it when I needed to use either. Then I just put it right back.
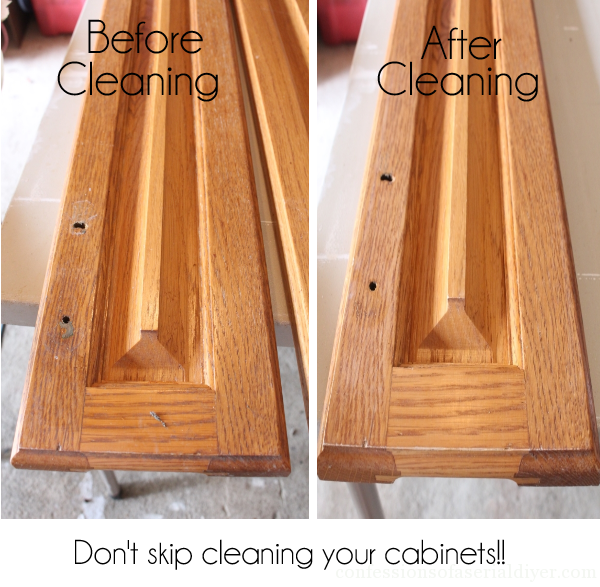
- The MOST IMPORTANT step for a beautiful, smooth finish is cleaning your cabinets! I used All Surface Paint Prep
which is a TSP substitute. This particular brand is no longer available, but this one is just as good…as long as it says it is also a deglosser.
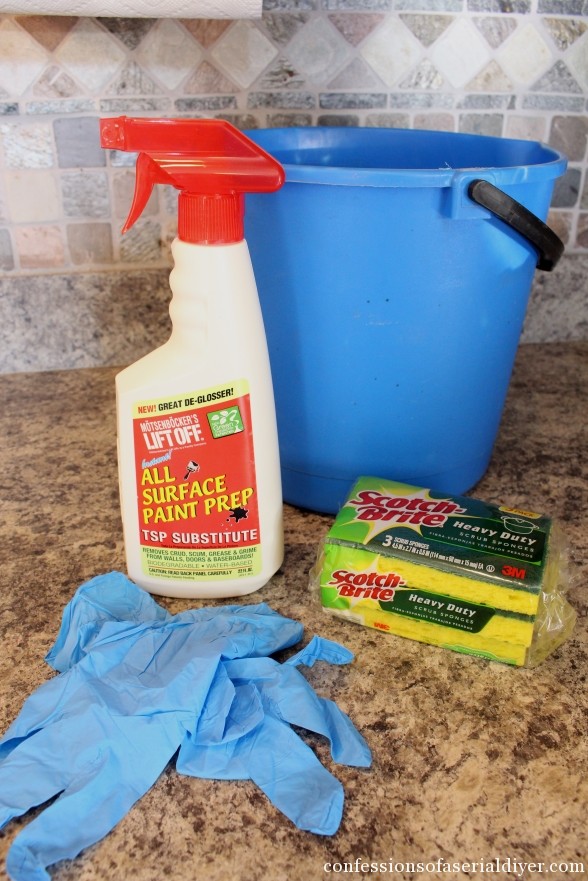
Because this product is also a deglosser, it will take the gloss off of any surface you use it on. Wearing gloves is recommended. I sprayed it directly onto my Scotch Brite sponge and then wiped the cabinets down with it. I had to use the abrasive side in stubborn areas. I started with my cabinet boxes.
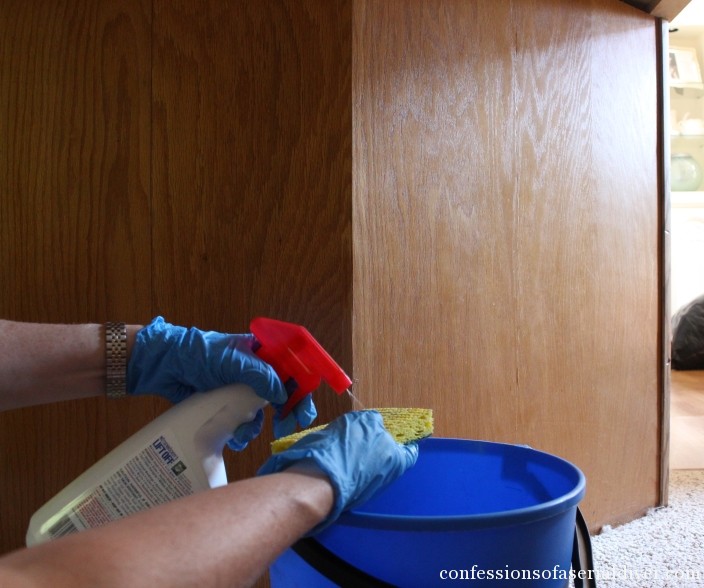
Action shot! I don’t think I’ve ever been photographed while cleaning before.
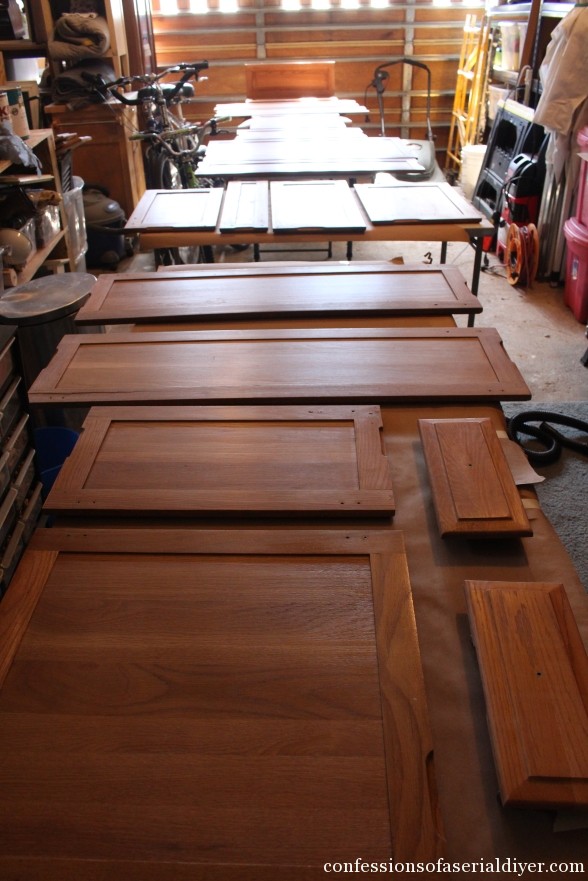
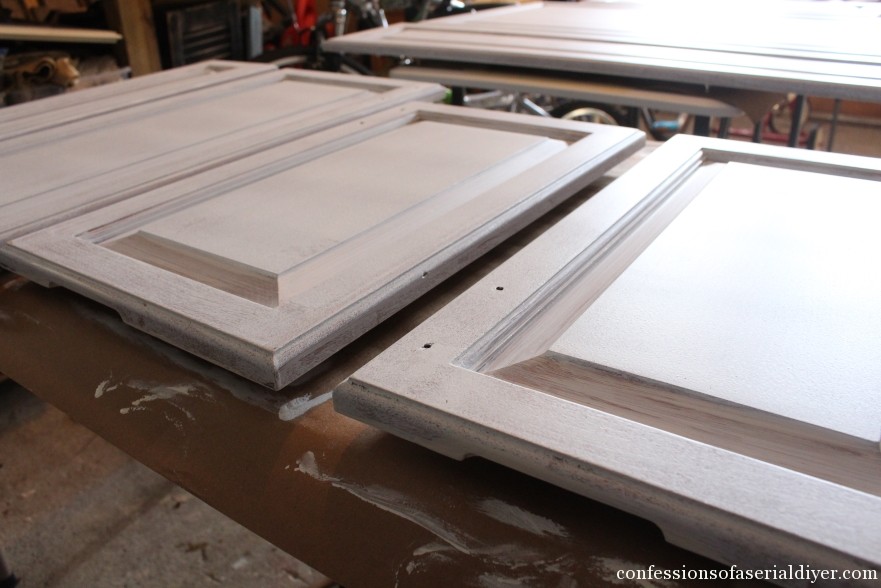
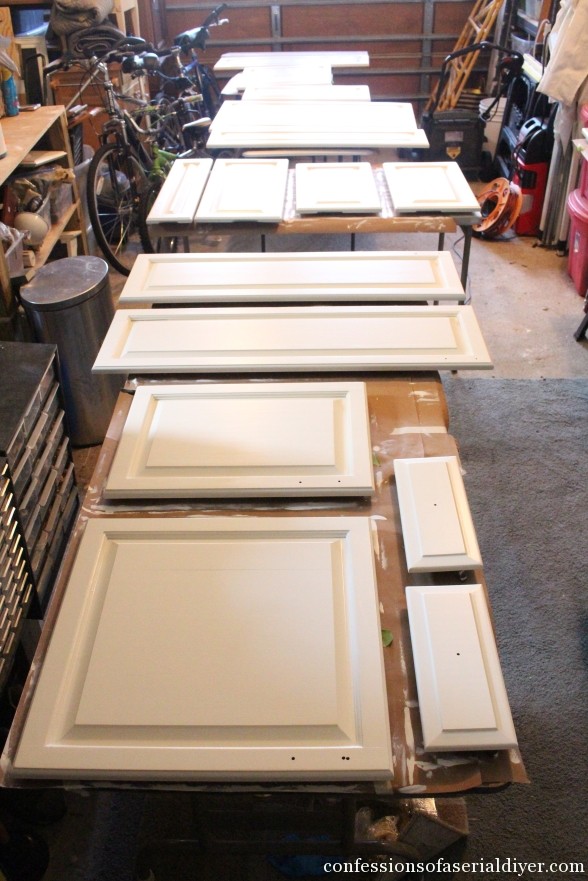
- Find a clean, dust-free area to lay out your cabinet doors. I have several tables I was able to set up, but you could just as easily lay them out on a drop cloth on the floor. You can see I carved out a very narrow space in my crowded garage!
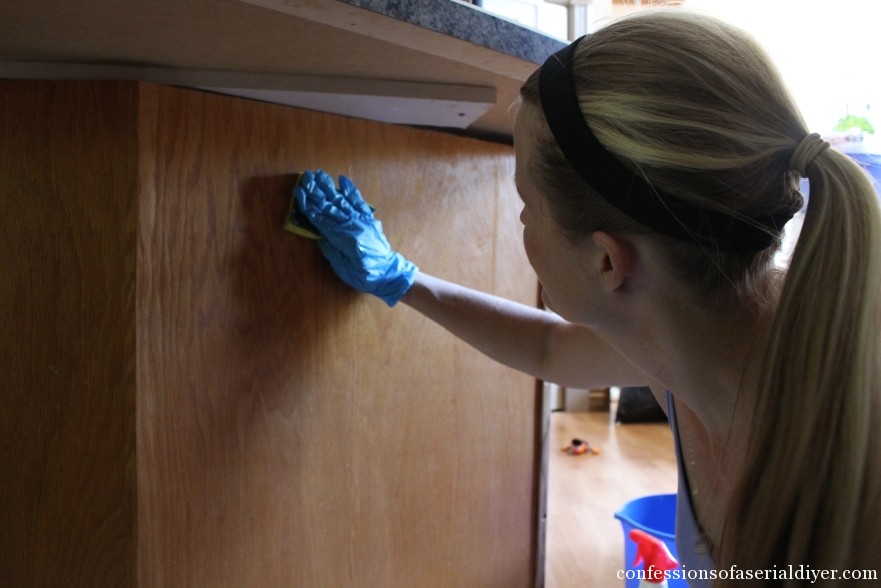
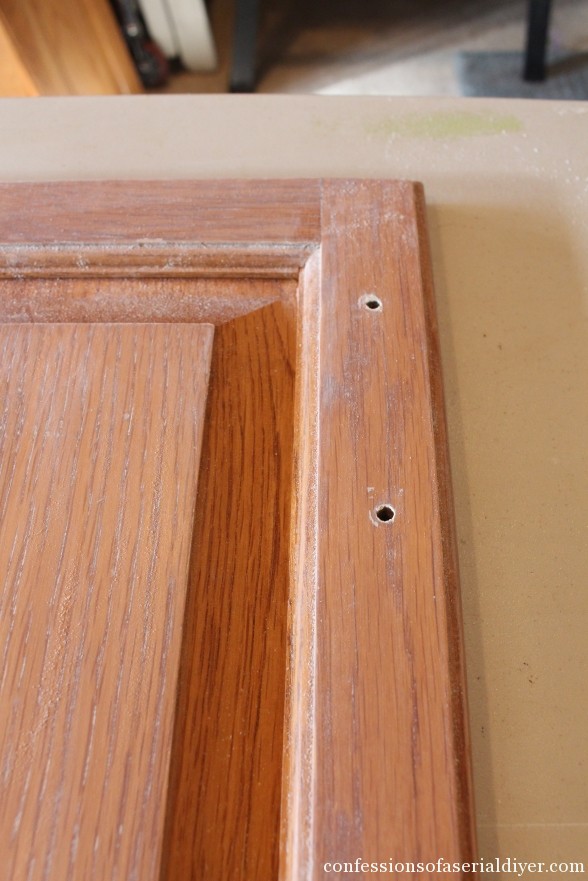
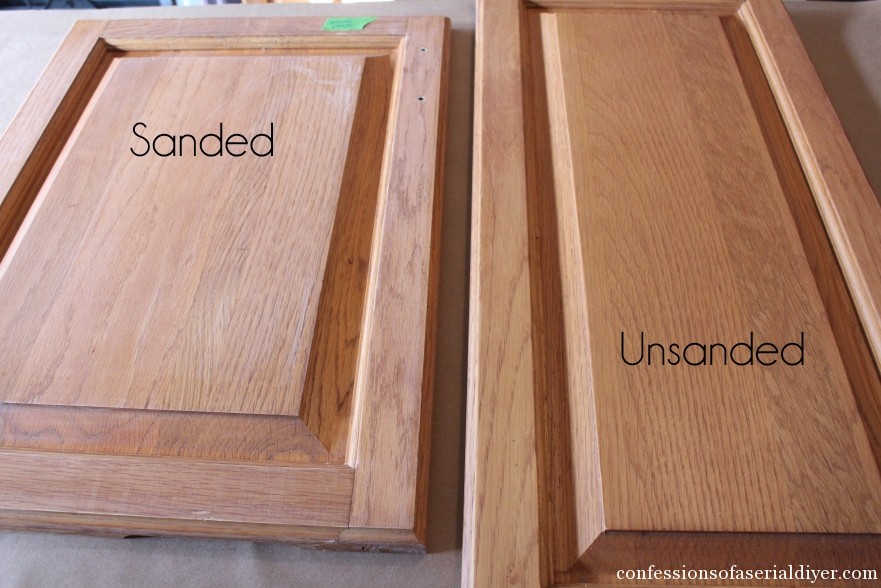
- Clean the cabinet doors. I was able to spray the cleaner right on to the doors this time since no other surfaces needed to be protected. Look at the difference on this tall cabinet:
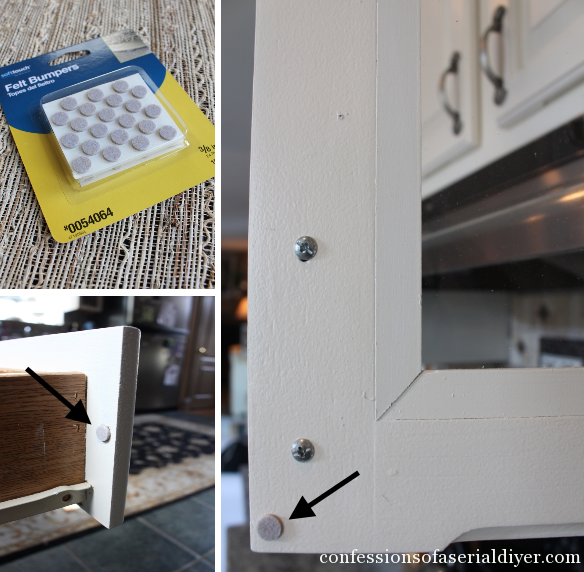
The cabinet on the right almost looks as though it’s been sanded. I also scraped off the old felt bumpers with a razor blade. (I think they were dry-rotted anyway.)
- Time to sand! Sand the cabinet boxes first. Sand all surface fronts and the lip just inside the cabinet. I did not paint the interior of the cabinets, so no prep is needed there. You are not sanding down to bare wood, just enough to remove any shiny surfaces that still remain after cleaning. Use 320 grit sandpaper or a fine sanding block. I like to cut full sheets of sandpaper into four rectangles, then wrap one around an old foam sanding block to sand my pieces, replacing each piece of sandpaper often. *I also highly recommend wearing a dust mask while sanding!
- Sand drawer fronts and doors. When sanding drawer fronts and doors, sand really well where the knobs and pulls are or will be, as those areas will receive the most wear.
- Use a shop vac to pick up the dust in the cabinets and from the crevices of the cabinet doors. Wipe off any remaining dust with a clean damp cloth.
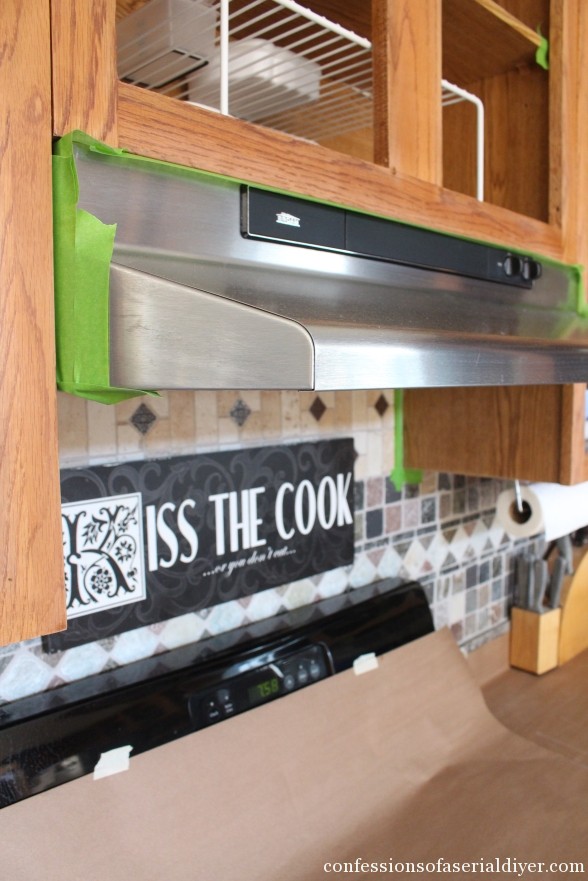
- Tape off the hood vent, inside of drawers, appliances and anything else that needs to be protected from paint.
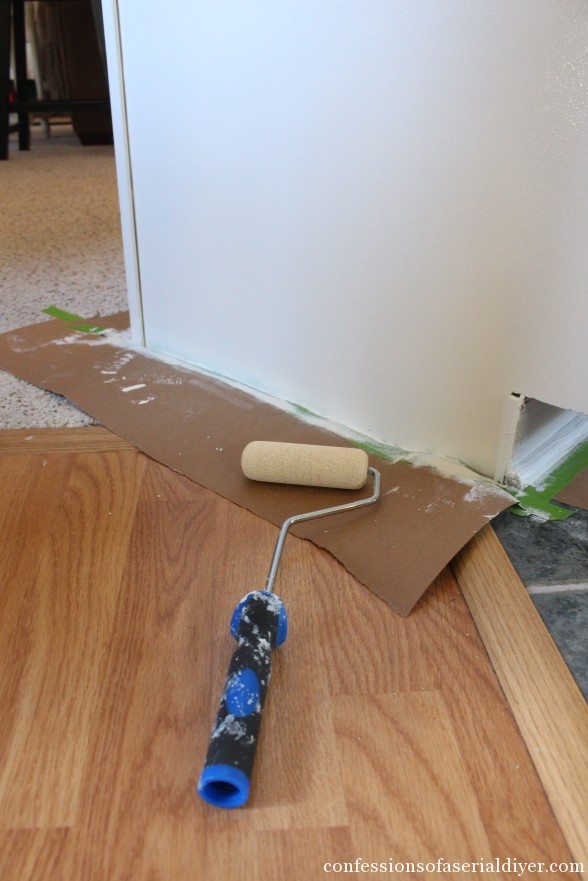
- Add about a foot of brown paper all around the base of the cabinets to catch drips and splatter. This is the only photo I have, but you can see it also provides a landing spot for your brush and roller as you’re switching back and forth.
Woo hoo! Your kitchen is officially prepped! Wasn’t that hard work??
Day 2: Time to Prime!
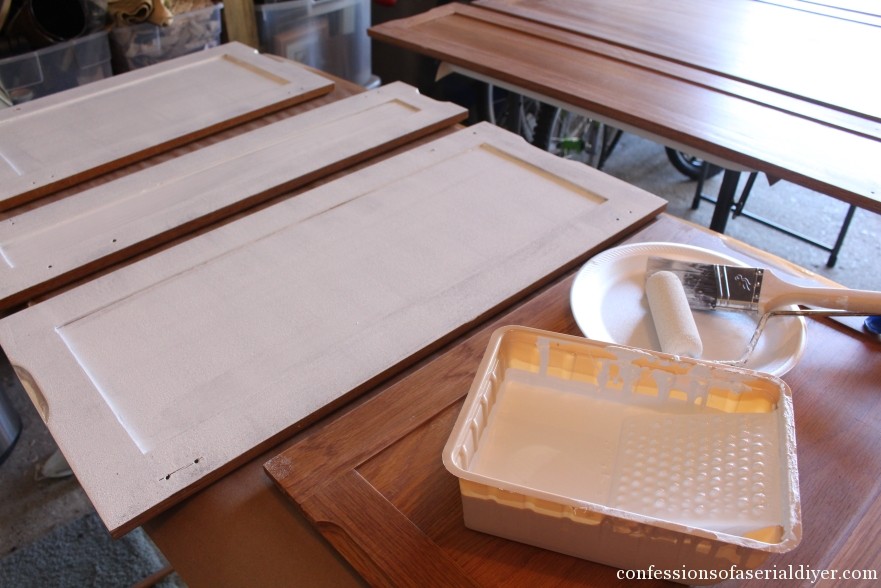
This is what you’ll need to start priming:
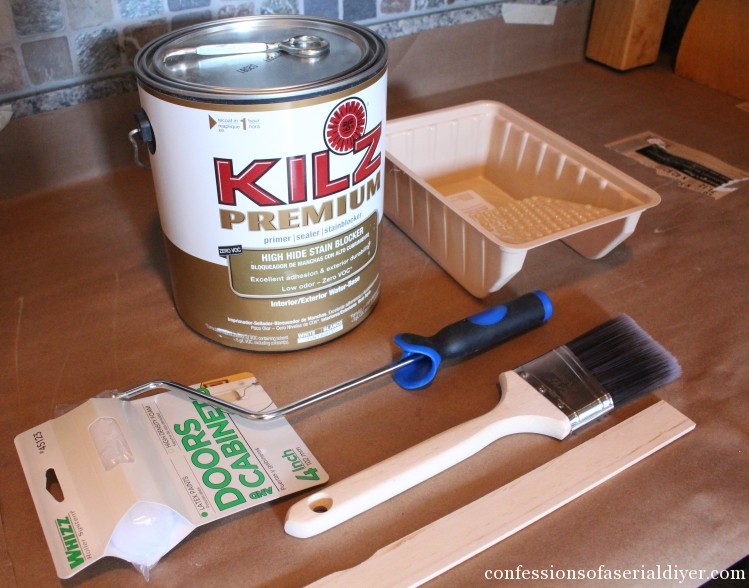
Four inch roller and an additional two-pack of smooth rollers (These are from Lowes and specified, “Doors and Cabinets”.)
Paintbrush -I prefer to use a Purdy 2.5-Inch Angle Brush, but I had this brand new brush on hand already, which is fine for priming. (I did use a Purdy for painting. )
Gloves (not shown) I bought a 25 pack of blue Nitrile Gloves and tried to wear them at all times to save on clean up.
-
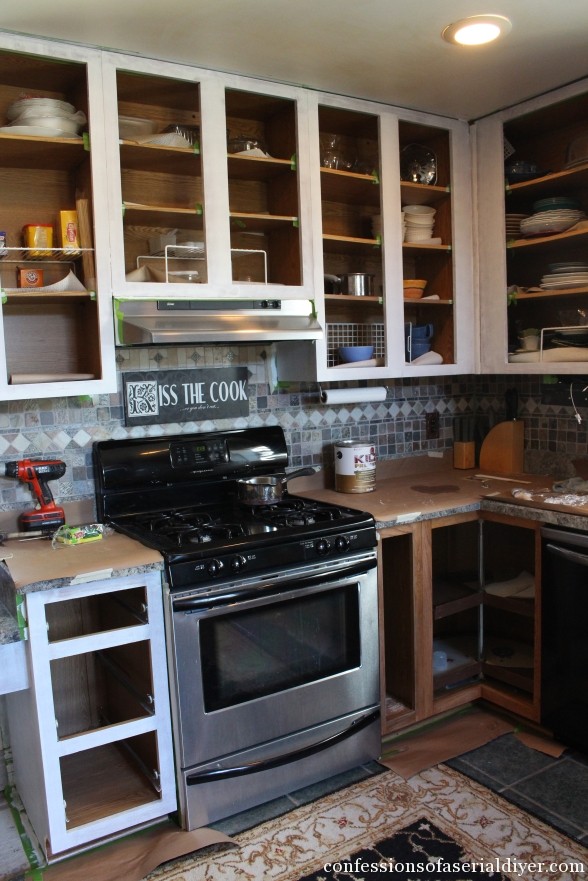
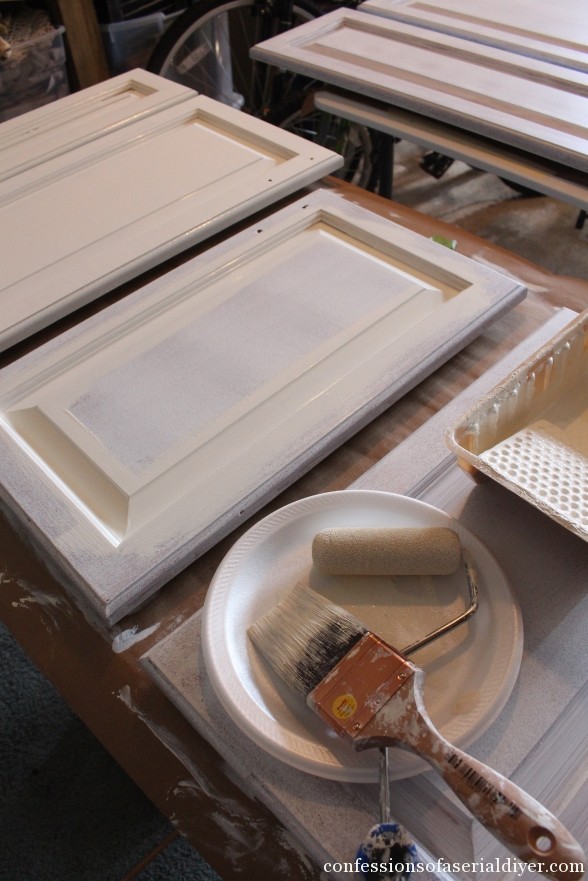
Start priming the boxes of your cabinets first. I painted mine much the same way you would paint a wall. I cut in with the brush and then rolled out the easier-to-reach areas. I will warn you that when you stand back and look at your primed cabinets you may start doubting the insane idea you had to paint your cabinets. They will look terrible but have faith. The paint will look spectacular!
Mine looked pretty awful at this point:
- Prime drawer fronts. I used a paintbrush to apply primer to the back of the drawer fronts and a roller to roll out the fronts. DO NOT prime the sides of the drawers, only the fronts and backside of the fronts.
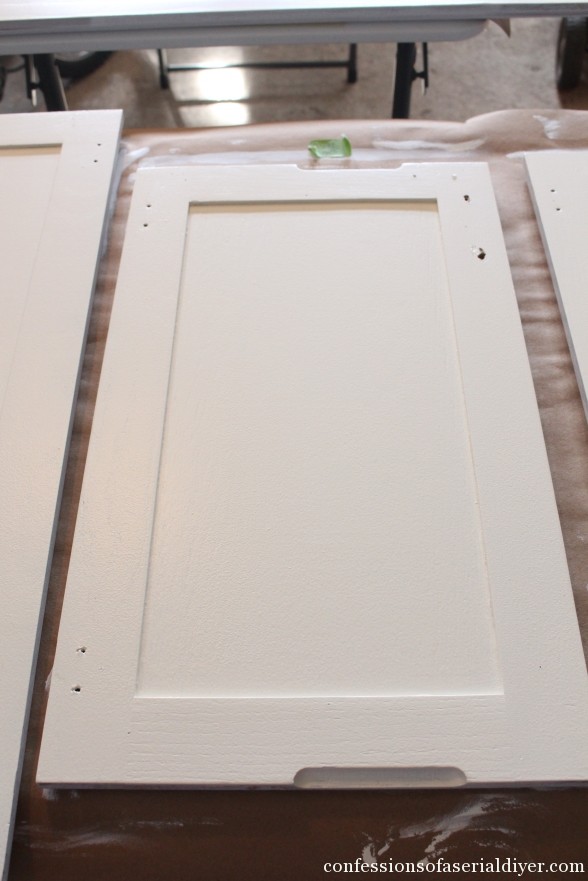
- Prime the cabinet doors. Lay all of the doors with the backsides facing up. The backs should be painted first. I cut in the inside panels with the brush and rolled out the rest.
Be sure to lightly roll the primer on at the edges, so that the primer only covers the top surface, and doesn’t drip down onto the sides:
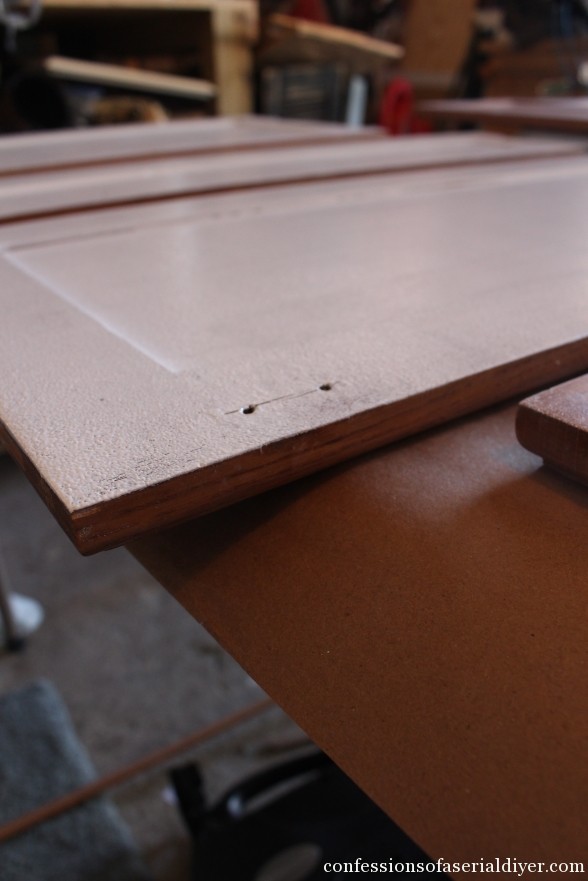
Only one coat of primer should do the trick, unless your cabinets are really dark, then I would recommend following up with one more coat of primer when that first coat is dry before moving on.
- After about two hours of dry time, I primed the fronts of the cabinet doors. To do this, I found a trick using push pins! Before flipping them over, I lightly hammered a pushpin in each corner to allow the backside to continue to dry thoroughly while still being able to prime the front!
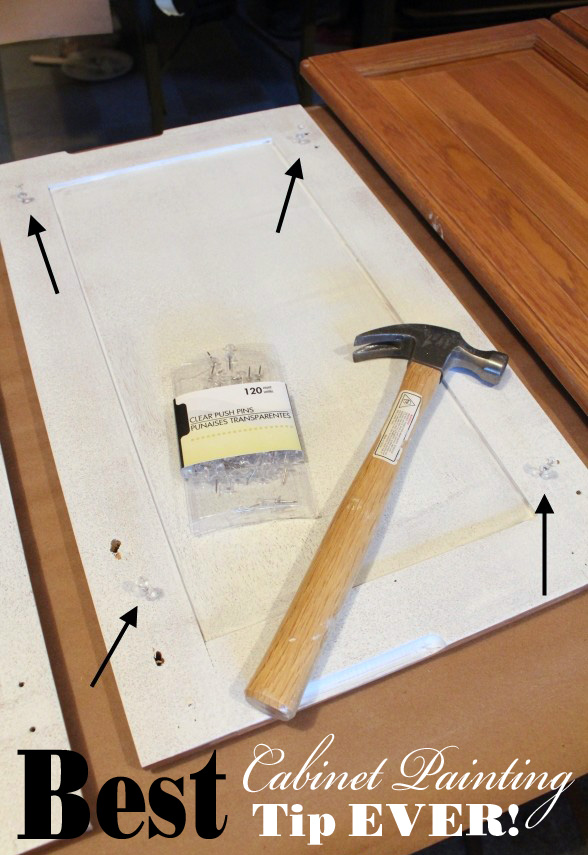
Ready for the front side now! It’s also easier to run a roller around the sides with the cabinet doors elevated.

Did I mention I was marathon painting? Thankfully primer dries really quickly. Since my cabinet boxes inside had been dry for a few hours, I started painting! (Not the doors, just yet, but the boxes were ready!)
Day 2 (still): Let’s Start Painting!
Here’s what you’ll need to paint your cabinets:
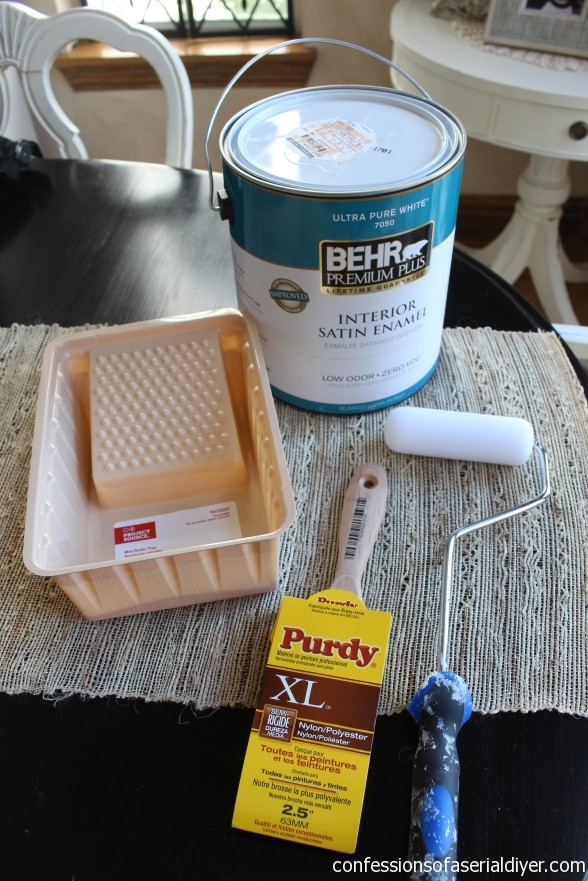
Interior Enamel Paint in a Satin finish (I used Behr’s Cottage White) **This is latex paint, but the enamel gives it a durable, easy-to-clean finish.
**I did not get the paint with primer built-in since I was priming separately, but I would recommend using the paint with the primer for even better coverage, as I did have to touch up a few areas.
Four-inch roller and an additional two-pack of smooth rollers (These are from Lowes and specified, “Doors and Cabinets”.)
Purdy 2.5-Inch XL Brush or other good quality brush (2 or 2 1/2″)
Nitrile Gloves (Again, if you can save on clean up…plus I used my fingers for clean up so they were covered in paint!)
-
Paint the cabinet boxes. Use the same method as priming, brush to cut in and roll out the rest.
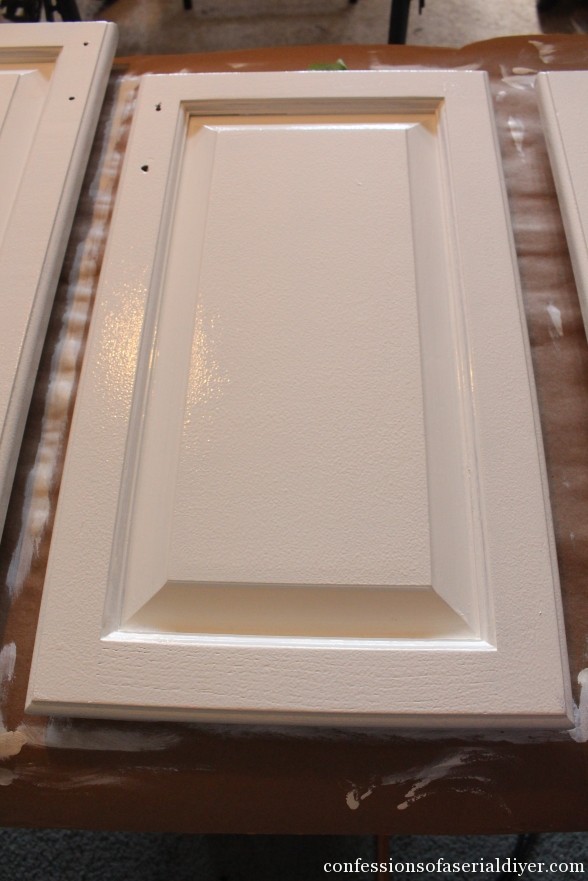
- Paint cabinet drawer fronts. Again, I used a paintbrush to paint the back of the drawer fronts and a roller to roll out the fronts. DO NOT paint the sides of the actual drawers. You are only painting the panels attached to the fronts of the drawers. I also painted the backs of those front panels.
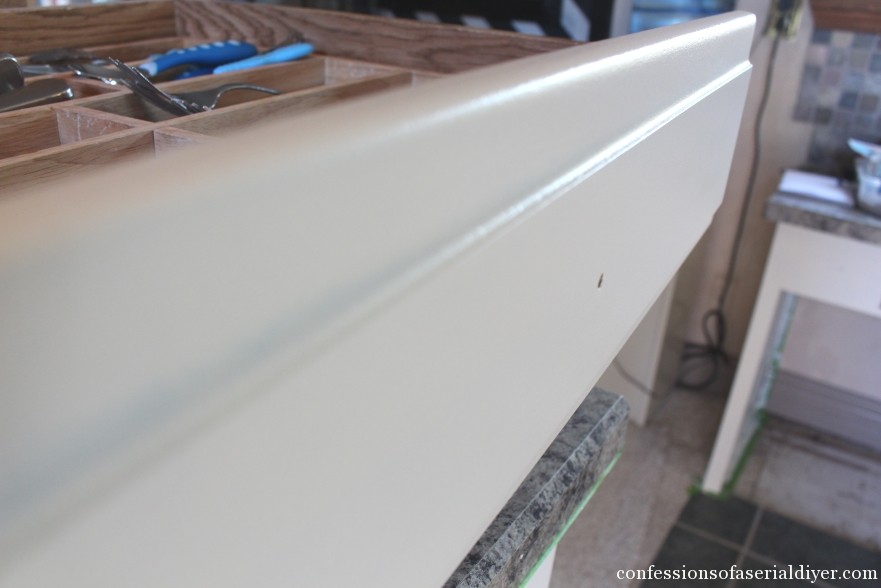
This photo shows how smooth and pretty the paint is!
- Allow everything to dry overnight.
- Wrap all brushes and rollers with Saran Wrap when not in use. I used mine off and on for about two weeks like this, no washing necessary in between uses.

Day 3: Paint, Paint, Paint
- Time to paint the back sides of the cabinet doors. You’ll need to remove the push pins from the backs and lay the fronts face down. They should be well dry after sitting overnight, so no push pins necessary. I painted the same way, using a brush to cut in the recessed area and a roller to roll it out.
- Paint the cabinet boxes next with their second coat of paint. This is when everything starts to look really great!
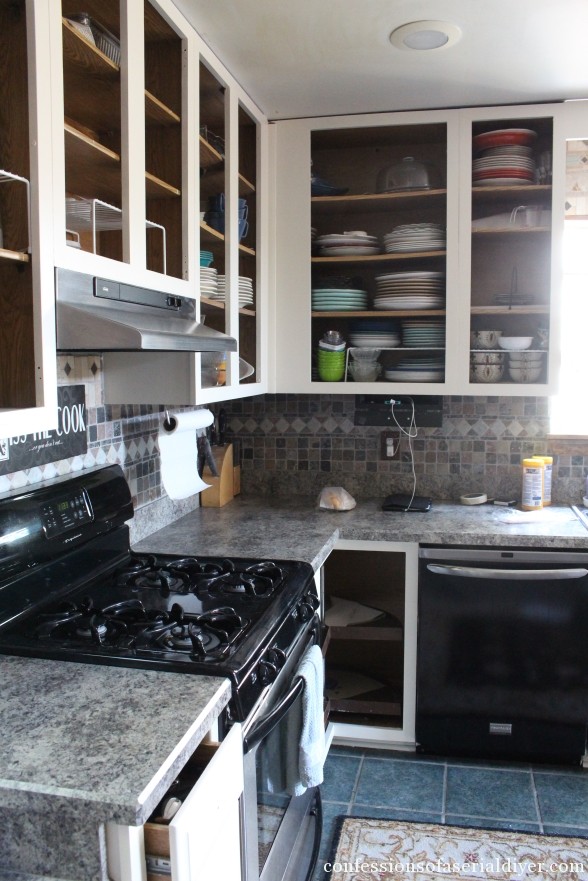
- Remove tape while your surfaces are still wet!! This includes the brown paper on the floor.
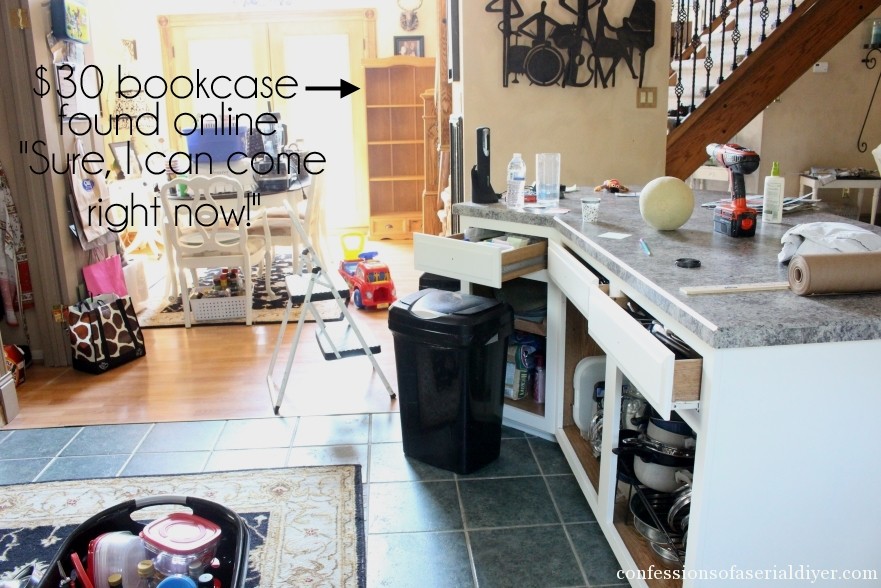
- Take a break and take care of things you’ve been neglecting for the past two days, while your paint dries. Or take your kids to the Strawberry festival and go pick up a bookcase you found on an online yard sale, but had no business doing since you are knee-deep in a kitchen redo war zone.
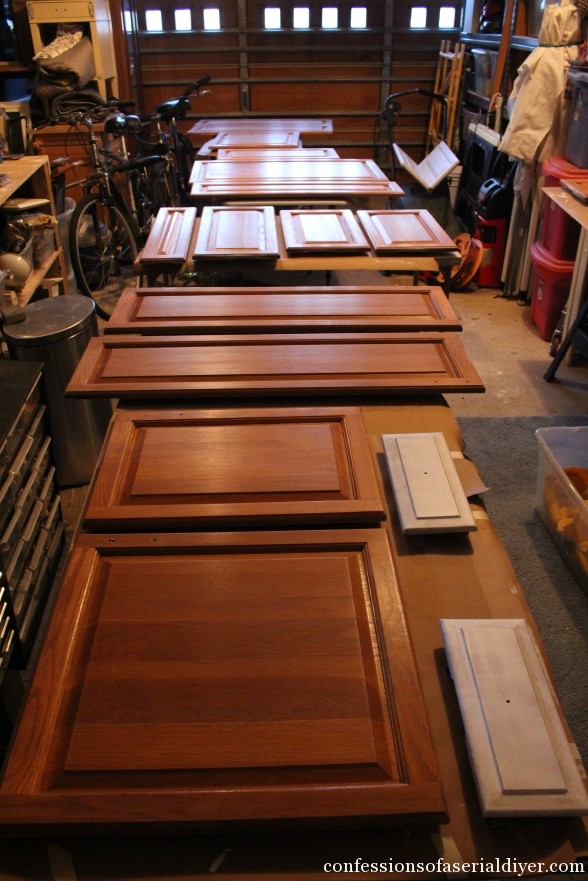
- After a few hours of allowing the first coat on the cabinet backs to dry, I applied the second coat. They look so pretty! (You can see here too that the labels ended up on the table in front of each cabinet.)
One coat of primer and two coats of paint gave perfect coverage in the rolled areas. The brushed areas, could benefit from the paint with primer added for even better coverage.
- Allow everything to dry overnight.
Day 4: Finish Painting
- Add pushpins once again to the backs of the cabinets.

- Turn cabinet doors over and paint. I used a brush in the recessed areas and rolled out the flat areas and sides.
- I let mine dry pretty much all day, then gave them a second coat. The paint dries to the touch really quickly.
- Let the fronts dry completely overnight.
Day 5: Put the Kitchen Back Together
You can wake up to this and know that the painting is behind you!
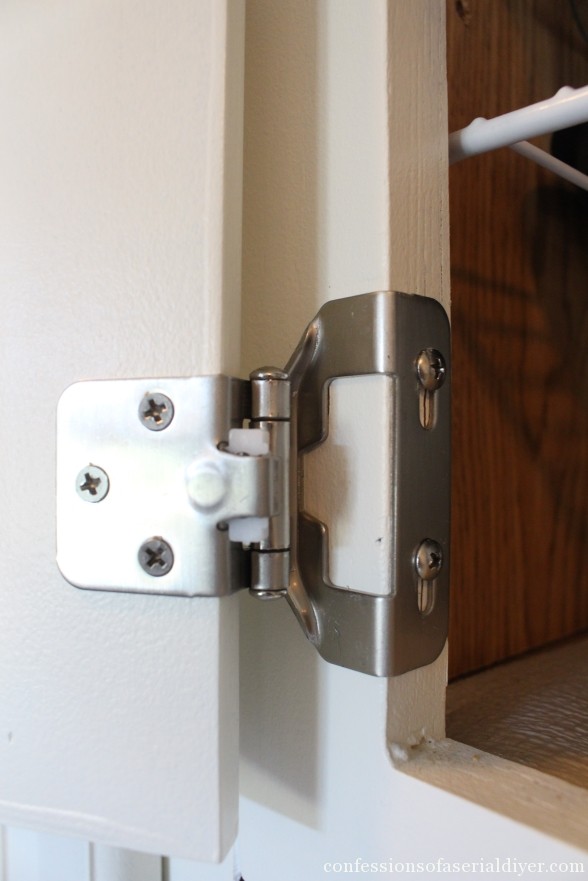
- Time to add hinges! I installed brand new hinges very similar to these Satin Nickel Self-Closing Cabinet Hinges
in quality and price: . I have spray-painted old hinges and reused them in the past. If your budget allows, I recommend new hinges. They just look and function so much better. The hinges I link to above run $30 for 10 pair. Well worth it!
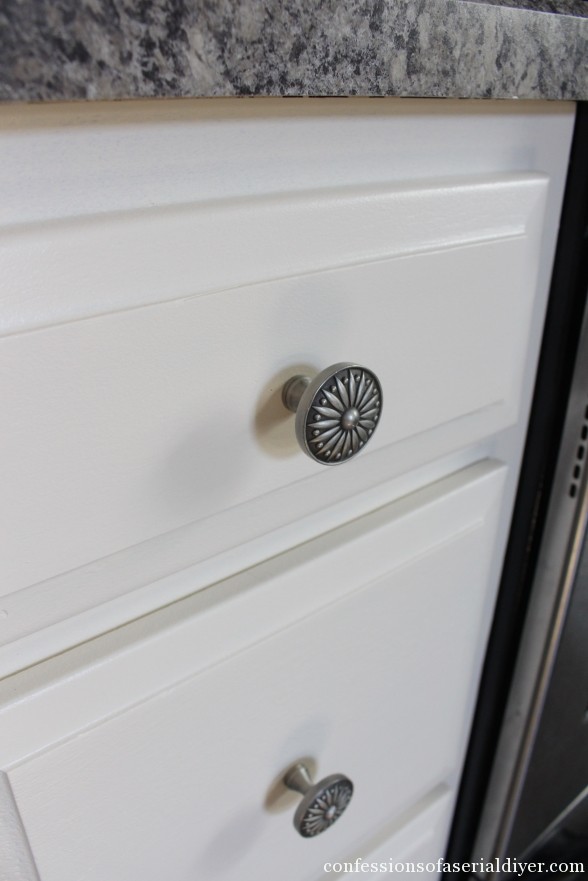
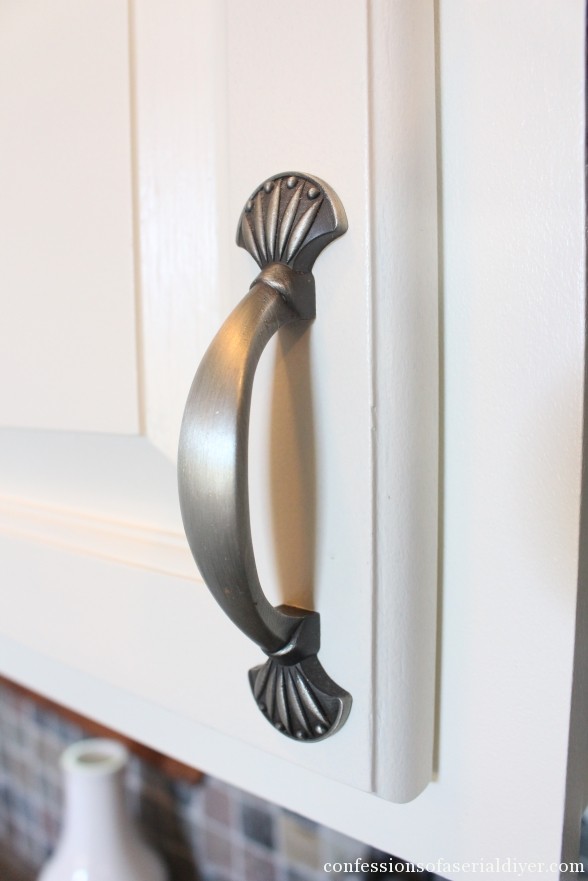
- Add handles and drawer pulls. I reused what we had before, since they are still pretty:
- I also purchased new Felt Bumpers
for the drawers and cabinets:
If you are only painting, you’re done! That was a lot of work, wasn’t it?
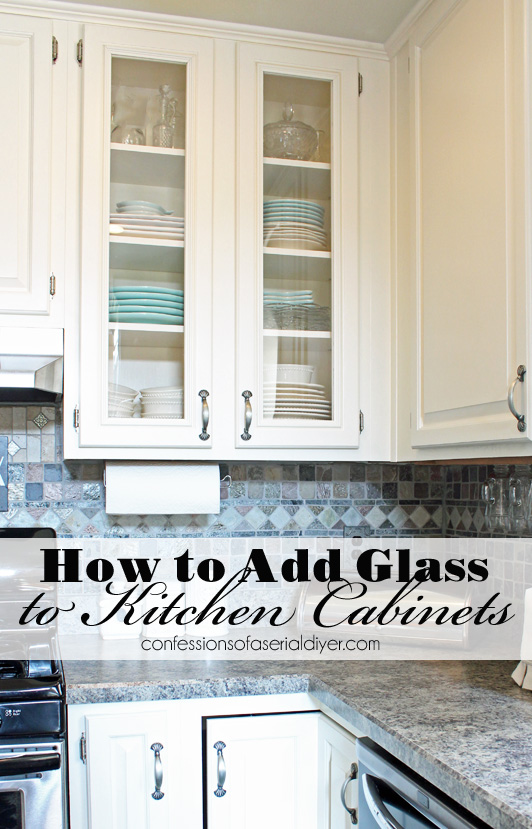
At this point I still had to paint the inside of the cabinet that I planned to add glass doors to, replace those door panels with glass, add a shelf above the window, install the crown molding above the cabinets, and add wainscoting to our large island.
It’s amazing what a difference paint can make! The after photo below is two years after I painted these cabinets and it is still holding up strong:
Why not use chalk paint?
I had been putting off this project for way too long. My toughest decision was what kind of paint to use. You know I am a huge fan of chalk paint and it seemed so much easier with the “no prep” idea behind chalk paint. However, I chose the latex enamel in the Satin finish and I could not be happier. The finish is so smooth and the enamel makes it durable and so easy to clean. The prep needed was well worth the end result, and there was no need to wax or seal the paint after, as would have been needed with chalk paint. That will make touch-ups so easy. Plus, you really want to have a smooth, grease and grime-free surface to paint on anyway!
I hope that you found this helpful! Maybe you’ll be inspired to get started on that kitchen update you’ve been putting off?
UPDATE: How have my cabinets held up after three years??
See for yourself HERE!
You might also like:
You might also enjoy seeing how I painted the kitchen in our new house using the exact same method, except this required two coats of primer since the cabinets were so dark:

See how it looks now HERE!
And here’s what else I paint around here:
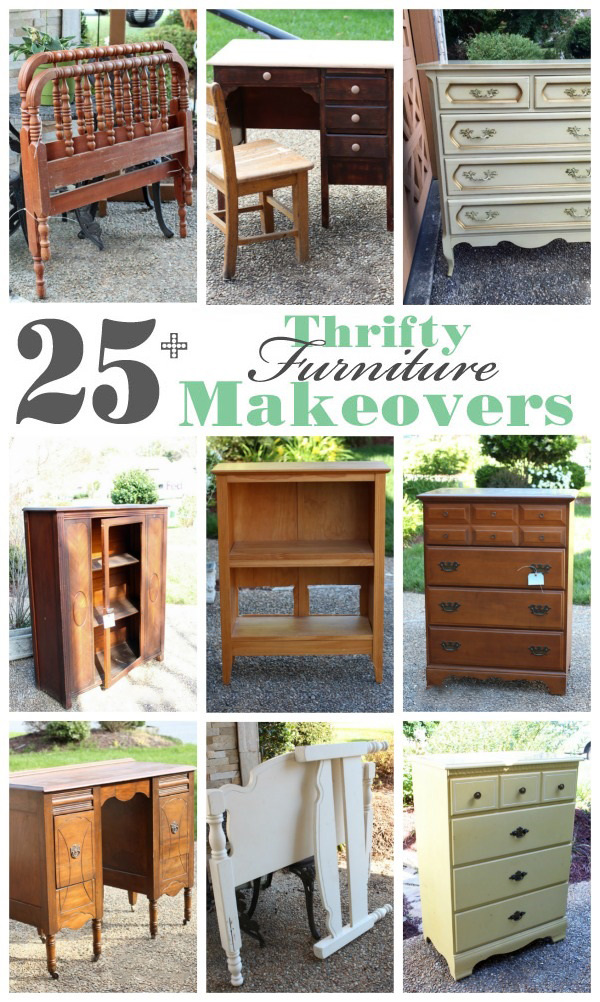 25+ Thrifty Furniture Makeovers
XO,
![]()
Don’t Miss a Thing!
If you like what you see, there are several ways to follow along!
Email * Facebook * Pinterest * Twitter * Instagram


Celia says
Yep, I’m inspired! Thanks Christy!! Have you heard from anyone who HAS used the primer/paint? I imagine it would cut down on time abit. Love your step by step and the push pins to elevate the doors! Great idea:)
Celia
Christy K. James says
Great! I have not heard anything about the primer and paint in one. The guy who mixed up my paint asked if I wanted it and I told him I would be using a separate primer, so he didn’t think it was necessary. The coverage with the regular paint is fantastic, but in the recessed grooves on the front of the cabinets where I used a brush, I had to go back and touch up in a few areas. I think the paint with the primer might have helped in those areas. Or maybe just prime those grooved areas twice? Honestly, it was probably only me that would have noticed it anyway 😉
Bev says
Oh my word, you’ve got me so excited to get started on my cabinets today although I can’t just yet. But, I do have my TSP, bucket and gloves! Would you suggest I wait for a much less humid day to get ready to paint? I value this post and will definitely use it as a reference and oh! I’m so glad you didn’t paint the inside of the cabinets. I was not looking forward to that if I needed to. Thanks!! -Bev
Christy K. James says
Yay! I’m so glad you’re feeling inspired!! With the humidity, you might just need a longer dry time, but honestly, I was amazed at how fast the paint and the primer dried. Paint has come a long way! I hope you share a link to the results when you’re done. I can’t wait to see! 🙂
Pam says
Wonderful makeover Christy! Thank you so much for the great step by step. I’m sure there are a lot of us who appreciate the detailed step by steps for those of us who have contemplated doing a project like this! Can’t wait for the how to for the glass panel!
One question I have is about the faux roman shade above the sink. It looks great and I wondered how you made it. Do you have a step by step for it.
Thanks again!
Pam
Christy K. James says
Thanks so much, Pam! I made the roman shade and did take pictures along the way so I could share, but I ran into a bit of trouble making them. If I can put a how-to together orderly, I might still share. I’ll have to look back through my photos. My secret to holding the faux folds together is hot glue. 🙂
Marie@The Interior Frugalista says
Oh Christy this is bringing back haunting memories of mine 1 1/2 years ago – so much work (I did mine while on crutches…I’m crazy like that). I love the push pin idea – so smart! I made the BIG mistake of sealing mine with poly and I hate the results. Even though I used a satin poly they have a sheen that cheapens the look. I was contemplating redoing them with chalk paint because I assumed latex needed sealed. I still have a lot of latex paint (same brand you used) left over so really all I need to do is apply a fresh coat of paint and call it a day! Thank you for the light bulb moment! Your cabinets look beautiful! I like how you replaced the cabinet housing your dishes with glass fronts (which is what I wanted to do but Mr. Frugalista talked me out of it). What a difference a can of paint and some elbow grease can do, eh!
Christy K. James says
Oh how I debated which paint to use! That’s honestly probably the reason it took me so long to start painting. I am SO happy with the latex. I painted my old kitchen with latex (long before chalk paint days)and I used a semi-gloss. The guy who was mixing my paint suggested satin and I am so glad he did! The cabinets are so easy to clean and the sheen is perfect…not too shiny. Yours would probably be easy to refresh and you wouldn’t even have to remove them, I bet. So glad you like my results. Have a fantastic week! 🙂
Marie@The Interior Frugalista says
That’s what I’m thinking too. Can’t wait to try this when time permits…famous last words! A fantastic week back to you 🙂
nicole says
It looks beautiful! Perfect timing as i woke up this morning & called my dad to see if he wanted to help paint my cabinets & then I see your post. Thanks for all the helpful info. I have been putting it off for 2 years as I was scared of the outcome.
Christy K. James says
I’m so glad you found me just in time! Good luck on your kitchen! 🙂
Lisa at Texas Decor says
I’m visiting from Home Stories A to Z. I just linked up my kitchen cabinet painting tutorial too! It must be the season for painting cabinets. 🙂 Your tutorial was great! Love all your tips and tricks and your cabinets look great!
Christy K. James says
I just checked yours out and your cabinets look amazing! Love the addition of the feet on the cabinets. We used foam rollers that specified they were for cabinets and doors and they worked great. I wonder if you had left yours if they would have “self-leveled”? Interesting. You know what else we have in common? Our cat’s name is Holly, too! So glad you stopped by 🙂
Robin A. says
Looks beautiful! Thanks for such a detailed post. I’m going to try this in my daughter’s bathroom.
Christy K. James says
Thanks you, Robin! Good luck on your project! 🙂
Karen P says
I recently spoke with a couple painters about painting my cabinets white. One suggested caulking any little gaps that you may not see now but will show up once everything is white and the other guy said over time the caulk will dry up and won’t look good. Guy #1 said it would take a long time for the caulk to dry up and I’d be much happier not seeing those little crevices. Do you have any thoughts on that? My cabinet doors are a flat center panel (not raised like yours) attached to the outer frame. Some are very tight and a few I can slip a paper in between.
My second question is how in the world did you pick your white? There are so many. My appliances are white (can’t afford to replace everything with stainless) and will white cabinets with white appliances look too boring with nothing to break up all that white? Anyone have thoughts on that?
Christy K. James says
There is so much to think about, right? Regarding the caulking, my suggestion would be to paint them as is and then go back and caulk in only the areas that need it. Then touch up the caulked areas with paint. I chose my paint color because I have used it for several furniture pieces and I loved it. It’s a creamy white. I also have this thing where I have to like the name of the paint (a little weird), and this paint is cottage white which sounded just right. You can probably stress over a ton of things before diving and painting, but the truth is: no matter what color you choose or if the gaps are picture perfect, you will probably love it a whole lot more than you do now. Hope this helps and good luck! Feel free to ask away if you have any other questions along the way! 🙂
Abby says
the after is quite impressive. I’m just wondering why you didn’t use an Alkyd paint – I use Benjamin Moore Alkyd paints for all my wood painting projects. The paint is not cheap… but its the next best thing to oil. It self levels wonderfully and you have extremely minimal texture from brush or rolling (even foam rollers) It works on top of oil and latex paints (so for Christy above who poly-ed hers… lightly sand and throw this on top. Comes in various sheens as well.
Great posts! Thanks for sharing. (You are brave with the kitchen!! 🙂 )
Christy K. James says
I’ve heard great things about BM’s self-leveling paint, but my go-to is always Behr. It’s my comfort paint. Thanks for the tip, though! 🙂
Lindsay Eidahl says
This post could not come at a better time. We are in the process of wanting to paint our cabinets. Your tips are very helpful. My only problem is the color. I am so worried about getting the color right. UGH!
Christy K. James says
Hope my experience is helpful to you, Lindsay! I chose this color because I’ve painted several pieces of furniture with it, and knew I liked it. It’s more of an off white. Good luck with narrowing your paint choice down. 🙂
Mandy Hank says
AM-AZING!!!!! Love it Christy. I wish we didn’t live in a rental… I would be all over this 🙂 I am saving it for “someday” 🙂
Christy K. James says
Yay, so glad you like it! Hopefully you’ll get to out it to good use soon, or maybe not…maybe you’ll find a house with the perfect kitchen already. 🙂
Megan says
I love how just a little bit of paint (I know it was a long process) can change the feeling of the whole room. Great kitchen remodel! This is on my list of things to do this year so thanks for the great tutorial…
Christy K. James says
Yes, that is so true! A little paint can do wonders! Thanks for stopping by 🙂
Desiree says
This is exactly what I’ve been searching for! Fantastic tutorial! Your kitchen looks amazing! Thank you for sharing, I now look forward to painting my cabinets.
Christy K. James says
Thank you, Desiree! Hope you find this helpful along the way! 🙂
Andrea says
Beautiful kitchen! I love to refinish furniture, and this tutorial is great for either furniture or cabinets. I’m sharing this with several friends who have talked about refinishing their cabinets!
Christy K. James says
Thanks so much, Andrea! This is perfect for furniture too 🙂
Pat says
Christy,
Amazing transformation, dear one!!!
We used the same plan of attack, but instead of Kilz,
I use a Bonding Primer from Sherwin~Williams and skip the sanding step!
I love the hue of your kitchen island and the roman shade above the sink.
Visiting from Susan’s Between Naps On Th Porch!
Fondly,
Pat
Christy K. James says
Thanks, Pat! There are so many products on the market these days, it’s hard to choose! So glad you stopped by! 🙂
Barbara Curtis says
Could you give me some further thought on why you chose satin enamel laytex paint over chalk? My main concerns in the kitchen are durability and chipping. I’ve painted for a long time but never used chalk paint so I don’t know much about it. P.S. Your kitchen looks great. Wonderful job.
Christy K. James says
Sure, Barbara…I have used chalk paint on a ton of furniture pieces and I love it! There is virtually no prep involved. However, each piece requires sanding after painting to achieve a smooth finish, and a coat or two of wax to seal and protect. This is buffed on. I love this “hand-painted” look for furniture. With my cabinets, I wanted something that would wear well and be easy to clean. The enamel in the paint I chose is what gives this paint a hard, durable finish. There is prep involved, but I didn’t mind doing the dirty work before painting because once you paint, that’s it. No sanding after to get a smooth finish and not waxing required (your arms will thank you). I also didn’t want a “hand- painted”, time-worn feel to my cabinets like I like in my furniture. I wanted them to look fresh and new. I hope this answers your question. 🙂
Barbara Curtis says
Thanks, Christy. Your answer helps a lot. BTW, had a thought on your window mouldings and hubby. (Aren’t they the cuties, though, with all their decorating ideas?). Now that he can see how the white pops on the cabinets, promise him – and it’s the truth as my sister’s husband put the same ones In their kitchen – that the mouldings and their details will show up so much more done in white.
Christy K. James says
I like the way you think, Barbara! Right now we still have a wood staircase and wood doors/frames in other parts of our downstairs, so if you see the whole thing, the wood around the windows works, but I want to paint it all!! Baby steps with the hubby, I might just get there. 🙂
Sue says
Thank you so much for these step-by-step instructions. My kitchen area has no direct lighting whatsoever. I am hoping when my husband sees your makeover, he will finally agree to painting the cupboards. We are retired, so on a limited budget to do much. Our new condo was built in the 50s as airbase housing and a rehab was done at least 10 years ago. This is perfect for a rehab on a budget.
Christy K. James says
I agree, paint can make such a difference especially when the budget is tight! It realty lightened up my kitchen too, even at night it is so much lighter and brighter. I had to work on convincing my hubby too, good luck with yours. 🙂
Andi says
Boy, do I have some catching up to do on your blog! I almost wish we were still back in the old house because I totally feel like I missed out on a life experience by NOT painting the cabinets!!! Again, they look amazing! And I really need to show this post to Phil so he realizes I’m not the only one who picks up project pieces when I have no business doing it. I swear he thinks I’m an anomaly. He’s SO wrong!!!
xoxo
-andi
Christy K. James says
I missed you round these parts…yeah you like how I dragged a bookcase home with my house in chaos?! I’m right there with you girl!
Aliya says
Hello Christy, I loved your cabinates idea it is amazing and I would definitely try this one, I have noticed the before and after picture there is a glass view to that cabinate how did you do that ? Did you purchase it or change it.
Christy K. James says
Thanks, Aliya. I replaced the panels with glass. You can see the full how-to here: https://www.confessionsofaserialdiyer.com/how-to-add-glass-to-cabinet-doors/ Hope this helps 🙂
Corene says
Christy,
You did an amazing job on the kitchen cabinets. I recently redid my kitchen cabinets too, however I had major problems with the surface texture on the face of the door fronts. I did the process exactly like you did with the exception of the paint. I used Behr semi-gloss interior paint/primer. I can’t understand why my door fronts aren’t smooth like yours. (By the way, the fronts were sanded completely smooth prior to applying the paint).
Do you have any suggestions for fixing them? Thanks so much for your post and your feedback!
Christy K. James says
I wonder if it was the roller? The one I used specified it was for cabinets and doors (from Lowes) for a super smooth finish. Also, the sheen of the semi gloss may be making the texture stand out more? Mine do have a very subtle texture, but it’s not really noticeable with the satin sheen. I used Behr satin enamel. You could try a quart in the satin and test out a door to see if it helps? Sorry you’re not happy, I know that is a LOT of work! Good luck!
Ruth Olenski says
Thanks for the very thorough tutorial on painting cabinets. I have just one question: Did you paint the sides of the doors when you got to the paint stage? You said not to paint them with the primer. Why is that?
Ruth Olenski says
I just figured it out! I see where you painted the sides after you turned the doors over.
I love your kitchen remodel.
Christy K. James says
Thanks so much, Ruth! I’m glad you were able to answer your own question. 🙂 This was a big job, but so worth the effort. I’d be glad to answer any other questions you may have! XO
valalrie says
Hi Christy; This post is just great and has encouraged me to get started myself but before I do I’m wondering how the paint has held up for the last 5 months. Thanks!
Christy K. James says
It has held up marvelously! Spills are so easy to wipe right up and I would do it all over again using the same products if I had to. Good luck with yours 🙂
Sammie says
Hi Christy! Any reason in particular that I shouldn’t paint the sides of the drawers? I’m getting ready to tackle this project this week and was just curious:) thanks for such a detailed and helpful tutorial! Beautiful work!
Christy K. James says
Hi Sammie, There really is no need to, and it saves the extra work. I don’t paint the sides of the drawers in my furniture pieces either. Not sure if this was helpful, but that’s the most scientific answer I could come up with ha ha. Good luck on your project. It is a lot of work, but SO worth the results. XO
Sammie says
Thanks for the quick reply! I love avoiding extra work! Starting today…. And a nervous wreck. Glad I have good guide from you to calm my nerves:)
Christy K. James says
You can do it! Good luck! XOXO
Mary says
i am in the midst of painting my bathroom cabinets. I have tried to follow your directions closely but I am finding that the paint is looking sort of clumpy. I am using Dutch Boy Cabinet and Trim paint. Do you think this paint might be the problem? I at first thought my problem was the roller I was using, a Purdy White Dove. So I went to Lowe’s and got the Cabinet and Door Roller but that does not seem to be helping. I would like to get this figured out as I want to do my kitchen next. Any suggestions would be appreciated. I would switch paint if necessary to get better results.
Christy K. James says
Sorry to hear that. My first guess would have been your roller also. But since you changed rollers, I would find a stopping point and let it dry a bit and see if the paint levels out as it dries. Also the first coat will always look terrible. Let me know how it goes. (Sorry if you get this twice…just wanted to make sure you got my response.)
Mary says
My first coat looked pretty good but had more texture than I wanted to see. That was why I switched rollers. It was the second coat that started clumping. Looks almost like large grains of sand across the surface of the cabinets. I am beginning to wonder if the Saran Wrap I put over the paint tray wasn’t airtight enough and the paint was drying some in the tray.
I am going to try gently sanding and give another try to a fresh coat of paint. If that doesn’t work I’ll head to Home Depot. I think they’re the only store around here that carries Behr. I’m definitely getting their paint when I start on the kitchen.
Christy K. James says
That’s strange. I’ve never used Dutch Boy so I can’t speak for how it works. I do love Behr though. I hope it works better for you! Keep me posted!
LB says
Just wanted to say thank you for this easy to follow tutorial! I love the contrast in colours between your cabinets and island and was just wondering what colour you went with for your island? It’s beautiful!
Christy K. James says
You are so welcome and thank you! The island is a mixture of Old White and Duck Egg Blue Annie Sloan Chalk Paint. You can see a post on it here: https://www.confessionsofaserialdiyer.com/rolling-kitchen-cart-makeover/ Hope this helps.
LB says
Perfect! Thanks so much!
Barbara says
Great tutorial! Thank you so much.
Christy K. James says
You are so welcome! 🙂
Kelly says
Ok I am offically inspired!! I have put this off for way too long but I honestly have to say the reason I am nervous is that I worry they may chip over time. My sister had my dad paint hers with a paint gun and they chipped almost immediately. How are yours holding up? Thanks 🙂
Christy K. James says
Hi Kelly! Mine are holding up PERFECTLY! The key is proper prep. Cleaning is the key first step to a long lasting paint finish. Then sanding, and finally priming. If you rush or skip those steps, your finish will not last. They did not take too long at all though and I was painting in no time. Good luck! You’ll be so pleased when you’re done! 🙂
Ryan Koesel says
Hi, where did you buy your hinges?? Thx!
Christy K. James says
Hi Ryan, I found them at Home Depot I believe. If not, Lowes.
Joanne says
hi Christy! I loved this tutorial! Thank you much for taking the time to type out all the steps. I am painting my cabinets soon and have been on the hunt for a great tutorial and I have to say yours takes the cake. I have been terrified of starting the project because I’m very impatient and I love instant gratification, but I know that this project will just take time and it is a lot of work. My hubs and I do all kinds of diy projects but this is one I’m afraid to start although I’m sure you know how it is, the desire just gets stronger and stronger and before you know it you’re prepping for it lol! I do have a quick question, I noticed you didn’t paint the inside of the cabinets. Does it bother you at all when you open them on a daily basis? I’ve considered not painting the inside of mine but I’m afraid of regretting it later. However I’m looking at yours and they look totally fine to me. Just wondering if personally it bothers you or if you feel they look good enough to not be worth the effort.
Your kitchen looks so much brighter and so beautiful! I’m so looking forward to mine feeling brighter and cleaner 🙂
Christy K. James says
Hi Joann! I’m so glad you find my tutorial helpful! I tried to be very thorough in writing it. As for the insides of the cabinets, it does not bother me at all to not have them painted. Good luck on your kitchen, I know you will be thrilled with the results! 🙂
Tom Stewart says
Christy,
You have inspired me again! The Head Board sign was the first inspiration and now painting my kitchen cabinets!
I have to tell you that I hate to paint and I have been in this house for going on 8 years with the walls just primed.
As I told you before, I deal a lot with RECYCLED WOOD and want to cover all the walls with that type of wood. But the Kitchen cabinets are a different story. They are oak and would look out of place with all the exposed wood I plan to use throughout the rest of the house.
I will be painting all light switch covers/out let covers (green?) and I might do the cabinets the same way. Maybe in two contrasting colors of Green?
I do not know when I will get started with all of this, But I will keep you up dated on any progress.
TOM
Christy K. James says
I’m glad you’re feeling inspired, Tom! Sounds like you’ve got a great project in the works!
Anna White says
Hi Christy,
Thank you so much for this thurough tutorial! I am beginning to tackle our kitchen now… Curious, re: the wood grain, I’m 2 coats of primer in & still see the texture of the grain. I’m hoping for a beautiful, smooth texture like yours. Any suggestions? Or does the paint “level” out the grain? I really appreciate that you’re still responding to comments nearly a year later! 🙂
maren says
Awesome! thanks so much for the pics!
I am going to follow you step by step, however, you say to NOT paint the sides of the cabinets and drawers, but you never said at what point to go back and paint them?
Christy K. James says
Hi Maren! I do paint the sides of the cabinets, just not the insides. I also don’t paint the insides or sides of the drawers at all. I don’t mind the cabinets being wood on the inside at all, and it saved a ton of extra work. Good luck with your kitchen! XO
Joanne says
Hi Christy,
It’s me again lol! I am about 3 weeks away from tackling my cabinets as my main summer project. So excited!! I’m wondering now that it’s been about a year, how your cabinets are holding up? Have you encountered any chipping/peeling/bubbling? I’m making a list of the supplies I need now and I’m finalizing the type of primer and paint I will be using. Curious about the latex Behr (I use it on all my trim and it works great) but wondering if it is holding up well. Thanks!
Christy K. James says
Hi Joanne! My cabinets are holding up fantastically! No chipping, peeling, or bubbling. I had a couple of spots where something had banged pretty hard against them, but touched them up really easily. I would use the same products again! 🙂
Michelle Bradley says
Hi 🙂 your tutorial is so helpful. I started chalk painting my upper cabinets and after hours of painting I realized I hate it the finish isn’t smooth enough and the glaze turned my white a super slight yellowish tint not huge my it’s driving me crazy. I. Sanding down the poly acrylic and want to buy the enAmel. Do you think I can’t paint the enamel over the chalk paint?
Christy K. James says
I don’t see why not! Sanding them lightly to dull the poly should be all you need to do. Good luck! 🙂
frank says
did you sand the primer? did you use a paint conditioner (floetrol)?
I ask because I see a lot of grainy texture on your cabinets and trim.
I was told sanding the primer (and first coat) will lead to a smoother look.
The paint conditioner “bleeds” out the brush marks.
Christy K. James says
I provided very clear step-by-step instructions, which included neither of those things. You will only get a factory smooth surface by using a paint sprayer. Floetrol will help, but the texture you see on my cabinets from the roller is minimal and can only be seen if you are less than a foot from the surface. I am thrilled with the results, and I would do them the exact same way all over again. Oh and…you do not want to sand your primer!! Hope this helps.
Frank says
Why wouldn’t you sand the primer? Every trade mag including popular mechanics, Bob Vila, family handyman all recommend sanding the primer. If you know why not to sand please share.
Christy K. James says
So it seems that is true…who knew? I did not find this step necessary, nor did I sand between paint coats (which if I were going to sand is probably where I would). I put a lot of effort into the prep, making sure they were cleaned and sanded really well. No matter how many times you sand in between, it seems to me that (if you are using a roller) you are still going to see the knap in the final finish, right? It’s been about a year since I painted mine and they really have held up very well, and they look great in person. I seriously would do it all again just the same way. Good luck!
Karissa says
Thank you for this post. I followed your directions and my cabinets turned out great. Just wondering how you clean your cabinets? And do you feel like you should have waxed or applied polyurethane? Thanks!!
Christy K. James says
That’s awesome!! I usually use Clorox wipes to wipe mine down. They clean up really easily. With the Latex enamel, there is no need to seal. I did mine a year ago and they are still holding up great! 🙂
Lorene @Remodelaholic says
Hi Christy! I just emailed you about featuring this in a round-up of sorts over at Remodelaholic. Sometimes my emails get caught in spam filters, so I wanted to leave you a comment, just in case. Drop me a line at hello@remodelaholic.com! Thanks!
Laura says
Hi Christy, I have been experimenting with chalk paint and finishes on a dresser and two bathroom’s cabinets in preparation for painting my kitchen cabinets. While at the store today I noticed Valspar has a cabinet enamel and came across your blog while researching enamel paint. Question for you, as someone who likes chalk paint, for which reasons did you decide to do enamel paint?
Christy K. James says
Hi Laura! I included this little snippet at the end of my cabinet painting tutorial:
“My toughest decision was what kind of paint to use. You know I am a huge fan of chalk paint and it seemed so much easier with the “no prep” idea behind chalk paint. However, I chose the latex enamel in the Satin finish and I could not be happier. The finish is so smooth and the enamel makes it durable and so easy to clean. The prep needed was well worth the end result, and there was no need to wax or seal the paint after, as would have been needed with chalk paint.” While I LOVE the time worn feel I get with chalk paint for my furniture pieces, I really wanted a clean fresh look for my cabinets. Behr’s latex enamel is so easy to clean as well. Good luck with your decision!
sugarcreeknbear says
Ms Christy after reading about painting the cabinets…. if you would have used paint with primer? Wouls you still have applied primer before painting with primer? My cabinets have magets were yours have the little dots. should I remove these prior to painting? maybe I could just tape around them? you saved a lot of money reusing your pulls. I noticed in one pic you had wine glass hangers…did you keep them also? My MIL covered the cabinets with murphys oil soap for years. will the cleaner or TSP take all the oil off of my cabinets? THANK YOU SO VERY MUCH FOR ALL OF YOUR WISDOM AND SHARING YOUR KNOWLEDGE !! Smiles and Blessings SassySugarcreek
Christy K. James says
Yes, I would definitely still use a separate primer. The paint+primer is more for good coverage than for it’s adhesion properties. If the magnets are easy to remove and put back, I would remove them so you don’t have to contend with them. I did keep the wine glass hangers, they are mounted under one of the cabinets. The TSP should remove all of the oil with no problem. I hope I answered all of your questions, but if you have any more at all along the way, I’d be more than happy to answer them! Good luck!! 🙂
Crystal says
This is by far the BEST most FANTASTIC tutorial I have come acrossed for painting kitchen cabinets! You didn’t miss a single detail in your explanations and your pictures are fantastic! Everything you explained and showed was real and down to earth. I truly LOVE it!!!! I’ve been wanting to paint my kitchen cabinets (which is close to the color of your old cabinets by the way) a lighter color like you did but wasn’t sure where to start. I have read and pinned TONS of tutorials on re-doing cabinets but still was very apprehensive on the whole idea. You have enlightened me and have given me a new found faith that this truly can be done and the results being fabulous! Thanks so much! And this canes from a girl who NEVER posts comments :0)
Christy K. James says
AWESOME, Crystal! I’m SO thrilled that I could put your mind at ease. You can totally tackle this! Thank you for taking the time to contact me, it makes stopping to take all those pictures along the way totally worth it! Good luck!
Carolyn says
We are in the process of planning our kitchen remodel. Painting the cabinets seems to be the most prudent financial choice. Since it has been a little while, how are your cabinets holding up? That is my biggest fear with painting them as we have done this in our bathroom and it has NOT held up. Granted we did not do our due diligent prep work and I think that will make a difference.
Christy K. James says
Hi Carolyn,
I replied directly via email, but am sending as a response in the comments as well just to be sure you get it. Our cabinets have held up fantastically well. We have a junk drawer that takes a lot of abuse that I have had to touch up a bit, but that’s it. This is my second time painting kitchen cabinets and the thorough prep work has made all the difference! Good luck!
XO,
Christy
Anna Murray says
I found this just in time! Thank you for being so detailed and such a big help! I just finished one bathroom and I’m making my way to the kitchen. You just brightened my thoughts about tackling this job! Thank you!
Erin says
where did you get those cabinet knobs and pulls?! They are SO pretty and would look amazing with my new white cabinets!!!
Christy says
Hi Erin! My husband purchased the hardware at Lowes several years ago. ????
Traci says
I started my HUGE cabinet refinishing project this past weekend. I sanded everything this weekend but still see shiny areas. Is it safe to use the TSP substitute on already sanded wood? I want to make sure everything its prepped exactly the way it should be.
Christy says
It should be fine as long as you allow the cabinets to dry before painting. Good luck…that’s a ton of work, but so worth the effort! ????
JoAnn says
How many gallons of Behr paint did you buy? Was one gallon enough to do two coats? What would you recommend? I have 20 cabinet doors and 11 drawers. Thank you!
Christy says
I’m pretty certain one gallon was plenty for my kitchen! 🙂
Stephanie says
Hello, I had white cabinets that needed light touch up so I meant to just touch up the dings and ended up fanning out and painting larger sections that I wanted….got over zealous.
When the light doesn’t hit them, they look good, but when the light hits them you could see paint marks that look and feel rougher than the professionally finished sections.
So I bought 600 to 800 grit finishing sandpaper and lightly sanded it. I can’t tell if it made things worse, it’s smoother but it kinds looked like it scuffed it more too. Then I applied (per the cabinet manufacturer recommendation) Deft satin brush on lacquer to try and blend the flat look into the more satin finished areas, they look ok but is there any way to buff out the rougher/scuffed looking areas?
Please help, I’m worried I ruined my nice cabinets. Thanks!
Stephanie
Christy says
Hi Stephanie! I wish I could give you some sound advice that speaks from experience, but I haven’t dealt with this specific issue before. Did the original cabinets have a painted finish? If you’ve already sealed them, I’m not sure you can go back and blend the two finishes now. Wish I could help more! Good luck!
Kathy says
Christy, I wanted to tackle the cabinets for a few years, when I read how you did yours I was inspired! I followed your directions exactly and I used the paint with the primer. They look beautiful! It was a lot of work but it was well worth it and it only cost me about $200!
Kathy
Christy says
AWESOME!!! I bet your kitchen looks brand new! It’s amazing what paint can do! Thanks so much for taking a minute to share with me!! XO
April Bannister says
Great job! Really good information. Also, I love your window shade, toaster cover and your island. You have great taste!
Christy says
Thanks, April! XOXO
Jolin Tay says
Great article. My kitchen cabinets also need new color. I will surely try out these tips. Thanks for sharing.
Jennifer says
I see you kept some items in the cabinets while sanding and painting. How did u contain the dust? I was thinking of getting a havd sander witha vacuum (ours does not have one). Love the tutorial and will be using your instuctions this weekend!!!
Christy says
Hi Jennifer! I sanded the cabinet boxes by hand, so there wasn’t as much dust flying around as there would have been with an electric sander. I also pushed the remaining items back as far as I could. Good luck this weekend!! How exciting!! XO
Rebecca Juliani says
Thank you for this step-by-step easy to follow tutorial! My mom, my wife and I tackled our kitchen cabinets recently and they look awesome. We, too, went from brown to white, but used Benjamin Moore Advance® Waterborne Interior Alkyd. Now we just need to do some more work in the kitchen such as lighting, paint, counter & sink. But for the time being we are thrilled with our progress. There were three of us so we got more steps done in less time, which is good because we took a couple days off of work for the project. We also painted the inside of the cabinets blue, like you did in another of your posts! Thanks for all of the ideas!!!
Christy says
Thanks so much for the positive feedback! Sounds like you had some great help! So glad you found my tutorial helpful…I’m sure your kitchen looks amazing!! XO
kim says
Awesome job! well done….do you know where to get those handles? they would go great in my kitchen! Kim
Christy says
Thanks, Kim! We purchased those at Lowe’s several years ago. 🙂
G Oberoi says
Thanks for the tutorial! Your cabinets look great and you make it seem a little less intimidating a job. Quick question: did you paint the undersides of your cabinets as well?
Christy says
You are so welcome! I did not paint the undersides of the cabinets. 🙂
Jane Gordon Clark says
Great tutorial.
Christy says
Thank you, Jane!
Savannah says
We are getting ready to redo our kitchen cabinets and debating over what method to use. I came across your tutorial and am wondering how they have held up over the years? I was leaning towards chalk paint and polycrylic finish until seeing this.
Christy says
Hi Savannah! They have held up fantastically! I LOVE chalk paint…for furniture, but decided it wasn’t the way to go with my cabinets. You do have prep when using regular paint, but no sealer is required, and if you ever need to touch up here and there, you can easily do that. The only wear I have seen is very slight right where you grab the handles on a couple of cabinets we really use a lot, and it was so slight that you had to be really close to see it. I took a few minutes to lightly touch them up in those areas. With chalk paint, there is minimal prep, but you need to seal, and if you ever need to do a touch up in the future, you would have to paint and then seal again. Plus you would really want to clean with a good cleaner first to get rid of all the greasy build up anyway. That’s my two cents anyway! Best of luck to you…it made such a difference in my kitchen!! XO
Savannah says
Wow, Thank you so much for the quick reply! That makes total since and now has me thinking this is the way to go! Did you water down your paint at all? And how many gallons did it take?
Christy says
I think I logged in just as you posted your question so good timing lol! I only used one gallon and I did not water it down. One coat primer, two coats paint, but get the paint with the primer built in. I did not since I was using a separate primer, and I had to recoat a couple of areas. Have fun! XO
Savannah says
Thank you!