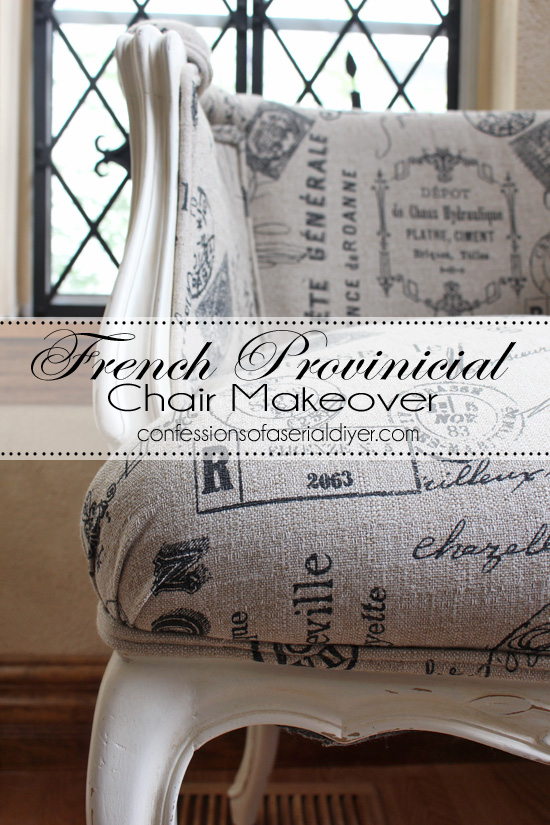
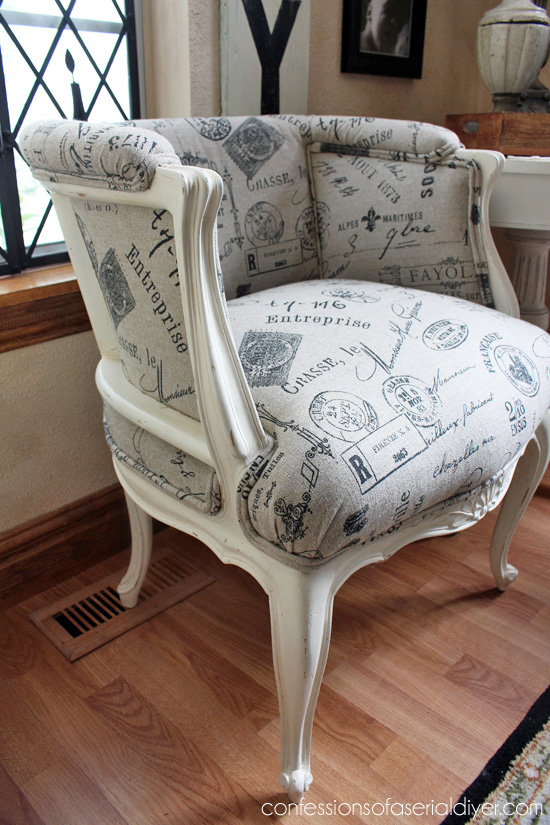
Today I am so excited to share my French Provincial Chair makeover with you! I’m excited mostly because they are done! As you can see by the preview photo, this story has a happy ending. But it wasn’t without a few bumps (and blisters) in the road.
My Mom and I spied these chairs at an estate sale last Friday. We passed on them, knowing they required a lot of work, but she had a change of heart and went back for them on Saturday. Luckily everything was 50% 0ff and she scored these two beauties for $55 for the pair! However, they did not work in the space she was envisioning them in, and she dropped them off to me the next day.
I knew I just had to use these as my project for our Furniture Revivals theme for this month’s Get Your DIY On party, but I seriously underestimated the amount of time it would take to redo them.
Here they are as we found them:
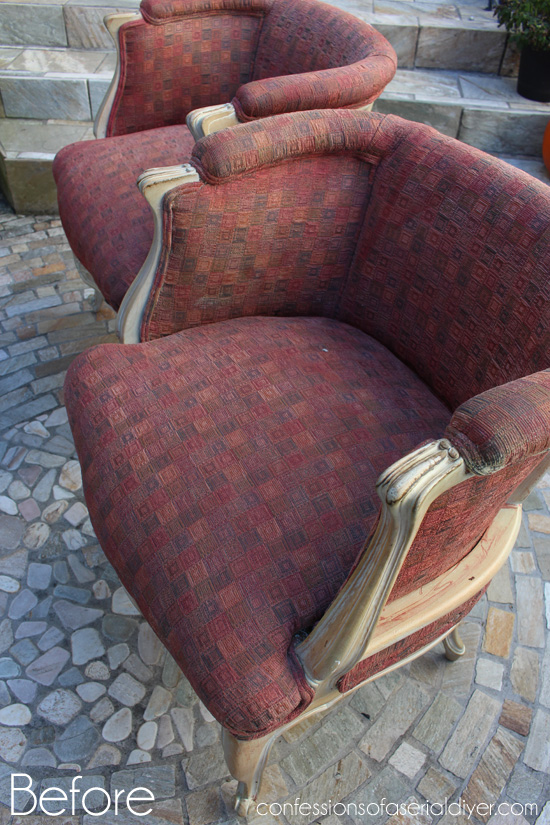
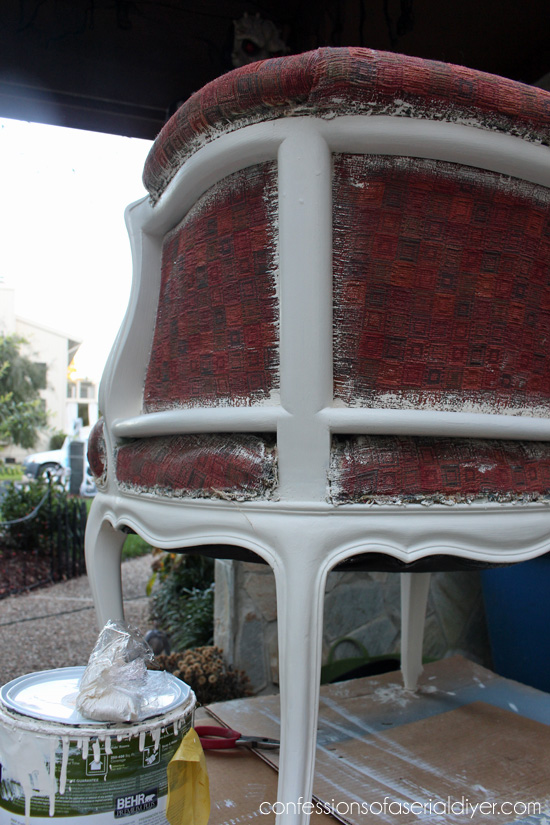
If you look closely, you might be able to tell they were painted. They did an awful job…
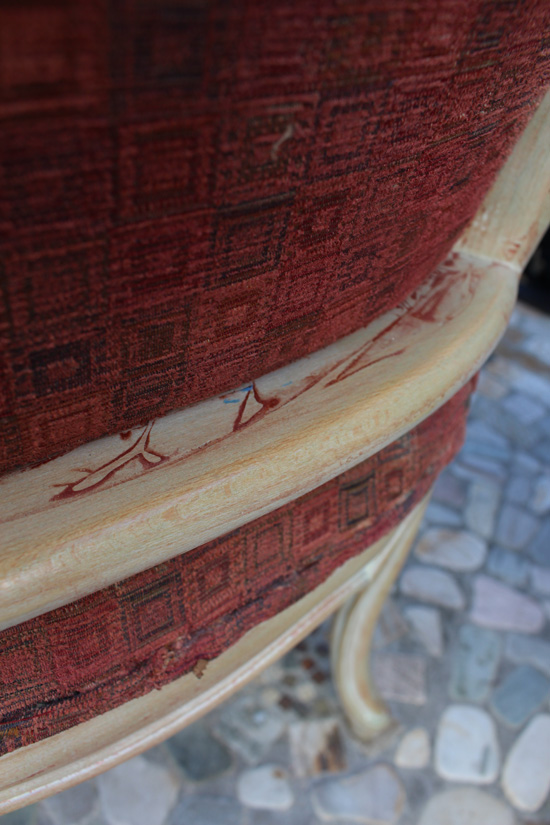
I was unable to remove the smeared paint without messing up the finish, so I painted out the frames.
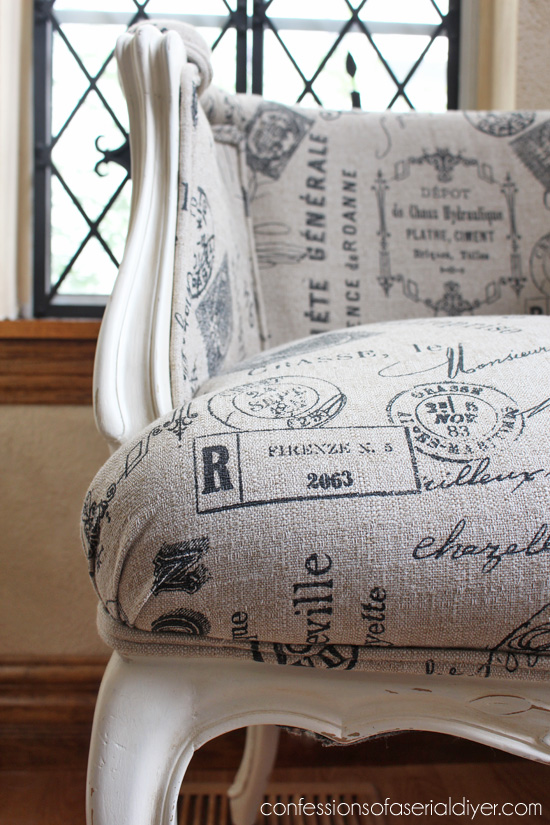
And here is the big makeover:
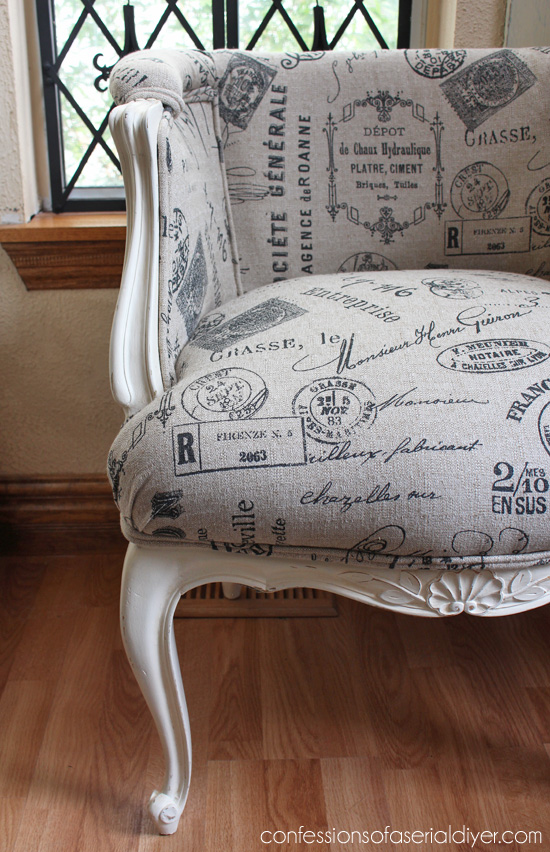
This is the same fabric I used on my Desk Chair and the Dresser I redid with fabric inlay on the drawers. It is perfect because while it still has a neutral feel, the color and pattern hide a multitude. It has held up extremely well on my desk chair. It is a heavier weight decorator fabric I found at Hancock Fabrics. It normally retails for $29.99 a yard, but I was lucky to find it at 50% off and had a 20% off the total purchase coupon. I think I used about a yard and a half for each chair.

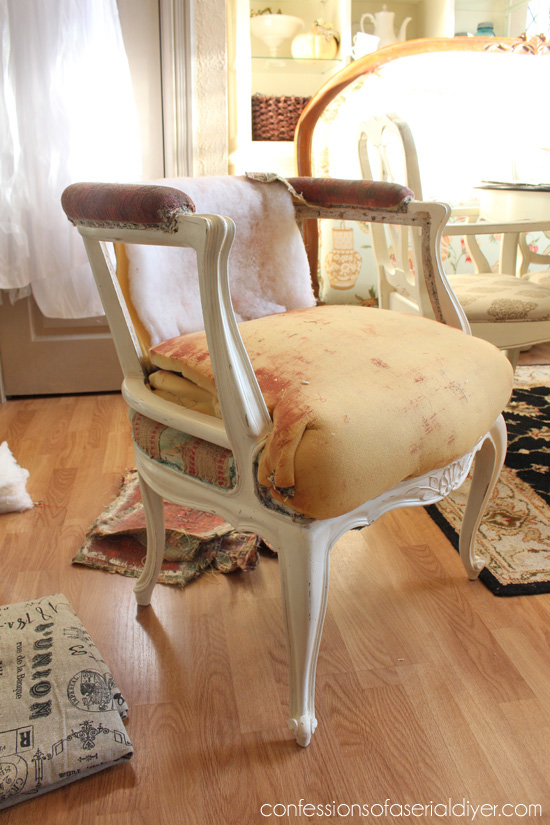
I am so in love with these chairs. I have been guarding them like crazy from my claw-happy cat and Cheetos-fingered four-year old. This was no easy undertaking. I thought (actually I wasn’t thinking at all) that I could just cover over the existing upholstery.
Easy as pie. I got right to it painting out the frame before I got started on the fabric part.
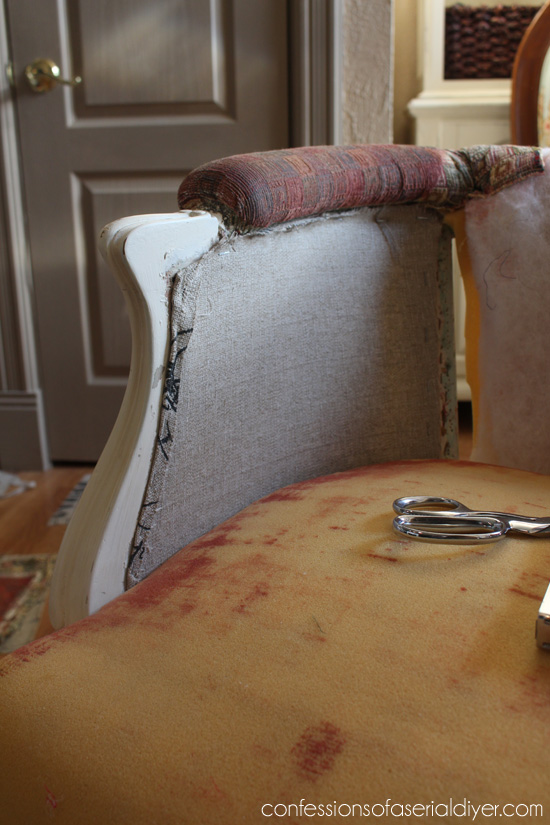
Perfect…except um…there is no way to cover over the side panels that are attached to the inside frame. Ugh. So I pulled, yanked, cursed, tugged, cursed at a gazillion staples that were holding this thing together.
I even threw in some of this action:
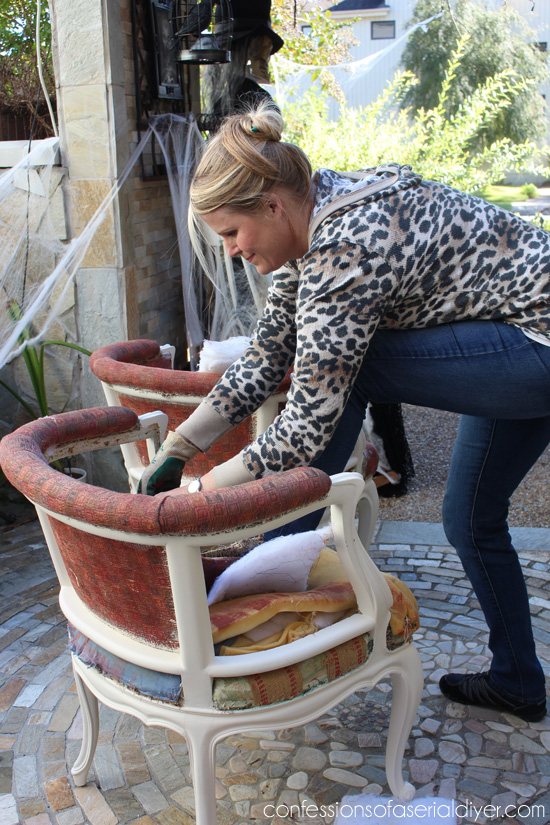
I had to use my leg for leverage. Two hours later…

I was done…with one chair. Are you kidding, I have another whole chair to go?? I couldn’t be satisfied with one chair for my big reveal, Oh No that wasn’t good enough. I MUST have two chairs.
And so I continued…yanking, pulling, cursing, tugging, cursing… I woke up to this on Tuesday morning:
Actually two like this. I worked feverishly the entire day…
Learning as I went of course because that’s how I do…

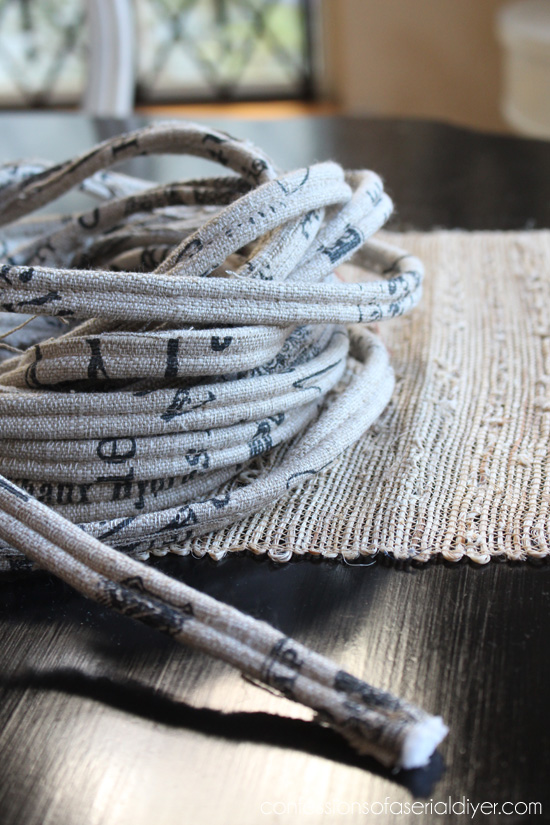
It was kind of fun to see it all come back together. I even made my own double welt cording to save money.
I took photos of every step and if anyone is curious to see the entire process, I will be more than happy to put it together for you. Just leave me a note in the comments. If you are looking to tackle a similar project, here are a few suggestions:
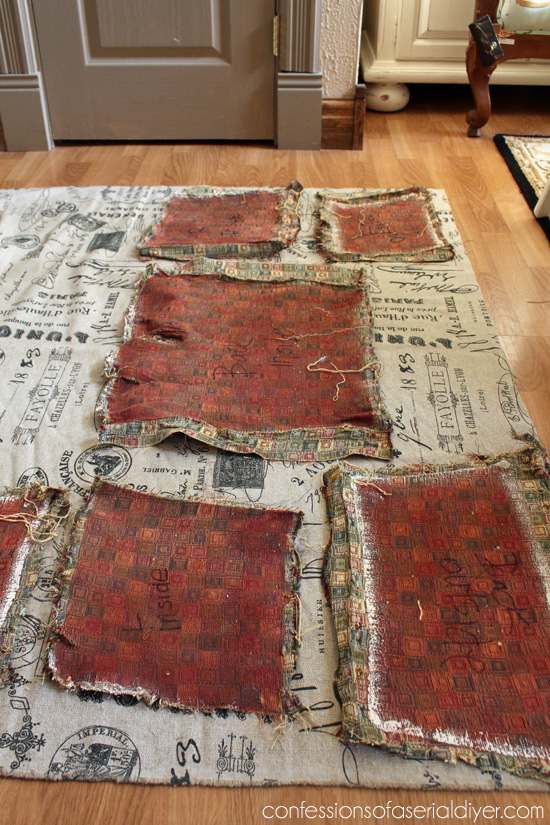
- Take photos of each step as you remove the old upholstery to reference when it’s time to reupholster.
- Mark each piece before you remove anything:

- Use these pieces as pattern pieces for your new upholstery.
- Paint AFTER you remove the old upholstery. (Some idiot out there might try to paint it first.)
- Wear work gloves to prevent blisters. (Trust me…or gardening gloves…hey it was all I had.)
If you see how everything comes apart, as long as you have lots of photos to refer back to, you should be able to piece it back together. I used the same foam and batting since it was in decent shape (and free).
I’m sure I saved a lot by making my own double welt cording, but there are a trims you can purchase too if you prefer that look and don’t want to bother with sewing your own.
Fifteen hours later, I was done. Marathon upholstery I tell ya! But I am SO thrilled with the results!
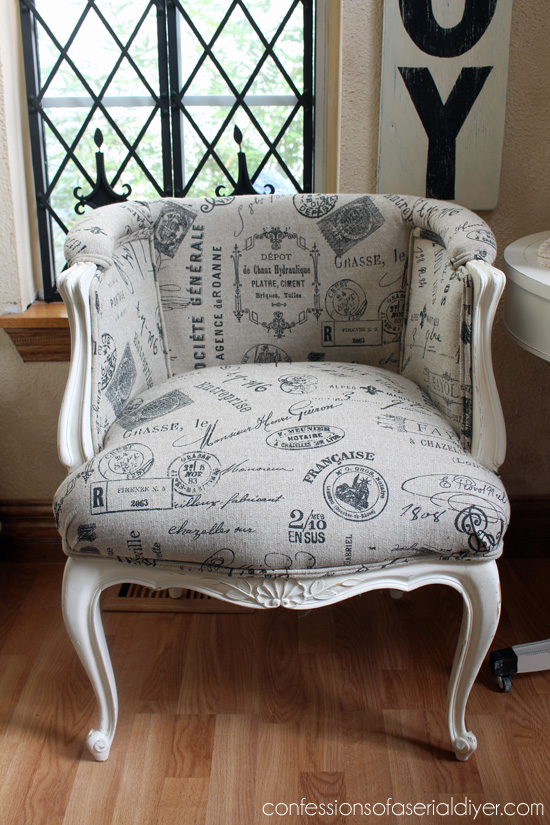
Beautiful details along the front…
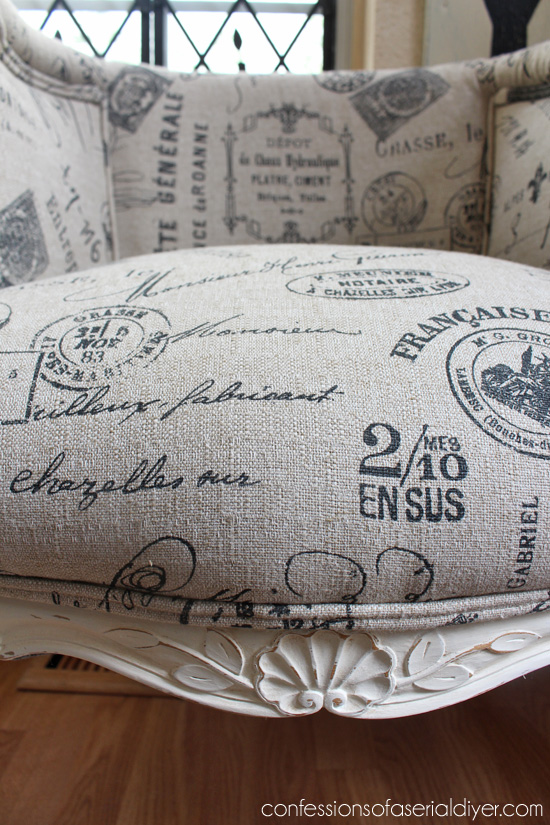
I used my DIY chalk paint left over from the Desk I just completed with French graphics. I sanded a bit and waxed with Annie Sloan’s clear soft wax, followed by a very light amount of dark wax. You almost can’t even see it in the photos, but you can in real life.

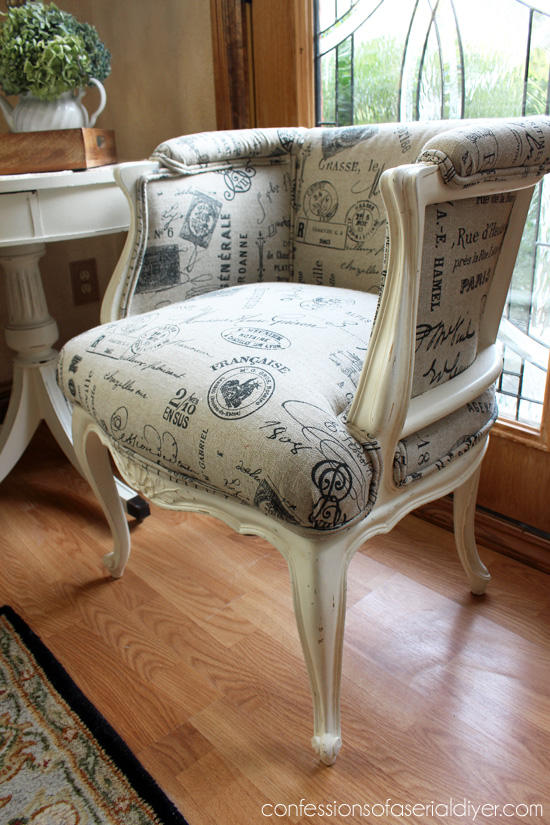
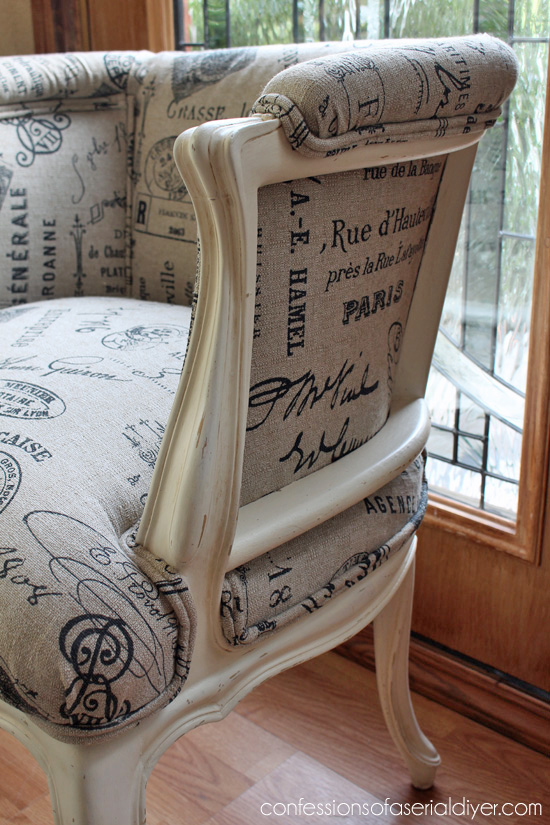
I love the peek-a-boo panels on the sides and back…
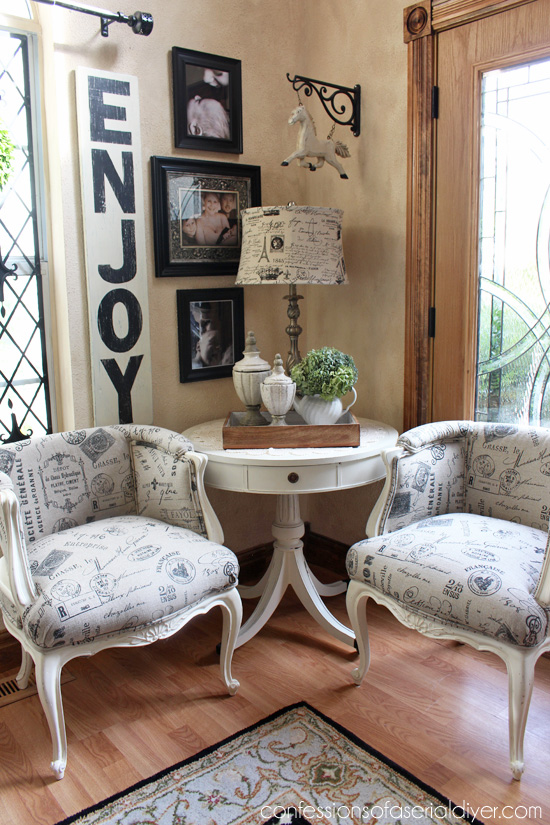
I’d love to keep them right here in my dining room, but did I mention I have a claw-happy cat and a Cheetos-fingered four year-old? These will be heading to my booth. 🙂
To see more of the how-to for these chairs, click here.
To see my tutorial for double welting, click here.
My awesome Get Your DIY On co-hosts were busy with furniture makeovers of their own:

A Gold and White Dresser by Abby at Just a Girl and Her Blog
Chalkboard Table Makeover by April at House by Hoff
White Chalky Paint Dresser Makeover by Krista at The Happy Housie
The fun starts this Sunday, November 2nd at 7:00pm EST.
Come link up any furniture makeover project or just come by to get inspired!
I will not be reupholstering anything anytime soon, I can promise you that! I need to at least lose the permanent staple gun grip from my right hand first.
Have you ever reupholstered anything? Did it go well?
XO,
![]()
If you like what you see, there are several ways to follow along! ![]()
Email * Facebook * Pinterest * Hometalk * Twitter * Instagram
I love to share at some of these great parties:
Home Stories A to Z Not Just a Housewife Kammy’s Korner The Happy Housie Design Dining and Diapers Liz Marie Blog Funky Junk Interiors Savvy Southern Style Tatertots and Jello DIY Show Off Redoux Interiors Between Naps on the Porch The DIY Dreamer Oh My Creative Little Miss Celebration Just a Girl and Her Blog Sand and Sisal Interior Frugalista House on the Way Addicted 2 DIY I should be Mopping the Floor My Repurposed Life Miss Mustard Seed


Robin Stephens says
Christy, wow….wow….WOW! What talent and vision you have….and probably a backache! LOVE the chairs so, so much! I think you appreciate a piece more when your blood, sweat and tears go in to it, don’t you?? Love the final vignette you created with them. Truly love it all! You’ve made my morning bright!
Fonda Rush says
These turned out wonderfully. You have some talent! Thank you for sharing.
Diane Zueck says
Wow! These so impressive! They turned out fabulous. You have inspired me to give this a try (maybe)! You are brave to undertake this project and do it in such a short amount of time. I would love to see the photos of the entire process.
Vicki Daugherty says
Wow, what a marvelous job you did. As professional-looking as any pro could do. And the cording is perfect. This was a monumental undertaking and my hat is off to you. (I only wish you could keep them, perhaps in a closed off bedroom!) Vicki in Louisville KY.
Sue Farmer says
WOW Christy, what a great job!!! They are beautiful. Don’t know how you do it!!!
Tami says
Absolutely gorgeous. Wish I was closer, I would buy those in a split second. You amaze me with your talent, ingenuity, and vision. Who would have ever thought the ugly chairs you restored could look like they do. Keep up the good work.
Lisa Poser says
I have chairs like that and would love to see the step-by-step, including what tools you used. Beautiful job!
kristen ayers says
Christy, once again, you have inspired me to get back to work…this time on a half finished Louis XV chair, found years ago in a thrift shop…the poor thing still needs A LOT of work, but I think NOW I am ready to tackle it! Would love to see your step by step!
Pat says
WOW!!!!!!!!!!!!!! Please post the tutorial. I know a lot of people would appreciate it.
Celia says
Christy! Those chairs turned out fabulous!! All of your blood, sweat and tears paid off. I thought they were for your Mom but I hope you got a good dollar for them at your booth!! Was it difficult to make the double welting and did you glue it on? Again, wonderful job!!
Celia
Joy Upanavage says
The chairs are absolutely georgious!! I would love to see the whole process. I have a old swivel vanity chair, compleat with pink silk fabric, horse hair seat cushion, and a foul smell of cat urine. I removed ever thing down to the frame. It’s still sitting in my garage, because I don’t know where to start. Again beautiful work!!
Linda D. says
Oh yes, step by step photos and instructions, please! I am eying my own upholstery project and I’d love to be able to reference your technique!
April says
I have 2 questions…
I love doing projects like, seeing a piece from the thrift store given new life. As I approach retirement, I’m thinking about renting a booth and selling them. How do you decide your asking price? The other questions is about the pedestal table in the pic. I have one but the top is lopsided and I’ve been trying to think of an idea for re-creating it. Do you have any suggestions?
Christy K. James says
Asking price is a tough one for me. I usually imagine what I would be willing to pay for an item. And remember you can always come down, but you can’t go up in price. Is there no way to repair the top of your table so that it’s no longer lopsided? If you remove the top and upholster the top and add short legs/wheels, it could make a great footstool. Or you could remove the top and add new table legs and make it a four legged table? Good luck! 🙂
Lindsay Eidahl says
Oh my goodness! You did an amazing job! I wish I could upholster! My garage would be full of many more projects if I could!
Christy K. James says
Thanks, Lindsay! I didn’t know I could upholster, lol. I mentioned above that this was one part talent and three parts courage lol. Glad they turned out. 🙂
Kris @ Junk Chic Cottage says
Christy,
Wow Wow Love these chairs. You Rock Girl. They are beautiful. How can you sell them!! They look so awesome in the corner of your dining room. One of the best re loves of chairs I have ever seen. Gorgeous.
Kris
Christy K. James says
Thanks so much, Kris!! These would be beautiful in your dreamy white guest bedroom! I might have a hard time parting with them when it comes down to it. 🙂
Marie@The Interior Frugalista says
Holy Christy, you finished both of these in fifteen hours! Impressed the heck out of me. What a score at $55.00 for both. Love love love that fabric, these chairs are stunning! They look so good in your dining room, I bet it’s going to be hard to part with them. If I lived nearby I’d be buying them from you in a heart beat. Beautiful professional looking upholstery job Christy. Do you have a piping foot on your sewing machine to make the double welting?
Christy K. James says
Thanks, Marie!! Yes, it was a marathon for sure. My husband kept asking me why it was so important to get them done so fast. He just didn’t get it lol. I can’t find my zipper foot, so I just used my regular old foot and it worked fine! I’ll share the how-to with my upholstery how-to. Have a fun Halloween! 🙂
Marie@The Interior Frugalista says
Christy I’m featuring your gorgeous chairs this weekend at the DIY Sunday Showcase party. Hope you have a great weekend!
Christy K. James says
Yay!! Thanks so much, Marie! XO XO
Tammy says
Christy….all that comes to mind is WOW!!!! I love what you did and all your hard work surly show how talented and great at what you do! LOVE them!
Christy K. James says
Thanks so much, Tammy! I appreciate your sweet comment!! 🙂
Mary says
Your chairs are awesome!! Thanks for offering to share the entire process of the makeover. I would love to see it!
I really enjoy your blog..it’s my fav!!!
Mary
Christy K. James says
Aww thanks so much, Mary!! I’ll be putting together the full tutorial soon. 🙂
Terry says
FABULOUS! I would get the cat declawed (I always do for my inside cats) and keep the 4 year old away from the chairs! You have to keep them they are so beautiful! I have to get me some of that fabric but the closest Hancock is 3 hours away! Making double welting is easy and yours looks great!
Christy K. James says
Thanks, Terry! My cat is 18 and just started clawing my hobby’s recliner a couple of years ago. I think she’s too old now. Your book page walls did prenominal in my FB page. 🙂
andi says
HOLY POO!!!!!!! These are amazing!! I’d be cutting the fingers and claws off the kid and cat and keeping these for my own dang self. 😛 You did an incredible job. They’re gorgeous!!!
xoxo
-andi
Christy K. James says
Thanks, Andi! I wish I had the space for them! I’m really loving how they turned out though, better than I thought they would. Happy Halloween! XO
Jeanne says
SPECTACULAR JOB Christy! Wow! You are talented and patient! As for the Cheeto’d 4 yr. old, you could Scotchgard the fabric. Not sure what to do about a clawwed cat; I have a big drooly dog, so I use a LOT of Mr. Clean Magic Sponges. I have been following your blog for awhile and love your taste and projects. Enjoy.
Christy K. James says
Thanks so much, Jeanne! I really don’t have the space for these either, but I sure wish I did! I really appreciate your following along!! XO XO
Vicki W says
OMG-those chairs are gorgeous!!! I would love to get the entire tutorial. Don’t know if I could ever do as good a job as you did but I’d sure like to try. Love the double welting ! Just beautiful, I would buy them both if I were close.
Christy K. James says
And I would sell them to you ha ha! Thanks, Vicki! I’ll be putting a tutorial together soon to include the upholstery and welting. 🙂
Kristi says
Oh Christy! These chairs were worth every single minute of hard work that you put into them! I’ve never really considered re-upholstering furniture before as it’s always seemed like an impossible feat to me, but these GORGEOUS chairs are SO inspiring!!! If you’re sharing tutorials of the entire process, I’d love to see one too! I’m pretty sure these are my most favorite chairs ever! AMAZING job girl!!!
Christy K. James says
Awww thanks, Kristi! I recovered my desk chair, but nothing ever close to this before. It really wasn’t as difficult as it looks, just labor intensive. I’m so glad you like them. They are my most favorite ever too. 🙂
Kris Beck says
Ii would love step by step instructions, especially on how to make the welting. I have two chairs I need/want to recover. What an awesome looking pair of French chairs. I love them.
Christy K. James says
Thanks, Kris! I’ll include the welting when I write the tutorial for the upholstery. 🙂
robin says
Words cannot describe how beautiful these chairs came out. Love them with the table and lamp. WONDERFUL job. And I do mean job. Would you do it again? Or was it too hard?
Christy K. James says
Thanks so much, Robin! Yes, it definitely was a job for sure. I might do it again in the future, but I would definitely allot myself more time next time!
Tina Matteson says
They are absolutely beautiful! GREAT job! And… I would like to see a tutorial, please! Thanks for offering.
Christy K. James says
Thanks, Tina! I will be putting a tutorial together soon. 🙂
Eva McAvoy says
These are fantastic. I’d love to see the entire process – Thanks for sharing !
Christy K. James says
Awesome! I’d be glad to put that together. Look for it soon. 🙂
Shanna Gilbert says
Upholstering a whole chair is something I’ve never been brave enough to take on. Yours look amazing and so pretty in your little vignette in the corner!
Christy K. James says
Thanks, Shanna! I did my desk chair, but nothing like this before. I think it wouldn’t have been as bad if I had allotted myself more time! XO XO
Addie says
WOW!!!! You are the master!!!! I humbly bow down to you!!!! GREAT JOB!!!!!
Your talents are unbelievable!!!! Everything turns out great….mmmm can you show us
a flop…just so we know you are human!!!!
Addie
Christy K. James says
Thanks, Addie! Your comment made my day! I flopped here by painting the wood first. Who would do that? Me that’s who ha ha. Have a great day! 🙂
Janie says
Wow! Wow! Wow! I love them, you are so blessed to have such talent!
Christy K. James says
Thank you so much, Janie! One part talent and three parts courage. 🙂
Linda says
The chairs are so beautiful!
I didn’t understand what you were referring to early on when you said they had been painted, When you showed your cutting layout I understood. Who would do that?
I’d like to see a post about making welt.
I’m sure the chairs will turn a tidy profit, good for you.
Christy K. James says
Thanks, Linda! I didn’t realize they were painted when I first saw them, but when I got a chance to look a little closer, they sure were! Crazy, right? I’ll be sure to include how I made the welt along with the upholstery how-to. It was pretty simple. 🙂
Diane says
I love the chairs because I love anything french provencial. Could you please include me in on the upholstery step by step how to. And the welts also. I have never done upholstery. How did you know what piece to take off first? where did you get that material? lastly, i love that lamp, did you do it too?
Have a blessed new year. I am so glad i follow you. I just i had been the one who purchased those chairs. Guess i gotta make my own. lol, Can’t wait!
Christy K. James says
Thanks, Diane! I found the fabric at Hancock Fabrics. I removed the welting first and went from there, taking a lot of photos as I went so I could see how it all went back together. I am hoping to put the step-by-step together soon, now that the Holidays are behind us. Be sure to subscribe to receive my posts via email so you don’t miss it. I shared the welting tutorial already which you can see here: https://www.confessionsofaserialdiyer.com/how-to-make-double-welting-for-upholstery-without-double-welting-cord/ The lamp was a TJ Maxx find. Thanks so much for stopping by! Happy New Year! XO
Mary Bannon says
Christy . . . . I must say you are very brave and extremely talented. I’m so pleased you are so willing to share the step-by-step instructions, photos, and “serious” language we may need to use, knowing it will help complete my project. I’m ready Girl! Thanks in advance.
Christy K. James says
All right, Mary! Let’s get started! I will be posting the how-to very soon. (Minus the serious language.) 🙂
Krista @thehappyhousie says
Oh my. WHAT. A. TRANSFORMATION. I can see why it just about killed you. They are absolute stunners now though, Christy. Amazing!!
Christy K. James says
Thanks so much, Krista! They were a lot of work, but they turned out so pretty. I’m glad my Mom went back for them. I passed them right by!
Nancy @ Artsy Chicks Rule says
LOL, how cute are you??? haha love it …and wow, they were a lot of work but they look it!!! GORGEOUS! What a fabulous job.
Nancy
Christy K. James says
Thanks sweet friend! They were SO. MUCH. WORK. I’m taking your advice on holding out for my price! XO
Charisse says
Those chairs make my heart sing! I just need one part of your courage!
Christy K. James says
I’m so glad you like them, Charisse! I figured they couldn’t look any worse than they did before. 🙂
Alison says
They look fantastic! I’d love to see a tutorial on it all…I have several chairs waiting for recovering here…
Christy K. James says
Thanks, Alison! I’ll be posting the how-to soon! 🙂
Janice says
Congrats! You did a great job.
Christy K. James says
Thanks, Janice! I appreciate It 🙂
Trish says
I want to let you know I feel in LOVE with your dresser. I now want to tackle a dresser and matching chair for my bedroom. Thanks for sharing your wonderful work.
Christy K. James says
Thanks, Trish! That dresser was a flop to begin with. I had originally transferred a huge graphic across the front, which took forever. When I started painting it in, there were too many ridges and bumps from the trim around the drawer fronts and it was looking terrible. At the last minute, I decided to repaint and add fabric to the drawer panels instead. It turned out better than the original idea. I’m so glad you feel inspired! 🙂 🙂
Ashley says
Unbelievably gorgeous! And they look SO good in your home!! I totally know what you mean about having the “staple gun grip” – I too gave reupholstering a try when I redid my living room valences. Luckily no sewing was involved, but there sure were a TON of staples, ha! You can check it out here: http://distress-to-impress.blogspot.com/2014/08/diy-valence-makeover.html
Can’t wait to see your next project!
Christy K. James says
Thanks, Ashley! Your valances turned out great!. XO XO
Claudia says
You go girl! Those look FABULOUS…I would not be able to part with them.
Christy K. James says
Thanks, Claudia! I might have a hard time letting them go. They are still in my dining room. 🙂
Heather@ viralupcycle.com says
Beautifully done! I have an open back round one I’m debating on doing. I don’t feel very confident about it. Thanks for the tips will definitely be referring back to this when ever I get around to doing it. I am considering painting the fabric because it seems to be fine. I’m ambivalent though because I don’t know what may be lurking underneath. Any suggestions? Great job Christie.
Christy K. James says
I have seen several painted upholstery projects in the blogosphere lately that look pretty spectacular. One of my favs is from my friend, Nancy at Artsy Chicks Rule:http://www.artsychicksrule.com/2014/05/painted-upholstered-chair-makeover-chalk-paint.html If they were just going in a space for looks rather than function, I would say go for it. If they will be used regularly, I would recover them. Good luck with whatever you decide! 🙂
JP says
Christy, you are…A-M-A-Z-I-N-G!!!
Christy K. James says
Aww, thanks, JP! You are always so kind! 🙂
Mirna Hill says
Hi Trish,
I have two Bergere chairs that need new fahric plus the facbric I chose was RED (can you believe it?)… anyway, I would love to re-do them just like you did yours, can you provide me step by step instructions. I know it would be hard and challenging but I really need to get these chairs redone; they are in the family room off the ktichen and i LOVE them so replacing them is not something I want to do. I can provide pictures so you can see what they look like now, their condition. Any help you and advise you can share would be greatly apprecited.
Thank you
Christy K. James says
Hi Mirna,
I’ll be sharing the step by step for this pair soon and maybe you will find it helpful. The best advice I can give to take photos step-by-step as you remove the upholstery from your chairs, and just put them back together the same way. 🙂
jeannie panza says
OMG Christy, you never seem to amaze me! Love this chair. You are so talented!!!!! It is beautiful!
Christy K. James says
Thanks so much, Jeannie! I really wish I had a place for them!! XOXO
Serena @ Thrift Diving says
Wow, what an amazing makeover! I can imagine your exhaustion with thinking, “Not another one!” I have felt that way when knitting socks. HA! You get done with one and then you’re so OVER it. HAHA. Great job, seriously! Much talent you’ve got there! 🙂
Serena @ Thrift Diving
Christy K. James says
Thanks, Serena! Yes, the thought of having one more to go was awful. I tried to do them side by side the whole way or once I finished with one, I would have said forget it! Ha ha!
Mei says
You are so talented. I am light years away from doing what you did to those chairs. They are beautiful. Great job!
Christy K. James says
Thanks so much, Mei! I’m so glad they are done! 🙂
Julie @ Southern Wild Design says
I am blown away! So great! Please, please do a step-by-step. Now that old man winter is knocking on the door, I will forced inside! I am lining up projects and would love to take on an upholstery project. ~Julie
Christy K. James says
I’m so glad you like them, Julie! I hope to put together the step-by-step soon! 😉
Iris says
Please send me step by step how you did this.
Kind regards Iris
Christy K. James says
I’ll be putting together the how-to soon, Iris. 🙂
Paula@SweetPea says
Beautiful job, Christy! I know these were way more work than you anticipated but the end result is so worth all of those hard hours. I’ll bet these will sell very quickly in your booth!
Christy K. James says
Thanks, Paula! I hope you’re right and they sell quickly. 🙂
Kristi says
Fantastic makeover! I probably would have passed on these seeing the original pictures. But you have a great eye and envisioned something completely amazing! You have totally inspired me to no end! Never underestimate a piece. I’d love to know the entire process of the project!
Christy K. James says
I did pass on them actually, but my Mom went back for them. I’m so glad she did! That is awesome to hear you feel inspired! I’ll be sharing the process soon. Thanks so much for visiting!! XO
Trish says
They are gorgeous. And what a great price…wow!!
Christy K. James says
Thanks, Trish! They were a steal for sure! XO
Kylie says
Lovely chairs, they look so nice with a little bit of love – that old fabric was awful! (What was someone thinking?)
So far my only foray into upholstering has been replacing the fabric seat on my nan’s antique commode chair that’s then one year old ripped to pieces – but it was fun – an air powered staple gun is a fun thing to use!
I’m waiting to find the right chair to upholster for a comfy reading nook in my lounge – so I’d love a tutorial.
Christy K. James says
Thanks, Kylie! They needed help for sure. I used a hand staple gun…I think if I plan to make this sort of makeover a habit, my poor hands will thank me for an air-powered one! Tutorial coming soon. 🙂
Kendra @ www.joyinourhome.com says
These are absolutely gorgeous, Christy! Too bad you can’t keep them but I”m sure someone will love them and grab them quickly!! One of my favorite makeovers I’ve seen!
Christy K. James says
Thanks so much, Kendra! I do wish I had the space for them! I hope you’re right and they will sell quickly. 🙂 XOXO
Beth Heim says
omg,,,I am beyond impressed. I have tackled smaller chairs and couldn’t even imagine doing something like this. It looks like a professional job that would probably cost 400-500 per chair! I love them.
Christy K. James says
I’m so glad you like them, Beth! Thank you! They turned out even better than I imagined. 🙂
gail says
I LOVE these chairs. I would love to catch you (feature you on Catch as Catch Can)
could you add a link to MRL on this post?
thanks!
gail
Christy K. James says
Yes! I can’t believe I don’t have you on there! 😉
Scribbler says
I am beyond impressed! I cannot imagine parting with these ever, ever, ever! Make the kid and the cat wear gloves! I have never met a French chair I didn’t like, and these are right up top.
Christy K. James says
Thanks so much, Scribbler! I just dropped them off today at my shop and I was actually relieved as they made it there unscathed ha ha. I’m sure I’ll come across another set when the time is right. Maybe by then I will be ready to tackle another set. 🙂
vera says
Lovely. Want to see all the steps !!! : )
Christy K. James says
Thank you, Vera! Will do very soon. 🙂
Paula ~ Mise en scène says
What a beautiful transformation!
Christy K. James says
Thank you, Paula! XO
heather @french press says
this transformation was simply astounding – those chairs are stunning
Christy K. James says
Thanks so much, Heather! I appreciate your sweet words! XO
Larissa ~ Prodigal Pieces says
Hahahaha…you look just like me, Christy, after I was done with my two chairs and you have the same tenacity I do to finish. Not to mention I have a cat and 6 kids! You did a fantastic job. ;o)
Christy K. James says
I do not know how you do it all with 6 kiddos!! You must be Wonder Woman! Your chairs turned out amazing and I think yours may have even been uglier than mine to start lol! XO
Cristina@Remodelando la Casa says
Hahaha you made me laugh with those action photos! I can see it was all worth it. the chairs look amazing! I have a couple of wingback chairs that I need to re-upholster, you’ve given me great tips to tackle them! Great job as always Christy!
Christy K. James says
Thanks, Cristina! I’m really pleased with them, especially for this being my first time reupholstering something like this. You are so talented, you should have no trouble at all with your chairs! 🙂
Sandy Walby says
Love them….do you every sell to out of state? I live in FLORIDA and in the slow process of redoing my living room, and those would look great. I too love the way you pictured them!
Christy K. James says
So sorry Sandy, but unfortunately no. 🙁 Perhaps if it were something much smaller. Thanks though, I’m so glad you like them! XO
Courtney at A Life From Scratch says
Gorgeous! You did such a professional looking job with these chairs. Thanks for sharing on the Whimsy Wednesday link party! If you get a chance to stop by my blog sometime, I’d love it! Have a lovely day 🙂
Christy K. James says
Thanks so much, Courtney! XO
Magali@TheLittleWhiteHouse says
Wow! Amazing transformation! I would never have had your patience.
Christy K. James says
Thanks so much, Magali! Doing them under a very tight deadline tried my patience for sure. Had I taken my time, they wouldn’t have been so bad to do. Thanks so much for visiting. 🙂
Christine says
These chairs are fabulous! I love all of your pieces. You are a huge inspiration to me…thank you for sharing your talent!
Christy K. James says
Thank you, Christine! I appreciate your kind comment so much!! XO XO
Ann Marie Byrd says
Oh my, they are beautiful. Your pictures conveyed the pathos and humor everyone who pulls out staples experiences. It’s a dirty, thankless job — but your chairs are gorgeously transformed. They look splendid in the spot you chose, despite your kitty and Cheetos-eating child.
Christy K. James says
Thanks so much, Ann Marie! Yes, that staple thing is real stinger. I’ve almost got my grip back. 🙂
Jen @ Girl in the Garage says
Christy, it is INSANE how GORGEOUS these are! You should be so proud of yourself! I have had a few big reupholstery projects on my to-do list for a very long time, but I’ve been too nervous to start. Wanna come help me? 😉
Christy K. James says
Ha ha…too bad I’m not closer. These projects would be more fun done together! I’ve had three people that have wanted me to ship them to them lol. I bet that would be expensive! Glad you like them! 🙂
Kathy says
What a fabulous job you did on the chairs! They look amazing. You put a lot of hard
work into this project and it shows. Beautiful job.
Kathy
Christy K. James says
I know, did you see how it wiped me out ha ha! Thank you, Kathy! 🙂
Cindee says
I love, love, love the chairs… Great job!
Attempting two wing back chairs, and would love to see your instructions…
Thank you for the post!
Christy K. James says
You bet! I hope to post it soon and thank you! They sold this weekend. 🙂
Teresa says
Yes, please send or post the pictures/tutorial of how to complete these chairs. They are beautiful, love the fabric, love the look! And you’re selling them?!!!
Christy K. James says
I sure will. They actually sold this weekend. I just didn’t have the perfect spot for them, but it was sad to see them go!
Marie says
I absolutely love these!! They are so beautiful! I love your fabric choice too! Thanks for sharing.
Christy K. James says
Thanks, Marie! I honestly didn’t imagine they would look so pretty after. This set already sold, so now I’ll be on the look out for a couple more. 🙂
Debi @ surroundingsbydebi.com says
Wow – these are gorgeous! Please do post the tutorial on how to do this. I want to recover a couple of chairs and this ins inspiration to do so.
Thank you for sharing!
Debi
Christy K. James says
Thank you so much, Debi! I plan to post the tutorial soon! 🙂
Robin @ Redo It Yourself Inspirations says
Christy, I loved these so much that I featured them as a Friday Favorite. I hope you stop by to see how I bragged about you.
Have a wonderful creative week~
Robin
Hester says
Fantastic chairs. You did a wonderfull job. Do you know I can buy the same fabric in a webshop? Because I love this fabric so much and MUST have it. I´m living in Spain.
Christy K. James says
So glad you like them, Hester! I found the fabric at Hancock Fabrics. If you go to their website, there are two fabrics listed under drapery fabrics that look like it, but I’m not certain which one it is because the background of the sample that matches the price and width of this fabric, looks much lighter. If you are able to contact a Hancock Fabrics store, this is the sku# you would need to order it: 3669926. Hope this helps!
Olivia says
I LOVE these chairs they turned out beautiful!
Christy K. James says
Thanks so much, Olivia! XO
Beth Heim says
Absolutely stunning job. I’ve been wanting to do one of these or a cane back chair but really don’t know how. Do you think what you completed can be done without a sewing machine?? I noticed you made your own welting. I suppose I could buy something that matches. I wish you had a little more detailed photos showing how you did the panels though!!!
Christy K. James says
Thanks, Beth! I only used my machine for the welting, but you can purchase pretty coordinating welting already made. It doesn’t have to be the same fabric. I did promise a how-to for this project, which I still plan to share, just waiting for the hustle and bustle of the Holidays to die down. Look for it very soon. 🙂
Adrianne says
I would like to know the steps that you did for recovering the chair. I have a French Provincial couch that I would like to recover myself. You did an awesome job on the chairs!
Christy K. James says
Thanks, Adrianne. I wrote all about how I did it here: https://www.confessionsofaserialdiyer.com/upholstering-a-french-provincial-chair/ Hope it helps! 🙂
Vickie says
Really sweet. I know this is an older post, but where did you find the fabric? Thanks.
Christy K. James says
Thanks, Vickie! I purchased this fabric at Hancock Fabrics. 🙂
Vickie says
Thanks for the reply for where you purchased the fabric!
Debbie Perkins says
Those are two of the prettiest chairs that I have ever seen. I have a friend that found us some chairs from a remodel for 5 dollars each. Woohoo! Bring them on. Ok, I got 4. Hey need some more? They are free! OMG my favorite word. Lets see how many armed chairs that you can squeeze into a Tahoe. Hmmmm, 8? Wait, I see a space, here are 2 bistro chairs…Beverlyhillbillies eat your heart out. THEN, I started to deconstruct. All I could hear was Blake Shelton’s song “What was I thinking”. I have 2 painted on stripped down to the wood. Your chair gives me hope that I can get them finished, I Love your fabric. What sized cording did you use? I bought black gimp trim to use on black and white damask, painted the chairs black. Thanks!
Christy K. James says
Thank you, Debbie! Sounds like you have a few weeks of projects on your hands! I used cotton cording from Walmart for the double welting. You can see how I did that here: https://www.confessionsofaserialdiyer.com/how-to-make-double-welting-for-upholstery-without-double-welting-cord/ Good luck with your chairs! XO
James Bay says
This is absolutely incredible! I have one of these old chairs laying around. I might try this out. Your tip about taking pictures the whole way will be very helpful.
Liz Armeson says
Oh my goodness, I NEVER would have guessed this was a DIY job. What a gorgeous and unique design. I love this chair, completely to die for. Keep up the amazing work!
Christy K. James says
Thanks so much, Liz!! XO
Isabelle says
Bonjour,
Magnifique travail.
Pouvez-vous me dire l’adresse où vous avez acheté votre tissu ?
Merci d’avance de votre réponse.
Christy K. James says
Merci! Je l’ai trouvé à Hancock Fabrics. Voici un lien: http://hancockfabrics.com/postage-and-script-on-tan-cotton-fabric-3669926.html
nelly says
Love, Love, Love this project. I purchased two wing chairs at a thrift store for $15 each and need to reupholster them for a luxe modern living room. Please send me your step by step instructions thanks.
Christy K. James says
Thanks, Nelly! I included a link to the step-by-step instructions at the bottom of that post, but here it is for quick reference: https://www.confessionsofaserialdiyer.com/upholstering-a-french-provincial-chair/ Good luck!
Kat says
Oh my goodness! Do you have patience or what? I have a Louis XVI chair with similar complex upholstery that needs to be redone but I can’t imagine doing it myself. Wish I had your perseverance and courage! These are beautiful.
Christy K. James says
Aww thanks, Kat! You might be surprised at what you can do. These did give me a run for my money though! 🙂
April from StampinFool.com says
They look amazing! Thanks for the detailed instructions!
Christy K. James says
Thanks so much, April and you’re welcome! 🙂
Teresa says
These chairs are some of the prettiest I have ever seen, great job! Can I ask the paint color of the trim we see a glimpse of in the picture where all the fabric pieces are laid out on the floor. This is exactly what I want for my kitchen cabinets. Thanks!
Christy says
Thanks, Teresa! That color of paint was actually an oops paint we bought years ago and no longer have unfortunately. We have since painted the doors, cabinets, and trim Cottage White by Behr. Sorry I’m no help!