
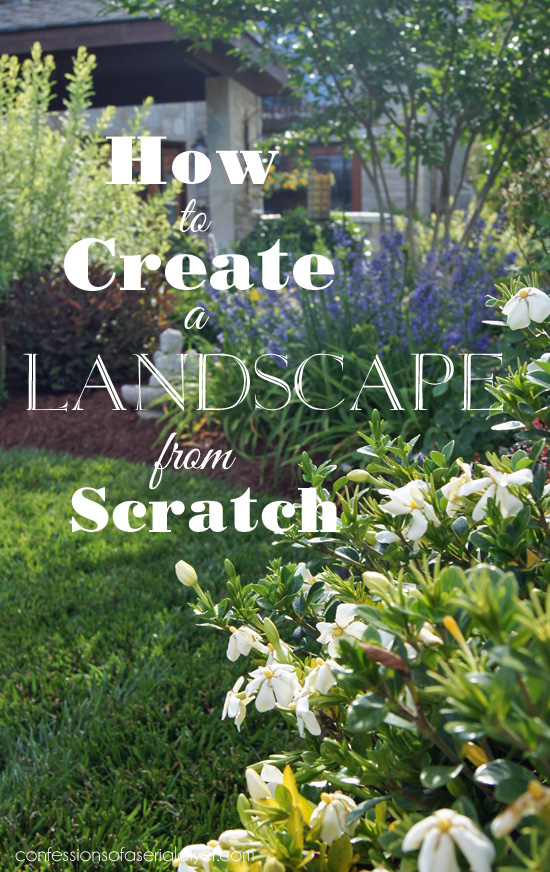
I have really enjoyed sharing my landscaping makeovers and hearing all of the awesome feedback. It was a lot of hard work that is really paying off. I love my outdoor space. I have been asked several questions about my makeovers with the most frequent one being, “How did I know what plants to buy?”
First I am going to share with you how I came up with my landscape plan and the work that went into creating my planting beds. After all, you can’t plant anything until the beds are ready, right?
I could easily break this into several posts about each and every step, but I know if I were planning an outdoor redo, I wouldn’t want to have to wait around for post after post. So here we go! Let me start by saying, I am in no way an expert! My suggestions are based solely on my experience and what I have learned along the way. Before we get started, if you haven’t seen any of my landscaping makeovers, here are the most recent updates.
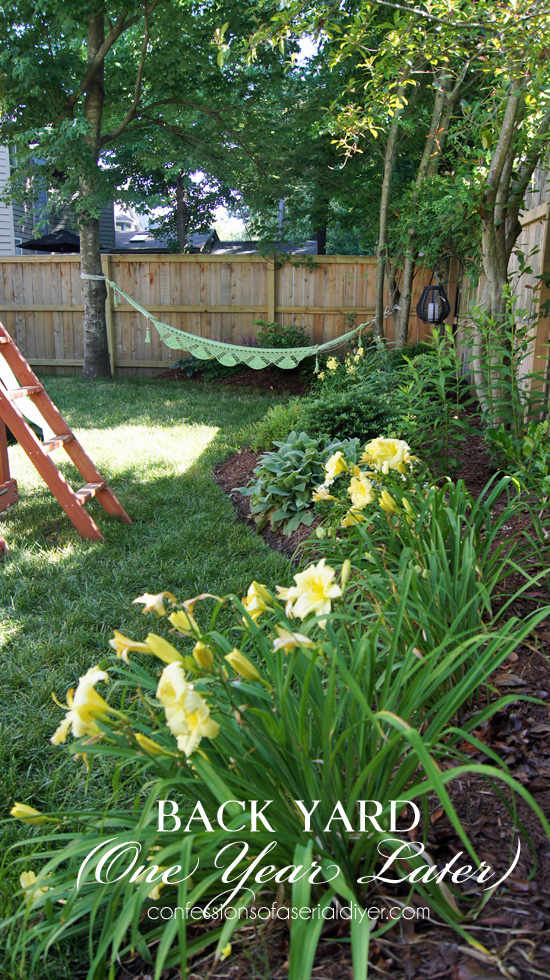
Back Yard Makeover (One Year Later)
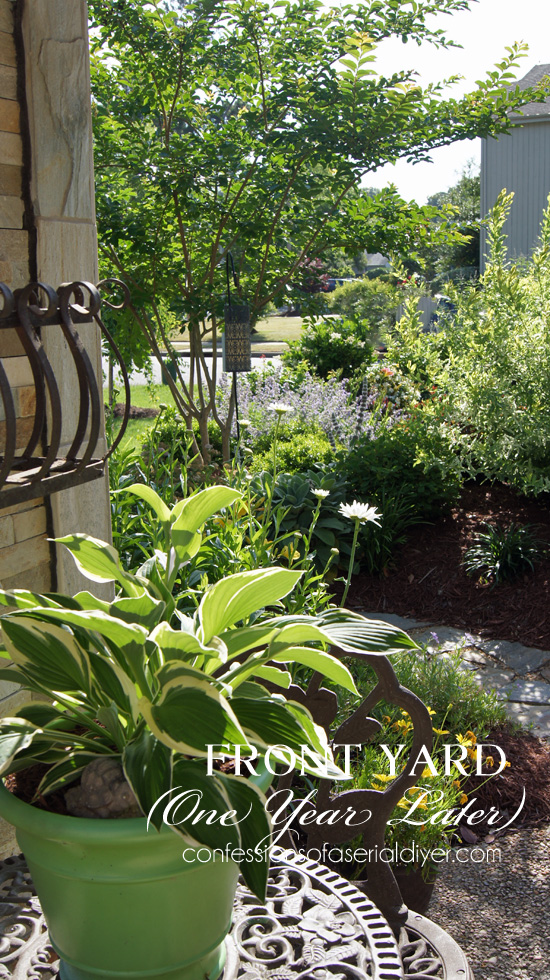
Front Yard Makeover (One Year Later)
Visit the original Back Yard Makeover reveal here.
Visit the original Front Yard Makeover here.
Visit the Side Yard transformation and granite block patio reveal here.
How do I know where to even begin changing my landscape?
The best way to create a plan for your landscape is to draw it out on graph paper. Draw the outline of your home. This will require some measuring. Each square on your paper = one square foot of space. Then draw the outline of your outdoor space. You may want to make copies now so you’ll have a clean sketch to go back to.
It is important to get your drawing as close to scale as possible because you will use this drawing to determine spacing for your plants later.
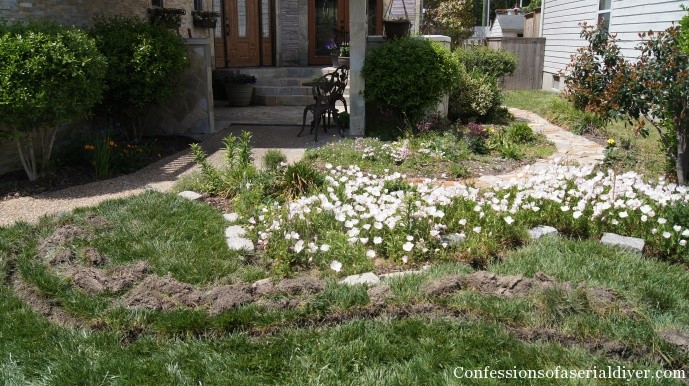
Add any bushes or trees that will be staying as well as any hard surfaces such as paths, driveway, etc. Now play with it. Pencil in different ideas. Don’t like it? Erase it and start again. I changed my mind several times on paper before I came up with a layout I liked. Even if you are redoing a small area. Draw it out. This will help you visualize the finished space. Here is the front border garden as I drew it out on paper: 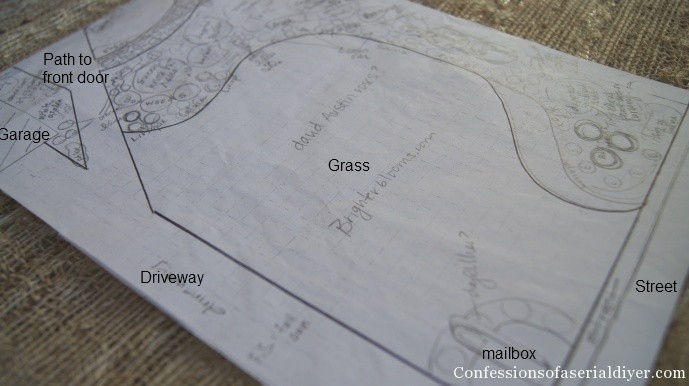 Don’t be afraid to go big! No area should be less than four feet in diameter. I am barely pushing it along the property line there. I would have made that wider if I could, but I have such a small patch of grass as it is. If it’s too narrow, your garden won’t have any depth. If you are planning on adding any hard scape, pathways, etc such as our flagstone pathway below, that should be done first!
What is the best way to create my planting beds?
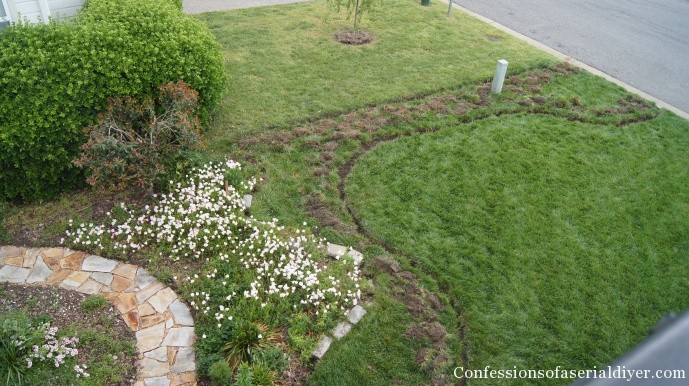
Once I determined how I was going to lay out my new landscape, I used flour to mark where my planting beds would go. This made it easy to change it if needed. *Don’t forget to call the underground utility company(s) to come out and mark their lines before you dig! (Thanks, Jackie!) Then I used a flat shovel and created a trench all around the outside edge. In this picture, you can see the initial cuts. I actually went back a second time to make them twice as wide as you see here. You can see I followed my original drawing, but I went back later and enlarged the area by the street to balance it better with the rest of the layout.
I turned each piece of sod face down towards the middle of the new planting bed. I did this around the entire perimeter of every area. I had a lot of flowers-gone-wild and weedy areas in my existing flower beds.
When I was researching the best way to create a new planting bed, I came across a seemingly unconventional method. If it worked…boy would that be awesome.
Instead of tearing out every shred of existing grass, weeds, etc. (I would suggest cutting everything on the lowest setting before getting started.) I used a technique that uses newspaper. After creating about a one foot trench around the perimeter of my new beds, I covered the entire area with newspapers 8-10 pages thick (you can also use cardboard). Then I wet down the newspapers to keep them in place and covered them with 10-12 inches of new topsoil. (My honey helped, too!)

We kept adding soil until we had about 10-12 inches in depth. Then we added a layer of compost. All of our new plants were planted in the new soil. This eliminated the frustration of trying to amend our existing soil. I didn’t test or amend a thing and everything except a couple of coral bells thrived.
This also provides perfect drainage. That’s a big deal in my area which is mostly clay!
Some shrubs and larger plants may need to be planted a bit deeper. Just cut a hole big enough to plant through the paper. The newspaper will last long enough as a barrier to kill anything below it which will decompose along with the newspaper adding more nutrients to the soil. It took over thirty cubic yards of soil and compost to complete our entire project. Our pick-up could only hold one yard of topsoil at a time because it is so heavy. That is a lot of trips to the nursery!! You can also have it delivered, at an increased cost. I used this method in my entire landscape and I had fantastic results! I love the look of a raised bed:
My beds were a breeze to take care of with very minimal weed growth. So now the burning questions…
How do I know what plants to keep and what to pull out?
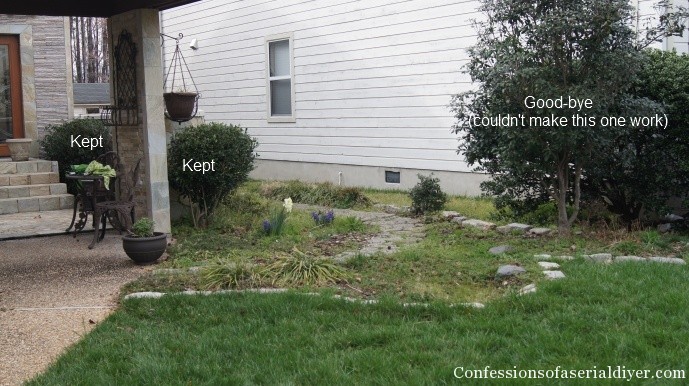
I think most people lean towards pulling everything out and starting fresh. There are advantages to this. However, working with a few things you already have will give your landscape a more established feel. (But only keep them if they work in your new landscape.) I have found that most healthy shrubs have very well established root systems and can take a severe cut pretty well. Consider cutting them way back. They might be mostly sticks for a while, but they will likely come back lusher than before and sooner than you think, depending on the time of year. If they don’t, what have you lost? I kept my holly bushes, but pulled out everything else:
When it comes to smaller plants, try to use them elsewhere in your landscape. I moved several to an area I wasn’t working on to save them for when I was ready to replant them. (By the way, my husband used a big pick axe to remove the larger shrubs and trees.)
How do I know what plants to buy?
This is the hardest part, but also the most fun! Don’t make the mistake of going online and finding things you like and then going to search for them locally. Its much easier to see what’s available in your area first and use what you know is already available to you. I am in Zone 7b, which means plants in this area can survive safely down to temperatures of 5º-10º. To find out what zone you live in, click here.
Visit all the nurseries and big box stores in your area to see what is available in your zone.
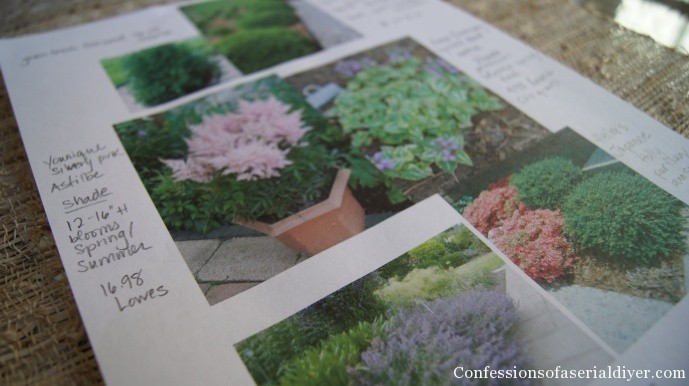
Take pictures of anything that catches your eye. Then go home and look them up. Find out how tall and wide they will grow, whether they like sun, shade, partial, etc, and what their watering needs will be. I printed pictures of all of the plants I liked, with space to write beside each one. I wrote all of this info as well as prices beside each one and kept it as a guide. Below is one of the many pages from my project.
Then look at your drawing and see where you might be able to use some of the plants you liked. Be sure to visualize their mature size. (***This is very important unless you plan on doing a lot of pruning , which you can do of course to keep things small, but that can be a lot of work.)
Doing your homework ahead of time will save you from buying on impulse and possibly choosing plants that won’t work where you need them to.
Keep in mind that your garden is always evolving. You can easily move most things around within the first year. Here are more thoughts to keep in mind:
-
What will give my landscape structure all year long?
Space evergreen shrubs/plants evenly throughout to give your landscape structure after perennials have said good bye for Winter. Deciduous shrubs although bare, also provide structure in the colder months. Keep in mind, most perennials will leave a bare spot behind.
-
Do I have a color pattern?
Limiting flowering plants to three complimentary colors is a good idea. Too many colors doesn’t give the eyes a place to land. I chose purples, yellows, and whites. **It’s also very important to consider WHEN everything will bloom. You don’t want to put all your Spring bloomers in one corner.
-
Is it a good idea to purchase everything at once?
Not necessarily. Your garden centers will change their inventory as the seasons change. Spring blooms will be the focus in March and April, but will soon make way for Summer blooms and so forth. So leave room to make some additions as more becomes available. This mostly applies to perennials. A good variety of shrubs and trees should be available throughout the season.
-
Should I buy bigger plants with a couple of years growth or smaller, younger versions?
I have found that larger, older plants are a bit more temperamental and require more TLC when planting because they have become comfortable in their current environment. Younger versions not only cost less, they are more adaptable to their new surroundings. If you want instant growth, and have the money to spend you may want the larger version. But if you are a patient gardener, this is one way to save some money and the little ones will catch up in no time!
-
Where should I purchase my plants?
Of course this will be specific to where you live. However in terms of big box verses local nursery? It depends. This is what I’ve found in my area: Local nurseries:
- Have a larger variety of plants to choose from
- Generally more expensive, but often have good sales
- More knowledgeable staff in most cases
- I tend to find larger, more healthy specimens because they fertilize their plants
- Plants are very well cared for
- Can be intimidating, even overwhelming (but the staff are there to help you, use them!)
Big box garden centers:
- Stock the basics (although some still have quite a nice variety)
- Usually less expensive
- Staff is not always knowledgeable
- Plants are usually healthy at the start of the season but begin to look a bit neglected as the season wears on
- You may have a better comfort level here because its familiar territory
Online Retailers: I have only had experience with purchasing veggies online. They arrived in a very pathetic state, but ended up strong and healthy! Here are some thoughts to consider:
- Prices are generally very good, but be mindful of shipping costs.
- You can find just about any specimen online, but will it thrive in your area?
- Will your garden be ready for planting as soon as it arrives? It will need to be planted right away.
These are just my opinions. I have purchased plants from all three sources with generally good results.
-
What if I am working with a limited budget?
There are several ways to acquire plants on a limited budget.
- Many plants spread like crazy and those babies are dug up and tossed to keep a neat garden. Ask friends, neighbors, family if they have any plants they can give you. I acquired a lot of my plants for my garden at my old house that way. Most gardeners are happy to share. To keep some plants healthy, they need to be divided every few years, so you may just luck out!
- At your garden center, look for plants that are big enough at the base that you can split it into two when planting. I did this with daylilies and hostas.
- If you are a patient gardener, you will be able to split what you have growing in your garden into more plants; some after the first year, but many after two or three years.
- As I mentioned above, buy the smallest version available. It will cost much less, but in a couple of years it will be strong and beautiful.
- Look on craig’s list. Many times people will advertise free or cheap plants if you are willing to dig them up.
- You don’t have to buy an entire landscape’s worth of plants at once. Buy a few each payday.
- Stick with perennials for color and seasonal interest vs. annuals. You will see a return on your investment for years to come. (I still like to use annuals for my window boxes and patio containers.)
Okay, Christy. I’ve read all your jibber jabber, but how do I know what will look good together??!
You will have to use your imagination a bit here to be able to visualize what will look great with what. But I do have a few tips:
- You can’t go wrong when planting in groups of three or more; in a row or staggered. Single specimens are okay too, just try to avoid even numbers.
- I used a lot of single specimens, but repeated them throughout. I wanted more of a garden feel than a low maintenance landscape.

- Repeat plants in your landscape to take your eyes all the way through.

- Play up textures. Large leafed varieties look great next to smaller leafed plants or spiky plants.
- Don’t be afraid to lay plants out at your garden center to get a feel for how they will look together.
I worked in sections. Because I was undertaking such a large project at once, this made it easier to keep my focus.
I laid out all of my photos of the plants I liked and just started plugging them into my drawing (using their estimated mature size).
I eventually came up with a game plan. I was purchasing a large quantity of plants, so I made a list of exactly what I needed to buy for each trip. I knew exactly where each plant would go before it ever even made it into my cart.
Any suggestions for planting?
Oh this part is the absolute best!! You really get see your landscape come together.
- Lay out your new plant babies to get an idea of how they will look when planted. Move them around until you are happy.
- Plant according to the instructions.
- ***Be careful not to plant too deep or you will smother the roots!
- I like to fill each hole with water as I am planting to give them a nice big drink.
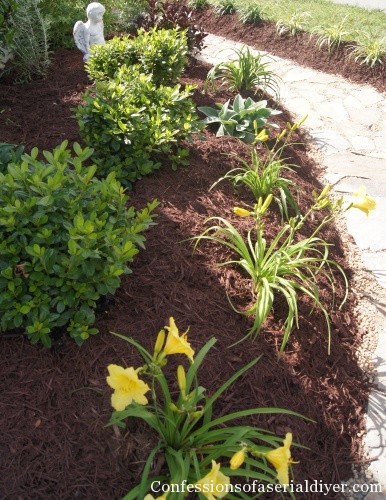
When all of your plants are planted, you will need to cover with 3-4 inches of mulch (any deeper may promote mold growth.) The mulch will do three things:
- Inhibit weed growth
- Help to retain moisture
- Keep the soil cool
Be careful that the mulch doesn’t touch the stems of your plants as most will not like it. I like to create a “well’ around the base of my plants. Now you can stand back and admire all of your hard work!
Don’t let the fear of not knowing what to do, keep you from creating an outdoor space you can be proud of. Just get out there and go for it! You will learn so much along the way.
I hope I was able to answer most of your questions. If you have any thoughts or suggestions to add, I would love to hear them! I can’t wait to get outside and get my hands in the soil!! If you want to learn about the easiest method I’ve found to water my garden, click here. Good Luck!
XO,
![]()
Don’t Miss a Thing!
If you like what you see, there are several ways to follow along!
Email * Facebook * Pinterest * Hometalk * Twitter * Instagram


Mary from Virginia says
This tutorial is wonderful. I just clicked on your pinterest page and I see where you are from and I live in Chesapeake. You are close enough to come tell me what to do with my yard 😉
Amazing what you and your husband have done. Thank you for the details in planning and making this project come together.
Mary
Christy K. James says
Thanks, neighbor! You are funny… I could be there in 20 minutes:)
Mary from Virginia says
It’s a deal! I’ll watch your children!
Christy K. James says
On my way! Ha ha!
Cristina@remodelandolacasa says
Wow Christy, AMAZING tutorial! This is a keeper for when I begin my work, Thanks!
Christy K. James says
Thanks, Cristina! Hope you find it helpful:)
Julia Kendrick says
Your landscaping is so beautiful! I pinned it for inspiration! Julia @ http://www.juliakendrick.com
Christy K. James says
Thanks, Julia! Hope it helps 🙂
Daniela @frugal ain't cheap says
great post! very informative. We are planning on doing some landscaping in our front yard…
Christy K. James says
Glad you found it helpful, Daniela! Good luck on your front yard 🙂
Kristina says
Wow! What a great post. We have lived in our house for 8 years and I have done landscaping a little at a time. I have no knowledge of plants other than I love to be outside in my space. Your space is so beautiful and so well thought out. I will definitely refer to this when we move and I need to start over. Thanks for all the great information. Oh – did you have to contend with an in ground sprinkler system?
Christy K. James says
Thanks Kristina! No, we didn’t have an inground sprinkler system, but I wish we had one now 🙂
Karin says
I LOVE the idea of using newspaper and cardboard. I can imagine they would form a really nice weed barrier. This was a great post. I can’t wait to try this out. Thanks!
Christy K. James says
The newspaper worked like a charm!! I had everyone I know saving papers for me!
gthomson says
I was doing similar around the perimeter of my backyard, but I don’t know anybody that gets the paper these days. And it was getting really expensive to buy them, just to bury them under compost. Then two weeks ago I was trying to get the garage cleaned up, and was trying to figure out what I was going to do with all those Amazon boxes that I keep, just knowing I’ll need them for shipping something some day. And then it struck me… those would be much better/easier to put under the compost. Always seemed as soon as I walked away from the latest set of putting newspapers down, and before I could get compost on it, the wind would scatter them. Used brown contractor paper rolls from Home Depot also. Not much better there. With the cardboard boxes – not a problem. And garage is cleaner as well. And now if I need to use them for shipping, I know right where they are 🙂
Christy K. James says
Absolutley! Cardboard is an excellent option as well and I did mention that in the post. For the future, if you wet the newspaper as you go, it stays in place. 🙂
micki @addhousewife says
AWESOME post! I just pinned it so I can read in more detail later. I am redoing the landscaping at our new house because the boxwoods are in front of the hydrangeas. It looks awful and the boxwoods take too much work. i need something really low maintenance 🙂 Our yard is awful looking right now and people are commenting o.o
Christy K. James says
I love the look of very low-growing, well trimmed box woods in front of bigger elements as a border of sorts. Maybe that’s how yours started? They can be a lot of work to maintain, though. Hopefully you’ll find my suggestions helpful:)
Rachel says
This is an amazing post. Being in a new home for the first time, I’ve got a few landscaping elements I want to bring to our yard (our backyard specifically) but I just don’t have any idea where to start! Ha. It’s so overwhelming. Tips and suggestions like this are so perfect to read through.
Christy K. James says
Thanks, Rachel! I was quite overwhelmed at first since we did our entire landscape front and back one after the other. I thought if I could share what I learned along the way, I could take the fear out of it for others. Good luck on your landscape 🙂
Cindy says
This is a fantastic tutorial! Thanks for sharing your knowledge.
Christy K. James says
My pleasure, Cindy! Hope you find it helpful 🙂
Lauren @momhomeguide says
Great tutorial! How do you figure out how much topsoil and mulch you’ll need? Is it best to buy it in bulk from the garden store? (If so, I will need to have them deliver, since I don’t have a pickup truck!)
Christy K. James says
If you are buying a large amount, I would definitely recommend purchasing in bulk from your local nursery. It’s sold by the cubic yard. (If you’re a visual person, imagine a block of soil 3’x 3’x 3′) According to my nursery, one cubic yard covers 100 sq. feet 3″ deep. I used my drawing and counted the blocks on the graph paper that would need soil to figure out how much I needed. (That’s why it’s important to get your drawing as close to scale as possible…one sq. foot=one block) I hope this helps! I’d be glad to answer any other questions 🙂
Jo @ Let's Face the Music says
This is great information and so detailed. I’ll be referring back regularly. Jo @ Let’s Face the Music
Christy K. James says
Awesome, glad you found it helpful:)
Lauren @momhomeguide says
Hi! Thanks for the info on calculating how much soil to get. It really helps! I may be ordering some in a week or two!
Christy K. James says
Great! You’re welcome…good luck:)
Monsterscirus says
Wow, wonderful with such check list! I always feel guilty when looking at our garden, now I know how to plan, organize and get buy. Thank you for the tips, this one is bookmarked 🙂 have a happy day
Christy K. James says
You are so welcome, thank you 🙂
Dee says
Great tips and so informational!!! I hope you will share at The CSI Project this week! You can link up until tomorrow. The challenge is Gardens and Flowers. Any flowers that you made or planted. These are perfect. Come on over!!!
http://www.thecsiproject.com
Christy K. James says
Thanks, Dee! I just linked up 🙂
Miss Kitty says
Wow! this is a really great tutorial on how to make a yard look pretty. Thanks so very much for sharing your tips with us. Congratulations on winning the CSI Project for the week…you deserve it.
Christy K. James says
Thanks so much, Miss Kitty!
Cindy @ Applestone Cottage says
Such a great tutorial! thank-you so much, I really enjoyed it and your tips are amazing and so helpful too.
Cindy
Christy K. James says
Thanks Cindy! Hope you find it helpful 🙂
Sharetha @ Perfectly Imperphect says
Hey Christy! I just came across your blog today and I am ecstatic! Your work is awesome. 🙂 I am in the process of landscaping my back yard (by myself for the most part, but I’m pretty new to gardening, so bear with me) and have a few questions. 🙂
First, did you use any type of border/edging after you created your flower beds to keep the grass away in the future or is that not necessary since they are raised? Second, I love the way your mulch looks. I have previously been addicted to red (dyed) pine bark and have that all over my landscaping. I’ve heard that maybe it’s not so good for the garden because of the dye. What are your thoughts on it?
Thanks for your help!
Sharetha
Christy K. James says
Hi Sharetha! In the back we used that black plastic edging that you sink down to ground level (so all you can barely see is something that resembles a black hose?) but in the front we didn’t use anything and we don’t seem to have any issues with grass growing into either. It could be because they are raised. I will say that my neighbor in the font has really weedy grass and sometimes I have to pull stray crab grass out from that side. As for the mulch, it is dyed also. It’s called “dyed chestnut” and we purchased it at our local nursery. I planted everything from scratch last year and the dyed mulch has had zero effect on my plants’ health! I did try not to take it all the way up to the stems though which may be why I haven’t had any issues! I hope this helps! Good luck with Your project, I’d be happy to answer any other questions 🙂
Sharetha @ Perfectly Imperphect says
Thanks so much for your response! That helps a lot!
Christy K. James says
Anytime 🙂
Jackie says
Great suggestions here! Two thoughts:
1. After you spend the afternoon measuring and graphing your property, make copies! Then you’ll have a clean slate for each potential design and you’ll be able to compare each.
2. Underground Utilities: Call your utility company(s) to come out and mark where your utility lines run. It’s usually free. It is important to consider where these lines run BEFORE you dig! When planning your gardens, keep in mind having your yard dug up to repair a busted line is very expensive especially when you’ve created stone pathways, water features, or a pergola.
Jackie in Jackson, TN
Christy K. James says
Great points, Jackie! I’ll add those to the post. I didn’t think to add about calling utilities because for our project, all of our plants were planted in new soil since we built our beds up quite a bit. Others may not though, so I’ll include a reminder 🙂
Suzan says
What an AMAZING post and tutorial – can’t imagine the time that went into it – but thanks so much for sharing – your landscaping looks completely professional – just gorgeous!
Hopping over from Glitter Glue and Paint
XOXO
Christy K. James says
Thanks, Suzan! It was a ton of work, but I learned so much, I just had to share! Thanks for visiting 🙂
Denyse @ Glitter, Glue & Paint says
Great post, Christy! I love the way you planned it all out and made it so easy to do. Thanks for sharing at Throwback Thursday. I will be featuring it this week.
xoxo
Denyse
Christy K. James says
Thanks so much, Denyse! XO
stephanie @ Simply Swider says
Great tips Christy! I’m still struggling with all my garden plans for the new house. Guess I should bust out the paper too. Where do you get your topsoil and mulch locally? We have a supplier in Chesapeake, but I was hoping to find one closer in Virginia Beach.
Christy K. James says
Thanks, Stephanie! I bought all of my topsoil and mulch at London bridge Nursery. It’s on London Bridge Blvd near Va Beach Blvd. You can pick it up or have it delivered for a fee. You can also purchase a discount card, I think it’s $25. It will give you a discount on all your purchases for the season. Worth it if you plan on spending several hundred dollars.
Jenny says
This is an EXCELLENT post, with wonderfully clear and helpful information – Thank you!!!
Christy K. James says
Thanks, Jenny! Glad you found it helpful!
Laura says
I also found this tutorial via Pinterest and am so glad I did! The way you broke down the steps makes overhauling my yard seem do-able. I live in colorado & any landscape is dependent on a good watering system. I am wondering if you had to revamp your sprinkler system? If so, how did you do it?
Christy K. James says
Thanks, Laura. I love your positive feedback! I didn’t have a sprinkler system prior to this project, and it wasn’t in the budget. So unfortunately I can’t offer any advice there. This is how I water my gardens: https://www.confessionsofaserialdiyer.com/the-easiest-way-to-water-your-garden/ I roll them up during the winter and replace them in the Spring. Good luck with your new landscape. 🙂
Kristianne says
I have been looking for a good tutorial like this (since we have an unfinished yard). THANK YOU!! It’s beautiful!
Christy K. James says
Thank you, Kristianne and you are so welcome! I know this would have been helpful to me when I was at the planning stage! Good luck and have fun!
Denise says
This is a great post! I acquired a house with a lot of great plants already such as hostas, ferns and daffodils… I’m wondering.. Once I lay down the newspaper and topsoil will they be able to break through that and come up? I think it’s a fabulous idea to prevent weeds and make everything look nice but I want to make sure the plants I do already have will come up! Thank you!
Christy K. James says
Sounds like you got lucky by inheriting some pretty things for your landscape! I would wait until whatever it is that is coming up is poking through and then cut a hole for it in the paper. I have had a couple of things come through the paper, but because you are adding nine layers, there is good chance some may not. Something else to consider, if you are adding topsoil to raise the beds like I did, those plants and flowers will be even lower in your garden now, so you may want to consider digging up the plants/bulbs you want to keep and replanting them after you raised the beds with soil. I replanted many of mine and they all thrived. Hope this helps! I worked in my garden beds all day today. It felt great to get out there after such a long cold winter! XO
Amy@Europe's Calling says
Wow! This is the best gardening post I’ve seen yet. I started following you on pinterest. Feel free to follow me too:)
Christy K. James says
Thanks, Amy! Following you back! 🙂
Jenny says
Thank you SO MUCH for this tutorial!! You handle the planning of an exterior space just like I would an interior space. For whatever reason, I’ve never thought of doing it that way. I also like how you recommend going to the various local garden stores to see what’s available & then moving forward from there. Really, just an all around great post!! Thank you!!!
Now, I need to do some measuring and “exterior” space planning!! 🙂
Christy K. James says
You are so welcome! I have a lot of requests for a list of what I used, but as you said, it is so much easier to see what is available in your area rather than chase down what you see online. Good luck on your outdoor space!
K Nelson says
I keep coming back to your wonderful tutorial and showing my husband so he can understand what I want to do! Your tutorial is the best one I’ve seen, especially since it is exactly what I want to do. I keep trying to shortcut the process but I see that I really will have to draw things out to scale to get it all to look right, as you have said. I know It will be worth it, I just need to develop more patience. =)
I don’t know if I missed this somewhere but how long did each section take to do and did you do the whole front yard at once or over several months?
Also, I visualize the “wells” around each of the plants, that you mention to keep the mulch away, but my imagine might not have it right. Do you have any photos? Is the base of the plants raised and then the well is like a moat or is the plant in the bottom of the well? Do you put mulch in the moat (if it’s a moat) or if a full well, keep it out of that area altogether?
Thanks a bunch!!! It’s almost warm enough in my part of Indiana to get going. Happy gardening to you.
Christy K. James says
I’m so glad you enjoyed this post and I certainly appreciate the positive feedback! It took us about six months total to do all of our outdoor spaces. The base of the plant is level with the soil and I create a moat of sorts out of the mulch to hold in water and so that the mulch is not right next to the base of the plant. Good luck with your landscape. Don’t rush the process. Start with your drawing and then visit your garden centers and nurseries and see what is available to you. You will be able to put a plan in place easier that way. 🙂
K Nelson says
Thanks a bunch, Christy for your response! Very helpful and inspiring. =)
Christy K. James says
You are so welcome! Good luck! 🙂
Becca says
Love this post … fabulous tips … thank you! Your yard is gorgeous and very inspiring! My apologies if I missed it, BUT, when you turned your sod/grass over in the beginning of the process, did you just keep it there, laying the newspaper on top, etc., or did you bag it up and haul it away? We’re getting ready to do mulch beds on the side of our new home and just not sure whether to bag up the existing sod or flip it over and put the newspaper (or bed liner) on top of it and go from there. Thank you so much
Christy K. James says
Thanks, Becca! We covered right over it with the newspaper. The grass will break down under there along with the newspaper and become valuable nutrients for your soil. I didn’t use bedliner in any of my beds either. The newspaper kills just about everything under it, and if you mulch, the weeds are very few and easy to manage. Good luck with your new landscape! 🙂
jasa desain interior murah says
Thanks a bunch for sharing this with all folks you
really understand what you’re talking about! Bookmarked.
Please additionally talk over with my web site
=). We can have a hyperlink trade arrangement between us
Shoba Krishnamurthy says
Hi,
I am a first time home buyer and incidentally this is a new home. So I literally have a clean slate to start. My problem is we live in a corner home that has a half stone-half iron railing that overlooks a very moderately used road that ends in a green belt. I am overwhelmed when I see my options and I have no clue where to start. I want privacy and a garden feel, i want it to feel like I want to be there all the time. I dont know If i can affotd a landscaper as they are all super pricey. I live in a 8a zone looks like. Yet, I loved your post for all its detailing and pointers. Thanks much. Let me know if you have any suggestions. I live in North Dallas!
Christy K. James says
Hi Shoba! I would start by drawing an outline of your space on graph paper, then visit your local nurseries and see what’s available. Hopefully you will be inspired by something you see!
Anita Arnold says
Wow! What a great article for people like me who don’t know where to begin. You addressed many of my hidden concerns that I hadn’t thought through yet. Thank you soooooo much for sharing your process. I sincerely appreciate it! I’ve already sent the article to my husband so we can start working on our midwest dream yard!
Christy K. James says
So glad you found it helpful, Anita!
Mark from Gardening Services London says
Hey. This is the first time I see someone to use newspapers as a protective layer from weeds. Does it really stop the weeds? I’ve seen people using nylon, but I think some weeds still manage to grow through it. Japanese knotweed and hogweed are pretty stubborn and grow through concrete and other hard materials. Not sure if a newspaper would stop them. 🙂
Christy K. James says
The newspaper is 9 layers thick and it was used mostly to kill anything that was already in the flower beds previously, rather than having to remove it all. It worked fabulously!
landscape architect chicago says
Great tips and so information .. Very informative and easy to understand.. Thanks for sharing this. Having a beautiful landscape is everyone’s dream. It also needs money and effort in order to achieve a landscape that will create a welcoming feel to your home.
Alisha Hyde says
I love it all! I love all the varieties of textures and colors! I’m wondering if you have a list of the plants you used? I am starting from scratch at my new home and would like to use more variety this time around. Thanks!
Christy says
Thanks, Alisha! I did not create a list of what I used and that was partly on purpose. Everything I have may not thrive or even be available in your area. The best way to choose your plantings is to visit your nursery and see what is available to you, take photos of what you like including the info cards attached, and go home and look them up to see if they’re a good fit for your space. That way you won’t be on a wild goose chase looking for something that may not be available to you. That said, if you are interested in knowing the names of anything in particular that I have, I’d be glad to pass that info on. 🙂