Hey there awesome Friends!! Today is a fun day because on the fourth Thursday of each month, not only do I share a furniture makeover, so do my Furniture Fixer Upper Friends! Be sure to look for the links to their makeovers at the bottom.
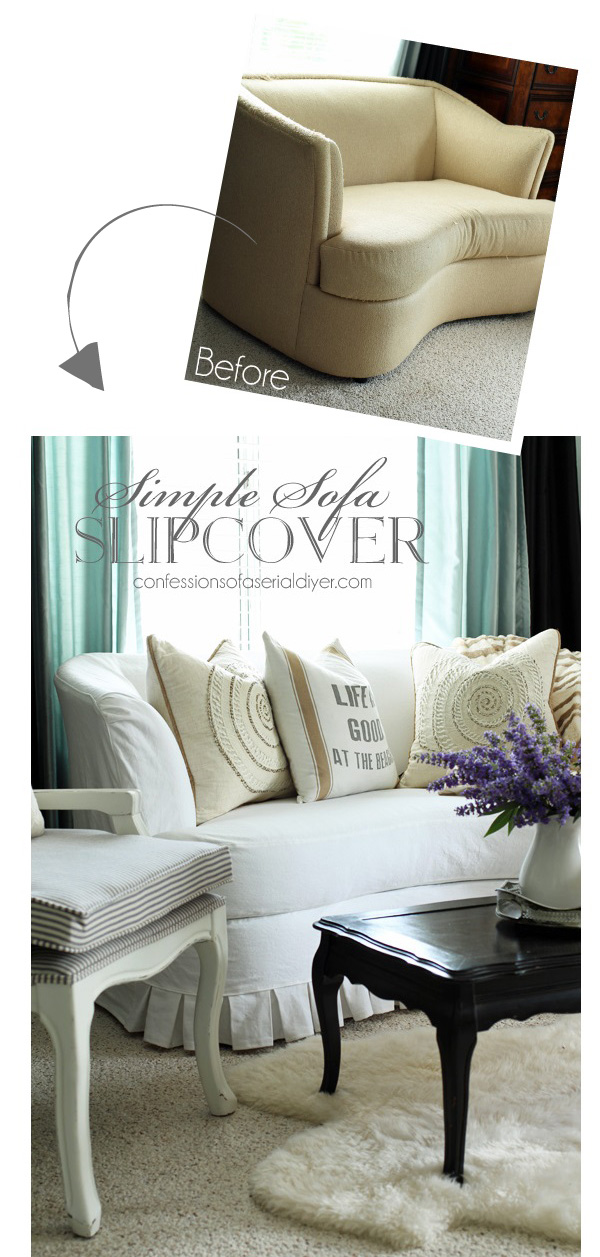
My project for today is this yellow sofa my Mother-in-law passed on to my husband before we were married:
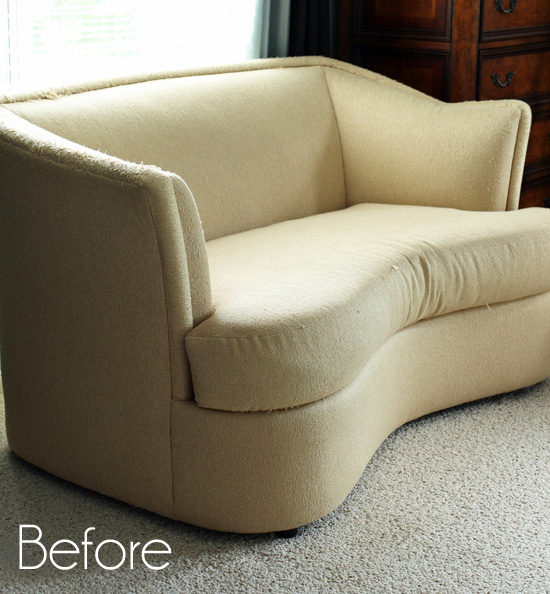
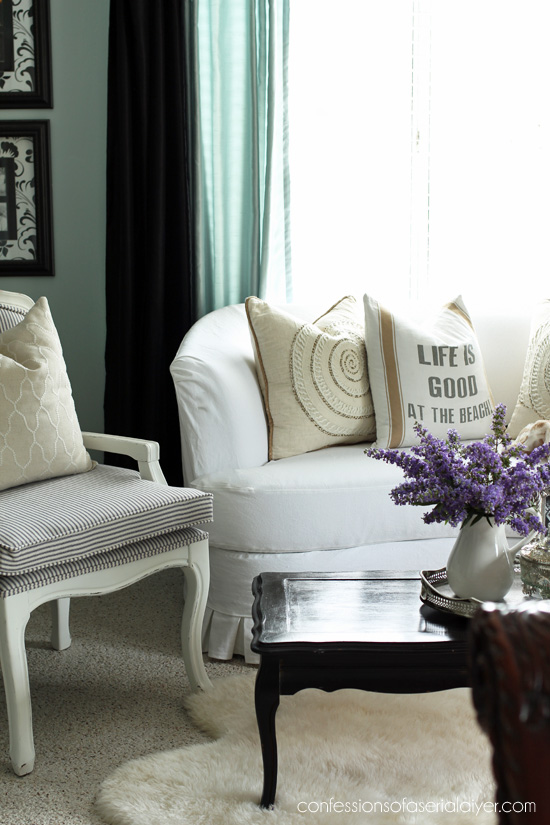
It is not really my style, but my MIL does not buy cheap furniture and let me tell you, this sofa is the most comfortable spot to sit in our in entire house! Plus it is the perfect size for our master bedroom, so I knew I wanted to be able to keep it somehow AND make it go with my style.
Slipcover to the rescue!
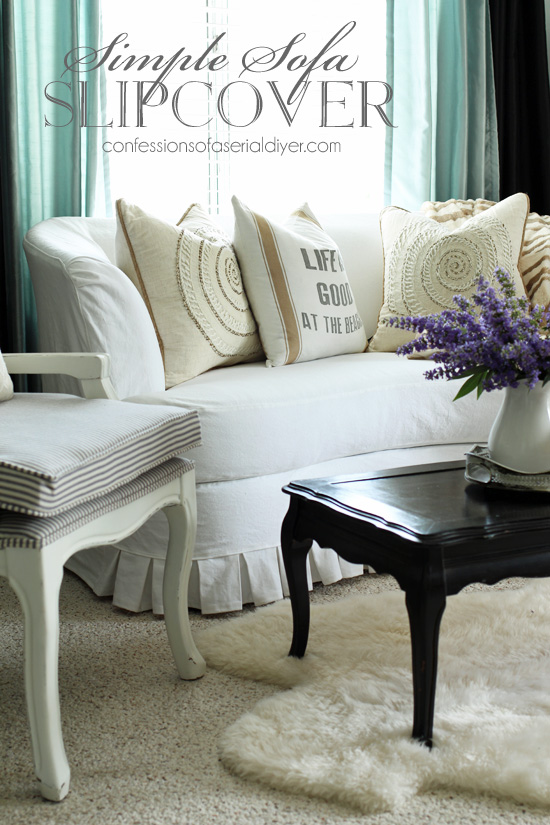
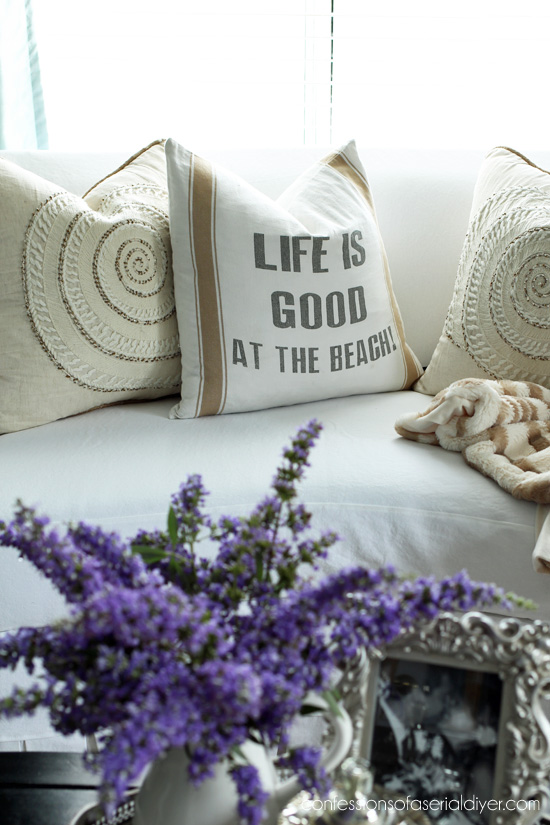
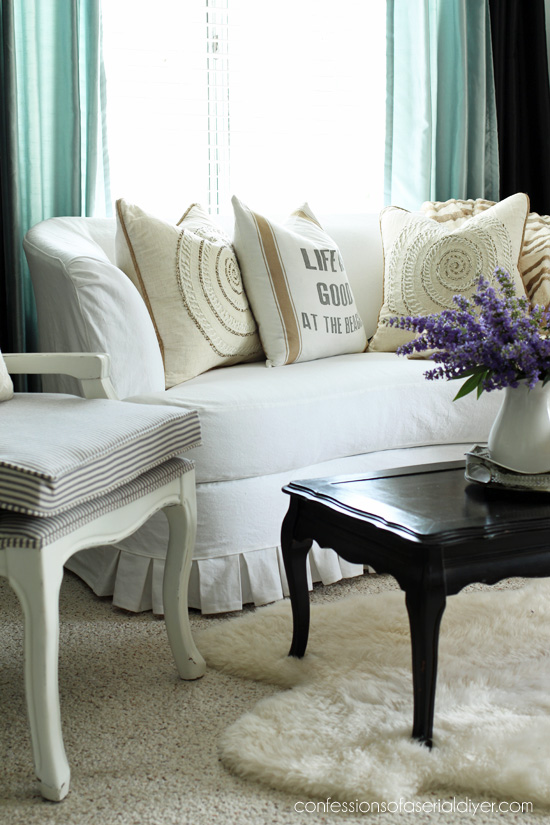
I love the look of this sweet sofa now!
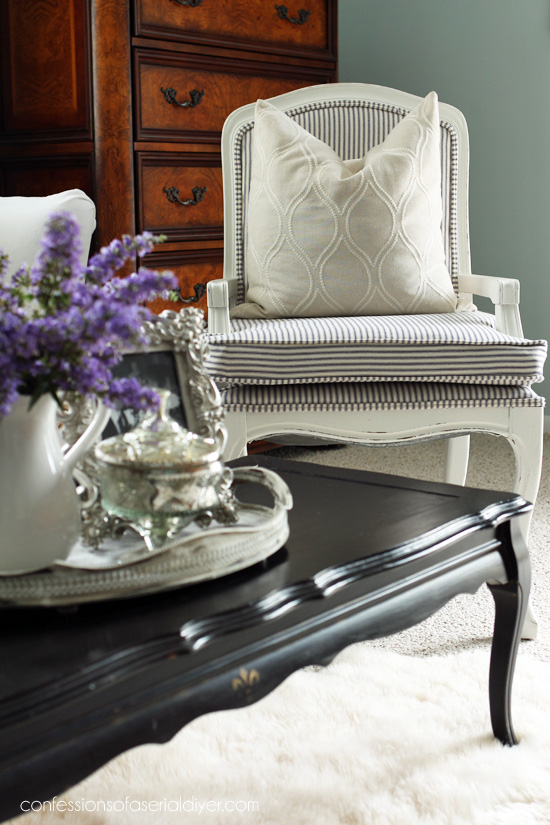
It pairs perfectly with my striped ticking chairs I upholstered not too long ago…
This still qualifies as a furniture makeover, right?
I use the term “simple slipcover” loosely as I know not everyone would consider this a simple project. However, it has no piping and comparing it to the sectional slipcover I tackled a couple of years ago (NOT simple), it was much easier!
I put together a quick rundown to show how this slipcover came together.
I started by washing my fabric on the same settings I would be washing my new slipcover in the future. I used 10 yards of White Bull Denim I purchased from JoAnn Fabrics.
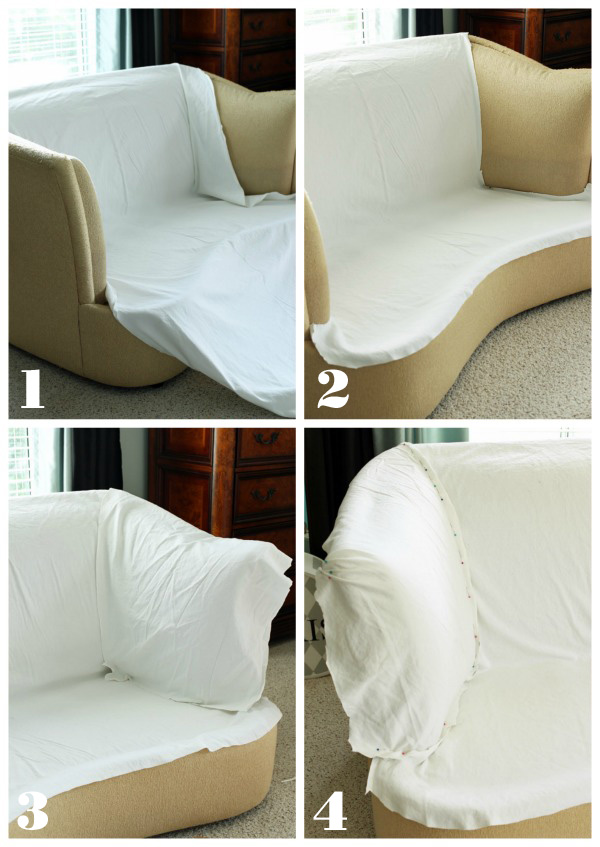
- First I draped my fabric right-side-down across the back and down the front.
- Making that first cut is super daunting, but just be sure to give yourself a couple of inches extra all along the area you want to cover. You can trim the excess later. I followed the existing seam lines.
- The next cuts I made were the inside panels of the sides.
- Then I pinned the inside seams.
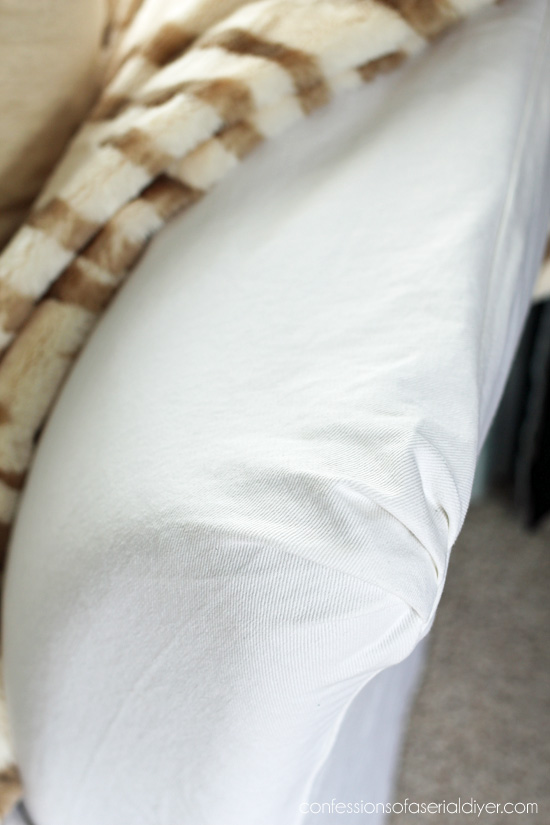
- I also pinned the edges of the arms where the fabric gathers.
- Then I sewed the seams I had pinned.
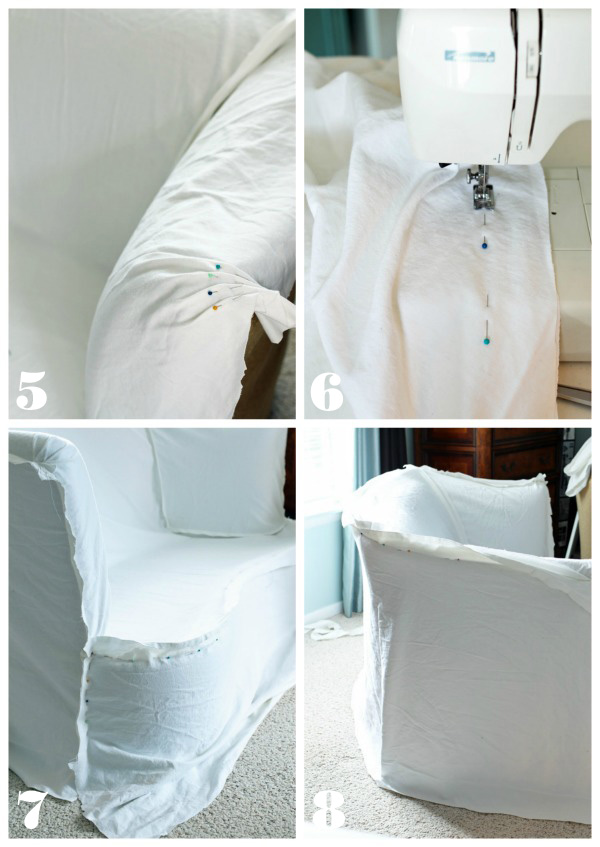
- I put the slipcover back on inside out and did a test-fit. It’s easy enough at this point to pick out any seams that aren’t quite right and fix them. I then pinned a piece across the bottom of the front.
- Then I added one long piece across the sides and back.
- I sewed the seams I had pinned. Then I trimmed across the front where I wanted to add a pleated ruffle trim. (I used a pencil and a ruler to mark where I wanted to cut the fabric first.)
- All cut and awkward looking.
- Next I made my pleated trim. For more detailed instructions on how I made it, visit this tutorial. After I had my pleats pinned, I sewed a quick stitch across the top to hold the pleats in place so I could remove the pins.
- Then I pinned the pleated trim detail in place (with the cover was right-side-out), and sewed it.
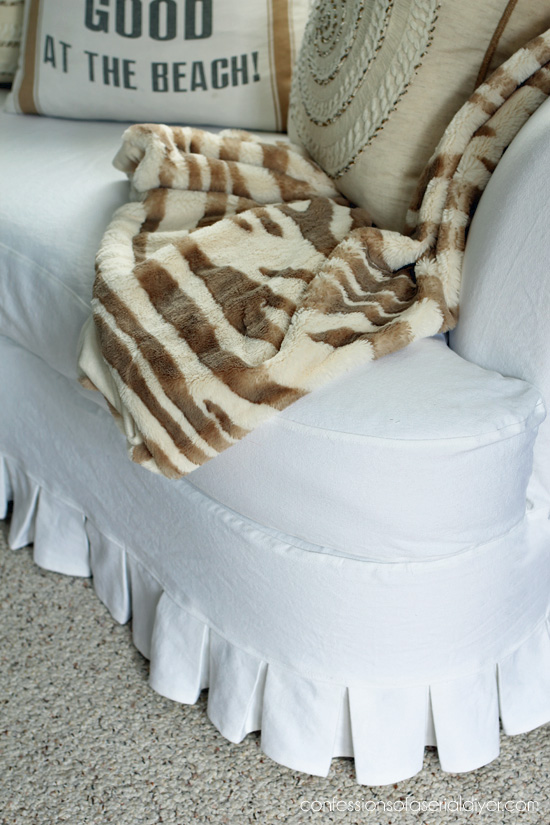
The last part of the base slipcover was to hem the sides and back, which I pinned in place while it was on the sofa.
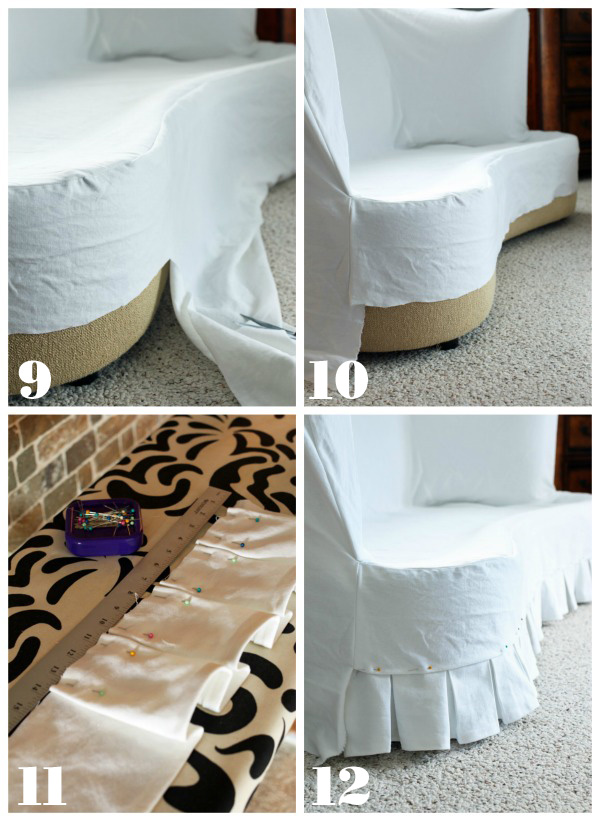
The final piece of the puzzle was the cushion cover. Since this was an odd shaped cushion, it wasn’t as easy as just measuring. I could have made a pattern from paper, but I decided to attach my fabric with pins to the cushion all the way around right where the original seam was. Then I cut 1/4″ larger all the way around. My fabric was doubled so I cut the top and bottom out at the same time.
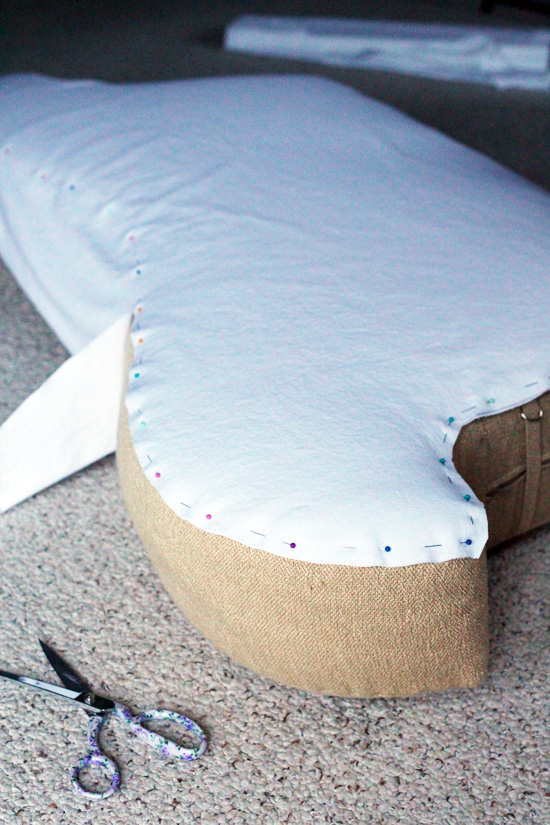
I measured for the pieces for the sides, cutting a separate piece for across the back where the zipper would go. That required two pieces so the zipper could be sandwiched in between.
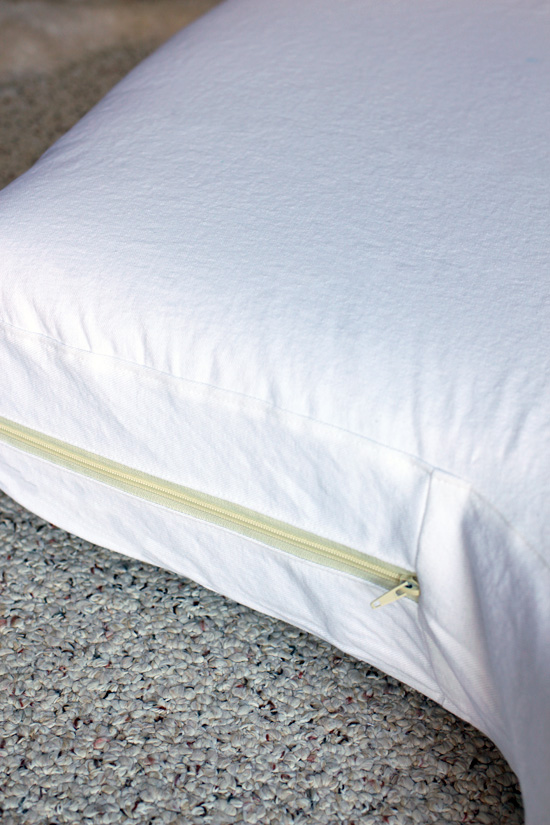
See my slipcover tutorial for more on covering cushions and adding piping and zippers HERE.
After your slipcover has been test fit and is good to go, trim all the excess fabric and run a zig-zag stitch along all the cut edges to prevent fraying in the wash. I also went back and sewed the seams flat along all of the edges, creating a double seam:
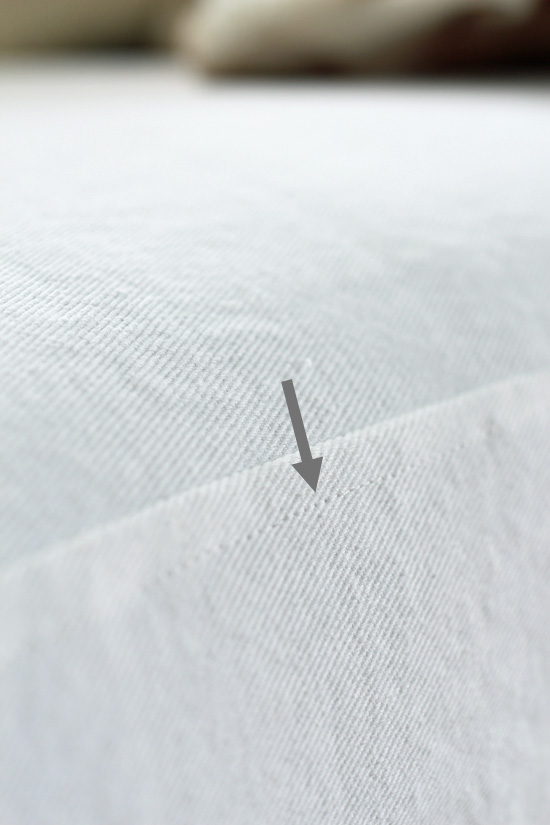
This makes all the seams lay nice and flat when you aren’t adding piping.
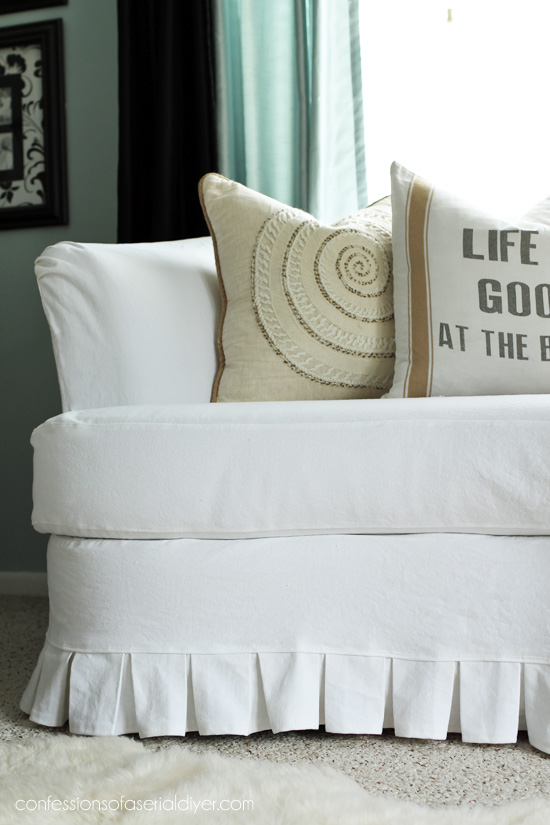
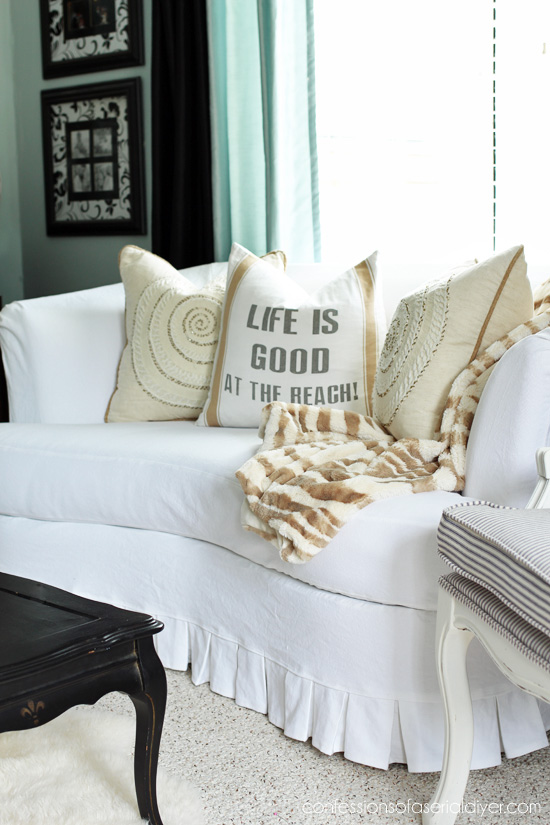
The pillows all came from HomeGoods.
Here’s a close up of how those gathered arms look:
If you have a more traditional styled rolled-arm, see my sectional slipcover tutorial for how to tackle those HERE.
The back is against a wall so I just let the fabric hang straight.
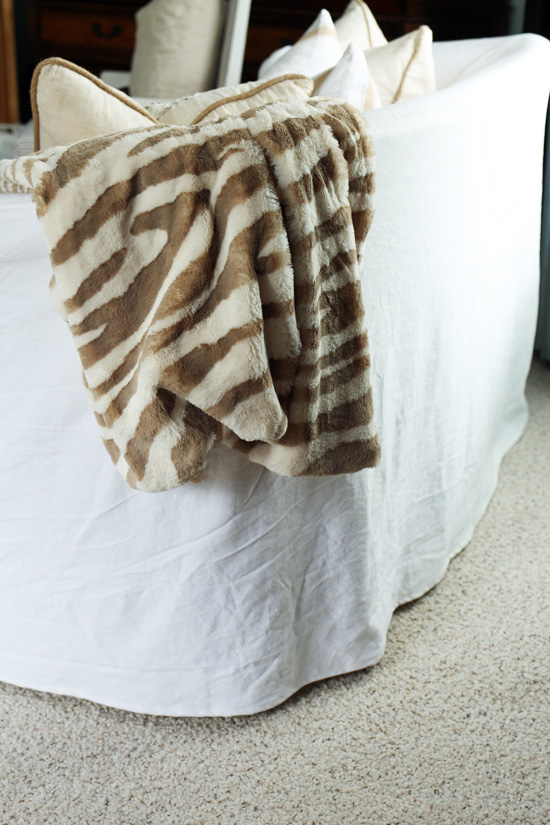
…probably should have ironed it. 😉
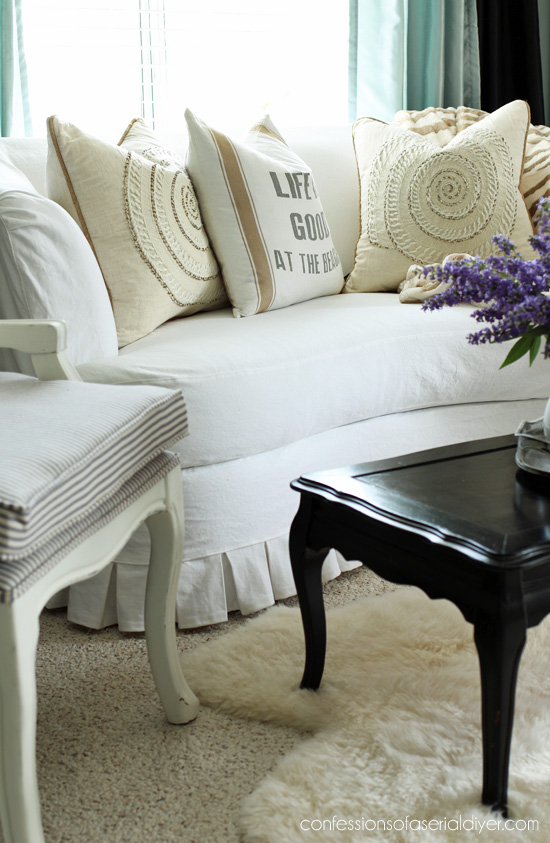
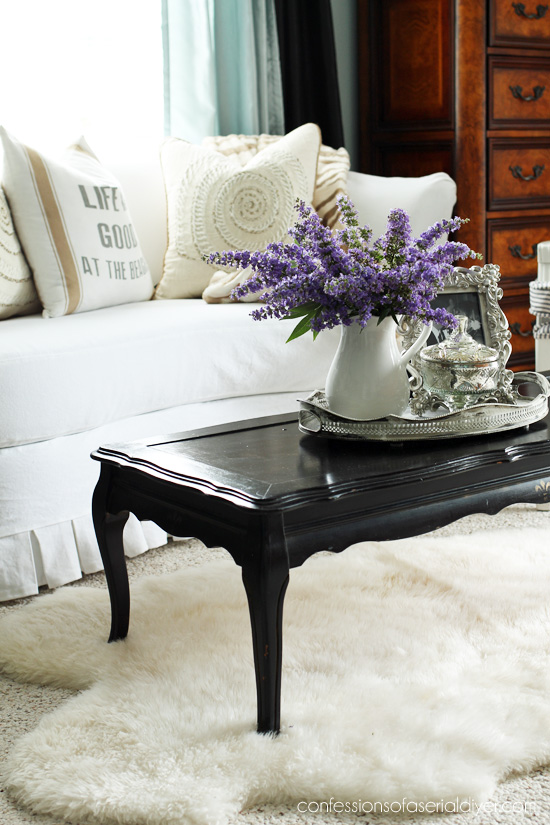
I just love how cute this little sofa is now!
See my detailed Sectional Slipcover Tutorial HERE.

Check out my Armless Accent Chair slipcover HERE.
My friends are sharing furniture makeovers too…check out the afters at the links below the image. (I think Marie and I missed the memo that there was a desk theme! 😉 )
Want more furniture makeover inspiration? Visit all my Furniture Fixer Upper makeovers HERE.
I’ll be back on Tuesday with an old favorite:
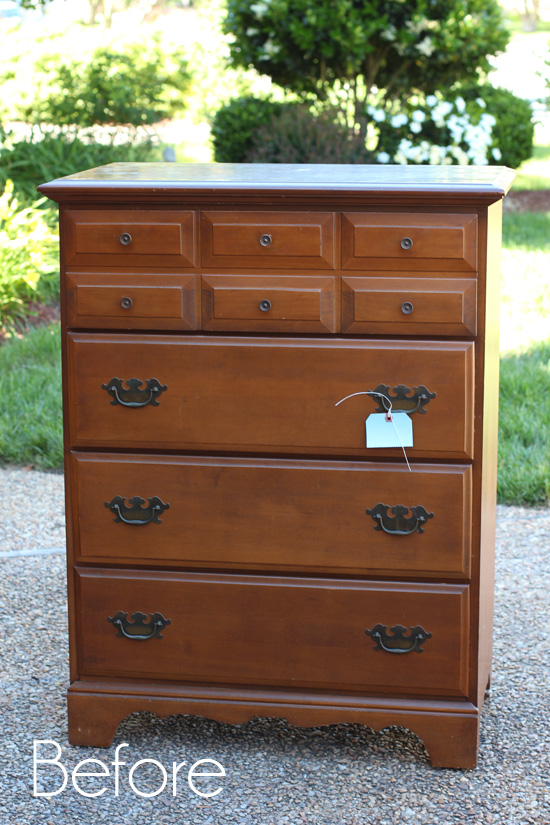
UPDATE: See how this dated dresser turned out HERE!
XOXO,
![]()
Don’t Miss a Thing!
If you like what you see, there are several ways to follow along!


Mary Kaiser says
WOW!! What a difference, it does fit your style now! I do believe next winter I am going to attempt a slip cover for my club chair and ottoman. You make it look so easy. I better get my sewing machine tuned up! Thanks for another great tutorial!!
Christy says
My pleasure, Mary! It’s amazing how they can totally transform the look of a piece of furniture! XOXO
Nancy @ Slightly Coastal says
It turned out so great! It’s amazing what a slipcover can do! I’ve been contemplating putting slips on two of our side chairs in the living room. I’ll be pinning this to help along the way.
Nancy
Christy says
Thanks, Nancy!! I have wanted to cover this sofa for the longest time, and I’m so glad it’s finished! Best of luck with yours. 🙂
Christina in FL says
Christy, you blow my mind with your mad skillz!!! Seriously, this is a gorgeous makeover. I love that you used a solid denim. The pillows are perfect. 🙂
Christy says
Aww thanks, Christina! You always say the nicest things, and I so appreciate it!! XOXO
Janice says
No doubt this is considered a furniture makeover. If it’s not, I don’t know what is. Love it. Is there nothing you can’t do? Love the shape of it and it looks right at home with your chairs. Love it.
Christy says
I’m so glad you like it, Janice! I’m not a big fan of cooking, but I’ll tackle just about any DIY project! 🙂 XO
Jody says
I am not a sewer at all. Two right arms so to speak. I will see if I can find someone who could do this. I love the pleats.
Christy says
Thanks, Jody! XO
Larissa ~ Prodigal Pieces says
What an absolutely GORGEOUS transformation, Christy. And, the tutorial is spot on. Bravo!!
Christy says
Thank you, Larissa! I’ve been wanting to tackle this for a while now…glad I finally did it! XOXO
Suzan says
What a great transformation! I wish I had the nerve to slipcover. I bought 10 yards of fabric at a really good price and just keep looking at it! I have a recliner that I love except that the fabric is just worn out in some places. I have a “Surefit” slipcover on it now and that is acceptable but I bought the fabric so I should use it, right? I keep pretending that it is because I am trying to decide whether to slipcover or upholster but the truth is that I am just too chicken to try either one!
Christy says
Thank you, Suzan! Getting started is very daunting, I agree, but once you start, it’s not so bad. 🙂
ColleenB.~ Tx. says
OMG. What a Beautiful Make-Over and what a difference it made. Sofa does look comfy and what a comfortable place to sit and read a book.
I must say; you are a Wonderful seamstress. I would have had no idea where to begin on making such a slipcover. Great job in your work. Simply amazed with the great talents you have. You for hire by any chance? :}
Christy says
Thank you, Colleen!! My Mom used to let me tinker on her machine when I was young. She would take me to the store to pick out a pattern then help me find all the materials for my project. I am so grateful for that now! Am I for hire? I’m now covering seats for my parents’ motorhome, and then I promised myself I would never take on anyone’s sewing project ever again…till the next time someone asks ha ha! And thank you for always cheering me on from the sidelines…it is so appreciated! XOXO
kandice says
This is so sweet now, I always admire your skill and patience for upholstery and sewing xoxo
Christy says
Thanks, Kandice! Hope you are having a blast!! XO
Amy says
This came out Gorgeous! It went from the ugly duckling to the beautiful swan and I am totally in love with this sofa!!! Beautiful! Beautiful! Beautiful!!!
Christy says
Thanks so much, Amy!! I am in love with it now too ha ha!
Barb says
You did a professional job on your reupholstering! Lovely. I also adore that chair with the ticking-stripe fabric! I could just move right into your home!
Christy says
Thank you, Barb! I appreciate that! XO
Dixie Lee says
Wow, quite a project and you did a great job. Did you ever consider painting/dying the sofa itself?
Christy says
Thanks, Dixie Lee! I haven’t ever tried painting or dying a fabric piece before. I like the slip-covered look for this piece, since the lines weren’t that pretty before, but I would love to try painting a really pretty chair! XO
Patty says
WOW Christy! You are so talented and inspiring!!! I appreciate your detailed instructions and great pictures as I will definitely refer to them for my own diy projects. Many thanks,
Patty
Christy says
Aww thanks so much, Patty! It is my pleasure sharing how I tackle projects, especially knowing that it inspires others! XOXO
Jen @ Girl in the Garage says
I’m so impressed, Christy! Beautifully done, and I love the addition of the pleated ruffle on the front. xo
Christy says
Aww thanks, Jen! Your desk blew me away! XOXO
Kimberly says
As always I am amazed at your talent. You make it look so easy! I consider myself a halfway decent sewist, but my one attempt at making a slipcover is still lying in pieces. Maybe after seeing you whip one out (yet again!) I will give it another go.
Christy says
Thank you so much, Kimberly! I still remember my first attempt at a slipcover, also after having several decent projects under my belt, and it was a disaster. I’ve learned since to follow the original seams. And you can always pick out the stitches and try again! Go for it and good luck! XOXO
Linda D. says
Wow! Beautiful beyond description…and far beyond my button sewing skills, unfortunately. I can bring dead plants back from the brink, cook a spectacular multi course dinner for a crowd, but my sewing machine just makes me shudder with dread. Yes, I have one – my Mom insisted on gifting me one when I married. It was like giving a Maserati to someone without a driver’s license. I even tried ‘practicing’ making a slipcover with Goodwill sheets. Nope. Wish you lived closer so I could ‘work a trade’ with you!
Christy says
Thank you, Linda!! I’d trade my sewing skills for your expertise in the kitchen any day…I am sadly lacking in that department! We all have our strengths…and limits ha ha! XOXO
Lori says
This is more than a makeover. It seems like it would be harder to do than redoing some wood furniture items. You are amazing! Seem like you can do everything!!
Christy says
Aww thank you, Lori! I’m not sure I can do everything, but I’m willing to try just about anything! 🙂
Marcie Lovett says
Christy, you are amazing! You’ve got to be daring to even think about tackling this kind of project. I have to laugh at it being “easy,” which it is to you, after your previous reupholstery jobs. But, I get it. Unfussy might be a more apt description. Still, all those curves and pieces! Simply wonderful to see it all come together.
I saw the most divine chair at Restore last week, but there was the fabric on the arm was torn and I couldn’t justify paying $40 for a chair that would cost hundreds of dollars to recover. I’ll have to contemplate trying this. Someday. ????
Christy says
Aww you’re the best, Marcie, thank you! I agree this may still seem not-so-simple, but don’t you almost feel like you could do it after seeing it broken down step by step? I agree $40 for a chair is steep when you still have to pay someone else to fix it. You could totally do this though! 🙂 Have a great weekend!! XOXO
Julie Briones says
This is crazy good in so many ways! It looks so country cottage now. I love it! Thanks for the tutorial on the sewing. The thing that scares me the most is putting in a zipper. Where did you learn to sew, Christy? Love the pillows, too. I was thinking to myself, “Wonder where she got those pillows?” and then you answered me. Love when that happens. 😉
Christy says
Aww thanks, Julie! The zipper is SO not hard at all. I share how easy it really is in that sectional cover tutorial. You just cut two strips of fabric and sew them to either side of the zipper. You would start with that, then add the rest around that part. I started tinkering with my Mom’s machine when I was around 12. My Mom would take me to the fabric store and let me pick out a pattern and help me find the materials I needed. Bermuda shorts were all the rage in the 80’s and those are one of the first projects I tackled lol. They were turquoise with huge pockets on the front. I never stopped after that. 🙂 XOXO
Lesle says
Wow! Well done. I love the size and the lines of the sofa, and I love it even more with your slipcover. I would definitely call it a makeover.
Christy says
Thanks so much, Lesle! I loved the curves of this sofa too! XO
Marie|The Interior Frugalista says
Gosh Christy, you make it look so easy! While reading the tutorial I kept telling myself that I could do this…and then fear set in. One day I’m going to muster the courage to “study” your tutorials (I’ve pinned all of them for reference) and FINALLY sew a slipcover for an armchair that’s been waiting in the queue for years. What a difference your slipcover made to this lovely curvy sofa – beautiful!
Christy says
Girl, you could totally do this!! I know it does seem daunting, but you just have to take it step-by-step! XOXO
Darlene Frankiw says
Wow I am so impressed with your slipcovers. I have a couch and loveseat I’d love to do but DO NOT have the nerve/confidence to attempt that one.
Good for you ! I really appreciate all your encouraging posts. Thank you for sharing with all of us.
Christy says
Thank you, Darlene! There was a time when I never thought I could tackle a slipcover, but I started with simple armless accent chairs, and they turned out really nicely. Then I did an ottoman, then thought why not try my sectional? I hated the color of it and making a slipcover was way cheaper than replacing it! Thank goodness it worked out! I appreciate you following along with me and it is absolutely my pleasure to share as much as I can here! XOXO
Debbie says
WOW!!! You are very talented and inspiring! You make that look so easy to do. I want to try it on something but a little terrified I will just end up wasting material. I will need to find a small piece of furniture to play with so there won’t be so much wastage if I fail miserably. :p Great tutorial!
Christy says
Thank you, Debbie, I appreciate that! Seeing it broken down makes it seem more do-able right? If you have basic sewing skills you can totally do this! XOXO
Joan says
Thank you for the EXCELLANT tutorial! So helpful for covering a more unusual shape piece like this. It turned out beautifully and the ruffles totally changed the look of the piece.
Christy says
You are so welcome, Joan, thank you! XO
Chris Augello says
Looks great! A laborious task, but worth it.
Christy says
Thanks, Chris! I put this off for so long, but this one wasn’t too bad actually! SO glad it’s done though. 🙂
Polly @ Convert says
Personally I think the sofa actually looks comfier and more inviting with the slip cover than without! It gives it an elegant look and feel you wouldn’t otherwise see.
Christy says
I agree, Polly! It is very comfy now, thank you! XO
Debbie in TX says
You are so talented and continue to blow me away every time I see one of your latest projects. This is simply elegant and worth all the time and effort you put into it. Super job!
Christy says
Aww thank you so much, Debbie, for those very kind words! XOXO
Becky says
Beautiful job! You have a gift, definitely. : ) The little pleats make this.
Christy says
Thank you so much, Becky! The pleats are a fun touch, huh? Have a great weekend! XOXO
Lois Keffer says
Christy, I’m amazed at the things you take on. The slight curve in this lovely sofa added an extra challenge, but your results are astounding. Thank you for your never-ending inspiration. I would love to know…do you ever have a piece you have to set aside and tackle later? We LOVE your dining room set and started to give ours a similar treatment in January. The first coat of stain/varnish was a bad one—turned our table orange. We tried a dark Behr paint but have not been able to get the smooth top we wish. Fortunately the chairs and table base are beautifully chalk painted white like yours. We decided to stash the table in the garage and give it another go when we get a second wind. Has this ever happened to you? Any other ideas for getting a great finish on our table top? The wood is a very hard, tough pecan. Love you to pieces!
Christy says
Oh wow, Lois, you are the sweetest ever, thank you!! I’ll try just about anything ha ha. And yes, I do happen to have a piece in my garage at the moment that was a big fail and it will take some work to undo what I’ve done, so there it sits! The blog is great for helping me push through though and fix most things right then and there though because I need post about them. As for your table, are you able to sand it smooth? You could just paint and poly instead of stain if the table is having a hard time taking the stain? Like I share here: https://www.confessionsofaserialdiyer.com/how-to-paint-a-laminate-kitchen-table/ I painted that table blue, but you could do a very dark brown/black maybe? I would have to see it to make any other suggestions. Thanks again for being so sweet!! XOXO
At Rivercrest Cottage says
Love the slipcover, especially the bottom edge. Of course I’ve pinned this for when I finally get my sewing machine out of the box it came in last year!
Christy says
Ha ha you are funny, thank you! Take that thang out already lol! XOXO
Sarah says
Brilliant!! You make it look so easy 🙂
Christy says
Aww thanks so much, Sarah! XO
Terri Hughes says
Great job, the sofa cover turned out beautiful.
Christy says
Thank you, Terri! XO
Addie says
GET OUT OF TOWN!!!!!! That is amazing!!! Kinda like a giant toaster cover!!! (which I drool over every time I see it). Love the pleats on the bottom…A+++++
God bless,
Addie 😉
Christy says
Ha ha yep gotta love the pleats! Thanks, Addie…have a fantastic weekend! XOXO
Anna @ Manchester Loft Conversion says
I don’t know how you keep coming out with such cool posts! Can I ask, how many tries did it take you to complete this the first time? I’m nervous to try!
Christy says
Thanks, Anna! This was the first try…you can do it!
Cecilia says
That is so cute! It went from blah to amazing. Love, love the ruffle detail! Perfect.
Christy says
Thanks, Cecilia! I was so happy to be able to keep it and make it pretty too! 🙂 XO
Nancy @ Artsy Chicks Rule says
That is awesome Christy! I am always so in awe of your sewing skills! xoxo
Christy says
Aww thanks, Girl! I knew I wanted to be able to keep this comfy piece and now it fits right in! XOXO
Bobbie says
b Such patience and love you show to us all, who are “scaredy” to get started on transforming something from so-so into a thing of beauty! Thank you for proving to us that “A journey of a thousand miles begins with the first step”!
Christy says
Thank you, Bobbie! I think it really does help to see a project broken down step-by-step. And that quote is true for so many things in life! 😀
Denise says
I love this tutorial Christy! You’ve broken it down step by step and made it look so easy. Sewing intimidates me but it makes me want to give it a try! Absolutely gorgeous makeover!
Christy says
Thank you so much, Denise! There are so many things you can make if you can just sew a straight line! 😀
Nanette says
That is amazing Christy! I wish I was as good of a sewer as you are. What kind of sewing machine do you have? Thanks!
Christy says
Thank you, Nanette! You are so sweet! At least you do sew, some are too afraid to give it a go. I have an inexpensive Kenmore that is about 20 years old and still humming. 🙂
Vicky says
Is there nothing you can’t do? I’m so impressed with how straightforward this is I’m going to give it a go on my tired looking, but still comfortable sofa. Well done and thanks for the inspo!
Christy says
Aww thanks, Vicky! Yes, give it a go! I figured my sofa would look better than it did no matter how the slipcover turned out lol! XO