Hello, dear friends and welcome back! Today, I’m sharing a super simple way to get the perfect distressed finish without a ton of sanding!
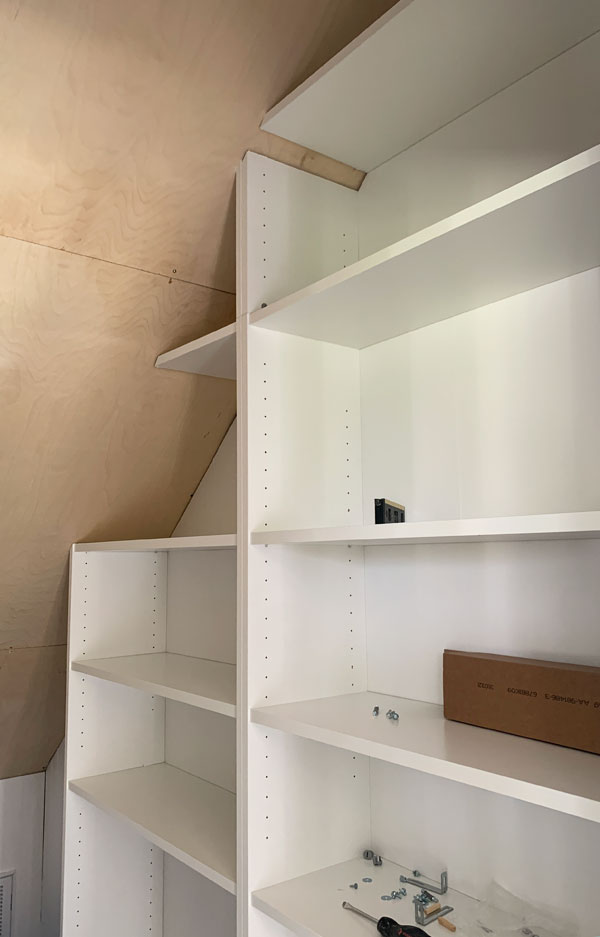
I was planning to share a few baskets I’m working on from my current haul, but I have been in pantry mode ever since our shelves we ordered from IKEA arrived on Thursday (picture me crazy, happy dancing!!), and I just didn’t want to stop to photograph the baskets, so they are coming soon, I promise!
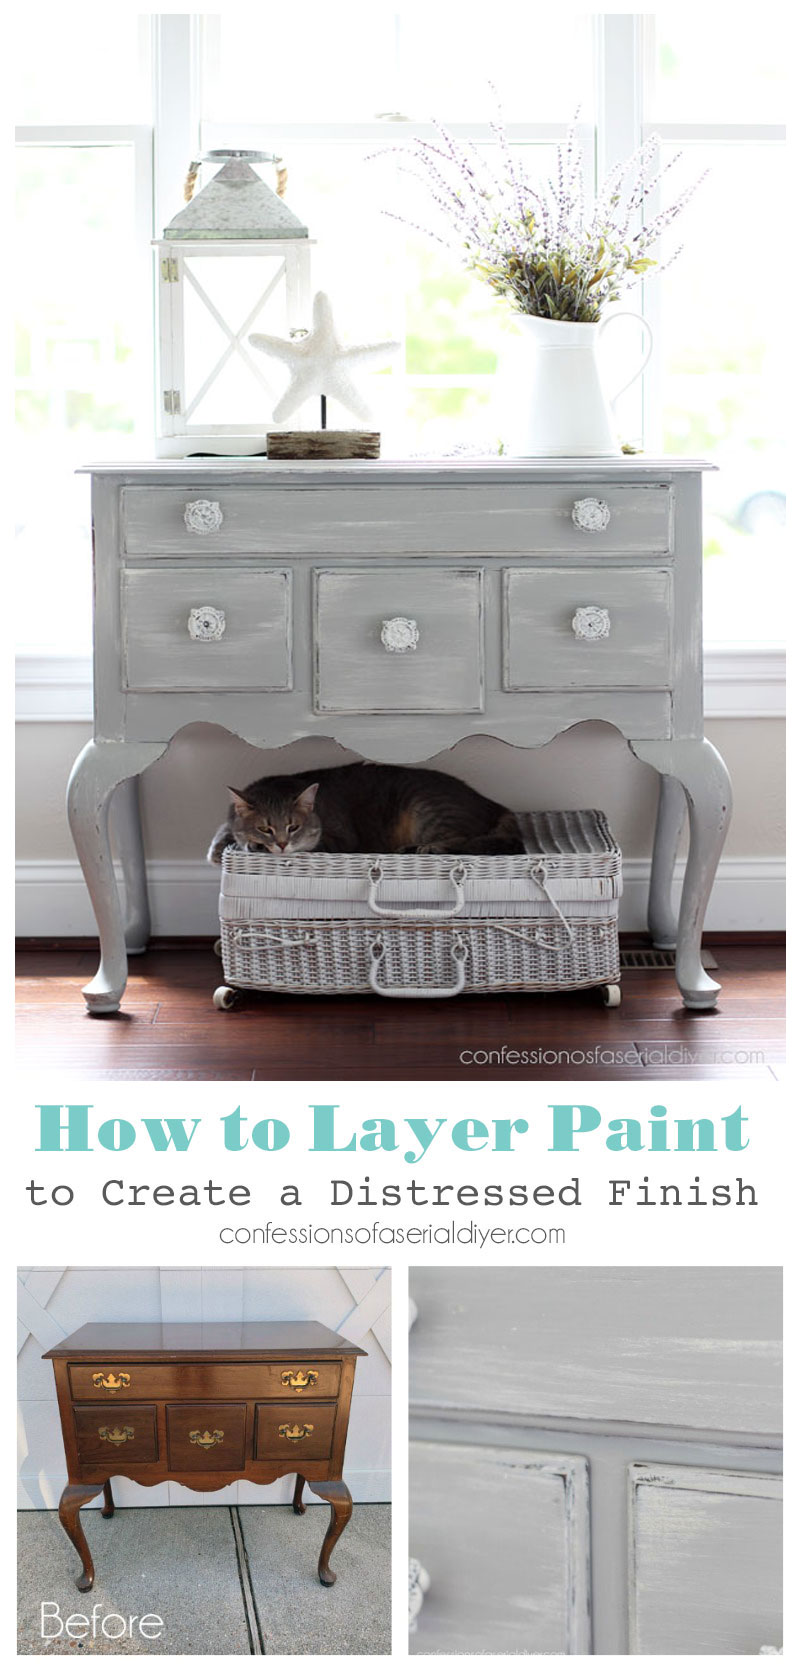
I thought I’d pull out this lowboy makeover I shared last year since the distressed finish is so easy to do that it really deserves another share!
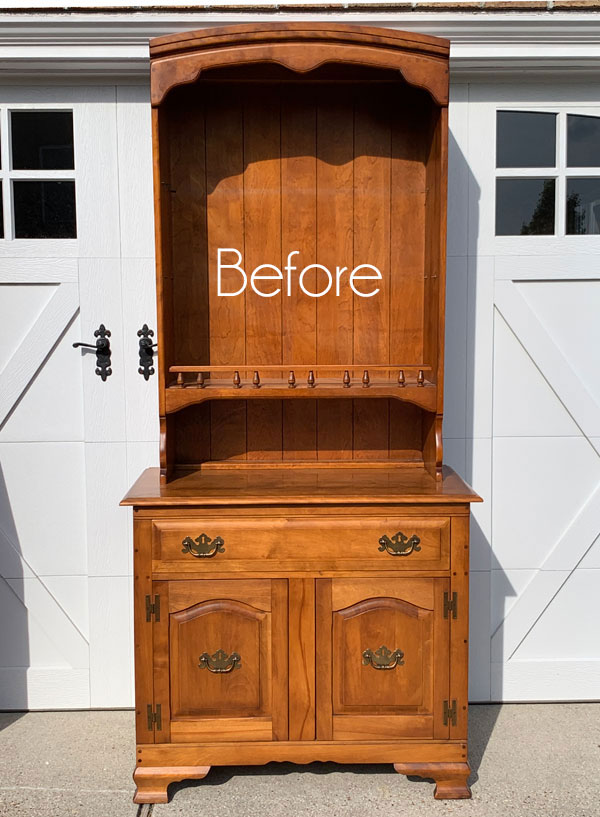
This is a piece that one of my besties gave me:
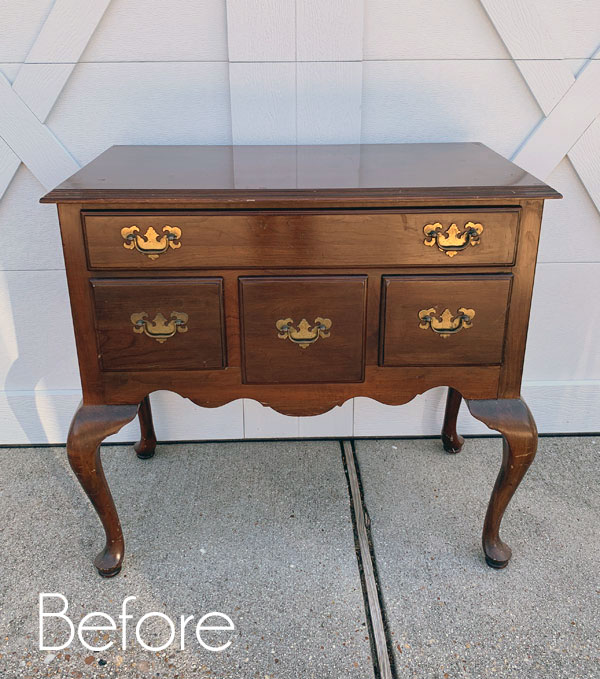
She brought this over when she dropped off this cabinet she wanted me to paint for her. It’s Ethan Allen and in great shape aside from a couple of small blemishes on the top.
After painting this frame that I shared in one of my Painting the Smalls posts:

I had a request to show more about how I got that distressed look, and this lowboy was the perfect candidate for this easy distressed finish! I’ve included a few affiliate links so you can find the products I love.
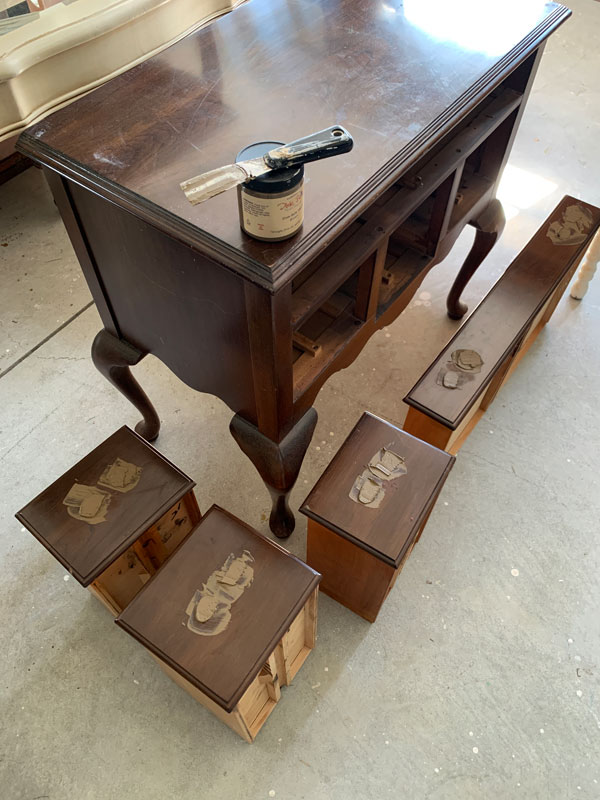
The Prep
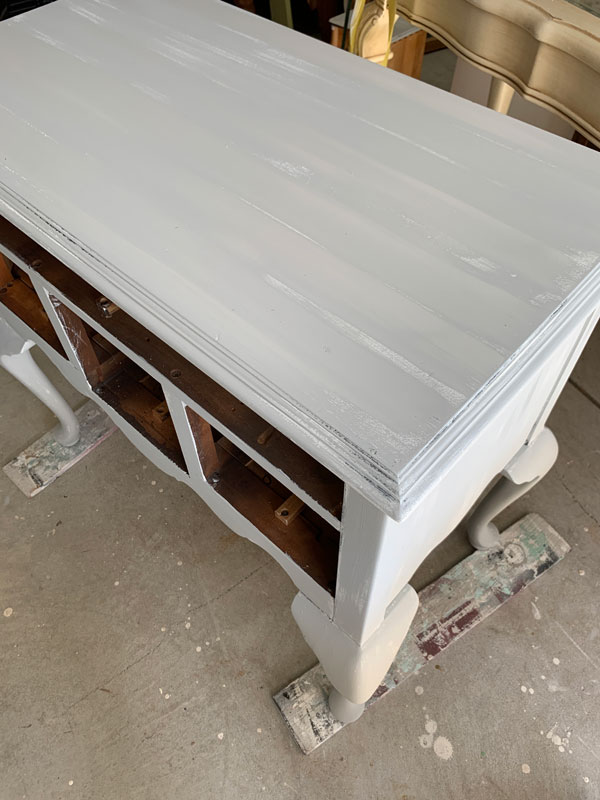
First, I started by filling the holes where the old hardware was using Dixie Belle’s Mud in brown:
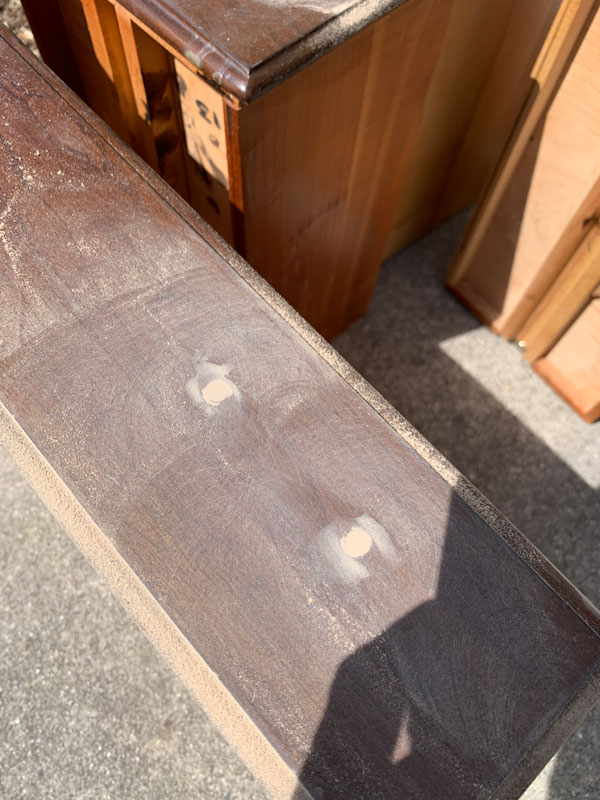
Don’t rush this part. I let this sit overnight so that it could dry all the way down in the holes. I overfill just a bit so when I sand, it will be flush.
Occasionally, you may need a second quick application. Leaving it in the sun to dry will speed up the process…

When I sanded it smooth with 220 grit sandpaper, it was completely filled and smooth:
How to Get a Distressed Finish without a ton of Sanding
I gave everything one coat of Dixie Belle’s Cotton, leaving some of the wood showing through in several places:
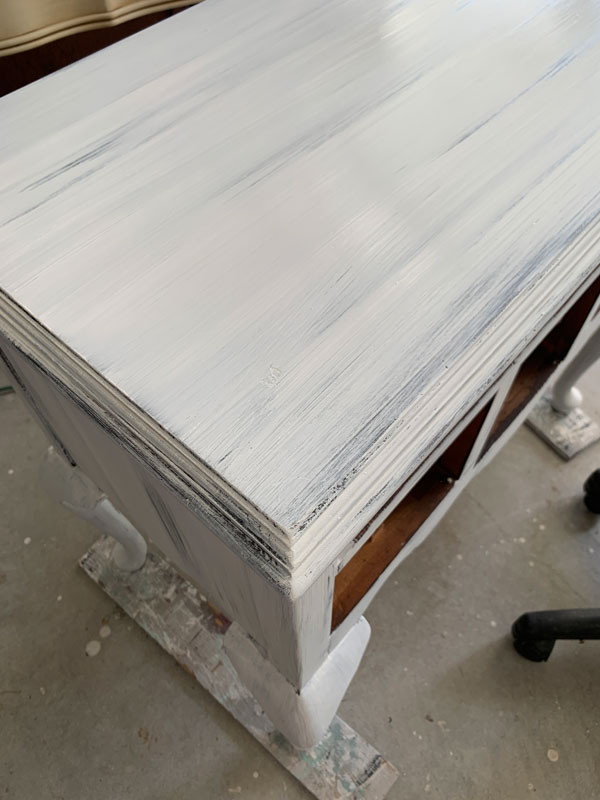
I still painted in nice, even strokes, moving from one edge to the other without stopping, but I was purposely leaving areas unpainted.
When that was dry, I followed up with a 50/50 mix of Dixie Belle’s Manatee and Cotton:
I also made sure not to completely cover all the white or the wood areas that were peeking through.
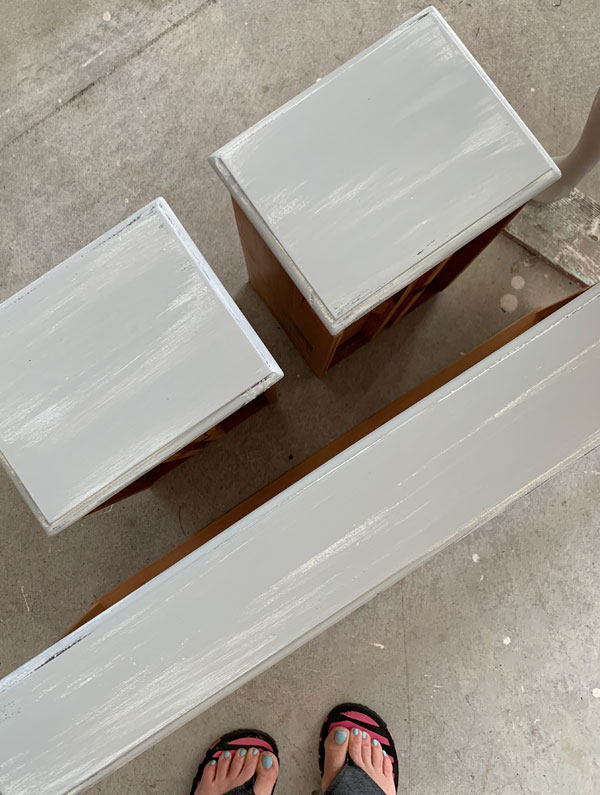
Then I used 220 grit sandpaper (wrapped around an old sanding sponge) to sand all the surfaces lightly. This was more to smooth everything out and show some of the edges rather than to distress. The paint did that for us!
I pulled out my shop vac and gave it a quick clean up, and then I sealed with Dixie Belle’s Clear Coat in Satin, using their blue sponge applicator.
You can see how I apply sealer with a sponge in this video:
If you have trouble viewing, find it on YouTube HERE.
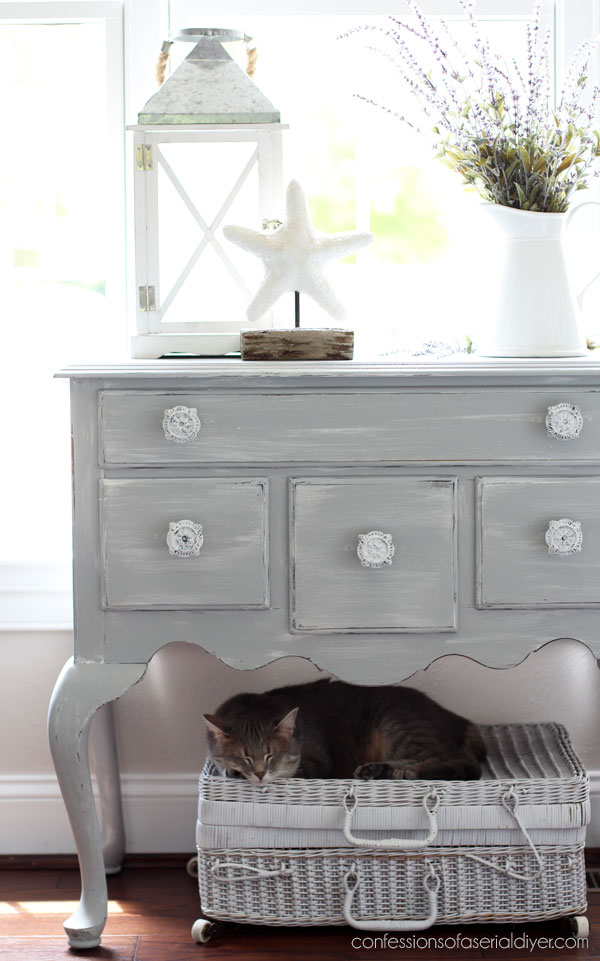
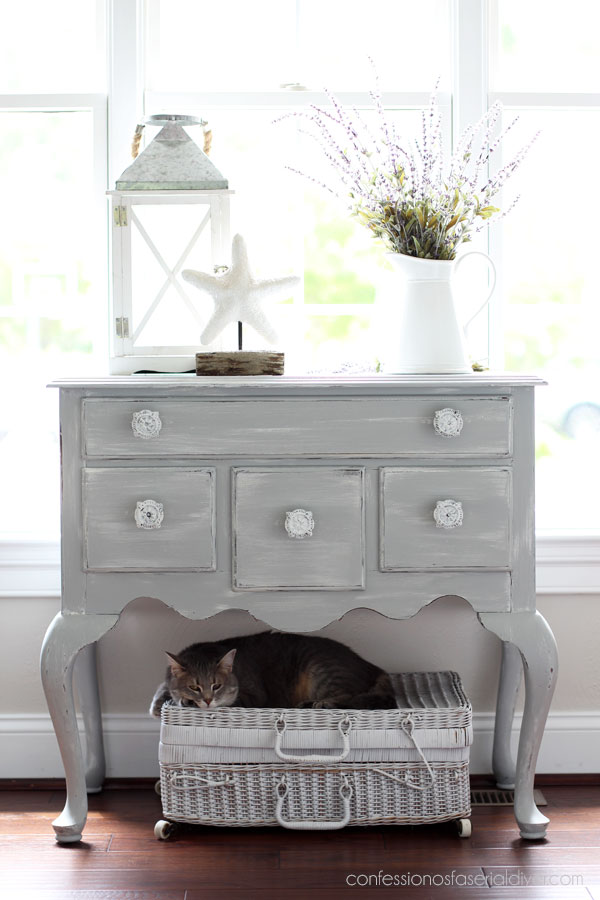
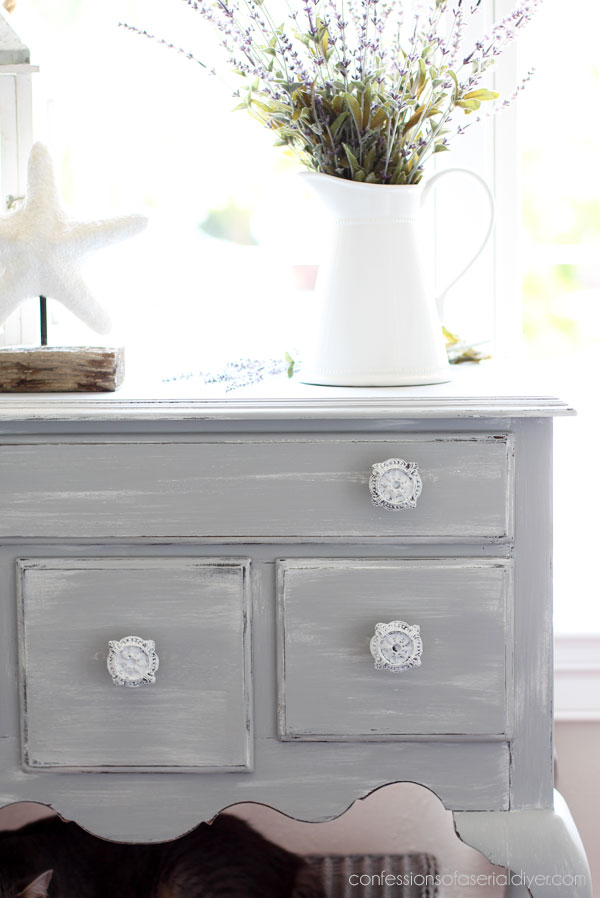
The Result
And here is what it looks like now!
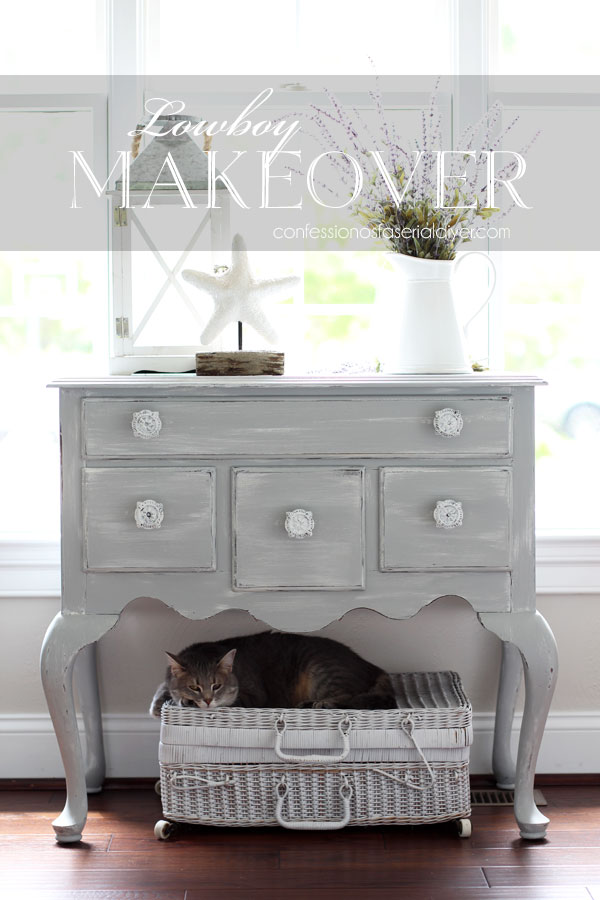
Instead of sanding back the paint, I just didn’t cover the previous layer completely!
Can I hear it for LESS work??
And look at my sweet girl, Lyla! She wasn’t even a year old yet in that picture. She follows me around everywhere and jumped up on this basket the second I put it there…like I did it just for her!
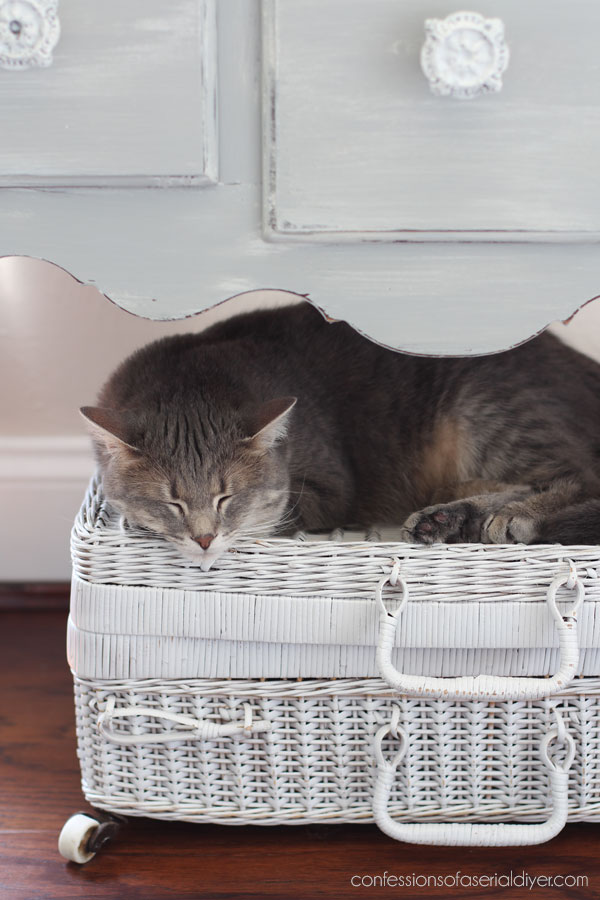
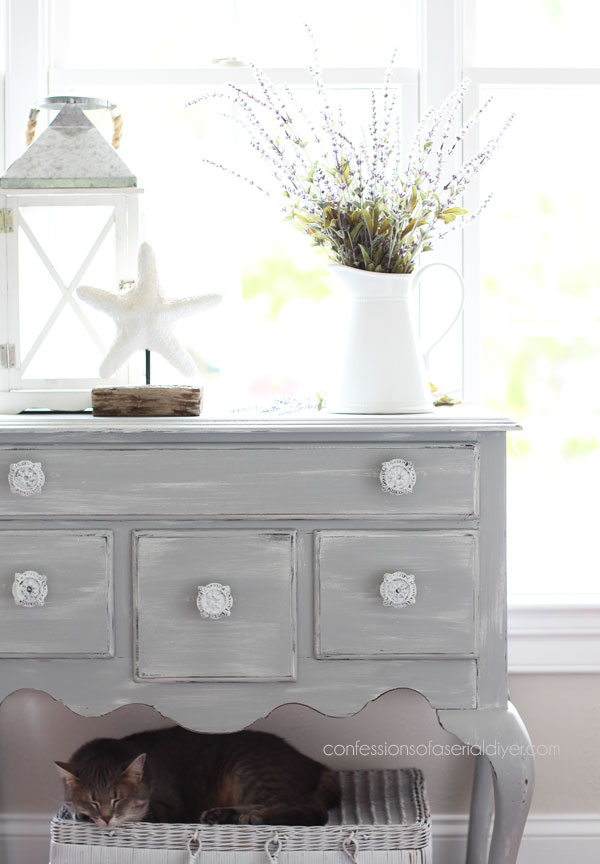
I love this relaxed look…it gives this piece a casual coastal vibe.
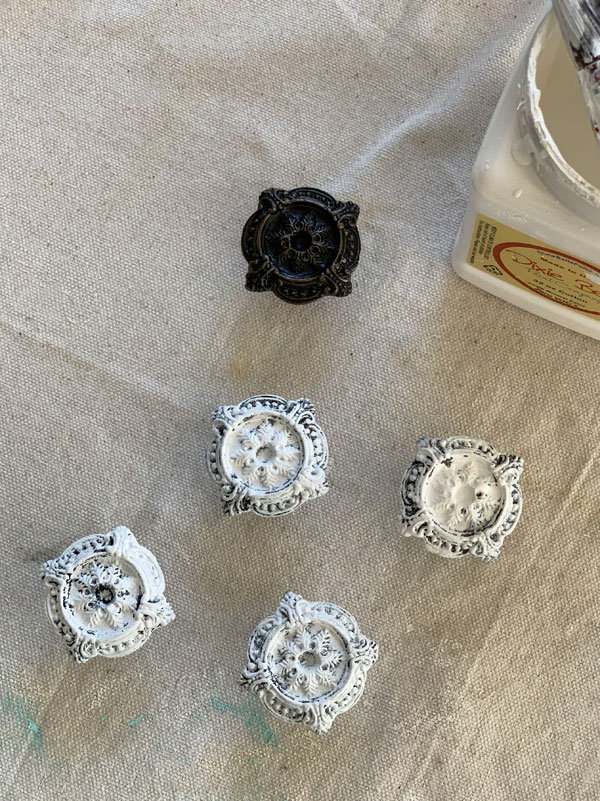
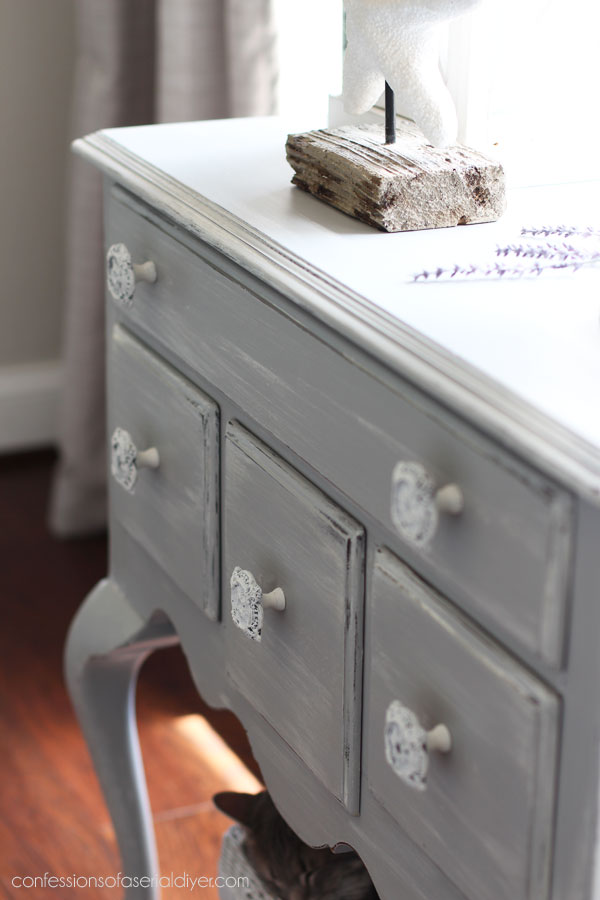
The knobs came from Hobby Lobby, but I painted them with two coats of Cotton, leaving areas unpainted on these as well:
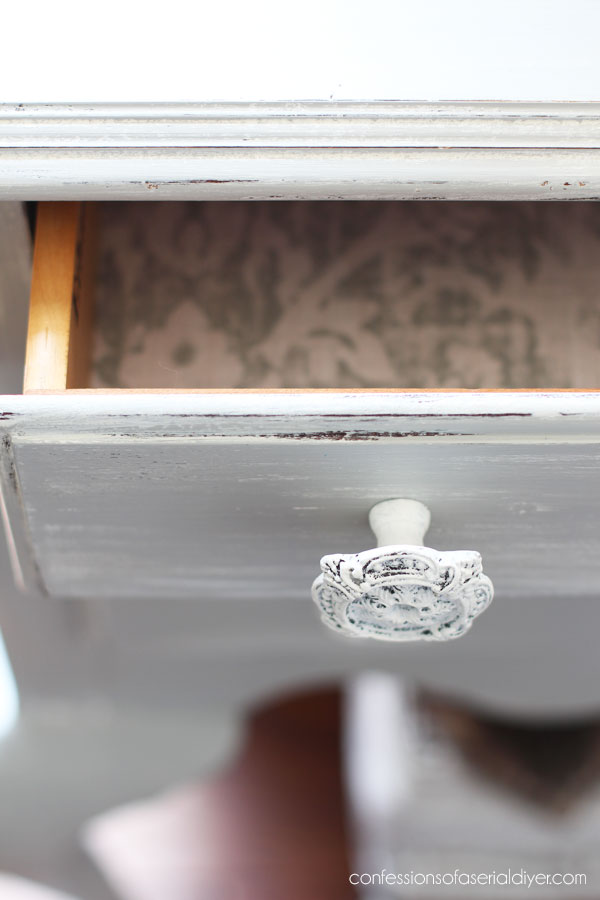
The top drawer got some pretty fabric:
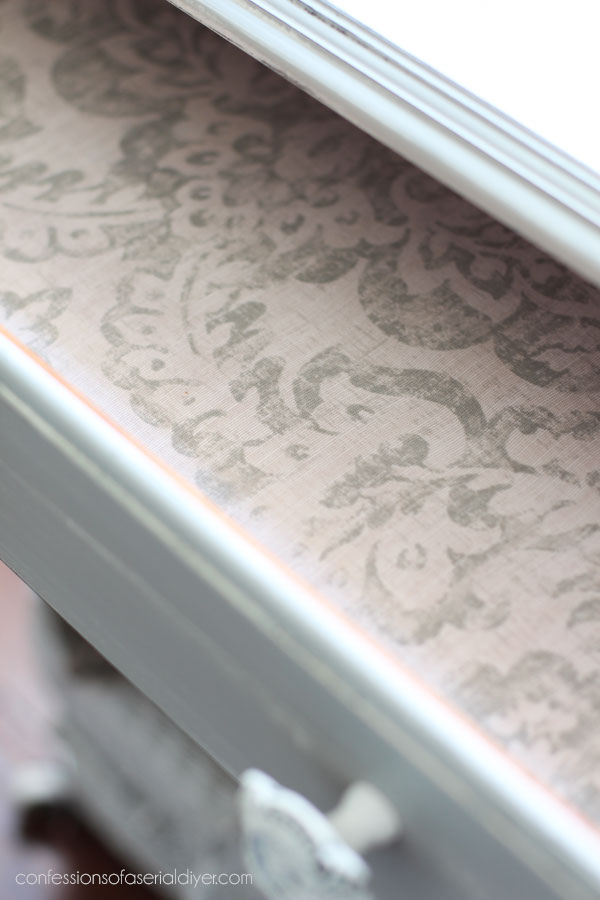
You can see how I line drawers with fabric HERE.
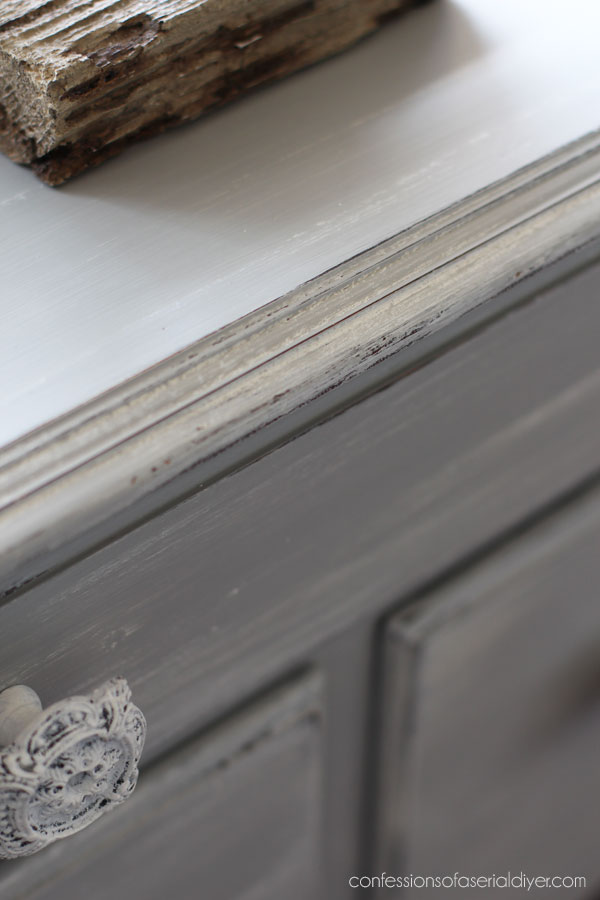
Here’s a closer look at the distressed finish…
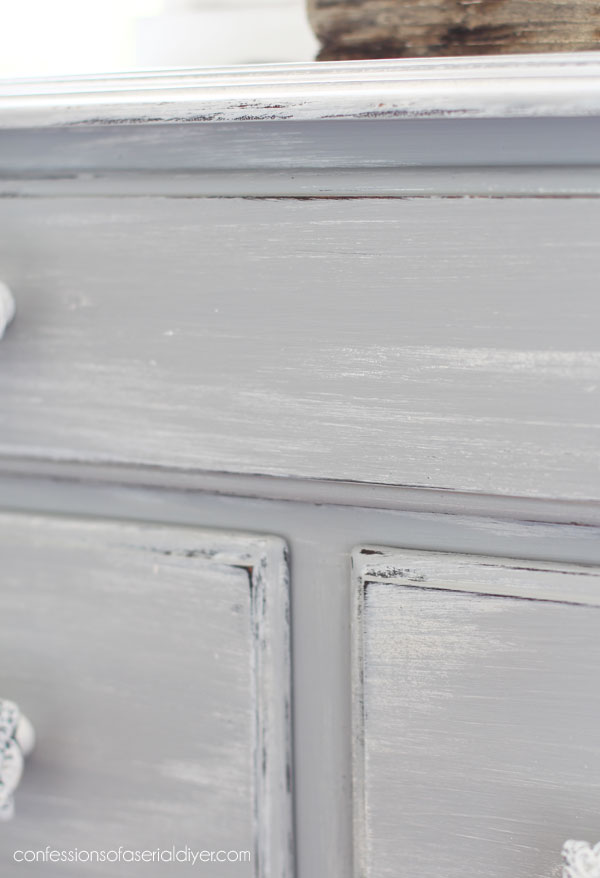
You could get an even more distressed look by leaving more of the original wood finish showing, or by using a lower grit sandpaper like a 100-150 grit and sanding more after.
This was so quick and easy to do!
 I hope you enjoyed seeing this simple way to achieve a distressed finish without a ton of sanding!
The customer who bought it planned to use it as a bathroom vanity by adding a vessel sink. I hope that worked out!
Thursday, I’m teaming up with my Furniture Fixer Upper girls, and I’ll be sharing this mini hutch:
I’ll be back with the baskets next week.
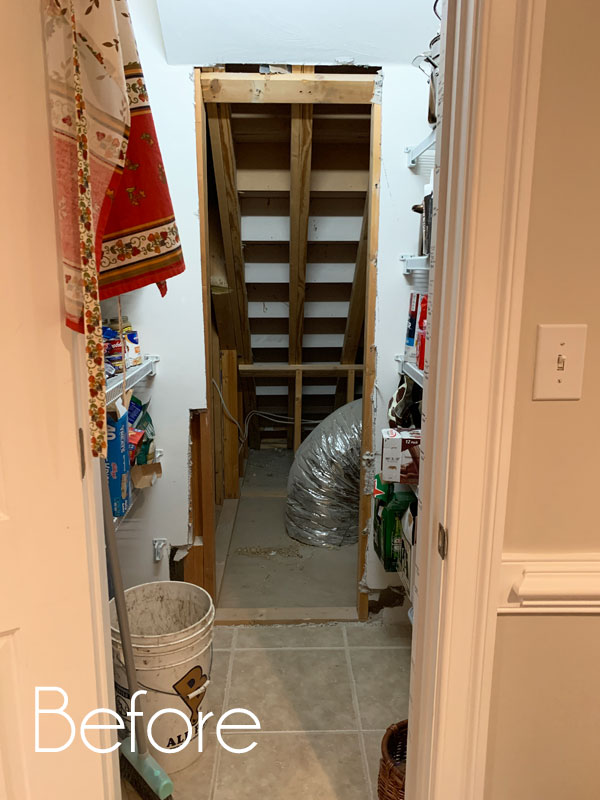
How about I leave y’all with some of our pantry progress?
Here is the earliest before photo I could find on my phone, back in February of 2020:
Pretty!
We discovered that there was quite a bit of space under our stairs when we had to replace the stair treads after removing the carpet.
My husband immediately busted through the wall once the stairs were finished, and it has taken almost a year and a half to get it to this point:
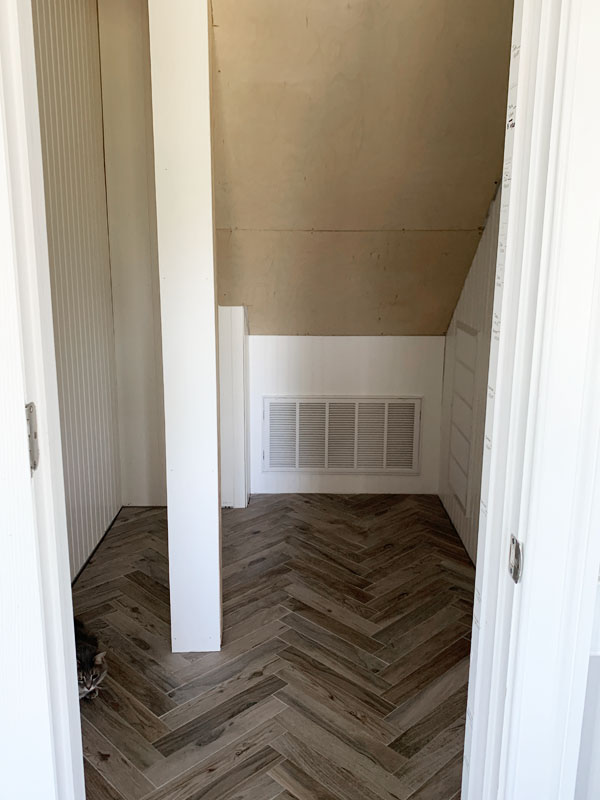
The post is where the original wall was. And here is what I was working on instead of photographing baskets:
Honestly, who could peel themselves away from this much fun?? He he.
UPDATE: See how beautiful that hutch turned out HERE! Or you can skip to the pantry reveal HERE if you like!
See y’all Thursday!
XOXO,
![]()
Don’t Miss a Thing!
If you like what you see, there are several ways to follow along!
Email * Instagram * Facebook * Pinterest * Twitter


Mary Kaiser says
Wow girl you have been busy! I like seeing this oldie because it was so pretty, and easy! Your flooring looks amazing in your pantry, and I love the white shelves your doing. It looks like you have a lot more space in there now. Make sure you take pictures when it is all done, and share all the information about how you did it!
Christy says
I’m glad you enjoyed this one again, Mary! I have been busy, but it has been fun! I’m almost done and will definitely share soon! We have so much more space in there now!! XOXO
Elizabeth says
Great job! Love it. We have a MCM beach house in Maine, but I just love that look. There are so many of those lowboys out there, so it’s nice to see one that really shines.
Christy says
Thank you, Elizabeth! These pieces have a more formal look, so it was fun to make it a bit more casual! XOXO
Christina says
Ooo this lowboy went from stoic looking to soft and welcoming! Love this look so much! I also adore the knobs and the fabric you used in the drawers.
Love seeing Lyla sweet self. Please give her some ear and chin rubs for me!
Congratulations on getting all that work done in your pantry! Wow, I bet those shelves are the best!!
Christy says
Thanks, Christina! I will definitely spoil Lyla for you a bit ha ha. I am so happy to see this project finally getting done! XOXO
Cheryl Atkinson says
Christy, I love this one. I’m glad you showed it again. I bet you are so excited about you cupboard!! It’s always a joy to have more room
Christy says
Thank you, Cheryl! And yes, I an SO excited, but moslty to not have to dig through plastic bins to find food ha ha! XOXO
Sue H Mellette says
Love this makeover. The distressed finish is just so pretty. I really highlights the legs’ curves. The hardware brings this piece to the 21st century. Of course, the added fabric in the drawers is such a happy touch! Thanks for sharing. Have a great week.
Christy says
Thank you, Sue! I thought this piece would be fun to make less formal! Enjoy your week too! XOXO
Denise Cox says
Love it… and the subtle two-tone look. And look at dear Lyla… 😙!!
Christy says
Thank you, Denise! XOXO
Linda Petersen says
Hi Christy👋, thank you for sharing the lowboy again. It’s really cute & “beachy”! I’m not at all surprised to see you are installing the pantry!! What a great way to use the empty space.
Christy says
Thank you, Linda! I am really surprised at how much space moving that wall back added! And yep, my hubby does the demo and removal, and I finish it off lol! XOXO
Teresa Farrell says
Oh, I love that.Such a beautiful transformation. I do hope you paid Miss Lyla for her staging rights😄 It really did turn out beautiful.
Christy says
Thank you so much, Teresa! Ha ha! XOXO
Michele M. says
First of all – so happy you shared this post cuz I had missed it last year. You took that gorgeous freebie piece and made it spectacular!!!! And it photographed beautifully – esp with sweet Lyla girl. You couldn’t stage that better if you’d tried! Great tutorial as well – thank you!
I am sooooo excited about your new pantry! Holy smokes, all that extra room and putting up nice white solid shelving – it’s a game changer and you are going to love it. Can’t wait to see it all finished. What a rock star you are, Christy!
Christy says
Thank you, Michele! I’m so glad you enjoyed this one… I have so many posts that get shared only once, so it is nice to be able to reshare some of my favorites! And yes…I am SO excited about having our pantry functional again!! XOXO
DIANE Ragot says
Can you tell me how I can get white with a touch of blue
I wish to do my dining room set that way
45 years ago I had done it Cres with a brown glaze then rubbed it off and then it was only in the natural veining oh the wood
What should I do before to take the brown out since I would like it replaced with blue?
Thankyou
Diane
Christy says
Hi Diane! I am having trouble envisioning the look you want for your table. Maybe if you paint it blue, and then white, then sand it back a bit here and there, you’ll see the blue come through? XOXO
cheryl says
Thank you for the lowboy project. I inherited the same piece and wondered about distressing or leaving it original. Also, I’d love to see a wide-shot photo of the finished shelving install as I’m working on a similar project in my daughter’s closet which is under the attic eaves. Thank you
Christy says
Oh perfect! Glad I could give you an idea for yours! I’ll share more on the pantry when it is completed and I’ll do my best to get a wider shot for ya! XOXO
Geri says
Looks absolutely beautiful! You are my inspiration for doing furniture rehabs! I look forward to your posts weekly.
Thank you for all your tips you share with us ❤️
Christy says
Aww yay! Thank you so much, Geri!! XOXO
Angela says
How do you get enough paint to go from one end to the other? I know you aren’t supposed to paint over an area to avoid lines in the paint etc, but I can’t ever seem to get enough paint to stretch from one end of a project to another.
Christy says
Hi Angela! I load up my brush and then start in the center of the row I’m working on and spread it out to either edge, if that makes sense? You can go back over to smooth it out, but just while it is still wet. Chalk paint dries incredibly fast, so that’s why you shouldn’t keep going back over it multiple times as starts to dry quickly. I hope this helps. XOXO
Sandi says
Some things don’t need to be painted and that low boy is one of them!
Christy says
I’m sorry, Sandi! Unfortunately, that piece would not have sold as is since there are so many of them out there just like it. Painting it made it more unique and sellable. It wasn’t antique or anything, likely from the 90’s. XOXO
Sandi says
Thank you for your explanation re low boy. Wasn’t sure the age. I’m all about the Beachy look. I have several pieces I’ve repainted. I also paint a lot of seascapes.
Christy says
I just peeked at your blog, and your paintings are absolutely amazing!! Do you sell online anywhere?
Sandi Graham says
Thank you so much. I have not sold on line, but in shows and galleries and a few customer requests. If you like a particular one unframed I can ship. Im not expensive for unframed pieces. I will try to post some available with prices. Best Sandi
Christy says
Thank you! 💕