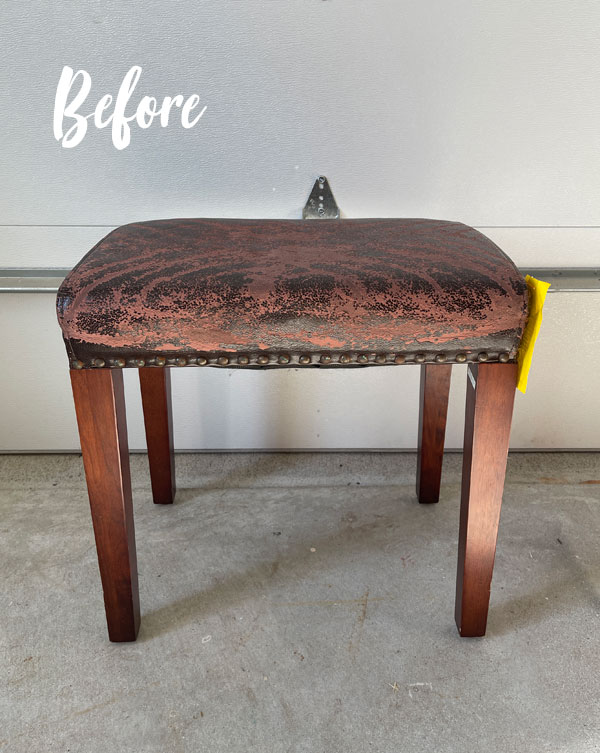
Hello dear friends!! I’m back today sharing how to repurpose a flatware box! I had planned to share a stool that I previewed on Tuesday, and it is done and ready to go, but this Tuesday is is Trash-to-Treasure day, and it is the perfect trashy project, so I’m saving it for that!
My stash is so skinny right now that I don’t even have anything left that would work better. I seriously need to shop, y’all!!
This trashy makeover is from a couple of years ago, but worth another look!
How to Repurpose a Flatware Box
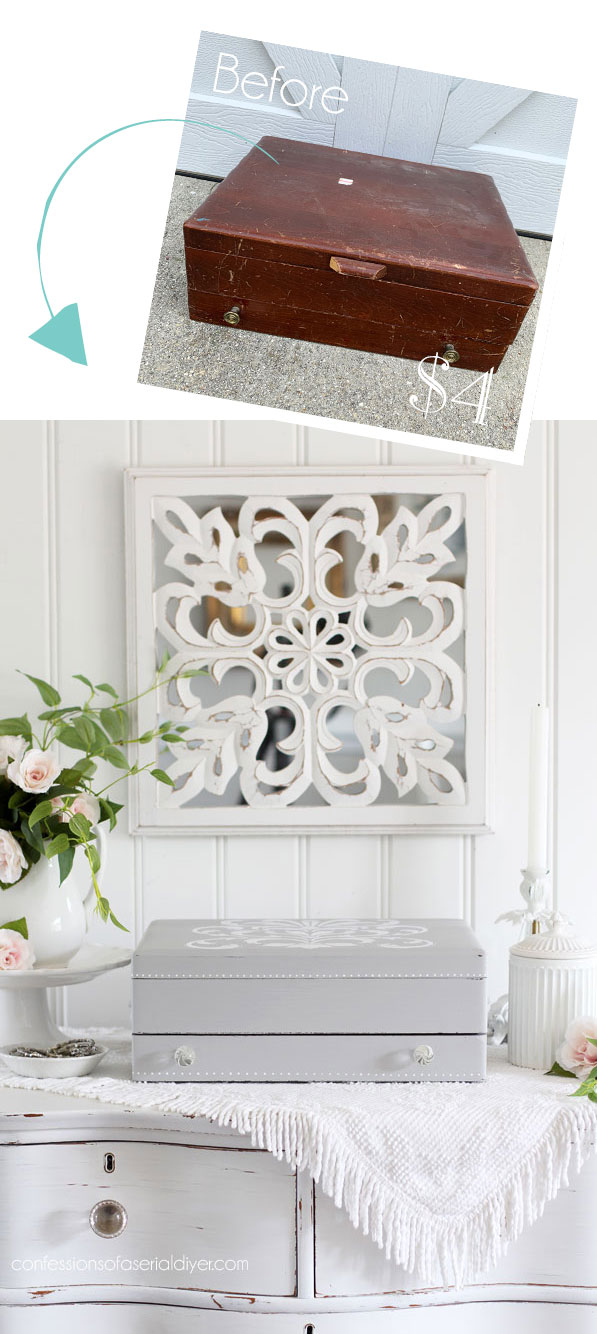
Here is today’s beautiful subject in its before state:
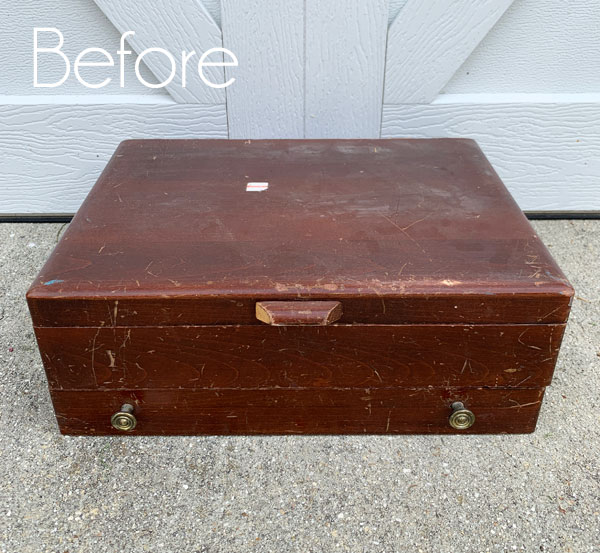
This flatware box was only four dollars at the thrift store and I’m such a sucker for these flatware boxes, so in the cart it went. But then, it was in such bad shape that I let it sit for several years!
Luckily, I had gathered a few of these boxes at one time and took them outside to do all the messy work of removing the insides all at once, so the hard part was already done and the inside was ready to go:
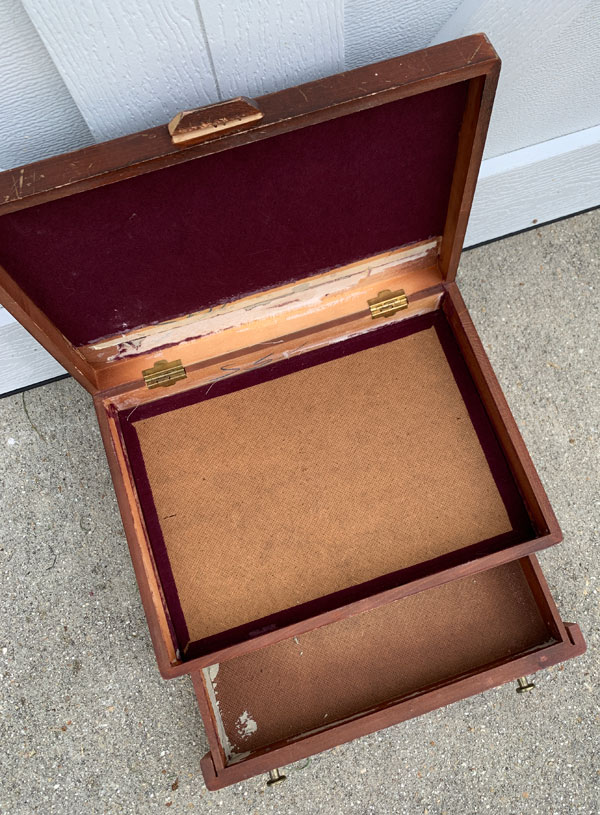
There is no secret formula for removing the innards of these things, just a good pair of pliers and some sweat equity! I’ve included a few affiliate links so you can find the products I love.
The prep
I started the outside by filling in a few deep scratches and the hole where that handle thingy was on the front with Dixie Belle’s Mud and sanding smooth with 220 grit sandpaper.
Paint
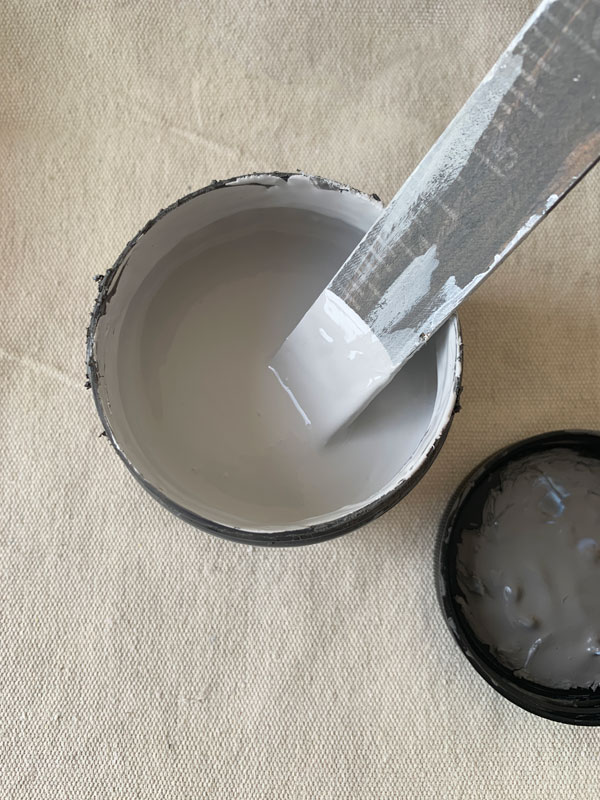
I really wanted a soft gray, so I pulled out my Hurricane Gray that only had about a third of the jar left and filled it the rest of the way with Cotton to get this lovely soft gray color:
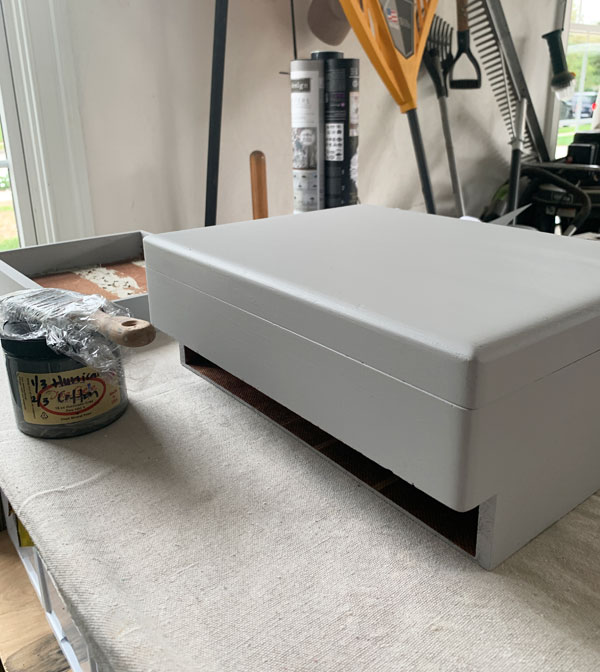
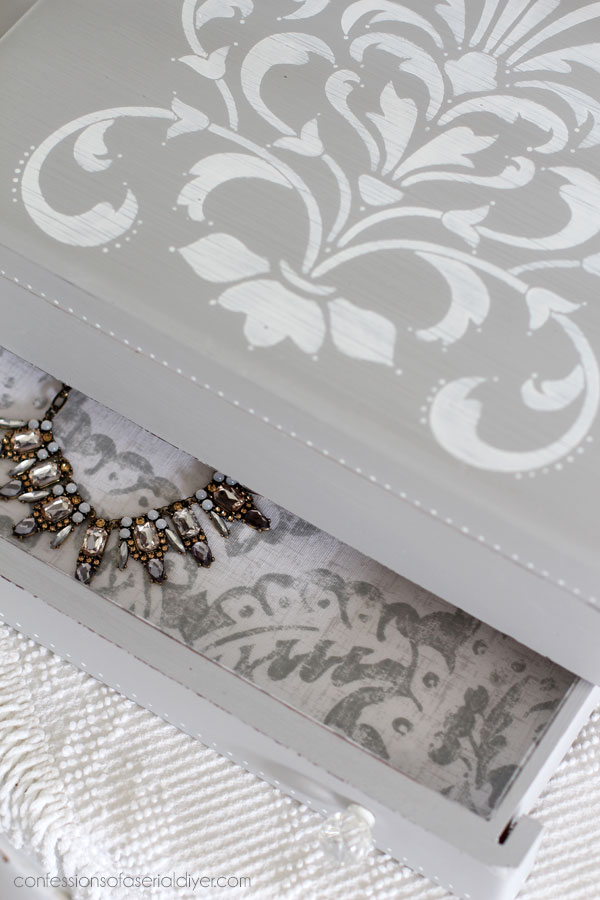
I gave it two coats and decided to dig through my stencils to find something to dress up the top.
Adding a Stencil
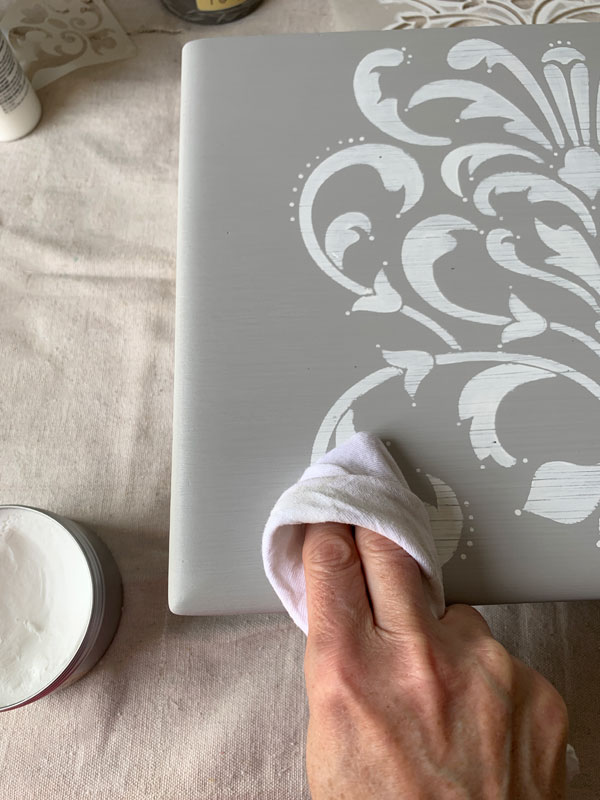
I used spray adhesive on the back of the stencil and then placed it on the top of the box. Then, I used a small brush to brush in the stencil using white acrylic craft paint, brushing away from the edges as much as possible:
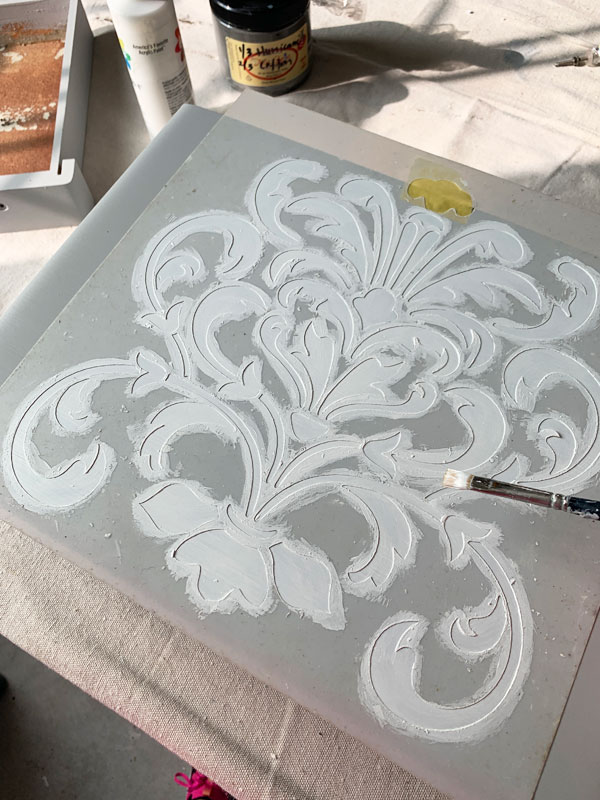
I like to use a brush rather than a pouncer, but you can use either. I don’t recall where I found this stencil, but I think maybe Michaels?
I applied three coats of paint and removed the stencil while the paint was still wet:
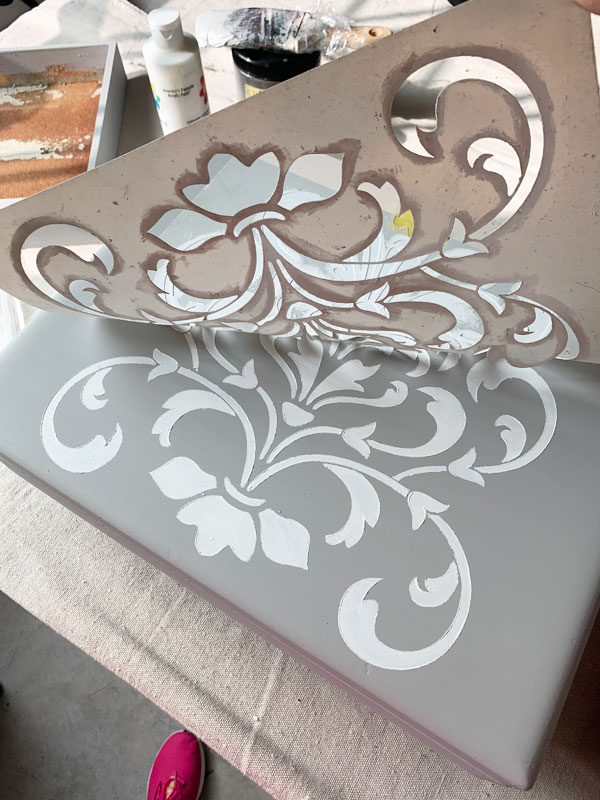
I usually just clean off the paint on the front and leave it tacky side up to dry. The adhesive will remain on your stencil. If you really want to clean that off too, you can use some odorless mineral spirits and it will take it right off.
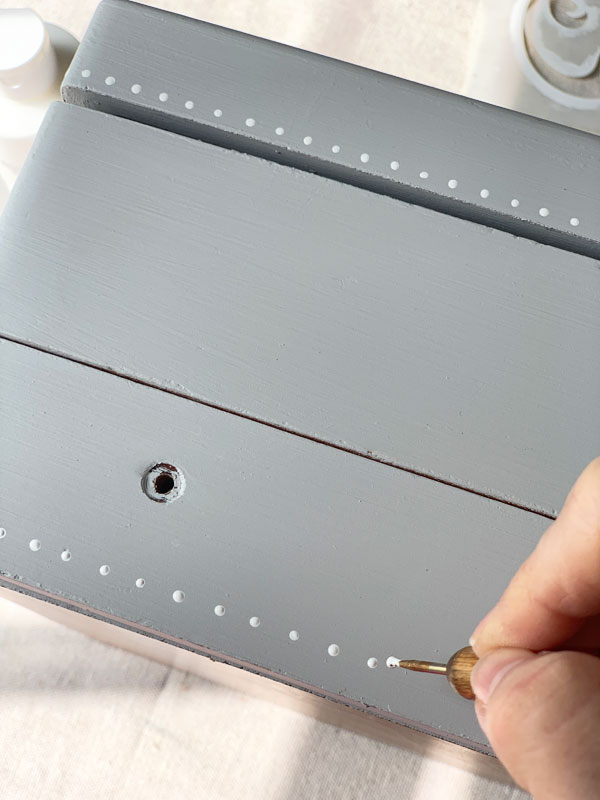
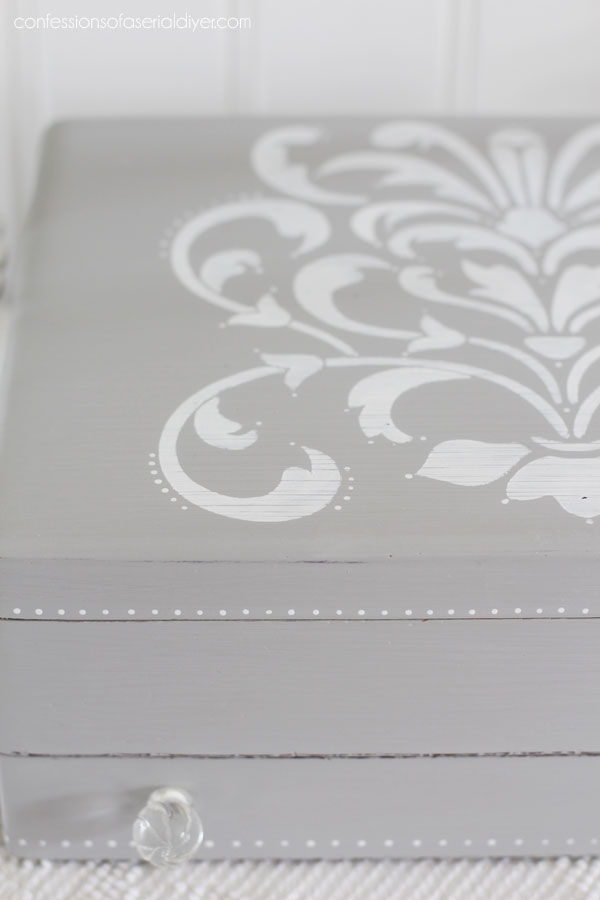
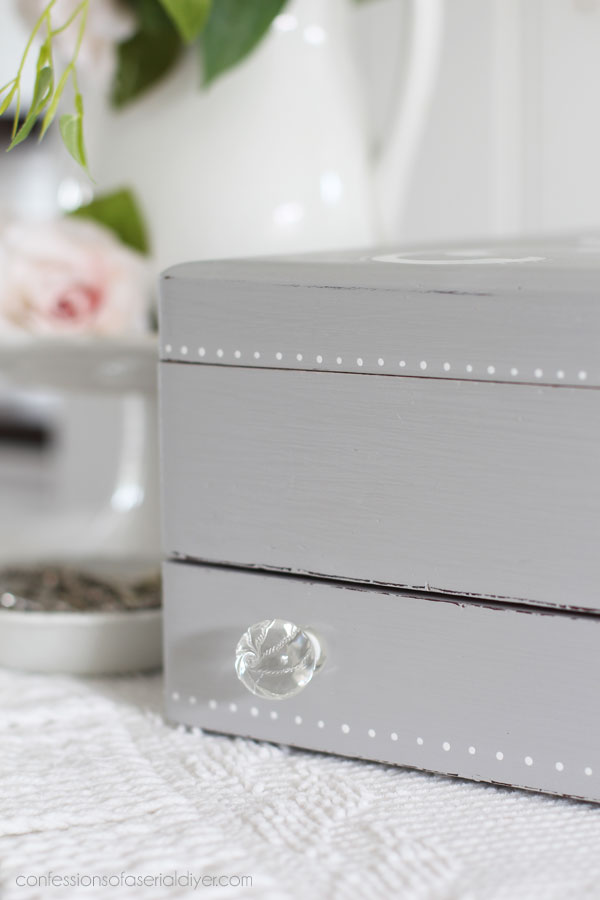
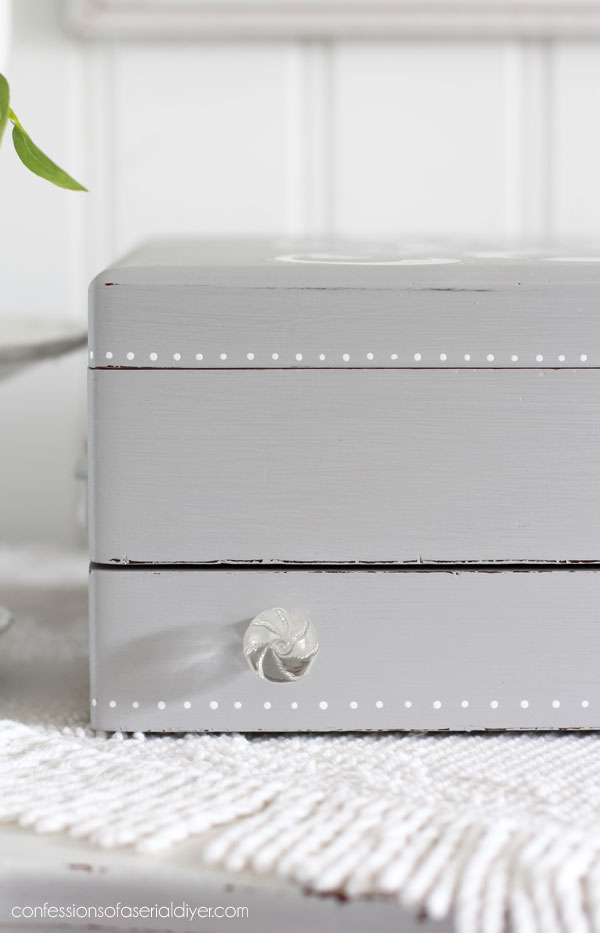
I then went back and added some fun detail with tiny dots using my stylus dotting tool:
When the paint was completely dry, I sanded with 220 grit sandpaper, including across the stencil, going from edge to edge:
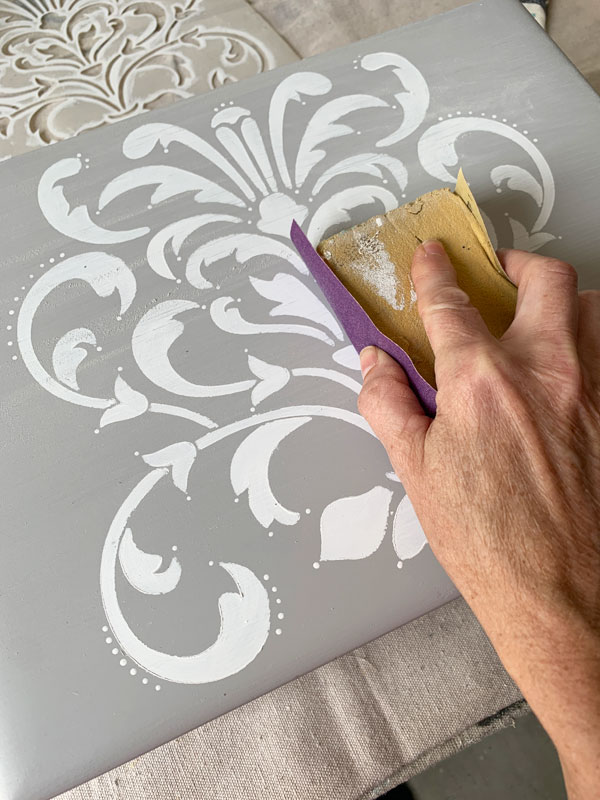
This smooths everything out and leaves a lovely finish. You can see I added some dots to the top as well.
I sealed this piece with clear wax, applying it with a wax brush and then buffing it with a clean, soft cloth:
This is Dixie Belle’s clear wax. It looks white but goes on clear, and it is water based, so it doesn’t have the harsh smells that some of the other brands do.
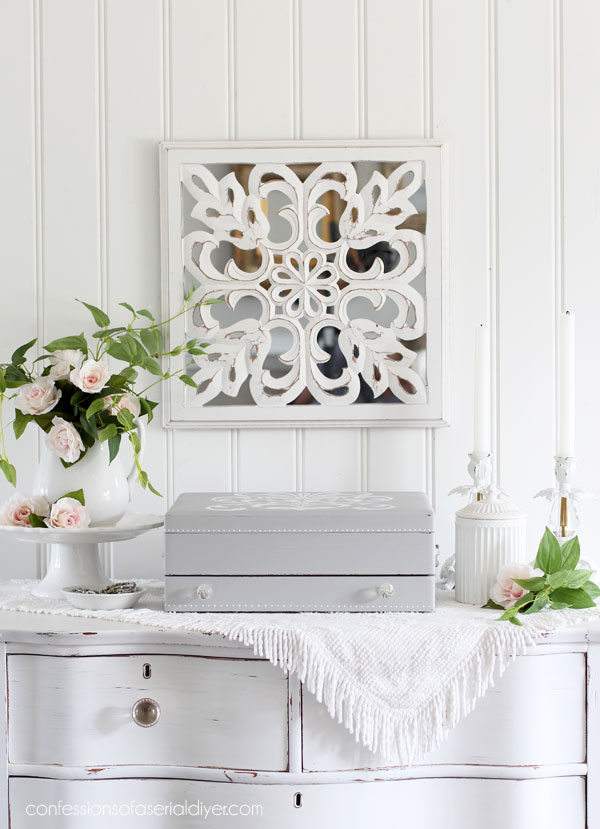
The Result
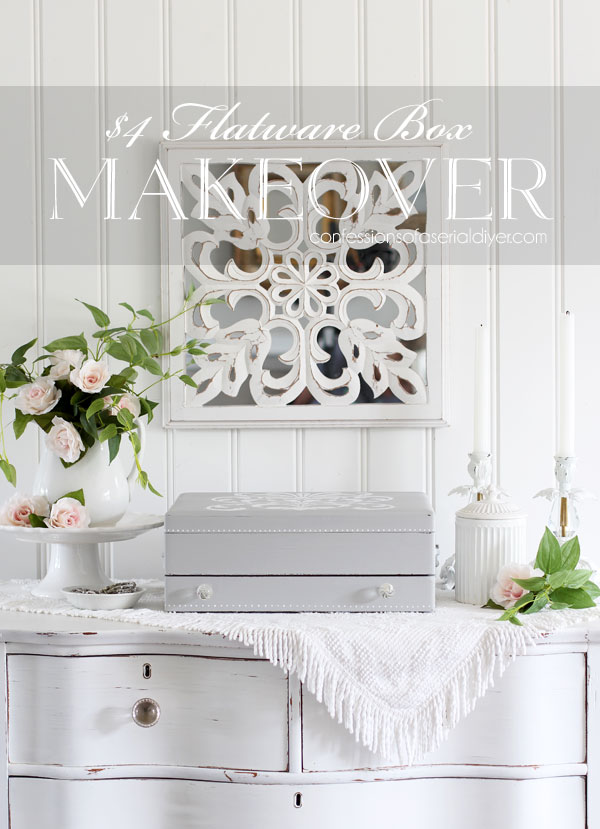
You would never know it started out as that ugly, battered box!
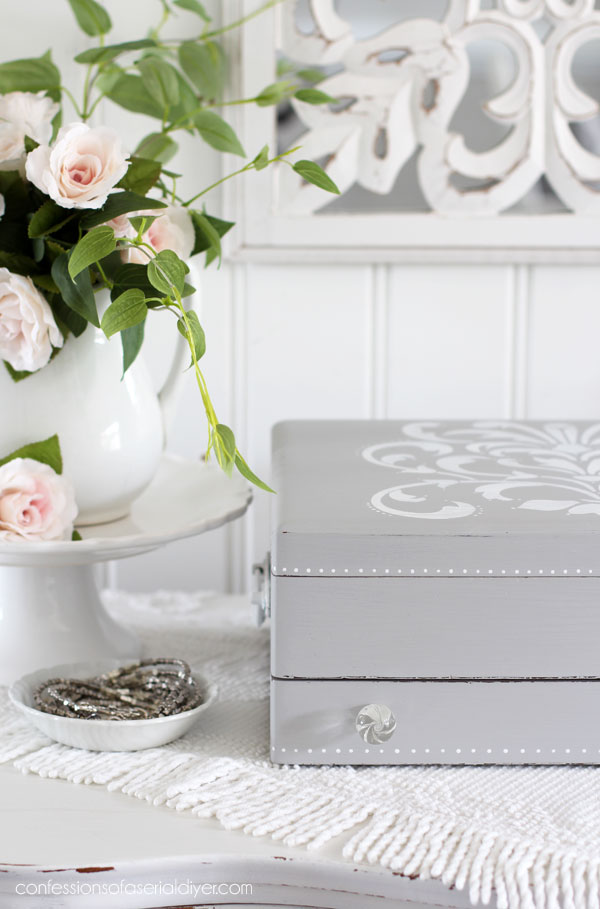
This custom Dixie Belle color turned out so soft and lovely. I think it ended up being 1/3 Hurricane and 2/3 Cotton.
And this pretty stencil was just what this box needed! You can see how smooth it looks after a light sanding…
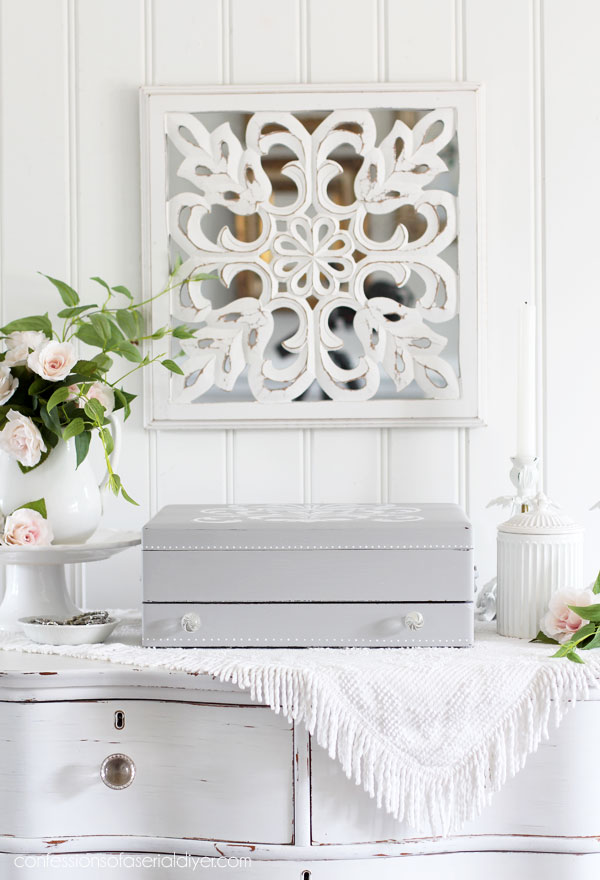
I found these sweet glass knobs at Hobby Lobby…
I removed the ugly wooden one that was on the top altogether and just left it without.
I added these handles on the sides that I had in my stash, but I think they originally came from Hobby Lobby also…
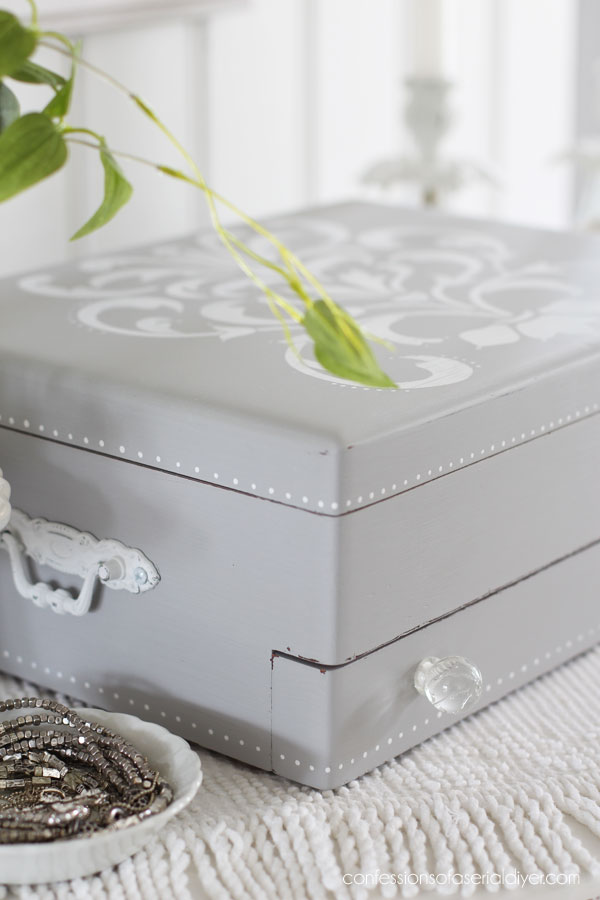
How sweet are the little dots that go all the way around?
And of course, I had to make the insides pretty too!
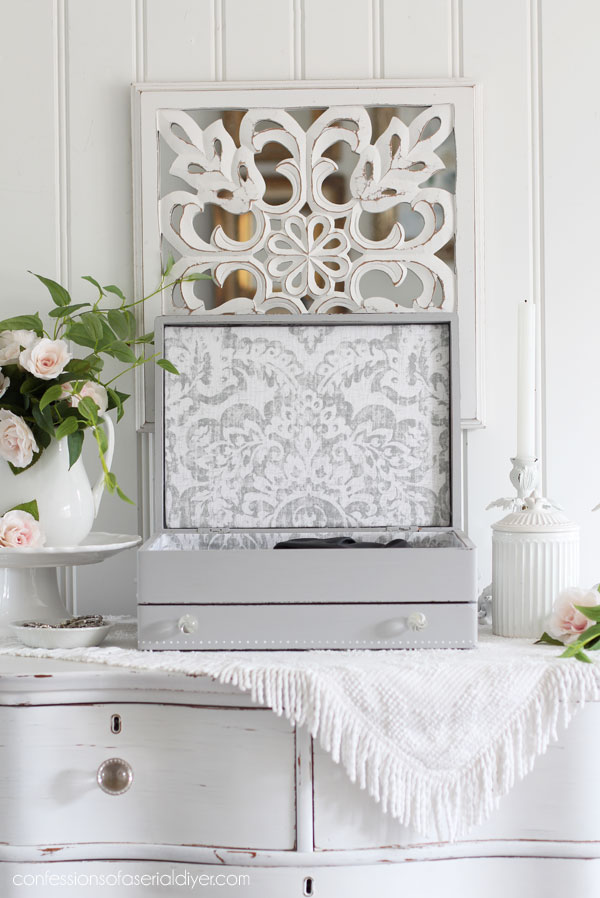
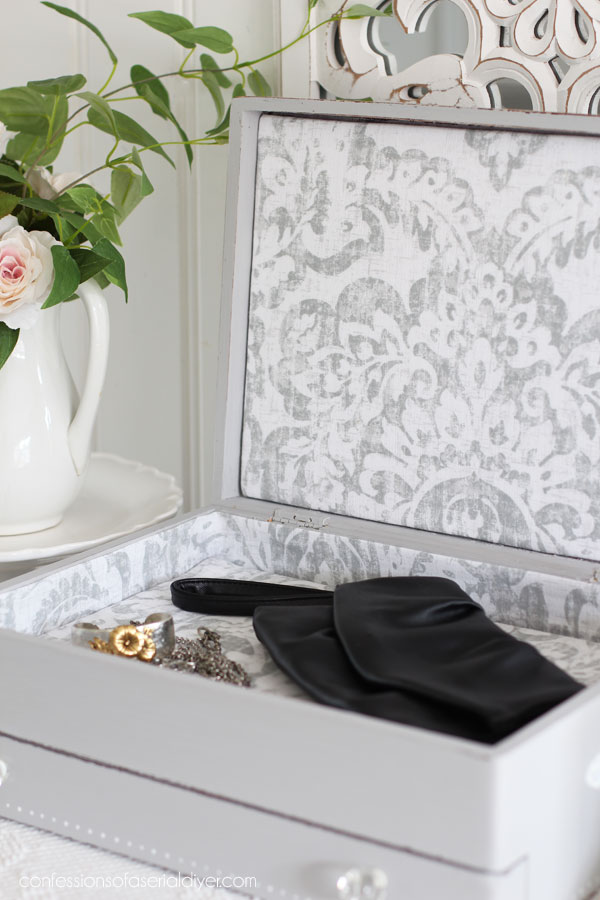
Now this can hold jewelry, remotes, bills, medications, etc!
I share how I line boxes with fabric in this post!
I hope you enjoyed today’s trashy makeover!
SHOP NEWS
In shop news, the brand new SILK All-in-One Mineral Paint colors are in stock in my Etsy shop and ready to ship!!
Just look at these gorgeous colors!

You can read more about Silk paint and the differences between it and chalk paint in this post!
And, there is a brand new Nail Head trim stencil added as well:
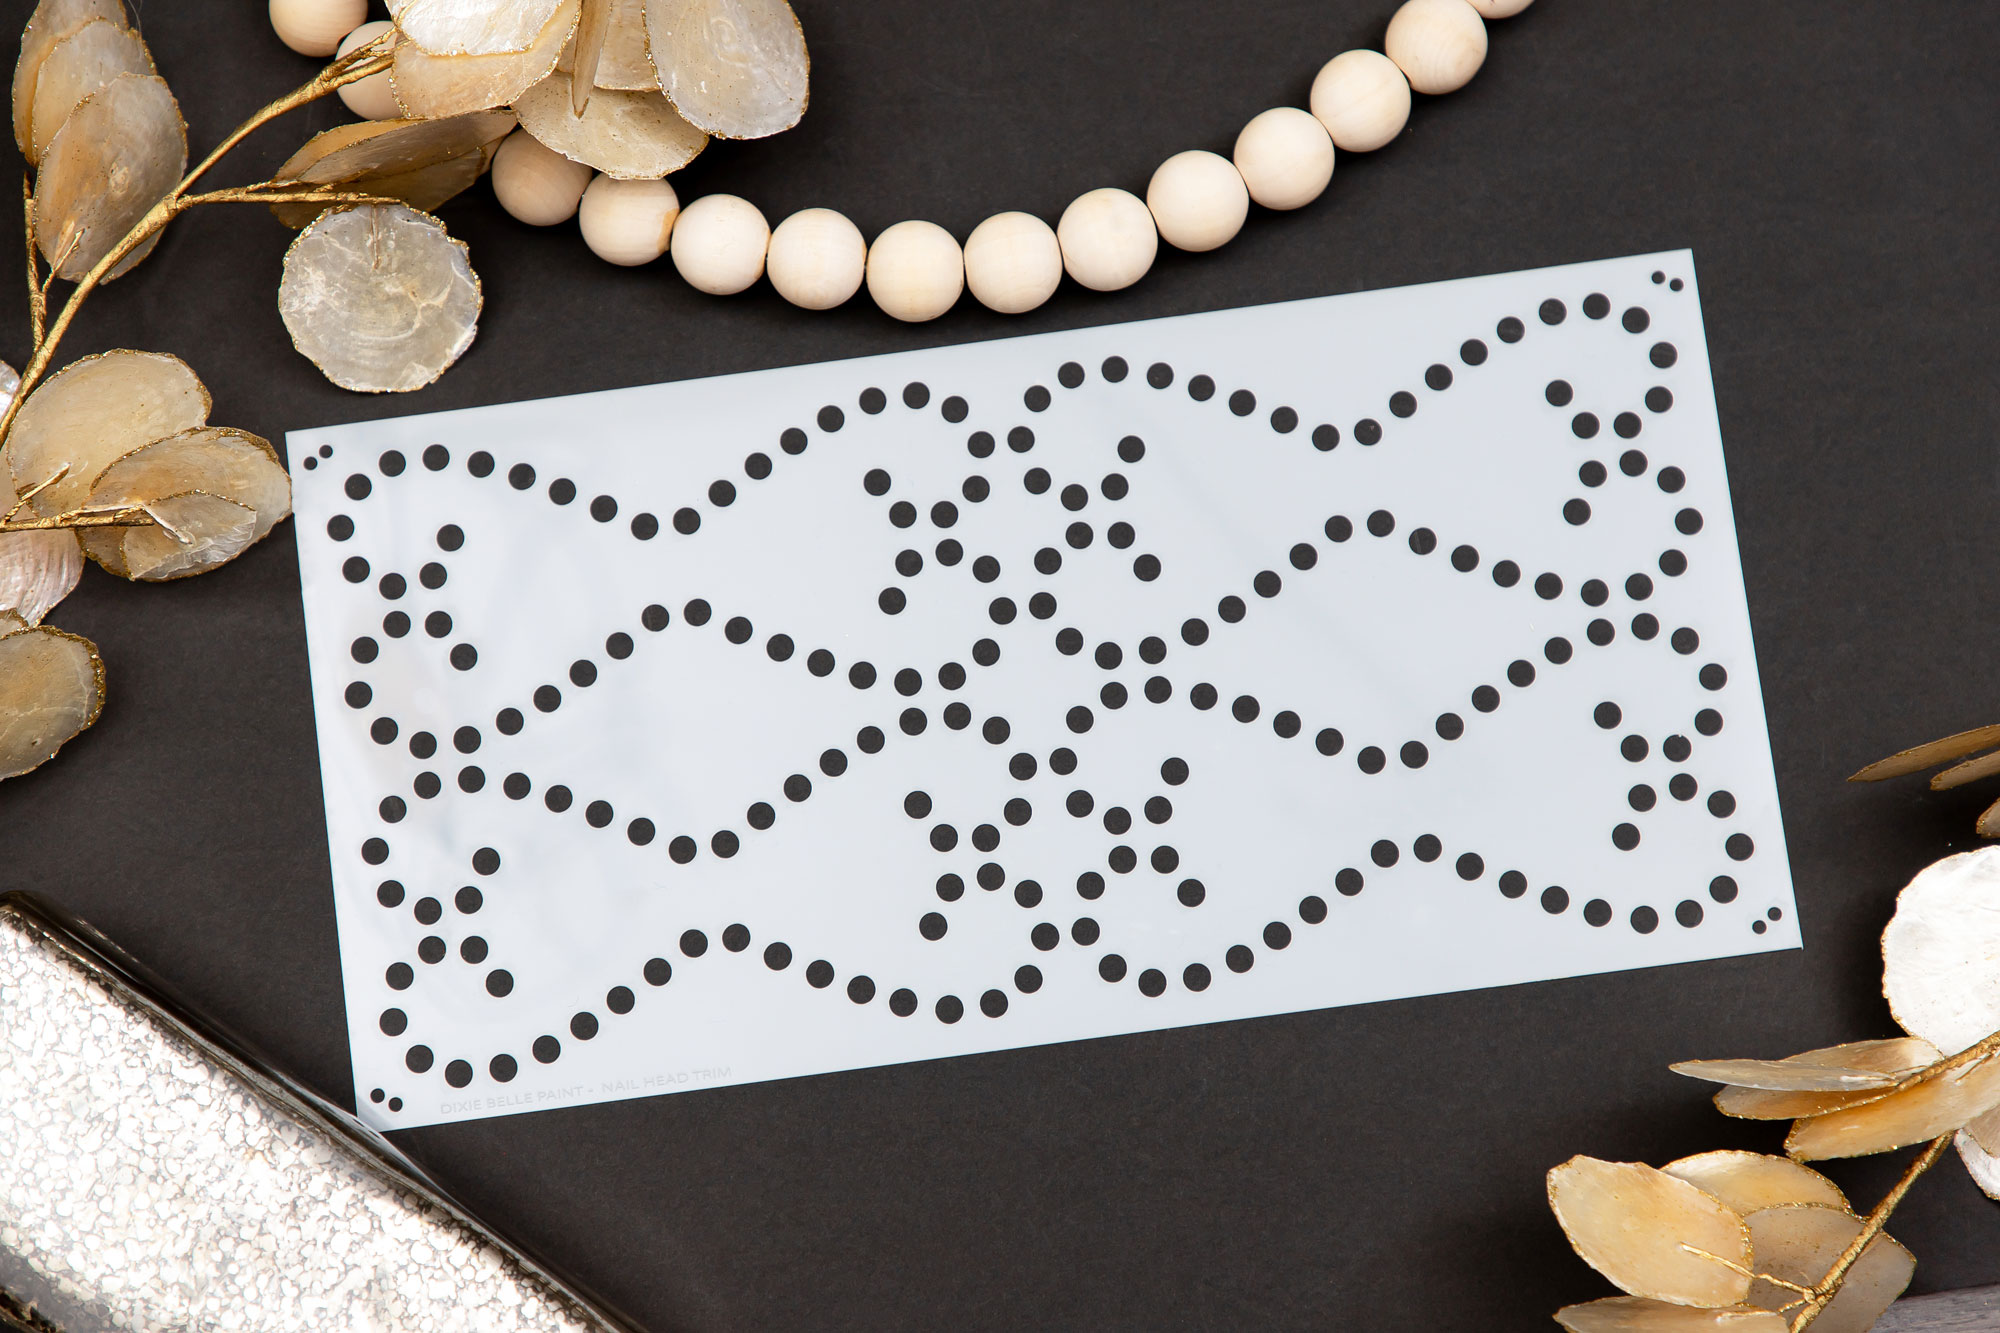
You’ll find it under Mylar Stencils. I can’t wait to use that one on something!
Visit my shop here to get yours today! All orders over $50 ship free same or next day!
I’ll be back on Tuesday with this brand new trashy find:
Have a fantastic weekend, and if you are stuck in a blizzard, stay safe and warm!!
UPDATE: This cutie is done and you can see it HERE now!
XOXO,

Don’t Miss a Thing!
If you like what you see, there are several ways to follow along!
EMAIL * INSTAGRAM * FACEBOOK * PINTEREST


")


Petra says
I really like that soft grey you use, and the inside is perfect. What a great little storage box for all sorts of little things. A pretty present for a little girl 🙂 I’m not anywhere near a blizzard zone but I am currently in tropical north Queensland (Cairns) and I can tell you it’s like an oven everyday outside!
Thank goodness for cool air-conditioning! Have a great weekend!
Christy says
Thank you, Petra! And isn’t it so funny that our weather is totally opposite lol? Stay cool down there! XOXO
Mary Kaiser says
I LOVE all your flatware box make overs! They are all so adorable! I have a flat ware box in my stash that this post reminds me that I have to get to it to make it beautiful like all yours! Thanks for always sharing such inspirational content! You are the BEST!!
Christy says
Aww thank you so much, Mary! I haven’t come across one of these in a while…I used to see them all the time! Have an amazing weekend!! XOXO
Christina says
This is so adorable Christy!! I love how you made this sad little box look serenely happy. Wonderful color, stencil and the dots are perfect.
Stay safe and have a great weekend!
Christy says
Thank you so much, Christina! It is so much happier now lol! Enjoy your weekend too! XOXO
Janice Holt says
The box turned out so pretty and love the little dots around it. It just added the right thing. I knew you were going to do the inside and you do the best job of that I’ve ever seen. It goes with the outside so well. Another job well done.
Christy says
Aww thank you so much, Janice! I really appreciate that! Have a wonderful weekend! XOXO
Barbara Friedman says
Christy, love, love, love all of your makeovers!! This color is fabulous and with the stencil and dots…..just great!! I have a question. When you use the spray adhesive, how do you get it off the box or project? I can get it off the stencil like you say but don’t know how to get it off the wood. So…….please help!
Christy says
Thank you, Barbara! Are you using the brand I linked to? It’s Loctite General Performance and I haven’t had any issues with the adhesive sticking to my projects. I have had that happen with other brands, however, and if you are sealing with wax, you should be able to buff it right off with the wax. I hope this helps! XOXO
Deborah Mealus says
Really beautiful transformation and I’m a “box collector”! Oh, btw, I am now obsessed with the Flannel scent of Big Mama’s Butta! I could wear it as perfume!
Thanks for sharing awesome inspiration!
Deborah
Christy says
Thank you, Deborah!! I love the scent of Flannel too!! I just packed up your order and saw that you purchased the Morning Sunrise color…I am not usually a purple person, but I am obsessed with that color!! It is so lovely and almost feels like a neutral! I can’t wait to try it on something! XOXO
Deborah Mealus says
I’m with you. I’m not normally a purple person either but something just drew me to it. I think I will try it out on a flatware box I just procured from the Salvation Army store!
Christy says
Perfect! I think that will be the first new color I try! 😀
Becky says
Great idea. I have one of these from my mother’s flatware. It’s just taking up space on a garage shelf. With a bit of TLC i.e., paint, it will become a useful box for something:)
Christy says
Thanks, Becky! They are such versatile boxes! XOXO
Kim Domingue says
I use them in my workroom. One sits right next to my Bernina and holds scissors, seam rippers, seam gauges and the like so they’re all close at hand. These boxes are handy to store spools of thread, as my cousin does, and bobbins. They work great at my cutting table for scissors, rotary cutters (and extra blades) as well as transfer paper and marking tools. I would dearly love to have a couple more of them but, like you, I haven’t come across one in some time.
Christy says
All such great ideas, Kim! I especially love the idea to use it for thread and bobbins! I don’t have any left to work on, so hopefully I’ll come across another one soon! XOXO
Kim Domingue says
Lol! Hopefully we both will!
Really enjoy your site 🤗
Christy says
Ha yes!! Thanks so much! XO
Marcie Lovett says
I have that same box, Christy, and it is stinky! It’s so bad that every time I open it, I keep shutting it and pushing it aside for “later” 😂
I remember the last time you showed it and the other boxes (which you know I had to look at again) and I thought I would tackle it. But it still sits in the basement, waiting for its eventual renewal. Maybe I’ll be motivated to take it on when it gets warm out, because you know what a messy job it is removing the insides 🙄
Christy says
Ooh yuck! I had one once that was super stinky too…super musty! You do have to work up to these as the insides are no fun to pull out lol…BOSS will seal in all that stink too! Good luck with yours! XOXO
Hannah Reyor says
I just wanted you to know how much I enjoy you. I look forward to your posts on Tuesday and Thursday and learn something new all the time! Thank you!!
Christy says
Aww I appreciate that so much, Hannah, thank you!! I’m so happy to have you following along with me! XOXO
Sheila Pack says
Love. love, LOVE this makeover. The color, the combination of the stencil and the lining fabric could not be more perfect. You’ve inspired me to look for a flatware box to makeover myself as I visit my local thrift shops!
Christy says
Thank you so much, Sheila! I used to see them quite often at thrift stores, but I haven’t seen any in a while. Good luck in your search! XOXO
Roberta Menconi says
I love all the flatware boxes! And this color is yummy. Have you ever done this cigar boxes? I have a few and would like to try it.
Christy says
Thanks so much, Roberta! I did redo a cigar box waaaaaaay back in 2015! It’s a super old post with lousy photos, but you can see it here lol: https://www.confessionsofaserialdiyer.com/cigar-box-upcycle/ XOXO
Roberta Menconi says
Very clever! Thanks so much!
Christy says
Thanks! You’re welcome! 🙂
Kathy says
I so love this makeover~the color, fabric, handles….everything. So pretty, and makes me want to attempt one myself. Also loved the suggestion to store remotes in it!
Christy says
Thank you so much, Kathy! These boxes are so fun to play with for sure! XOXO
Denise - Salvaged Inspirations says
Lovely, and can’t wait to see what you do with that stool! XOXO
Christy says
Thank you, my friend! The stool turned out so cute! Have a fabulous weekend with all your snow lol! XOXO
Dalila says
Christy, that box looks so beautiful now. What a transformation! I have the same box and will give it some love, too.
Christy says
Thank you, Dalila! Have fun transforming yours! XOXO
Sharon L Austin says
Turned out awesome! I finally used one of my silverware boxes and repurposed it into a knife case for my grandson. Your way of lining the box was much easier than what I had done previously. Yay!! The dividers I had to add were a little tedious though, LOL. Dang, I wish we could add photos here!
Christy says
Thank you, Sharon! Great idea! And good that you were able to salvage the dividers. I love to see y’all’s projects…if you want to share, you can always email me directly at christykjames@cox.net! XOXO
Sharon L Austin says
I’ll try to send a pic…. I didn’t salvage the original dividers, I had to make new. It prob would’ve been easier if I could have used the originals! LOL
Christy says
Okay! Ha ha whatever works, right? XO
Cecilia from Georgia says
Love the dots! I bought a set of styluses sometime back and it them up. Then forgot what i had seen you do with them. I’m going to grab them and redo a silver chest to copy your style! Fortunately, the lining I put in is in good condition. Stay warm! It’s in the 70’s here! Perfect for painting outside 🤩.
Christy says
Thanks, Cecilia! The dots just add a little something extra, right? I bet you could create a whole design just with the dots. Have fun transforming your chest! It’s been so nice here the past two days also, getting up to 71 today, but it’s suppose to be back in the 30’s tomorrow….brrr! XOXO
Michele M. says
Brilliant. That box is absolutely gorgeous. Christy! WOW! I love it!!!!!
And those bright fun new Silk Paint colors – wow – I am not a big color person but I sure look forward to seeing you use them in your genius way of making ugly ducklings into beautiful swans.
Christy says
Thank you, Michele! Yes, this new lot of colors is so rich! I already know which one I’m going to use first woot woot! XOXO
Caroline says
I love this makeover! I have a couple of these boxes to do. How the heck did you get those dots so evenly spaced!
Christy says
Thank you, Caroline! With a very steady hand ha ha! XOXO
Debra Hubbs says
This came out so pretty! Love the soft gray color you mixed.
Christy says
Thank you, Debra! XOXO