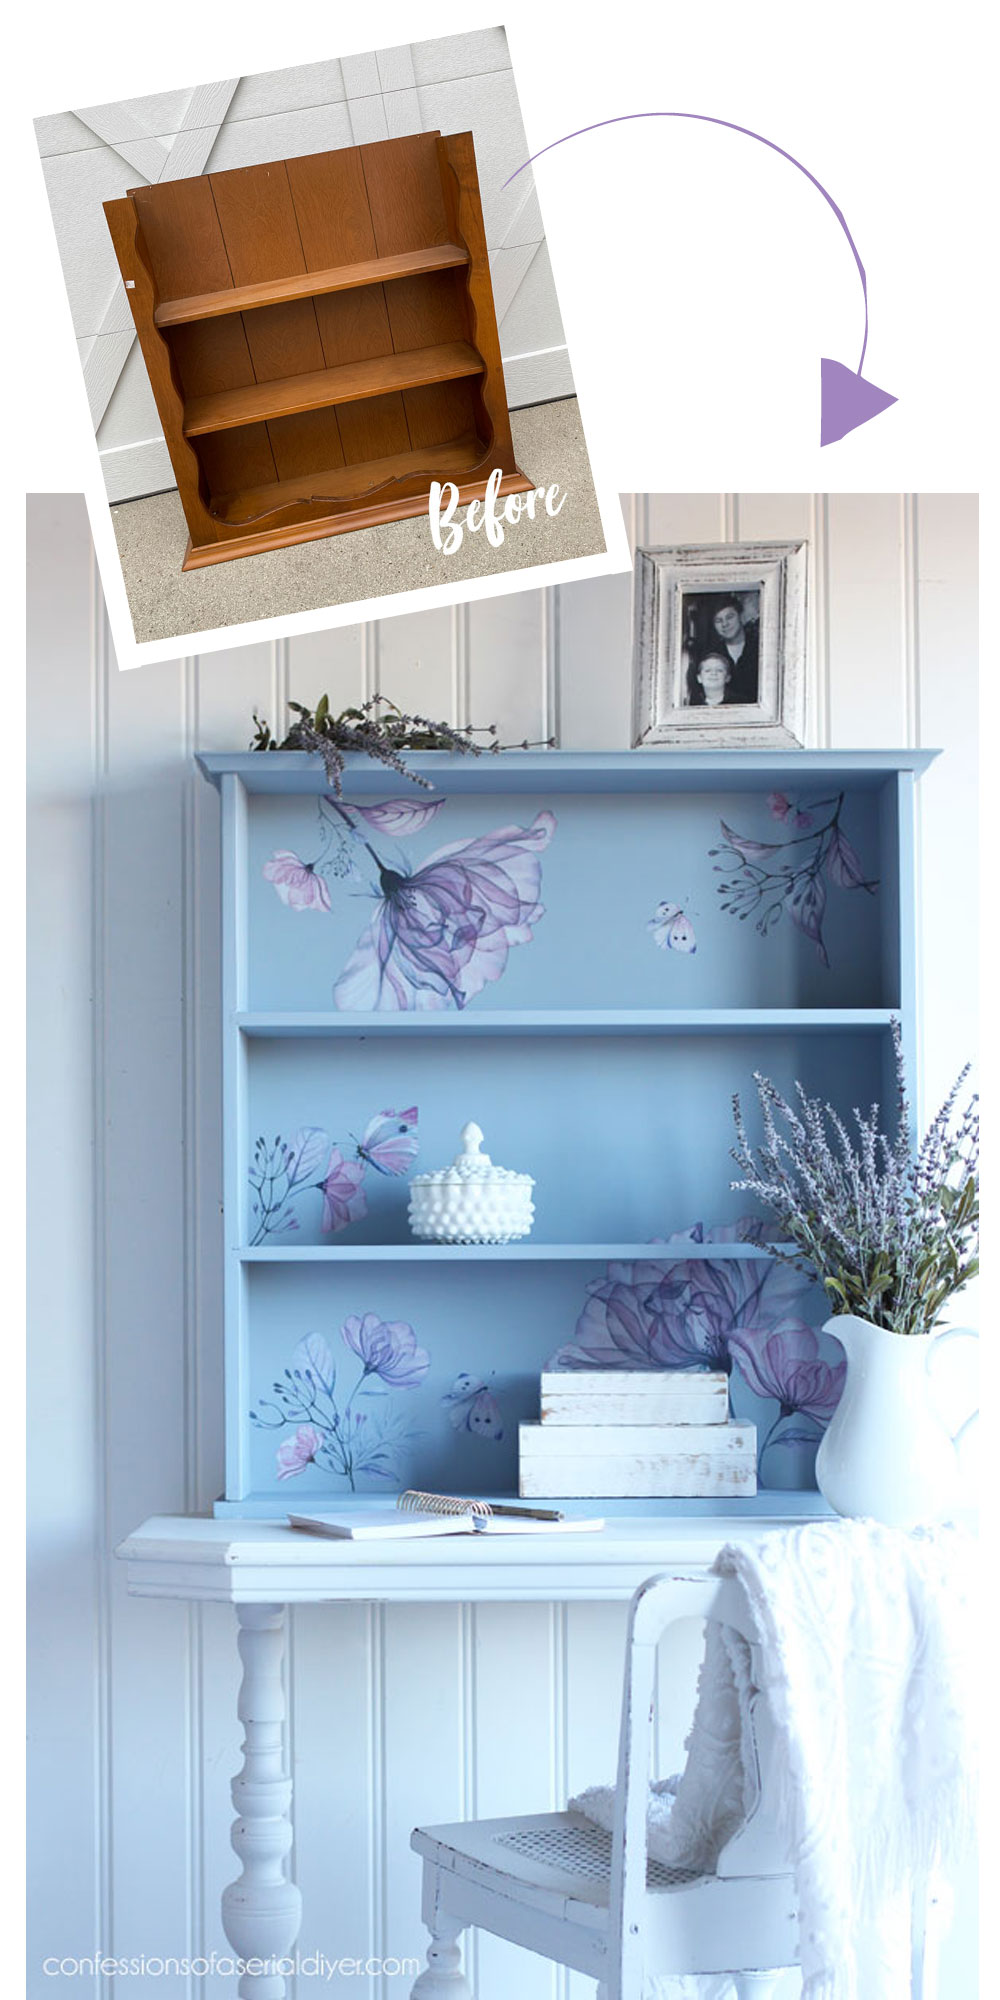
Hello, beautiful friends! Today, I’m sharing how to repurpose a secretary desk hutch. I’m happy to report that our baby shower/Mom’s birthday weekend was a great success! With my sister still in town, I am playing instead of working, so I’m pulling out this fun makeover to share!
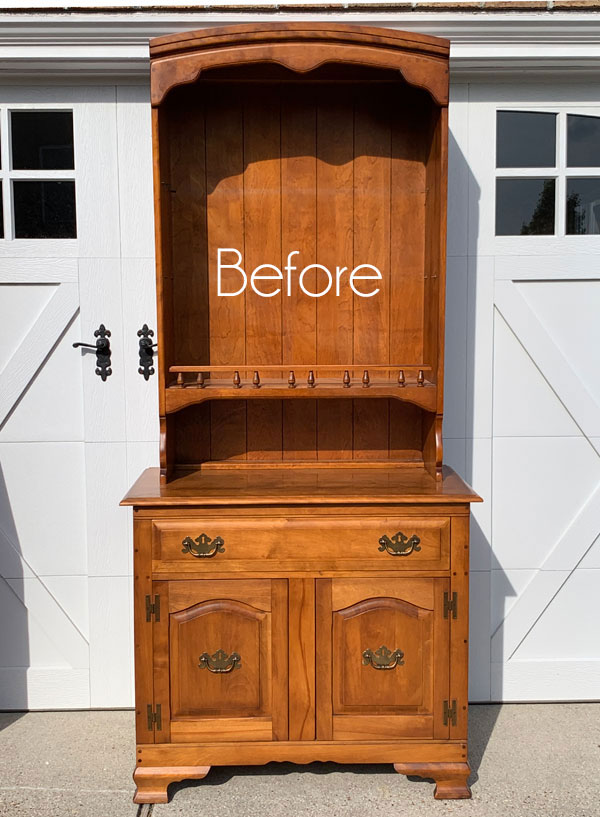
Here is how the piece I’m sharing today originally started:
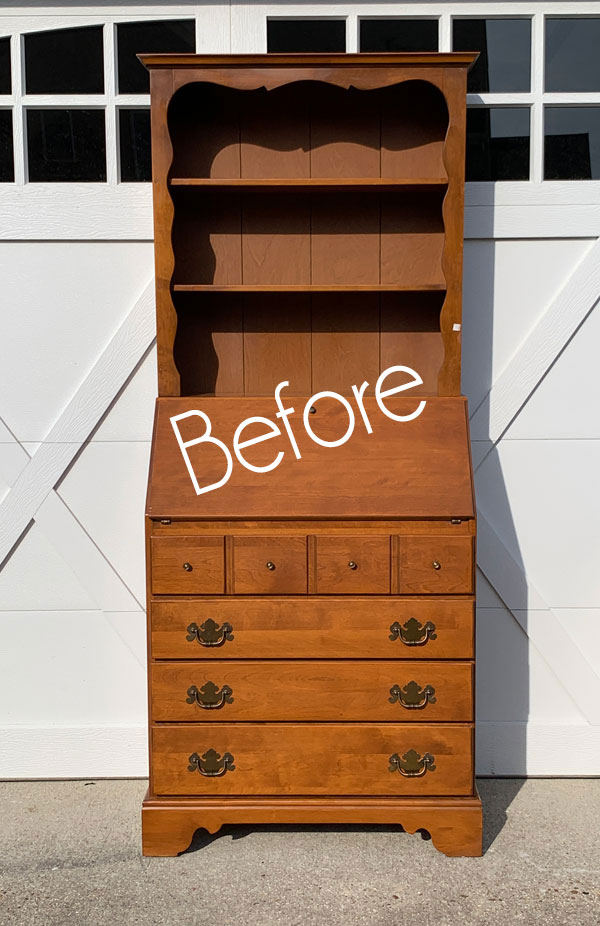
I redid this secretary desk and ditched the hutch on top. See that makeover HERE.
I knew this top piece had to go, but I just couldn’t throw it away:

I wasn’t sure how I was going to make something functional out of it, but throwing it in with my Free-to-me Haul forced me to figure it out!
How to Repurpose a Secretary Desk Hutch
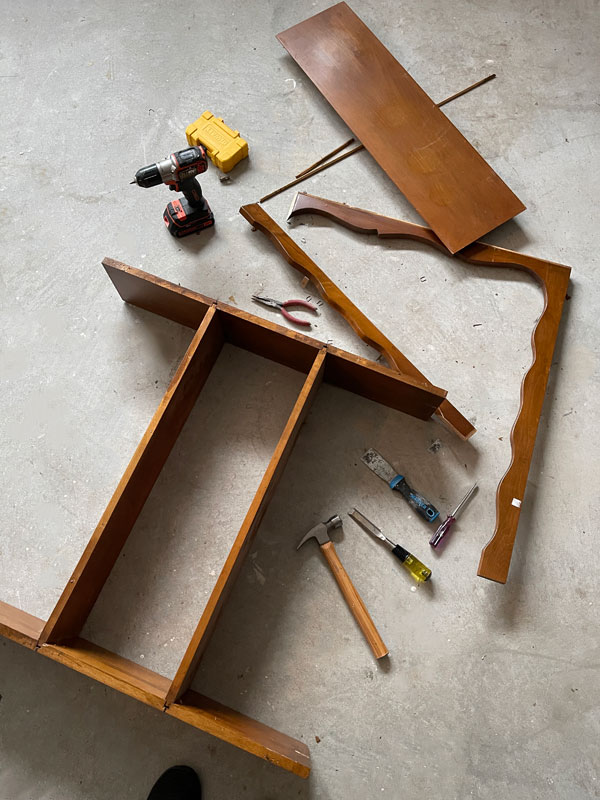
I started by taking it apart so I could see what pieces I had to work with:
I’ve included a few affiliate links so you can find the products I love.
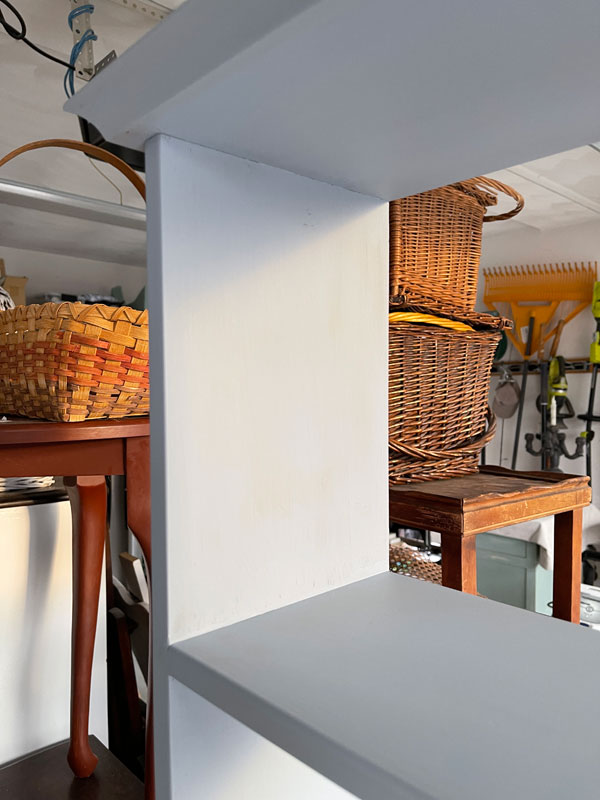
After removing the dated trim, I realized that the two shelves were actually fitted into the two side pieces, so they really couldn’t be reconfigured any other way, and I just decided to keep it as a mini shelf.
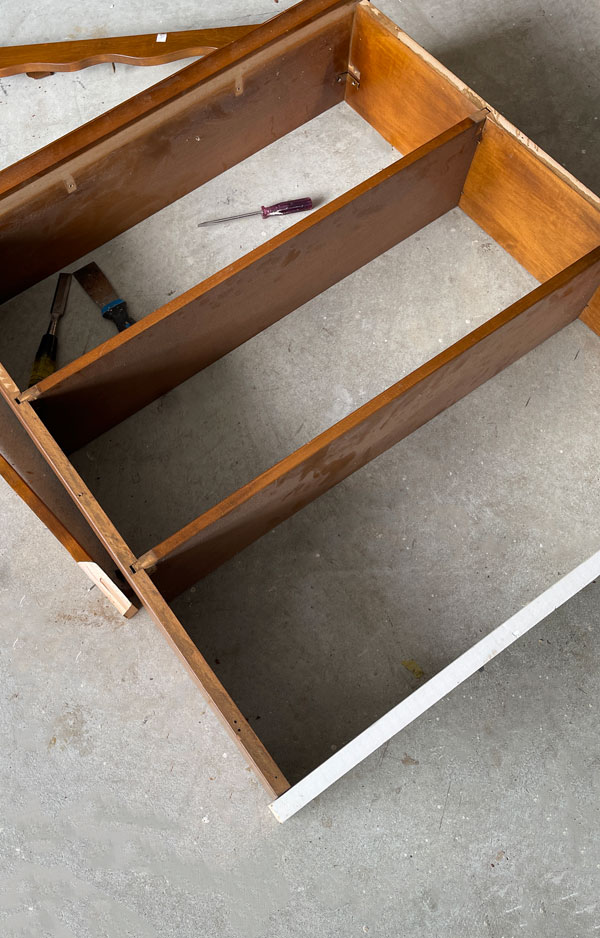
To do that, I had to remove about an inch from the top piece since that wavy trim piece was no longer a part of the new shelf:

To make it function on its own, I found a primed scrap of wood that I cut for the bottom:
I let it overhang just a tad on either side so that it looked more like a base.
To reattach the top and the new bottom to the sides, I used wood glue first, and then here’s what else I did to secure them:
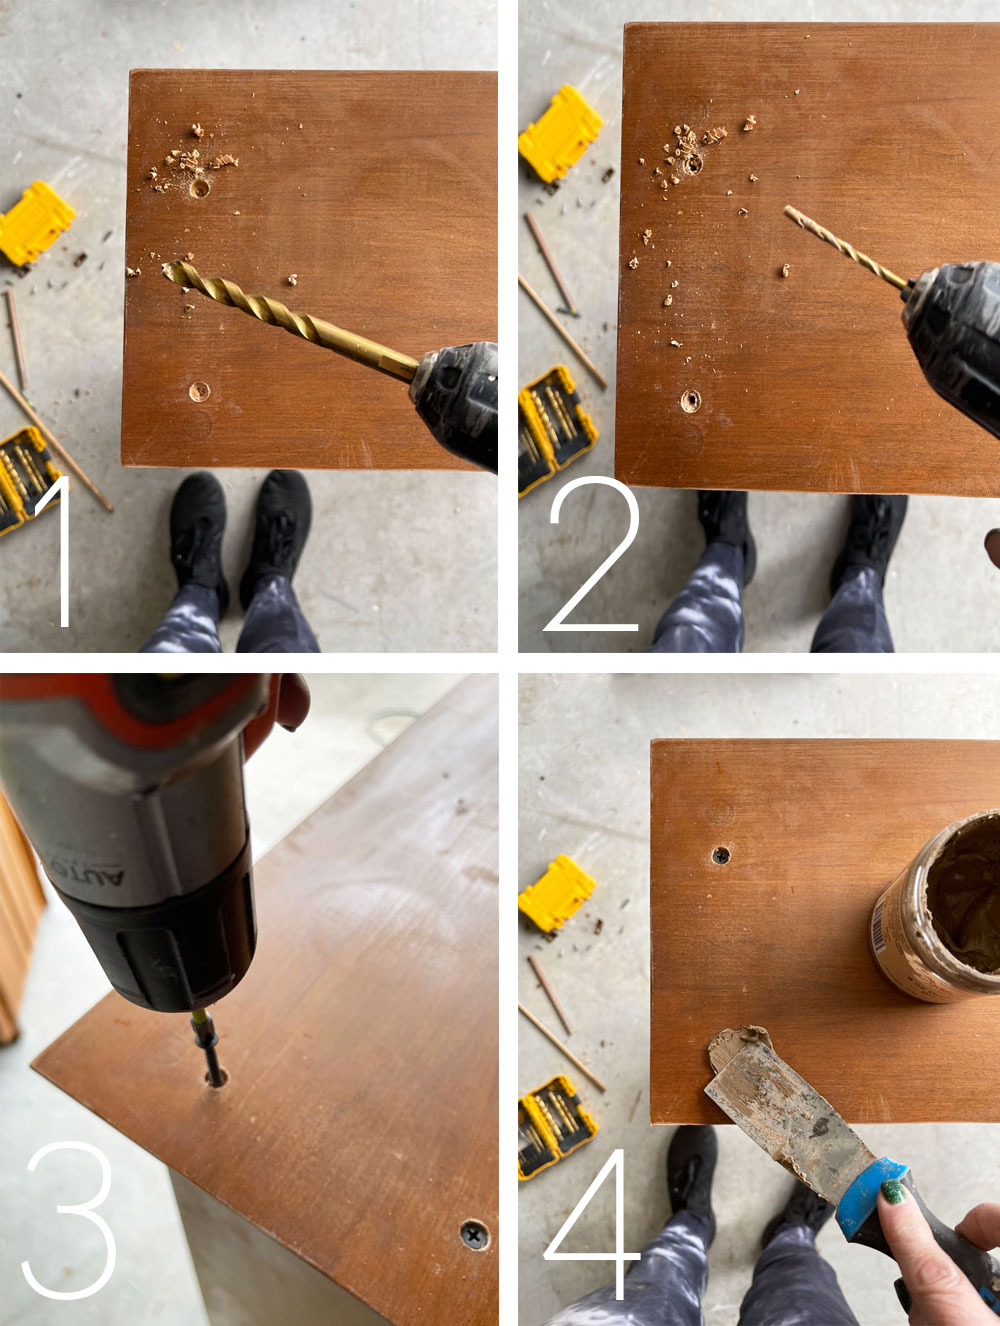
- First, I used my drill to make a shallow hole just a tad bigger and deeper than the head of the screws I planned to attach them with.
- Next, in the center of those larger holes, I predrilled for my screws.
- Then, I drilled the screws in place.
- Finally, I patched the holes with Dixie Mud and allowed it dry.
Once the mud was dry, I sanded the areas smooth using my favorite sander for small jobs:
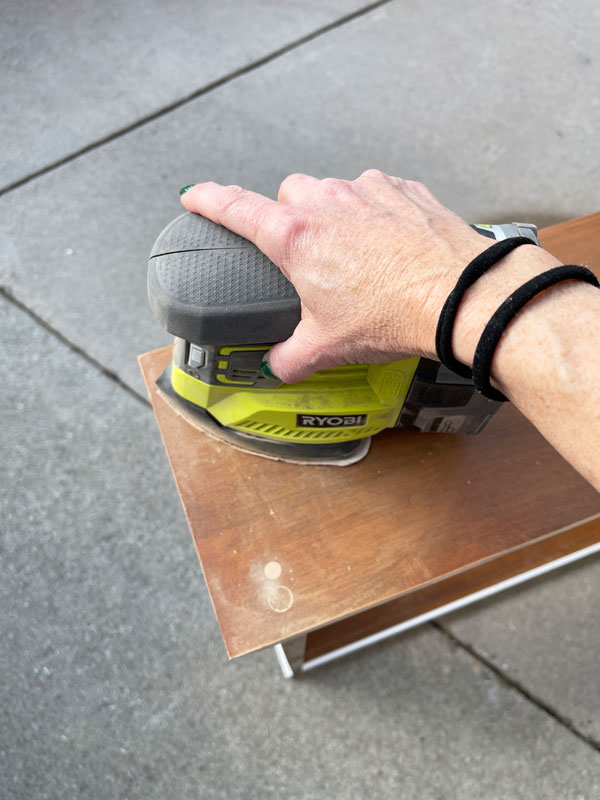
I usually do a lot of hand sanding for these smaller jobs, but this sander is so compact that it works great also and is much quicker! I have the cordless one, but it is also available in a corded option if you don’t already have the Ryobi batteries.
Finally, I had to cut a new back piece which I did out of some hardboard (like pegboard but without the holes) that I had in the garage:
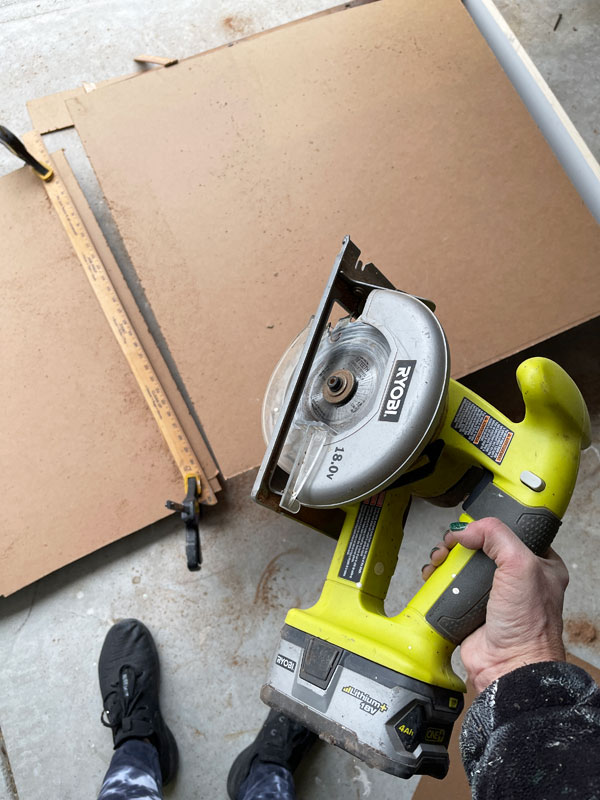
A small circular saw works great for this! As you can see, I clamped a yard stick in place to act as my guide for nice straight cuts.
Paint
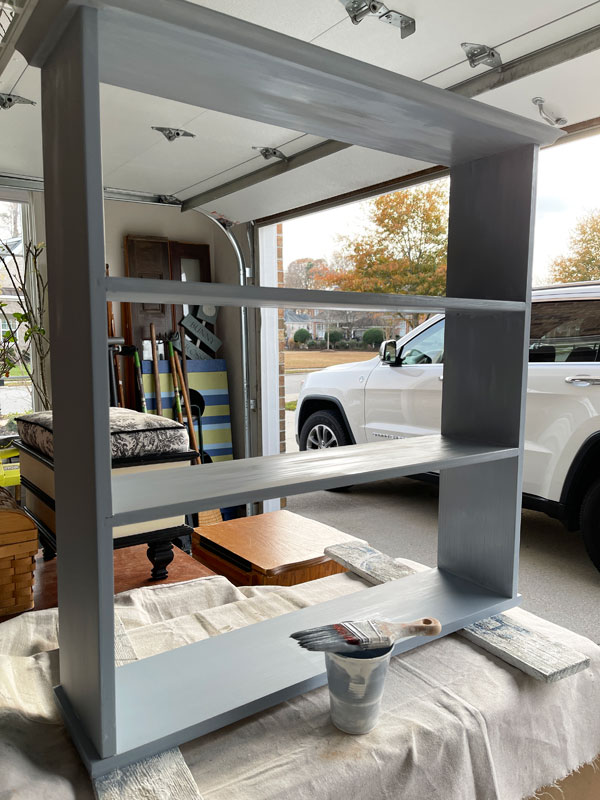
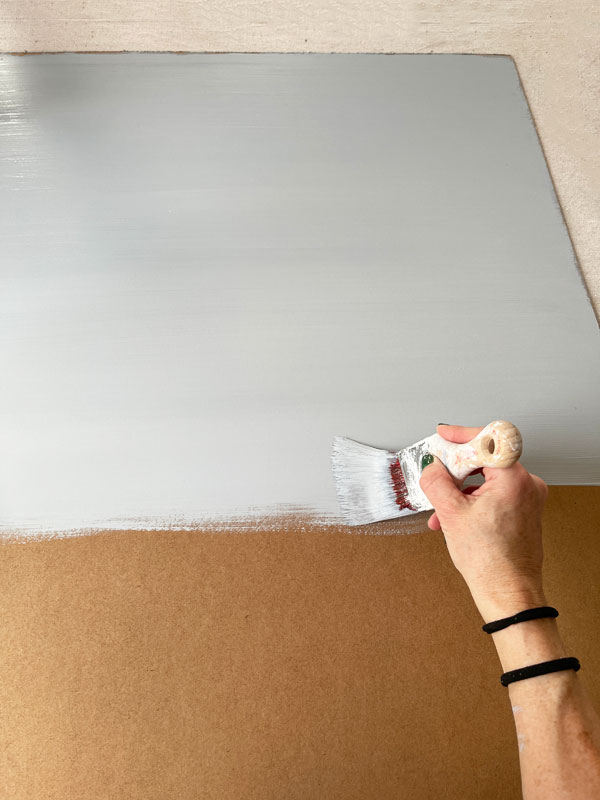
Then it was time for paint!
Because I planned to use Silk Mineral paint for this hutch, after sanding where I applied the Mud, I also sanded the rest of the hutch to prep for Silk paint.
The Silk needs something to grip onto. If you want to skip the sanding prep, you can apply Slick Stick as an alternative.
Now, I know better than to get right to painting on an older piece like this, especially one that I have sanded, since bleed-through is a real probability.
But, I did it anyway:
I used a custom 50/50 mix of Silk Whitecap and Quiet Cove:
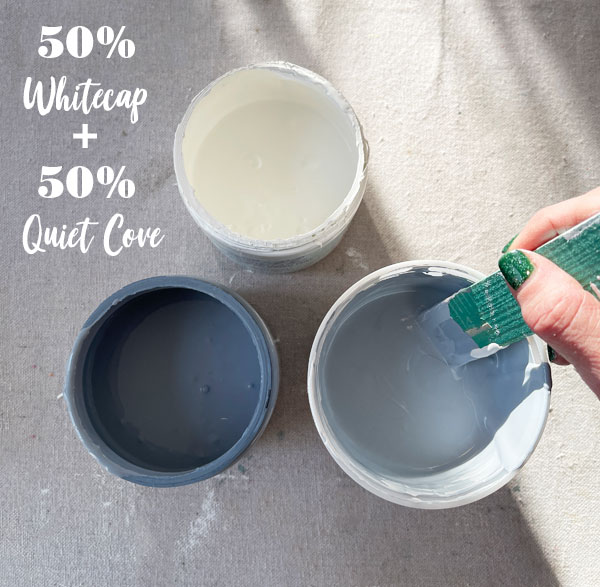
I love Quiet Cove, but I wanted to lighten it up a bit.
As I knew would happen, I got major bleed-through!
Oh no! Not to worry though, there is a super easy fix!
How to fix bleed through
I just reached for my favorite product for bleed-though: BOSS!
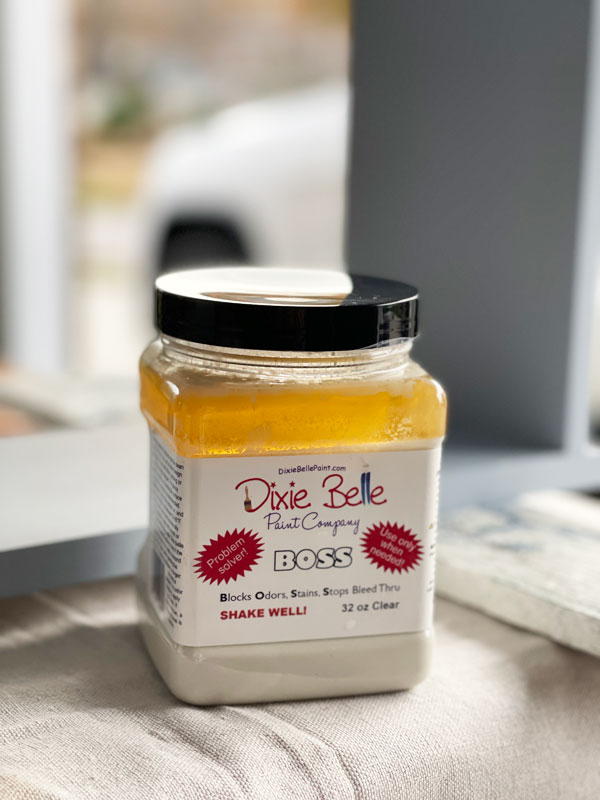
I’m sharing this photo of my old jar of clear BOSS just in case you have one that looks like this too. It is OK! BOSS is water-based (no harsh smells!), so it’s not unusual for contents to separate. Just give it a good shake or stir and you are good to go!
Here it is after a quick shake:

I applied one coat of clear BOSS and as you can see, it really pulled those tannins out even further!
You know it’s the tannins because as you can see, the bottom shelf looks perfect since it was the piece of primed lumber I added.
I allowed this to dry overnight. Proper dry time is KEY!
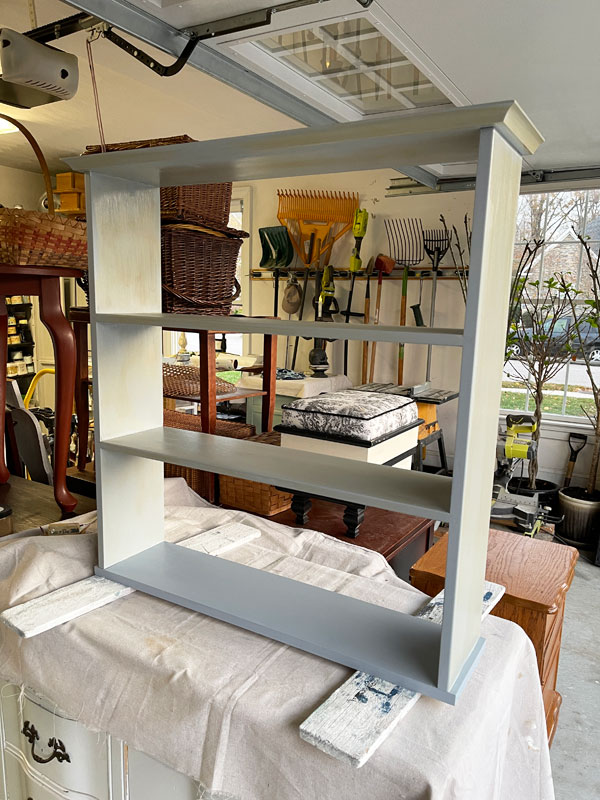
I repainted the next day and it was perfect! This is by far the BEST product I have used for bleed-through!
There was no need to seal the shelves since Silk does not require a topcoat, so that was it for the shelves. *You’ll want to use your piece with care for the first three to four weeks while your paint hardens and cures completely.*
The Back board
For the backboard, I had other plans!
I applied two coats of my custom silk paint mix using my favorite Mini Angle brush:
Once that was dry, I reached for one of Dixie Belle’s transfers, Translucent Garden:
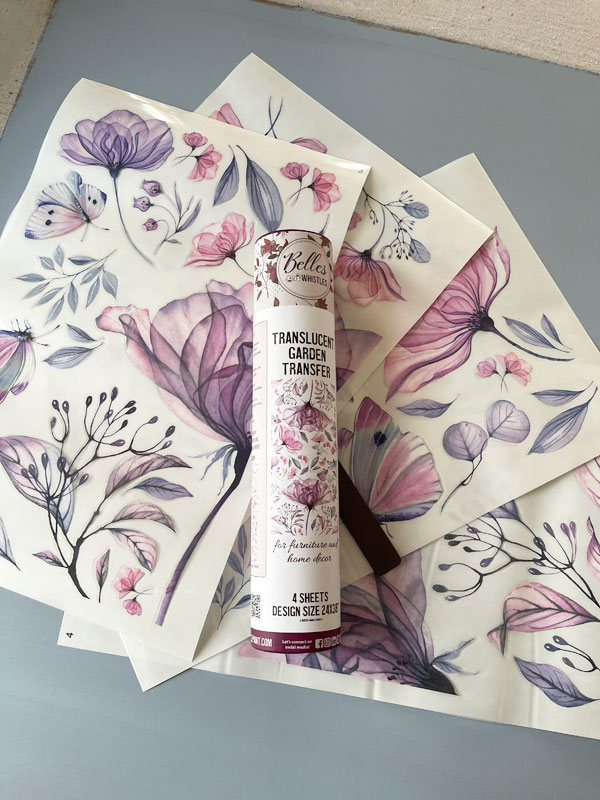
Isn’t she so pretty?? (And she’s marked down now too!)
You can see now that I was trying to match the paint to this transfer.
Adding the transfer
This one has so many pieces you can use to create whatever look you want. I started with a couple of the larger blooms:
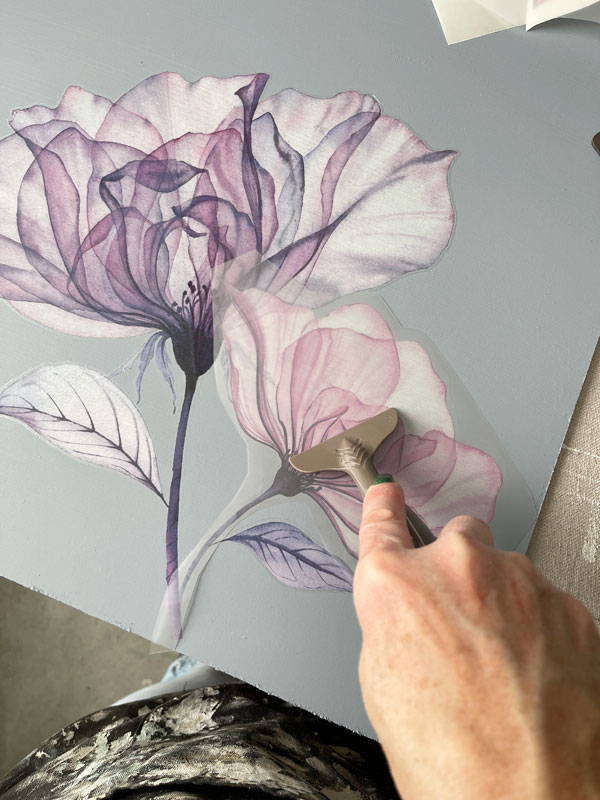
To apply a transfer, you just cut the piece out that you want to use, remove the white backing and then use the provided tool to burnish the transfer onto your piece. (Or you can use this sturdier tool if you use a lot of transfers, but the stick works too.)
Once the image has been transferred onto your surface, remove the clear film on top. If any of the transfer sticks to the top, just lay it back down and burnish some more.
I continued to add on:
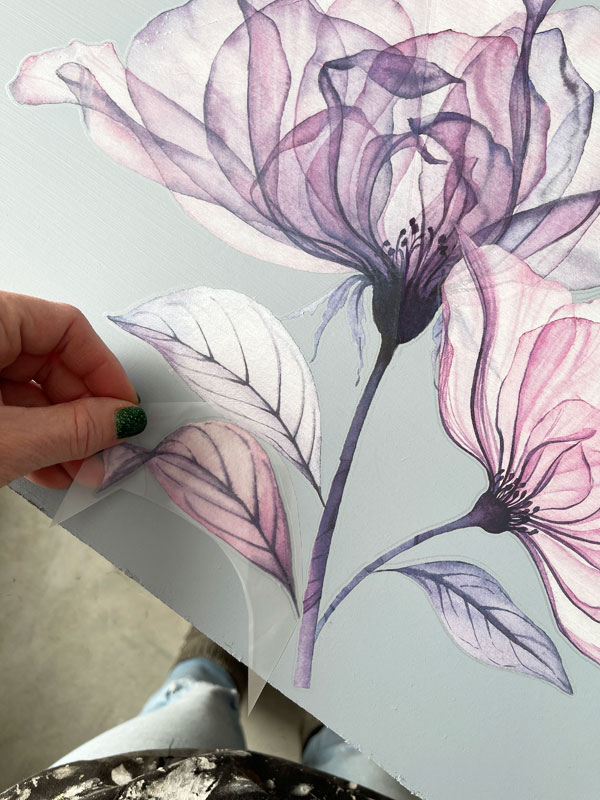
Until I had a look I liked…
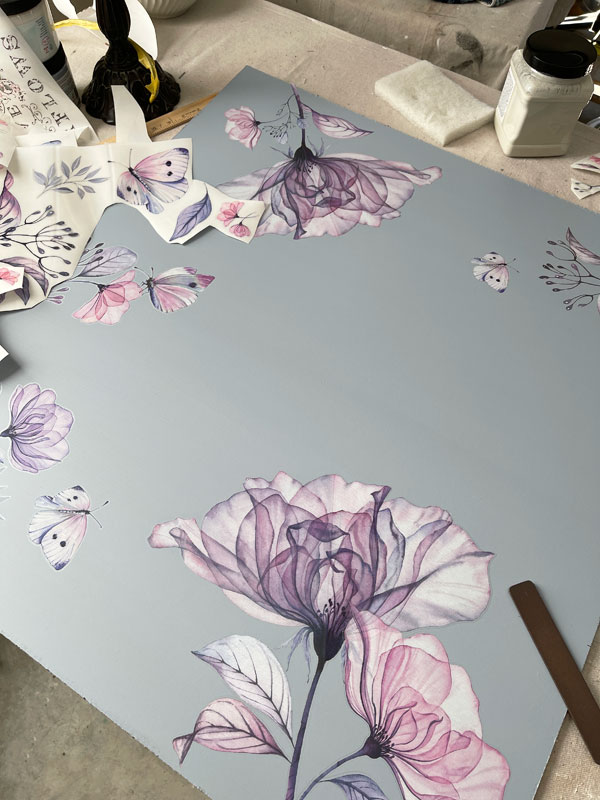
Then, I sealed the transfer to protect it using Clear Coat in Satin, which I applied with my blue sponge applicator:
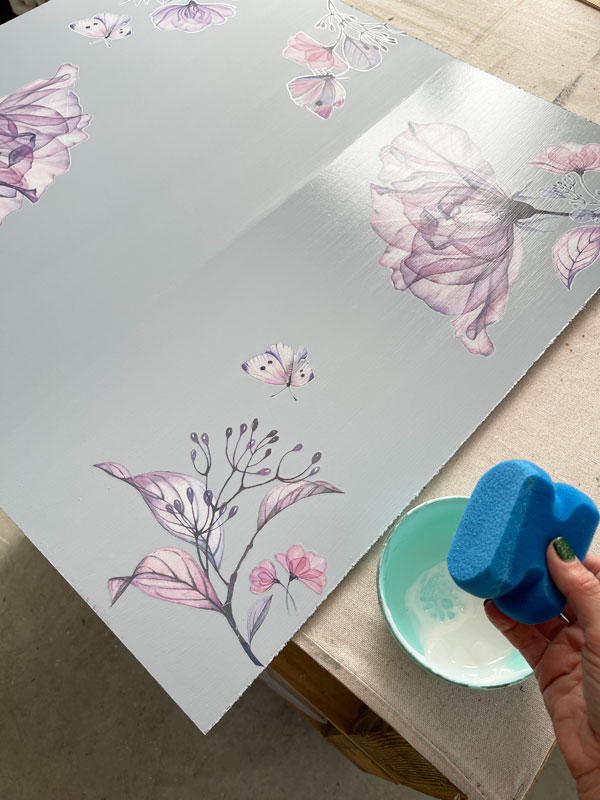
As you can see I cut my sponge flat on either side, so I can fit it under the top edge of dressers and such, but it makes it easier to handle too!
You can use these over and over again. Rinse them well with water after using, and then squeeze the excess moisture out with a paper towel and allow to air dry.
I used small finishing nails to reattached the backing and this makeover was complete!
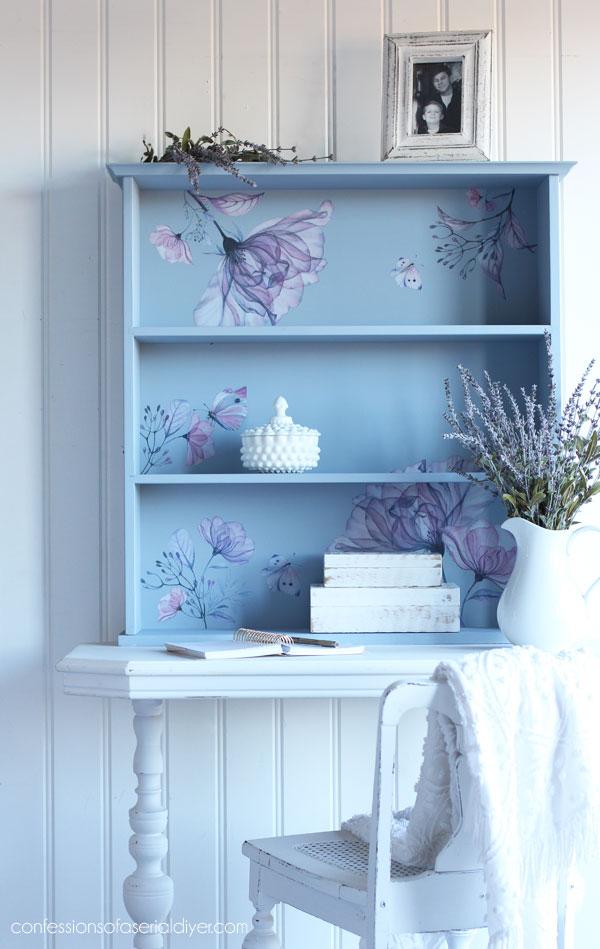
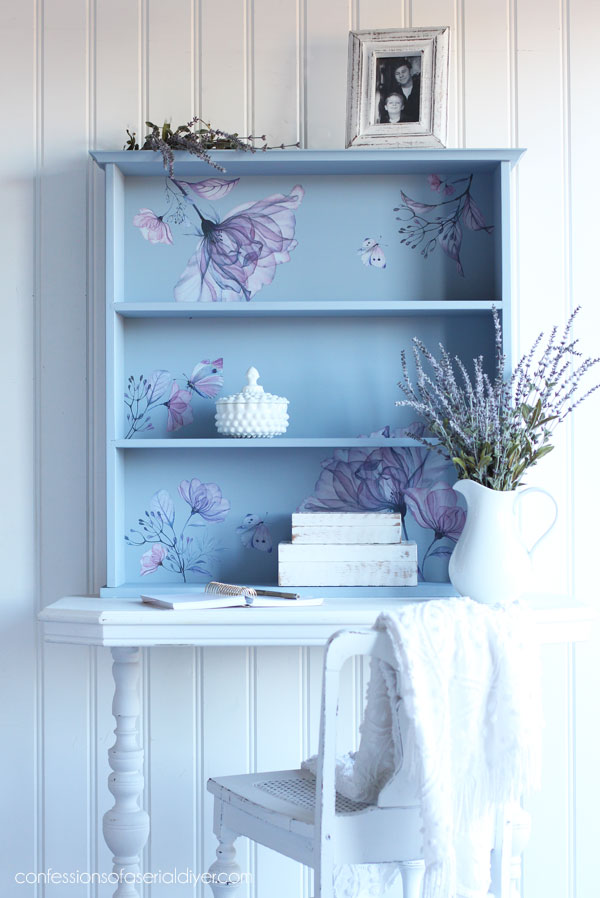
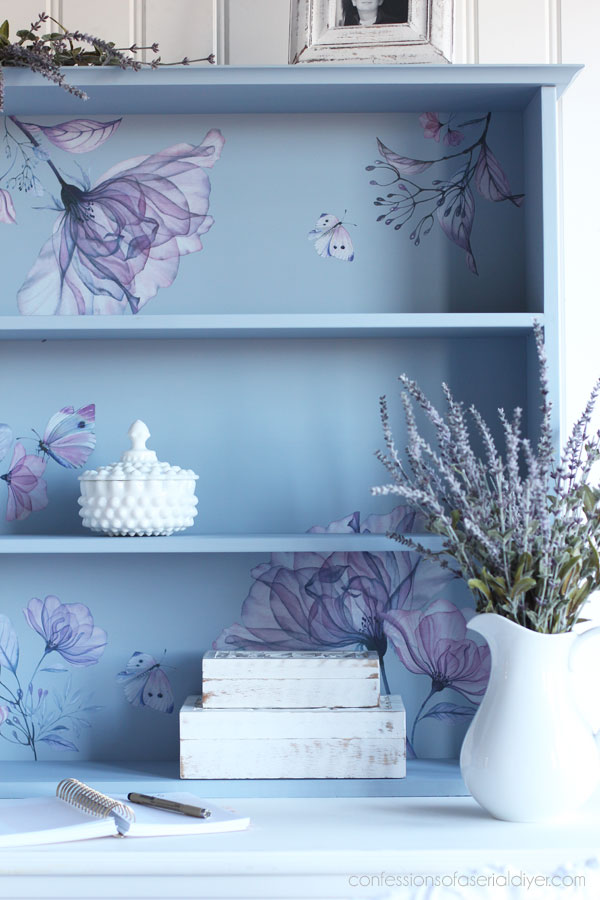
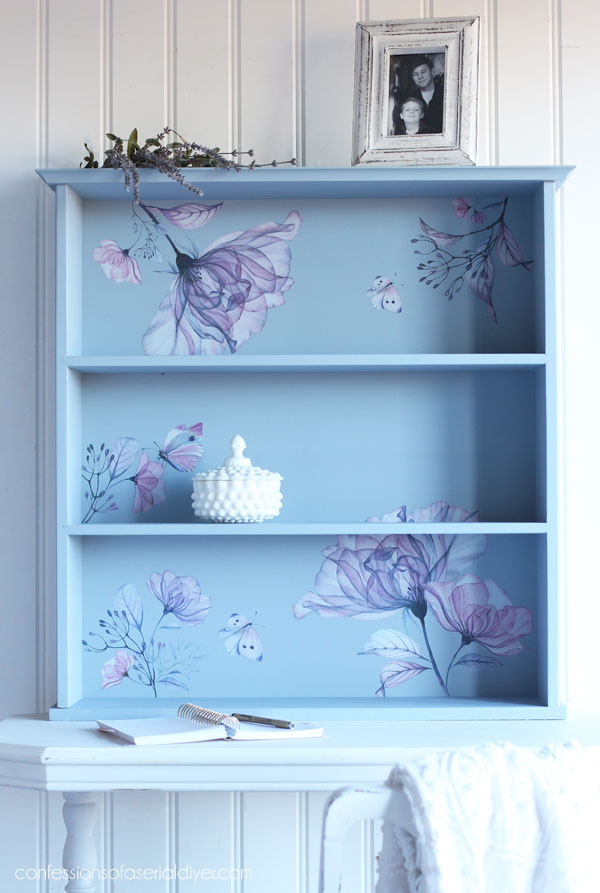
The After
Here is how this old secretary hutch looks now!
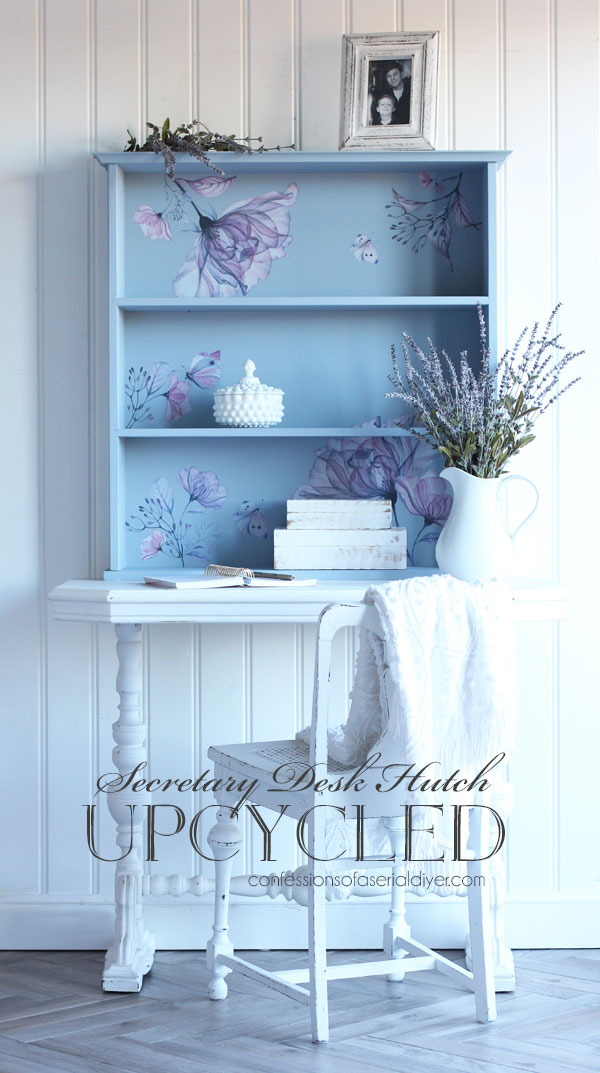
With the new base, it could definitely still work as a mini free standing bookcase, but I love it as it was intended originally…as a desk hutch!
My photos seem to have a blue hue to them, but I think it’s just the blue radiating from this piece!
I had a lot of fun layering all the different pieces to create these sweet images!
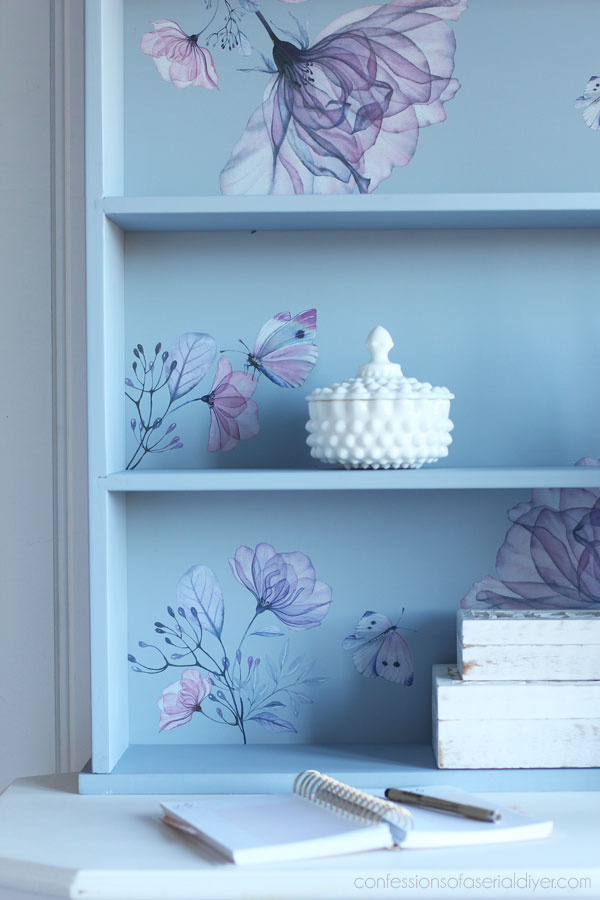
There are tons of flowers, butterflies, and even a huge dragonfly that I didn’t use.
Here are all the piece I had left over:
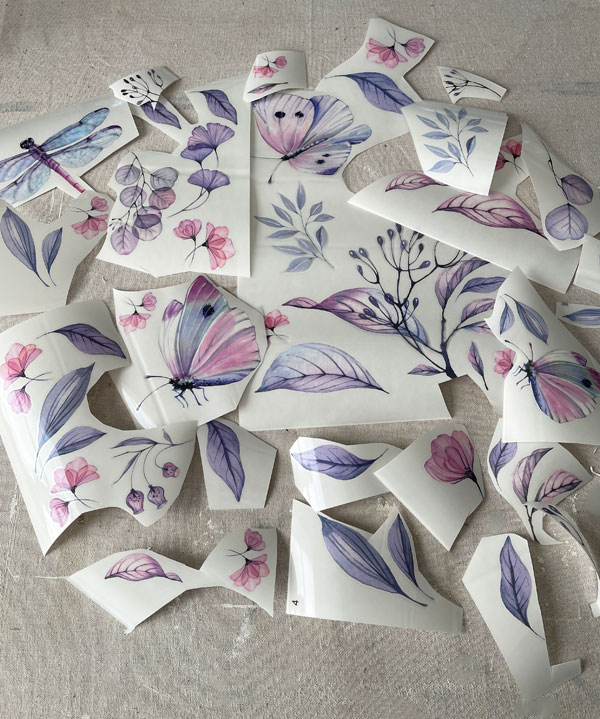
You could definitely get more than one project done with this, especially if you were using it on something small like a jewelry box.
And here’s a peek without anything obstructing the design:
I was so happy to have finally given this left over piece a purpose again!
Here’s another piece that came with a hutch on top. Did I keep the hutch this time??
Find out HERE!
Have a great week, friends, and I’ll see ya Thursday sharing what I did with this gem:
UPDATE: Any guesses?? Now see if you’re right HERE!
XOXO,

Don’t Miss a Thing!
If you like what you see, there are several ways to follow along!
EMAIL * INSTAGRAM * FACEBOOK * PINTEREST


Get FREE SHIPPING on all orders over $50. No code needed at checkout! Orders under $50 always enjoy $8 flat rate shipping! Most orders ship same or next business day!


")

Janette says
Another gorgeous make-over, love the colour and those pretty transfers are perfect.xx
Christy says
Thank you, Janette! These transfers were so fun to play with! XOXO
Mary Kaiser says
I remember this one, and how sweet it turned out! I am glad that you had a great weekend with family! How fun that every thing turned out great and that sister is still around to take more time with! Have fun!
Christy says
Thank you, Mary! We are heading out shopping today…got to enjoy every minute! Have a great week! XOXO
Margie West says
Christy you are amazing! I just live all the beautiful things you make! Keep up the great work you do! Margie\Tennessee
Christy says
Aww I appreciate that so much, Margie! Thank you! XOXO
Janice Holt says
So glad your busy week-end turned out great. You just enjoy your family and we’ll see what you have in store for us later. Family is most important. Oh and love the hutch.
Christy says
Thank you, Janice! You are always so wonderful when I need to take a minute away and I appreciate that! Enjoy your week! XOXO
Denise Zdziennicki says
Gorgeous Christy, I love this transfer! Enjoy your sister/family time… and aren’t sisters the BEST!👯♀️🤗
Christy says
Thank you, Denise!! YES! I know you are so grateful for Andrea and I feel the same about my sisters!! XOXO
Kathleen says
Love this! I just bought this one as well as vigorous violet and I just so happen to have a bookcase I want to do. Was going to use vigorous violet for it but now I’m second guessing because yours turned out so beautiful.
I’m new to furniture transfers, is there anything I should know about layering or any tips you’ve got?
Christy says
Aww yay! This one was fun because you can arrange them anyway you like! I just wanted to keep going lol. This one would be a good one to start with because you are adding small pieces at a time. You can layer right over other pieces, and if you mess up, you can cut similar looking pieces and fill the boos right in. Good luck! XOXO
Kathleen says
Well I think you just made my decision for me then LOL.
Christy says
Ha ha have fun! XO
Linda says
Christy, do the items you’ve been doing with transfers sale well in your booth? Just curious since I haven’t been seeing the transfers used on furniture, etc. around where I live. Thanks,
Linda
Christy says
Hi Linda! Yes! This bookcase sold almost right away. And most pieces I’ve done have sold pretty quickly! If you have a booth, I would give some a go and see how they do! XOXO
Lane says
Quite lovely as usual.
Christy says
Thank you so much, Lane! XOXO
Cheryl Atkinson says
Hi Christy! Hope you are enjoying some mom and sister time!! This May be an oldie but it’s a newbie to me. It turned out so cute.
Christy says
Thank you, Cheryl, I sure am! I’m so glad this one was new to you! XOXO
Nana Diana says
What a cute idea…very clever. It is nice that you can use pieces that you disassemble from other pieces. Great job! Diana
Christy says
Thank you so much, Diana! I was so excited to have been able to reuse this piece! XOXO
Sharon L Austin says
OMG I LOVE THIS. Those transfers are sooo me! I need to find something to use them on asap. LOL
Christy says
Thank you, Sharon! There are so many pieces in this one, so I had a lot of fun with it…I could have just kept going lol! XOXO
Debi says
I love my Tuesday inbox! This turned out so pretty…..you always inspire me.
Christy says
Aww yay!! I appreciate that so much, Debi, thank you!! XOXO
Michele M. says
Oh, that is absolutely beautiful, Christy! You certainly gave it a lovely new life!!!!
Christy says
Thank you, Michele! I was so happy to have finally done something with it lol! XOXO
Marian says
Oh, Christy, you do such beautiful work. A wonderful new life for a so so piece of furniture. Thank you for sharing a great make-over.
Christy says
I appreciate that so much, Marian, thank you! XOXO
Janet says
I have been lurking on diy pages for YEARS! This Translucent Garden has me hooked….I am attempting my first ever project; is there a white paint you would recommend to accommodate the tones of that transfer?
Christy says
Aww I love that, Janet! This is such a pretty transfer for sure! If you want to go with the Silk paint as I used on this piece, Saltwater is a beautiful white and would make a lovely backdrop. XOXO
Janet Huey says
Ordered both today!
Thank you!
Sandi says
Lovely!
But what did you do with the bottom of the desk?
Christy says
Thank you, Sandi! I linked to the rest of the secretary at the top of the post, but you can see it here: https://www.confessionsofaserialdiyer.com/beckys-secretary-makeover/ XOXO