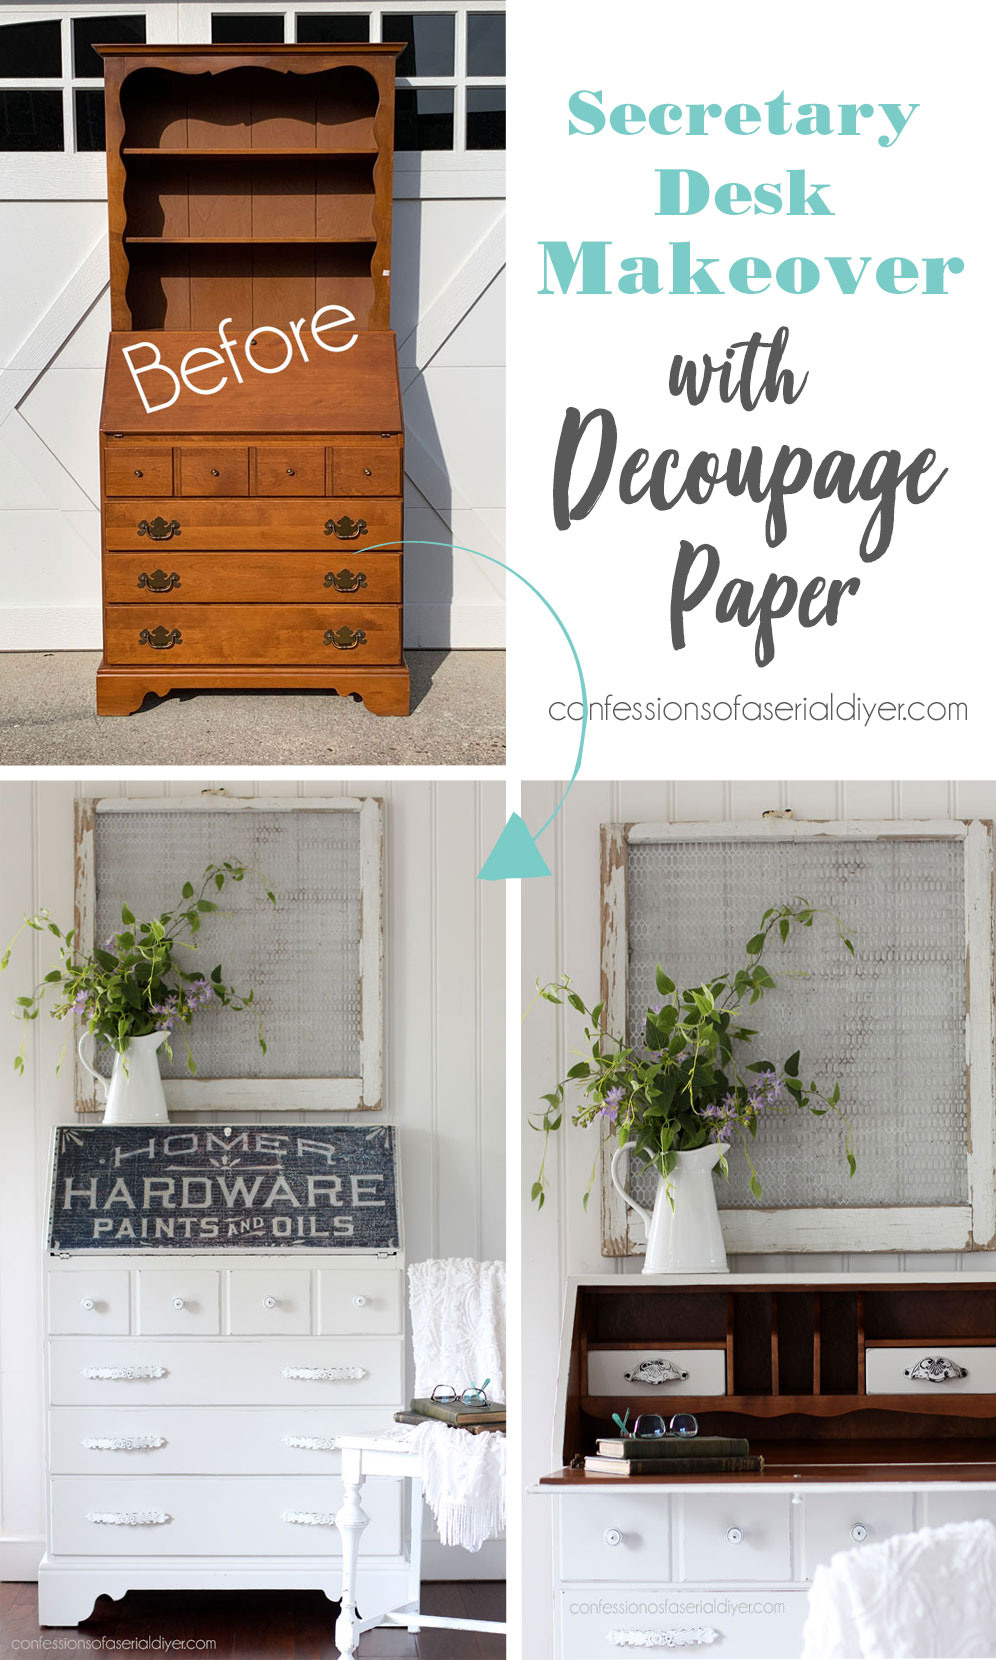
Hello, dear friends! I’m back today with a personal favorite, a dated secretary desk updated with decoupage paper. I don’t use decoupage paper as much since I discovered transfers, but they can do wonders too!
This secretary desk belonged to the parents of my sister’s MIL:

When her MIL acquired it, she wanted it updated. I don’t often agree to paint pieces for others as I don’t enjoy trying to bring other people’s visions to life. I like to have the freedom to do what I want. However, I love her, and she was very open to what I wanted to do as long as it was mostly white.
That I can work with! I’ve included a few affiliate links so you can find the products I love.
Secretary Desk Updated with Decoupage Paper
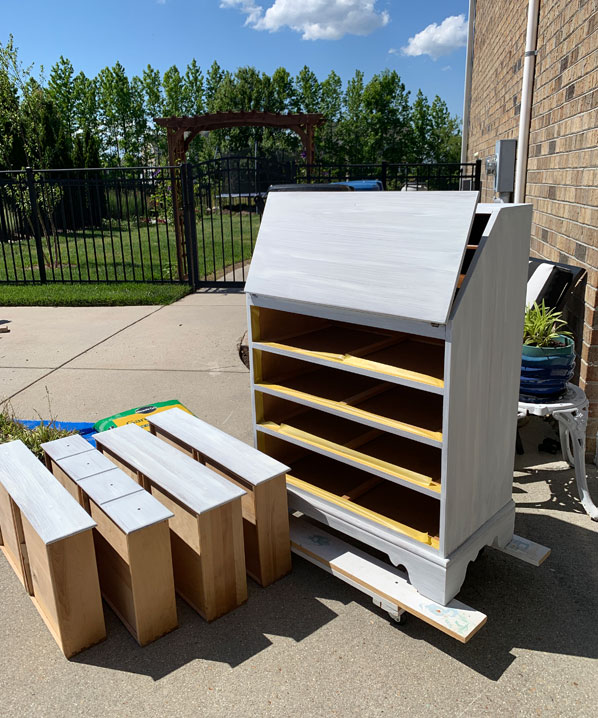
The first thing that I did was suggest ditching the hutch on top. It made this piece way too tall and heavy.
I knew I wanted to replace the dated hardware, and so that was the next thing to go.
Clean
Next, I gave this secretary a good wipe-down with White Lightning. It comes in a powder form that I mix one TBSP of into a half gallon of warm water:
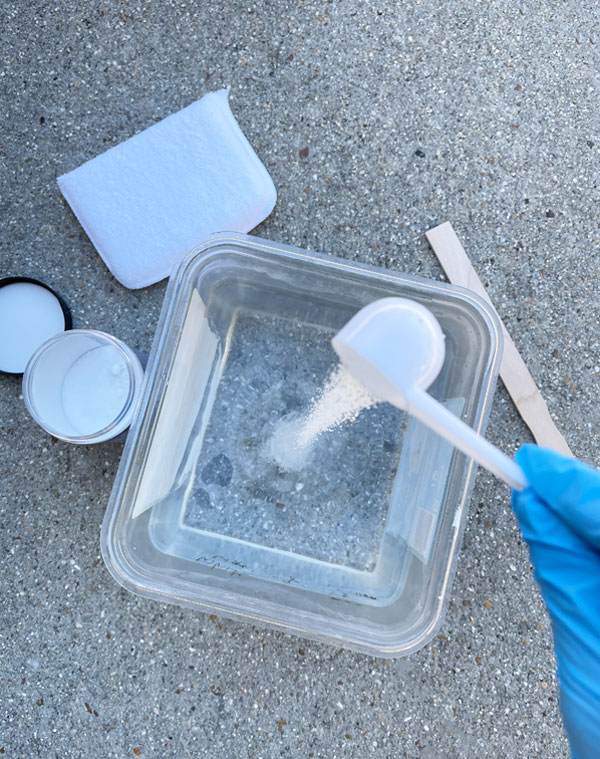
Once my piece is clean, I swap out the dirty water for clean water and wipe down once more to remove any residue.
Fill old holes
Then, I filled the old hardware holes with Dixie Mud in brown:
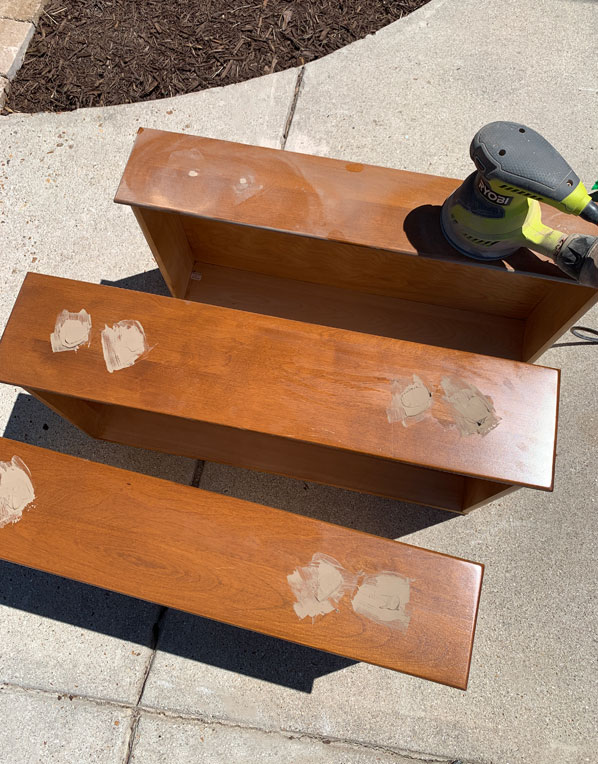
(The Mud is water soluble until it cures, so you want to clean first.) It was a nice sunny day the day I worked on this, so I let the drawers bake in the sun for a couple of hours until the Mud was good and dry. I then sanded them smooth with my rotary sander using 220 grit sandpaper.
I wiped away the sanding dust with a clean cloth.
Prime with BOSS
I planned to use chalk paint for this piece which does NOT normally require a primer. However, sometimes when you sand through the original sealer on a finish (as I did on the drawers), you can get some bleed-through in those places.
To save myself that possible headache, I went ahead and gave it a coat of BOSS in white all over:
BOSS also comes in a clear formula if you don’t want white coming through when you sand, and a gray formula as well.
You don’t want to rush BOSS…plenty of dry time is key! I usually let it dry overnight, but leaving it out in the sunshine speeds up the process, and it was ready for painting in just a few hours.
Paint
Time for paint! I followed the BOSS with Fluff:

Fluff has excellent coverage! I like to describe it as more of a vintage white. My favorite brush for painting is an angled brush.
After the paint was dry, I sanded lightly all over with 220 grit sandpaper wrapped around an old foam sanding sponge.
Here is a video tutorial on my techniques for painting furniture:
Decoupage Paper
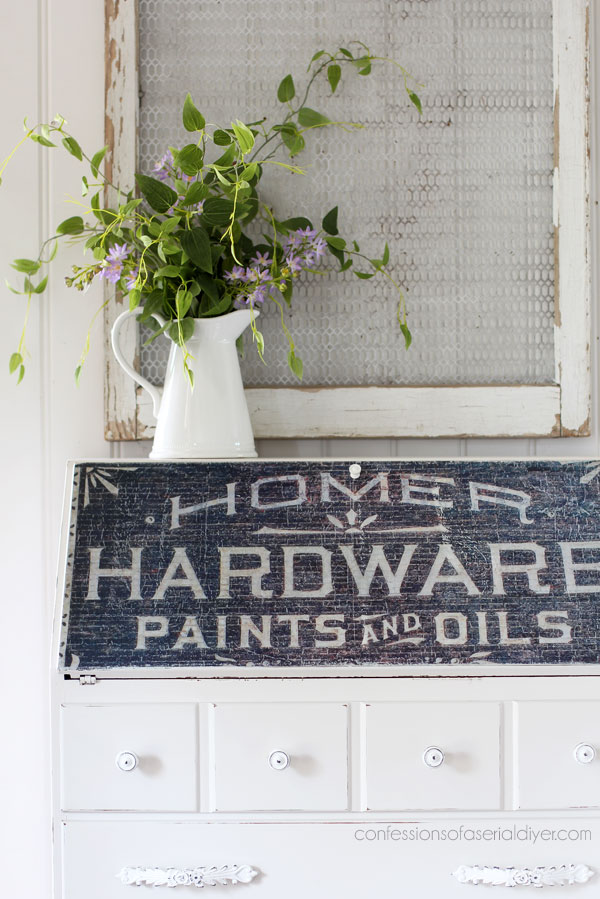
I sent my sister’s MIL a couple of options, but I knew I wanted to add decoupage paper to the front piece that folds down.
She chose this one:
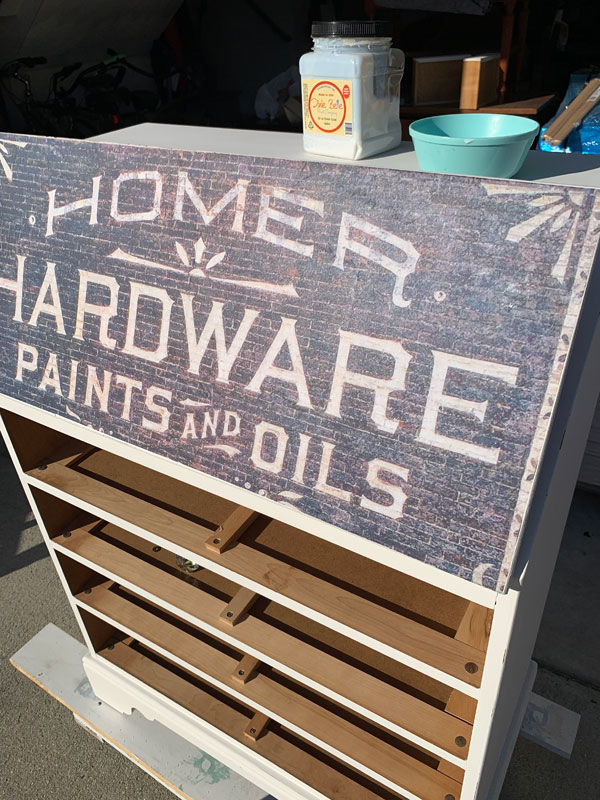
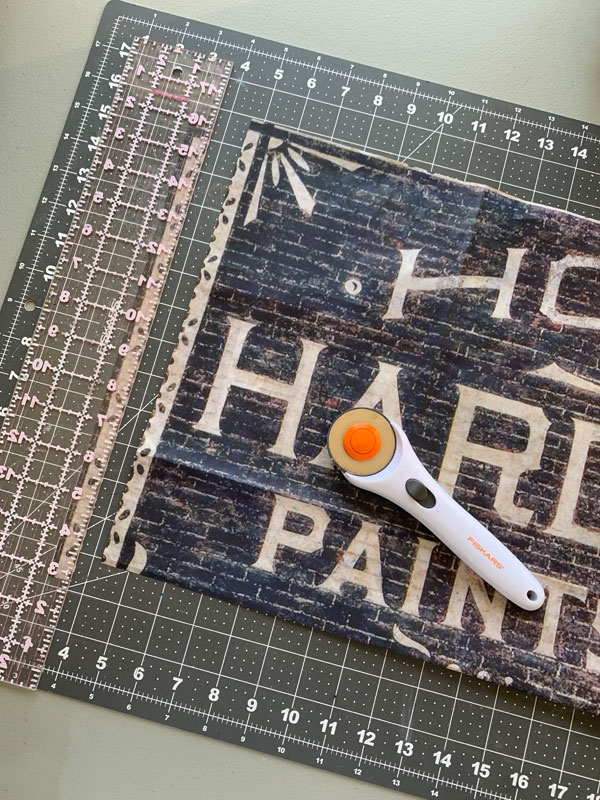
This was my favorite too. This paper is decoupage paper by Roycycled Papers and it’s called Homer Hardware Decoupage Craft Paper. The Etsy shop I purchased it from no longer has it in stock, but you may be able to find one that does if you search that name on Etsy.
It’s a nice large size and was perfect for this piece.
I used my rotary cutting set to cut it to the size I needed. (This is the set I have…it includes the mat, the rotary cutter, and straight edge.)
Here’s what I used to apply the paper:
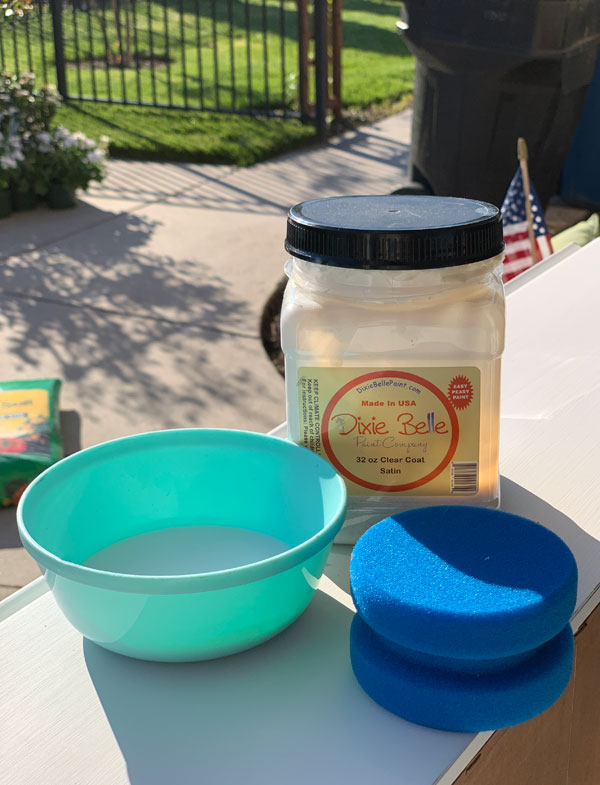
I applied Satin Clear Coat a bit liberally to the front and then immediately applied the paper. In my haste to get it done, I followed up with a top coat of the clear coat and left it to dry without doing a thorough enough job of smoothing out the bubbles. This can be done with a credit card, a rubber brayer like this one, or the this transfer tool.
So, I did have a few wrinkles that didn’t want to come all the way out. Luckily, with the rugged design on this paper, I was able to sand across the surface once it was dry, which distressed it some, and it looks like it was always meant to be that way!
After sealing the rest of the body with Satin Clear Coat using the blue sponge, this piece was done!
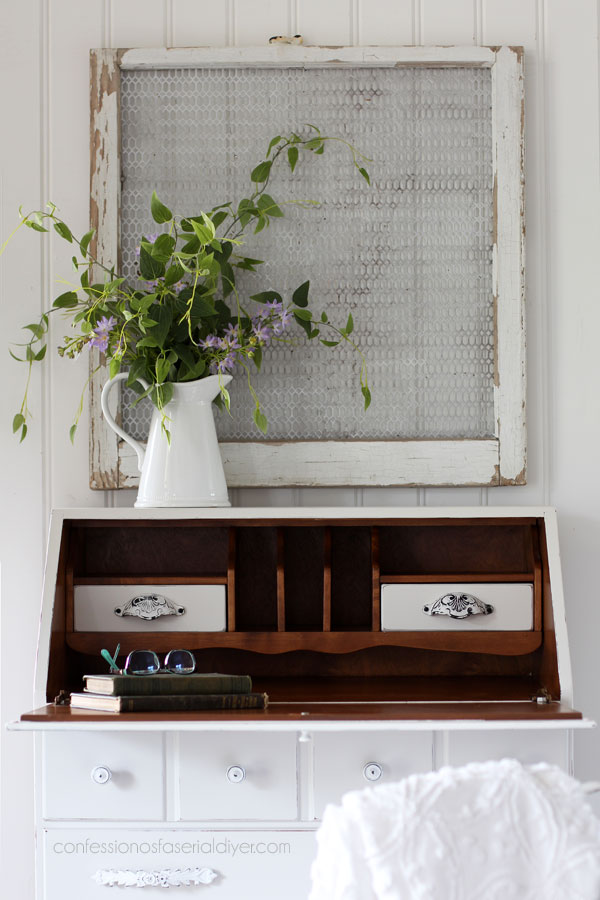
The Result
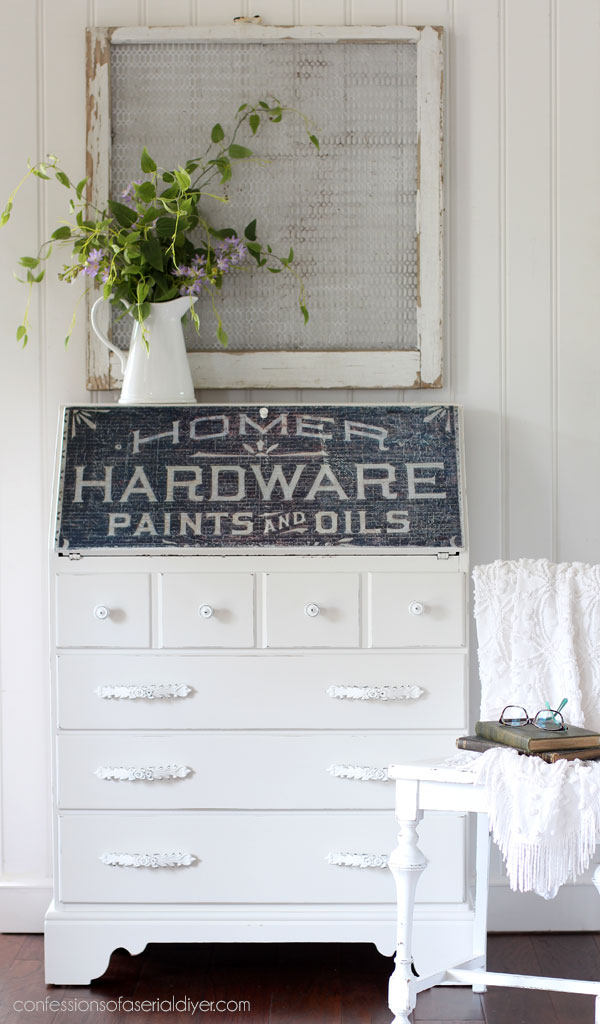
Here is how this hard-working piece looks now:
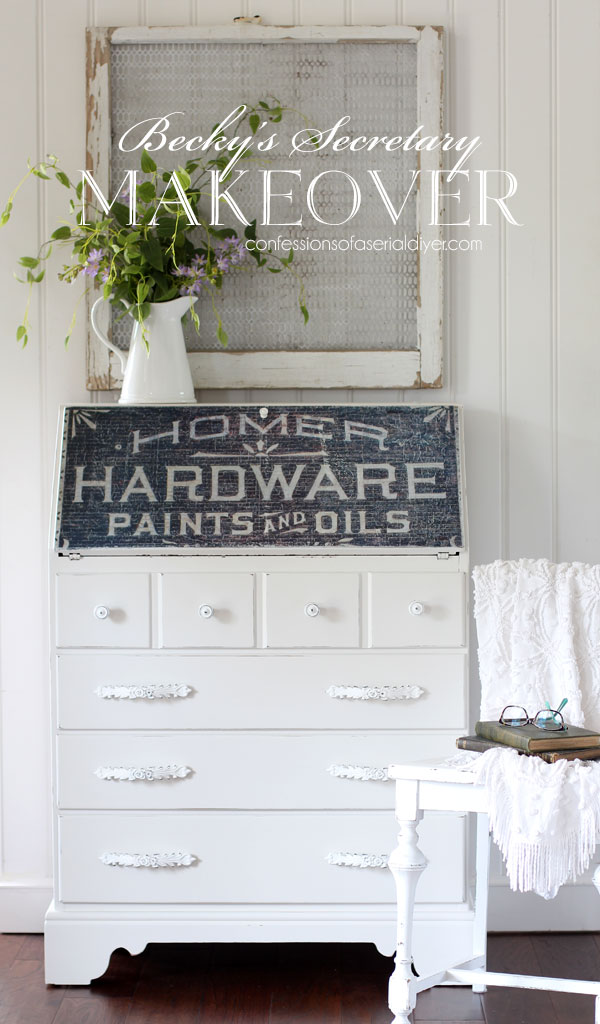
Much better, no?
I always tend to lean more towards “pretty”, but I love the more masculine feel the decoupage paper adds to this piece!
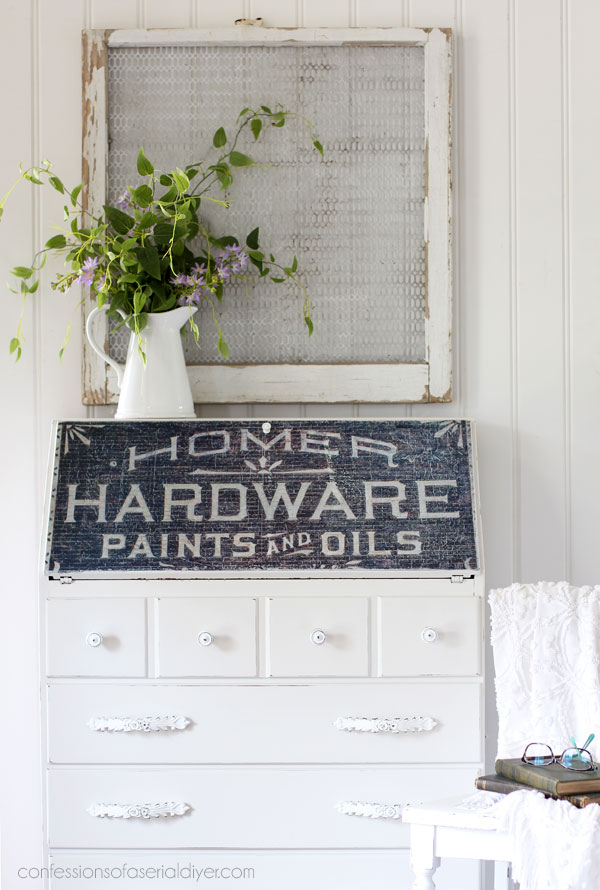
Here you can see the effect sanding had on it:
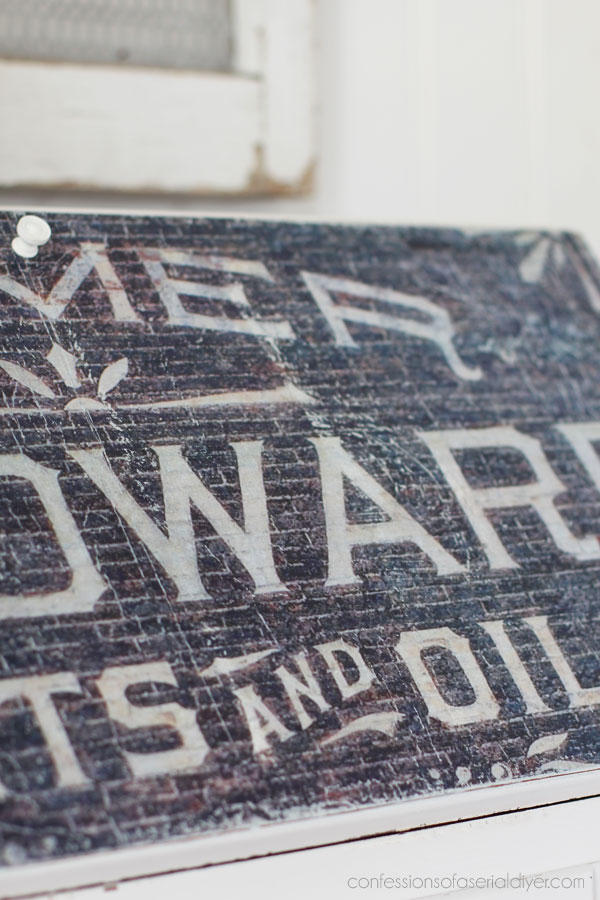
It looks time-worn and wonderful!
I did apply another coat of Clear Coat in Satin after sanding.
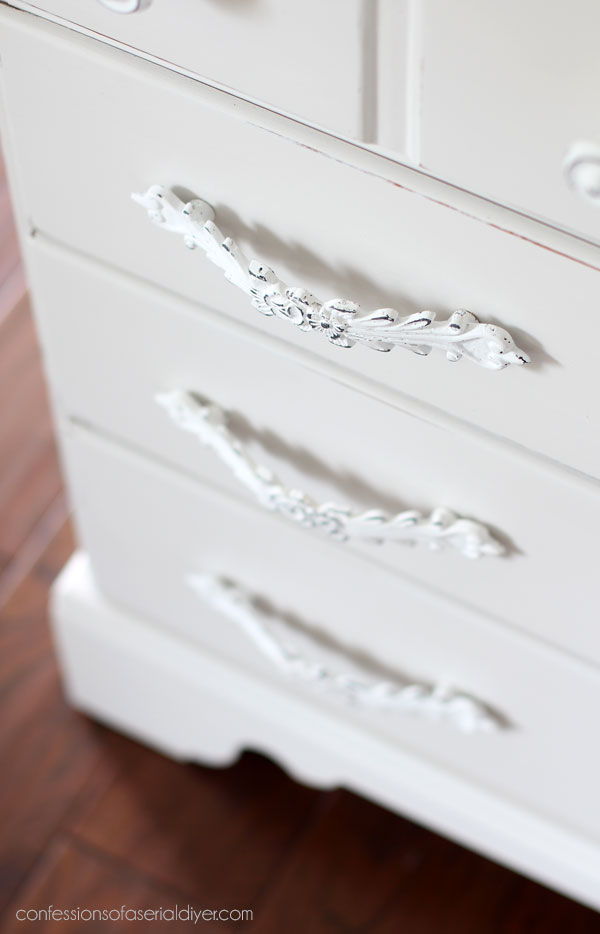
The knobs were replaced with these larger pulls I found at Hobby Lobby:

And I used these ones that I’ve used many times before, also from Hobby Lobby, on the three bottom drawers:
The insides
I thought the handsome look of the outside worked well with the original wood finish on the inside, so I kept it:
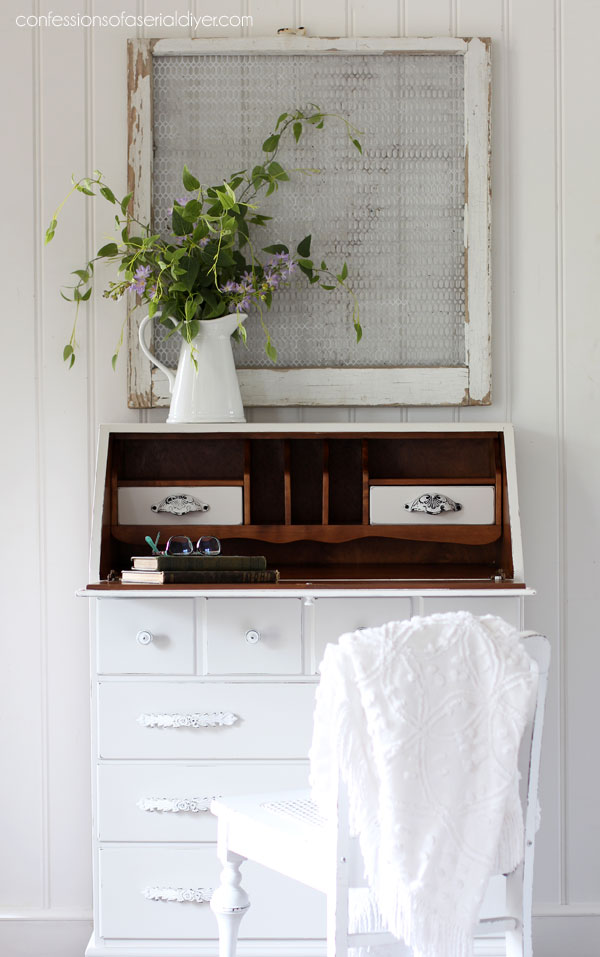
Mostly…
I did paint the two drawers and changed out the tiny knobs for these cup pulls I found at HomeGoods a while back:
This piece was in excellent condition, so it was nice to be able to preserve some of that. The drawers were also in pristine condition, so I was able to leave those as is also.
My sister’s MIL absolutely loved the finished look!
And what did I do with the top hutch that was removed??
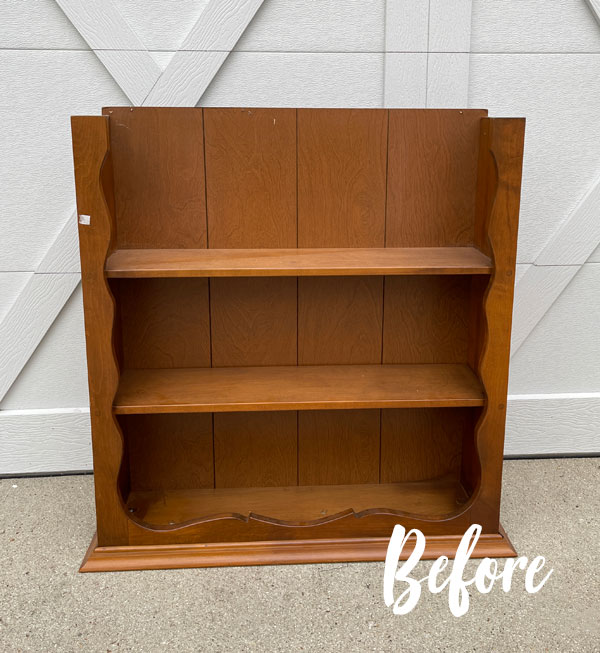
You can see that HERE!
SHOP NEWS
I had a chance to paint some samples of the BRAND NEW COTTAGE COLLECTION of Dixie Belle Chalk Mineral Paints, and they are so pretty in person!

Those are in stock in my Etsy Shop and available to ship now!
Enjoy the rest of the week while I play hooky with my niece and her family lol, and I’ll be back with this favorite on Thursday:
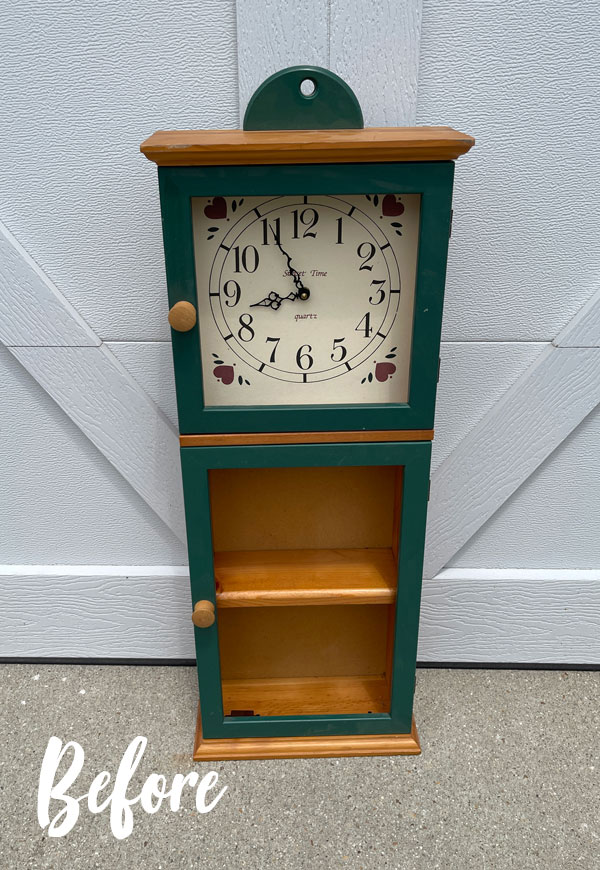
UPDATE: See how sweet this is now HERE!
XOXO,

Don’t Miss a Thing!
If you like what you see, there are several ways to follow along!
EMAIL * INSTAGRAM * FACEBOOK * PINTEREST


Get FREE SHIPPING on all orders over $50. No code needed at checkout! Orders under $50 always enjoy $8 flat rate shipping! Most orders ship same or next business day!


Rebecca says
Beautiful, as always. I was anticipating you would do something floral. I love love love the more masculine look. Question: do you find the Hobby Lobby pulls to have really long screws?
Christy says
Thank you so much, Rebecca! I enjoyed the more masculine look for a change too! I do find the Hobby Lobby pulls to have long screws, but I use a dremel like tool with a metal cutting wheel to trim them. XOXO
Lizzy says
I love what you did with it. It’s really pretty. I bought the exact same secretary at an estate sale years ago and painted it Old White with stripes and a transfer.
https://www.pinterest.com/pin/153615037280729863/
Christy says
I love yours!! With it painted, the top doesn’t look too heavy for it at all now! Thank you for sharing your beautiful work! XOXO
Lizzy Leff says
Thank you so much! 🙂
Christy says
You’re welcome! ????
Cecilia says
Love it! That paper is fabulous and really makes the piece. Love how you left the wood alone inside except for the two drawers. Perfect! Nice job as always. ????
Cecilia
Christy says
Thank you so much, my friend! I’m glad I was able to preserve some of that pretty wood! XOXO
dodie says
Always impressive work! I’ve recommended your blog to friends just cause you have such cool ideas – I always learn something new and clever. Thank you for sharing.
Christy says
Thank you SO much, Dodie! I truly appreciate that! XOXO
Petra says
I bet she loves this piece now, it’s got so much more character 😀
Christy says
She does! It looks so pretty in her space! Thanks, Petra! XOXO
Sue Duffy says
Love it and, basically, your total remake of the hutch top with the floral transfers. You sure put in the work, Christy – it shows! TFS
Christy says
Aww thank you so much, Sue! I really appreciate that! XOXO
Sharon L Austin says
That turned out so cool. I have an old handmade secretary that’s a family heirloom. I’ve toyed with the idea of painting because it’s just so dark and dark wood depresses me. I just don’t know if I can take the plunge, but this gives me hope.
Christy says
Thank you, Sharon! The wonderful thing about paint is that you can always remove it later if you like. It would be nice to be able to enjoy that wonderful heirloom not only because it is sentimental, but also because you love how it looks! XOXO