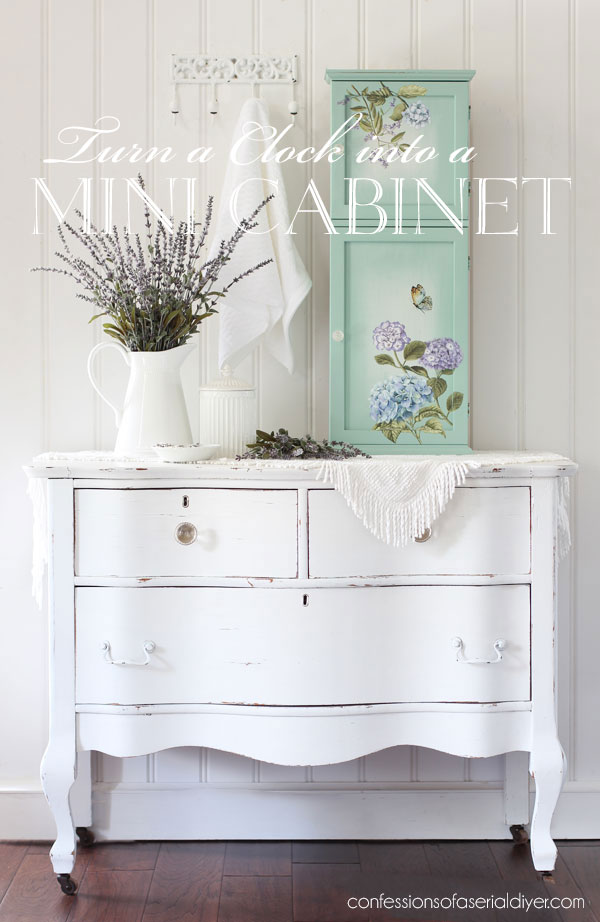
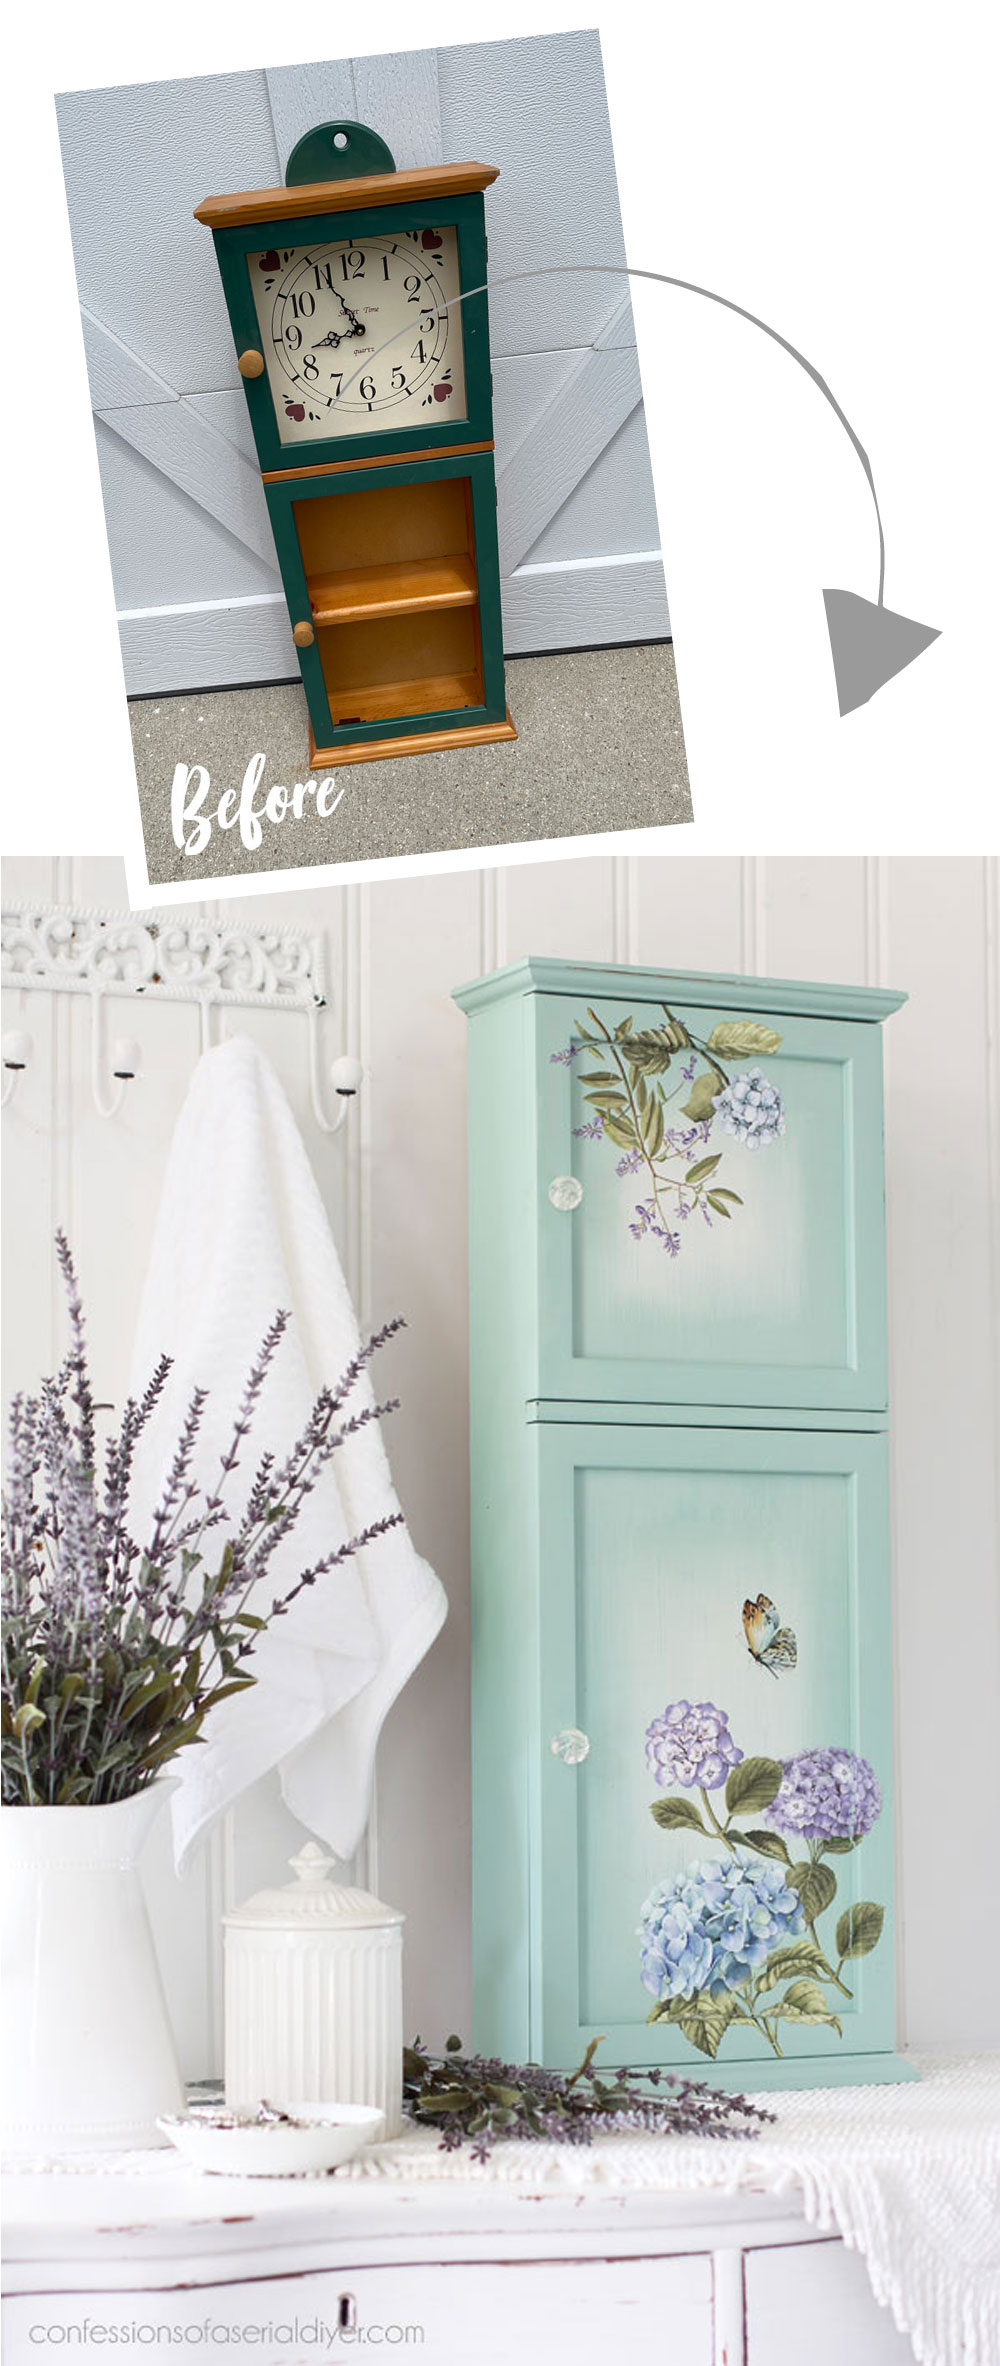
Hello, beautiful friends!! Today I’m sharing how to turn a clock into a cabinet. That is if it’s one of these old gems:

This is a project I redid last summer, but it is perfect for the season, so I thought it deserved another share since I have been enjoying family in town instead of working.
I had a clock very similar to this one in the early nineties. Mine was navy blue.
Maybe you still have one hanging around? The tell-tale hearts say it all.
This one was priced at $8.25, but with a full punch card at the thrift store, I got it for $6.50.
I’ve included a few affiliate links so you can find the products I love.
Clean
I gave this piece a good cleaning with White Lightning, so it was nice and clean and ready to go!
This clock had a weird half circle thing on the very top that I removed first.
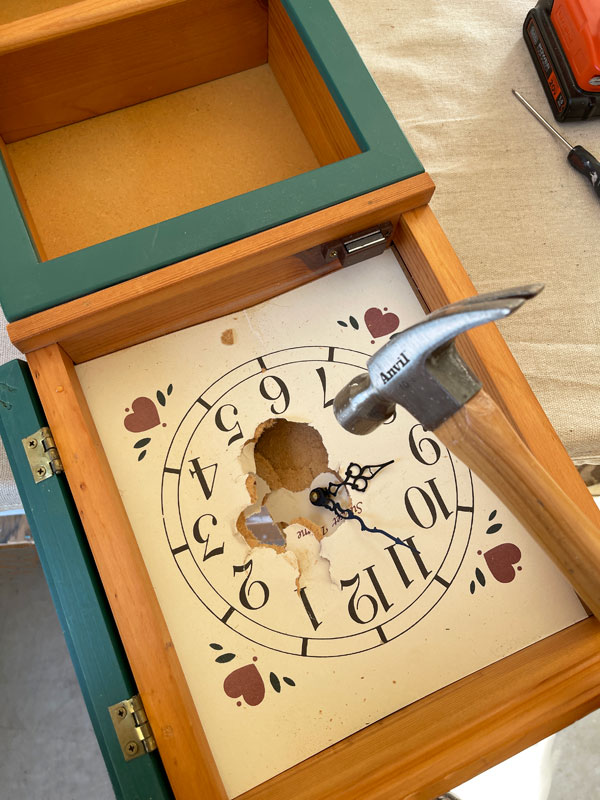
Now this was technically partly a cabinet already, but we’re going to make the whole thing a mini cabinet!
To do that, I took a hammer to the clock part to whack it out of that top cubby since it was sandwiched in there real good:
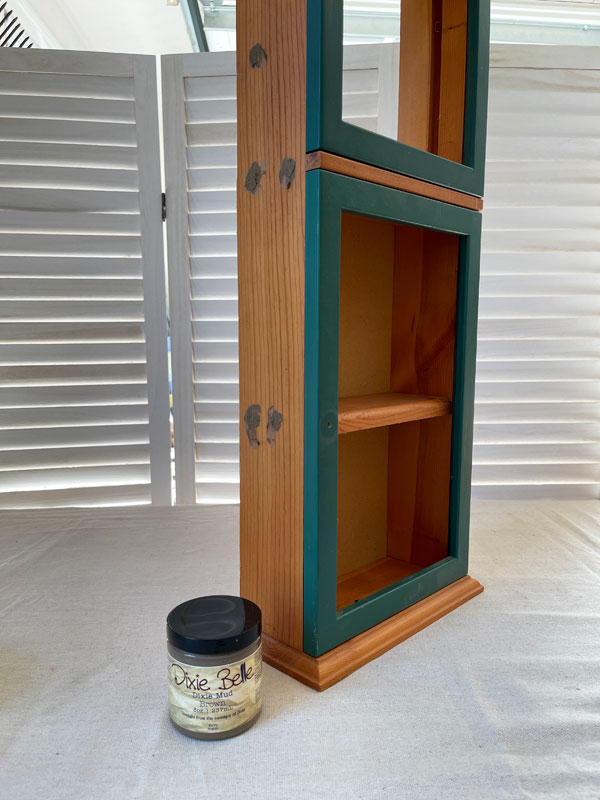
Next, I filled all the nail holes with Dixie Mud:
Once they were dry, I sanded them smooth with 220 grit sandpaper wrapped around a sanding sponge:
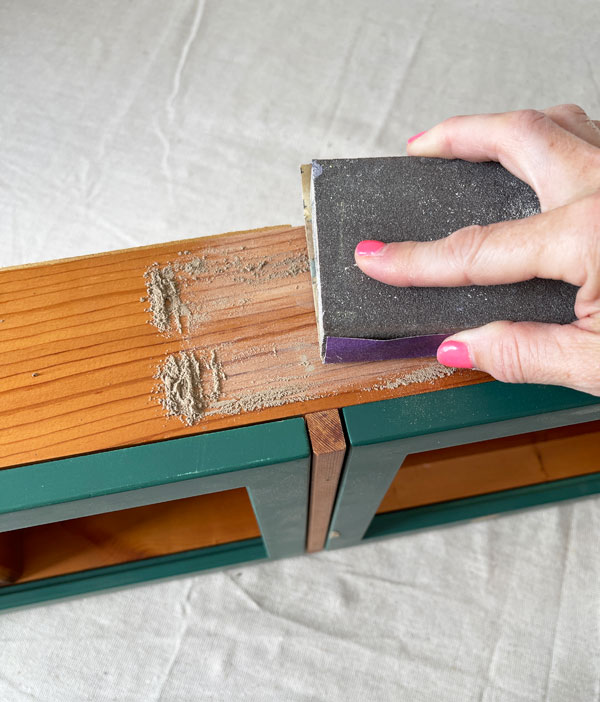
This just makes the sandpaper easier to handle. I also now carry these sanding sponges that would work great as well.
New door panels
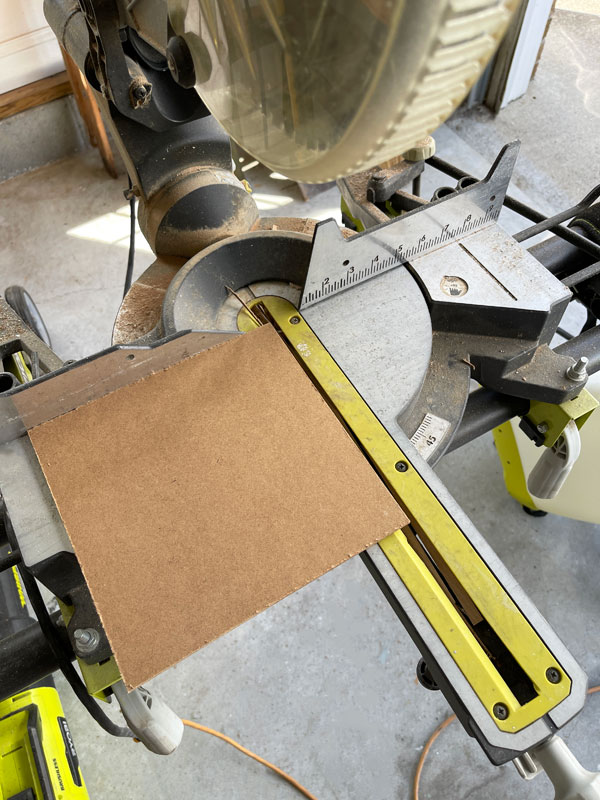
Neither of the doors had glass in them, so I decided to cut door panels out of hardboard I had in the garage.
That’s just pegboard without the holes that I keep on hand for chalk boards.
Paint
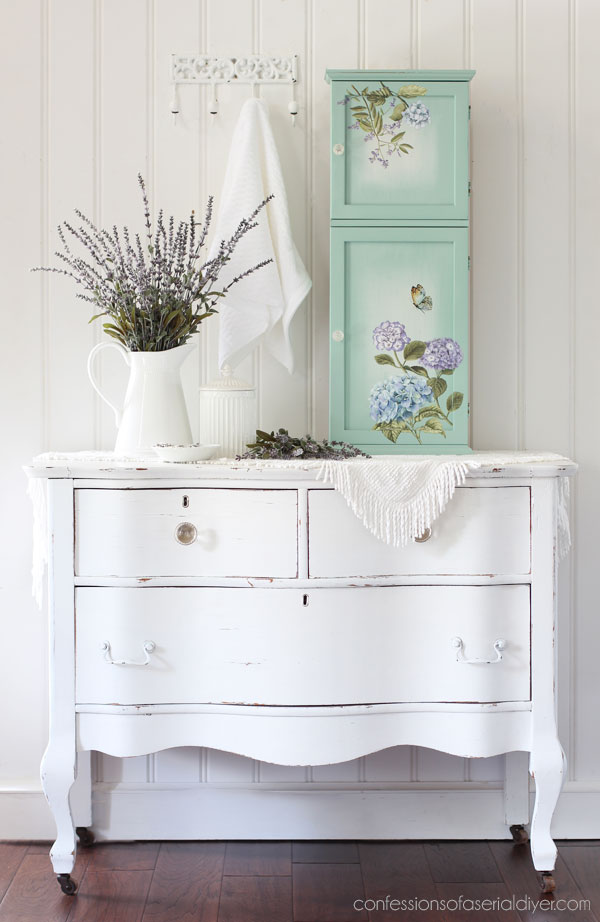
For this piece, I chose Sea Glass from the chalk mineral paint line and painted everything in this gorgeous coastal green/blue:
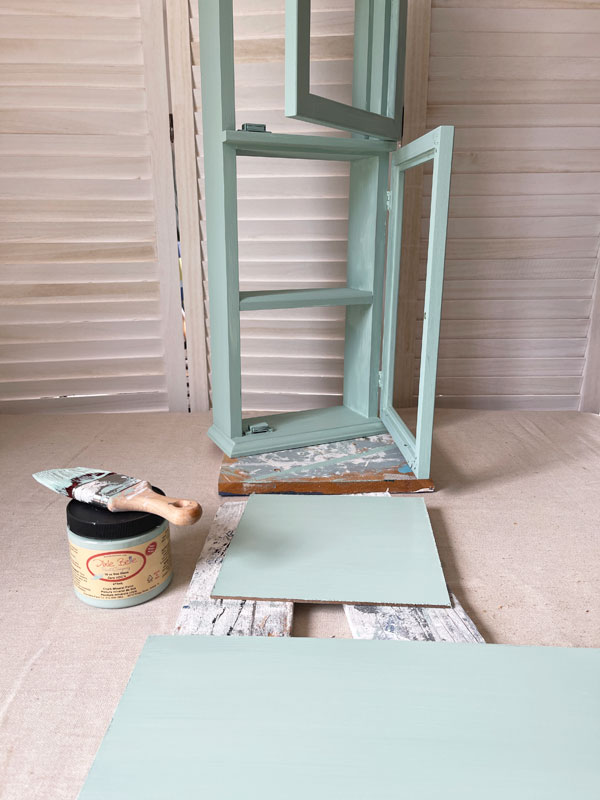
I also cut a new backing out of bead board that isn’t pictured, but it got painted in Sea Glass also.
It took two coats for solid coverage.
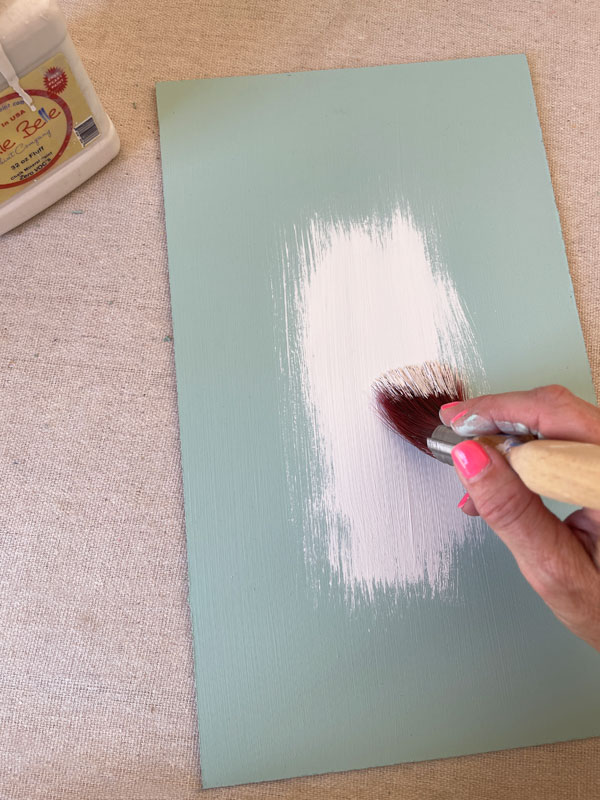
Blending
The blended sewing table I shared last week is what reminded me of this one!
I decided to do some blending on the door panels by adding a bit of Fluff to the inside of each:
I gave it a good spritz of water with my continuous mist spray bottle:
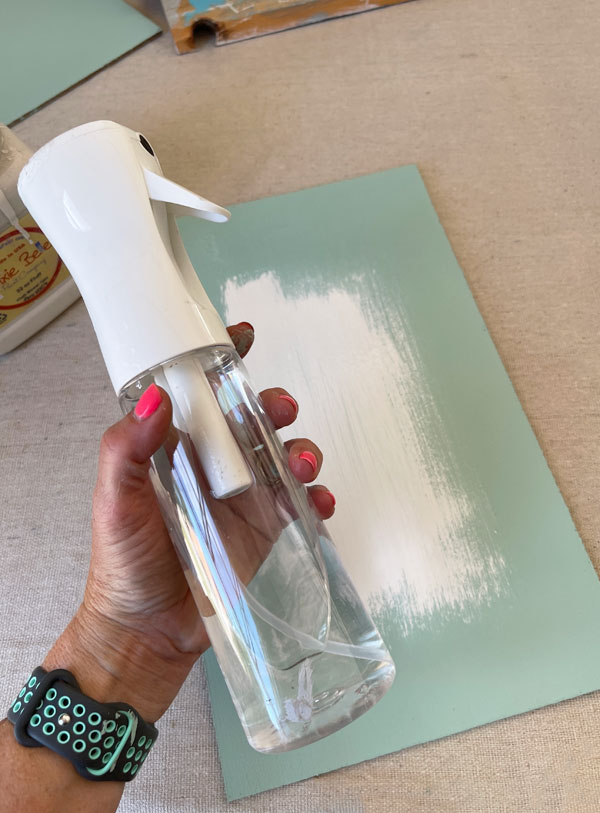
And then used my brush to blend the colors together to blur the lines. I swapped back and forth between brushes until I got a look I was happy with:

Once the door panels were dry, I added them to the door frames. I used the existing points that held the previous door panel in place, plus I added a few more points with my Logan point driver to secure the new doors.
Adding a transfer
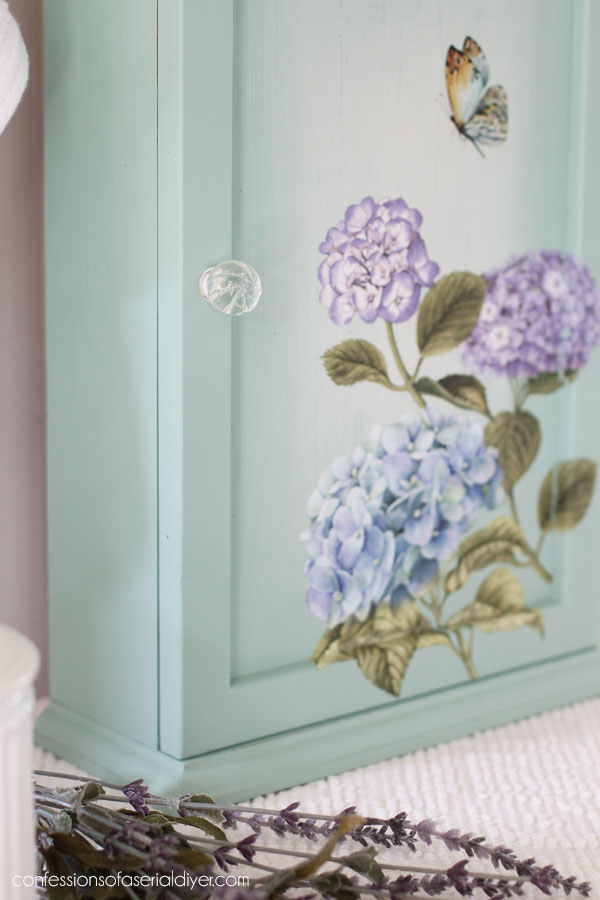
I decided to embellish the fronts of the doors on this piece with this gorgeous Mystic Hydrangea mini transfer from Redesign:
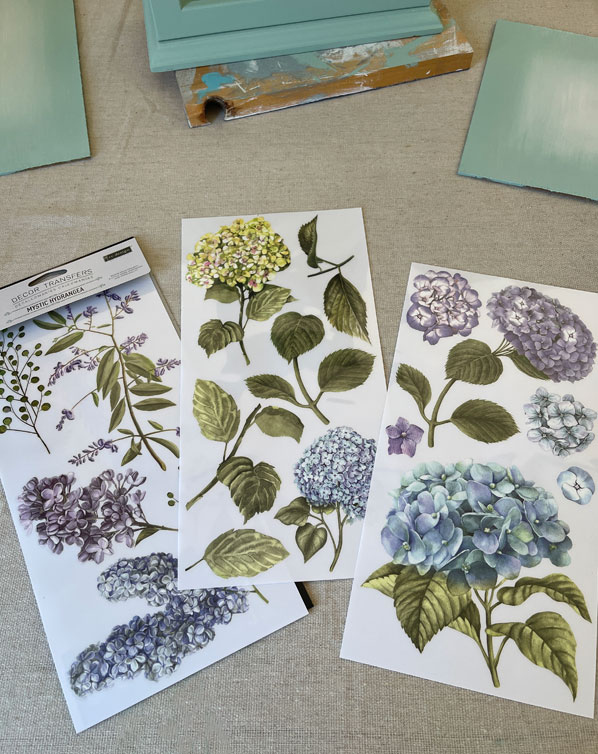
If you’ve been with me for a while, you know I love hydrangeas! I couldn’t wait to find a piece to use this transfer on!
These smaller sheets of transfers are 6″ x 12″ and there are three sheets of designs in each pack, perfect for smaller projects, and at $12.99, they are easier on the budget too!
See all the transfers I have available in my shop HERE, but wait until tomorrow (Friday, the 30th) to buy as they will be on sale 25% off!!
There are over 50 of this smaller size to choose from and several brand new ones since this I redid this cabinet.
I cut all the flowers apart to start and then laid them out how I liked. I started adding them one by one, layering them to get the look I wanted:
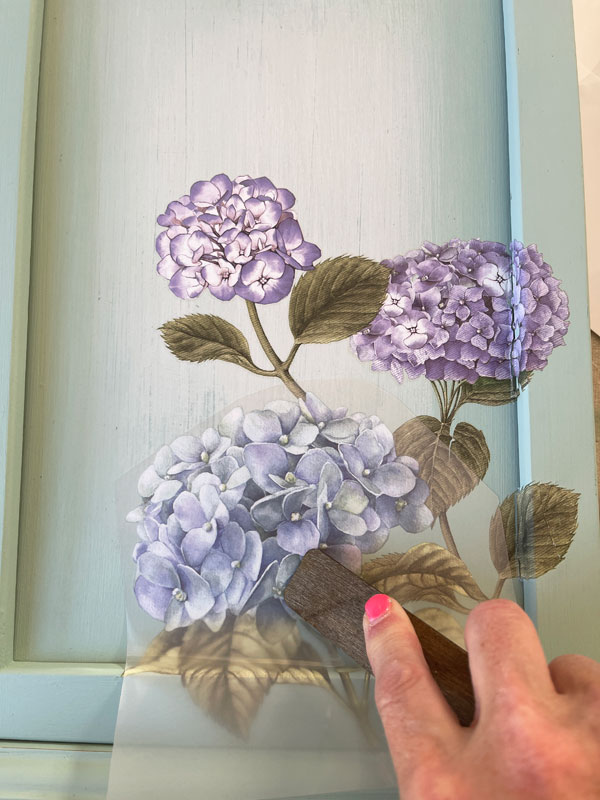
As you can see, I went right up an over the edges of the door frame. You can cut these apart at those places to make them easier to apply.
Seal
I still had my Best Dang Wax out from when I sealed this little demilune table I was working on also at the time, so I just used that to seal this small piece too!
I applied the wax with my La Petite brush:

This brush is a bit smaller and fits into those tighter areas a bit better than the Best Dang Brush that I like to use on larger pieces.
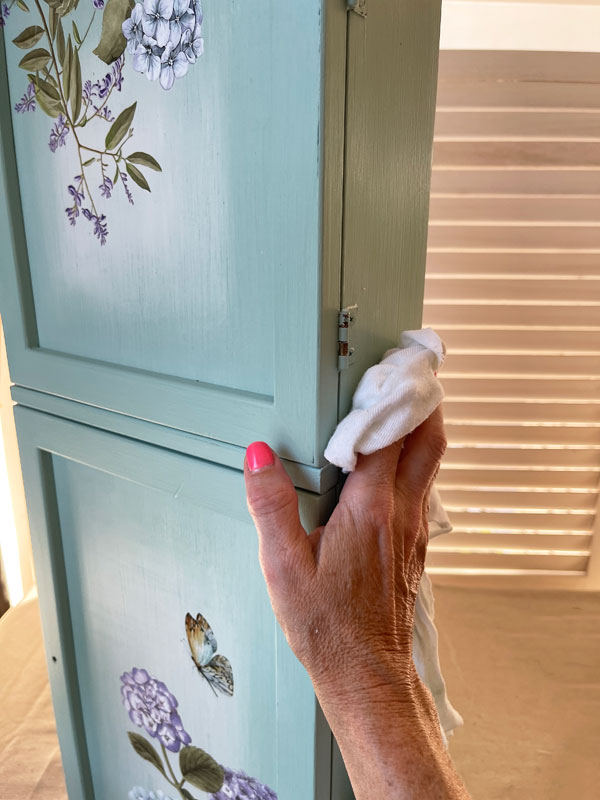
I then buffed away any excess wax with a clean, soft cloth:
Turn a Clock into a shelf, the after
Here is this 80’s clock repurposed into the sweetest mini cabinet!
Blending in a bit of Fluff to the center panels adds a bit of depth…
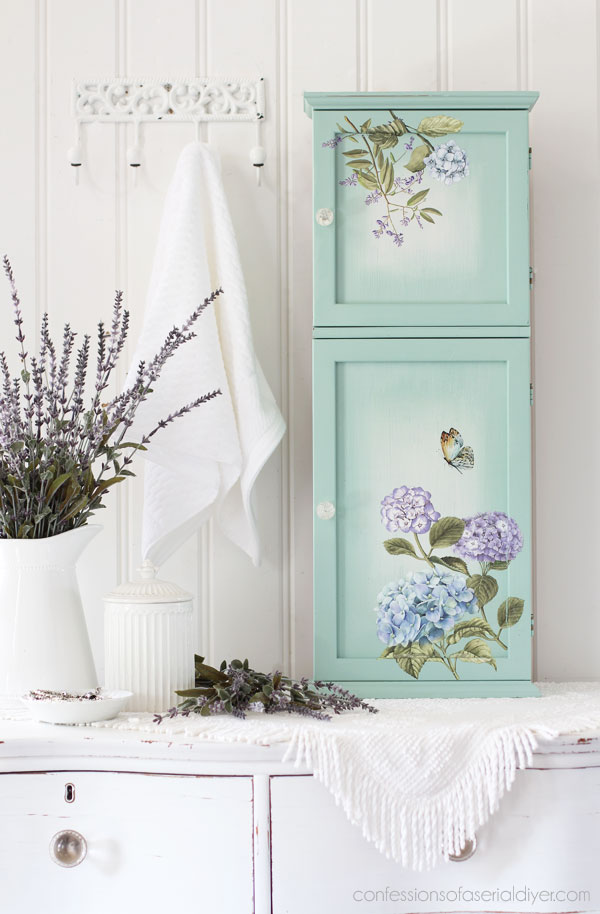
I just love this transfer against the Sea Glass!

The butterfly was left over from another transfer.
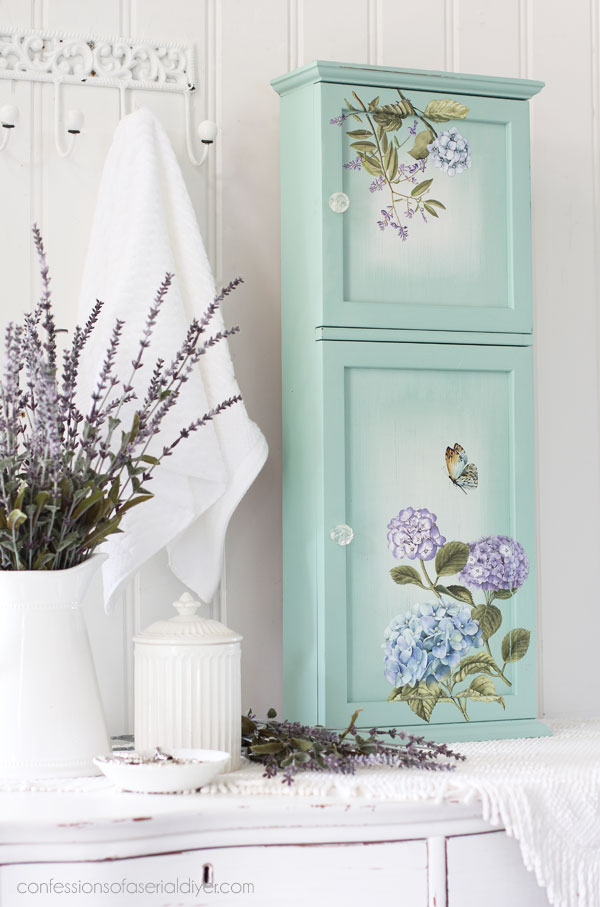
The original knobs were swapped out with these dainty glass ones from Hobby Lobby:
To cut the backs of them to fit, I used this rotary tool from Black and Decker:

It comes with several accessories, but I had to purchase the metal cutting wheel separately. Be sure to use extreme caution with this tool!
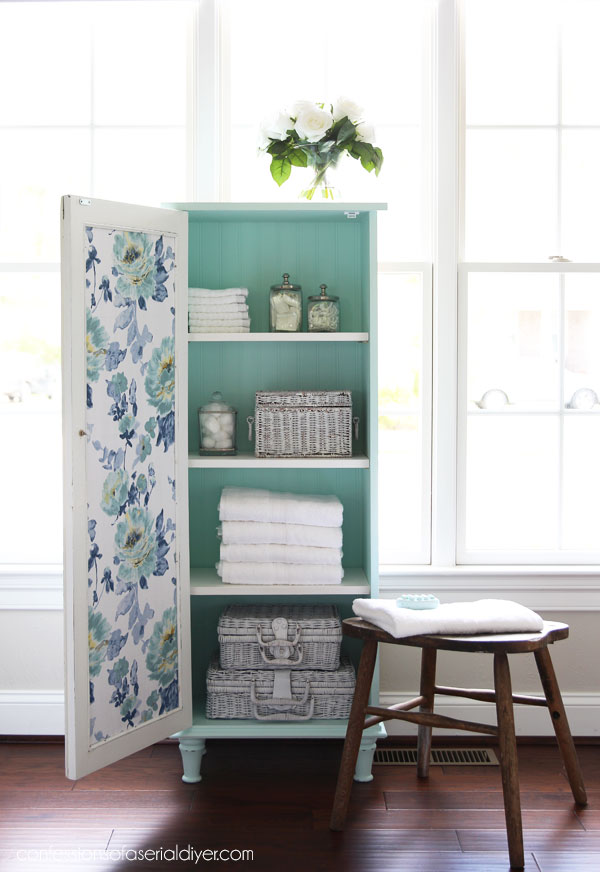
The inside
The new bead board backing I added with small finishing nails finished this piece off perfectly!

For the backs of the doors, I added this pretty, coordinating fabric with Mod Podge:
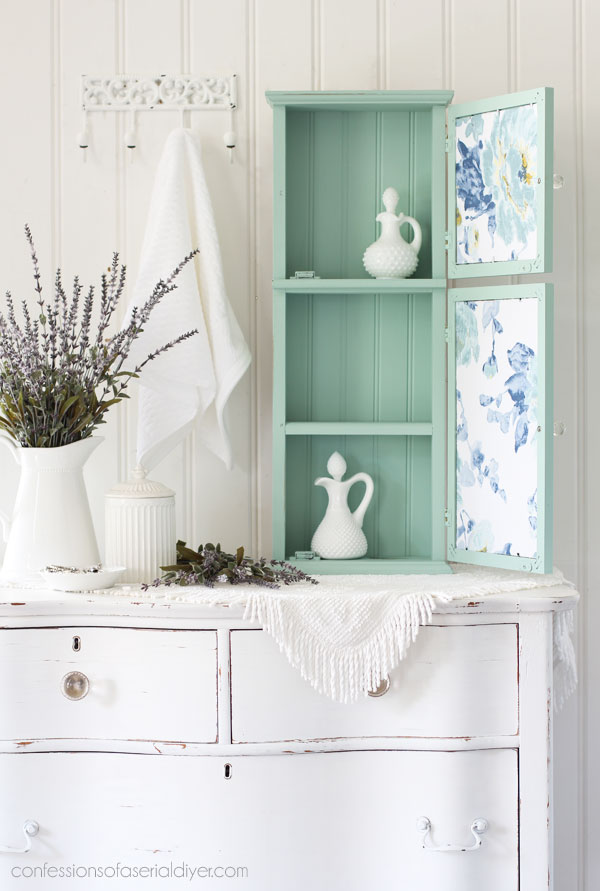
I’ve use that on several projects including this cabinet I built to fit this antique door:
See that full project HERE.
I’ll be back tomorrow as a BONUS with over 15 Furniture transformations using transfers!
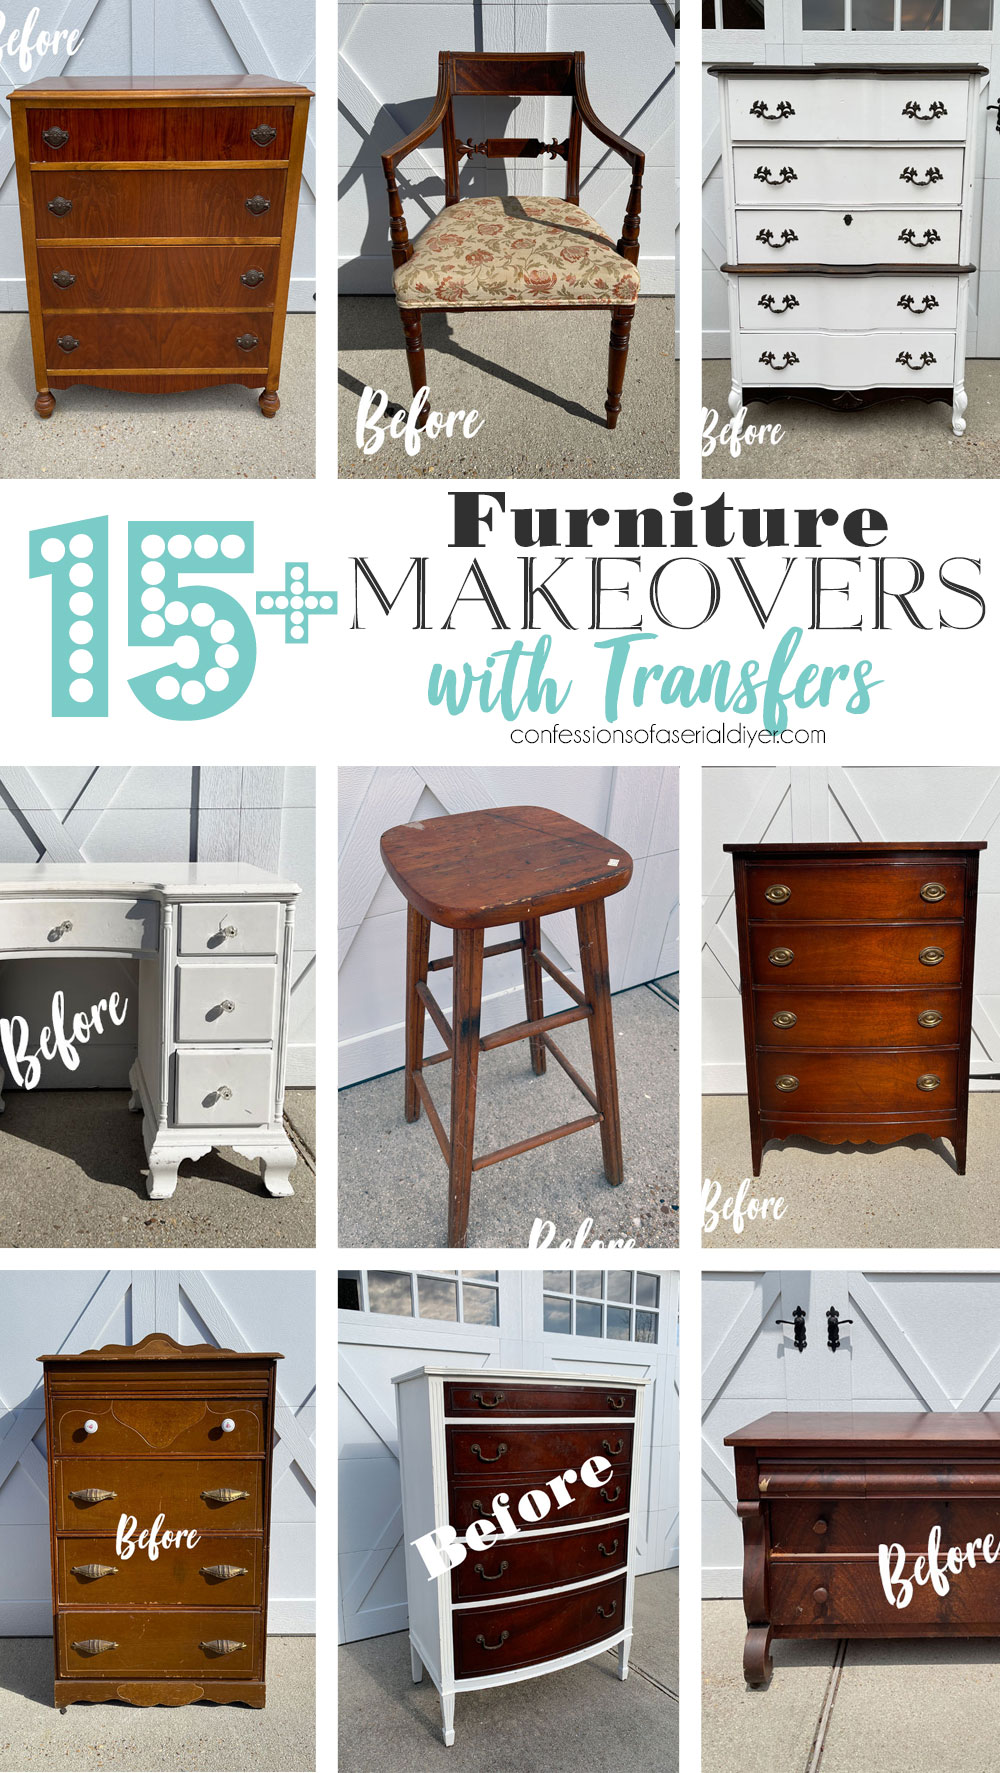
UPDATE: See them all HERE now!
Have an amazing weekend!
XOXO,

Don’t Miss a Thing!
If you like what you see, there are several ways to follow along!
EMAIL * INSTAGRAM * FACEBOOK * PINTEREST


Get FREE SHIPPING on all orders over $50. No code needed at checkout! Orders under $50 always enjoy $8 flat rate shipping! Most orders ship same or next business day!


Jeanne says
Looks great! Love the blending.
Christy says
Thanks so much, Jeanne! XOXO
Cecilia says
That’s what I love about you, Christy! You can see an old dated piece and reimagine it as something different! I thought maybe you were going to keep it a clock but remove the bottom portion and see? You didn’t think clock, you thought cabinet! It turned out great. Love the blended area and the pretty transfers. Beautiful! Have a wonderful weekend!
😊Cecilia
Christy says
Aww thank you so much, Cecilia! You would never know it was a dated clock lol! Have wonderful weekend too, my friend! XOXO
Janice Holt says
Such a sweet cabinet now. You would never know it was an out-dated clock. Glad you are enjoying family. Have a great 4th and see you Tuesday.
Christy says
Thank you, Janice! Right? Will do…I hope you have a wonderful fourth as well! XOXO
Karen says
Beautiful little cabinet!
Christy says
Thank you, Karen! XOXO
Catherine says
What a gorgeous redo! I want it!! I love hydrangeas!
Christy says
Thank you so much, Catherine! This one sold almost right away! XOXO
Sue says
I love this redesign, and the colors and transfer bring its beauty!
Christy says
Thanks so much, Sue! XOXO
Elise Howell says
Hi Christy,
This dated clock turned BEAUTIFUL cabinet is amazing. Once again you hit a home run, especially with the colors. Yes, I see how the fluff really sets off the pretty transfer—Stunning! And your usual peek-a-boo touches with the bead board and perfectly coordinated inside fabric — maybe this one is more than a home run — a grand slam!
Appreciation hugs from San Diego,
Elise
Christy says
Aww thank you so much, Elise! I’m so glad you enjoyed this one! XOXO
Sharon L Austin says
I knew I was going to love this the minute I saw you were using sea glass. Bravo! It looks amazing and completely different!!
Christy says
Ah yes…I know you love those coastal hues! Me too!! Thank you, my friend! XOXO
Lizzy says
It’s so pretty!
Christy says
Thank you, Lizzy! XOXO
Michele M. says
WOW! What a transformation!!! It looks amazing. Too bad it couldn’t look like this and still be a clock – but I absolutely love how the transfers you chose look against that gorgeous sea glass color. Love love love.
Speaking of love – the new colors are AWESOME!! I hope hope hope you do something with that lighter sage green – it is my all time very fav color and it just speaks volumes to me. I may have to do some shopping soon. I suppose I need to clean my basement first. And I don’t see that happening anytime soon, haha.
Christy says
Thank you so much, Michele! I love that new green too, and I don’t usually do green…but I will be using this one for sure!! And ha ha! XOXO
Addie says
Good bye sad clock and 1980’s!!!! Hello and welcome to 2023!!!
Christy says
Right?? It was so happy to join this century ha ha! XOXO
Marian says
Oh, Christy, that sea glass is sooooo pretty. I like the white highlight you added. It gives the doors another dimension. You always have the best ideas!
Christy says
Aww thank you so much, Marian! XOXO
Bonnie says
Love the blending technique. Just when we think you are done your like “but wait” there’s more. Remember when they would sell that stuff on a commercial on TV and say that? I think it was As seen on TV? Anyway that reminds me of your projects LOL.
That’s a good thing by the way😉
Happy 4th lady….Hugs
Christy says
Ha ha thank you, Bonnie! Yes! I remember that…act now and you’ll get all this lol! You too!! XOXO
Patricia says
The butterfly brings it all together. You do beautiful work. Thank you
Christy says
Thank you so much, Patricia! XOXO
Caye Cooper says
It’s just amazing! LOVE that Sea Mint shade and your pretty transfers. I don’t know how you made the door to fit, but it’s just perfect. Good job!
Christy says
Thank you, Caye!! I love this color too…it’s such a pretty backdrop for transfers! Have a great weekend! XOXO
Petra says
I was finding it hard to visualise this as a cupboard until you painted it and added board to the doors. What a transformation – it was so ugly before, and now it’s a piece that would look great anywhere 😀
Christy says
Thank you, Petra! It needed some help for sure ha ha! XOXO
Barbara A Fisher says
you just make everything look so good. love all your work. you are talented and creative.
Christy says
Aww thank you so much, Barbara! XOXO