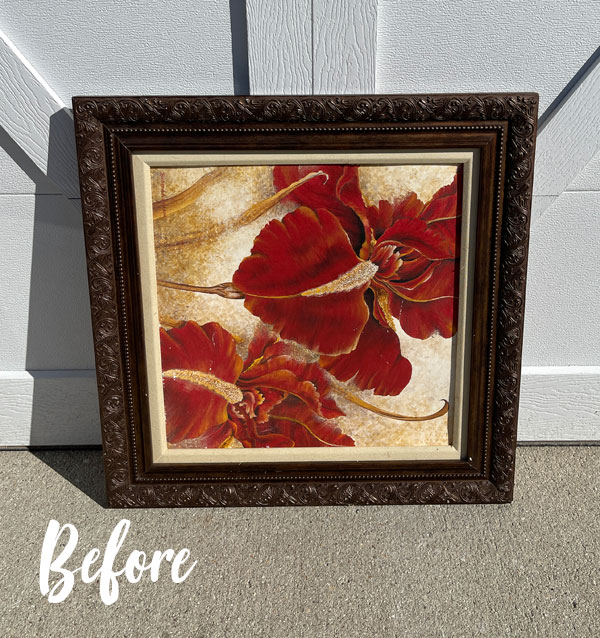
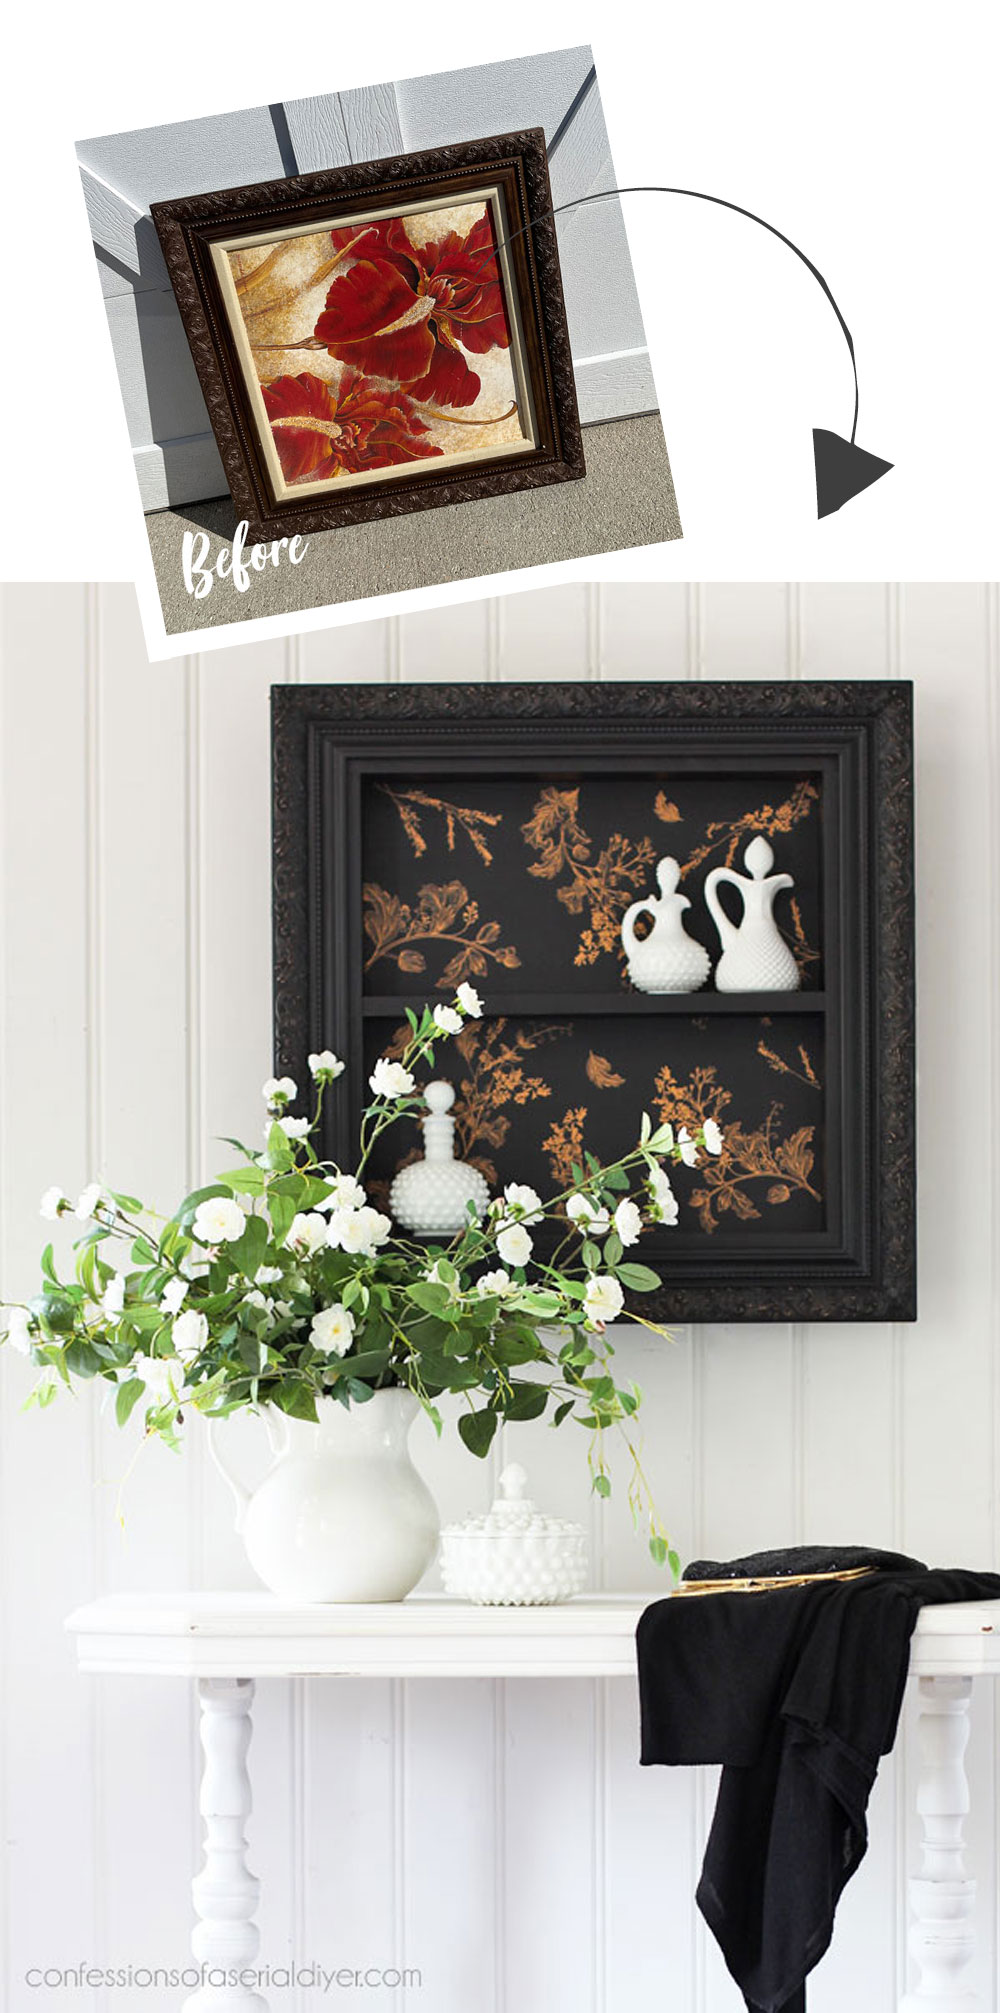
Hello, amazing friends! I am SO excited to be sharing my LAST piece from my current haul today!! With this final piece, I’m going to turn a frame into a shelf!
Here it is as I found it at the thrift store for just a few dollars:
I usually toss these pretty frames into my cart with the intention of turning them into chalkboards, but that doesn’t make for very exciting makeovers, so I tried to stretch my imagination to see what these last couple of frames could become.
See what I created with the last one HERE if you missed it.
I’ve included a few affiliate links so you can find the products I love.
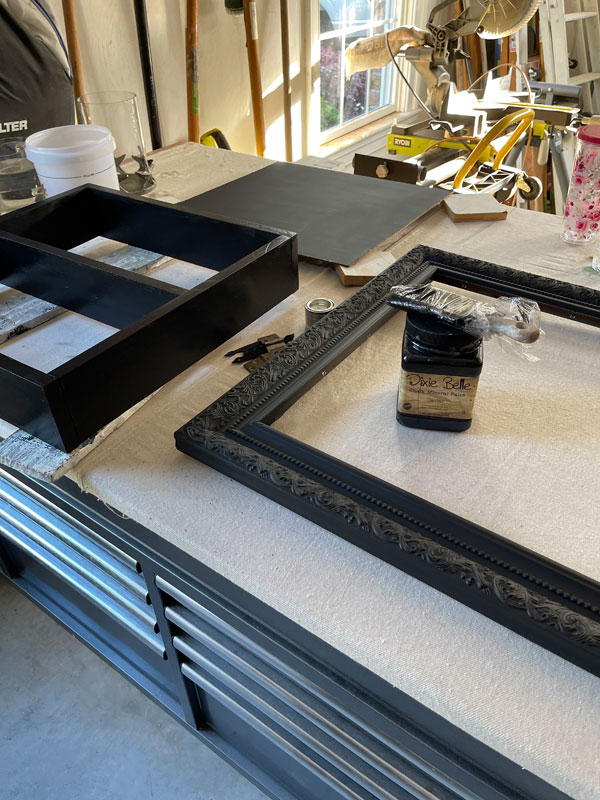
For this one, I started by removing the cardboard image and the fabric covered frame that was on the inside:
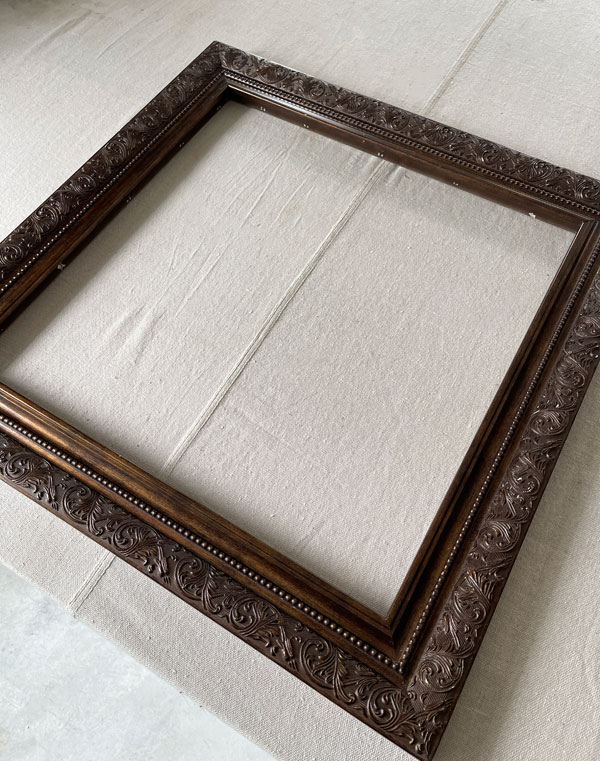
You can paint those fabric wrapped parts on the inside, but they really soak up the paint and I didn’t need it here.
Turn a frame into a shelf
Let’s turn this frame into a shelf!
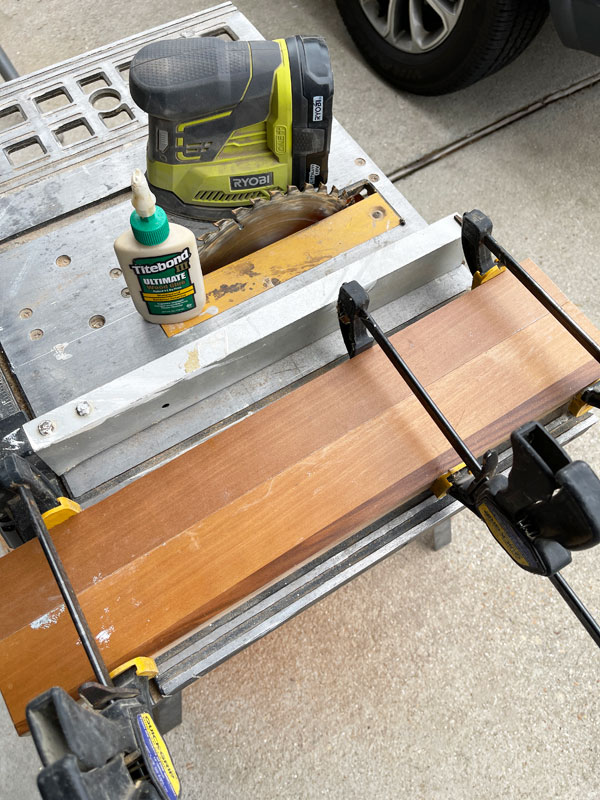
I started with a piece of wood that was once a shelf I took out of the bottom compartment of a china cabinet. I used my table saw to cut it…
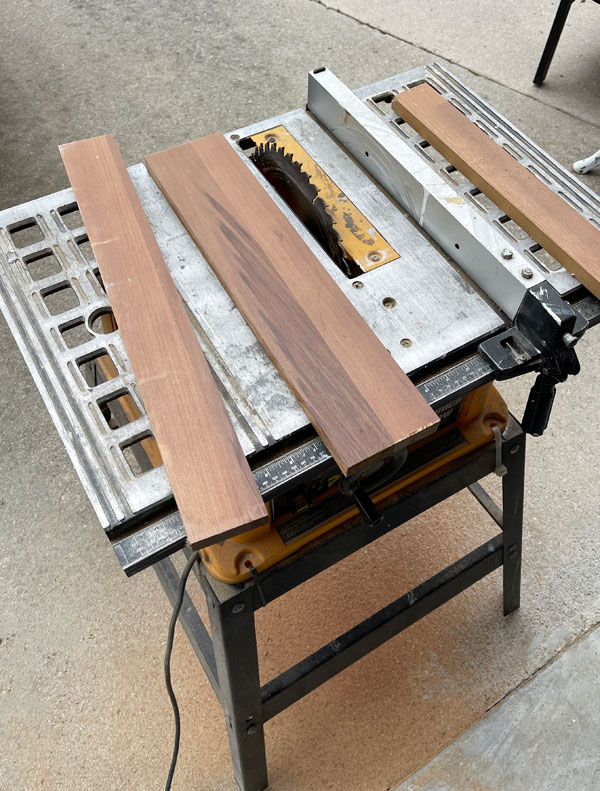
And I got four pieces out of it that will create the outside frame for my shelf:
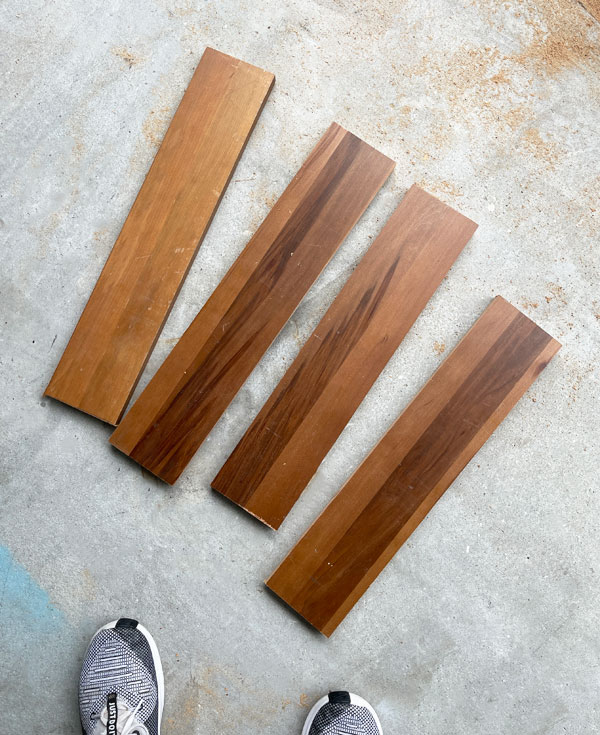
I needed one more piece to use as the shelf across the center though and found another scrap since I didn’t have enough of this.
Here are all the pieces cut to fit:
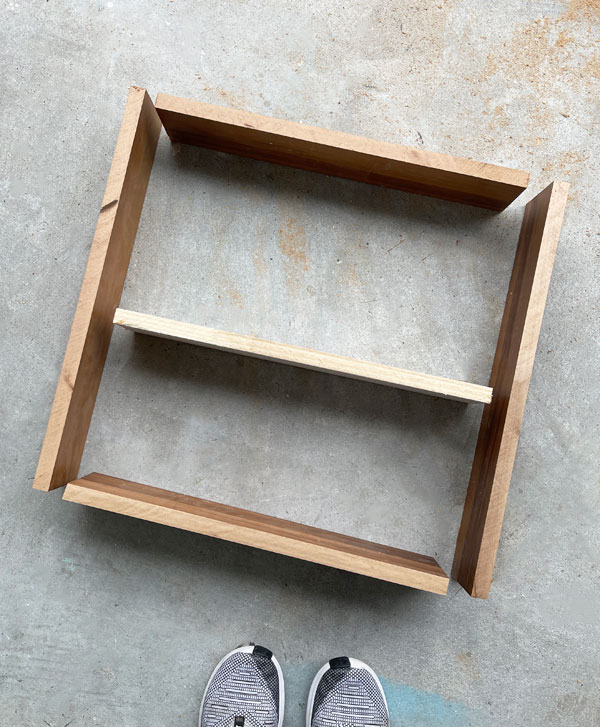
I determined the length by cutting them so they fit just inside the frame.
Once everything was cut, I used my cat sander to sand all the raw edges smooth.
Then, to join the outside frame of my new shelf together, I applied wood glue to the ends of each piece and then clamped them together inside the frame to keep them square:
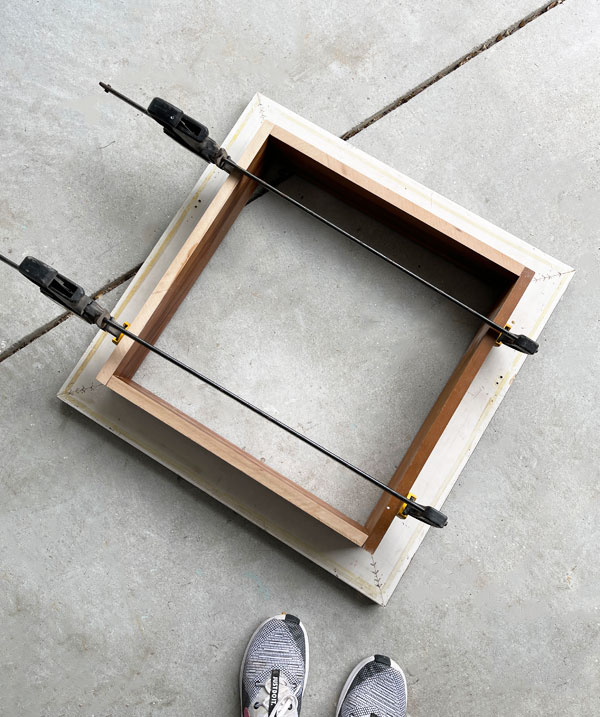
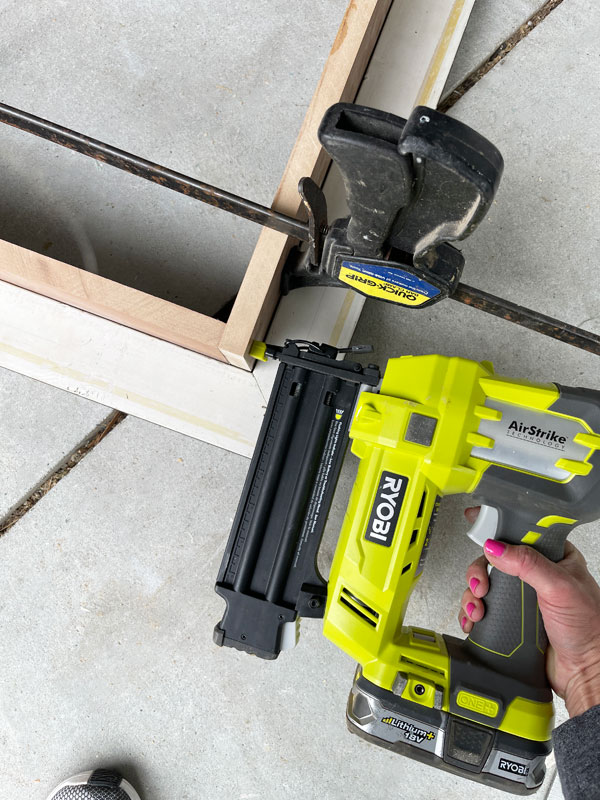
Once they had tried for about 30 minutes, I used my Ryobi nail gun to join them together:
Only one teeny tiny issue… I just couldn’t live with this:
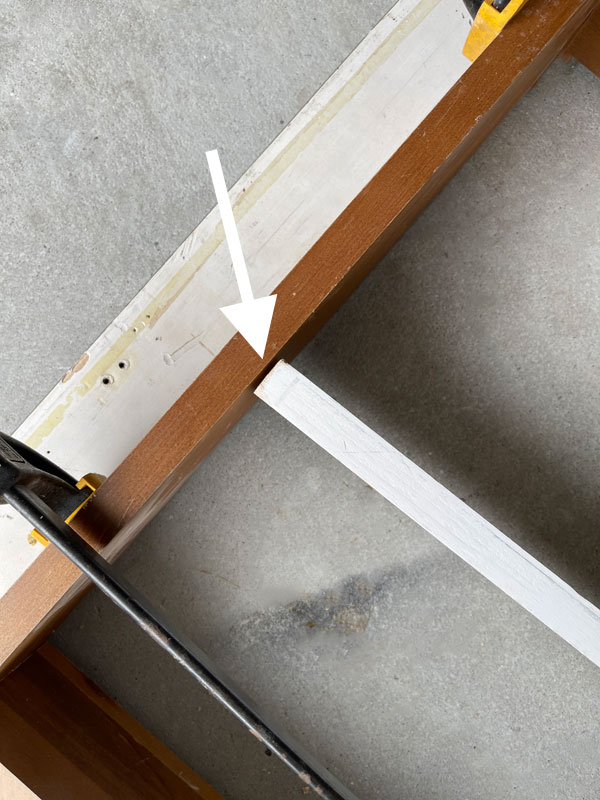
I cut it just a hair short!
As I sat there for forever staring at my wood scrap pile determined I was NOT buying wood for this project, I got an idea.
I decided to join two pieces of scraps that I had left from the shelf board of the china cabinet with wood glue to create a piece wide enough for my shelf:
And yay! That worked perfectly!
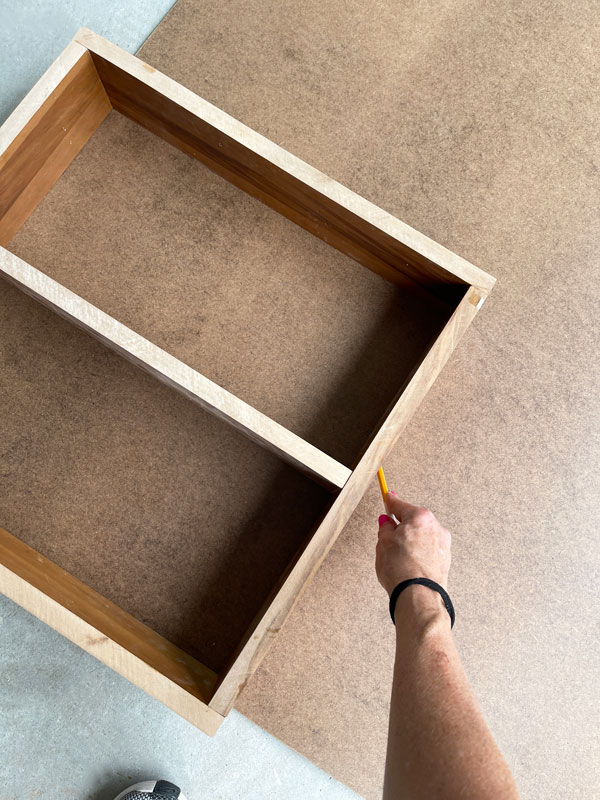
I added that piece across the center to create a shelf.
Then, I removed the built shelf from the frame so I could secure it with the nail gun further down.
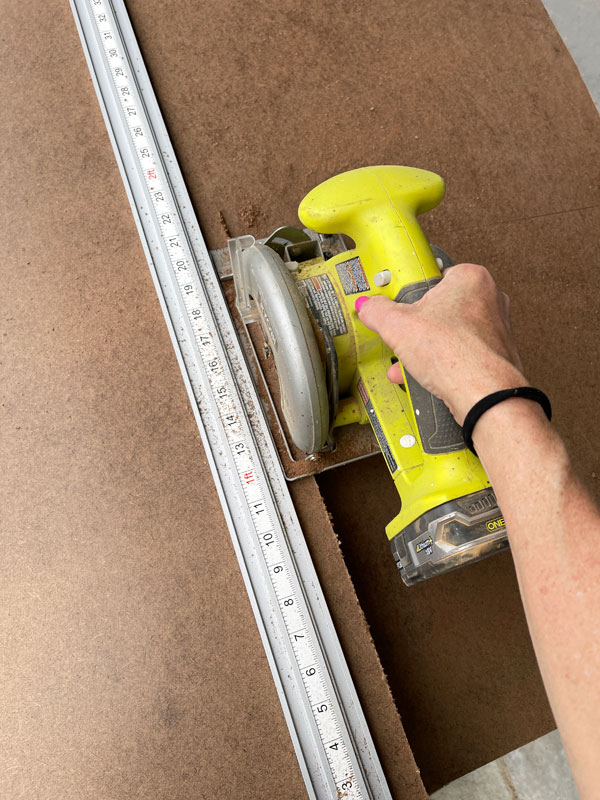
To cut a backing for my new shelf, I traced the outline onto a piece of hardboard:
I cut that with my small circular saw to get nice, straight cuts, but you could use a table saw or a jigsaw to cut it as well.
Paint
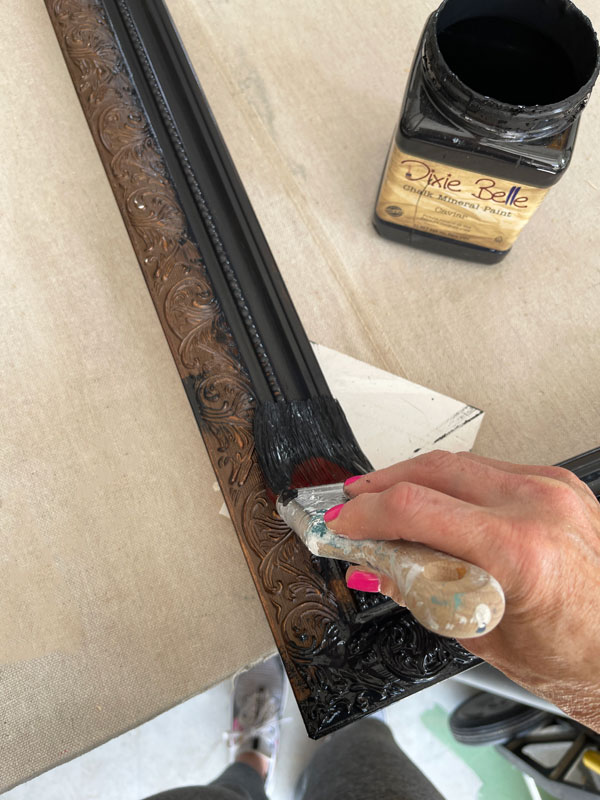
With all the pieces still separate, I painted them in two coats of Caviar, starting with the frame:
I had to add Transfers
Okay, I technically didn’t have to add transfers, but they are so fun to play with and add so much!
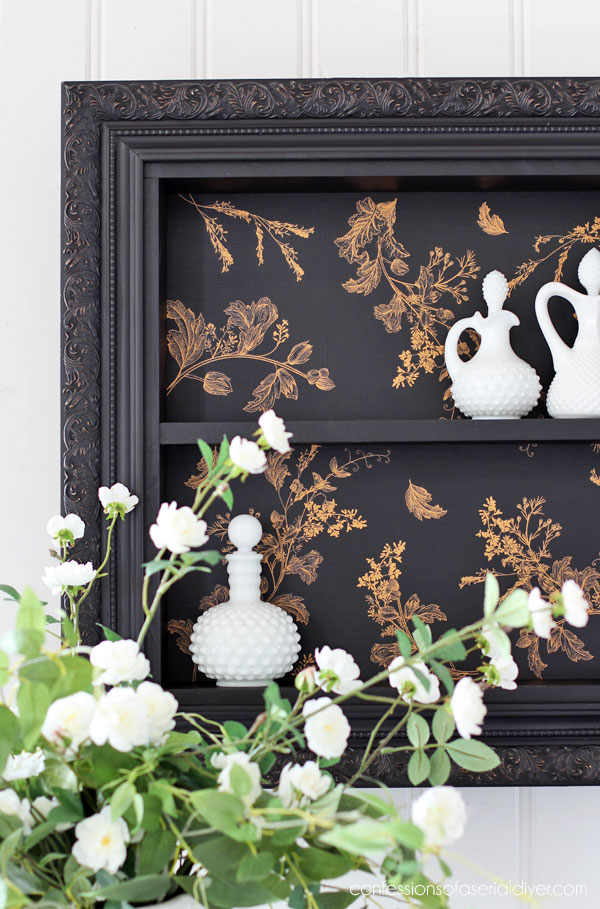
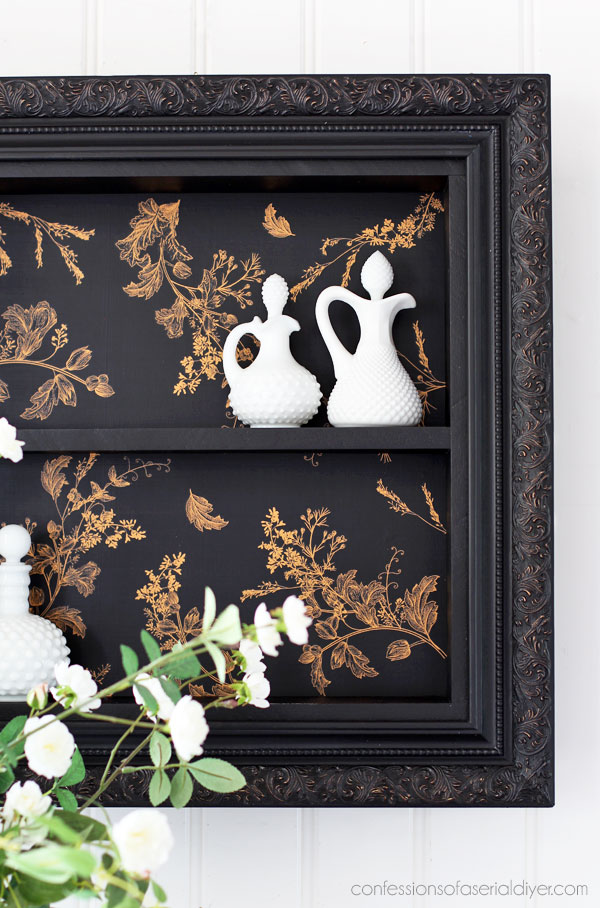
For the back of the shelf, I chose this pretty gold transfer called Dainty Blooms and it comes with two 12 x 12″ sheets:
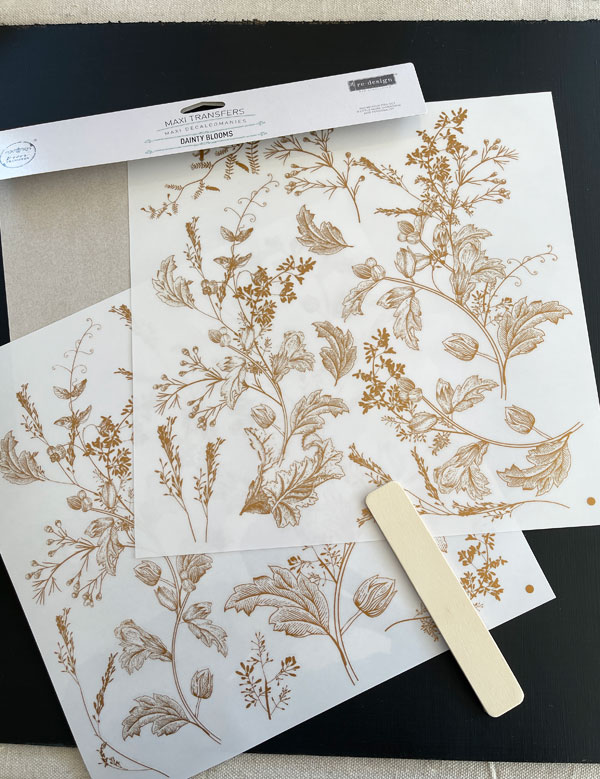
You can make the pieces go further by spreading the design out more, or you can create a more compact design like I did.
I laid them out how I wanted them and started burnishing them to my surface with the enclosed tool:
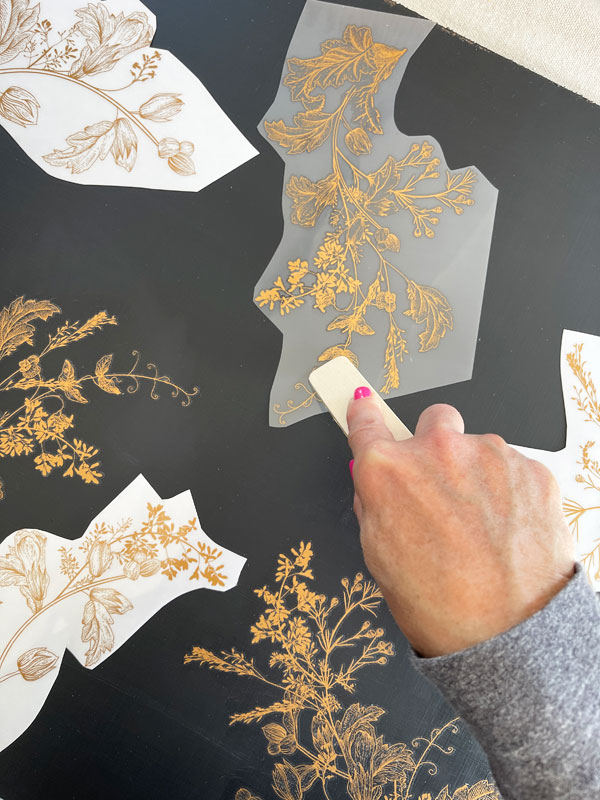
Doing this will leave funky marks in your dark painted finish, but they will go away once you seal the surface. Also, when adding transfers to darker surfaces, they require a bit more burnishing to get rid of the halo. That will also be minimized with sealer.
The frame
I had originally planned to add Gold Gilding wax to the frame to highlight the pretty details, but when I did, it kind of took away from the gold on the transfer.
So, I reached for my Odorless Mineral Spirits and started to remove the gilding wax and as I rubbed, it started to reveal the original frame color beneath.
The color coming through was super subtle and gave me the perfect amount of highlight…

Happy accident!
Seal
I sealed everything with Clear Coat in Satin using the blue sponge applicator:
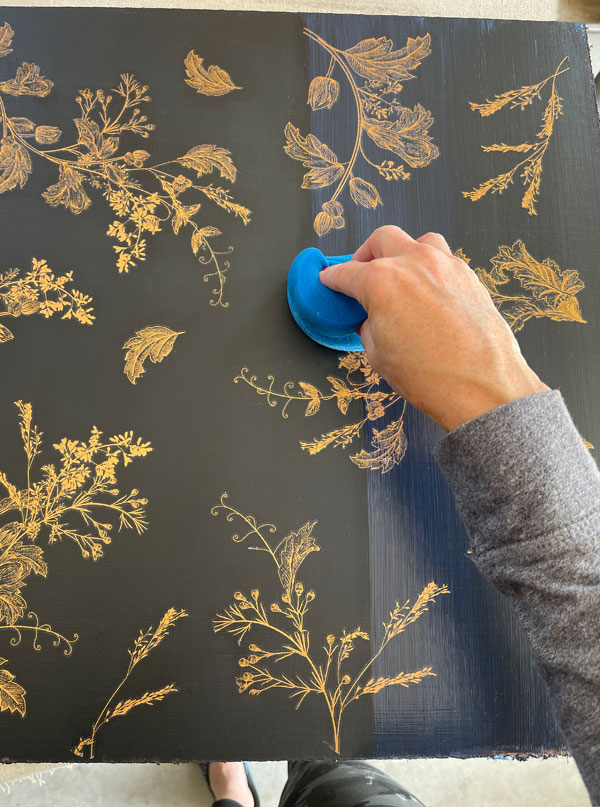
I always use the satin Clear Coat or Clear Wax to seal transfers.
Gator Hide is not recommended to seal over transfers as it can cause transfers to lift. If you want the water repellent protection that Gator Hide offers, add a coat of Clear Coat first.
The fun part
Now for the most fun part…putting it all together!
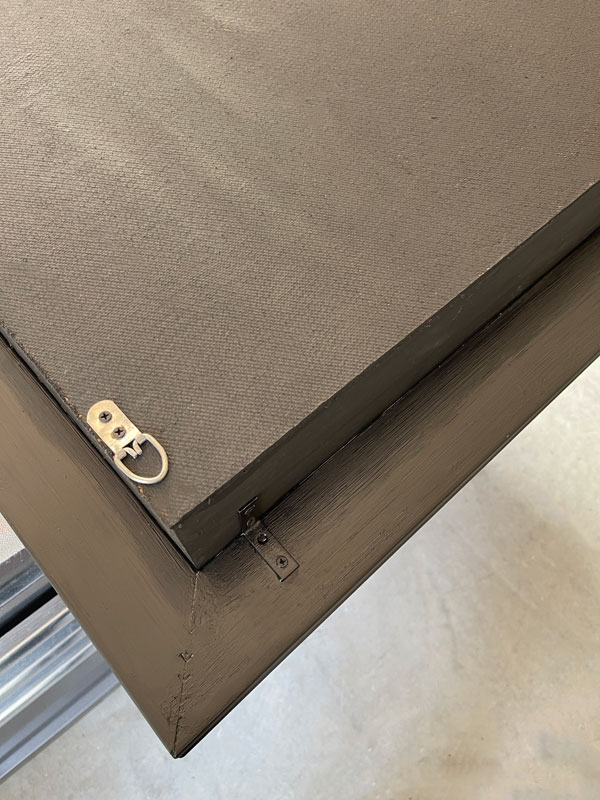
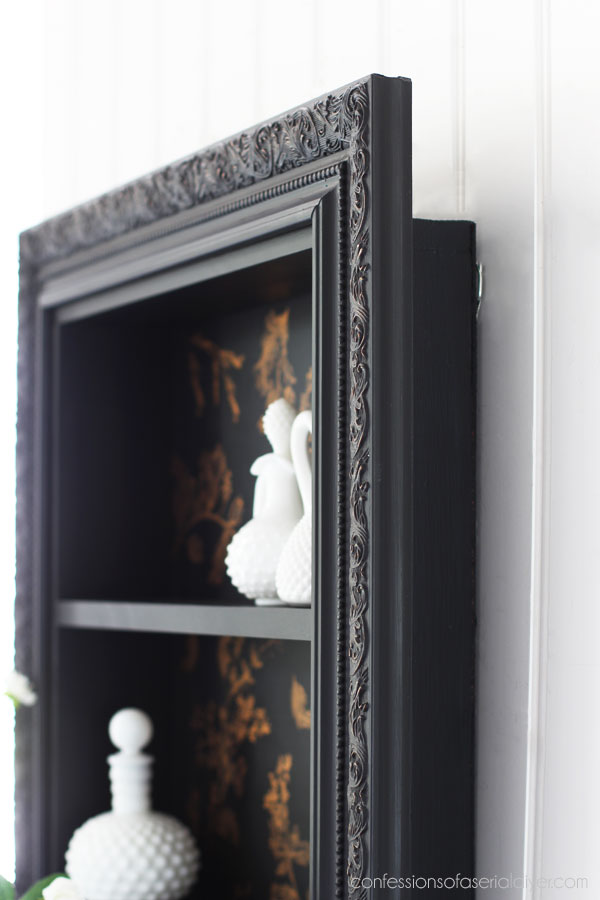
I used these angled brackets I picked up at the Home Depot:

Jack and I had to make a pit stop there after lunch this weekend, but then I found a whole drawer of them the drawers from my hardware organizer. Shhh…don’t tell Jack lol! I forgot I bought them!
I added two on the top and two on the bottom to secure the frame to the shelf. I also add the original D-ring hardware back for hanging:
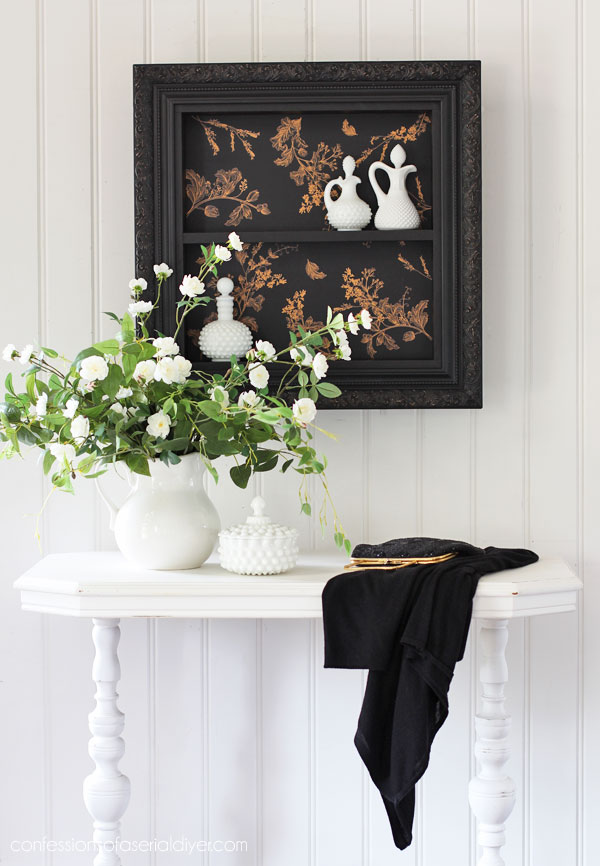
The After
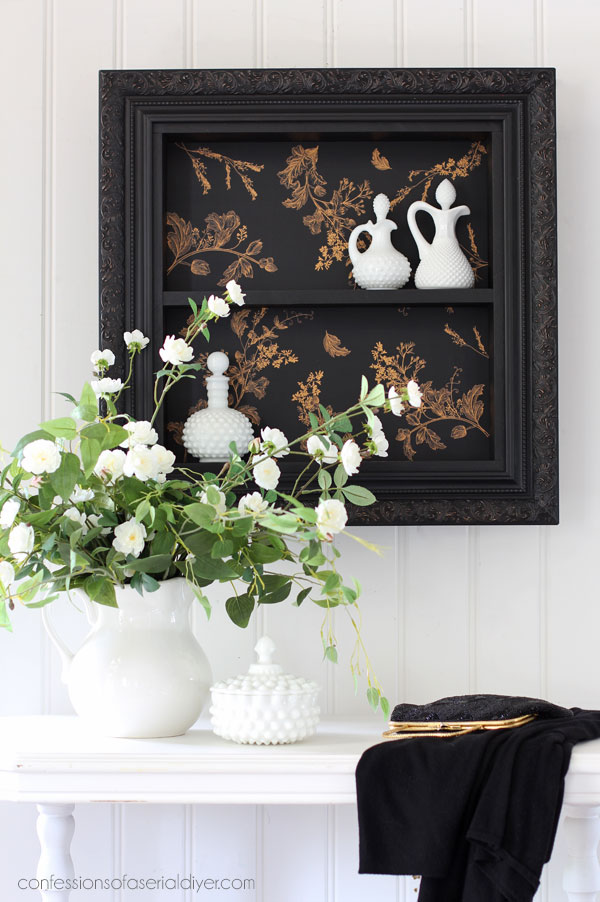
And here is how this thrift store frame is going to spend the next several years:

Not a bad life, right?
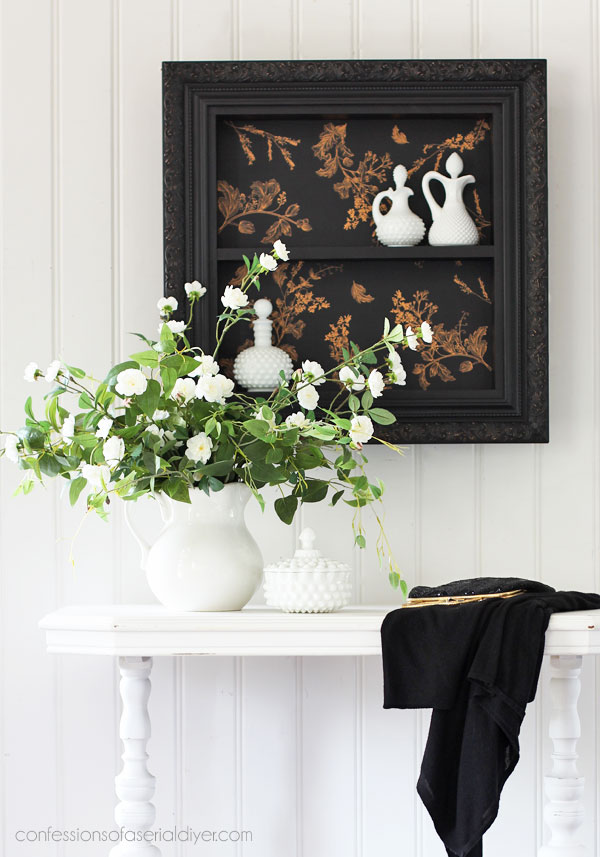
I could see this in a dining room holding some treasured china pieces.
Here’s a better peek at the frame.
Using Mineral Spirits to remove some of the paint was actually easier than wet distressing, and this is the perfect amount of highlight!
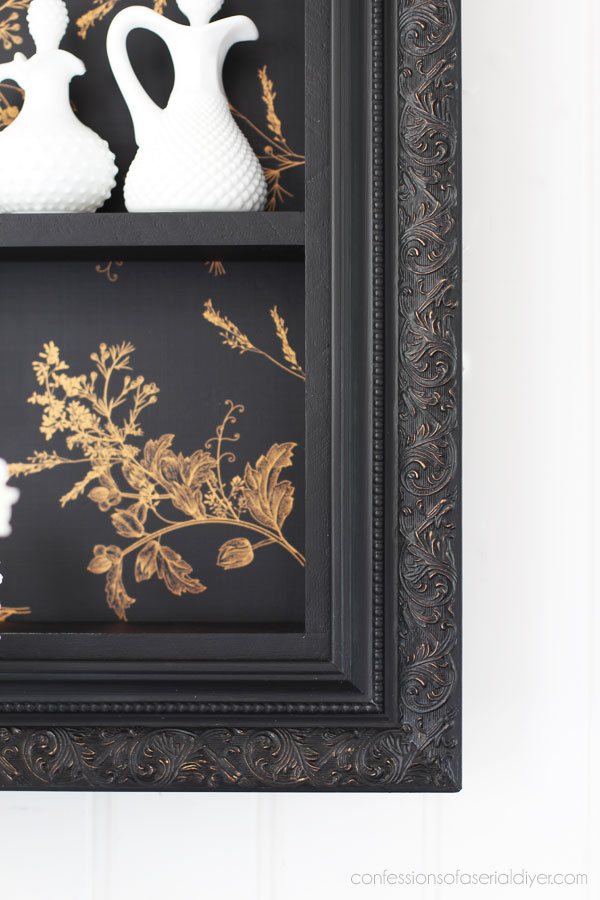
The transfer has a bit of a metallic shimmer to it in the light…
And the frame part does sit off the wall a bit, so I made sure to make the outside look as clean and sleek as the inside.
Y’all, this completes this haul! Can I get a WOOHOO?!!
SO satisfying!
See anything you may have missed at the links below!
Magazine Rack Makeover & a Bonus Makeover!
Repurpose an Old Frame
Repurposed Wine Box
Painted Antique Chairs
$3 Mint Julep Tote Makeover
80’s Towel Rack Shelf Makeover
Hot Mess Magnolia Dresser
Petite Antique Dining Chair Makeover
Vintage Magazine Table Makeover
Painting the Smalls #21 (Six seven more mini Makeovers!)
Update an Old DIY Toolbox
How to Make a Tray from a Picture Frame (Super Easy!)
Freebie Chair Makeover
Vintage Stool Makeover with Terra Clay Paint
Mini Basket Box Makeover
Mirrored Wall Shelf Makeover
Rolling Buffet Makeover
Painted Antique Side Table
Pretty in Blue Box Makeover
A Great way to Repurpose a Chair
Painting the Smalls #20 (Six mini makeovers!)
White Painted Desk with Transfer
I have a BRAND NEW haul of goodies to share, but I can’t share just yet!
Thursday is Furniture Fixer Upper Day, so I’ll be back with one of my new pieces, this dated sofa table:

And then next week, I’ll share all the goodies in my new haul!
UPDATE: No need to wait! See how this table got brought into this decade HERE now!
XOXO,

Don’t Miss a Thing!
If you like what you see, there are several ways to follow along!
EMAIL * INSTAGRAM * FACEBOOK * PINTEREST


Get FREE SHIPPING on all orders over $50. No code needed at checkout! Orders under $50 always enjoy $8 flat rate shipping! Most orders ship same or next business day!


Jan Fowler says
Christy! This is absolutely stunning! Way better than my tray suggestion, and a great idea for my own stuff in the future. You are the best source for ideas and materials. Love you, love your Etsy shop, love your willingness to share knowledge. Thanks!
Christy says
Aww I appreciate that so much, Jan, thank you!! XOXO
Mary Kaiser says
WOOHOO!!! You are amaazing to work through all those pieces! I knew you could do it!!! How fun to watch you do a new haul, I am looking forward to seeing what you found for your next haul!! I love that sofa table, and I can’t wait to see what you do to it! Good Job!!
Christy says
Thank you, my friend! It is so satisfying to cross off that last piece lol! XOXO
Janette says
Love this, its stunning.xx
Christy says
Thanks so much, Janette! XOXO
Nana Diana says
That frame turned shelf turned out great. When I was a kid my grandmother always called that sort of thing a ‘whatknot’ shelf. ]
Can’t wait to see the sofa table updated. Have a wonderful day!
Christy says
Thank you, Diana! Oh I love that name for it! It’s perfect for all the little baubles ands whatnots ha ha! Enjoy our day also! XOXO
Valerie Nirala says
This is one of your most amazing transformations. Incredibly creative!
Christy says
Oh wow thank you so much, Valerie! I’m so glad you like it! XOXO
Cyndi says
That is SO pretty! I agree…the frame turned out just right with the bit of original color coming through. Anything more would have been too much. Perfect!
Christy says
Thank you, Cyndi!! I’m so glad that worked out! XOXO
Barbara Warner says
Gorgeous! You have such a wonderful eye for making something simple into a gorgeous deccor piece. Love this, especially the black on the frame and the background!
Christy says
Aww thank you so much, Barbara! It is really fun to see what things can become! XOXO
Carol says
Turned out beautiful!!
Christy says
Thank you, Carol! XOXO
Cecilia says
Woohoo! Yay for finishing this haul! Can I say this might be my favorite frame makeover so far? Love the accidental distressing. It really is the right amount. I love this! Looking forward to seeing the new haul next week. And I can’t wait to see what you’ve done to the sofa table!
😊Cecilia
Christy says
Thank you, Cecilia! I’m so glad you like how this one turned out! See ya Thursday! XOXO
Janice Holt says
This turned out so pretty; the black and gold together just makes it perfect. You are a perfectionist and that’s a good thing and because of that, it makes seeing your work so much more enjoyable. Can’t wait to see your new haul.
Christy says
Aww thank you, Janice! I can’t wait to share all my new goodies! XOXO
Lori says
We love waiting to see what your new haul will be !
Christy says
Aww yay! I enjoy sharing all my goodies too! XOXO
Marcie Lovett says
This is amazing, Christy! When you asked what you should do with the frame, I thought chalkboard, since I haven’t seen one in a while. But you went completely above and beyond with this one. Oh, and woo hoo! 😂 Looking forward to seeing what you have coming up next.
Christy says
Ha ha thanks for the WOOHOO, Marcie! It is fun to come up with new ways to use frames, but I am running out of ideas lol. I don’t believe my new haul has any frames in it. Can’t wait to share it all! XOXO
Peggy says
Wow. This is soooo different from anything you have done. Nice change!
WHERE do you get the ideas? (you have a Genius mind, Christy!)
Christy says
Aww thank you, Peggy! Most of my ideas come as I’m drifting off to sleep, and they often work out lol! XOXO
Peggy says
Not only do you turn nothings into somethings you inspire people along the way!
Christy says
Aww I appreciate that so much, Peggy! I find so much joy in that!! XOXO
Kim says
Super clever to use a frame to make a shelf! The decals are lovely and unique.
Christy says
Thanks so much, Kim! XOXO
Monica Crumley says
Wow! Your ability to think outside the box is amazing! Thank you for such great ideas and photos!
Christy says
Thank you so much, Monica, and you are so welcome! XOXO
Kimmylouwho says
Again, I am really impressed! This turned out really neat and someone’s going to love it!
Christy says
Thank you so much, Kimmylouwho!! XOXO
Fran says
Wow! Quite an elegant piece. I am no longer afraid of painting with black with the projects you have shared. Love your use of the transfers.
Christy says
Thanks so much, Fran! Black is such a great color to work with for sure! XOXO
Niki says
That is pretty darn snazzy, with a little gold glam! I like the shelf- also very versatile and could be used in any room. I would probably use it in the office space I don’t currently have.
Christy says
Thanks, Niki! Absolutely! Or in a bathroom maybe for some of the prettier toiletries? SO many possibilities! XOXO
p says
You definitely have earned a WOOHOO !!!
This frame / shelf transformation has a wonderful and elegant look. 🙂
I do agree… the touches of the original frame color coming thru is perfect.
I applaud your creative carpentry skills – a lot.
Thanks for sharing !!
p
Christy says
Aww thank you, P!! I love happy accidents like that…the original color coming through was much more subtle which worked out so well! XOXO
Debbie in TX says
Wow, this one’s pretty. A wonderful and unique idea for the frame, and the result is super useful. Depending on how it’s finished, I could see this type of shelf going in a bathroom, kitchen, wherever. And of course the transfers are the icing on the cake!
That old sofa table is a beautiful piece of furniture, and I could see it looking right at home in a beach house : )
Christy says
Thank you, Debbie! Absolutely…it’s very versatile! You read my mind on the beach house look for that next piece! XOXO
Josee says
All I can say is wow! different from your usual stuff and still gorgeous!
Christy says
Aww I appreciate that so much, Josee! It’s fun to step outside the box every now and then! XOXO
Mary says
I sure admire your creativity AND your skills working with wood, Christy! This repurpose is beautiful! And you did a superb job, attending to details as is your custom. Love how the “accident” worked so well to highlight that frame just the perfect amount. Oh my! I bet it will fly out of your booth. 🥰
Christy says
Thank you so much, Mary! I do enjoy a good wood working project every now and then. And yes, that was a happy accident for sure! See ya Thursday! XOXO
Michele M. says
Oh, my word, look at that beautiful piece. Just wow. You are absolutely amazing, Christy.
Christy says
You are the sweetest, Michele, thank you!! XOXO
Sue Carole McCombs says
The shelf is beautiful and the light highlights on frame to embellish the transfer is totally gorgeous. Would not have occurred to me to frame a shelf unit. Your are the best.
Christy says
Aww thank you, Sue! This was fun to work on! XOXO
Olga says
I absolutely love it Christy!!! Its so elegant!
Christy says
Thank you so much, Olga!! XOXO
Hannah Reyor says
Another outstanding result! Never would have thought of using a crams as shelves. Brilliant and beautiful!!
Christy says
Thank you so much, Hannah! It was fun to get creative with this one! XOXO
Marietta.Walker says
Just stop it! You are wayt o creative and you are wearing me out running around buying things to try to make something as beautiful as you do. Geez, give a girl a break!
Christy says
Ha ha! You are a hoot, Marietta and so sweet…thank you! You’ll get a break on Tuesday since I’m sharing my new haul lol! XOXO
Corrine says
Here’s a WOOHOO from me!! You always amaze me. This project is brilliant AND I vibe with the black and gold soooo much!
One of my favorite things to do is change frames from the thrift store. Usually I am replacing the cheesy art with art that’s more my style (I’d say I’m an eclectic maximalist). Quick note on that: I have sealed the inner cloth frame with Dixie Belle’s Clear Coat. A couple/few coats of that and it doesn’t soak up the paint I use after.
I am super excited about this framed shelf! And, of course, for your new haul!!
Much love xoxox
Christy says
Yay and thank you so much, Corrine! I’m so glad you enjoyed this project! Great tip on using the clear coat on the fabric frame…I’ll have to try that some time! XOXO
Margie says
The first time I used transfers I panicked because of the “ghost” effect.
What a beautiful moody piece.
Christy says
Thank you, Margie! Oh yes, they do show on those darker surfaces until you seal. XOXO
Toni says
This is GORGEOUS Christi!
Christy says
Thanks so much, Toni! XOXO