
Hello awesome friends! Who’s ready for a little Fall project? Honestly, me either!
Seriously y’all, it is 94• outside right now as I type this, and my boys don’t start school until the day after Labor Day, so Fall seems lightyears away at the moment.
However it IS coming and the Seasonal Simplicity Fall Tour hosted by my sweet friend, Krista from The Happy Housie, starts today, so of course I wanted to join in!
Several crafty bloggers are sharing simple Fall projects to help put you in the mood for the cooler weather! You can see all the projects linked at the bottom. 🙂
Here is how my project started:
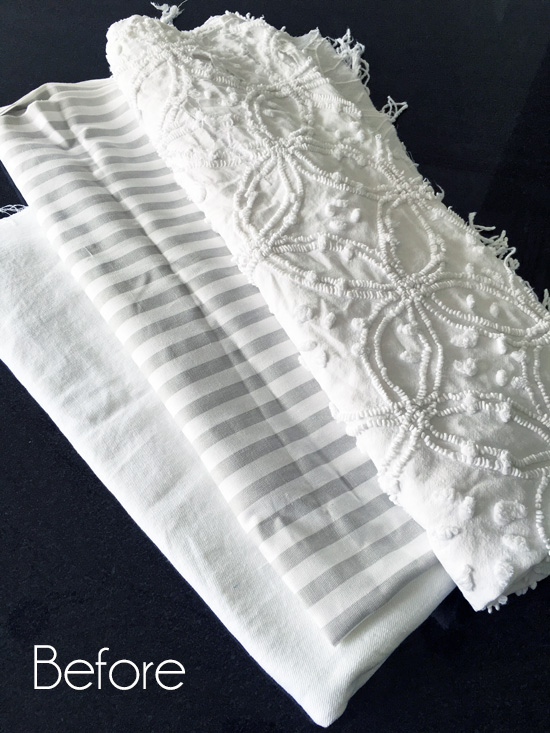
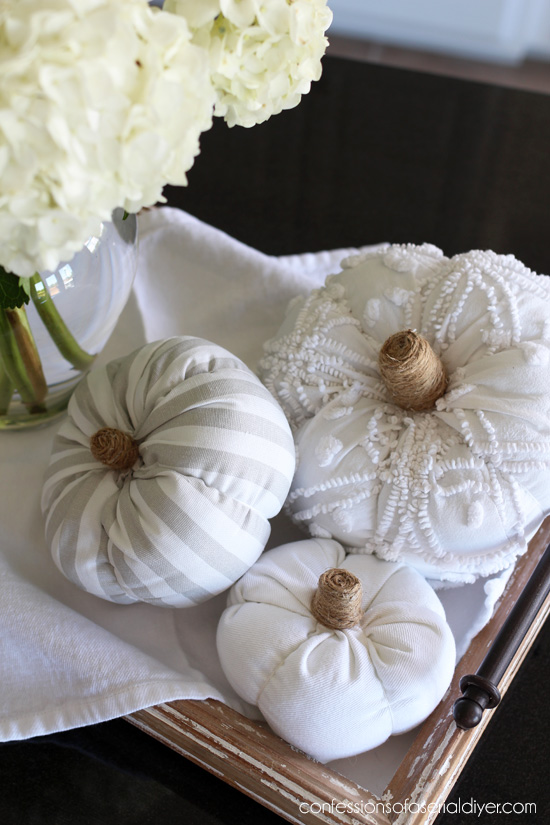
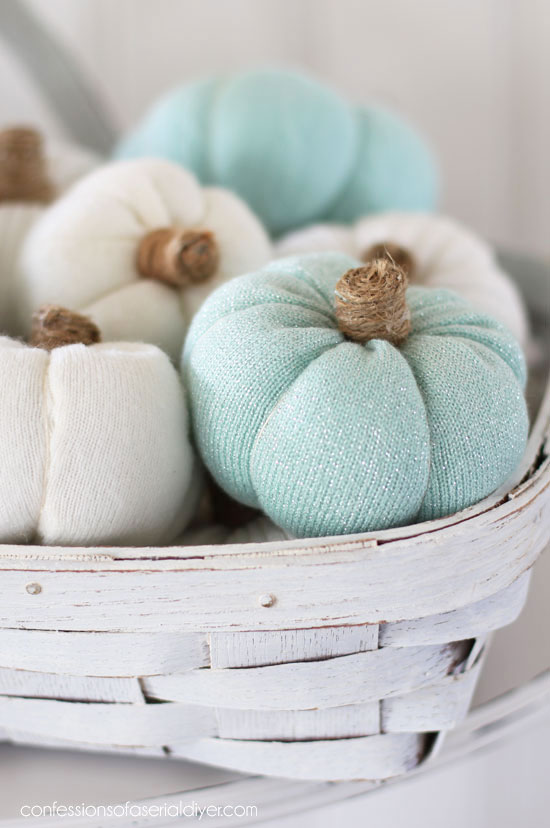
Since I have to ease into Fall, I started slowly with a traditional Fall item, but in these very easy-to-handle-at-the-moment colors:
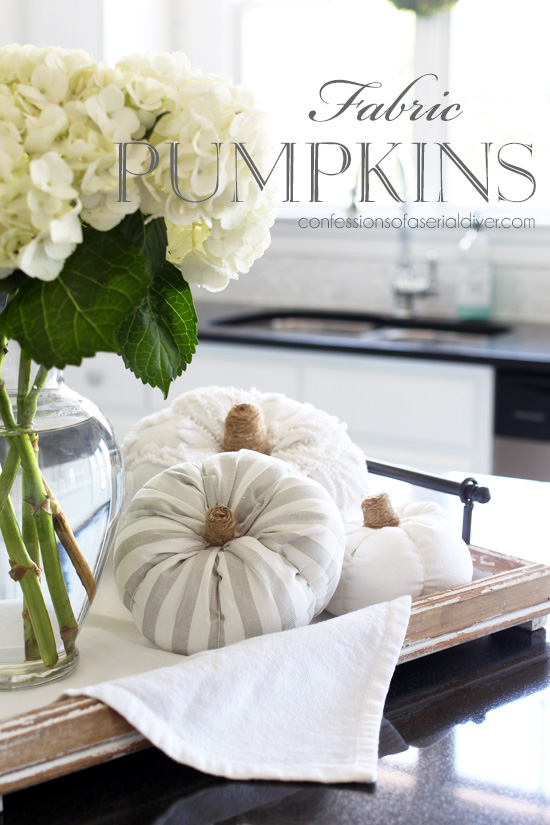
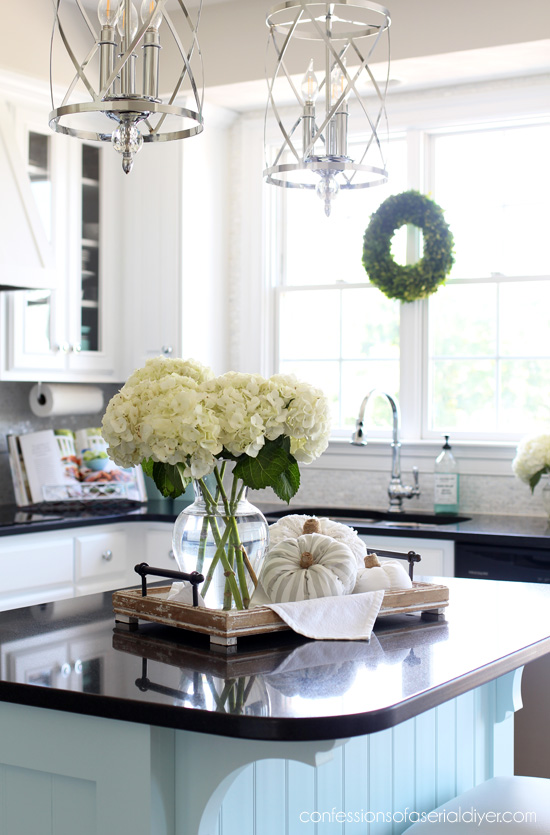
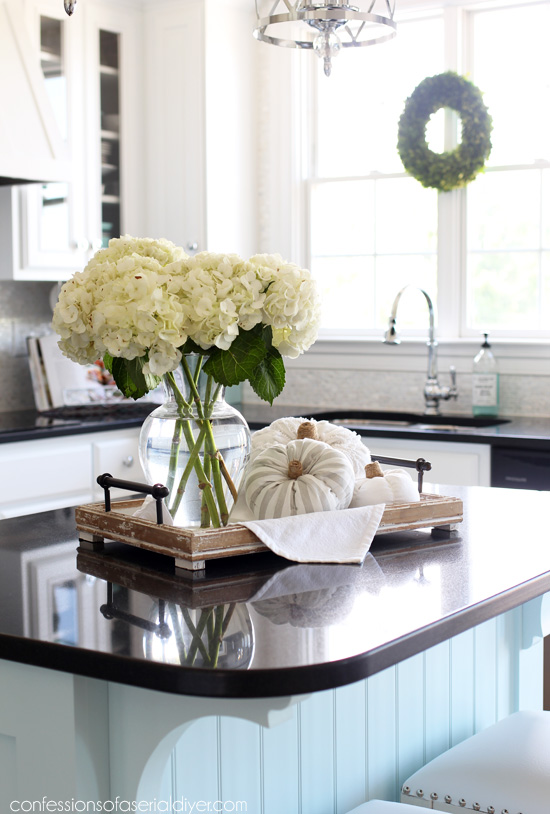
I couldn’t resist using our newly made over kitchen as a backdrop! (Visit the big reveal HERE if you missed it!)
These are so easy to make and can be made out of any fabric you like, AND no sewing machine required!
My favorite is this one I made out of an old chenille throw that I picked up from a yard sale for $5 a few years ago:
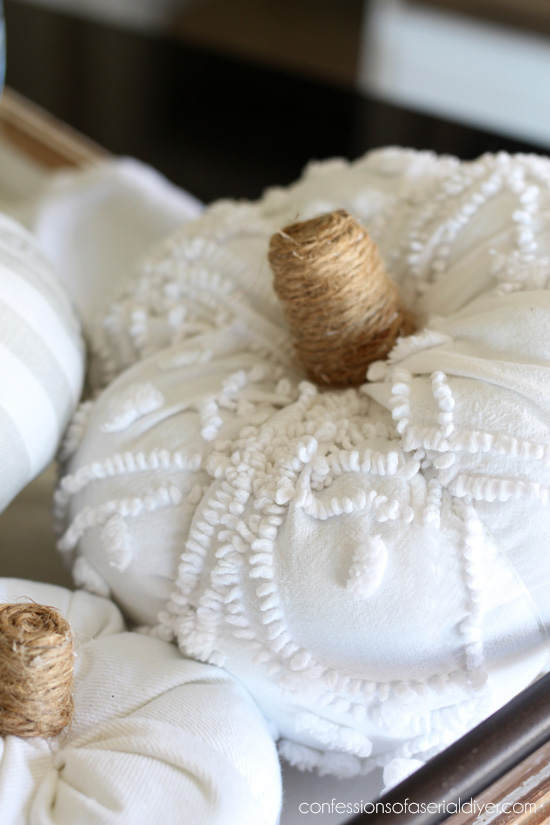
I just love the texture!
Unfortunately I didn’t realize that moths had already had their way with it when I bought it, but that gave me permission to cut it up and use it for other things! I’ve included a few affiliate links so you can find the products I use.
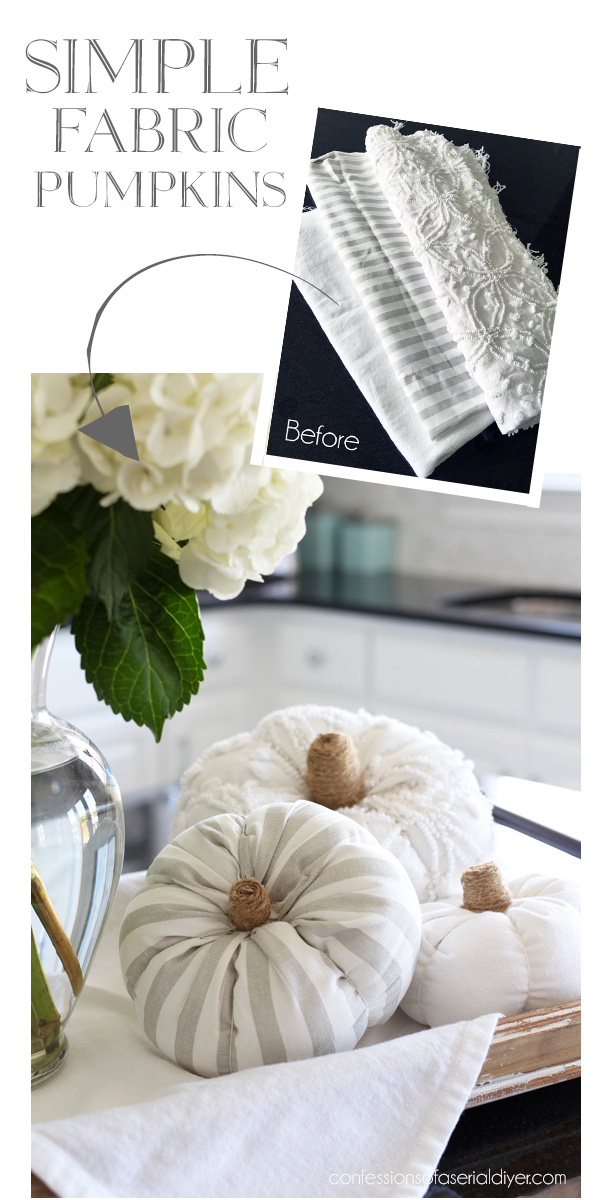
I already had the striped fabric left over from my dining room chairs, and the white one is made from left over denim from our sectional slip cover.
I already had the rest of the supplies on hand as well, so these were basically free! My kind of project!
Want to make a few of your own? They are super easy to do!
First, here is a list of what you will need:
- Fabric of your choice (Old flannels would be great too!)
- Polyester fiber fill
- Embroidery floss or Crochet thread
- Jute twine
- Hot glue gun/ glue
- Extra long needle
- Scissors or cutting mat/straight edge/rotary cutter
I started by cutting my fabric. 15″ x 24″ for the largest one, 12″ x 20″ for the medium one, and 9″ x 16″ for the smallest.
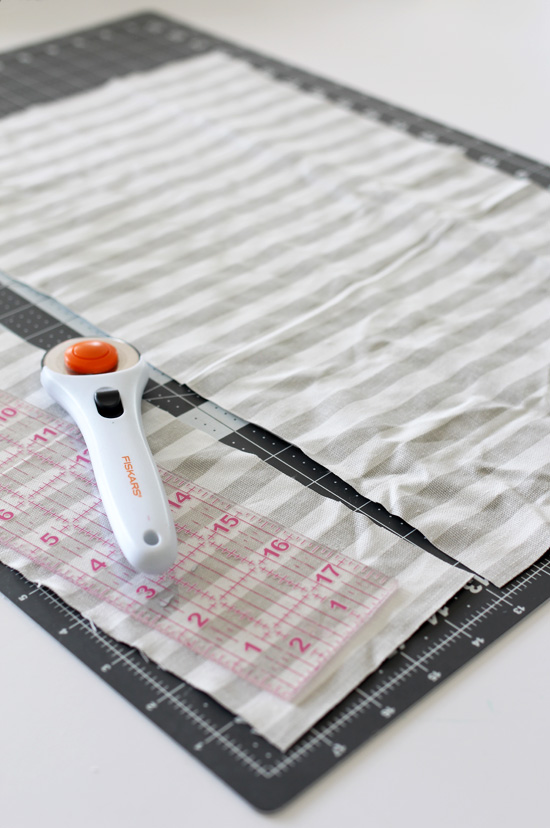
I like my rotary cutter and straight edge for getting perfectly straight cuts.
Next I folded my fabric in half width-wise with right sides together and sewed along the open edge:
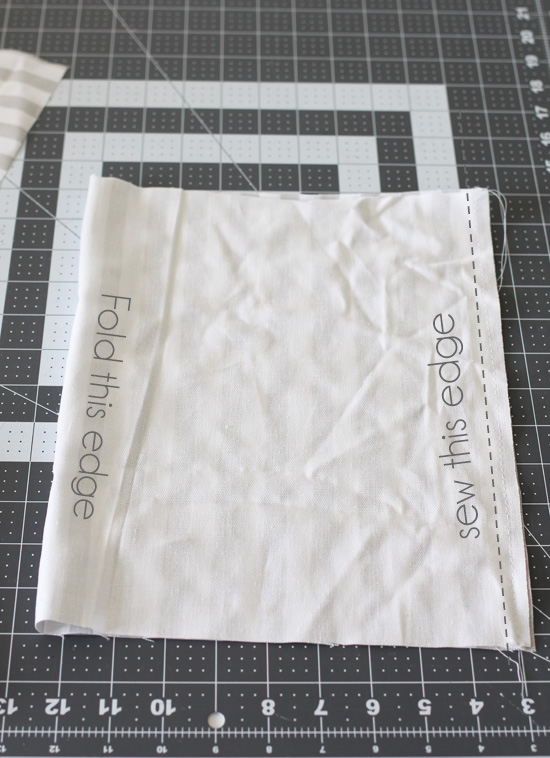
You can machine stitch OR easily hand stitch these!
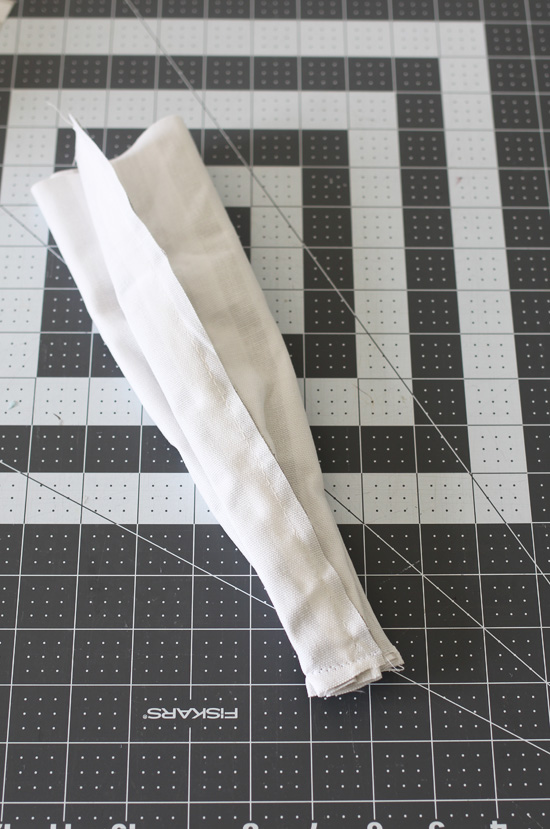
Then gather one end and sew across it with your machine, or just tie the end tightly with a piece of string…
Turn it right-side out and stuff with polyfill. Then gather the top edge closed with string:
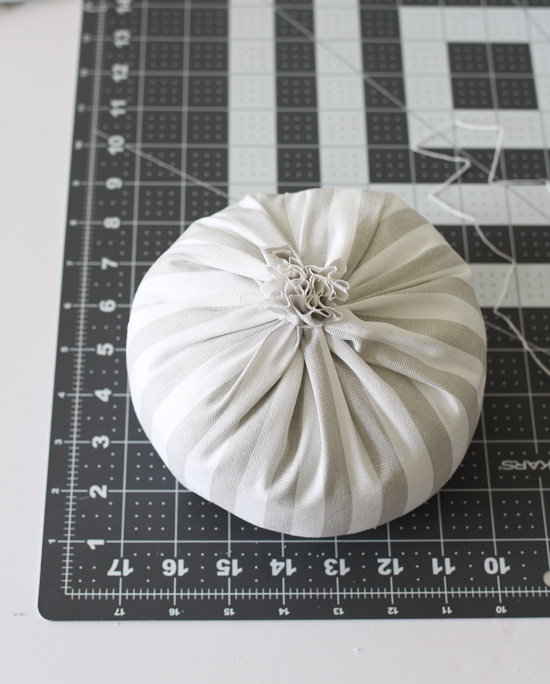
Use your extra long needle and matching string to add the indentions:
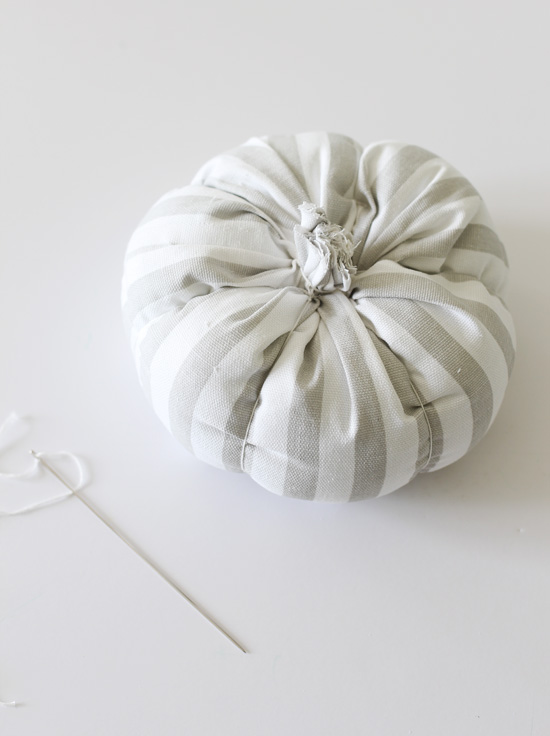
Pull the string through until you get the look you like, then knot it before threading it through again.
I switched to full strand embroidery floss for this since it was the only white string I had.
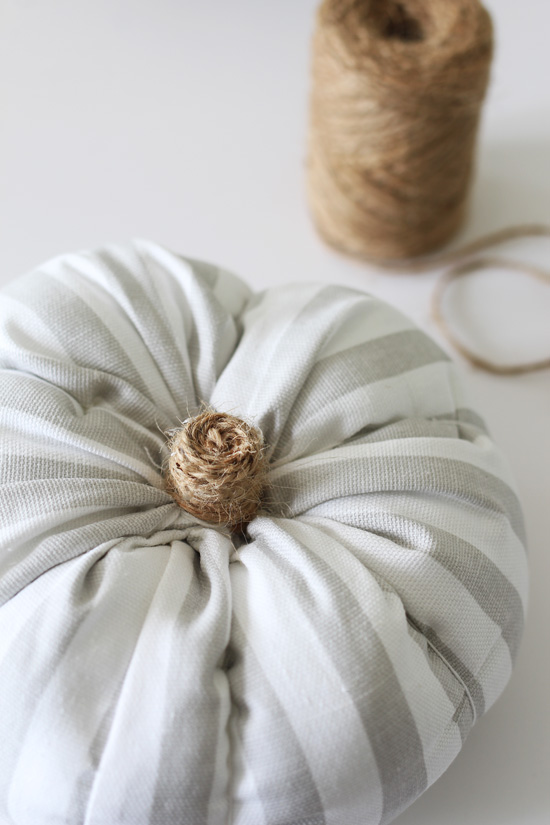
To make the stem, attach jute twine to the base of the stem with hot glue:
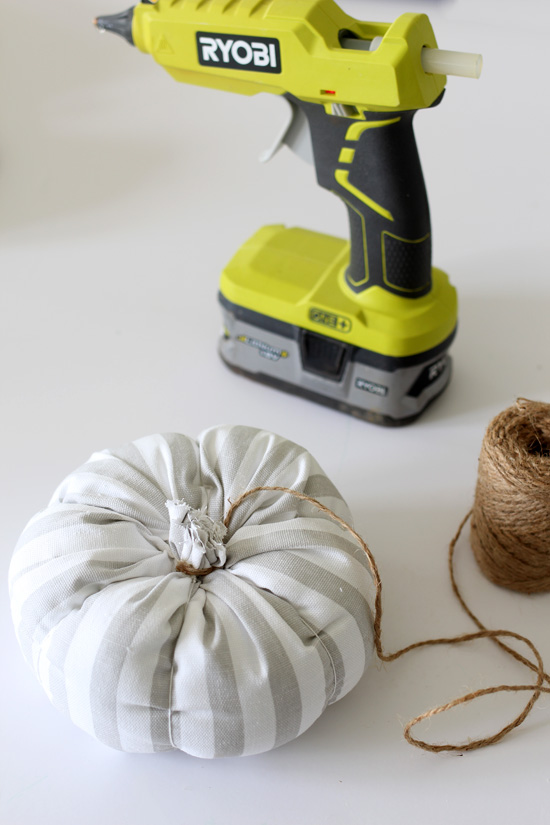
Then continue to wrap it around the stem snuggly, securing it here and there with hot glue. You may need to cut across the top of the stem to get a nice flat surface on top…
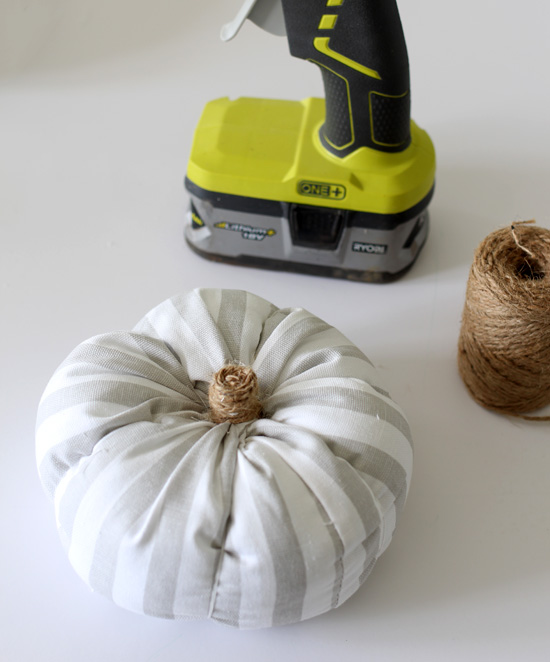
To finish it off, coil the jute around on the top and glue in place.
And that’s it! Pretty simple!
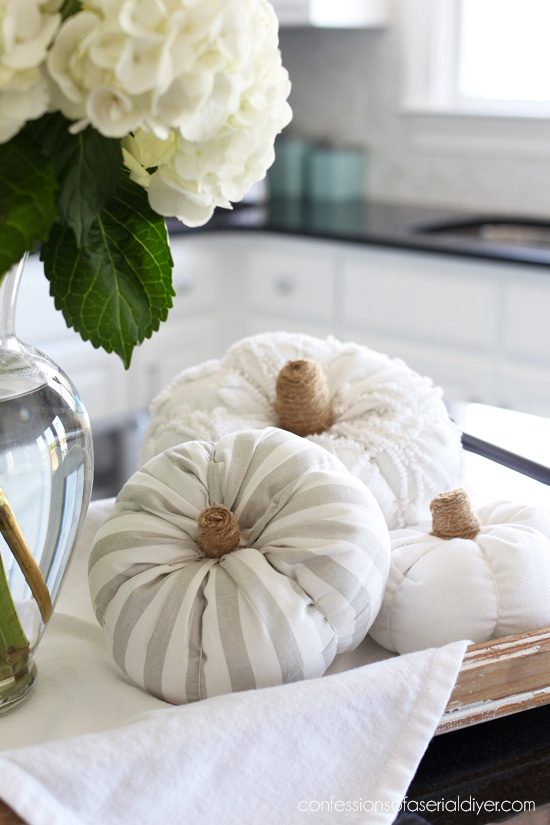

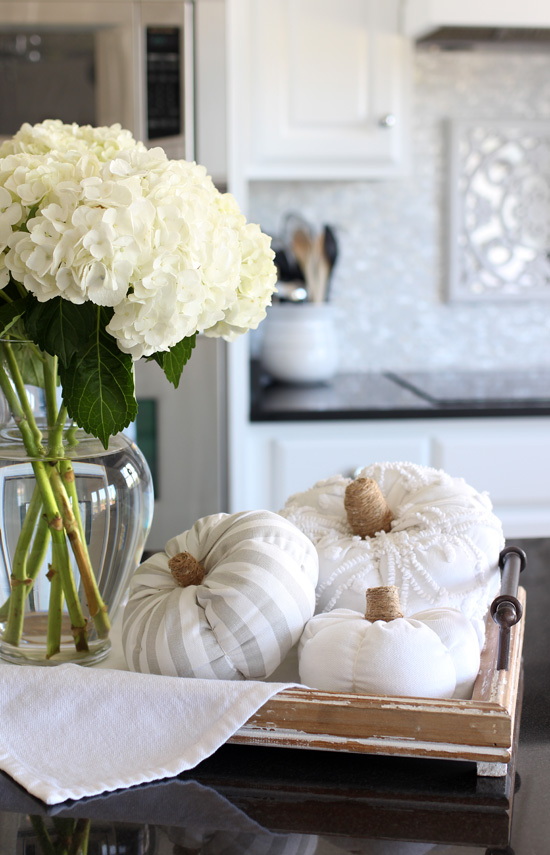
They look cute sitting here on our kitchen island.
The rest of the house will catch up eventually. Maybe.
You may remember these ones I made out of old sweaters:

I used the sleeves of the sweaters to make these ones, so pretty much no sewing involved at all!
Here’s more…
You can see a detailed video of how I made those below:
If you have trouble viewing, find it on YouTube HERE.
Visit my friends below for more projects to get you in the mood for Fall!

Sweater Pumpkins at The Happy Housie // Chinoiserie Pumpkins at Shabbyfufu // Wire Basket Bundt Pan Pumpkins at Bless’er House // Plastic Fall Fruit Makeover at Craftberry Bush // Pumpkin Topiary at Inspiration for Moms

Forest Pine Candle at Setting for Four // Wooden Trough at Deeply Southern Home // Thrifty Magnolia Wreath at Home Made Lovely // Pumpkin Vase at Amber Tysl // Autumn Watercolour Place Cards at Finding Silver Pennies
Wooden Pumpkin at The Turquoise Home // Cotton Wreath at My Uncommon Slice of Suburbia // No-Sew Burlap Table Runner at Jenna Kate at Home // Cute Pumpkin Plants at House by Hoff // Fall Flannel Quilted Pillow at TIDBITS
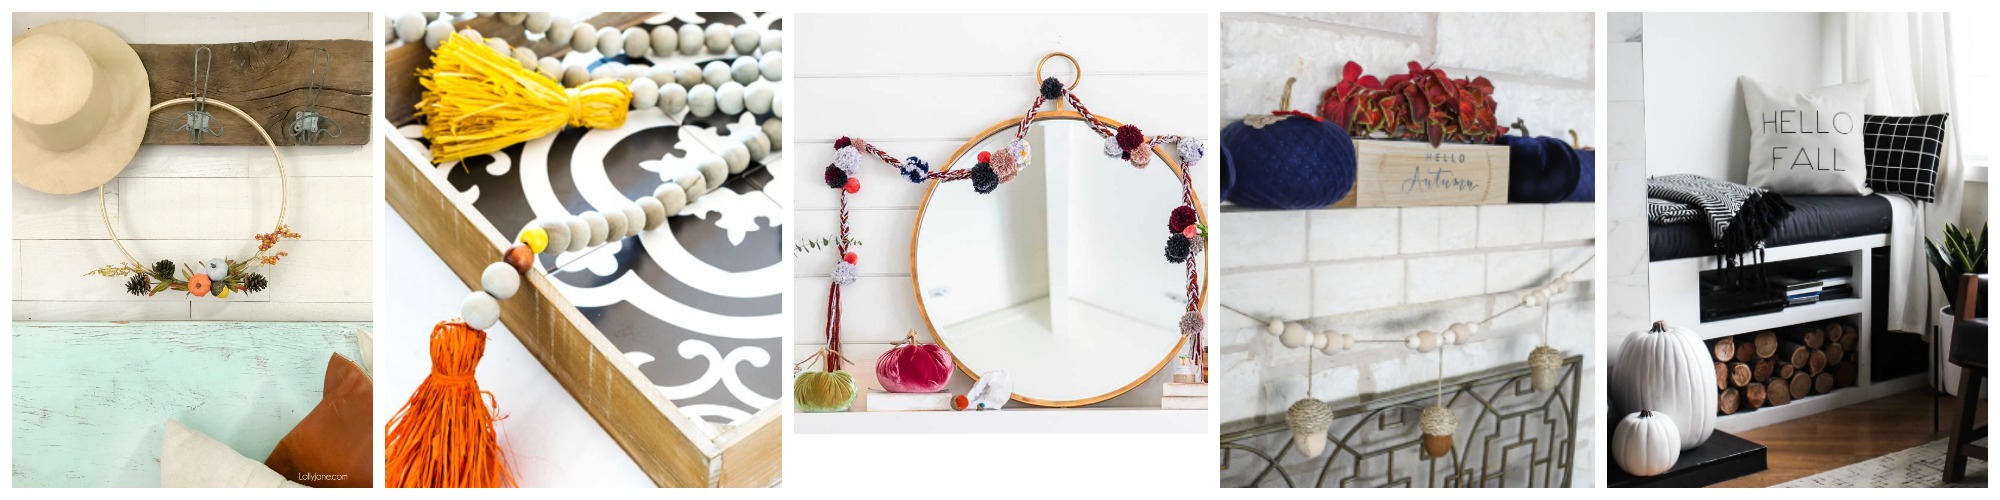
Hoop Wreath at Lolly Jane // Tiled Coffee Table Tray at In My Own Style // Pom Pom Garland at Modern Glam // Acorn Garland at Jen Woodhouse // Hello Fall Pillow at Love Create Celebrate

Silk Fall Floral Arrangement at Town and Country Living // Simple Fabric Pumpkins at Confessions of a Serial Do It Yourselfer // Soy Candles at The DIY Mommy // Lighted Pumpkin Bucket at Clean and Scentsible
Handprinted Pumpkin Pillow at Hallstrom Home // Corn Husk Pumpkins at Paint Me Pink // Fall Glam Candle Wreaths at Summer Adams
I’ll meet y’all back here on Thursday sharing how I installed our Mother-of-Pearl backsplash.
UPDATE: See how easily the backsplash went in HERE! 🙂
See ya then!
XOXO,
![]()
Don’t Miss a Thing!
If you like what you see, there are several ways to follow along!
Email * Facebook * Pinterest * Twitter * Instagram


Mary Kaiser says
How easy and adorable. I can even make them, thanks for sharing. Not sure I am ready for fall, but these adorable pumpkins will help!
Christy says
Thank you, Mary! Yes they are so simple to make! And I am not ready either!! XOXO
susana says
Simplemente… me dejas con la boca abierta ¡son preciosas! Me encanta comprobar lo que se puede hacer con imaginación y buen gusto ¡enhorabuena!
p.d. disculpa que no comente en inglés
Christy says
¡¡Muchas gracias!! XOXO
Christina in SW FL says
Oh Chrissy these are super cute! I love how easy they are to make and they look wonderful in your kitchen.
Christy says
Thank you, Christina! Yes super easy! XOXO
Sheila DelCharco says
These are adorable! I’m so going to make these! I’ll tag you on IG when I do! (It’s still way to early for fall here in FL so it will be a while yet.) Do you see my tags? I’ve credited you with inspiration before!
Christy says
Thank you, Sheila! I hope you do, and yes please tag me so I can see them!! I’ll look out for your tags from now on…if I see them, I always respond! XOXO
Cecilia says
Yes with days in the 100’s, Fall feels far away (sob). ???? Love your pretty pumpkins and they sound easy to make. Thanks for sharing!
Christy says
YESSSS! It will be 95 today and Fall feels a mile away! This little project was a good way to ease into it ha ha. Thanks, Cecilia! XOXO
laura janning says
your pumpkins are so pretty. i have always wanted to make my own, you make them look so easy. maybe i will have to give it a go this fall season.
Christy says
Thank you, Laura!! They are easy…I hope you make some! XOXO
Denise Rocha says
Hi Christy,
They look great!!! How did you make the indents on the pumpkins?
Christy says
Thanks, Denise! I used a five inch needle and embroidery floss to create those indentions, knotting it after each pass. 🙂
Bar Sperling says
Beautiful!!!!!! Love it!!
Christy says
Thank you, Bar!! XO
Debbie in TX says
These are so pretty! I love the color and the texture. And that gorgeous tray in your kitchen makes a beautiful setting for them. I’m actually glad Fall feels a long way off ’cause I love the warm weather! Have a great week!!!
Christy says
Thanks, Debbie! I am just not ready for the cold weather either, my friend! XOXO
Patti says
Thanks for the directions! So cute!
Christy says
My pleasure, Patti! Thank you! XOXO
Ashley says
These are so cute and your tutorial is so informative!
Christy says
Thank you so much, Ashley! XO
Brenda Johnson says
I love these fabric pumpkins and was just thinking about making some myself, so thanks for the instructions.
Christy says
Thank you, Brenda! Yes, very simple to make! XO
Bonnie Hipps says
Hey Girl, these are so stinking cute and instructions look easy. I remember last year seeing your others and saying I want to make those but never got around to it. Now I am early enough to do them. With the next ten days in the high 60s and 70s it has the feeling of fall in the air already. In wa school has already started and leaves turning but, o how I miss my falls in the south. See you Thursday. Hugs!
Christy says
Thank you, Bonnie! These are so easy to make! And I envy you and your cool weather lol, although I will change my mind when it is freezing outside here ha ha! XOXO
MaryJean says
What a cute Idea! Not quite thinking about fall decor yet. I just received today my sheet of laminate for the top of my island. Can’t wait to put it on! I’m a little nervous, but excited too!
Christy says
Thank you, Mary Jean! I am still trying to soak up the last of Summer so I hear ya. Good luck with your laminate!! XOXO
Jennifer Lifford says
So cute and easy! I love that chenille one. And your kitchen is gorgeous!
Christy says
Thank you so much, Jennifer! XO
Julie Briones says
Love these, Christy! Great tutorial, too!
Linda Peteresen says
Hi Christy, love this year’s take on the fabric pumpkins! They are just too cute????. Your kitchen is fabulous! The backsplash is totally amazing–love the shimmer. Can’t leave out the bookcase. Really cute. BTW, I can’t wait for fall????!! I start decorating on Sept 1st. “Pumpkin Spice & Everything Nice”. XOXO
Christy says
Thank you, Linda!! It was fun working on a crafty project after finishing the kitchen! I do love Fall when the cooler temps hit! XOXO
Krista says
These are adorable, Christy! I love me a fabric pumpkin, and you nailed it, my friend! Glad you could be on this hop!
Christy says
Thank you, Krista! Can’t go wrong with pumpkins! Thanks for hosting this fun tour!! XOXO
Lauren says
Ooh! The chenille pumpkin is my favorite! Cute, Christy!
Christy says
Thank you, Lauren! That’s my fave too! XOXO
Becky says
Funny I should read this today when our high is supposed to be 70!!!! Schedule me for some garage time, the pumpkins can wait until it’s hot again – tomorrow, haha!
These are so cute! I love the one made from the throw! I need to make some more. I made a basket full when you first posted your directions. They sit in a basket on our coffee table all fall, and are known as “throwing pumpkins”. Seven boys (and one dad) in the house? You bet they get thrown! And the girls and I HAVE to throw them back, so… They don’t really spend that much time in the basket after all. It’s a fun tradition though! The kids would rise in protest it I left the pumpkins out! : )
Christy says
Ooh lucky!! I am not ready for Summer to end, but this heat wave can take a break! And ha ha…I love that you and your kids…wow SEVEN boys??…have fun with your pumpkins!!! XOXO
Heather Luckhurst says
These are so gorgeous!! I’ll try making these – I’d love a big bowl of them!!
Christy says
Thank you, Heather!! Yes….I hope you do! A bowl full would make a great centerpiece! XO
Danielle says
These are adorable. LOVE them!
Christy says
Thank you, Danielle! XO
Kristin salazar says
These are so pretty and I love the mix of fabrics!
Christy says
Thanks, Kristin! XO
Benita says
Okay, you’ve inspired me. I’m going to give them a try! Love these, they are just too adorable!!
Christy says
Awesome! I love that you are inspired to make some too! Have fun! XOXO
Amanda Baehler says
I love these Fabic pumpkins. I will be making some of these. Th is for the inspiration
Christy says
Thanks, Amanda! They are super simple to do! Have fun! XO
Mary says
I love these! So last weekend I made them. I made ELEVEN. LOL. Go big or go home. I didn’t have white fabrics (love the white you made) so made them from different colors I had. Made numerous because I wasn’t sure what I would like best in a finished pumpkin. Tried to paste a picture here, but it wouldn’t let me. 🙂 Everyone who has seen them loves them. Thank you so much for the instructions. I did a couple things different. I couldn’t get string tied around to close them so I rubber banded them, Then tied them and removed the rubber band. I also used tan duct tape I had around the “stems” before the twine which also made it easier to glue the twine on.
Christy says
I am so happy you shared a photo with my on my FB page! They turned our fantastic!! Smart ideas for finishing them too! XOXO