Want to see my favorite spot in the house?
Come check it out:

Now it would be really difficult to appreciate this master closet makeover without seeing how it started out.
Take a look:
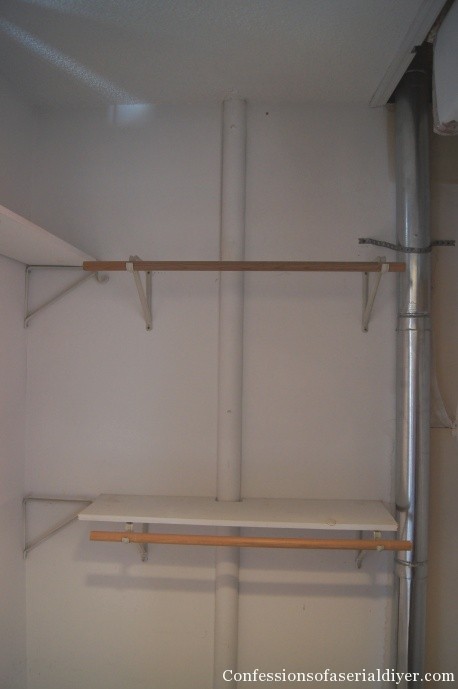
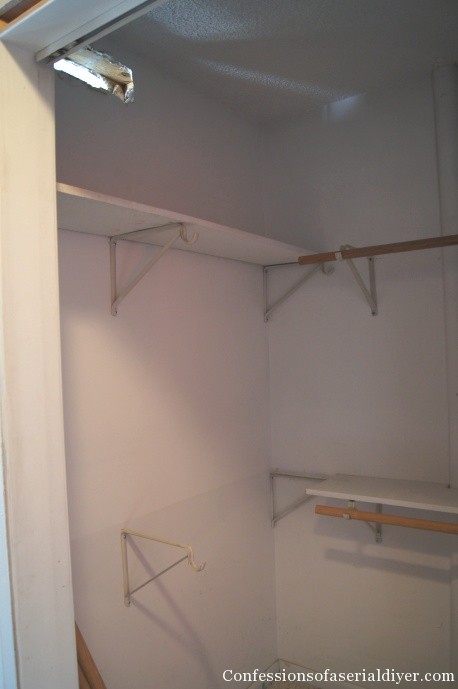

Had enough? Me too! Gross, huh? My husband and I both shared this closet and there was a lot of wasted space. That’s when I dug out my graph paper and pencil and got to work measuring, creating the perfect space.
This closet is pretty dinky for a master closet in a house that was built in the 80’s. It was crucial that I lay it out just right to maximize it’s potential.
I added a lot of shelves to help divide the space as well as create a place to store socks, undergarments, etc. I love that I can get completely dressed from my closet without having to dig through my dresser.
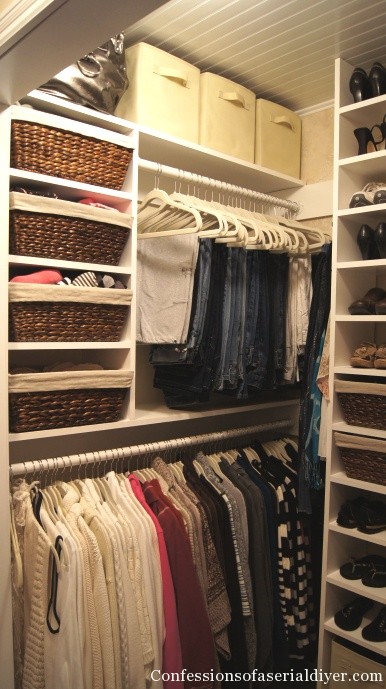

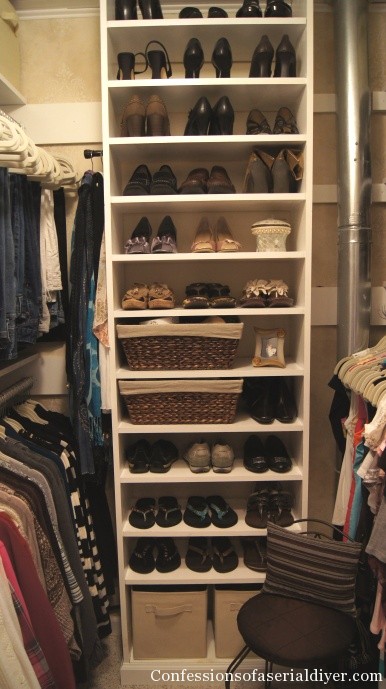
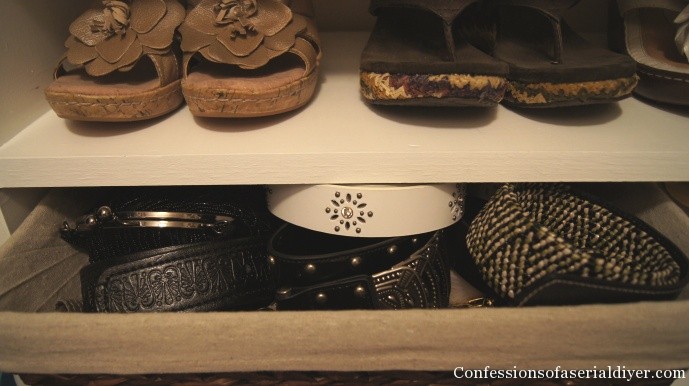
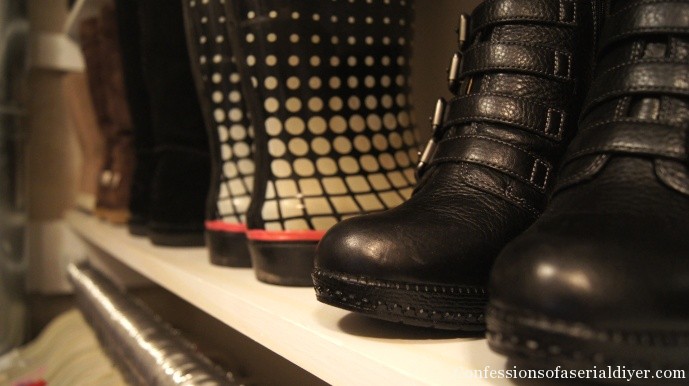
I’ll admit I do not own a ton of beautiful shoes. I am a nurse currently staying home with two boys. There aren’t a whole lot of places I go that require beautiful shoes but I still need shoe storage for my not-so-beautiful shoes, right?
Baskets to hold my belts…
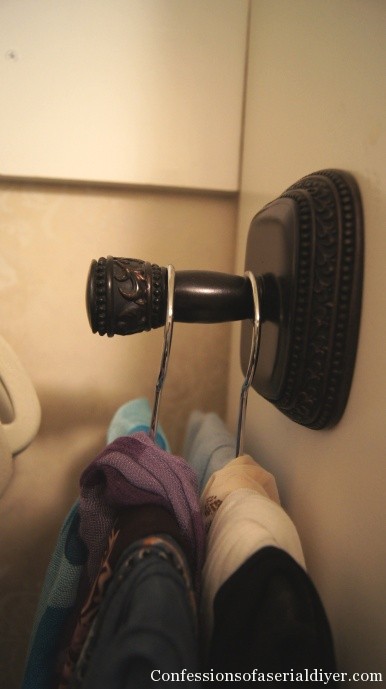
This hook that holds my scarves is actually part of a leftover towel rack from the master bath redo. The hole that normally holds the towel bar is on the other side.
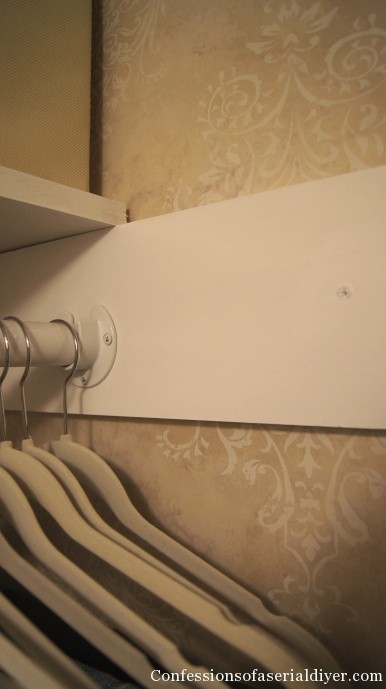
This wall paper was also left over from the master bath renovation. I pieced it together to cover the back wall.
We put bead board on the ceiling. This is the click-in type but honestly I think we could have gotten away with a sheet of bead board paneling here.
Lot’s of bins to hold things make the closet appear neat and organized.
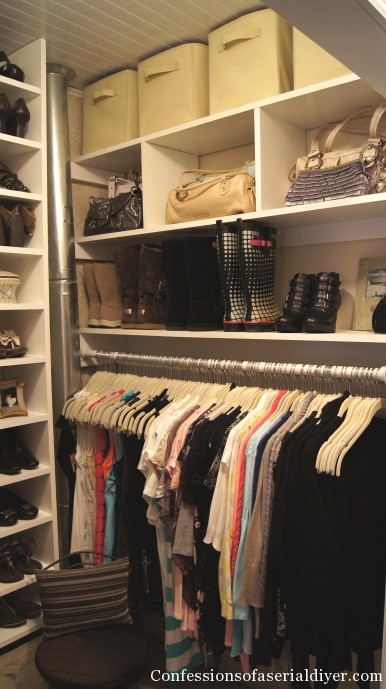
This shelf was made tall enough to accommodate tall boots.
More bins along the top to maximize storage while keeping it neat.

Side-by-side before and afters:

Ah…so lovely and organized!
I was originally planning to install french doors but it looks so pretty, I decided to leave it open!
This ended up being the perfect home for my new ($5) table!
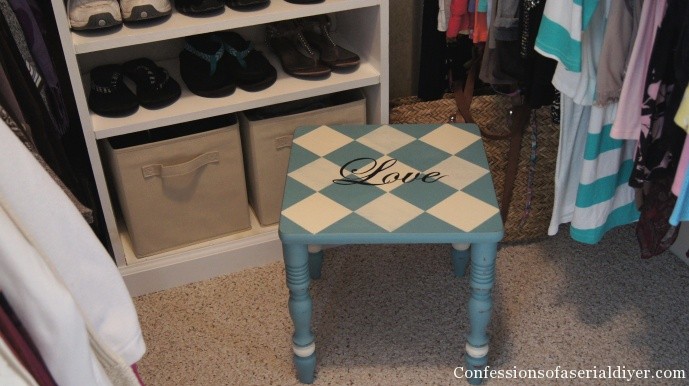
(You can check out the before and how to here.) It’s perfect for sitting on to put on socks and shoes!
Are you wondering what happened to all my husband’s clothes? You can check out our Master Closet Makeover (Part2) where I’ll show you!
You can also check out my Top 10 Tips to a Better Closet:
UPDATE: You can see updated photos and how I built my closet too!

Hope you enjoyed my tour. I ‘d love to know what you think!
XO,
![]()
If you like what you see, there are several ways to follow along! ![]()
Email * Facebook * Pinterest * Hometalk * Twitter * Instagram
I love to share at some of these great parties:
Home Stories A to Z Not Just a Housewife Kammy’s Korner The Happy Housie Design Dining and Diapers Liz Marie Blog Funky Junk Interiors Savvy Southern Style Tatertots and Jello DIY Show Off Redoux Interiors Between Naps on the Porch The DIY Dreamer Oh My Creative Little Miss Celebration Just a Girl and Her Blog Sand and Sisal Interior Frugalista House on the Way Addicted 2 DIY I should be Mopping the Floor Miss Mustard Seed


Melissa @ mamamiss says
LOVE it! Looks Beautiful!! LOVE the bead-board ceiling.
Christy K. James says
Thanks for checking it out Melissa:)
Tracey says
You are my inspiration. This is my walkin robe month. I’ll send pics at the end!
Christy K. James says
Curious about you walkin robe month?!
Danni@SiloHillFarm says
Looks fabulous! I have got to get going on my own closets!
Christy K. James says
Thanks Danni!
olthings says
Lovely closet ! All seem organized and so beautiful !
Have a nice week !
Olympia
Christy K. James says
Thanks Olympia(cool name!)! It doesn’t always stay this pristine but its easy to organize quickly since everything has a place:)
vel says
can clearly see why it’s your favorite- super cool and super organized, love it!! Huge pat on the back for you dear for a great job!
Christy K. James says
Thank you Vel for such a nice compliment:)
Deb says
Found this link via I Heart Naptime — beautiful plus you really made maximum use of the space!!
Christy K. James says
Thanks Deb! I tried…wanted to be able to cram as much stuff as I could in ha ha:)
kristin says
Love your closet all organized! thanks for linking up.
XO
Kristin
Christy K. James says
Thanks Kristin!
Rebekah says
What are your closet dimensions? The size looks similar to mine. I’m wanting to redo mine but I’m having trouble with proportions for clothing and shoes.
Christy K. James says
Hi Rebekah, my closet is 6′ wide by 4 1/2’deep. I used graph paper to draw it out first. One block = one square foot. I found my longest pair of pants to get a measurement for my pants area. I used my tallest boots for the boot area, etc. I found my baskets first so I could make the shelving to fit. Hope this helps! I’d be glad to answer any more questions you might have:)
Rebekah says
Thanks! Mine is 66″Wx40″D, so it’s a little smaller. I have already done a little bit to increase storage. I took down the single bar stretching the width and the row of shelves behind it and replaced them with temporary 1×2’s for hanging rods going the depth. I’m looking for a more finished look, like yours. I just got so overwhelmed with figuring out where/how to put stuff and had to take a break. Thanks for the inspiration!
Christy K. James says
You are so welcome! Believe me, I am no carpenter…drawing up my plan on graph paper helped me get a better vision. That way I could see exactly what I would need to build it. Take a trip to Home Depot or Lowes and see what is available to work with. They will make your cuts for you too if you know what you need. Good luck! 😉
Tamara says
How did u do it though? As in, you bought what? You installed it how? They have kits at lowes and home depot and I was thinking of just having a handy man install some of those.
Christy K. James says
After I drew it out to scale (one block=one square foot), I made a list of what I needed. The shelves are pine. They were 1’x 8’to start and I cut them to length based on my sketch. The shelf supports are also pine. I screwed them into the studs. The shoe shelves were put together with a nail gun. You might be able to see more of that detail in my husband’s closet makeover. There’s a link from mine. The kits are great, too. I’ve used several of those. They are easy to install, you could probably do it yourself:)
Whitney says
I LOVE how you organized your closet! Ours has the exact same dimensions and was thinking of doing something similar. What did you use for the base of your shoe rack? It looks so elegant and I would like to try something like that for all of my shoes.
Whitney
Christy K. James says
Thanks, Whitney! I used the same pine that I used for the shelving. I just made the very bottom shelf the same height as the molding. Good luck with yours:)
Angela says
Can you give me the dimensions of the shelving with the long wicker baskets and your shoe shelving? Also, where did you find the baskets?
Christy K. James says
The shoe shelving is 12″ deep X 30″ wide. I put three pairs of shoes side by side to come up with those dimentions. The basket shelves I measured to fit the baskets. I found them first at Michaels. I would suggest finding baskets you like first and build the shelving to fit. Target also had a nice selection that looked similar. I’d be glad to answer any other questions you might have 🙂
Angela says
How tall are your shoe shelves?
Christy K. James says
They go floor to ceiling and most are 6″ apart. Two are 7″ apart to accommodate the baskets. I hope I answered your question:)
Christy K. James says
Test comment
Your Husband says
Why do you get the bigger closet??
Christy K. James says
Love You!
Liz Blumberg says
Hi Christy! You have an amazing closet. Where did you get the storage baskets?
Thanks!
Liz
Christy K. James says
Thanks! I found the baskets at Michaels. They had similar ones at Target not too long ago. 🙂
Denyse @ Glitter, Glue & Paint says
I want to rip my closet apart and re-do and you are giving me ideas. lol
Thanks for sharing at Throwback Thursday.
xoxo
Denyse
Christy K. James says
My pleasure, Denyse! I found lots of great projects at your party! 🙂
Tamara Tasse says
I have a walk-in closet which was already built when we bought the house but it’s lacking major organization. I’ve been searching for frugal ways to make it more functional and came across your blog on Pinterest. I love what you did to your closet and intend to take a couple of ideas like the shelving for shoes and baskets. Thanks for sharing!
Christy K. James says
I’m so glad you found some ideas helpful, Tamara! I had a lot if fun designing my closet. Good luck with yours 🙂
vanessa says
Love your closet! Are those huggable hangers from Walmart? How do you like? Does the velvet rub off on your clothes? I’m in the midst of re organizing my closet!
Christy K. James says
Thanks, Vanessa! I did by my hangers at Walmart and they are fantastic! The velvet is still 100% in tact. 🙂
Krystal says
Love the closet! I’m in the middle of reorganizing mine and I’m stuck on the clothing order, I constantly go back and forth. Do you put all the same color together and then style? Or do you do style and then color? Lastly what color format do you follow? Thank you!!!
Christy K. James says
Hi Krystal! I like to organize by category first, then color within the category. So I have tanks, then short sleeved Ts, then long sleeved Ts etc. I arrange each from light to dark, so start with white and work your way to black. Hope this helps! XO
Krystal says
Thank you! What about patterns, stripes, etc? Do you keep them separate or with the most dominant color in the top?
Christy K. James says
Yep, I keep them with the most dominant color. This post of how I built my closet has much better photos. 🙂 https://www.confessionsofaserialdiyer.com/how-a-girl-built-her-closet/
Linda Mintey says
Love the use of space can you tell me what is the distance from the clostes to the edge of the shelving unit?
Christy K. James says
Hi Linda, I’m not sure of your question. Is that clothes, closet, or closest? I’m thinking you meant “clothes”. From the clothes to the shoe shelving? If so, it’s about 5″.
Linda Mintey says
Sorry didn’t spell check yes the distance between the edge of the shoe tower and the actual end of the hanger or clothing on the hangers.
Christy K. James says
Ha ha yep, it’s about 5″. 🙂