
This is the perfect time of year to start thinking about getting organized. One of my all time favorite spaces in my house is my master closet, probably because it is the most organized space in my house!
I originally shared my Master Closet Makeover last year, and for a while I was getting questions about it almost on a daily basis.
Today I’m going to share how I built my closet. This post contains some affiliate links for your convenience. Click here to read my full disclosure policy.
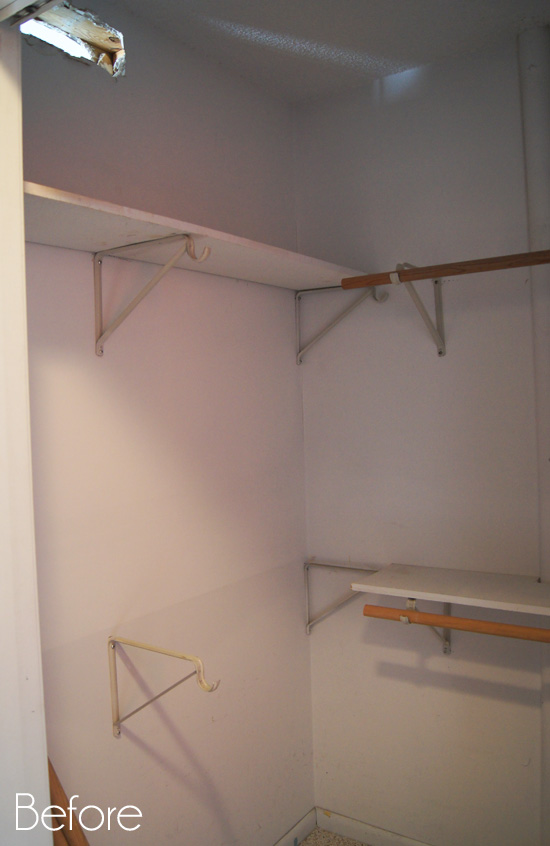
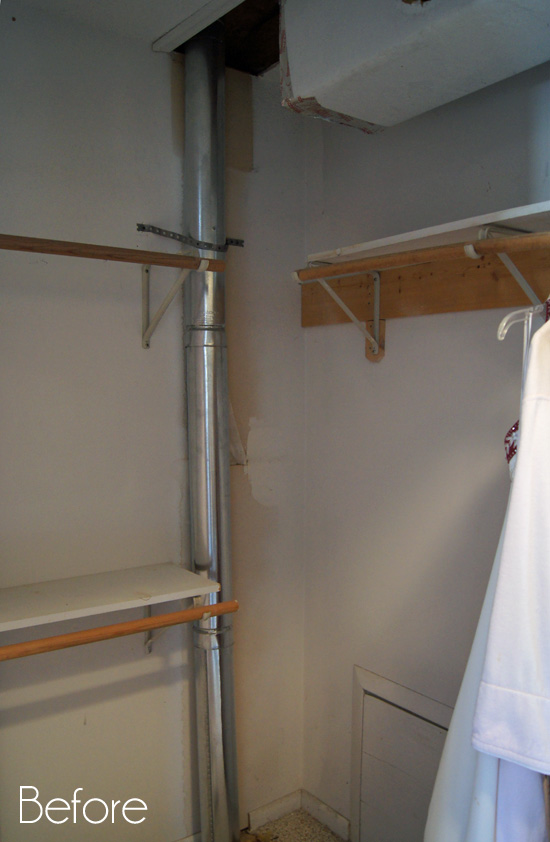
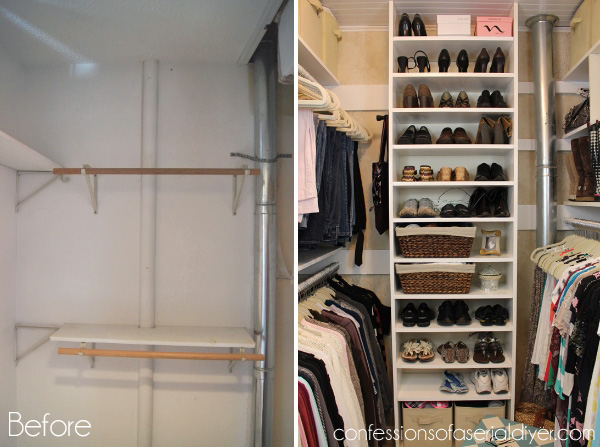
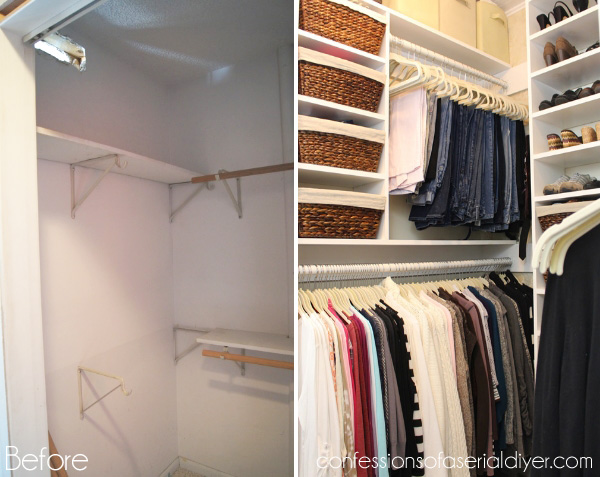
If you haven’t seen my closet makeover, allow me to set the scene. This is how it started:
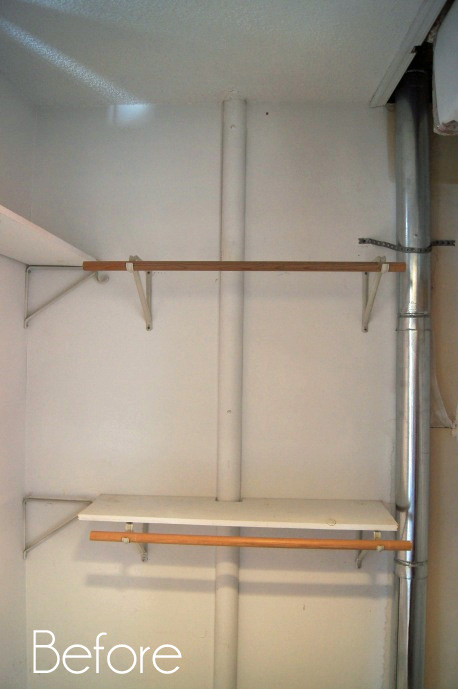
Lovely, right? Here is how it looks today:
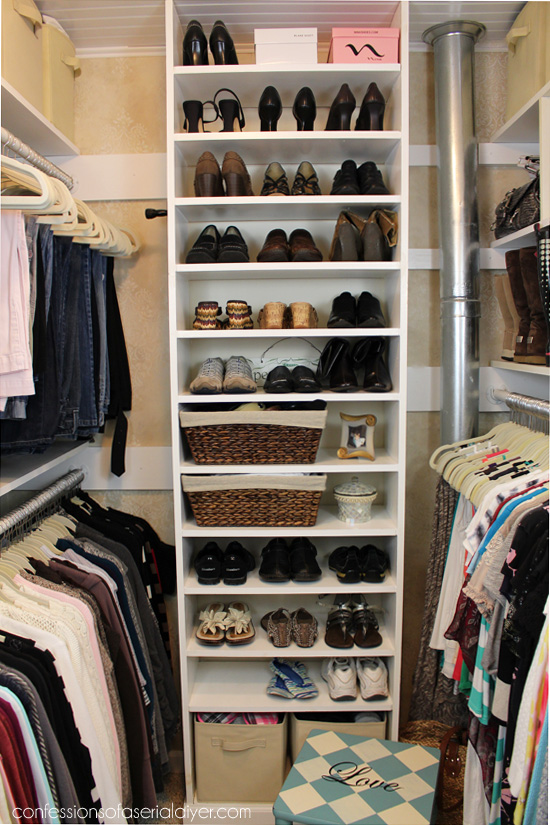

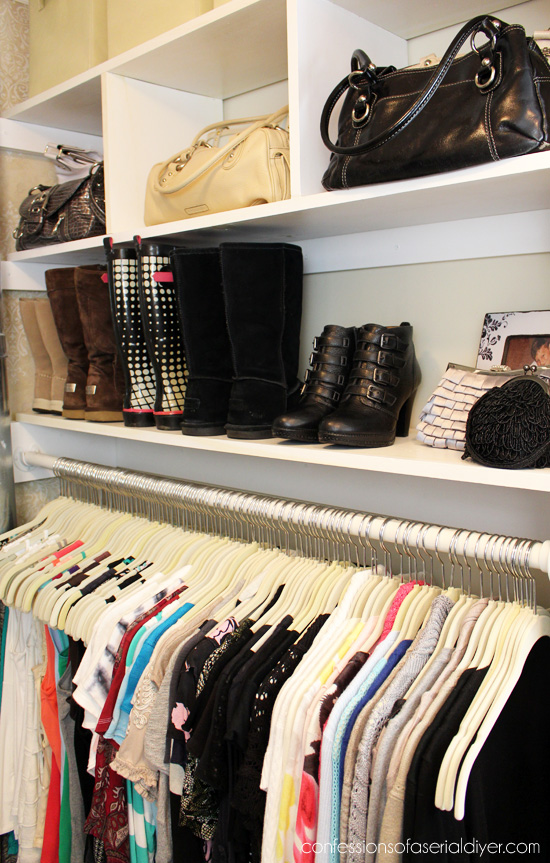
So. Much. Better, Right??
It is not a huge space by any means compared to similar sized houses from the 80’s, so it was important that I use every square inch wisely.
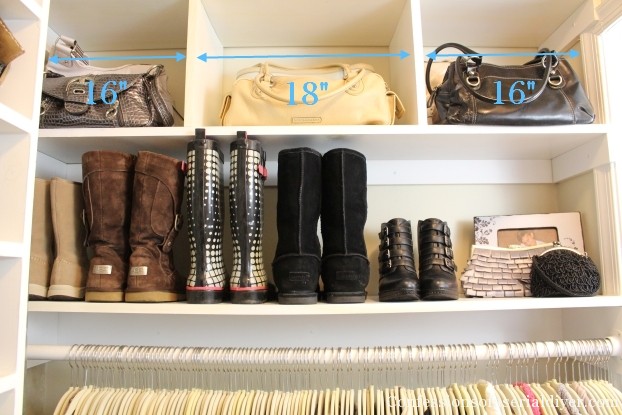
Most of the questions I received were about measurements and how I knew what would go where. Hopefully I will answer those questions here:
What are the measurements of your closet?
My closet measures 6′ wide X 4 1/2′ deep and from ceiling to floor is about 8′.
How did you get started?
I sketched each wall of my closet on graph paper, allowing each square to equal one square foot. Then I started penciling in what I wanted to go where.
How did you decide how to divide the space so that everything would fit your needs?
To decide on the height for each space, I used a sample of what would be hanging/stored there. I used a few pairs of pants to determine how tall to make that section. I used a few shirts to measure out that section. I did the same with my shoes and boots. For the spaces that hold baskets and bins, I found the bins first. Then I measured to accommodate them.
Did you paint the wood first?
Yes! I primed and painted everything first. The knots have bled through a tiny bit in a few spots, so I would probably prime any knots a couple of times before painting. I used a six-inch sponge roller to apply the paint and then touched up any areas that needed it with a brush after installation.
Where did you start?
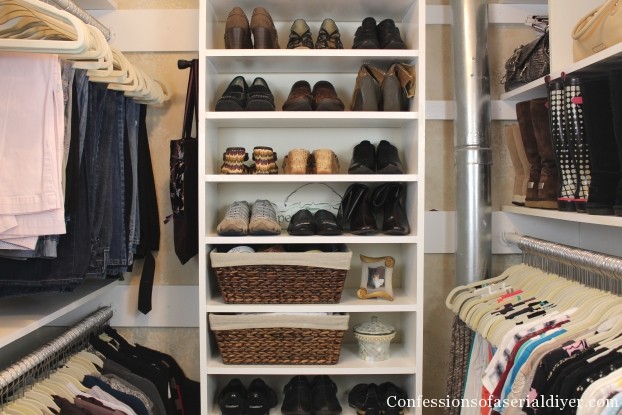
I painted the walls first of course, using some leftover bathroom wall paper scraps on either side of where the shoe shelves would go. Then I built the shoe tower. For the sides of the shelving as well as all the shelving in the closet I used 12″ pieces of pine cut to fit the lengths I needed. Here are the measurements for the shoe shelves:
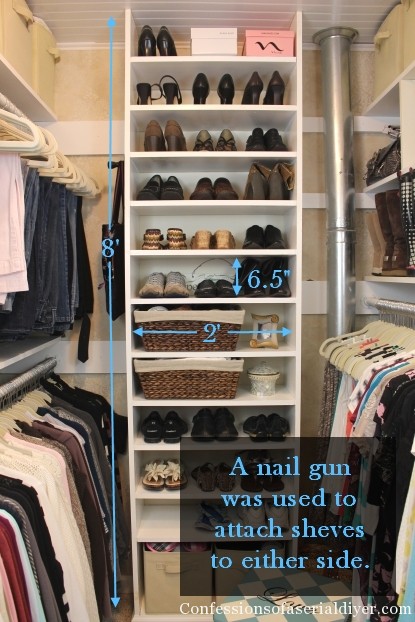
All of the shelves are about 6 1/2″ apart with the exception of the bottom shelf which is 12″ tall to accommodate a couple of bins. I store my flip-flops and slippers in these. The bottom shelf is at the same height as the molding I used to trim it out.
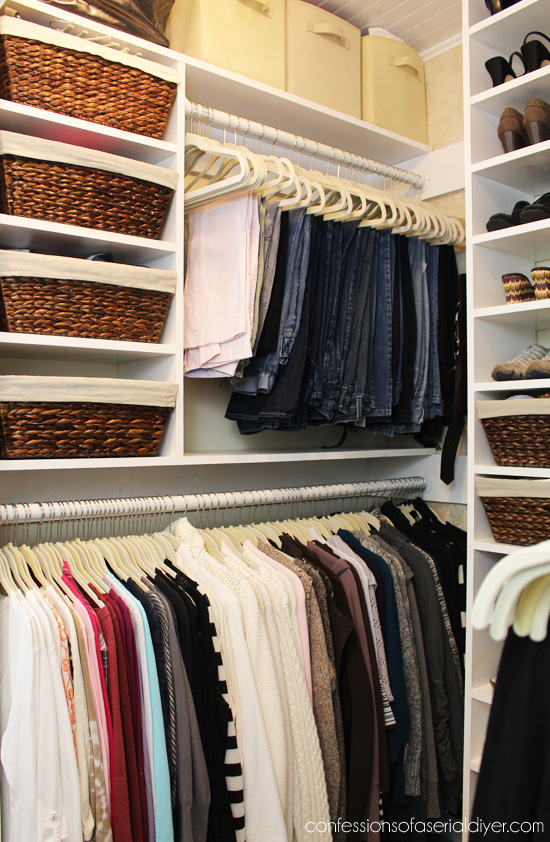
How are the clothing areas installed?
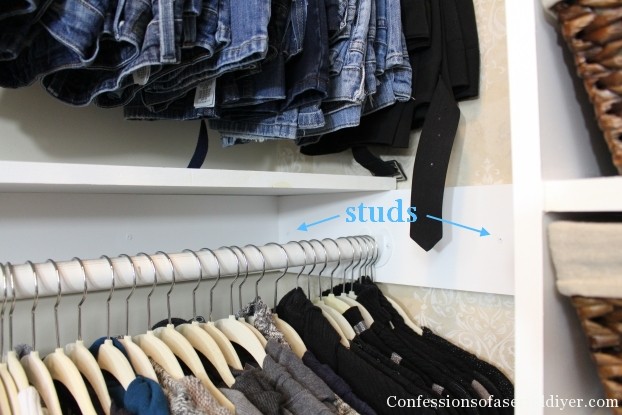
If you look at my closet closely, you can see a piece of 1X5 pine that is supporting the shelving all the way around.
This was the next step. Installing this piece the length of the wall allowed me to screw it right into the studs. I added another piece the depth of the shelf on the left for support:
On the right side, I took the support all the way to the shoe shelving so I could find a stud. Clothes are extremely heavy, so try to take advantage of studs whenever possible.
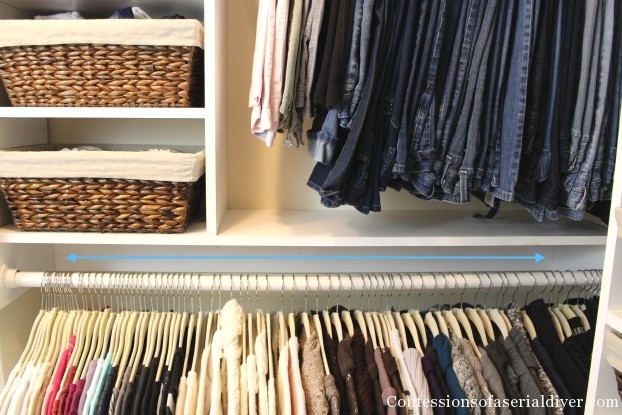
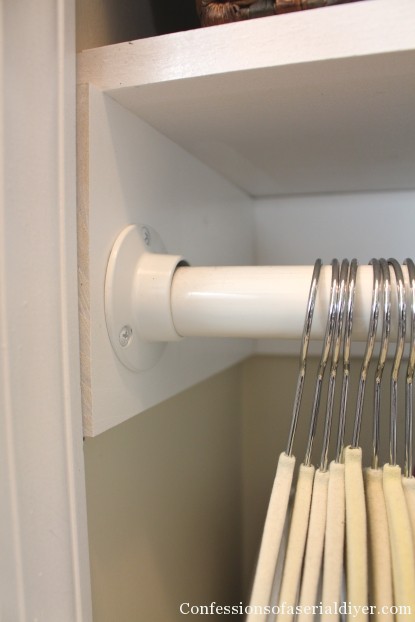
I installed the hanging bar next, screwing the rod holder right into the side supports. Then I added the shelf above. Here are some basic measurements I used:

The basket shelving was built by adding 1X3 pieces (the depth of the shelves) to the wall, screwing them into studs.

Then I cut a piece of 1X12 for the right side support in the height I needed. I attached the shelving with a nail gun from the right side, using a level as I went.
Here are my measurements which are based on the size of the baskets, yours may vary depending on your needs.
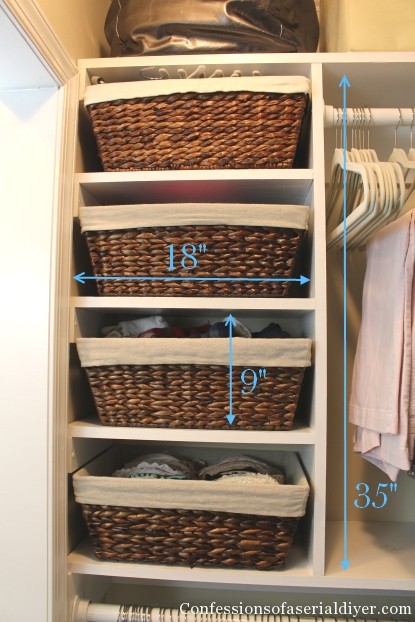
To finish this side off, I added 1X5 the rest of the length of the top, and to the right side and added the top shelf. This holds bins that keep everything from books, to photo albums, to jeans I may or may not be hoping to squeeze back into some day 🙂

The other side was built very similarly. I started with the support pieces for the hanging bar and shelf. Here are some basic measurements:

For the left side supports, I took them to the shoe shelving, again to take advantage of the studs. It doesn’t take away from the finished look. Now that pipe is another story…
For the middle shelf, I added supports the same way, only I used 1X3 s. I added my shelf and then to build the cubbies, I cut two pieces of 1X12 to 12″ to act as dividers. They also support the top shelf along with side wall supports. I secured them with my nail gun through the top shelf.
The shelf and hanging bar appear to be sagging a bit, but it’s just the picture. As you can see the shelf appears to be leaning forward as well, but it’s not. This is a good time to tell you though that if you have a wall that’s any larger than this, you probably want to add shelf brackets in the center for additional support.
Where do you hang your maxi dresses?
I get this question a lot. I made the right side long enough to accommodate my shorter sundresses, but I only have a handful of longer dresses. It just didn’t make sense to me for my space to create an entire area dedicated to them. I hang them on my regular velvet hangers but use these clips
to fold them up at the bottom. It’s a solution that works for me. If you have a lot of longer dresses, you may want to include an area for them.
Where did you buy your baskets?
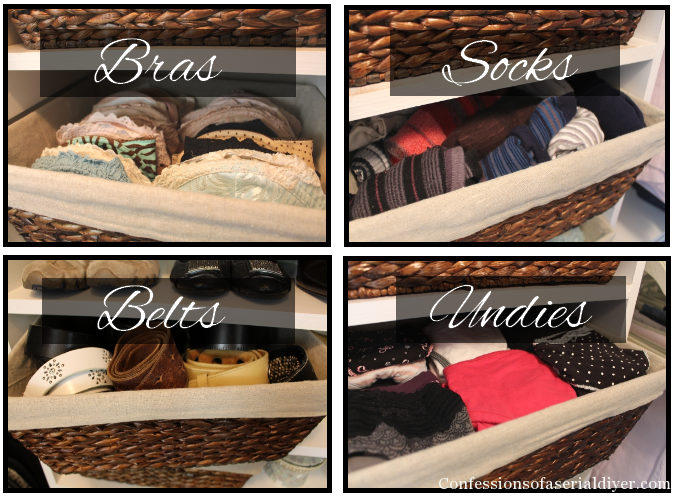
I found these at Michaels for 50% off. Their styles change with the season, but they always have a nice selection. Be careful they’re not made from banana leaves. The first ones I bought were and there’s a bit of an earthy odor to them. Unless of course you like your underwear to smell earthy!
Here are some that are perfect (prettier than mine) that I found on Amazon:

I use them to house my undergarments and belts and such:
Ok so there you have it. This is how I built my closet.
Let’s take another look back so you can really appreciate this makeover…
The before was so lovely.
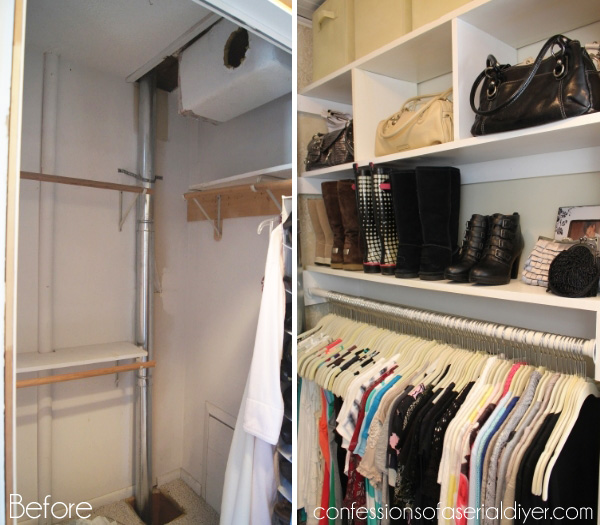
It came a long way! And I think I managed to use every square inch!
Want to know what happened to my Hubby’s clothes?
Find out what happened to my Hubby’s clothes here:

And you won’t want to miss my 10 Tips to a Better Closet. You can put these to work today!

If you have any other questions about my closet, feel free to leave me a comment. This isn’t a huge dream closet, but it is a “real” closet and it is completely do-able!
Love it? Pin this image for later! 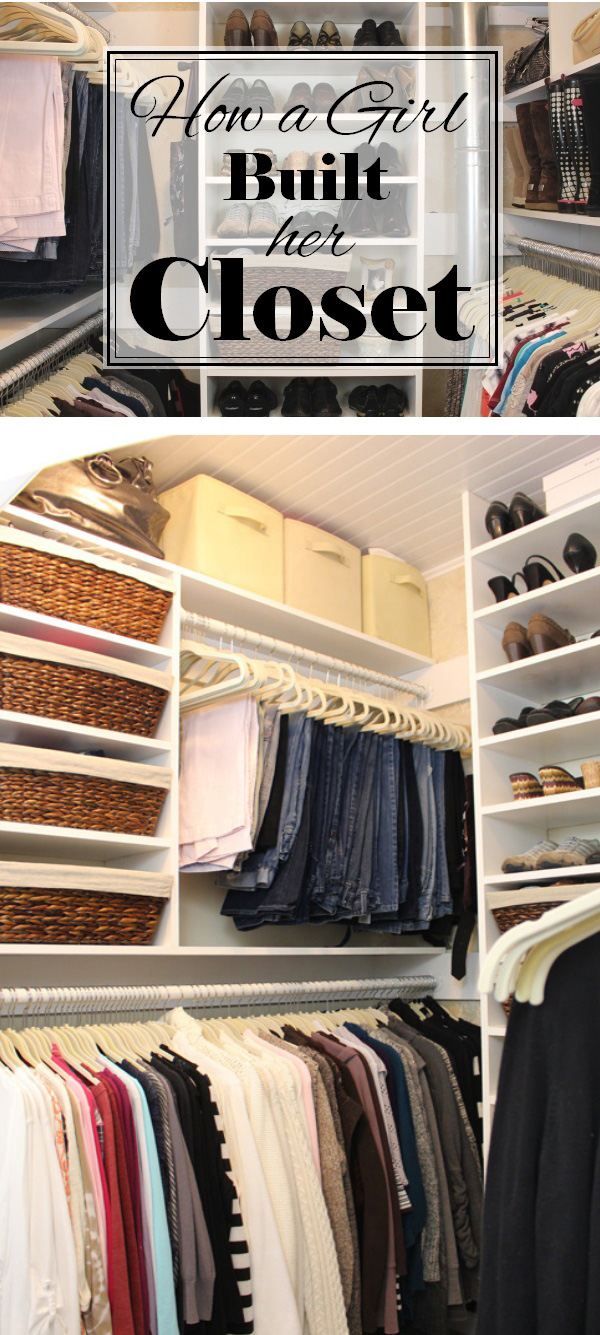
I’d love to hear from you, your comments always make me smile!
XO,
![]()
Don’t Miss a Thing!
If you like what you see, there are several ways to follow along!
Email * Facebook * Pinterest * Hometalk * Twitter * Instagram


AnnetM says
Wow, great job and thanks for laying it all out. I have a closet to build this year (each room has a long deep narrow cupboard, so I’m splitting both in half and opening them out, but they would be about 1/10th of your space!! Then that’s okay, since I have less than 1/20th of the clothes that you do!! Very well organised, does it always stay so?
Christy K. James says
Thanks, Annet! It actually does stay neat since there is a place for everything. That is if you don’t count the small pile of clothes that seem to accumulate on that little bench. Maybe thus will be helpful to you with your closet! Good luck 🙂
Tasha @ Designer Trapped in a Lawyer's Body says
You have OFFICIALLY inspired me to tackle my master closet. Thank you for the inspiration!
Christy K. James says
I’m so glad, Tasha! In all seriousness, it was not that hard to do. I hope you do take on your closet and I’d love to see the result! XO
Mandy Hank says
This is amazing Christy! It looks like you had it professionally done! I love that you fold your undies oh so nicely! Mine are crammed in a drawer 🙂
Christy K. James says
Thanks, Mandy! They’re usually crammed in that basket…I folded them just for you! 🙂
Abby @ Just a Girl and Her Blog says
Um, AWESOME! I’m having some serious closet envy right now! I love how you really maximized the space and there is room for everything! Great job, my friend!
~Abby =)
Christy K. James says
Uh..everything except long dresses lol! I fold them up over the top of the hanger hee hee. I only have a few anyway! It’s where I go when I finally tire of picking up the same toys five times…my little haven of organization 🙂
Stephanie @ Simply Swider says
Amazing Christy! Our closet really needs a makeover but I’ve been putting it off because I don’t really know where to start. I have to say though that I am most impressed with your matching hangers 🙂
Christy K. James says
Lol…you are so funny! I ditched all of my old ones when I redid my closet. These weren’t expensive at all…from Walmart! This was easy to do, really! Just draw out your closet on paper and go from there 🙂
Joy @ Yesterfood says
Christy, I saw this at Best of the Weekend, and had to come over for a better look. WOW, just wow. I love everything about it. Especially the organization and tidiness!! You inspire me to at least organize, maybe even build! Thanks! 🙂
Christy K. James says
Thanks, Joy! It actually stays pretty tidy, too! As you can see, it was not that hard to do! XO
Carol Paxman says
Wow! And can I just say, WOW! I’ve been putting off finishing the redo of my master bedroom because I’m so intimidated by the closet but I think if I pay close attention to what you’ve done I can do it!
Christy K. James says
Absolutely, Carol! This was not that difficult at all! Good luck on your closet 🙂
Krista @ the happy housie says
Wow! What a huge difference Christy- it looks amazing “after”. Our closet is a decent size but not used efficiently at all. Another project for the list! Pinning yours for future inspiration.
Christy K. James says
Thanks, Krista! We wasted so much space before too, and it really isn’t very big at all, so I milked every square inch 🙂 have a great weekend!
Katie @ Addicted 2 DIY says
Your closet is awesome! I’ve got a fairly small master closet as well and I’d love to tackle it the way you did yours. Thanks for the inspiration!
Christy K. James says
Thanks, Katie! I’ve seen what you can do, this would be no problem for you! 🙂
Cindy Eikenberg says
Christy, you just amaze me!!! Your closet is fantastic and I know how much this will inspire so many people – thanks so much for joining us and sharing at Best of the Weekend! Pinning and sharing! You are so going to be my go-to girl for the (lots) of help I’m going to need with my own goal of tackling my chronic disorganization! 🙂 Have a fantastic first weekend of 2014!
Christy K. James says
You are so funny, Cindy…I told Abby that this is my tiny box of organization for when I need to retreat from all the toys I’ve picked up five times already! Have a great weekend!! XO
Leah @ Grace Lee Cottage says
It looks fabulous!! My husband and I share a pretty small closet and it is in bad need of a good clean out and some kind of organizing system. I think I can use several of your ideas in our small space. I love how you used every inch of space! Beautiful!
Christy K. James says
Thanks, Leah! We wasted so much space before. Sitting down and drawing it out really helped me to maximize the space! It’s a great place to start 🙂
April Hoff says
OMG…I would kill for a closet like this!!! Amazing!
Christy K. James says
Thanks April! This is the one spot in my house that actually stays organized 🙂
Suburbsmama says
What an amazing transformation, I love how organized everything is and everything has a place. Great job! If you get a chance, please link up to my link party: http://suburbsmama.blogspot.com/2014/01/sunday-linky-39.html
Christy K. James says
Thanks! Linked up 🙂
arod says
i love the job you did on this closet i think you converted every inch into usable space great job
Christy K. James says
Thanks, Arod! I tried! 🙂
Therese @ Fresh Idea Studio says
OK that’s totally awesome! Thanks for sharing at the DIY Sunday Showcase!
Christy K. James says
Thanks for coming to check it out, Therese! XO
Melissa @ Two it Yourself says
Hi Christy, You did an awesome job on your closet. We just expanded our master bathroom to make room for a double vanity (I was tired of dancing around each other and fighting over the sink)! Anyway, to do that we had to take party of my already impossibly small reach and grab closet. Even though I lost space in my closet, we took down the wall between my husband and my closets and made it into one ‘large’ closet – not large by any sense… The access is bigger now with french doors and we put in an organizing system like you have built! I used about every square inch, as well, and I can’t believe how much more actually fits into my closet now that it’s super organized and the space is utilized so much better. Thanks for sharing your ideas! I would love it if you linked up at the Link It or Lump It party going on right now > http://www.twoityourself.com/2014/01/link-it-or-lump-it-party-20-plus.html
Christy K. James says
All linked up, Melissa! Thanks! Isn’t it crazy how much space can be wasted? Our closet had so much missed opportunity for storage. I love it now :)Have you posted about yours? I’d love to check it out! XO
Melissa @ Two it Yourself says
Hi Christy, I posted about our closet here : ) http://www.twoityourself.com/2013/10/best-small-closet-system-to-maximize.html#more I think your referred to your closet as a 1980’s size…mine was from 1960. Did they not have shoes or bags back then? haha 🙂
Christy K. James says
Funny!…going to check it out 🙂
Angela says
What a fabulous space! i’m so jealous 🙂 http://www.handmadeintheheartland.com/
Christy K. James says
Aww, thanks Angela! Would it make you feel better if I told you this is the only space in the house that stays organized?!
Nancy @ Artsy Chicks Rule says
Awesome Christy!! I am SO inspired, you have no idea. We have done semi renos on our tiny little “walk in” and are going to do a big reno soon! Now I want to start sooner than later!! Beautiful closet…well used space!
Nancy
Christy K. James says
Thanks, Nancy! There was so much wasted space in our closet before, now it’s my little box of organization 🙂
Sarah says
Beautifully organized closet, I am so ready to organize mine. It’s a good sized space but I need to have a plan for it. Thanks for the inspiration.
Christy K. James says
Thanks, Sarah! And you are welcome…now go get started 🙂
Kim says
Yes, you did use every square inch!! Great job – it looks so lovely and functional to the max. 🙂
Blessings,
Kim
Christy K. James says
Thanks for coming to check it out, Kim! 🙂
Bonnie @ Our Secondhand House says
You really did an amazing job on your closet. Every inch is used to it’s maximum potential. I love it! My closet is on my “to do ” list this year. It’s no where near as big as yours but it does have a lot of wasted space I can use. Thanks for sharing your project. It’s so inspirational!
Christy K. James says
Thanks, Bonnie! Our closet had so much wasted space. When I first redid outer closet, I had so much room. It didn’t take too long to fill it ha ha! Hope you get to redo yours soon! 🙂
Debra @ MsMoozys Open House says
I found you through Fluster Busters blog………Wow this is awesome and so organized, I just love it all. I miss having a big walk in like I used to have and maybe some day I will have one back and can get it organized like this. Thanks for sharing and have a great week.
Christy K. James says
Thanks, Debra! It’s my little organized retreat for when I want to get away from all the toys strewn throughout the rest of my house 🙂
Diane | An Extraordinary Day says
Christy…there is no doubt that you used every square inch of space! And you did it beautifully too! I love an organized closet and yours is fabulous. Thanks for sharing all the important details on how you made it happen, too.
Thank you for sharing it at Project Inspire{d}!
Hope your week is Extraordinary!!
Christy K. James says
Thanks, Diane! I’m so glad you stopped by to see it! XO
Melinda @ Love Melinda says
Great closet! Something that needs to be done at my house but is way down the list. 🙂
Christy K. James says
Thanks, Melinda! There’s a lot of that going on in my house too…I want so much done, but much more important (but no fun at all) things need to come first! Thanks for stopping by! 🙂
Carmen says
Awesome work and idea! This makes me wanna tackle my closet! Thanks for the inspiration. Btw, I have the same storage boxes that you have on the very top but in gray. 🙂 Just came over from the Suburbs Mama Blog.
Carmen
Christy K. James says
Thanks, Carmen! I love those storage bins. My kids have them in their rooms for their toys too! Thanks for visiting! XO
Jennifer Burke says
Would ya’ll like to share where the best place to buy those bins are? (The ones on the top, Carmen I was thinking Grey also!) I love everything about this Blog Christy!
Christy K. James says
Thanks, Jennifer! I found those bins on top at Target. They are sold flat in the package and they have a lot of fun colors to choose from!
Athena at Minerva's Garden says
Your closet is so inspirational–lots of great ideas!
Christy K. James says
Thanks, Athena! I’ve got a downstairs closet that needs serious attention…trying to get motivated lol 🙂
Andi says
Will you marry me? You think I’m joking but I’m not. Or at least just be my girlfriend long enough to do this in my closet? I know Phil is going to want to put up a bunch of wire racks and shelving and I just don’t want that. I want this. And I’m pretty dumb when it comes to building stuff, so I can’t count on Me. Right now my closet is wide open, empty, and ready for whatever I dream up. I just lack the building skillz…..
-andi
Christy K. James says
OMG if I only had a blank canvas to work with! I know we don’t get too serious, but Seriously, this was not hard to do! Seriously. Show Phil and see what he says. I’m pretty sure it would be cheaper too! Draw out your closet on graph paper like I suggested in my post and go from there. Home Depot or Lowes will make your cuts for you. Have I convinced you at all? Ok, if we “go out”, I get to be the girl. XO
Lisa says
The mark of a good teacher is making the students feel that they can be successful. You have made me believe I can do this! I’m going to start drawing up plans for a smaller closet in another room. I’ve tried a couple of times to redo it, but it is such an odd shape. I think I can plan it out now so that it will maximize the space. Then … on to the master closets. I have small walk-ins. One will be a “cloffice”, and one will be my closet. I’m going to rock this because of you. Thank you so much 🙂
Christy K. James says
This is the sweetest comment ever!! Thanks so much, Lisa! I am thrilled that you feel inspired to tackle your closets. You really CAN rock this! If you start with a plan on paper to maximize the potential in your spaces, then make a list of what you need and get started. I’d love to hear how it all turns out…keep me posted!! XO
Rachel Paxton says
This is amazing, Christy! We redid our master closet last summer, and I know how much work it can be. Thanks for sharing at Give Me the Goods… you were featured!
Christy K. James says
Awesome, Rachel!! Thanks for making my Monday morning! 🙂
Meredith @ unOriginal Mom says
LOVE this! I’ve got a bare-bones closet that is HUGE but doesn’t use the space very well. A makeover like this is on my wish list! Now, to just get my hubby to build it for me, hehe…
Christy K. James says
Thanks, Meredith! Sounds like a fun new project is in your future!
malia says
This is amazing! Thanks for linking up to Project Inspired… I featured you this week!
Christy K. James says
Yay!! Thanks so much, Malia!! 🙂
Karen says
Christy, I think this is your most impressive DIY to date!!! I am sharing at my party. It has been popular this week, and for such a good reason!
Christy K. James says
That’s awesome! Thanks so much, Karen!! 🙂
Ariean @OneKriegerChick says
Thank you for linking up to the Hit Me With Your Best Shot Link Party Last week. Hope to see you and your Awesome ideas tonight at 7 EST!
~Ariean http://onekriegerchick.com/
Katie Goldsworthy says
This is so, so awesome!!! Thanks for linking it up at Monday Funday! I’m inspired!
Christy K. James says
Thanks, Katie! 🙂
Nancy says
Bravo!
Michelle says
Thanks for the post. I really, really need to update our closet, it’s a mess! This is just the inspiriaton I need to get going! Great job!
Christy K. James says
I’m so glad you feel inspired, Michelle…thank you! I was so over mine too! 🙂
Kim says
This is so AWESOME!!!!!!! I am inspired. Thanks so much for doing a great job on the pics and explanations.
Christy K. James says
Awesome, Kim!! Now get to work! Ha ha… This was a fun and rewarding project 🙂
Jane says
Nice closet but are you not worried about carbon monoxide leaking from the vent into your bedroom? I am surprized that it is not boxed in.
Christy K. James says
My husband and his family own an HVAC business and he said it wasn’t necessary? Yikes…hopefully that won’t be an issue.
Denyse @ Glitter, Glue & Paint says
Christy!!!! I think I forgot to give you my address so we can start on my closet 😉
I love it! Thanks for sharing at Throwback Thursday.
xoxo
Denyse
Christy K. James says
Oh yes, I’ll be over the minute I get your address to get started! 🙂
mzklever says
FINALLY! Someone posts a REAL closet with a REAL amount of clothes! I think you’re the first on the web. Seriously though, Container Store and IKEA have great closet suggestions, but their measly two skirts, three pairs of pants, five shirts, and three pairs of shoes are ridiculous. Home decor mags are just as bad. My daughter’s clothing collection takes up about 75 linear feet of shelves, hanging, and floor space, and she’s still crammed in. Yours is the first closet I’ve seen that looks as though she maybe could fit everything in one space. GREAT design job, cute clothes, and fab inspiration!!
Christy K. James says
Ha Ha! You are so right. Every closet system advertised doesn’t even show enough clothes for a long weekend away! My closet is pretty full, but you can see clearly how much it can hold (a lot). So glad you stopped by and found some inspiration here! XO
Tela says
You have totally inspired me! I want this now!!! I had a few questions…I am not the graph paper planning type so do you have your sketch that you could show us? Did you do it from above or of each wall? Also, the rods you used, are they wood or something else? Did you paint those as well and where did you get them? Thank you so much for sharing!
Christy K. James says
Awesome! Unfortunately I don’t have my sketch, but I drew each section as if I were standing in front of it looking at it head on. I measured each wall of my space and made each square on the graph paper = one foot, so my drawing would be to size. The rods are metal and I purchased them in the white finish at Home Depot. I’m so excited you feel inspired and I’m happy to answer any questions you have along the way. 🙂
Tela says
Thanks Christy! My husband was wondering what gauge and length nails you used and the length of the screws. Thanks so much!
Christy K. James says
I’m not sure about the nails, since I borrowed the nail gun and don’t have any leftover nails for reference, but I believe I used 2″ wood screws. I’d love to see your project when you’re done if you’re up to sharing! 🙂
Tela says
Christy, I feel like I may drive you crazy before I even get this started. I wanted to know if your shoe tower was attached to the wall and if it is how you did it. I don’t see a back on it, so I wasn’t sure. I have small children and the last thing I need is for them to pull a shelf of shoes over on them. Thanks a ton!
Christy K. James says
Ha ha, you’re no bother at all. As for the shelves, I had to wedge the two side pieces in place because they were a very tight fit, so honestly that’s what’s keeping them up. I had planned to add a few “L” brackets to secure it to the wall behind it, from the inside. It’s so snug in there, though that I haven’t yet. The brackets should hold it securely in place if needed. 🙂
Camille says
Simply amazing!
Christy K. James says
Thanks, Camille! So worth all the effort. 🙂
Angela says
Very, very impressive!! I have awful wire shelves in my closet, and I have really been wanting to redo it. You have really inspired me to hop to it. This will be my summer project. Thank you for sharing with the rest of us who were afraid to tackle such a project. 🙂
Christy K. James says
Thanks, Angela! I was never a fan of the “ventilated” shelving either. I’m so glad you feel inspired! 🙂
Cammi says
Thanks for the inspiration! I’m in the middle of redoing mine now. We removed all the wire shelves and pull out bins(saving in the basement for some other project) and the carpeting and my husband has installed hardwood floors.
I’m kinda stuck so I decided to patch some of the drywall (wasn’t sure if I was going to do it since a lot may end up being covered by wood) just to pass some time. I’m having a difficult time committing to a design layout, LOL. I keep searching online then I find something else I want to incorporate, LOL. Ours isn’t a huge closet either (8 feet across back wall, about 4 1/2 on the sides. After looking at yours, I may just have to take the plunge and commit.
Christy K. James says
I certainly understand the commitment part! That’s why I drew it out on graph paper. It’s so much easier if you can get your vision down on paper, then just add your measurements and make a list of what you’ll need. Good luck with your project, I’d love to see it if you are up to sharing when its done. 🙂
Susan Hubbard says
Christy, just discovered your site through Woodgrain Cottage. It’s lovely! Can I ask two questions? First, how far out are your rods? Second, how deep are your shelves (for baskets & shoes). Love what you did with your closet. I’ve been trying to figure out how to utilize my space more efficiently and now I know I can!
Christy K. James says
Awesome! So glad to have you hear, Susan! The center of the hanging bar is at 9 1/4″ from the back shelf support. All of the shelves are 12″ deep. Hope this helps! 🙂
Susan Hubbard says
You are awesome….thanks! This really helps with the design of my closet. Excited to get started 🙂
Christy K. James says
Good Luck! This was a really fun project! I’d be happy to answer any other questions you may have along the way. 🙂
Molly Allen says
THat is a thing of beauty. We are not worthy of you.
Christy K. James says
You are so sweet. Thank you 🙂
Karen Carlson says
Looks wonderful…what would you say the total cost was roughly? So I can can do some sweet talking to the other half:) I want mine just like this!
Christy K. James says
Glad you like it! I would guess I came in somewhere around $250? It was a while ago, but I know I didn’t spend a fortune that’s for sure! Building it yourself is definitely the most cost effective way to get what you want. I’d be happy to answer any questions you have along the way!
Karen Carlson says
Wow…good deal. I think I can get him to do that:) Thanks for the great ideas!
Christy K. James says
Sure 🙂
Vallari says
I love your closet. It is very inspiring. One thing I want to know is why you don’t have a hanging area for dresses, like long maxis or full length?
Christy K. James says
Thanks, Vallari! Great question! I really wanted to maximize the storage in this closet, and I honestly only have four maxi dresses, so it made no sense to me to create an entire section dedicated to four dresses. Instead I just fold the bottoms up and secure them with clips. Problem solved! I made the hanging bar on the right high enough to accommodate my shorter dresses since I have more of them. Hope I answered your question. 🙂
Molly Fernandez says
Hey, I found your blog on Pinterest, I just got back from California Closets and they want 1300 dollars for something like what you did. This is my question, I noticed that you don’t have any space for long hanging items. Do you wish that you had a space for long hanging dresses and what not?
You are an inspiration I want a closet just like yours for Christmas, so maybe I can do it myself.
Molly F.
Christy K. James says
Hi Molly! I do not miss having a space for long hanging items at all, but I have very few of them. I made the right side hanging bar high enough to hang shorter/knee-length dresses and anything longer than that, I just pull the hem up and attach it to the top of the hanger with clips. It has worked perfectly! You can absolutely do this yourself…draw up a plan like I did and go for it! Good luck and I’d love to hear how it turns out! XO
Suzanne Holt says
I admire people that are handy and can save money. Pinned to my “Frugal Fun” board.
Christy K. James says
Awesome! Thanks, Suzanne!
Tanisa Samuel says
Great job! You’ve inspired me so much. One question though. Don’t you have long dresses? Gowns that need the full 6ft?
Tanisa Samuel says
Oopsies! I just saw your post about the long dresses! Thanks!
Christy K. James says
Ha ha…I should add my thoughts on that in the post because I do get a lot of questions about that. I don’t miss having that long space at all. The right side is high enough to accommodate most of my dresses that are a knee length. The longer ones, I fold up on the hanger. SO happy to hear you feel inspired! 🙂
Maureen says
In the middle of using your design to redo our master closet which is exact same dimensions as yours! Thank you SO much for the dimensions of shelves and for the inspiration to begin with! Can’t wait to show you the pics!
Christy K. James says
Awesome!! So glad you feel inspired and how convenient that the dimensions are the same! I’d love to see pictures when you are done! XO
Pat S. says
Maybe I missed it, but can you give me the approximate cost of materials was for this closet? And how much time you put into it? I’m getting prices from custom closet companies, and while I’d love to do it myself, it needs to be worth it in terms of both time and cost. Thanks!
Christy K. James says
This was roughly around $250. I would say that is without the cost of the hangers. I built it long before I started blogging, so that’s why I don’t have an exact figure given in the post. For a more accurate cost for your space, draw out your plan on graph paper like I did, and take it to the home improvement store with you. Don’t forget to figure in costs for the hanging bars, baskets and bins, and replacing the hangers if you plan to do so. I completed my space in less than a week. Good luck!
Christine says
May i ask: How much did the closet makeover cost? Good job by the way.It seems very realistic.
Christy K. James says
Thanks, Christine! This closet is completely do-able! This came in somewhere around $250.
Morgan says
What size nail gun did you use (gauge for nails also)?
Thanks!
Christy K. James says
Hi Morgan, I used 1 1/2 ” nails.
Cleo says
Hi. Love how you utilized all the space here. How far away is the edge of the pant hanger from the side shoe wall? It looks like there is enough clearance but wondering if you have trouble reaching to the back of the pant wall to get things out?
Christy K. James says
Thank you, Cleo! There is about 8 inches or so clearance, but it is not a problem at all to get things. Plus I usually have my out-of-season pants or jeans I hope to get back into one day (yeah right!) hanging at the back. 🙂
Cleo says
OMG, yes, I have some of those jeans as well. Terrible how they shrink in the heat of the closet isn’t it? 🙂
Christy K. James says
Ha ha yes! 😉
Carolyn Price says
Hi, Christie!!
When you have time (Ha!!), you should instruct on SkillShare. For example: How to Mix DIY Chalk Paint, How to Design Lettering, How to Transfer Lettering, How to Paint After Transfer., etc. The possibilities are endless. You would be in great demand!
Christy K. James says
You are so sweet, Carolyn! I had never heard of SkillShare before, but I like it…thanks for telling me about it!! XO
Michelle says
Wow! Add my vote to everyone who loves it and is inspired to tackle their own closet! Fantastic job! I just recently got a nail gun too, I bet it made the job go by much more quickly.
Christy K. James says
Thanks so much, Michelle! A nail gun is such a time-saver! XO
Roxanne says
This is seriously awesome! I will be pinning and sharing this!
Christy K. James says
Thanks so much, Roxanne! Seriously the most organized space in my home! 🙂
Nancy says
Hey Christy
Love your closet makeover – in fact, this is my closet or close to it lol but you have used every inch so perfectly – now it’s back to my closet for me and time to revamp. I especially love the way you have organized your purses – mine are just dumped on the upper shelf. Just one question, – what about your dresses? One side of my closet is relegated to my dresses (of couse the closet is entirely mine). Great post and once again lots of inspiration! Thanks
Christy K. James says
Thank you, Nancy! The hanging bar on the right side of my closet is high enough for shorter dresses and my maxi dresses, since I only have few, are hanging on pants hangers with the bottom of them flipped up over the hanger. I had such a limited space that I didn’t feel it necessary to create a section specifically for those few things. I also added hooks on either side of the shoe tower which could also hold a few longer dresses if needed. You could absolutely add a section for them if you have a lot. 🙂
Kimmie says
I like what you have done to the small closet space; it looks great! I have a closet similar in size desperately in need of a makeover much like this one. Thank you for laying out how you completed this project and your suggestion to add a support bracket if the shelving unit is much longer… nothing worse than figuring that out later after everything fell down 🙁 I am new to your posts, and I have really enjoyed the project ideas you have shared. Thank you!
Christy says
Thanks, Kimmie! So glad you found me! XO